manuals.online logo
Brands
  1. Home
  2. •
  3. Brands
  4. •
  5. modway
  6. •
  7. Indoor Furnishing
  8. •
  9. modway MOD-5423 User manual

modway MOD-5423 User manual

Customer Service 908-368-1025︱www.modwayfurniture.com Page 1 of 6
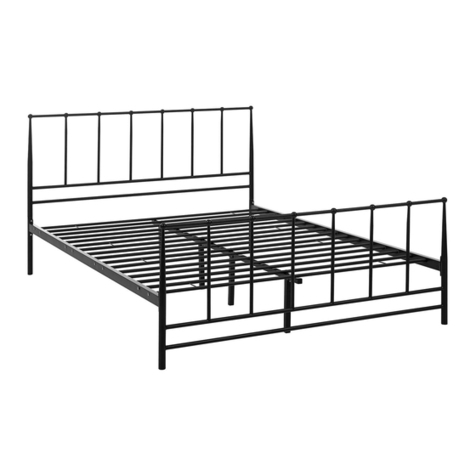
MOD-5421/5422/5423/5424/5425/5426 BED
Hardware:
Component:
C Bolt M8x60mm x3
E Flat Washer x8
G Allen Wrench x1
Thank you for purchasing the MODWAY BED!
Before you start, here is some helpful advice:
1.We suggest you spend a short time reading through this leaflet and then follow the simple step by step
instructions.
2.Owing to the size and weight of the bed, we recommend that it is assembled by two adults, on a carpeted or
padded area, in the room that it is intended for. Approx assembly time: 45 minutes.
3.Please do not use any tools other than those provided or recommended in these instructions.
4.Please do not throw away any of the packaging or the instruction until you have checked all the components and
hardware and the furniture is fully assembled. Please ensure that the packaging is disposed of in a safe
environmentally friendly way.
5.Assemble all components loosely until advised to tighten. Depending on use, it may be necessary to tighten the
components from time to time, so please save the tools that has been provided.
6.Please keep all fitting out of reach of children.
P1
P2
P8
P3
P10
P4
P9
P8
P3
P4
P9 P10
P11 P7
P12 P14
P6
A Bolt M8x20mm x28
B Bolt M8x35mm x12
D Spring Washer x8
F Nut M8 x6
H Open Wrench x1
Headboard x1 Footboard x1
P1 P2 Side Rail x2
P3 Side Rail x2
P4
Metal Corner x4
P5
P5
Stretcher x1
P6 Center Rail x2
P7 Leg x2
P8
Leg x2
P9 Short Support Leg x2
P10 Long Support Leg x2
P11
Center Support Leg x1
P12 Plastic Cover x12
P13 P14 Slat x24
P13
Customer Service 908-368-1025︱www.modwayfurniture.com Page 2 of 6
MOD-5421/5422/5423/5424/5425/5426 BED
Bx8 Dx8 Ex8
Gx1
STEP 1:
Hardware & Tool required
STEP 2:
P1
P2
P9
P8
P9
P8
P8
P1
D
B
E B
G
D
E
Ax8 Gx1 Hardware & Tool required
P1
P2
P1 P5
P5
P5
P5
P5
A
A
G
Attach 1 piece of Leg (P8) and 1 piece of Leg (P9) into Headboard (P1) as shown.
Secure by using 4 pieces of Bolt (B), 4 pieces of Spring Washer (D) and 4 pieces of Flat Washer (E).
Use Allen Wrench (G) to tighten Bolts (B) clockwise until secure.
Repeat the same steps for Footboard (P2).
Attach 2 pieces of Metal Corner (P5) into Headboard (P1).
Secure by using 4 pieces of Bolt (A) as shown.
Use Allen Wrench (G) to tighten Bolts (A), do not fully tighten Bolts (A) at this step.
Repeat the same steps for Footboard (P2).
Customer Service 908-368-1025︱www.modwayfurniture.com Page 3 of 6
MOD-5421/5422/5423/5424/5425/5426 BED
Ax4 Gx1
STEP 3:
Hardware & Tool required
STEP 4:
P3
P4
P10
A
G
Ax8 Jx1 Hardware & Tool required
P1
P5
P5
P4
P5 A
P2
G
A
P3
P1 P3
P3
P4
P5
Connect 1 piece of Side Rail (P3) and 1 piece of Side Rail (P4) by using 1 piece of Short Support Leg (P10) as shown.
Secure by using 2 pieces of Bolt (A).
Use Allen Wrench (G) to tighten Bolts (A) clockwise until secure.
Repeat the same steps for the remaining Side Rail (P3&P4) and Short Support Leg (P10).
Attach 1 piece of assembled Side Rail (P3&P4) to Headboard (P1) and Footboard (P2).
Secure through Metal Corner (P5) by using 4 pieces of Bolt (A) as shown.
Use Allen Wrench (G) to tighten Bolts (A), do not fully tighten Bolts (A) at this step.
Repeat the same steps for the remaining assembled Side Rail (P3&P4).
Customer Service 908-368-1025︱www.modwayfurniture.com Page 4 of 6
MOD-5421/5422/5423/5424/5425/5426 BED
Bx4 Fx4
Gx1
Hx1
STEP 5:
Hardware & Tool required
STEP 6:
Attach 1 piece of Long Support Leg (P11) to 1 piece of Center Rail (P7) as shown.
Insert 2 pieces of Bolt (B) through the corresponding holes on Center Rail (P7) to the holes on Long Support Leg (P11).
Secure by using 2 pieces of Nut (F).
Use Allen Wrench (G) and Open Wrench (H) to tighten Bolts (B) and Nuts (F) until secure.
Repeat the same steps for the remaining Center Rail (P7) and Long Support Leg (P11).
P7
F
H
Ax4 Gx1 Hardware & Tool required
P1
F
P11
G
B B
P2
P7
P7
P7
P1
A
A
G
Attach 1 piece of assembled Center Rail (P7) to Headboard (P1).
Secure by using 2 pieces of Bolt (A) as shown.
Use Allen Wrench (G) to tighten Bolts (A), do not fully tighten Bolts (A) at this step.
Repeat the same steps for the remaining assembled Center Rail (P7) to Footboard (P2).
Customer Service 908-368-1025︱www.modwayfurniture.com Page 5 of 6
MOD-5421/5422/5423/5424/5425/5426 BED
Cx2 Fx2
Gx1
Fx1
STEP 7:
Hardware & Tool required
STEP 8:
P7
Ax4 Gx1 Hardware & Tool required
P6
F
1
P4
P3
A
F
H
P7
P7
P7
G
C
C P11
2
P3
P3
P4
P4
P6
G
A
Attach each end of Stretcher (P6) to the assembled Side Rail (P3&P4).
Secure by using 4 pieces of Bolt (A) as shown.
Use Allen Wrench (G) to tighten Bolts (A).
Do not fully tighten Bolts (A) at this step.
Attach Center Support Leg (P11) to each end of Center Rail (P7) as shown.
Insert 2 pieces of Bolt (C) from the holes on one side of Center Support Leg (P11) through the corresponding holes
on each Center Rail (P7 to the holes on the other side of Center Support Leg (P11).
Secure by using 2 pieces of Nut (F).
Use Allen Wrench (G) and Open Wrench (H) to tighten Bolts (C) and Nuts (F) until secure.
P11
Inside view of side rail
Customer Service 908-368-1025︱www.modwayfurniture.com Page 6 of 6
MOD-5421/5422/5423/5424/5425/5426 BED
P14
Cx1 Gx1
STEP 9:
Hardware & Tool required
STEP 10:
Gx1 Hardware & Tool required
P7
P7
11
P6
P12
P12
P7
P7 C
G
P14
P13
P14
P14
Pre-drilled holes at Side Rail
Assembly is complete. Your bed is ready to be enjoyed now!
P13
holes at Center Rail
P4
P3
P3
P4
P7
P7
P7
Insert 2 pieces of Slat (P14) into 1 piece of Plastic Cover (P13) as shown.
Insert the other end of the same Slats (P14) into the corresponding pre-drilled holes at each Side Rail (P3&P4) as shown.
Then insert the assembled Plastic Cover (P13) into the corresponding holes at Center Rail (P7).
Repeat the same steps for the remaining Slats (P14).
After checking all the connections, use Allen Wrench (G) to tighten all Bolts (A&B&C) clockwise until secure.
Insert 1 piece of Bolt (C) through the holes on Stretcher (P6) into the holes on Center Support Leg (P12).
Use Allen Wrench (G) to tighten Bolts (C), do not fully tighten Bolts (C) at this step.

This manual suits for next models

5

Other modway Indoor Furnishing manuals

modway EEI-4264 User manual

modway

modway EEI-4264 User manual

modway EEI-1804 User manual

modway

modway EEI-1804 User manual

modway MOD-5538 User manual

modway

modway MOD-5538 User manual

modway EEI–2308 User manual

modway

modway EEI–2308 User manual

modway EEI-2461 User manual

modway

modway EEI-2461 User manual

modway Render MOD-7058 User manual

modway

modway Render MOD-7058 User manual

modway MOD-6235 User manual

modway

modway MOD-6235 User manual

modway EEI-6164 User manual

modway

modway EEI-6164 User manual

modway Ramp EEI-2143 User manual

modway

modway Ramp EEI-2143 User manual

modway MOD-6268 User manual

modway

modway MOD-6268 User manual

modway RENDER MOD-7071 User manual

modway

modway RENDER MOD-7071 User manual

modway MOD-6307 User manual

modway

modway MOD-6307 User manual

modway EEI-1325 User manual

modway

modway EEI-1325 User manual

modway EEI-2220 User manual

modway

modway EEI-2220 User manual

modway MOD-6223 User manual

modway

modway MOD-6223 User manual

modway Regent EEI-2222 User manual

modway

modway Regent EEI-2222 User manual

modway MOD-5470 User manual

modway

modway MOD-5470 User manual

modway Render EEI-6228 User manual

modway

modway Render EEI-6228 User manual

modway EEI-5703 User manual

modway

modway EEI-5703 User manual

modway Envision EEI-4260 User manual

modway

modway Envision EEI-4260 User manual

modway EEI-6795 User manual

modway

modway EEI-6795 User manual

modway EEI-2251 Manual

modway

modway EEI-2251 Manual

modway EEI-4621 Safety guide

modway

modway EEI-4621 Safety guide

modway 1204 User manual

modway

modway 1204 User manual

Popular Indoor Furnishing manuals by other brands

Sunset Trading ED-SK100 Assembly instructions

Sunset Trading

Sunset Trading ED-SK100 Assembly instructions

BENE DOCK-IN BAY TWIN BAY Assembly instructions

BENE

BENE DOCK-IN BAY TWIN BAY Assembly instructions

Venjakob 4108 Assembly instructions

Venjakob

Venjakob 4108 Assembly instructions

Emmezeta VERO 850593 Assembling instructions

Emmezeta

Emmezeta VERO 850593 Assembling instructions

Radius KABELLARASA 1100 a Assembly instructions

Radius

Radius KABELLARASA 1100 a Assembly instructions

SUNARGY Smart Comfort 166 Assembly instructions

SUNARGY

SUNARGY Smart Comfort 166 Assembly instructions

IKEA IBESTAD instructions

IKEA

IKEA IBESTAD instructions

Minar Melis TV Stand Assembly manual

Minar

Minar Melis TV Stand Assembly manual

BK FURNITURE 1040 quick start guide

BK FURNITURE

BK FURNITURE 1040 quick start guide

Glacier bay PPMELCHT18 Use and care guide

Glacier bay

Glacier bay PPMELCHT18 Use and care guide

HoMedics EnviraScape Tabletop Relaxation Fountain... Instruction manual and warranty

HoMedics

HoMedics EnviraScape Tabletop Relaxation Fountain... Instruction manual and warranty

Jysk NYSTED 712-16-1004 manual

Jysk

Jysk NYSTED 712-16-1004 manual

Leuwico Go2 basic user manual

Leuwico

Leuwico Go2 basic user manual

SIT&MORE SONOMA manual

SIT&MORE

SIT&MORE SONOMA manual

Tuscany QL055 owner's manual

Tuscany

Tuscany QL055 owner's manual

Homelegance 1525-1 Assembly instruction

Homelegance

Homelegance 1525-1 Assembly instruction

Merax VD - 9005 Assembly instructions

Merax

Merax VD - 9005 Assembly instructions

CB2 GLOSS Assembly instructions

CB2

CB2 GLOSS Assembly instructions

manuals.online logo
manuals.online logoBrands
  • About & Mission
  • Contact us
  • Privacy Policy
  • Terms and Conditions

Copyright 2025 Manuals.Online. All Rights Reserved.