manuals.online logo
Brands
  1. Home
  2. •
  3. Brands
  4. •
  5. Monacor
  6. •
  7. Digital Camera
  8. •
  9. Monacor TVCCD-124 User manual

Monacor TVCCD-124 User manual

Kamera mit Bildspiegelung
Bitte lesen Sie die Bedienungsanleitung vor der Instal-
lation gründlich durch und heben Sie sie für ein späteres
Nachlesen auf.
1 Verwendungsmöglichkeiten
Die S/W-Kamera TVCCD-124 und die Farbkamera
TVCCD-124COLsind speziell fürAnwendungen geeignet,
die eine spiegelverkehrte Bilddarstellung erfordern. Sie
können jedoch bei Bedarf auch auf seitenrichtige Bild-
darstellung umgeschaltet werden. Durch ihre wetterfesten
Gehäuse (IP65) eignen sich die Kameras für Außen-
installationen. Zum Lieferumfang gehören ein Sonnen-
dach, ein Montagebügel und ein 20-m-Kabel.
Die Kameras sind mit einem Fixfokus-Objektiv aus-
gestattet und verfügen über eine automatische Verstär-
kungsregelung (AGC), einen automatischen elektroni-
schen Shutter zur Belichtungsregelung und eine Gegen-
lichtkompensation. Die Farbkamera besitzt außerdem
einen automatischen Weißabgleich.
2 Wichtige Hinweise für den Gebrauch
Die Kamera entspricht allen erforderlichen Richtlinien der
EU und ist deshalb mit gekennzeichnet.
●Schützen Sie die Kamera vor extremen Temperaturen
(zulässiger Einsatztemperaturbereich von
-
10°C bis
+50°C).
●Das Kameragehäuse ist wetterfest, jedoch nicht absolut
wasserdicht. Tauchen Sie darum die Kamera nicht in
Wasser ein.
●Verwenden Sie für die Reinigung der Kamera keine
aggressiven Reinigungsmittel oder Chemikalien.
●Wird die Kamera zweckentfremdet, nicht richtig mon-
tiert, falsch angeschlossen oder nicht fachgerecht re-
pariert, kann keine Haftung für daraus resultierende
Sach- oder Personenschäden und keine Garantie für
die Kamera übernommen werden.
3 Montage
Für die Montage liegen der Kamera bei:
4 kleine Kreuzschlitzschrauben;
zum Befestigen des Sonnendachs an der Kamera
4 Sechskantschrauben (kurz) mit Unterlegscheiben;
zum Befestigen des Bügels an der Kamera
4 Sechskantschrauben (lang) mit Unterlegscheiben;
zum Montieren des Bügels am Montageort
Alternativ zum beiliegenden Bügel kann auch eine andere
Kamerahalterung mit Fotogewinde [6,3mm (1/4")] verwen-
det werden: Die Halterung an der Gewindebuchse auf der
Kameraunterseite festschrauben.
4 Inbetriebnahme
1) Die Mini-DIN-Kupplung (2) des beiliegenden Kabels mit
dem Stecker (1) des Kamerakabels verbinden.
2) Den Cinch-Stecker (4) mit dem Videoeingang des
Monitors verbinden.
Wichtig! Die Anschlüsse (1, 2, 4, 5, 6) und der Kabel-
verteiler (3) sind nicht wetterfest. Bei einer Außeninstal-
lation müssen sie entsprechend geschützt werden.
Soll die Kamera endgültig aus dem Betrieb
genommen werden, übergeben Sie sie zur
umweltgerechten Entsorgung einem örtlichen
Recyclingbetrieb.
3) Ein stabilisiertes Netzgerät mit einer Ausgangsspan-
nung von 12V und einer Dauerbelastbarkeit von min.
100mA an die Stromversorgungskupplung (5) an-
schließen. Für den Anschluss wird ein Kleinspan-
nungsstecker mit den Maßen 5,5/2,1mm (Ø außen/in-
nen) benötigt (Innenkontakt = Pluspol).
4) Die Kamera ist ab Werk auf vertikale Bildspiegelung
eingestellt. Um sie auf seitenrichtige Bilddarstellung
umzuschalten, die beiden freien Leitungen (6) mitein-
ander verbinden.
5) Nach demAnlegen der Betriebsspannung ist die Kame-
ra betriebsbereit. Um sie genau auf den Überwa-
chungsbereich auszurichten, die Sechskantschrauben
an beiden Seiten des Montagebügels etwas lösen, die
Kamera wie gewünscht neigen und die Schrauben wie-
der fest anziehen.
5 Technische Daten
Bildsensor: . . . . . . . . . . . . . . . . . CCD-Chip, 8,5 mm (1/3")
Synchronisation: . . . . . . . . . . . . . CCIR, hor. 15 625 Hz, vert. 50 Hz
Farbsystem (TVCCD-124COL): . PAL
Anzahl der Bildpunkte, Auflösung
TVCCD-124: . . . . . . . . . . . . . . hor. 512 x vert. 582, 380 Linien
TVCCD-124COL: . . . . . . . . . . hor. 500 x vert. 582, 330 Linien
Objektiv, Mindestbeleuchtung: . . 1 : 2,0/2,97 mm, 1 Lux
Signal-Rausch-Abstand: . . . . . . . > 48 dB
Autom. elektron. Shutter: . . . . . . 1/50 –1/100 000 s
Videoausgang: . . . . . . . . . . . . . . 1 Vss/75 Ω
Stromversorgung: . . . . . . . . . . . . 12 V , 100 mA
Maße (H x B x T), Gewicht: . . . . . 77 x 95 x 80 mm (inkl. Sonnendach
und Bügel), 400 g
Änderungen vorbehalten.
Camera With Mirror-Inverted Picture
Please read these operating instructions carefully prior to
installation and keep them for later use.
1 Applications
The black-and-white camera TVCCD-124 and the colour
camera TVCCD-124COL are especially suitable for appli-
cations which require a mirror-inverted picture representa-
tion. If required, they can also be switched to normal pic-
ture representation. Due to their weatherproof housings
(IP65) the cameras are also suitable for outside installa-
tion.A sunshield, a mounting bracket, and a cable of 20m
are supplied with the camera.
The cameras are equipped with a fixed focus lens and
have an automatic gain control (AGC), an automatic elec-
tronic shutter for exposure control, and a backlight com-
pensation. The colour camera is additionally equipped
with an automatic white balance.
2 Important Notes
The camera corresponds to all required directives of the
EU and is therefore marked with .
●Protect the camera against extreme temperatures (ad-
missible ambient temperature range
-
10°C to +50°C).
●The camera housing is weatherproof but not absolutely
watertight. Therefore, do not immerse the camera in
water.
●For cleaning the camera do not use aggressive deter-
gents or chemicals.
●No guarantee claims for the camera and no liability for
any resulting personal damage or material damage will
be accepted if the camera is used for other purposes
than originally intended, if it is not correctly mounted or
connected, or not repaired in an expert way.
3 Mounting
Thefollowing screws aresupplied for mountingthe camera:
4 small recessed head screws;
to fix the sunshield to the camera
4 hexagon screws (short) with washers;
to fix the bracket to the camera
4 hexagon screws (long) with washers;
to mount the bracket to the place of mounting
Alternatively to the supplied bracket, another camera
support with thread [6.3mm (1/4")] may also be used:
Tightly screw the support to the thread jack on the lower
side of the camera.
4 Operation
1) Connect the mini DIN inline jack (2) of the supplied
cable to the plug (1) of the camera cable.
2) Connect the phono plug (4) to the video input of the
monitor.
3) Connect a regulated power supply unit with an output
voltage of 12V and a permanent current rating of
Important! The connectors (1, 2, 4, 5, 6) and the cable
distributor (3) are not weatherproof. In case of outside
application they must be protected accordingly.
If the camera is to be put out of operation de-
finitively, take it to a local recycling plant for a
disposal which is not harmful to the environ-
ment.
100mA as a minimum to the power supply inline
jack (5). For the connection a low voltage plug with the
dimensions 5.5/2.1mm (Ø outside/inside) is required
(inside contact = positive pole).
4) The camera is adjusted to vertical mirror-inverted pic-
ture ex factory. To switch it to normal picture represen-
tation, connect the two bare lines (6) with each other.
5) After applying the operating voltage the camera is
ready for operation. To adjust it exactly to the surveil-
lance area, slightly release the hexagon screws on both
sides of the mounting bracket, incline the camera as
desired, and retighten the screws.
5 Specifications
Image sensor: . . . . . . . . . . . . . . . CCD chip, 8.5 mm (1/3")
Synchronization: . . . . . . . . . . . . . CCIR, hor. 15 625 Hz, vert. 50 Hz
Colour system
(TVCCD-124COL): . . . . . . . . . . . PAL
Number of pixels, resolution
TVCCD-124: . . . . . . . . . . . . . . hor. 512 x vert. 582, 380 lines
TVCCD-124COL: . . . . . . . . . . hor. 500 x vert. 582, 330 lines
Lens, minimum illumination: . . . . 1 : 2.0/2.97 mm, 1 lux
S/N ratio: . . . . . . . . . . . . . . . . . . > 48 dB
Automatic electronic shutter: . . . 1/50 –1/100 000 s
Video output: . . . . . . . . . . . . . . . . 1 Vpp/75 Ω
Power supply: . . . . . . . . . . . . . . . 12 V , 100 mA
Dimensions (H x W x D), weight: 77 x 95 x 80 mm (incl. sunshield
and bracket), 400 g
Subject to technical modification.
®
TVCCD-124 Best.-Nr. 19.0970
TVCCD-124COL Best.-Nr. 19.0980
®
Copyright©by MONACOR INTERNATIONAL GmbH & Co. KG, Bremen, Germany. All rights reserved. A-0502.99.02.02.2006
®
D A CH
GB
12V
Video
12 3
4
6
5
Caméra avec visualisation
miroir des images
Veuillez lire la présente notice avec attention avant l’ins-
tallation et conservez-la pour pouvoir vous y reporter
ultérieurement.
1 Possibilités d’utilisation
La caméra noir et blanc TVCCD-124 et la caméra couleur
TVCCD-124COLsont spécialement adaptées pour les uti-
lisations nécessitant une visualisation des images en
mode miroir inversé. Si besoin, vous pouvez commuter
sur la visualisation normale. Grâce au boîtier résistant aux
intempéries (IP65), les caméras peuvent être installées
en extérieur. Sont livrés également un pare-soleil, un étrier
de montage et un câble de 20m.
Les caméras sont équipées d’un objectif à focale fixe
et disposent d’un réglage automatique d’amplification
(AGC), d’une obturation électronique automatique pour le
réglage de l’exposition et d’une compensation du contre-
jour. La caméra couleur possède en plus une compensa-
tion automatique du blanc.
2 Conseils importants d’utilisation
La caméra répond à toutes les directives nécessaires de
l’Union Européenne et porte donc le symbole .
●Protégez la caméra des températures extrêmes (plage
de température de fonctionnement autorisée :
-
10°C à
+50°C).
●Le boîtier de la caméra est résistant aux intempéries,
mais pas absolument étanche. Ne plongez pas la
caméra dans l’eau.
●Pour nettoyer la caméra, n’utilisez en aucun cas de pro-
duits abrasifs ou chimiques.
●Nous déclinons toute responsabilité en cas de domma-
ges corporels ou matériels résultants si la caméra est
utilisée dans un but autre que celui pour lequel elle a été
conçue, si elle n’est pas correctement montée, bran-
chée ou n’est pas réparée par une personne habilitée,
de même, la garantie deviendrait caduque.
3 Montage
Pour le montage, sont livrées avec la caméra :
4 petites vis cruciformes
pour fixer le pare-soleil sur la caméra
4 vis hexagonales (courtes) avec rondelles
pour fixer l’étrier sur la caméra
4 vis hexagonales (longues) avec rondelles :
pour monter l’étrier sur le lieu de montage
Un support de caméra avec filetage 6,3 (1/4") peut être uti-
lisé à la place de l’étrier livré : vissez le support à la prise
filetée sur la face inférieure de la caméra.
4 Fonctionnement
1) Reliez la mini prise DIN (2) du cordon livré à la fiche (1)
du cordon de la caméra.
2) Reliez la fiche RCA (4) à l’entrée vidéo du moniteur.
Important ! Les branchements (1, 2, 4, 5, 6) et le répar-
titeur de câble (3) ne sont pas résistants aux intempéries.
Pour une installation en extérieur, il faut les protéger en
conséquence.
Lorsque la caméra est définitivement retirée
du service, vous devez la déposer dans une
usine de recyclage de proximité pour contri-
buer à son élimination non polluante.
3) Reliez une alimentation stabilisée avec une tension de
sortie de 12V et une capacité de charge permanente
de 100mA minimum à la prise alimentation (5). Pour le
branchement, une fiche aux dimensions 5,5/2,1mm
(Ø extérieur/intérieur) est nécessaire (contact inté-
rieur : pôle plus).
4) La caméra est réglée, départ usine, sur la visualisation
verticale en mode miroir inversé. Pour commuter sur la
visualisation en mode normal, reliez les deux conduc-
teurs libres (6) ensemble.
5) Dès que la tension de fonctionnement est présente, la
caméra est prête à fonctionner. Pour une orientation
précise sur la zone à surveiller, desserrez un peu les vis
hexagonales sur les deux côtés de l’étrier de montage,
orientez la caméra comme souhaité et revissez les vis.
5 Caractéristiques techniques
Capteur image : . . . . . . . . . . . . . puce CCD 8,5 mm (1/3")
Synchronisation : . . . . . . . . . . . . CCIR, hor. 15 625 Hz, vert. 50 Hz
Système couleur
(TVCCD-124COL) : . . . . . . . . . . PAL
Nombre de points, résolution
TVCCD-124 : . . . . . . . . . . . . . hor. 512 x vert. 582, 380 lignes
TVCCD-124COL : . . . . . . . . . hor. 500 x vert. 582, 330 lignes
Objectif, luminosité minimale : . . 1 : 2,0/2,97 mm, 1 lux
Rapport signal/bruit : . . . . . . . . . > 48 dB
Obturation électronique autom. : 1/50 –1/100 000 s
Sortie vidéo : . . . . . . . . . . . . . . . 1 Vcc / 75 Ω
Alimentation : . . . . . . . . . . . . . . . 12 V , 100 mA
Dimensions (H x L x P), poids : . . 77 x 95 x 80 mm (avec pare-soleil
et étrier), 400 g
Tout droit de modification réservé.
Telecamera con immagine
specchiata
Vi preghiamo di leggere attentamente le presenti istruzioni
prima dell’installazione e di conservarle per un uso futuro.
1 Possibilità d’impiego
La telecamera b/n TVCCD-124 e la telecamera a colori
TVCCD-124COL sono adatte in modo particolare per le
applicazioni che richiedono una rappresentazione spec-
chiata dell’immagine. Tuttavia, se necessario possono
essere impostate anche per una rappresentazione nor-
male dell’immagine. Grazie ai contenitori resistenti alle
intemperie (IP65) possono essere installate anche all’e-
sterno. Il kit comprende un parasole, una staffa di mon-
taggio e un cavo di 20m.
Le telecamere sono equipaggiate con un obbiettivo a
fuoco fisso e dispongono di regolazione automatica del
guadagno (AGC), di un otturatore elettronico automatico
per regolare l’esposizione e di compensazione della con-
troluce. La telecamera a colore presenta inoltre un bilan-
ciamento automatico del bianco.
2 Avvertenze importante per l’uso
La telecamera è conforme a tutte le direttive richieste
dell’UE e pertanto porta la sigla .
●Proteggerela telecamerada temperatureestreme (tem-
peratura d’impiego ammessa fra
-
10 e +50°C).
●La telecamera è resistente alle intemperie, ma non è a
tenuta assoluta dell’acqua. Perciò non immergerla
nell’acqua.
●Per la pulizia della telecamera non impiegare detergenti
aggressivi o prodotti chimici.
●Nel caso d’uso improprio, di montaggio scorretto, di col-
legamenti sbagliati o di riparazione non a regola d’arte
dellatelecamera, non si assume nessuna responsabilità
per eventuali danni consequenziali a persone o a cose
e non si assume nessuna garanzia per la telecamera.
3 Montaggio
Per il montaggio, la telecamera ha in dotazione:
4 piccole viti con testa a croce;
per fissare il parasole sulla telecamera
4 viti esagonali (corte) con rondelle;
per fissare la staffa sulla telecamera
4 viti esagonali (lunghe) con rondelle;
per montare la staffa al luogo di montaggio
In alternativa alla staffa in dotazione si può usare anche un
altro supporto per telecamera con filettatura per macchina
fotografica [6,3mm (1/4")]: avvitare il supporto alla boccola
filettata sul lato inferiore della telecamera.
4 Messa in funzione
1) Collegare la presa mini-DIN (2) del cavo in dotazione
con la spina (1) del cavo della telecamera.
2) Collegare la spina RCA (4) con l’ingresso video del
monitor.
Importante! I connettori (1, 2, 4, 5, 6) e il distributore dei
cavi (3) non sono resistenti alle intemperie. Nel caso di in-
stallazioneall’esterno occorre proteggerliappositamente.
Se si desidera eliminare la telecamera defini-
tivamente, consegnarla per lo smaltimento ad
un’istituzione locale per il riciclaggio.
3) Alla presa per alimentazione DC (5) collegare un ali-
mentatore stabilizzato con tensione d’uscita di 12V
e con potenza permanente minima di 100mA. È ri-
chiesta una spina per alimentazione DC 5,5/2,1mm
(Ø esterno/interno) [contatto interno = polo positivo].
4) Dalla fabbrica, la telecamera è impostata per una rap-
presentazione specchiata dell’immagine in senso verti-
cale. Per passare alla rappresentazione normale del-
l’immagine,collegare fra diloro i dueconduttori liberi(6).
5) Dopo aver applicato la tensione d’esercizio, la teleca-
mera è pronta per l’uso. Per orientarla esattamente
sulla zona da sorvegliare, allentare le viti esagonali ai
due lati della staffa di montaggio, inclinare la teleca-
mere secondo desiderio e stringere di nuovo le viti.
5 Dati tecnici
Sensore ottico: . . . . . . . . . . . . . . chip CCD, 8,5 mm (1/3")
Sincronizzazione: . . . . . . . . . . . . . . CCIR, orizz. 15 625 Hz, vert. 50 Hz
Sistema di colori
(TVCCD-124COL): . . . . . . . . . . . PAL
Numero pixel, risoluzione
TVCCD-124: . . . . . . . . . . . . . . orizz. 512 x vert. 582, 380 linee
TVCCD-124COL: . . . . . . . . . . orizz. 500 x vert. 582, 330 linee
Obiettivo, illuminazione minima: . 1 : 2,0/2,97 mm, 1 lux
Rapporto S/R: . . . . . . . . . . . . . . > 48 dB
Shutter elettronico automatico: . . 1/50 –1/100 000 s
Uscita video: . . . . . . . . . . . . . . . . 1 Vpp/75 Ω
Alimentazione: . . . . . . . . . . . . . . 12 V , 100 mA
Dimensioni (h x l x p), peso: . . . . 77 x 95 x 80 mm (incl. parasole e
staffa), 400 g
Con riserva di modifiche tecniche.
®
TVCCD-124 Best.-Nr. 19.0970
TVCCD-124COL Best.-Nr. 19.0980
®
Copyright©by MONACOR INTERNATIONAL GmbH & Co. KG, Bremen, Germany. All rights reserved. A-0502.99.02.02.2006
®
12V
Video
12 3
4
6
5
F B CH
I
12V
Video
Cámara con imagen invertida de
espejo
Por favor, lea atentamente estas instrucciones antes de la
instalación y guárdelas para su uso posterior.
1 Usos
La cámara en blanco y negro TVCCD-124 y la cámara en
color TVCCD-124COL están especialmente indicadas
para usos que requieren una representación de imagen
invertida de espejo. Si es necesario, también pueden ser
conmutadas a una representación de imagen normal.
Gracias a sus carcasas resistentes a la intemperie (IP65)
las cámaras están indicadas para la instalación en exte-
rior. Con la cámara se entrega un protector solar, un
soporte de montaje y un cable de 20m.
Las cámaras están equipadas con un objetivo de foco fijo
y tienen un control automático de ganancia (AGC), un ob-
turador electrónico automático para control de exposición,
yuna compensación de contraluz. Lacámara en colortam-
bién está equipada con un balance automático de blancos.
2 Notas importantes
La cámara responde a todas las Directivas requeridas por
la UE y por lo tanto está marcada con .
●Proteja la cámara contra las temperaturas extremas
(temperatura ambiente permitida: de
-
10°C a +50°C).
●La carcasa de la cámara es resistente a la intemperie
pero no es completamente estanca. Por lo tanto, no
sumerja la cámara en agua.
●Para limpiar la cámara no use detergentes o sustancias
químicas agresivas.
●No se aceptará ninguna reclamación de garantía para
la cámara y no se asumirá ninguna responsabilidad por
cualquier daño personal o material si la cámara es usa-
da para otros fines distintos a aquel para el que fue ori-
ginalmente fabricada, si no es correctamente montada
o conectada, o si no es reparada de manera experta.
3 Montaje
Para el montaje de la cámara se entregan los siguientes
tornillos:
4 tornillos Phillips pequeños;
para sujetar el protector solar a la cámara.
4 tornillos de hexagonales (cortos) con arandelas;
para sujetar el soporte a la cámara.
4 tornillos hexagonales (largos) con arandelas;
para montar el soporte en el lugar de montaje.
Alternativamente al soporte de montaje proporcionado, se
puede usar otro soporte de cámara con rosca [6,3mm
(1/4")]: sujete fuertemente el soporte a la toma de rosca en
el lado más bajo de la cámara.
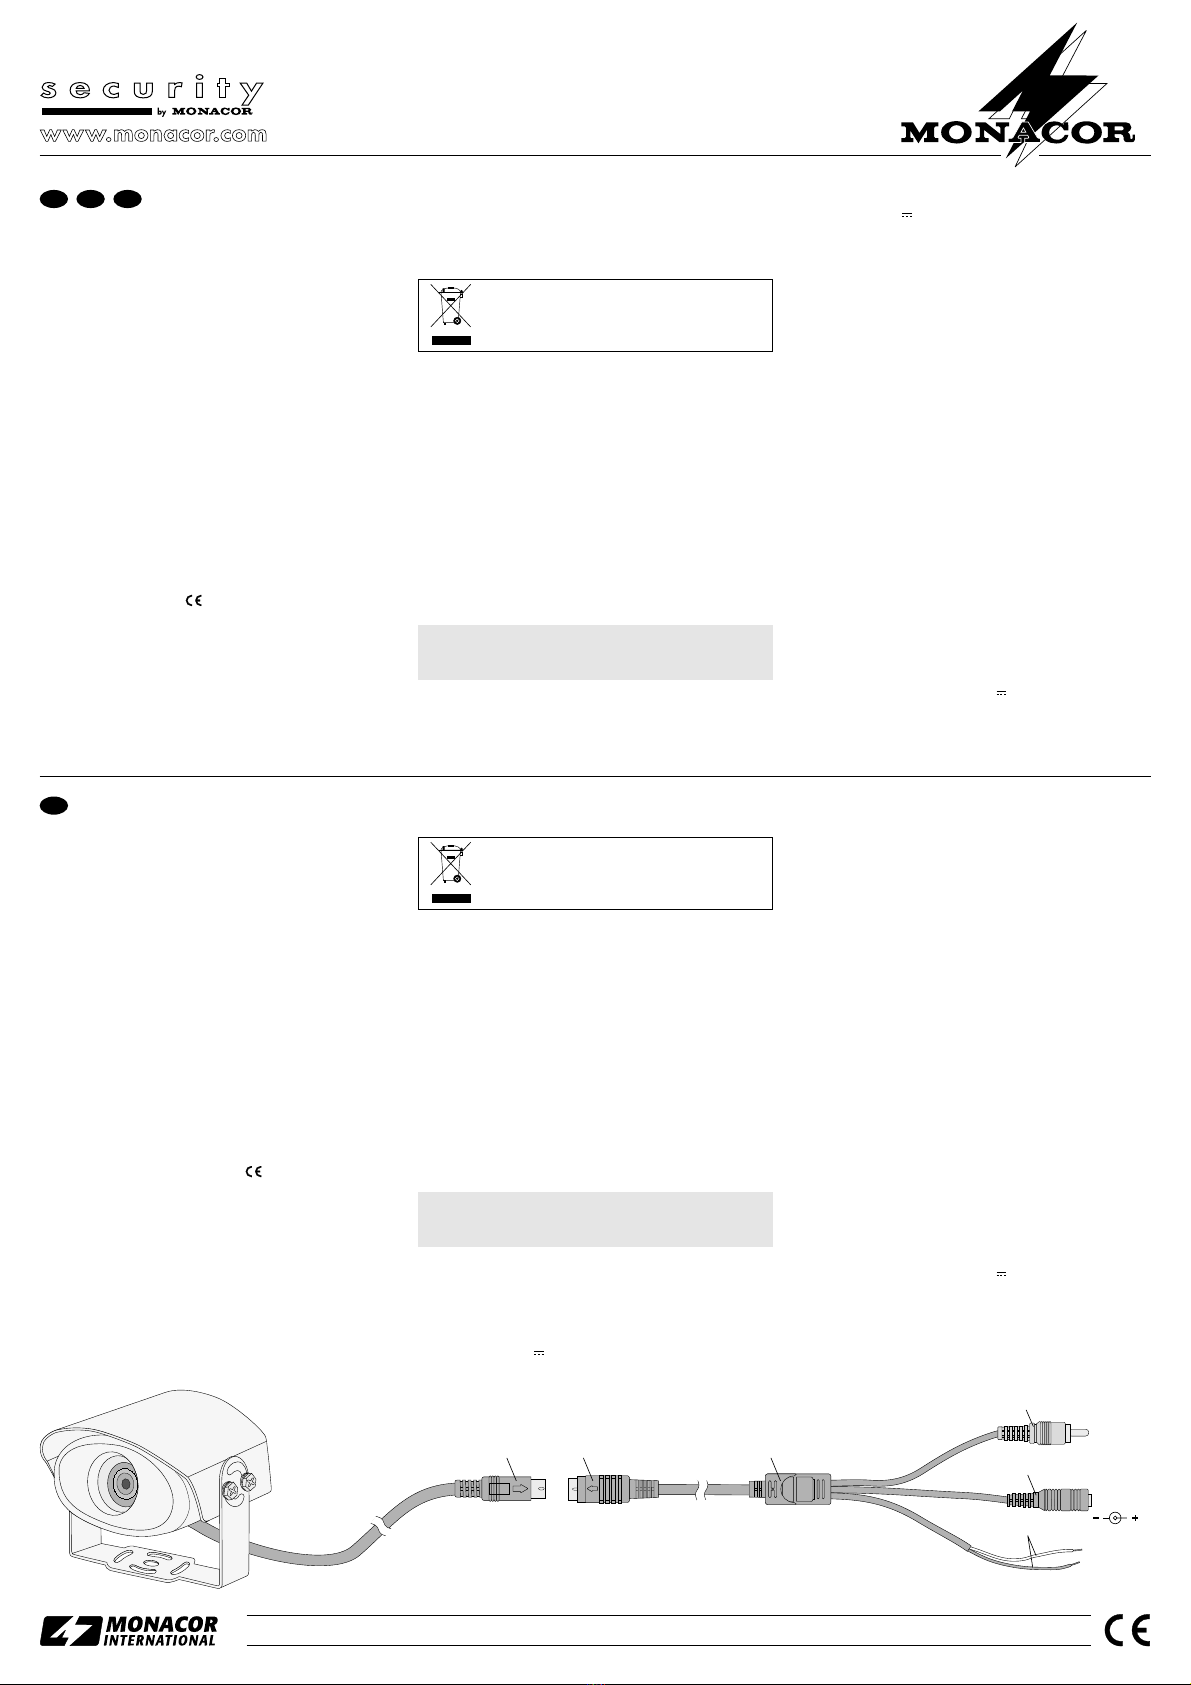
4 Funcionamiento
1) Conecte la toma hembra mini DIN (2) del cable entre-
gado a la toma macho (1) del cable de la cámara.
2) Conecte la toma macho phono (4) a la entrada vídeo
del monitor.
¡Importante! Las tomas de conexión (1, 2, 4, 5, 6) y el
cable distribuidor (3) no son resistentes a la intemperie.
En caso de uso en exterior, deben ser protegidos de
manera adecuada.
Si la cámara es retirada definitivamente del
funcionamiento, llévela a un centro de reci-
claje para su eliminación no contaminante
para el medio ambiente.
3) Conecteuna unidad dealimentaciónregulada a unaten-
sión de salida de 12V y una valoración de corriente
permanente de 100mA como mínimo a la toma hembra
de alimentación (5). Para la conexión se requiere una
toma de bajo voltaje con las dimensiones 5,5/2,1mm
(Ø exterior/interior) [contacto interior = polo positivo].
4) La cámara viene ajustada de fábrica con una imagen
de espejo invertido vertical. Para cambiarla a una
representación de imagen normal, conecte los dos con-
ductores libres (6) el uno con el otro.
5) Tras haber aplicado la tensión operativa, la cámara está
lista para su uso. Para ajustarla exactamente al área de
vigilancia, afloje ligeramente los tornillos hexagonales a
ambos lados del soporte de montaje, incline la cámara
como desee y luego apriete los tornillos de nuevo.
5 Características técnicas
Dispositivo de imagen: . . . . . . . . chip CCD, 8,5 mm (1/3")
Sincronización: . . . . . . . . . . . . . . CCIR, hor. 15 625 Hz, vert. 50 Hz
Sistema color (TVCCD-124COL): PAL
Número de píxeles, resolución
TVCCD-124: . . . . . . . . . . . . . . hor. 512 x vert. 582, 380 líneas
TVCCD-124COL: . . . . . . . . . hor. 500 x vert. 582, 330 líneas
Objetivo, luminosidad mínima: . . 1 : 2,0 / 2,97 mm, 1 lux
Relación señal/ ruido: . . . . . . . . > 48 dB
Obturador automático electrónico: 1/50 –1/100 000 seg.
Salida vídeo: . . . . . . . . . . . . . . . . 1 Vpp/ 75 Ω
Alimentación: . . . . . . . . . . . . . . . 12 V , 100 mA
Dimensiones (H x B x P), peso: . 77 x 95 x 80 mm (incluye parasol y
soporte), 400 g
Sujeto a modificaciones técnicas.
Kamera o odwróconym obrazie
Prosimy o uważne przeczytanie poniższej instrukcji przed
użyciem urządzenia, oraz o zachowanie tekstu do wglądu.
1Zastosowanie
Kamera czarno-biała VCCD-124 oraz kolorowa VCCD-
124COL znajdują idealne zastosowanie tam, gdzie po-
trzebne jest przedstawienie obrazu jako lustrzanego odbi-
cia. Kamery można również przełączyć na tryb zwykłego
odtwarzania obrazu. Obudowy kamer są wykonane z
materiału odpornego na działanie czynników atmosfe-
rycznych (klasa ochrony IP 65), dzięki czemu można je
zamontować na zewnątrz. W skład każdego zestawu
wchodzą również: osłona przeciwsłoneczna, uchwyt
montażowy, oraz kabel połączeniowy o długości 20 m.
Urządzenie wyposażone jest w obiektyw o stałej
ogniskowej, automatyczną regulację wzmocnienia
(AGC), automatyczną migawkę elektroniczną do kontroli
naświetlania oraz kompensację tylnego oświetlenia.
Kamera kolorowa jest ponadto wyposażona w automa-
tyczną równowagę bieli.
2Bezpieczeństwo użytkowania
Ponieważ urządzenie spełnia wszelkie normy obowiązu-
jące w Unii Europejskiej, jest oznaczone symbolem .
●Należy chronić urządzenie przed wpływem bardzo
wysokich bądź bardzo niskich temperatur (dopusz-
czalny zakres temperatur to
-
10 °C do 50 °C).
●Urządzenie jest odporne na działanie czynników
atmosferycznych, jednak nie jest całkowicie wodosz-
czelne. Nie wolno zanurzać urządzenia w wodzie.
●Do czyszczenia urządzenia nie wolno używać silnych
detergentów ani chemicznych środków czyszczących.
●Nie ponosi się odpowiedzialności za wynikłe uszko-
dzenia sprzętu lub obrażenia użytkownika w przy-
padku, gdy urządzenie jest wykorzystywane w innych
celach niż to się przewiduje, jeśli zostało niewłaściwie
zainstalowane, lub jeżeli nie zostało poddane specja-
listycznej naprawie.
3Montaż
W zestawie znajdują się następujące śruby do montażu
urządzenia:
4 małe śruby z łbem gniazdkowym;
do montażu osłony przeciwsłonecznej na kamerze
4 śruby sześciokątne (krótkie) z podkładkami;
do przymocowania uchwytu montażowego do kamery
4 śruby sześciokątne (długie) z podkładkami;
do przymocowania uchwytu montażowego w żądanym
miejscu.
Zamiast uchwytu montażowego wchodzącego w skład ze-
stawu można użyć innego uchwytu do kamery z gwintem
6,3 mm (1/4"): należy mocno przykręcić uchwyt do gniazda
gwintowego znajdującego się w dolnej części kamery.
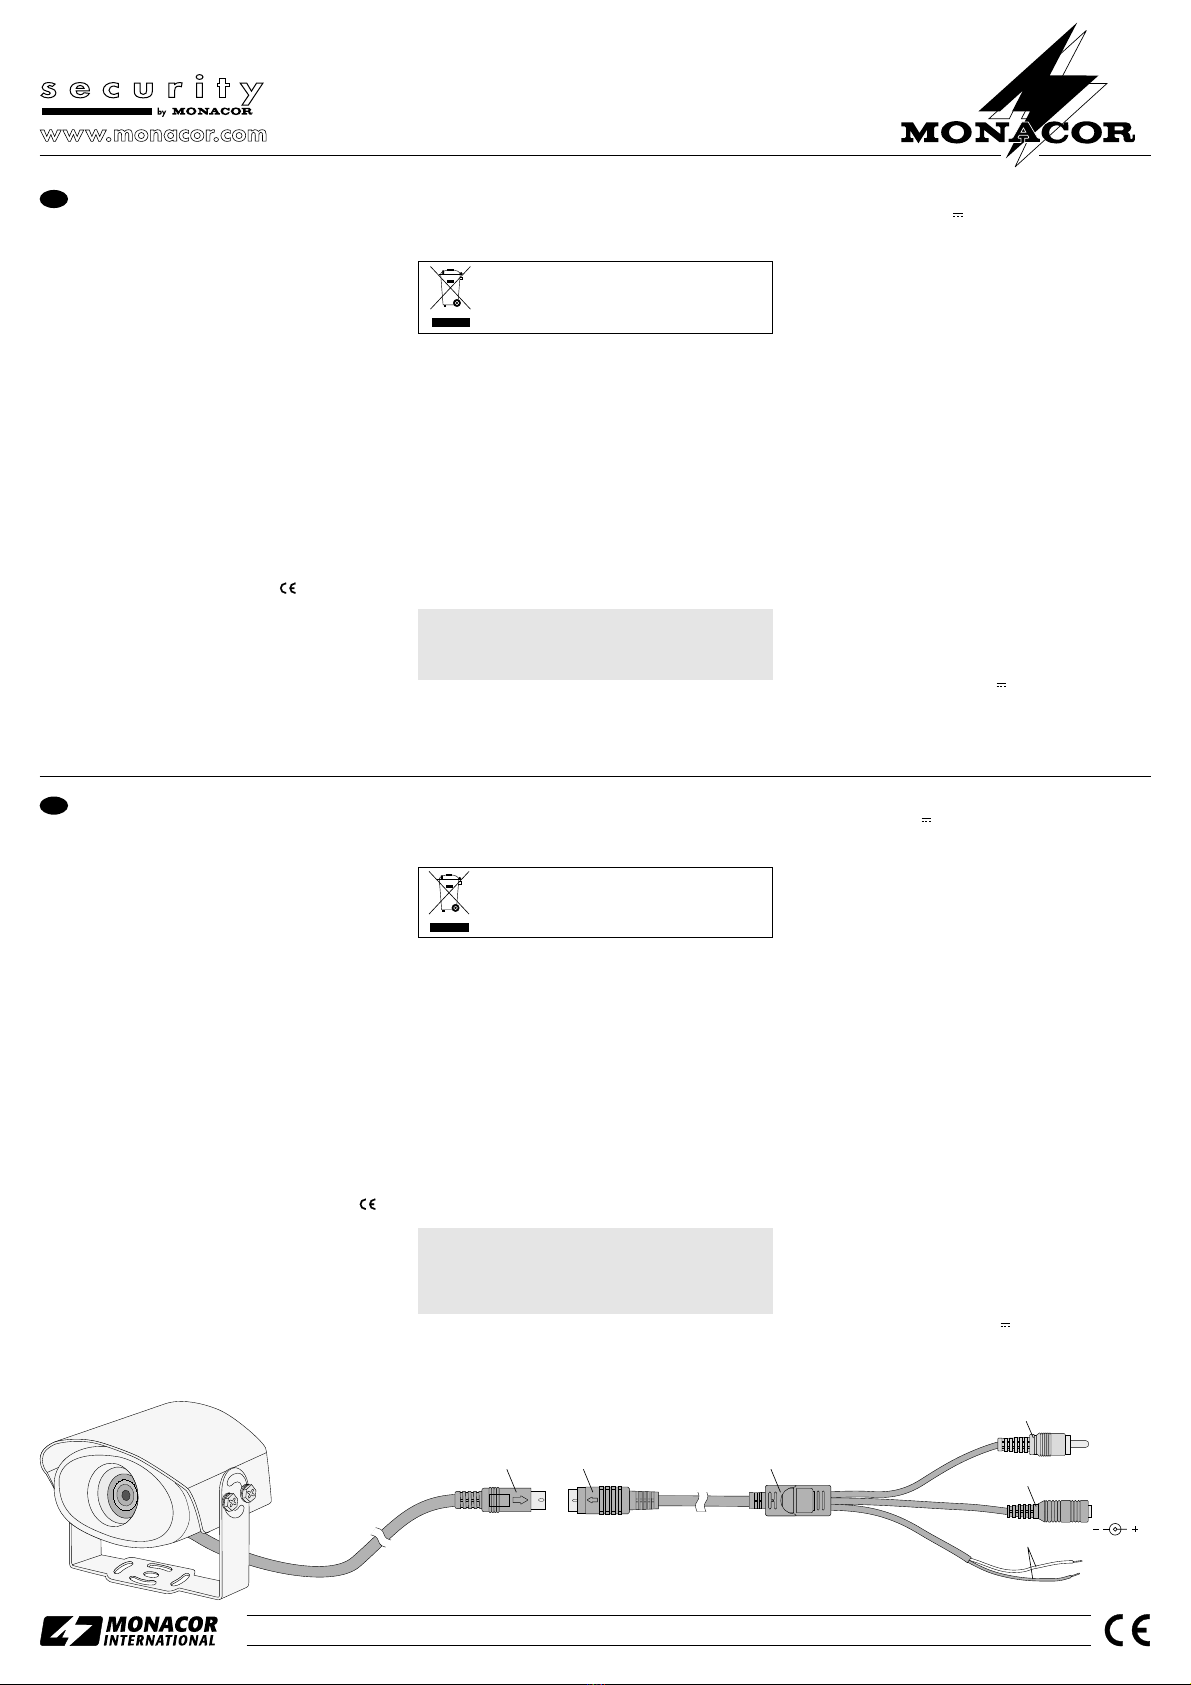
4Przygotowanie do pracy
1) Należy podłączyć gniazdo nakablowe mini DIN (2) do
wtyku (1) na kablu kamery.
2) Należy podłączyć wtyk fono (4) do wejścia video w
monitorze.
Uwaga! Elementy połączeniowe (1, 2, 4, 5, 6) oraz
rozdzielacz sygnałowy (3) nie są odporne na działanie
czynników atmosferycznych. Jeśli urządzenie będzie
montowane na zewnątrz, należy odpowiednio zabe-
zpieczyć elementy połączeniowe i rozdzielacz.
Jeśli urządzenie ma zostać ostatecznie
wycofane z użycia, należy przekazać je do
punktu utylizacji odpadów, aby uniknąć
zanieczyszczenia środowiska.
3) Należy podłączyć zasilacz stabilizowany o napięciu
wyjściowym 12 V i minimalnej wydajności prądowej
100 mA do zasilającego gniazda nakablowego (5).
Wymagany jest wtyk niskonapięciowy o wymiarach
5,5/2,1 mm (Øzewnętrzna/wewnętrzna). Należy
zwrócić uwagę na odpowiednią polaryzację pinów:
wewnętrzny pin jest stykiem dodatnim.
4) W ustawieniu fabrycznym kamera pracuje w trybie
przedstawiania obrazu jako lustrzanego odbicia. Aby
przełączyć kamerę na tryb zwykłego odtwarzania
obrazu, należy połączyć dwa gołe przewody (6).
5) Po podłączeniu napięcia urządzenie jest gotowe do
pracy. Aby optymalnie dostosować ustawienie kamery
do monitorowanego obszaru, należy lekko poluźnić
sześciokątne śruby umieszczone po obu stronach
uchwytu montażowego, odpowiednio ustawić nachy-
lenie kamery, następnie dokręcić śruby.
5Dane tec niczne
Przetwornik obrazu: . . . . . . . . . . . 8,5 mm (1/3"), chip CCD
Synchronizacja: . . . . . . . . . . . . . . CCIR,
pozioma 15 6 5 Hz, pionowa 50 Hz
System (TVCCD-1 4COL): . . . . . . . . PAL
Piksele, rozdzielczość
TVCCD-1 4: . . . . . . . . . . . . . . 51 x 58 (poziom x pion), 380 linii
TVCCD-1 4COL: . . . . . . . . . . . 500 x 58 (poziom x pion), 330 linii
Obiektyw, minimalna jasność: . . . . 1 : ,0/ ,97 mm, 1 lux
Stosunek S/N: . . . . . . . . . . . . . . > 48 dB
Automatyczna migawka
elektroniczna: . . . . . . . . . . . . . . . 1/50 –1/100 000 s
Wyjście video: . . . . . . . . . . . . . . . 1 Vpp/75 Ω
Zasilanie: . . . . . . . . . . . . . . . . . . . 1 V , 100 mA
Wymiary (wys. x szer. x głęb.), waga: 77 x 95 x 80 mm (z osłoną prze-
ciwsło-neczną i uchwytem), 400 g
Z zastrzeżeniem do możliwych zmian.
®
TVCCD-124 Best.-Nr. 19.0970
TVCCD-124COL Best.-Nr. 19.0980
®
Copyright©by MONACOR INTERNATIONAL GmbH & Co. KG, Bremen, Germany. All rights reserved. A-0502.99.02.02.2006
®
12 3
4
6
5
E
PL

This manual suits for next models

3

Other Monacor Digital Camera manuals

Monacor TVCCD-92A User manual

Monacor

Monacor TVCCD-92A User manual

Monacor TVCCD-92AP User manual

Monacor

Monacor TVCCD-92AP User manual

Monacor TVC-500 User manual

Monacor

Monacor TVC-500 User manual

Monacor TVCCD-310 User manual

Monacor

Monacor TVCCD-310 User manual

Monacor TVCCD-119 User manual

Monacor

Monacor TVCCD-119 User manual

Monacor TVCCD-95 User manual

Monacor

Monacor TVCCD-95 User manual

Monacor TVCCD-302 User manual

Monacor

Monacor TVCCD-302 User manual

Monacor INC-4312BBVM User manual

Monacor

Monacor INC-4312BBVM User manual

Monacor AV-420SET User manual

Monacor

Monacor AV-420SET User manual

Monacor security TVCCD-92AP User manual

Monacor

Monacor security TVCCD-92AP User manual

Popular Digital Camera manuals by other brands

Panasonic Lumix DMC-FS5 operating instructions

Panasonic

Panasonic Lumix DMC-FS5 operating instructions

Casio EX-Z4 - EXILIM Digital Camera user guide

Casio

Casio EX-Z4 - EXILIM Digital Camera user guide

Canon Ixy Digital 90 Service manual

Canon

Canon Ixy Digital 90 Service manual

Sanyo VPC-S122EXBL Service manual

Sanyo

Sanyo VPC-S122EXBL Service manual

Rovershot RS-5310Z user manual

Rovershot

Rovershot RS-5310Z user manual

Olympus CAMEDIA C-5060 Wide Zoom quick start guide

Olympus

Olympus CAMEDIA C-5060 Wide Zoom quick start guide

AquaPix W3048-V user manual

AquaPix

AquaPix W3048-V user manual

Rollei DR5100 Operation manual

Rollei

Rollei DR5100 Operation manual

Olympus C-2040 quick start guide

Olympus

Olympus C-2040 quick start guide

Huawei VPT300 Product overview

Huawei

Huawei VPT300 Product overview

AgfaPhoto Optima 2338mT user manual

AgfaPhoto

AgfaPhoto Optima 2338mT user manual

Kodak C700 - Advantix Zoom Camera user guide

Kodak

Kodak C700 - Advantix Zoom Camera user guide

Prosilica GS Series user manual

Prosilica

Prosilica GS Series user manual

Omron STC-MBS163POE user guide

Omron

Omron STC-MBS163POE user guide

IFM O3D3 Series Brief instructions

IFM

IFM O3D3 Series Brief instructions

Odys Slim5L Benutzerhandbuch

Odys

Odys Slim5L Benutzerhandbuch

Panasonic Lumix DMC-LX15 Operating instructions for advanced features

Panasonic

Panasonic Lumix DMC-LX15 Operating instructions for advanced features

Samsung ES60 Quick start manual

Samsung

Samsung ES60 Quick start manual

manuals.online logo
manuals.online logoBrands
  • About & Mission
  • Contact us
  • Privacy Policy
  • Terms and Conditions

Copyright 2025 Manuals.Online. All Rights Reserved.