manuals.online logo
Brands
  1. Home
  2. •
  3. Brands
  4. •
  5. Monacor
  6. •
  7. Security Camera
  8. •
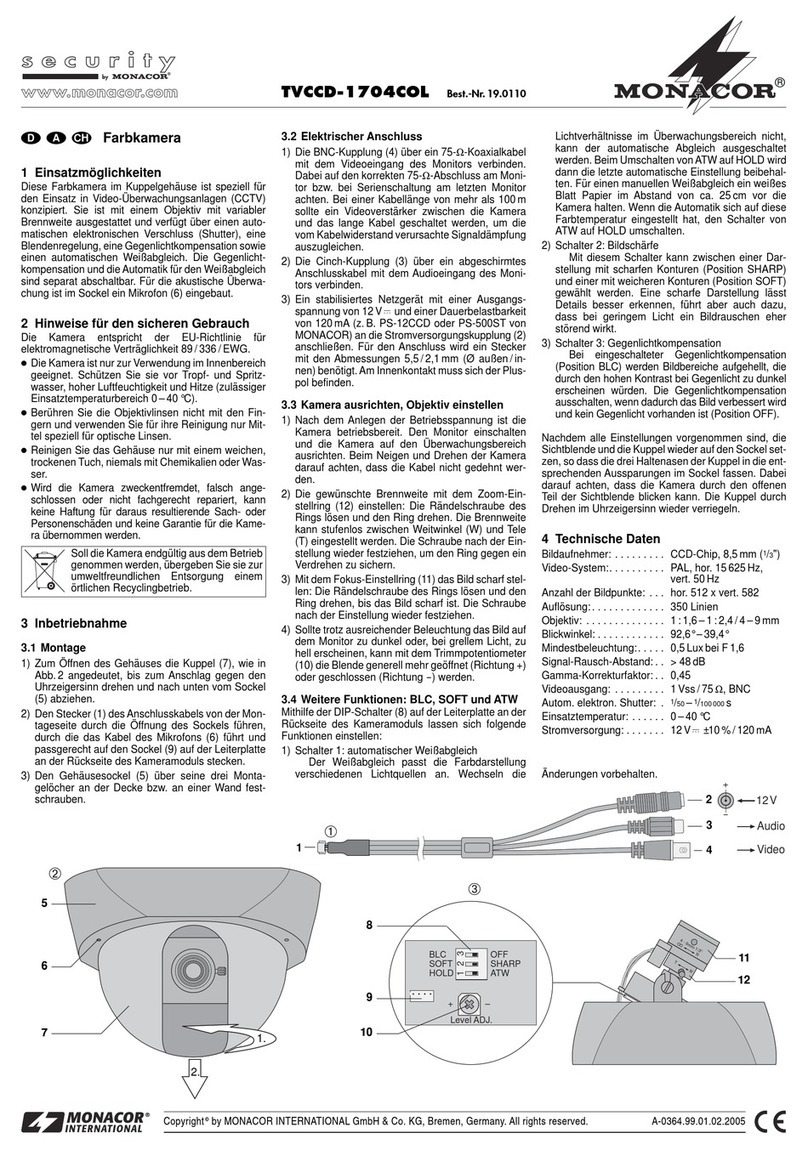
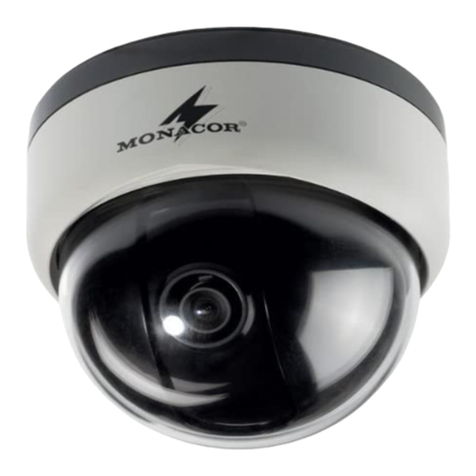
  9. Monacor TVCCD-316 User manual

Monacor TVCCD-316 User manual

VIDEO
12
V
2
13
4
5
Copyright©by MONACOR INTERNATIONAL GmbH & Co. KG, Bremen, Germany. All rights reserved. A-0198.99.01.02.2004
®
CCTV-Dome-Kamera
1 Einsatzmöglichkeiten
Die CCTV-Dome-Kameras TVCCD-316 (Schwarzweiß-
version) und TVCCD-316COL (Farbversion) sind speziell
für den Einsatz in Video-Überwachungsanlagen konzipiert
und werden an der Decke montiert. Zum Schutz gegen
Vandalismus besteht die Kuppel des Gehäuses aus
besonders bruchfestem Material. Das Gehäuse lässt sich
nur über den beiliegenden Spezialschlüssel öffnen, so
dass Manipulationen an der Kamera verhindert werden.
Die Kameras sind mit einem Fixfokus-Objektiv ausge-
stattet und verfügen über eine automatische elektronische
Verstärkungsregelung (AGC) und einen automatischen
elektronischen Verschluss („Shutter“). Die Farbkamera
besitzt außerdem einen automatischen Weißabgleich.
2 Hinweise für den sicheren Gebrauch
DieKameraentsprichtder EU-Richtliniefür elektromagne-
tische Verträglichkeit 89/336/EWG.
●Die Kamera ist nur zur Verwendung im Innenbereich
geeignet. Schützen Sie sie vor Feuchtigkeit und Hitze
(zulässiger Einsatztemperaturbereich 0–40°C).
●Reinigen Sie das Gehäuse nur mit einem trockenen,
weichen Tuch, niemals mit Chemikalien oder Wasser.
●Berühren Sie die Objektivlinse nicht mit den Fingern
und verwenden Sie für ihre Reinigung nur Mittel speziell
für optische Linsen.
●Wirddie Kamera zweckentfremdet, nicht richtig montiert
bzw. angeschlossen oder nicht fachgerecht repariert,
kann keine Haftung für daraus resultierende Sach- oder
Personenschäden und keine Garantie für die Kamera
übernommen werden.
●Soll die Kamera endgültig aus dem Betrieb genommen
werden, übergeben Sie sie zur umweltfreundlichen Ent-
sorgung einem örtlichen Recyclingbetrieb.
3 Inbetriebnahme
1) Zum Öffnen des Gehäuses den Haltering (1) für die
Kuppel abschrauben und die Kuppel abnehmen.
[Ist der Ring mit der Innensechskantschraube gegen
ein Abschrauben gesichert (siehe Position 3 in der
Abbildung), mit dem mitgelieferten Schlüssel erst die
Schraube lösen, dann den Ring abschrauben.]
2) Den Gehäusesockel (2) über seine beiden Montage-
löcher an der Decke festschrauben.
3) Die gelbe Cinch-Kupplung (4) über ein 75-Ω-Koaxial-
kabelmit dem VideoeingangamMonitor verbinden. Bei
einer Kabellänge über 100m sollte ein Videoverstärker
zwischen die Kamera und das lange Kabel geschaltet
werden, um die Kabelverluste auszugleichen.
4) An die rote Kupplung (5) ein stabilisiertes 12-V-Netzge-
rät mit einer Belastbarkeit von mindestens 120mA (für
TVCCD-316) bzw. 160mA (für TVCCD-316COL) an-
schließen. Es wird ein Kleinspannungsstecker mit den
Maßen 5,5/2,1mm (Ø außen/innen) benötigt. Den
Pluspol an den Mittelkontakt des Steckers anlegen.
5) Nach dem Anschluss ist die Kamera betriebsbereit.
DenMonitor einschalten und die Kamera auf den Über-
wachungsbereich ausrichten. Dazu die entsprechen-
den Schrauben der Kamerahalterung lösen und nach
dem Ausrichten wieder festziehen.
6) Die Kuppel wieder auf den Sockel setzen. Dabei dar-
auf achten, dass die Kamera durch den durchsichtigen
Teil der Kuppel blickt. Dann den Haltering für die Kup-
pel aufschrauben.
Umzu verhindern, dass Unbefugtedas Gehäuse öff-
nen, liegt der Kamera zum Sichern des Halterings eine
Innensechskantschraube mit passendem Schlüssel
bei. Die Schraube in die Bohrung am Haltering schrau-
ben und fest anziehen (siehe Position 3 in der Abbil-
dung): Der Ring ist dann arretiert und lässt sich nicht
abschrauben.
4 Technische Daten
Laut Angaben des Herstellers. Änderungen vorbehalten.
CCTV Dome Camera
1 Applications
The CCTV dome cameras TVCCD-316 (black-and-white
version) and TVCCD-316COL (colour version) are spe-
cially designed for application in video surveillance sys-
tems. They are mounted on the ceiling. As a protection
against vandalism, the dome of the housing is made of
extra break-proof material. To prevent any tampering with
the camera, the housing can only be opened with the spe-
cial key supplied.
The cameras are equipped with a fixed focus lens, an
automatic electronic gain control (AGC), and an automatic
electronic shutter. The colour camera is additionally pro-
vided with an automatic white balance.
2 Safety Notes
The camera corresponds to the directive for electromag-
netic compatibility 89/336/EEC.
●The camera is suitable for indoor use only. Protect it
against humidity and heat (admissible ambient temper-
ature range 0–40°C).
●For cleaning the housing only use a dry, soft cloth; never
use chemicals or water.
●Never touch the lens with your fingers. For cleaning the
lens, only use specific cleansing agents for optical
lenses.
●No guarantee claims for the camera and no liability for
any resulting personal damage or material damage will
be accepted if the camera is used for other purposes
than originally intended, if it is not correctly mounted,
connected or not repaired in an expert way.
●If the camera is to be put out of operation definitively,
take it to a local recycling plant for a disposal which is
not harmful to the environment.
3 Operation
1) To open the housing, unscrew the ring (1) supporting
the dome, then remove the dome.
[If the ring is secured against unscrewing by the
hexagon socket screw (see position 3 in the figure
below), use the supplied key to release the screw be-
fore unscrewing the ring.]
2) Screw the base of the housing (2) to the ceiling via its
two mounting holes.
3) Connect the yellow phono inline jack (4) via a 75Ω
coaxial cable to the video input on the monitor. With a
cable length exceeding 100m, a video amplifier should
be inserted between the camera and the long cable to
compensate cable loss.
4) Connect a regulated 12V power supply unit with a
minimum current rating of 120mA (for TVCCD-316) or
160mA (for TVCCD-316COL) to the red inline jack (5).
Alow voltage plug of the dimensions 5.5/2.1 (Ø inside/
outside) is required. Connect the positive pole to the
central contact of the plug.
5) After the connection has been made, the camera is
ready for operation. Switch on the monitor and adjust
the camera to the surveillance zone. For this purpose,
release the corresponding screws of the camera sup-
port and retighten them after adjusting.
6) Place the dome on the base. Make sure that the came-
ra is looking through the transparent part of the dome.
Screw on the supporting ring for the dome.
To prevent unauthorized persons from opening the
housing, the camera is supplied with a hexagon socket
screw with matching key for securing the supporting
ring. Insert the screw in the hole on the supporting ring
and tighten it (see position 3 in the figure below): Thus,
the ring is locked and cannot be unscrewed.
4 Specifications
According to the manufacturer. Subject to technical modification.
®
®
D A CH
GB
TVCCD-316 Best.-Nr. 19.9300
TVCCD-316COL Best.-Nr. 19.9310
Modell TVCCD-316
Farbsystem
—
Anzahl der Bildpunkte hor. 500 x vert. 582
Stromversorgung 12 V /120 mA 12 V /160 mA
TVCCD-316COL
PAL
Abmessungen, Gewicht Ø 130 mm x 85 mm, 500 g
Synchronisation hor. 15 625 Hz, vert. 50 Hz (CCIR)
Auflösung 380 Linien 330 Linien
Fixfokus-Objektiv 1 : 2,0/3,6 mm
Videoausgang 1 Vss/75 Ω
Mindestbeleuchtung 0,5 Lux 1 Lux
Signal-Rausch-Abstand > 46 dB
Einsatztemperatur 0–40°C
CCD-Bildaufnehmer 8,5 mm (1/3")6,35 mm (1/4")
Model TVCCD-316
Colour system
—
Number of pixels hor. 500 x vert. 582
Power supply 12 V /120 mA 12 V /160 mA
TVCCD-316COL
PAL
Dimensions, weight Ø 130 mm x 85 mm, 500 g
Sychronization hor. 15 625 Hz, vert. 50 Hz (CCIR)
Resolution 380 lines 330 lines
Fixed focus lens 1 : 2.0/3.6 mm
Video output 1 Vpp/75 Ω
Minimum illumination 0.5 lux 1 lux
S/N ratio > 46 dB
Ambient temperature 0–40°C
CCD chip 8.5 mm (1/3")6.35 mm (1/4")
Caméra CCTV à dôme
1 Possibilités d’utilisation
LescamérasTVCCD-316 (modèlenoir & blanc) etTVCCD-
316COL(modèle couleur) sont spécialement conçues pour
une utilisation dans des installations de surveillance vidéo
et peuvent être montées au plafond. Pour les protéger con-
tre tout acte de vandalisme, la coupole du boîtier se com-
pose d’un matériau particulièrement résistant aux cassu-
res. Le boîtier ne peut être ouvert que via la clé spéciale
livrée, empêchant ainsi toute manipulation sur la caméra.
Les caméras sont dotées d’un objectif à focale fixe et
disposent d’un réglage automatique électronique d’ampli-
fication (AGC) et d’une obturation automatique électroni-
que (“shutter”). La caméra couleur dispose en plus d’une
compensation automatique du blanc.
2 Conseils d’utilisation et de sécurité
La caméra CCTV répond à la norme européenne 89/336/
CEE relative à la compatibilité électromagnétique.
●La caméra n’est conçue que pour une utilisation en in-
térieur. Protégez-la de l’humidité et de la chaleur (plage
de température de fonctionnement autorisée : 0°C à
+40°C).
●Pour nettoyer le boîtier, utilisez un chiffon sec et doux,
en aucun cas de produits chimiques ou d’eau.
●Ne touchez jamais les lentilles de l’objectif avec les
doigts, pour le nettoyage, utilisez toujours les produits
spécifiquement conçus pour les lentilles optiques.
●Nous déclinons toute responsabilité en cas de domma-
ges corporels ou matériels résultants si la caméra est
utilisée dans un but autre que celui pour lequel elle a été
conçue, si elle n’est pas correctement montée, bran-
chée ou n’est pas réparée par une personne habilitée,
de même, la garantie deviendrait caduque.
●Lorsque la caméra est définitivement retirée du service,
vous devez la déposer dans une usine de recyclage
de proximité pour contribuer à son élimination non pol-
luante.
3 Fonctionnement
1) Pour ouvrir le boîtier, dévissez l’anneau de maintien (1)
pour la coupole puis retirez cette dernière.
[Si l’anneau est sécurisé contre tout dévissage par
la vis à 6 pans creux (voir position 3 sur le dessin), des-
serrez tout d’abord la vis avec la clé livrée puis dévis-
sez l’anneau].
2) Vissez le socle du boîtier (2) au plafond via ses deux
trous de montage.
3) Reliez la prise RCAjaune (4) via un câble coaxial 75Ω
à l’entrée vidéo du moniteur. Pour une longueur de
câble supérieure à 100m, il convient de placer un
amplificateur vidéo entre la caméra et le câble pour
compenser les pertes en ligne.
4) Connectezà la prise rouge (5) une alimentation secteur
stabilisée 12V d’une puissance minimale de 120mA
(pour TVCCD-316) ou de 160mA (pour TVCCD-
316COL). Une fiche alimentation 5,5/2,1 (Ø ext./int.)
est nécessaire. Le pôle plus doit être au contact mé-
dian de la fiche.
5) Une fois le branchement effectué, la caméra est prête
à fonctionner. Allumez le moniteur et dirigez la caméra
vers la zone à surveiller. Pour ce faire, desserrez les
vis correspondantes sur le support de la caméra puis
revissez après l’orientation.
6) Replacez la coupole sur le socle. Veillez à ce que la ca-
méra puisse voir à travers la partie transparente de la
coupole puis vissez l’anneau de maintien pour la cou-
pole.
Pour empêcher toute ouverture non autorisée du
boîtier, la caméra est livrée avec une vis à 6 pans creux
avec clé correspondante pour sécuriser l’anneau de
maintien. Insérez la vis dans le trou sur l’anneau et ser-
rez (voir position 3 sur le dessin). L’anneau est alors
verrouillé et ne peut être dévissé.
4 Caractéristiques techniques
D’après les données du constructeur.
Tout droit de modification réservé.
Telecamera CCTV a cupola
1 Possibilità d’impiego
Le telecamere CCTV a cupola TVCCD-316 (versione b/n)
e TVCCD-316COL (versione a colori) sono state realizza-
te specialmente per l’impiego in impianti di sorveglianza
video con montaggio al soffitto. Per proteggerle contro atti
di vandalismo, la cupola del contenitore è di materiale
infrangibile. Il contenitore stesso può essere aperto solo
con la chiave speciale in dotazione; in questo modo si
escludono le manipolazioni della telecamera.
Le telecamere sono equipaggiate con obiettivi a fuoco
fisso e dispongono di regolazione automatica del guada-
gno (AGC) e di un otturatore elettronico automatico
(“Shutter”). La telecamera a colori offre in più un bilancia-
mento automatico del bianco.
2 Avvertenze di sicurezza
La telecamera è conforme alla direttiva CE 89/336/CEE
sulla compatibilità elettromagnetica.
●La telecamera è prevista solo per l’uso all’interno di
locali. Proteggerla dall’ umidità e dal calore (temperatu-
ra d’impiego ammessa fra 0 e 40°C).
●Per la pulizia usare solo un panno morbido, asciutto;
non impiegare in nessun caso prodotti chimici o acqua.
●Non toccare la lente dell’obiettivo con le dita e per la sua
pulizia usare solo prodotti previsti per la pulizia di lenti
ottiche.
●Nel caso d’uso improprio, di montaggio o collegamenti
sbagliati, o di riparazione non a regola d’arte della tele-
camera, non si assume nessuna responsabilità per
eventuali danni consequenziali a persone o a cose e
non si assume nessuna garanzia per la telecamera.
●Se si desidera eliminare la telecamera definitivamente,
consegnarla per lo smaltimento ad un’istituzione locale
per il riciclaggio.
3 Messa in funzione
1) Per aprire il contenitore, svitare l’anello (1) che regge la
cupola e togliere la cupola.
[Se l’anello è assicurato con la brugola (vedi posi-
zione 3 nell’illustrazione) occorre prima allentare la vite
aiutandosi con la chiave in dotazione, e quindi svitare
l’anello.]
2) Avvitare lo zoccolo (2) del contenitore al soffitto per
mezzo dei due fori di montaggio.
3) Collegare la presa RCA gialla (4) con l’ingresso video
del monitor servendosi di un cavo coassiale di 75Ω. Se
la lunghezza del cavo supera i 100 metri, conviene
inserire un amplificatore video fra la telecamera e il
cavo lungo, per compensare le perdite dovute al cavo.
4) Collegare la presa rossa (5) con un alimentatore 12V
stabilizzato con potenza minima di 120mA (per
TVCCD-316) o 160mA (per TVCCD-316COL). Serve
unconnettore perpiccole tensioni delle dimensioni 5,5/
2,1mm (Ø esterno/interno). Collegare il positivo con il
contatto centrale del connettore.
5) Dopo il collegamento, la telecamera è pronta per l’uso.
Accendere il monitor e orientare la telecamera sulla
zonada sorvegliare.Per fare ciò allentare le relative viti
del supporto della telecamera e stringerle dopo aver
eseguito l’orientamento della telecamera.
6) Rimettere la cupola sullo zoccolo. Fare attenzione che
la telecamera abbia di fronte la parte trasparente della
cupola. Quindi avvitare l’anello che regge la cupola.
Per evitare che persone non autorizzate aprano il
contenitore, la telecamera ha in dotazione una brugola
con relativa chiave per bloccare tale anello. Avvitare la
brugola nel foro sull’anello e stringere bene (vedi posi-
zione 3 dell’illustrazione). In questo modo, l’anello è
bloccato e non può essere svitato.
4 Dati tecnici
Dati forniti dal costruttore. Con riserva di modifiche tecniche.
®
TVCCD-316 Best.-Nr. 19.9300
TVCCD-316COL Best.-Nr. 19.9310
®
Copyright©by MONACOR INTERNATIONAL GmbH & Co. KG, Bremen, Germany. All rights reserved. A-0198.99.01.02.2004
®
VIDEO
12
V
2
13
4
5
F B CH
I
Modèle TVCCD-316
Système couleur
—
Nombre de points hor. 500 x vert. 582
Alimentation 12 V /120 mA 12 V /160 mA
TVCCD-316COL
PAL
Dimensions, poids Ø 130 mm x 85 mm, 500 g
Synchronisation hor. 15 625 Hz, vert. 50 Hz (CCIR)
Résolution 380 lignes 330 lignes
Objectif à focale fixe 1 : 2,0/3,6 mm
Sortie vidéo 1 Vcc/75 Ω
Luminosité minimale 0,5 lux 1 lux
Rapport signal/bruit > 46 dB
Température fonc. 0–40°C
Puce CCD 8,5 mm (1/3")6,35 mm (1/4")
Modello TVCCD-316
Standard colore
—
Numero pixel hor. 500 x vert. 582
Alimentazione 12 V /120 mA 12 V /160 mA
TVCCD-316COL
PAL
Dimensioni, peso Ø 130 mm x 85 mm, 500 g
Sincronizzazione hor. 15 625 Hz, vert. 50 Hz (CCIR)
Risoluzione 380 linee 330 linee
Obiettivo a fuoco fisso 1 : 2,0/3,6 mm
Uscita video 1 Vpp/75 Ω
Illuminazione minima 0,5 Lux 1 Lux
Rapporto S/R > 46 dB
Temperatura d’impiego 0–40°C
Sensore ottico CCD 8,5 mm (1/3")6,35 mm (1/4")
Cámara CCTV con cúpula
1 Posibilidades de utilización
Las cámaras TVCCD-316 (modelo negro & blanco) y
TVCCD-316COL (modelo color) están especialmente fa-
bricadas para una utilización en instalaciones de vigilan-
cia video y pueden instalarse en techo. Para protegerlas
en contra de actos de vandalismo, la cúpula de la caja se
compone de un material especialmente resistente a los
golpes.La caja solo se puede abrir mediante la llave espe-
cial entregada, lo que impide cualquier manipulación de la
cámara.
Las cámaras disponen de un objetivo con enfoque fijo
y disponen de un reglaje automático electrónico de ampli-
ficación (AGC) y de una obturación automática electróni-
ca(“shutter”). La cámara color dispone a más de una com-
pensación automática del blanco.
2 Consejos de utilización y seguridad
La cámara CCTV cumple con la normativa europea
89/336/CEErelativa a la compatibilidad electromagnética.
●La cámara está fabricada únicamente en interior. Pro-
téjela de la humedad y del calor (temperatura de fun-
cionamiento autorizada: 0°C a +40°C).
●Para limpiar la caja, solo utilice un trapo seco y suave,
no utilice en ningún caso productos químicos o agua.
●No manipule nunca la lente del objetivo con los dedos,
para limpiarla, utilice siempre productos específicamen-
te fabricados para las lentes ópticas.
●Rechazamos toda responsabilidad en caso de daños
corporales o materiales si la cámara se utiliza en otro fin
para el cual ha sido fabricada, si no está correctamente
montada, conectada o reparada por una persona habi-
litada, además por todos estos mismos motivo la cáma-
ra carecería de todo tipo de garantía .
●Cuando la cámara está definitivamente sacada del ser-
vicio, deposítela en una fábrica de reciclaje de proximi-
dad para contribuir a una eliminación no contaminante.
3 Funcionamiento
1) Paraabrir lacaja de protección, desatornille la anilla de
mantenimiento (1) de la cúpula y saquéela.
[Si la anilla está bloqueada contra desatornillar con
la tuerca de cabeza con hexágono interior (vea pos. 3
del esquema), desatornille antes de todo la tuerca con
la llave entregada y entonces desatornille la anilla].
2) Atornille la base de la caja (2) al techo vía los dos agu-
jeros de montaje.
3) Conecte la toma RCA amarilla (4) vía un cable coaxial
75Ωa la entrada video del monitor. Para una longitud
de cable superior a 100m, conviene colocar un ampli-
ficador video entre la cámara y el cable largo para
compensar las perdidas en línea.
4) Conecte a la toma roja (5) una alimentación estabiliza-
da de 12V de una potencia mínima de 120mA (para
TVCCD-316) ou de 160mA (para TVCCD-316COL).
Una toma de baja alimentación 5,5/2,1 (Ø ext./int.) es
necesario. El polo positivo debe estar al contacto me-
diano de la toma.
5) Una vez la conexión efectuada, la cámara está lista
para funcionar. Conecte el monitor y coloque la cámara
hacia la zona a vigilar. Para efectuar esta manipulación,
desatornille las tuercas correspondientes en el soporte
de la cámara y, después de colocar, atornille de nuevo.
6) Coloque la cúpula sobre la base. Verifique que la
cámara pueda ver a través la parte transparente de la
cúpula. Entonces atornille la anilla de mantenimiento
para la cúpula.
Para impedir toda apertura no autorizada de la caja,
la cámara está entregada con una tuerca de cabeza
con hexágono interior con una llave correspondiente
para bloquear la anilla de mantenimiento. Inserte la
tuerca en el agujero de la anilla y atornille (vea pos. 3
en el esquema). La anilla está entonces bloqueada y
no puede desatornillarse.
4 Características técnicas
Según datos del fabricante.
Nos reservamos el derecho de modificación.
Kamera sferyczna CCTV
1Zastosowanie
Kamery TVCCD-316 (wersja czarnobiała) oraz TVCCD-
316COL (wersja kolorowa) rzeznaczone są głównie do
stosowania w systemach monitorowania. Montowane są
do sufitu. W celu ochrony rzed wandalizmem ko uła
obudowy wykonana jest z wysoce od ornego na uszko-
dzenia materiału. W celu za obieżenia nieu rawnionemu
mani ulowaniu rzy kamerze obudowa może być otwie-
rana jedynie rzy użyciu od owiedniego klucza.
Kamery wy osażone są w obiektywy o stałej ognisko-
wej, automatyczną regulację wzmocnienia sygnału
(AGC) oraz automatyczną migawkę. Dodatkowo kamera
kolorowa wy osażona jest w system równowagi bieli.
2Informacje Dotyczące Bezpieczeństwa
Urządzenie od owiada normie zgodności elektroma-
gnetycznej 89/336/EEC.
●Urządzenie rzeznaczone jest do użytku tylko
wewnątrz omieszczeń. Należy chronić je rzed wilgo-
cią oraz wysoką tem eraturą (do uszczalna tem era-
tura otoczenia racy wynosi 0 – 40 °C).
●Do czyszczenia obudowy używać jedynie suchego,
czystego kawałka materiału; nie używać środków che-
micznych, ani wody.
●Nie dotykać obiektywu alcami. Do czyszczenia
obiektywu używać s ecjalnie do tego celu rzezna-
czonych środków chemicznych.
●Dostawca oraz roducent nie onoszą od owiedzial-
ności za ewentualnie wynikłe szkody materialne lub
uszczerbki na zdrowiu, jeśli urządzenie było używane
niezgodnie z rzeznaczeniem, zostało nie o rawnie
zainstalowane lub obsługiwane oraz było oddawane
na rawom rzez nieautoryzowany ersonel.
●Jeżeli urządzenie nie będzie już nigdy więcej używane,
wskazane jest rzekazanie go do miejsca utylizacji
od adów, aby zostało utylizowane bez szkody dla
środowiska.
3Obsłu a
1) Aby otworzyć obudowę należy odkręcić ierścień (1)
odtrzymujący ko ułę, a nastę nie zdjąć ją. [Jeżeli
ierścień jest zabez ieczony rzed odkręceniem za
omocą śruby sześciokątnej ( atrz ozycja 3 na
rysunku oniżej), należy do jego ściągnięcia użyć
dołączonego klucza.]
2) Przykręcić odstawę obudowy (2) do sufitu rzez dwa
otwory montażowe.
3) Podłączyć żółty wtyk (4) za omocą rzewodu kon-
centrycznego 75 Ωdo wejścia monitora. Jeżeli rze-
wód ołączeniowy rzekracza 100 m, należy zastoso-
wać wzmacniacz sygnałowy.
4) Podłączyć zasilacz stabilizowany 12 V o minimalnej
mocy 120 mA (w rzy adku TVCCD-316), lub 160 mA
(w rzy adku TVCCD-316COL) do wtyku czerwonego
(5). Należy użyć wtyku 5,5/2,1 mm (Øzewnętrzna/
wewnętrzna). Wewnętrzny styk = biegun dodatni.
5) Po odłączeniu kamera jest gotowa do racy. Należy
włączyć monitor i ustawić kamerę na monitorowany
obszar. W tym celu należy oluzować od owiednie
śruby uchwytu mocującego kamery, a nastę nie
dokręcić je o ustawieniu kamery.
6) Umieścić ko ułę ochronną na odstawie kamery.
U ewnić się, że kamera skierowana jest na monitoro-
wany obszar o rzez rzezroczystą część osłony.
Dokręcić ierścień mocujący.
Aby uniknąć mani ulowania rzy kamerze rzez
nieu oważnione osoby, ierścień wy osażony jest w
śrubę sześciokątną. Należy włożyć śrubę w otwór zna-
jdujący się w ierścieniu mocującym ( atrz ozycja 3
na rysunku oniżej) dokręcić: Dzięki temu ierścień
będzie zablokowany Inie będzie go można odkręcić.
4Dane Techniczne
Zgodnie z danymi roducenta. Może ulec zmianie.
®
TVCCD-316 Best.-Nr. 19.9300
TVCCD-316COL Best.-Nr. 19.9310
®
Copyright©by MONACOR INTERNATIONAL GmbH & Co. KG, Bremen, Germany. All rights reserved. A-0198.99.01.02.2004
®
VIDEO
12
V
2
13
4
5
E
PL
Model TVCCD-316
System kodowania koloru
—
Liczba pixeli poz. 500 x pion. 582
Zasilanie 12 V /120 mA 12 V /160 mA
TVCCD-316COL
PAL
Wymiary, waga Ø 130 mm x 85 mm, 500 g
Synchronizacja poz. 15 625 Hz, pion. 50 Hz (CCIR)
Rozdzielczo ć 380 linii 330 linii
Stała ogniskowa 1 : 2,0/3,6 mm
Wyj cie video 1Vpp/75Ω
Minimalna jasno ć 0,5 Lux 1 Lux
Współczynnik S/N > 46 dB
Dopuszczalna temperatura 0–40°C
Chip CCD 8,5 mm (1/3")6,35 mm (1/4")
Modelo TVCCD-316
Sistema color
—
Cantidad de puntos hor. 500 x vert. 582
Alimentación 12 V /120 mA 12 V /160 mA
TVCCD-316COL
PAL
Dimensiones, peso Ø 130 mm x 85 mm, 500 g
Sincronización hor. 15 625 Hz, vert. 50 Hz (CCIR)
Resolución 380 líneas 330 líneas
Objetivo con enfoque fijo 1 : 2,0/3,6 mm
Salida video 1 Vcc/75 Ω
Luminosidad mínima 0,5 lux 1 lux
Relación señal/ruido > 46 dB
Temperatura func. 0–40°C
Sensor CCD 8,5 mm (1/3")6,35 mm (1/4")

This manual suits for next models

5

Other Monacor Security Camera manuals

Monacor TVCCD-1702COL User manual

Monacor

Monacor TVCCD-1702COL User manual

Monacor VIEWEX-370 User manual

Monacor

Monacor VIEWEX-370 User manual

Monacor HDCAM-620 User manual

Monacor

Monacor HDCAM-620 User manual

Monacor TVCCD-400COL User manual

Monacor

Monacor TVCCD-400COL User manual

Monacor INC-4036DF User manual

Monacor

Monacor INC-4036DF User manual

Monacor TVCCD-250SET User manual

Monacor

Monacor TVCCD-250SET User manual

Monacor TVCCD-186HCOL User manual

Monacor

Monacor TVCCD-186HCOL User manual

Monacor TVCCD-123COL User manual

Monacor

Monacor TVCCD-123COL User manual

Monacor TVCCD-700COL User manual

Monacor

Monacor TVCCD-700COL User manual

Monacor security HDCAM-370 User manual

Monacor

Monacor security HDCAM-370 User manual

Monacor TVCCD-240 User manual

Monacor

Monacor TVCCD-240 User manual

Monacor TVCCD-600COL User manual

Monacor

Monacor TVCCD-600COL User manual

Monacor TVCCD-1706COL User manual

Monacor

Monacor TVCCD-1706COL User manual

Monacor AHCAM-310DF User manual

Monacor

Monacor AHCAM-310DF User manual

Monacor TVCCD-320/SW User manual

Monacor

Monacor TVCCD-320/SW User manual

Monacor TVCCD-152SET User manual

Monacor

Monacor TVCCD-152SET User manual

Monacor INC-4312BVM User manual

Monacor

Monacor INC-4312BVM User manual

Monacor TVCCD-350 User manual

Monacor

Monacor TVCCD-350 User manual

Monacor TVCCD-160SCOL User manual

Monacor

Monacor TVCCD-160SCOL User manual

Monacor Security TVCCD-125COL User manual

Monacor

Monacor Security TVCCD-125COL User manual

Monacor TVCCD-187HCOL User manual

Monacor

Monacor TVCCD-187HCOL User manual

Monacor TVCCD-147COL User manual

Monacor

Monacor TVCCD-147COL User manual

Monacor ELAX-2812DPTZ User manual

Monacor

Monacor ELAX-2812DPTZ User manual

Monacor security TVCCD-189HCOL User manual

Monacor

Monacor security TVCCD-189HCOL User manual

Popular Security Camera manuals by other brands

Mini Gadgets MCC1080Wifi manual

Mini Gadgets

Mini Gadgets MCC1080Wifi manual

TRENDnet TV-IP342PI user guide

TRENDnet

TRENDnet TV-IP342PI user guide

Yale SV-DFFI-W installation guide

Yale

Yale SV-DFFI-W installation guide

Airsight XX59A user manual

Airsight

Airsight XX59A user manual

IXIUM 808 Custom manual

IXIUM

IXIUM 808 Custom manual

e-Line Technology ELI-SIP2-APTZ8-R30X manual

e-Line Technology

e-Line Technology ELI-SIP2-APTZ8-R30X manual

Black BLK-CWD208VH user manual

Black

Black BLK-CWD208VH user manual

X10 SC23A install guide

X10

X10 SC23A install guide

Vitek VTC-IRX36/3895 Specifications

Vitek

Vitek VTC-IRX36/3895 Specifications

Sygonix 1911204 App instruction manual

Sygonix

Sygonix 1911204 App instruction manual

D-Link DCS-3112 Quick installation guide

D-Link

D-Link DCS-3112 Quick installation guide

Dahua TPC-SD2221-TB3F4 quick start guide

Dahua

Dahua TPC-SD2221-TB3F4 quick start guide

Dedicated Micros Oracle installation manual

Dedicated Micros

Dedicated Micros Oracle installation manual

Vivotek FD8155 user manual

Vivotek

Vivotek FD8155 user manual

Detection Systems 7090 Installation and programming manual

Detection Systems

Detection Systems 7090 Installation and programming manual

Phytec AK-035-1 instruction manual

Phytec

Phytec AK-035-1 instruction manual

Teli CS8560D Operation manual

Teli

Teli CS8560D Operation manual

Idis DC-S3 83HRX Series Operation manual

Idis

Idis DC-S3 83HRX Series Operation manual

manuals.online logo
manuals.online logoBrands
  • About & Mission
  • Contact us
  • Privacy Policy
  • Terms and Conditions

Copyright 2025 Manuals.Online. All Rights Reserved.