manuals.online logo
Brands
  1. Home
  2. •
  3. Brands
  4. •
  5. Monacor
  6. •
  7. Security Camera
  8. •
  9. Monacor TVD-30 User manual

Monacor TVD-30 User manual

Copyright©by INTER-MERCADOR GMBH & CO. KG, Bremen, Germany All rights reserved. MONACOR®International 05.00.01
®
TVD-30 Best.-Nr. 19.5600
CCTV-Kamera-Attrappe
Einsatzmöglichkeiten
Die Kamera-Attrappe TVD-30 wird anstelle einer funk-
tionstüchtigen CCTV-Kamera eingesetzt. Durch die
blinkende LED wirkt das Gerät wie eine „echte” Über-
wachungskamera.
Die Kamera-Attrappe wird mit einem Kamerahalter
und zwei Aufklebern mit dem Hinweis auf Videoüber-
wachung, jeweils in deutsch und englisch, geliefert.
Hinweise für den sicheren Gebrauch
Das Gerät entspricht der EMV-Richtlinie für elektro-
magnetische Verträglichkeit 89/336/EWG.
●Das Gerät ist nur zur Verwendung im Innenbereich
geeignet.Schützen Sieesvor Feuchtigkeitund Hitze
(zulässiger Einsatztemperaturbereich 0–40°C).
●Verwenden Sie für die Reinigung nur ein trockenes,
weiches Tuch, auf keinen Fall Wasser oder Chemi-
kalien.
●Wird das Gerät zweckentfremdet, nicht richtig mon-
tiert oder nicht fachgerecht repariert, kann für even-
tuelle Schäden keine Haftung übernommen werden.
●Werfen Sie verbrauchte Batterien oder defekte Ak-
kus nicht in den Hausmüll, sondern geben Sie sie
nur in den Sondermüll (z.B. Sammelbehälter bei
Ihrem Einzelhändler).
●Soll das Gerät endgültig aus dem Betrieb genom-
men werden, übergeben Sie es zur Entsorgung
einem örtlichen Recyclingbetrieb.
Inbetriebnahme
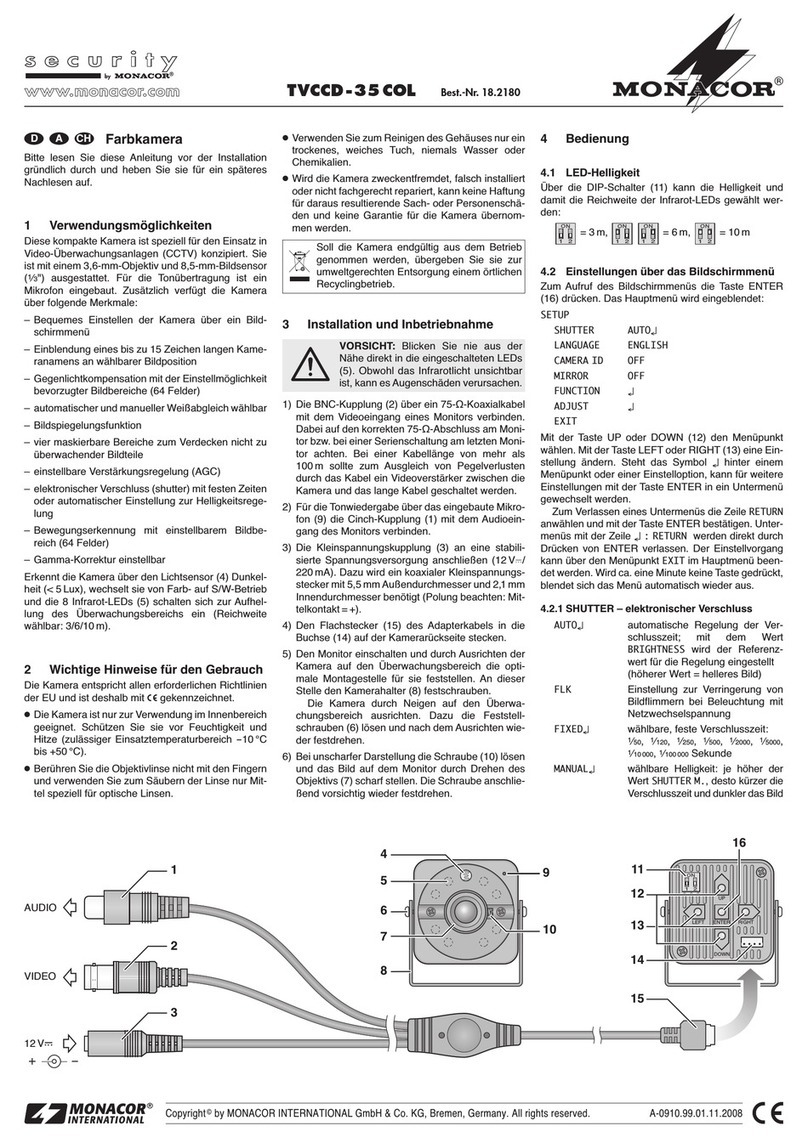
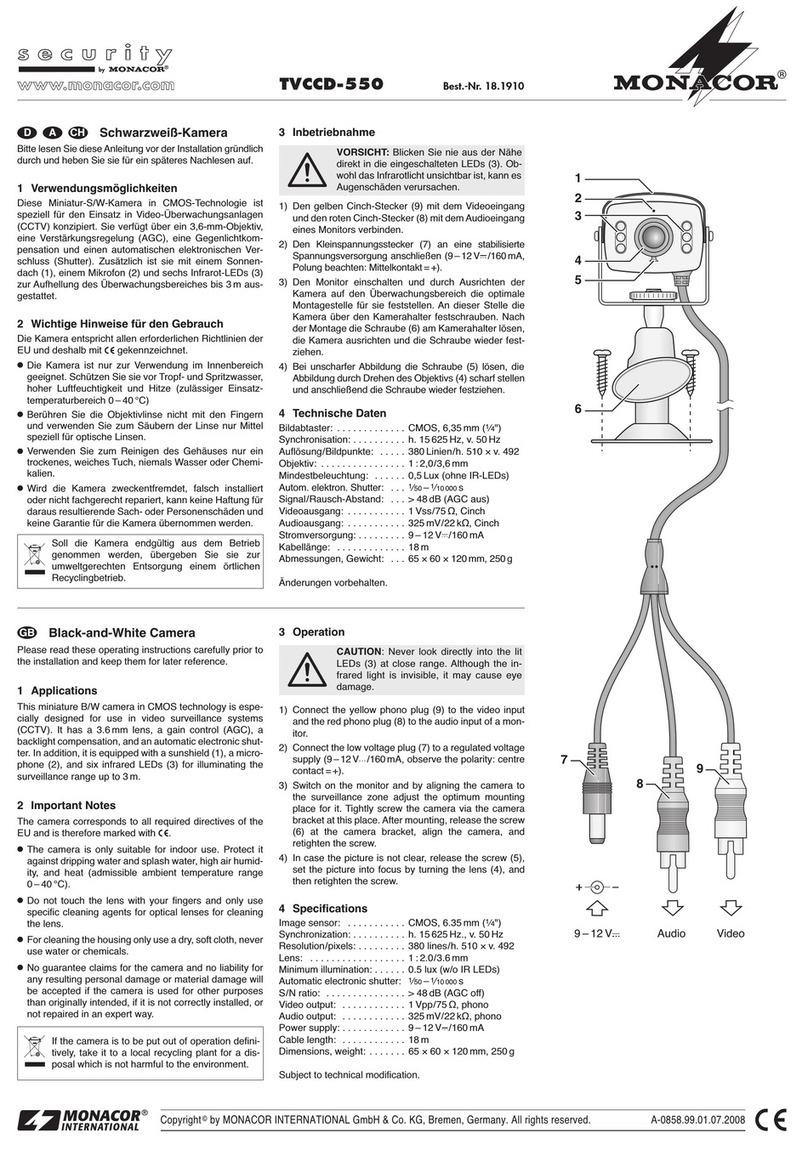
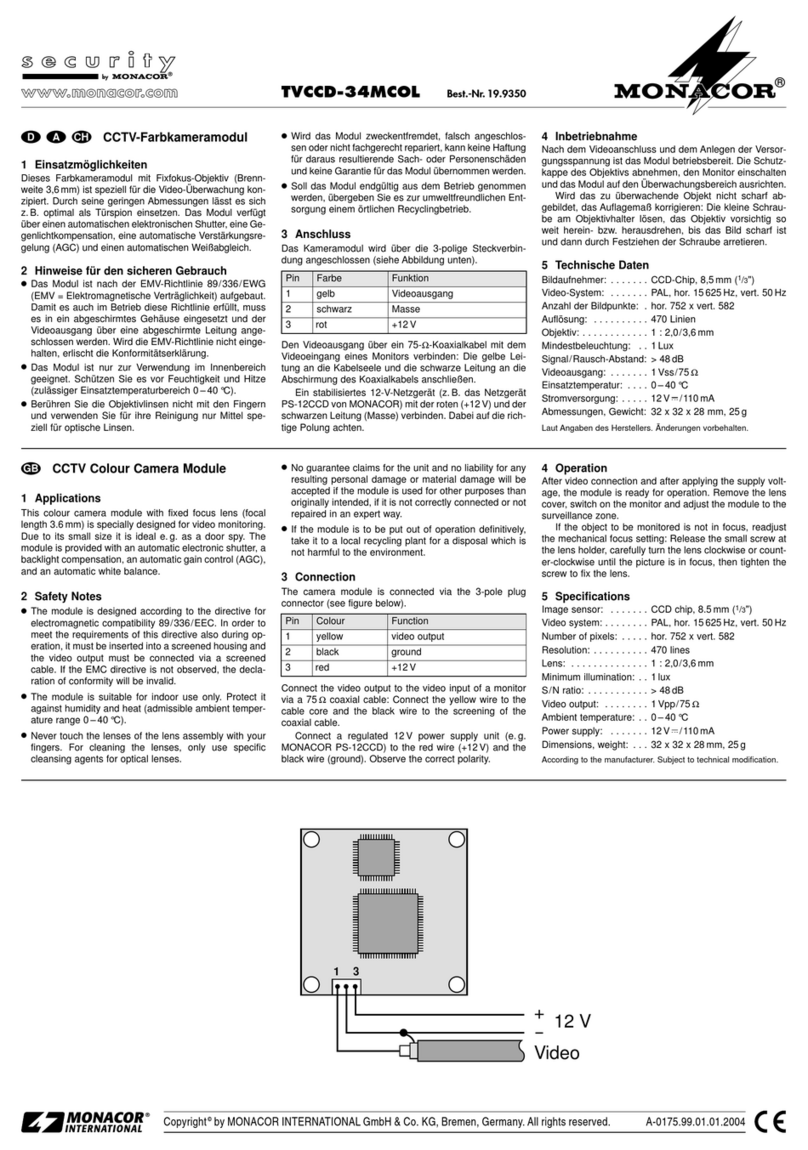
1) ZumEinsetzen der Batterienmuß derKamerahalter
vom Gerät abmontiert werden. Dazu die Schraube
(C) am Fuß des Halters lösen, so daß der Halterarm
herausgezogen werden kann. Dann den Gewinde-
bolzen (A) aus der Gewindebuchse des Geräts her-
ausschrauben.
2) Das Gehäuse aufschrauben, zwei Akkus bzw. Bat-
terien der Größe Mignon (AA) gemäß dem Auf-
druck im Batteriefach einlegen, und das Gehäuse
wieder schließen. Mit aufgeladenen Akkus bzw.
neuen Batterien kann das Gerät ca. 6–8 Monate
betrieben werden.
Bei längerem Nichtgebrauch (z.B. länger als
eine Woche) sollten die Akkus bzw. die Batterien
herausgenommen werden. So bleibt das Gerät bei
einem eventuellen Auslaufen der Akkus bzw. der
Batterien unbeschädigt.
3) Das Gerät wieder auf den Kamerahalter montieren
und diesen mit den beiliegenden Schrauben an der
gewünschten Stelle (Wand oder Decke) befesti-
gen.
4) Zum Ausrichten des Gerätes die Gelenkschraube
(B) des Halters lösen, das Gerät in die gewünschte
Position neigen und die Schraube wieder fest an-
ziehen.
Änderungen vorbehalten.
CCTV Camera Dummy
Applications
The camera dummy TVD-30 is installed instead of a
functioning CCTV camera. Due to the flashing LED the
unitgives the impressionof a“real” monitoringcamera.
The camera dummy is supplied with a camera
bracket and two labels to indicate video monitoring,
one in English and one in German.
Safety Notes
The camera dummy corresponds to the directive for
electromagnetic compatibility 89/336/EEC.
●The unit is suitable for indoor use only. Protect it
against humidity and heat (admissible ambient tem-
perature range: 0–40°C).
●For cleaning only use a dry, soft cloth, by no means
chemicals or water.
●If the unit is used for other purposes than originally
intended, if it is not correctly installed or not repaired
by skilled personnel, no liability for any damage will
be accepted.
●Dead batteries or defective rechargeable batteries
do not belong in the household rubbish:Always take
them to special waste disposal (e.g. container at
your retailer).
●If the unit is to be put out of operation permanently,
take it to a local recycling plant for disposal.
Operation
1) To insert the batteries, the camera bracket must be
dismounted from the unit. For this purpose, release
the screw (C) on the base of the bracket so that the
support arm can be removed. Then unscrew the
threaded bolt (A) from the threaded hole of the unit.
2) Unscrew the housing, insert two rechargeable size
AA batteries or two size AA batteries according to
the imprint in the battery compartment and close
the housing again. With recently recharged bat-
teries or new batteries the unit can be operated for
approx. 6 to 8 months.
If the unit is not used for a longer period (e. g. more
than a week), the (rechargeable) batteries should
be removed to prevent damage to the unit in case
of battery leakage.
3) Mount the unit to the camera bracket again and
fasten the latter to the desired location (wall or ceil-
ing) by means of the supplied screws.
4) To adjust the unit, release the hinge screw (B) of
the bracket, incline the unit to its desired position
and tightly fasten the screw.
Subject to technical change.
D A CH
GB
B C
A
Caméra factice CCTV
Possibilités d’utilisation
La caméra factice TVD-30 peut être utilisée à la place
d’une vraie caméra CCTV. Grâce à la LED clignotan-
te, la TVD-30 donne l’impression d’être une “véritable”
caméra de surveillance.
Elle est livrée avec un support de caméra et deux
autocollants indiquant la surveillance vidéo, un en
allemand et un en anglais.
Conseils d’utilisation
Cet appareil répond à la norme européenne 89/336/
CEE relative à la compatibilité électromagnétique.
●L’appareil n’est conçu que pour une utilisation en
intérieur; protégez-le de l’humidité et de la chaleur
(température d’utilisation admissible 0–40°C).
●Pour le nettoyer, utilisez uniquement un chiffon doux
et sec, en aucun cas de produit chimique ou d’eau.
●Nous déclinons toute responsabilité si l’appareil est
utilisé dans un but autre que celui pour lequel il a été
conçu, s’il n’est pas correctement monté ou s’il n’est
pas réparé par une personne habilitée.
●Des batteries usagées ou des accumulateurs défec-
tueux ne doivent pas être jetés dans la poubelle
domestique; déposez-les dans une poubelle spécifi-
quement prévue (par exemple, collecteur chez votre
commerçant spécialisé).
●Lorsque l’appareil est définitivement retiré du ser-
vice, vous devez le déposer dans une usine de re-
cyclage adaptée.
Mise en fonctionnement
1) Pour insérer les batteries, démontez le support de
caméra: desserrez la vis (C) au pied du support de
manière à pouvoir retirer le bras; devissez ensuite
le boulon fileté (A) de la douille de l’appareil.
2) Dévissez le boîtier, insérez deux batteries (ou ac-
cumulateurs) de type R6 en respectant les inscrip-
tions figurant dans le compartiment. Refermez le
boîtier. Lorsque les batteries sont neuves ou les
accumulateurs sont rechargés, l’appareil peut fonc-
tionner pendant 6 à 8 mois environ.
En cas de non-utilisation prolongée (par exemple,
plus d’une semaine), retirez les accumulateurs ou
les batteries. Comme ils pourraient couler, vous
éviterez ainsi tout dommage causé à l’appareil.
3) Remontez l’appareil sur le support et fixez le sup-
port à l’endroit souhaité (mur ou plafond).
4) Pour aligner la caméra factice, desserrez la vis de
l’articulation (B), inclinez la caméra à la position
souhaitée, puis revissez.
Tout droit de modification réservé.
Telecamera CCTV finta
Possibilità d’impiego
La telecamera finta TVD-30 viene montata al posto di
una telecamera CCTV funzionante. Grazie al LED
lampeggiante sembra una “vera” telecamera.
La telecamera finta viene consegnata con un sup-
porto per telecamera e con due adesivi in lingua te-
desca e inglese che segnalano la sorveglianza video.
Avvertenze
Quest’apparecchio corrisponde alla direttiva CE 89/
336/CEE sulla compatibilità elettromagnetica.
●Usare l’apparecchio solo all’interno di locali. Proteg-
gerlo dall’umidità e dal calore (temperatura d’impie-
go ammessa fra 0°C e 40°C).
●Per la pulizia usare solo un panno morbido, asciut-
to; non impiegare in nessun caso prodotti chimici o
acqua.
●Nel caso di uso improprio, di montaggio scorretto o
di riparazione non a regola d’arte non si assume
nessuna responsabilità per eventuali danni.
●Non buttare le pile scariche nell’immondizia norma-
le ma solo negli appositi contenitori.
●Se si desidera eliminare l’apparecchio definitiva-
mente, consegnarlo per lo smaltimento ad un’istitu-
zione locale per il riciclaggio.
Messa in funzione
1) Per inserire le batterie smontare il supporto dallo
strumento: allentare la vite (C) ai piedi del suppor-
to in modo da poter estrarre il braccio di sostegno.
Quindi svitare il perno filettato (A) dalla sua sede.
2) Avvitareil contenitoree inseriredue batterie deltipo
mignon (AA) come segnato nel vano batterie. Quin-
di richiudere il contenitore. Con le batterie fresche,
lo strumento funziona da circa 6 a 8 mesi.
Nel caso di non utilizzo per un tempo prolunga-
to (p.es. più di una settimana) conviene togliere le
batterie dal vano batterie per evitare per perdano
danneggiando lo strumento.
3) Montare lo strumento di nuovo sul supporto e fis-
sare quest’ultimo sul luogo desiderato (parete o
soffitto) con l’aiuto delle viti in dotazione.
4) Per orientare lo strumento allentare la vite (B) del
supporto, inclinare lo strumento secondo le neces-
sità e stringere bene la vite.
Con riserva di modifiche.

®
TVD-30 Best.-Nr. 19.5600
Copyright©by INTER-MERCADOR GMBH & CO. KG, Bremen, Germany All rights reserved. MONACOR®International 05.00.01
B C
A
F B CH
I

This manual suits for next models

1

Other Monacor Security Camera manuals

Monacor TVCCD-157SET User manual

Monacor

Monacor TVCCD-157SET User manual

Monacor INC-2812BV User manual

Monacor

Monacor INC-2812BV User manual

Monacor TVCCD-187HCOL Manual

Monacor

Monacor TVCCD-187HCOL Manual

Monacor TVCCD-125COL User manual

Monacor

Monacor TVCCD-125COL User manual

Monacor INC-4036BF User manual

Monacor

Monacor INC-4036BF User manual

Monacor TVCCD-318HCOL User manual

Monacor

Monacor TVCCD-318HCOL User manual

Monacor TVCCD-400 User manual

Monacor

Monacor TVCCD-400 User manual

Monacor AXC-3557PTZ HYBRID User manual

Monacor

Monacor AXC-3557PTZ HYBRID User manual

Monacor AV-3033CCD User manual

Monacor

Monacor AV-3033CCD User manual

Monacor TVCCD-700COL User manual

Monacor

Monacor TVCCD-700COL User manual

Monacor TVCCD-316 User manual

Monacor

Monacor TVCCD-316 User manual

Monacor TVCCD-150SET User manual

Monacor

Monacor TVCCD-150SET User manual

Monacor INC-2722BCP User manual

Monacor

Monacor INC-2722BCP User manual

Monacor TVCCD-187HCOL User manual

Monacor

Monacor TVCCD-187HCOL User manual

Monacor TVCCD-120 User manual

Monacor

Monacor TVCCD-120 User manual

Monacor INC-2036DM User manual

Monacor

Monacor INC-2036DM User manual

Monacor INC-1500THERM User manual

Monacor

Monacor INC-1500THERM User manual

Monacor TVCCD-350 User manual

Monacor

Monacor TVCCD-350 User manual

Monacor TVCCD-155HCOL User manual

Monacor

Monacor TVCCD-155HCOL User manual

Monacor TVCCD-340COL User manual

Monacor

Monacor TVCCD-340COL User manual

Monacor TVCCD-330 User manual

Monacor

Monacor TVCCD-330 User manual

Monacor HDCAM-340 User manual

Monacor

Monacor HDCAM-340 User manual

Monacor TVCCD-118 User manual

Monacor

Monacor TVCCD-118 User manual

Monacor HDCAM-652AF User manual

Monacor

Monacor HDCAM-652AF User manual

Popular Security Camera manuals by other brands

Overmax Camspot 4.9 user manual

Overmax

Overmax Camspot 4.9 user manual

Eneo ICB-72M2713MAA Quick installation guide

Eneo

Eneo ICB-72M2713MAA Quick installation guide

Observint ALIBI ALI-TP3125R Quick installation guide

Observint

Observint ALIBI ALI-TP3125R Quick installation guide

SC2000 MH-39131E1 instruction manual

SC2000

SC2000 MH-39131E1 instruction manual

Super Circuits N6076 quick guide

Super Circuits

Super Circuits N6076 quick guide

Sanyo VCC-3944 - 1/4" Color CCD DSP Camera Specification sheet

Sanyo

Sanyo VCC-3944 - 1/4" Color CCD DSP Camera Specification sheet

EverFocus ED335 operation instruction

EverFocus

EverFocus ED335 operation instruction

Time2 Olivia3 user manual

Time2

Time2 Olivia3 user manual

Moog Videolarm SM75CF2N instructions

Moog Videolarm

Moog Videolarm SM75CF2N instructions

Fortinet FortiCam FD40 quick start guide

Fortinet

Fortinet FortiCam FD40 quick start guide

Samsung SCC-B531x(B) user guide

Samsung

Samsung SCC-B531x(B) user guide

Bosch VOT-320V013L Specifications

Bosch

Bosch VOT-320V013L Specifications

GeoVision GV-TDR Series user manual

GeoVision

GeoVision GV-TDR Series user manual

D-Link DCS-3430 user manual

D-Link

D-Link DCS-3430 user manual

Ava Flex Mounting guide

Ava

Ava Flex Mounting guide

Cisco WVC210 - Small Business Wireless-G PTZ Internet Video... Administration guide

Cisco

Cisco WVC210 - Small Business Wireless-G PTZ Internet Video... Administration guide

Foscam FI8910W Quick installation guide

Foscam

Foscam FI8910W Quick installation guide

Siqura HSD62 series quick start guide

Siqura

Siqura HSD62 series quick start guide

manuals.online logo
manuals.online logoBrands
  • About & Mission
  • Contact us
  • Privacy Policy
  • Terms and Conditions

Copyright 2025 Manuals.Online. All Rights Reserved.