Subject to technical change. Copyright © by INTER-MERCADOR GMBH & CO. KG, Bremen, Germany. All rights reserved. 11.98.01
CCTV-Farbkameramodul
mit Mikrofon
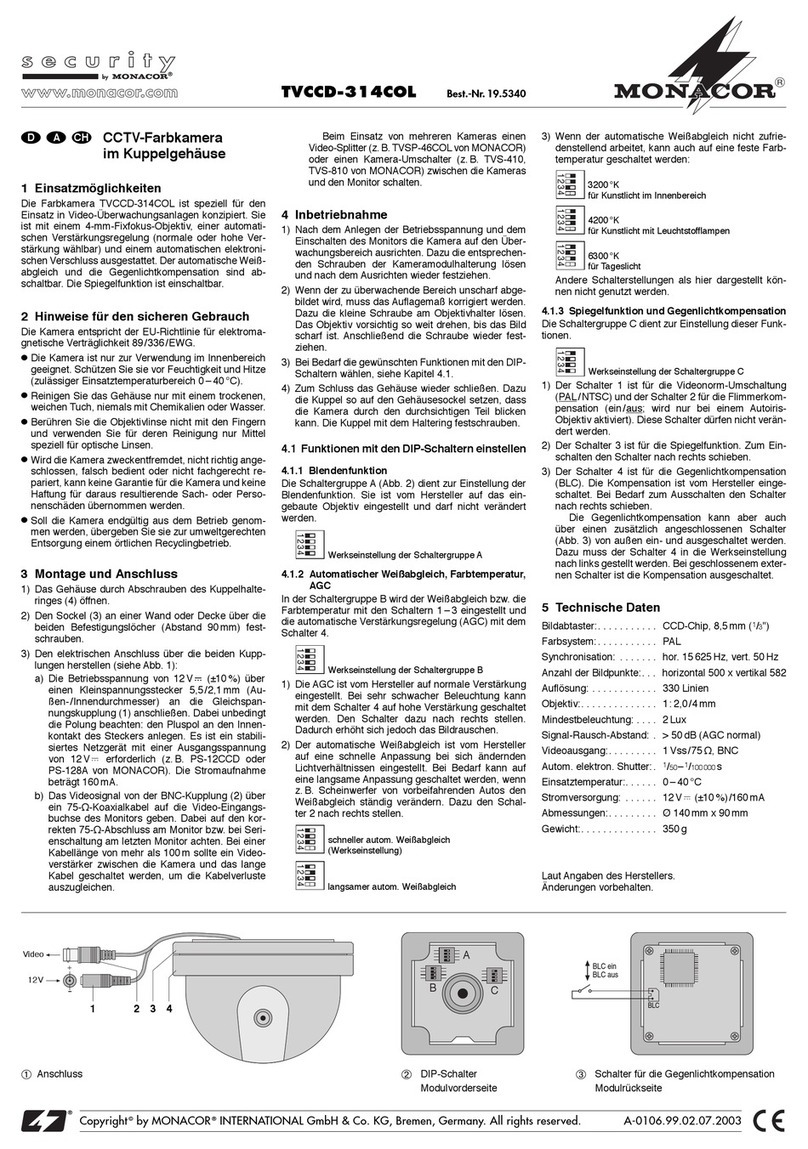
1 Verwendungsmöglichkeiten
Das Farbkameramodul mit Fixfokus-Objektiv eignet sich für
den Einsatz in Überwachungs- und Alarmanlagen. Dank der
geringen Abmessungen läßt es sich optimal als Türspion oder
versteckte Überwachungskamera verwenden.
2 Wichtige Hinweise zur Montage
●Das Modul ist nach der EMV-Richtlinie 89/336/EWG (EMV
= Elektromagnetische Verträglichkeit) aufgebaut. Damit es
auch im Betrieb diese Richtlinie erfüllt, muß es in ein ab-
geschirmtes Gehäuse eingesetzt und die Ausgänge müs-
sen über abgeschirmte Leitungen angeschlossen werden.
Wird die EMV-Richtlinie nicht eingehalten, erlischt die Kon-
formitätserklärung.
●Schützen Sie das Modul vor Feuchtigkeit und Hitze (zuläs-
siger Einsatztemperaturbereich 0–40°C).
●Schützen Sie die Linsen des Objektivs unbedingt vor Staub
und sonstiger Verschmutzung. Berühren Sie sie auf gar kei-
nen Fall mit den Fingern.
●Wird das Modul zweckentfremdet, falsch angeschlossen
oder nicht fachgerecht repariert, kann für eventuelle Schä-
den keine Haftung übernommen werden.
●Soll das Modul endgültig aus dem Betrieb genommen wer-
den, übergeben Sie es zur Entsorgung einem örtlichen Re-
cyclingbetrieb.
3 Anschluß des Kameramoduls
Das Modul wird über die 6polige Buchse auf der Hauptplatine
angeschlossen (siehe Abbildung auf der Rückseite):
Pin 2: Anschluß für +12V (roter Anschlußdraht)
Pin 3: Videoausgang (gelber Anschlußdraht)
Pin 4: Audioausgang (weißer Anschlußdraht)
Pin 5: Masse für Stromversorgung, Video- undAudioausgang
(schwarzer Anschlußdraht)
3.1 Stromversorgung
Ein elektronisch stabilisiertes 12-V-Netzgerät (z.B. PS-12CCD
oder PS-128A von MONACOR) mit Pin 2 (+12V) und Pin 5
(Masse) verbinden. Dabei auf die richtige Polung achten. Die
Stromaufnahme beträgt ca. 180mA.
3.2 Videoausgang
An Pin 3 der Anschlußbuchse die Kabelseele, an Pin 5 die
Abschirmung eines 75-Ω-Koaxialkabels anschließen und die-
ses mit einem oder mehreren Monitoren verbinden. Dabei auf
korrekten 75-Ω-Abschluß am Monitor bzw. bei Serienschal-
tung am letzten Monitor achten.
3.3 Audioausgang
An Pin 4 der Anschlußbuchse die Kabelseele, an Pin 5 die
Abschirmung eines abgeschirmten Audiokabels anschließen
und dieses mit dem Audioeingang des Monitors verbinden.
4 Inbetriebnahme
Nach dem Video- und Audioanschluß und dem Anlegen der
12-V-Versorgungsspannung ist das Kameramodul betriebsbe-
reit. Das Modul genau auf den Überwachungsbereich ausrich-
ten, und das Objektiv vorsichtig so weit drehen, bis das Bild
scharf ist.
TVCCD-60MACOL
Best.-Nr. 19.3570
CCTV Colour Camera Module with
Microphone
1 Applications
The colour camera module with fixfocus lens is suitable for the
use in monitoring and alarm systems. Due to its small dimen-
sions it can be used in an optimum way as a door spy or con-
cealed monitoring camera.
2 Important Notes for the Mounting
●The module corresponds to the EMC directive 89/ 336/EEC
(EMC = electromagnetic compatibility). To conform to this
directive also while in operation, the module must be placed
into a shielded housing and the outputs must be connected
via shielded cables. If the EMC directive is not complied
with, the declaration of conformity expires.
●Protect the module against humidity and heat (admissible
ambient temperature range 0–40°C).
●The lenses of the lens assembly must be protected against
dust and other impurities and must not be touched with the
fingers in any case.
●If the module is used for other purposes than originally
intended, if it is connected in the wrong way or not repaired
by authorized, skilled personnel, no liability can be taken
over for possible damage.
●If the module is to be put out of operation definitively, bring
it to a local recycling plant for disposal.
3 Connection of the Camera Module
The module is connected via the 6-pole jack on the main PCB
(see figure on the back page):
Pin 2: connection for +12V (red wire)
Pin 3: video output (yellow wire)
Pin 4: audio output (white wire)
Pin 5: ground for power supply, video output and audio out-
put (black wire)
3.1 Power supply
Connect an electronically regulated 12V power supply (e.g.
PS-12CCD or PS-128Aby MONACOR) with pin 2 (+12V) and
pin 5 (ground). Watch the correct polarity. The power con-
sumption is approx. 180mA.
3.2 Video output
Connect to pin 3 of the jack the cable core, to pin 5 the screen
of a 75Ωcoaxial cable and connect this with one or several
monitors. Watch the correct 75Ωtermination at the monitor or
in case of series connection at the last monitor.
3.3 Audio output
Connect to pin 4 of the jack the cable core, to pin 5 the screen
of a shielded audio cable and connect this with the audio input
of the monitor.
4 Setting into Operation
After carrying out the video and audio connection and apply-
ing the 12V supply voltage the camera module is ready for
operation. Arrange the module exactly for the monitoring
range, and adjust a clear picture by turning the lens carefully.
D A CH
GB
Module caméra couleur
CCTV avec microphone
1 Possibilités d'utilisation
Le module caméra couleur avec objectif à focale fixe est con-
çu pour une utilisation dans les centrales de surveillance et
d'alarme. Ses petites dimensions permettent de l’utiliser com-
me espion de porte ou comme caméra de surveillance cachée.
2 Conseils importants d’installation
●Le module de caméra répond à la norme européenne
89/336/CEE portant sur la compatibilité électromagnétique.
Afin que le module, lorsqu’il est en fonction, y corresponde,
il doit être placé dans un boîtier blindé, les sorties doivent
être reliées par des câbles blindés. Si les modalités de cette
norme ne sont pas respectées, le module n’est plus en con-
formité avec la norme.
●Protégez le module de l'humidité et de la chaleur (tempéra-
ture ambiante autorisée 0–40°C).
●Protégez les lentilles de la poussière et de toute autre salis-
sure; en aucun cas, ne touchez jamais les lentilles avec les
doigts.
●Nous déclinons toute responsabilité en cas de dommage si
le module est utilisé dans un but autre que celui pour lequel
il a été conçu, s'il n'est pas correctement branché ou répa-
ré.
●Lorsque le module de caméra est définitivement retiré du
circuit de distribution, vous devez le déposer dans une usi-
ne de recyclage adaptée.
3 Branchements
Le module est branché par la prise 6 pôles sur la platine prin-
cipale (voir schéma au verso).
pin 2: branchement +12V (câble rouge)
pin 3: sortie vidéo (câble jaune)
pin 4: sortie audio (câble blanc)
pin 5: masse pour l'alimentation et les sorties audio et vidéo
(câble noir)
3.1 Alimentation
Vous devez relier une alimentation stabilisée 12V (par exem-
ple MONACOR PS-12CCD ou PS-128A) au pin 2 (+12V) et
au pin 5 (masse). Veillez à respecter la polarité. La consom-
mation est de 180mA environ.
3.2 Sortie vidéo
Reliez l'âme d’un câble coaxial 75Ωau pin 3 de la prise et le
blindage du câble au pin 5. Reliez le cable à un ou plusieurs
moniteurs en veillant au branchement 75Ωsur le moniteur ou,
dans le cas d'un montage en série, sur le dernier moniteur.
3.3 Sortie audio
Reliez l'âme d'un câble audio blindé au pin 4 et le blindage du
cable au pin 5; reliez le cable à l’entrée audio du moniteur.
4 Utilisation
Une fois les branchements effectués et le module sous ten-
sion, il est prêt à fonctionner. Orientez le module vers la zone
de surveillance et tournez l'objectif doucement jusqu'à ce que
l'image soit nette.
F B CH
Bildabtaster 8,5-mm-CCD-Chip (1/3")
Synchronisation hor. 15625Hz, vert. 50Hz
Anzahl der Bildpunkte hor. 537 x vert. 597
Auflösung 420 Linien
Objektiv, Mindestbeleuchtung 1:2,0/3,6mm, 1Lux
Videoausgang 1Vss, 75Ω
Signal-Rauschabstand > 50 dB
Abmessungen:
Hauptplatine
Objektivplatine 32 x 62 x 15mm
32 x 35 x 25mm
Technische Daten
Audioausgang 150mV/10kΩ
Einsatztemperatur 0
-
40°C
Gewicht 40g
Laut Angaben des Herstellers. Änderungen vorbehalten.
Stromversorgung 12V , 180mA
According to the manufacturer. Subject to change.
Image sensor 8.5mm (1/3") CCD Chip
Synchronization hor. 15625Hz, vert. 50Hz
Number of pixels hor. 537 x vert. 597
Resolution 420 lines
Lens, minimum illumination 1:2.0/3,6mm, 1Lux
Audio output 150mV/10kΩ
Video output 1Vpp, 75Ω
S/N ratio > 50 dB
Ambient temperature 0
-
40°C
Specifications
Weight
Dimensions:
main PCB
lens PCB 32 x 62 x 15mm
32 x 35 x 25mm
Power supply 12V , 180mA
40g
D’après les données du constructeur.
Tout droit de modification réservé.
Système puce CCD 8,5mm (1/3")
Synchronisation hor. 15625Hz, vert. 50Hz
Nombre de points hor. 537 x vert. 597
Résolution 420 lignes
Objectif, luminosité minimale 1:2,0/3,6mm, 1Lux
Sortie audio 150mV/10kΩ
Sortie vidéo 1Vcc, 75Ω
Rapport signal/bruit > 50 dB
Température ambiante 0
-
40°C
Caractéristiques techniques
Poids
Dimensions:
platine principale
platine d’objectif 32 x 62 x 15mm
32 x 35 x 25mm
Alimentation 12V , 180mA
40g
