manuals.online logo
Brands
  1. Home
  2. •
  3. Brands
  4. •
  5. Monacor
  6. •
  7. Speakers System
  8. •
  9. Monacor EDL-412/WS User manual

Monacor EDL-412/WS User manual

ELA-Kugellautsprecher
Bitte lesen Sie diese Anleitung vor der Installation gründlich
durch und heben Sie sie für ein späteres Nachlesen auf.
1 Verwendungsmöglichkeiten
Dieser Lautsprecher ist speziell für den Einsatz in ELA-Anla-
gen konzipiert. Er ist mit einem Übertrager für den Betrieb an
100-V-Anlagen ausgestattet, kann aber auch direkt an nieder-
ohmige Verstärkerausgänge angeschlossen werden. Die An-
passung der Anschlussleistung erfolgt über die Auswahl der
Anschlussleitungen. Durch sein wetterfestes Gehäuse (IP 44)
ist er auch für Außeninstallationen verwendbar.
2 Wichtige Hinweise für den sicheren Gebrauch
Der Lautsprecher entspricht allen erforderlichen Richtlinien der
EU und ist deshalb mit gekennzeichnet.
GSchützen Sie den Lautsprecher vor großer Hitze und Kälte
(zulässiger Einsatztemperaturbereich 0 – 40 °C).
GVerwenden Sie für die Reinigung nur ein trockenes oder
leicht angefeuchtetes, weiches Tuch, auf keinen Fall Che-
mikalien oder aggressive Reinigungsmittel.
GWird der Lautsprecher zweckentfremdet, nicht fachgerecht
installiert oder überlastet, kann keine Haftung für daraus re-
sultierende Sach- oder Personenschäden und keine Garan-
tie für den Lautsprecher übernommen werden.
3 Montage
EDL-412B und EDL-420B:
1) Die Montagehalterung an der Wand oder Decke fest-
schrauben.
2) Das Kabel durch das Loch in der Halterung führen und die
Gewindehülse am Lautsprecher in das Gewinde der Halte-
rung schrauben. Die Sicherungsschraube (2) festdrehen.
3) Zum Ausrichten des Lautsprechers die Flügelmutter (1) lö-
sen. Den Lautsprecher in die gewünschte Position drehen
und die Flügelmutter wieder festdrehen.
EDL-412 und EDL-420:
Den Lautsprecher am Kabel mit für Lampen üblichen Monta-
gemitteln aufhängen.
Soll der Lautsprecher endgültig aus dem Betrieb ge-
nommen werden, übergeben Sie ihn zur umwelt-
gerechten Entsorgung einem örtlichen Recycling-
betrieb.
4 Elektrischer Anschluss
Warnung: Im Betrieb liegt berührungsgefährliche
Spannung bis 100 V an den Anschlüssen an. Isolieren
Sie unbedingt die nicht benutzten Anschlussleitungen.
Die Installation darf nur durch Fachpersonal erfolgen.
Achten Sie auf die richtige Leistungsanpassung. Eine
falsche Anpassung kann den ELA-Verstärker zerstören!
1) Falls die ELA-Anlage eingeschaltet ist, diese zuerst kom-
plett ausschalten!
2) Den Lautsprecher anschließen: Die schwarze Ader (Minus-
pol) und die orange, graue oder weiße Ader, entsprechend
der gewünschten Nennbelastung durch den Lautsprecher,
mit dem 100-V-Ausgang des Verstärkers verbinden (siehe
Tabelle). Alternativ die schwarze und die braune Ader an ei-
nen niederohmigen Verstärkerausgang anschließen.
Beim Anschluss von mehreren Lautsprechern darauf achten,
dass die Lautsprecher alle gleich gepolt werden (schwarze
Ader = Minuspol) und dass der Verstärker nicht überlastet wird.
B
PA Ball Speaker
Please read these operating instructions carefully prior to in-
stallation and keep them for later reference.
1 Applications
This speaker is specially designed for application in PA sys-
tems. It is equipped with a transformer for operation at 100 V
systems, however, it may also be directly connected to ampli-
fier outputs of low impedance. The connected load is matched
via selection of the connection cables. Due to its weatherproof
cabinet (IP 44) it is also suitable for outdoor installation.
2 Safety Notes
This unit corresponds to all required directives of the EU and is
therefore marked with .
GProtect the speaker against extreme high or low tempera-
tures (admissible ambient temperature range 0 – 40 °C).
GFor cleaning only use a soft cloth, dry or slightly damp; never
use chemicals or aggressive detergents.
GNo guarantee claims for the speaker and no liability for any re-
sulting personal damage or material damage will be accepted
if the speaker is used for other purposes than originally in-
tended, if it is not correctly installed or if it is overloaded.
3 Mounting
EDL-412B and EDL-420B:
1) Screw the mounting bracket to the wall or ceiling.
2) Lead the cable through the hole in the bracket and screw
the threaded sleeve on the speaker into the thread on the
bracket. Fasten the locking screw (2).
3) To adjust the speaker, release the wing nut (1). Position the
speaker as desired and retighten the wing nut.
EDL-412 and EDL-420:
Suspend the speaker from its cable using mounting acces-
sories customary for lamps.
If the speaker is to be put out of operation definitively,
take it to a local recycling plant for a disposal which is
not harmful to the environment.
4 Electrical Connection
Warning: During operation, there is a hazard of contact
with a voltage of up to 100 V at the connections. Always
insulate the connection cables which are not used.
The installation must be carried out by skilled personnel
only. Observe the correct power matching. An incorrect
matching may damage the PA amplifier!
1) If the PA system is switched on, switch it off completely be-
fore connecting it!
2) Connect the speaker: Connect the black core (negative
pole) and the orange, grey, or white core corresponding to
the desired power rating by the speaker to the 100 V output
of the amplifier (see table). Alternatively, connect the black
core and the brown core to an amplifier output of low im-
pedance.
When connecting several speakers, make sure that all speak-
ers have the same polarity (black core = negative pole) and
that the amplifier is not overloaded.
B
Haut-parleur Public Adress
en forme de boule
Veuillez lire la présente notice avec attention avant lʼinstallation
et conservez-la pour pouvoir vous y reporter ultérieurement.
1 Possibilités dʼutilisation
Le haut-parleur est spécialement conçu pour une utilisation
dans des installations de Public Adress. Il est équipé dʼun
transformateur pour un fonctionnement dans des systèmes
100 V, mais il peut également être relié directement à des sor-
ties basse impédance dʼamplificateurs. Lʼadaptation de puis-
sance sʼeffectue via la sélection des câbles de branchement.
Grâce à son boîtier résistant aux intempéries (IP 44), il est éga-
lement utilisable en extérieur.
2 Conseils dʼutilisation et de sécurité
Le haut-parleur répond à toutes les directives nécessaires de
lʼUnion Européenne et porte donc le symbole .
GProtégez le haut-parleur dʼune grande chaleur ou dʼun
grand froid (plage de température de fonctionnement autori-
sée : 0 – 40 °C).
GPour le nettoyage, utilisez uniquement un chiffon doux, sec
ou légèrement humide, nʼutilisez jamais de produits chi-
miques ou de détergents agressifs.
GNous déclinons toute responsabilité en cas de dommages
matériels ou corporels résultants si le haut-parleur est utilisé
dans un but autre que celui pour lequel il a été conçu, sʼil
nʼest pas correctement installé ou sʼil y a surcharge ; en
outre, la garantie deviendrait caduque.
3 Montage
EDL-412B et EDL-420B :
1) Vissez le support de montage sur le mur ou au plafond.
2) Faites passer le câble dans le trou sur le support et vissez
la partie filetée sur le haut-parleur dans le filetage du sup-
port. Serrez la vis de sécurité (2).
3) Pour orienter le haut-parleur, desserrez lʼécrou papillon (1).
Tournez le haut-parleur dans la position souhaitée et res-
serrez lʼécrou.
Lorsque le haut-parleur est définitivement retiré du
service, vous devez le déposer dans une usine de re-
cyclage adaptée pour contribuer à son élimination non
polluante.
EDL-412 et EDL-420 :
Suspendez le haut-parleur via son câble en utilisant les ac-
cessoires de montage usuels pour lampes.
4 Branchement électrique
Avertissement : Pendant le fonctionnement, une ten-
sion de contact dangereuse jusquʼà 100 V est présente
aux branchements. Isolez impérativement les cordons
de branchement non utilisés. Seul un personnel qualifié
peut effectuer les branchements. Veillez à adapter la
puissance correctement. Une puissance erronée peut
endommager lʼamplificateur Public Adress !
1) Si lʼinstallation Public Adress est allumée, veillez à la dé-
brancher totalement !
2) Reliez le haut-parleur : reliez le conducteur noir (pôle
moins) et le conducteur orange, gris ou blanc en fonction
de la puissance nominale souhaitée par le haut-parleur, à
la sortie 100 V de lʼamplificateur (voir tableau). Vous pou-
vez, à la place, relier le conducteur noir et le conducteur
marron à une sortie basse impédance de lʼamplificateur.
Si plusieurs haut-parleurs sont branchés, veillez à ce que les
haut-parleurs aient tous la même polarité (conducteur noir =
pôle moins) et que lʼamplificateur ne soit pas en surcharge.
B
EDL-412/WS
EDL-420/WS
EDL-412B/WS
EDL-420B/WS
Best.-Nr. 16.1860
Best.-Nr. 16.1880
Best.-Nr. 16.1870
Best.-Nr. 16.1890
12
EDL-412B
EDL-420B
F B CH
GB
DA CH
Änderungen vorbehalten. Subject to technical modification. Tout droit de modification réservé.
Technische Daten Specifications Caractéristiques techniques EDL-412(B) EDL-420(B)
Frequenzbereich Frequency range Bande passante 160 – 20 000 Hz 120 – 20 000 Hz
Nennbelastbarkeit/Impedanz
bei Anschluss der Adern
schwarz – orange (an 100 V)
schwarz – grau (an 100 V)
schwarz – weiß (an 100 V)
schwarz – braun
(nicht für 100-V-Ausgänge!)
Power rating / Impedance when
connecting the cores
black – orange (at 100 V)
black – grey (at 100 V)
black – white (at 100 V)
black – brown
(not for 100 V outputs!)
Puissance nominale/Impédance
pour le branchement des conducteurs
noir – orange (sous 100 V)
noir – gris (sous 100 V)
noir – blanc (sous 100 V)
noir – marron
(pas pour des sorties 100 V !)
10 WRMS/1k
Ω
5WRMS/2k
Ω
2,5 WRMS/4k
Ω
10 WRMS/8
Ω
20 WRMS/500
Ω
10 WRMS/1k
Ω
5WRMS/2k
Ω
20 WRMS/8
Ω
Abmessungen Dimensions Dimensions ∅184 mm ∅265 mm
Gewicht Weight Poids 1,7 kg (1,9 kg) 2,2 kg (2,5 kg)
Mittlerer Schalldruck (1 W/1 m) SPL (1 W/1 m) Pression sonore moyenne (1 W/1 m) 92 dB 94 dB
MONACOR INTERNATIONAL GmbH & Co. KG • Zum Falsch 36 • 28307 Bremen • Germany
Copyright©by MONACOR INTERNATIONAL. All rights reserved. A-0524.99.02.06.2011
®
Altoparlante PA a sfera
Vi preghiamo di leggere attentamente le presenti istruzioni
prima dellʼinstallazione e di conservarle per un uso futuro.
1 Possibilità dʼimpiego
Questo altoparlante è stato realizzato in modo particolare per
lʼimpiego in impianti PA. È equipaggiato con un trasformatore
per impianti con uscita audio a 100 V, ma può anche essere
collegato direttamente con le uscite a bassa impedenza di un
amplificatore. Lʼadattamento alla potenza di connessione
avviene scegliendo i conduttori di connessione. Grazie al con-
tenitore resistente alle intemperie (IP 44) può essere impiegato
anche per installazioni esterne.
2 Avvertenze di sicurezza
Lʼaltoparlante è conforme a tutte le direttive richieste dellʼUE e
pertanto porta la sigla .
GProteggere lʼaltoparlante da forte freddo e caldo (tempera-
tura dʼimpiego ammessa fra 0 e 40 °C).
GPer la pulizia usare solo un panno morbido, asciutto o leg-
germente inumidito; non impiegare in nessun caso prodotti
chimici o detergenti aggressivi.
GNel caso di uso improprio, di installazione sbagliata o so-
vraccarico non si assume nessuna responsabilità per even-
tuali danni consequenziali a cose o persone e non si as-
sume nessuna garanzia per lʼaltoparlante.
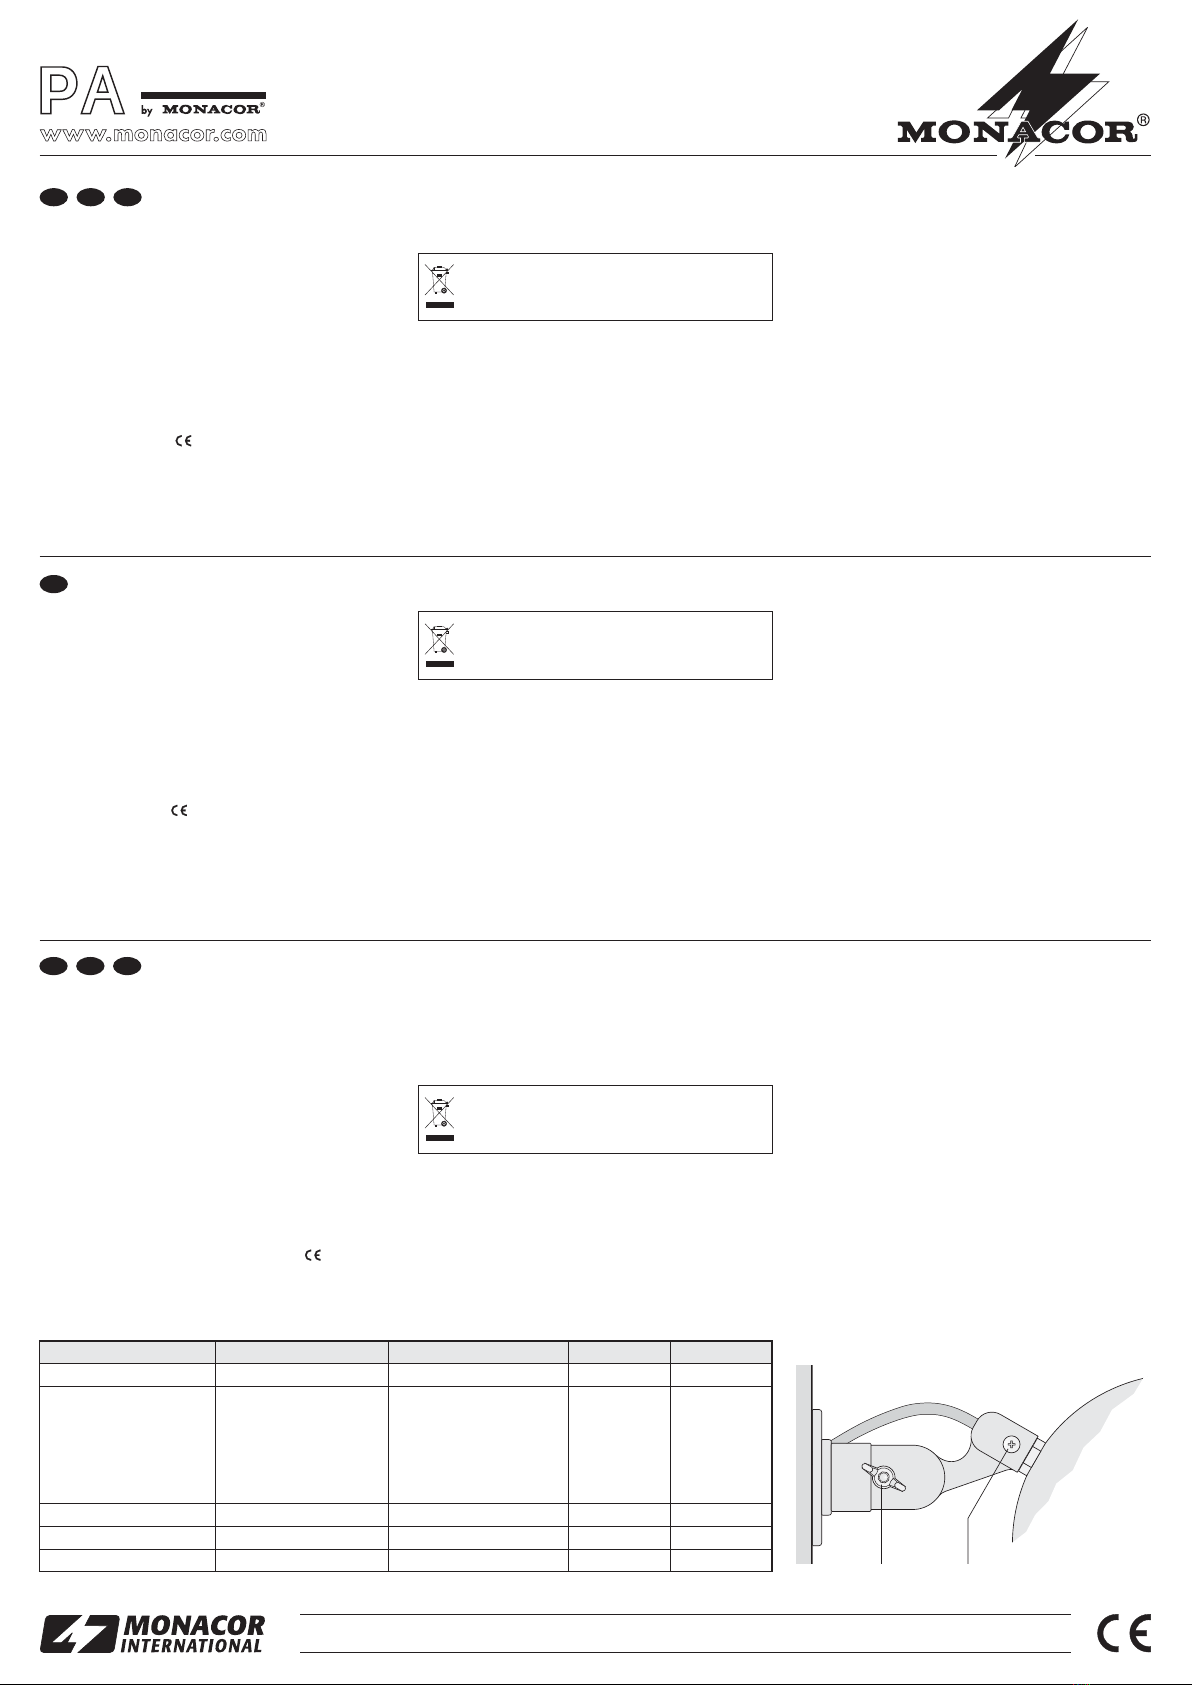
3 Montaggio
EDL-412B e EDL-420B:
1) Avvitare il supporto di montaggio alla parete o al soffitto.
2) Far passare il cavo attraverso il foro del supporto e avvitare
la bussola filettata dellʼaltoparlante nella filettatura del sup-
porto. Stringere bene la vite di sicurezza (2).
3) Per orientare lʼaltoparlante allentare il dado alettato (1). Gi-
rare lʼaltoparlante nella posizione desiderata e stringere di
nuovo il dado.
EDL-412 e EDL-420:
Appendere lʼaltoparlante al cavo con i mezzi di montaggio
usati generalmente per lampade.
Se si desidera eliminare lʼaltoparlante definitivamente,
consegnarlo per lo smaltimento ad unʼistituzione
locale per il riciclaggio.
4 Connessione elettrica
Avvertimento: Durante il funzionamento, ai contatti è
presente una tensione pericolosa fino a 100 V. Isolare
assolutamente i conduttori di connessione non usati.
Lʼinstallazione deve essere fatta da personale qualifi-
cato. Fare attenzione al corretto adattamento della
potenza. Lʼadattamento errato può provocare la distru-
zione dellʼamplificatore PA!
1) Se lʼimpianto PA è acceso, spegnerlo prima completa-
mente!
2) Collegare lʼaltoparlante: il conduttore nero (negativo) e il
conduttore arancione, grigio o bianco, a seconda della
potenza nominale desiderata, con lʼuscita 100 V dellʼampli-
ficatore (vedi tabella). In alternativa si possono collegare i
conduttori nero e marrone con lʼuscita a bassa impedenza
di un amplificatore.
Nel caso di collegamento di più altoparlanti fare attenzione alla
medesima polarità di tutti gli altoparlanti (conduttore nero = ne-
gativo) e di non sovraccaricare lʼamplificatore.
B
Altavoz de bola para megafonía
Lea atentamente estas instrucciones de funcionamiento antes
de la instalación y guárdelas para posteriores usos.
1 Usos
Este altavoz ha sido especialmente diseñado para usos en sis-
temas de megafonía. Está equipado con un transformador
para funcionar en sistemas de 100 V, sin embargo, también
puede ser conectado directamente a salidas de amplificador
de baja impedancia. La carga conectada se ajusta mediante
selección de los cables de conexión. Gracias a su recinto
resistente a la intemperie (IP 44) también está indicado para
instalación en exterior.
2 Notas de seguridad
Esta unidad responde a todas las Directivas requeridas por la
UE y por lo tanto está marcado con .
GProteja el altavoz de las temperaturas extremadamente altas
o bajas (zona de temperatura ambiente admisible 0 – 40°C).
GPara limpiar use sólo un paño suave seco o levemente hú-
medo; no use nunca productos químicos o detergentes a-
gresivos.
GNo se asumirá ninguna garantía para el altavoz ni se acep-
tará ninguna responsabilidad en caso de daños personales
o materiales si el altavoz es usado con fines distintos a
aquellos para los que fue concebido, si no es correctamente
instalado o si es sobrecargado.
3 Montaje
EDL-412B y EDL-420B:
1) Atornille el soporte de montaje a la pared o al techo.
2) Conduzca el cable a través del agujero en el soporte de
montaje y atornille el tornillo de rosca sobre el altavoz en la
rosca en el soporte. Apriete el tornillo de cierre (2).
3) Para ajustar el altavoz, suelte la tuerca de mariposa (1).
Coloque el altavoz como desee y vuelva a poner la tuerca
de mariposa.
EDL-412 y EDL-420:
Cuelgue el altavoz de su cable usando accesorios de montaje
habituales para lámparas.
Si el altavoz debe ser retirado del funcionamiento de-
finitivamente, llévelo a un centro de reciclaje local para
su eliminación no dañina para el medio ambiente.
Głośniki kulowe PA
Przed przystąpieniem do instalacji, prosimy zapoznać się z in-
strukcją obsługi, a następnie zachować ją do wglądu.
1 Zastosowanie
Głośnik kulowy przeznaczony jest do zastosowania w syste-
mach PA. Wyposażony jest w transformator 100 V, można go
również podłączyć bezpośrednio do wyjścia wzmacniacza o
małej impedancji. Wymagana moc głośnika może być w prosty
sposób wybrana poprzez przyłączenie linii głośnikowej do od-
powiedniej kombinacji przewodów zasilających. Obudowa od-
porna na działanie czynników atmosferycznych (IP 44) umożli-
wia montaż urządzenia na zewnątrz.
2 Bezpieczeństwo użytkowania
Ponieważ urządzenie spełnia wymogi norm obowiązujących w
Unii Europejskiej, zostało oznaczone symbolem .
GNależy chronić urządzenie przed działaniem bardzo wyso-
kich lub bardzo niskich temperatur (dopuszczalny zakres
temperatury otoczenia pracy 0 – 40 °C).
GDo czyszczenia urządzenia należy używać miękkiej tkaniny,
suchej lub nieco wilgotnej; nie wolno używać chemicznych
środków czyszczących ani detergentów.
GProducent ani dostawca nie ponoszą odpowiedzialności za
wynikłe szkody (uszkodzenie sprzętu lub obrażenia użyt-
kownika) jeśli urządzenie było używane niezgodnie z
przeznaczeniem, jeśli zostało nieodpowiednio zainstalo-
wane, lub jeśli było przeciążone.
3 Montaż
EDL-412B i EDL-420B:
1) Należy przykręcić uchwyt montażowy do ściany lub sufitu.
2) Należy przeciągnąć przewód przez otwór w uchwycie i przy-
kręcić tuleję gwintowaną głośnika do gwintu na uchwycie.
Następnie należy zamocować śrubę blokującą (2).
3) Aby ustawić głośnik w żądanym położeniu, należy poluzo-
wać nakrętkę motylkową (1). Następnie należy wybrać od-
powiednią pozycję głośnika i dokręcić nakrętkę blokującą.
EDL-412 i EDL-420:
Należy zawiesić głośnik na przewodzie, stosując akcesoria
montażowe używane do montażu lamp.
Jeśli urządzenie ma zostać ostatecznie wycofane z
użycia, należy przekazać je do punktu utylizacji odpa-
dów aby uniknąć zanieczyszczenia środowiska.
4 Podłączenie
Uwaga: W czasie pracy na przyłączu linii występuje
niebezpieczne napięcie osiągające do 100 V. Należy
zaizolować kable połączeniowe, które nie są używane.
Podłączenie urządzenia należy zlecić specjaliście.
Szczególną uwagę należy zwrócić na odpowiedni do-
bór mocy głośników do mocy wzmacniacza. Nieodpo-
wiedni dobór mocy głośników może spowodować
uszkodzenie wzmacniacza PA.
1) Jeśli zestaw PA jest włączony, przed rozpoczęciem podłą-
czania należy go wyłączyć!
2) Podłączanie głośnika: Należy połączyć czarną żyłę (biegun
ujemny) z żyłą pomarańczową, szarą lub białą, w zależno-
ści od żądanej mocy znamionowej głośnika, do wyjścia
100 V wzmacniacza (zob. tabela). Można też podłączyć
czarny rdzeń z żyłą brązową do wyjścia wzmacniacza o
małej impedancji.
Przy podłączaniu kilku głośników, należy się upewnić, czy
wszystkie głośniki mają odpowiednią biegunowość (czarny
rdzeń = biegun ujemny) i czy wzmacniacz nie został przecią-
żony.
B
EDL-412/WS
EDL-420/WS
EDL-412B/WS
EDL-420B/WS
Best.-Nr. 16.1860
Best.-Nr. 16.1880
Best.-Nr. 16.1870
Best.-Nr. 16.1890
12
EDL-412B
EDL-420B
Con riserva di modifiche tecniche. Sujeto al cambio. Z zastrzeżeniem do możliwych zmian.
E
PL
I
Dati tecnici Características técnicas Dane Techniczne EDL-412(B) EDL-420(B)
Gamma di frequenze Gama de frecuencias Pasmo przenoszenia 160 – 20 000 Hz 120 – 20 000 Hz
Potenza nominale / Impedenza
collegando i conduttori
nero – arancione (con 100 V)
nero – grigio (con 100 V)
nero – bianco (con 100 V)
nero – marrone
(non per uscite 100 V!)
Potencia nominal / Impedancia
cuando se conectan los conductores
negro – naranja (en 100 V)
negro – gris (en 100 V)
negro – blanco (en 100 V)
negro – marrón
(¡no para salidas de 100 V!)
Moc znamionowa/Opór
przy podłączaniu rdzeni
czarny – pomarańczowy (tryb 100 V)
czarny – szary (tryb 100 V)
czarny – biały (tryb 100 V)
czarny – brązowy
(nie przy wejściu 100 V!)
10 WRMS/1k
Ω
5WRMS/2k
Ω
2,5 WRMS/4k
Ω
10 WRMS/8
Ω
20 WRMS/500
Ω
10 WRMS/1k
Ω
5WRMS/2k
Ω
20 WRMS/8
Ω
Dimensioni Dimensiones Rozmiary ∅184 mm ∅265 mm
Peso Peso Waga 1,7 kg (1,9 kg) 2,2 kg (2,5 kg)
Pressione sonora media (1 W/1 m) Presión sonora media (1 W/1 m) SPL (1 W/1 m) 92 dB 94 dB
MONACOR INTERNATIONAL GmbH & Co. KG • Zum Falsch 36 • 28307 Bremen • Germany
Copyright©by MONACOR INTERNATIONAL. All rights reserved. A-0524.99.02.06.2011
®
4 Conexión eléctrica
Advertencia: Durante el funcionamiento, existe un
riesgo de contacto con un voltaje de más de 100 V en
las conexiones. Aísle siempre los cables de conexión
que no se utilizan.
La instalación sólo debe llevarla a cabo personal espe-
cializado.
Fíjese en el emparejamiento correcto de la potencia
¡Un emparejamiento incorrecto puede dañar el amplifi-
cador de megafonía!
1) ¡Si se conecta el sistema de megafonía, apáguelo comple-
tamente antes de conectarlo!
2) Conecte el altavoz: Conecte el conductor negro (polo
negativo) y el naranja, gris, o blanco correspondiendo a
la valoración de potencia deseada por el altavoz a salida
de 100 V del amplificador (vea tabla). Alternativamente,
conecte el conductor negro y el conductor marrón a una
salida de amplificador de baja impedancia.
Cuando conecte varios altavoces, asegúrese de que todos los
amplificadores tienen la misma polaridad (conductor negro =
polo negativo) y que el amplificador no es sobrecargado.
B

This manual suits for next models

7

Other Monacor Speakers System manuals

Monacor EUL-2/SW User manual

Monacor

Monacor EUL-2/SW User manual

Monacor ESP-200/WS User manual

Monacor

Monacor ESP-200/WS User manual

Monacor EDL-10TW User manual

Monacor

Monacor EDL-10TW User manual

Monacor EDL-255/WS User manual

Monacor

Monacor EDL-255/WS User manual

Monacor ETS-340TW/BN User manual

Monacor

Monacor ETS-340TW/BN User manual

Monacor TXA-624CD/SW User manual

Monacor

Monacor TXA-624CD/SW User manual

Monacor ESP-315/SW User manual

Monacor

Monacor ESP-315/SW User manual

Monacor img Stage Line MEGA-110 User manual

Monacor

Monacor img Stage Line MEGA-110 User manual

Monacor TXA-400 User manual

Monacor

Monacor TXA-400 User manual

Monacor EDL-300L User manual

Monacor

Monacor EDL-300L User manual

Monacor ESP-15/WS User manual

Monacor

Monacor ESP-15/WS User manual

Monacor EUL-26/WS User manual

Monacor

Monacor EUL-26/WS User manual

Monacor ESP-415-WS User manual

Monacor

Monacor ESP-415-WS User manual

Monacor ESP-76AB/ WS User manual

Monacor

Monacor ESP-76AB/ WS User manual

Monacor EDL-435/WS User manual

Monacor

Monacor EDL-435/WS User manual

Monacor ESP-303/SW User manual

Monacor

Monacor ESP-303/SW User manual

Monacor EDL-170-AL User manual

Monacor

Monacor EDL-170-AL User manual

Monacor EAM-17DT User manual

Monacor

Monacor EAM-17DT User manual

Monacor ETS-410TW/WS User manual

Monacor

Monacor ETS-410TW/WS User manual

Monacor EDL-222/ WS User manual

Monacor

Monacor EDL-222/ WS User manual

Monacor RL-1EN User manual

Monacor

Monacor RL-1EN User manual

Monacor EDL-22/WS User manual

Monacor

Monacor EDL-22/WS User manual

Monacor TXA-622CD/SW User manual

Monacor

Monacor TXA-622CD/SW User manual

Monacor ETS-515TW/SW User manual

Monacor

Monacor ETS-515TW/SW User manual

Popular Speakers System manuals by other brands

Pioneer PDP-S22-LR Service manual

Pioneer

Pioneer PDP-S22-LR Service manual

KYE Systems Corp. Genius SW-S2.1 200 Service guide

KYE Systems Corp.

KYE Systems Corp. Genius SW-S2.1 200 Service guide

JBL SIMPLY CINEMA SCS110 Setup guide

JBL

JBL SIMPLY CINEMA SCS110 Setup guide

Philips MX900/22 Instructions for use

Philips

Philips MX900/22 Instructions for use

JBL Two-Piece Speaker System Technical specifications

JBL

JBL Two-Piece Speaker System Technical specifications

Devialet Phantom quick start

Devialet

Devialet Phantom quick start

Kenwood KS-8200EX instruction manual

Kenwood

Kenwood KS-8200EX instruction manual

Philips Fidelio HTL9100 user manual

Philips

Philips Fidelio HTL9100 user manual

Sony Bravia Theatre Sync RHT-G800 Service manual

Sony

Sony Bravia Theatre Sync RHT-G800 Service manual

Teufel Cinebar Ultima Technical description and user manual

Teufel

Teufel Cinebar Ultima Technical description and user manual

Creative SBS E2900 quick start guide

Creative

Creative SBS E2900 quick start guide

LG S65Q Simple manual

LG

LG S65Q Simple manual

Bowers & Wilkins 600 Series 3 manual

Bowers & Wilkins

Bowers & Wilkins 600 Series 3 manual

Yamaha YSP-5600 Quick reference guide

Yamaha

Yamaha YSP-5600 Quick reference guide

Creative Inspire GD580 user guide

Creative

Creative Inspire GD580 user guide

Starke sound SR7 owner's manual

Starke sound

Starke sound SR7 owner's manual

Samsung HW-J6500 user manual

Samsung

Samsung HW-J6500 user manual

Philips HTL3160B/79 user manual

Philips

Philips HTL3160B/79 user manual

manuals.online logo
manuals.online logoBrands
  • About & Mission
  • Contact us
  • Privacy Policy
  • Terms and Conditions

Copyright 2025 Manuals.Online. All Rights Reserved.