Monarch Water WELLBEING CAPRICORN User manual


IMPORTANT
READ BEFORE COMMENCING INSTALLATION
/ UNIT SPECIFICATIONS
Voltage and Frequency: 11 0V-240V 50Hz/60Hz
Wattage: 25W-36W
RO Element Capacity: 50/75/100/125/150GPD
Tank Capacity : 3.2G Steel or 3.0G Plastic
Inlet TDS: ≤ 250ppm
Chlorine Level: ≤ 0.2ppm
Average RO Rejection Rate: 98%
Inlet Water Pressure (min/Max): 14.5 - 43.5 psi
Inlet
Water Temperature (min/Max): 5 ° C - 45 ° C
Flush Type (model dependent): Auto or Manual
/ CONTENTS OF PACKAGE
Reverse Osmosis Unit - 1 pc
Housing Wrench - 2 pcs
Food Grade Tubing - 4 pcs (Red, White, Yellow, Blue)
Faucet - 1 pc
Accessories- Drain Clamp, Tee Fitting,
Ball Valve, Feed Water Valve RO Membrane -1 pcs
Manual -1 pcs
/ RECOMMENDED TOOLS NEEDED FOR
INSTALLATION
Knife
Electric drill
Hammer
ALL CAPRICORN UNITS MUST BE INSTALLED BY A COMPETENT PERSON.
/ BEFORE YOU START
• Read through all instructions before beginning installation and using this system. Follow all steps
exactly or risk damaging system/incorrect operation.
• This system contains filters that need to be replaced at certain intervals. Replacement intervals
will vary according to use, please contact your local dealer for details.
• Please install system on potable water only. On non-potable water sources, system will not
function properly and additional pre-treatment may be needed.
• Ensure source water pressure is between 14.5 - 43.5 psi. If source water pressure exceeds
maximum pressure a pressure reduction valve may be needed, consult your local dealer.
• Ensure source water temperature is between 5°C - 45°C. System will not function properly if
these temperatures are exceeded. DO NOT INSTALL ON HOT WATER SOURCE.
• Do not use system on noticeably contaminated water such raw sewage or well water.
• This unit operates on 110V-240V power. Please ensure you are using the correct power source.
/ WARNING
• Do not disassemble, open, or modify this unit. Tampering with the unit may cause failure or
damage and will void warranty.
• Do not cover the unit, as this will prevent proper heat dissipation and can cause damage or fire.
• Do not place objects on top of the unit as this may cause damage to the unit and may cause
leaking.
• Follow all recommended operating pressures and temperature, failure to do so will cause damage
to the unit and void warranty.
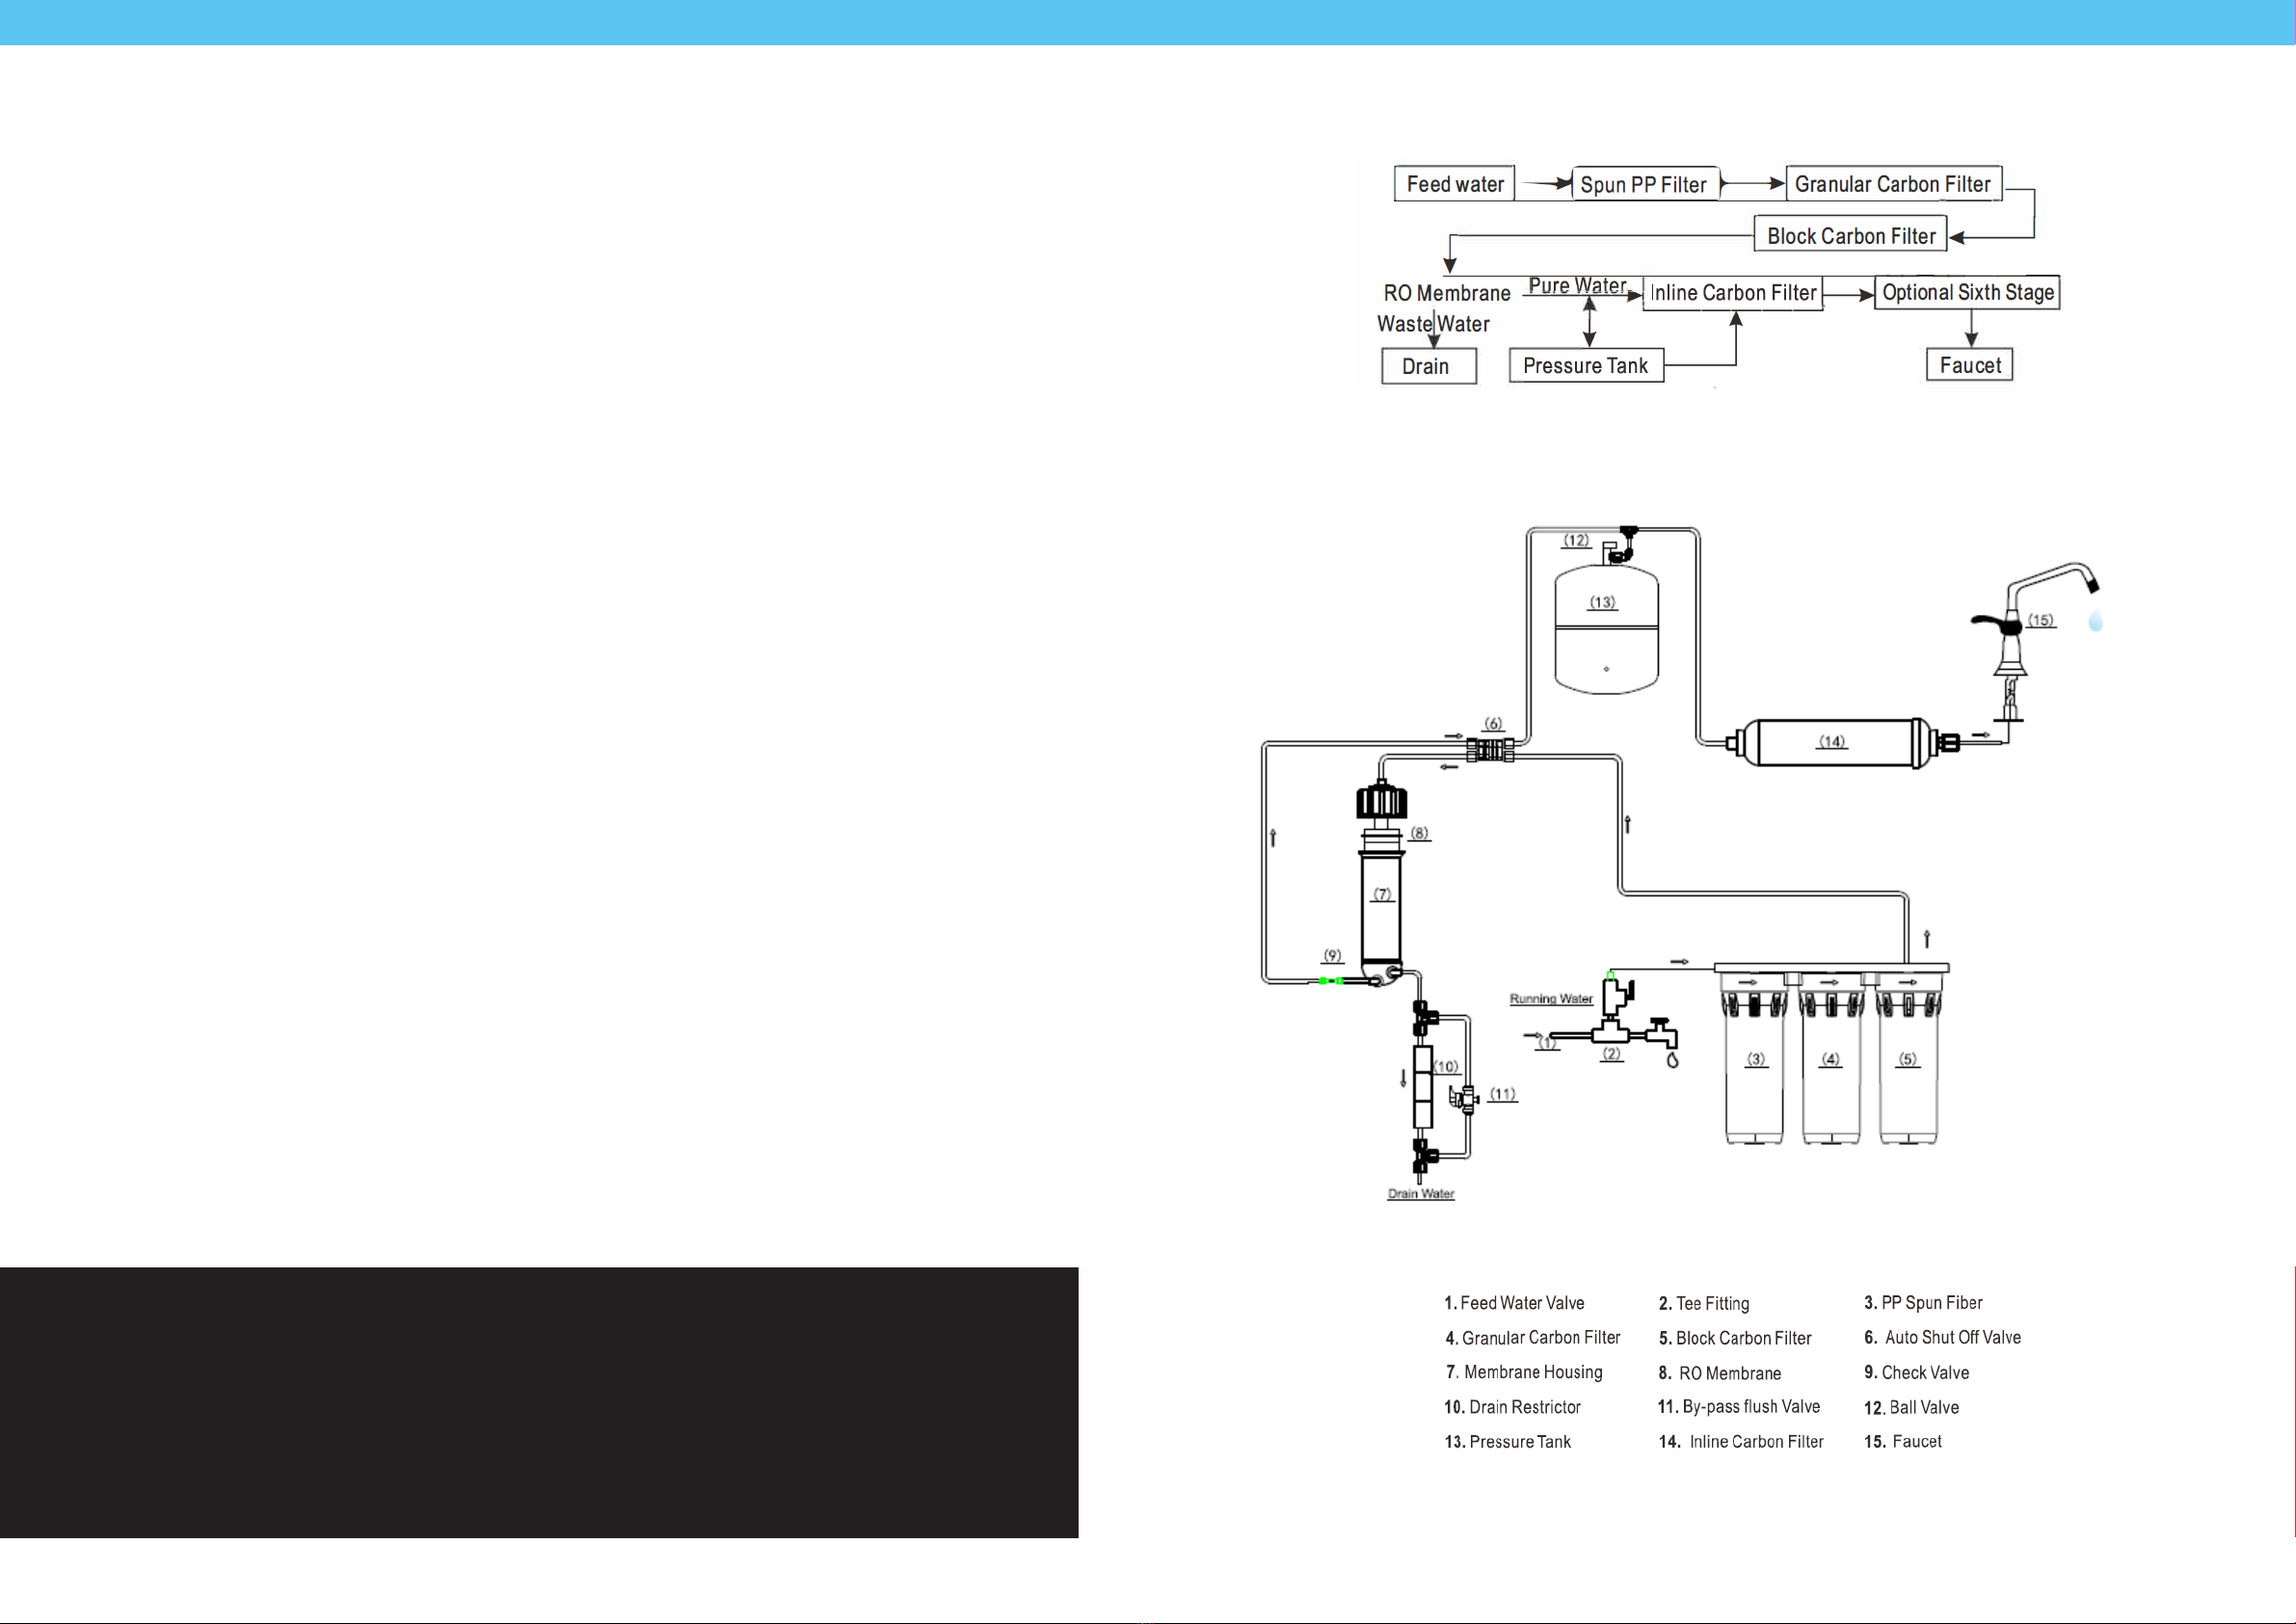
/ 5 STAGE FILTRATION
The stages and their functions are outlined below
• First Stage / Spun PP Filter -removes larger particles suspended in water.
• Second Stage / Granular Carbon Filter - removes organics, chlorine, odour, and turbidity.
• Third Stage / Block Carbon Filter - further removes any organics, chlorine, odour and turbidity.
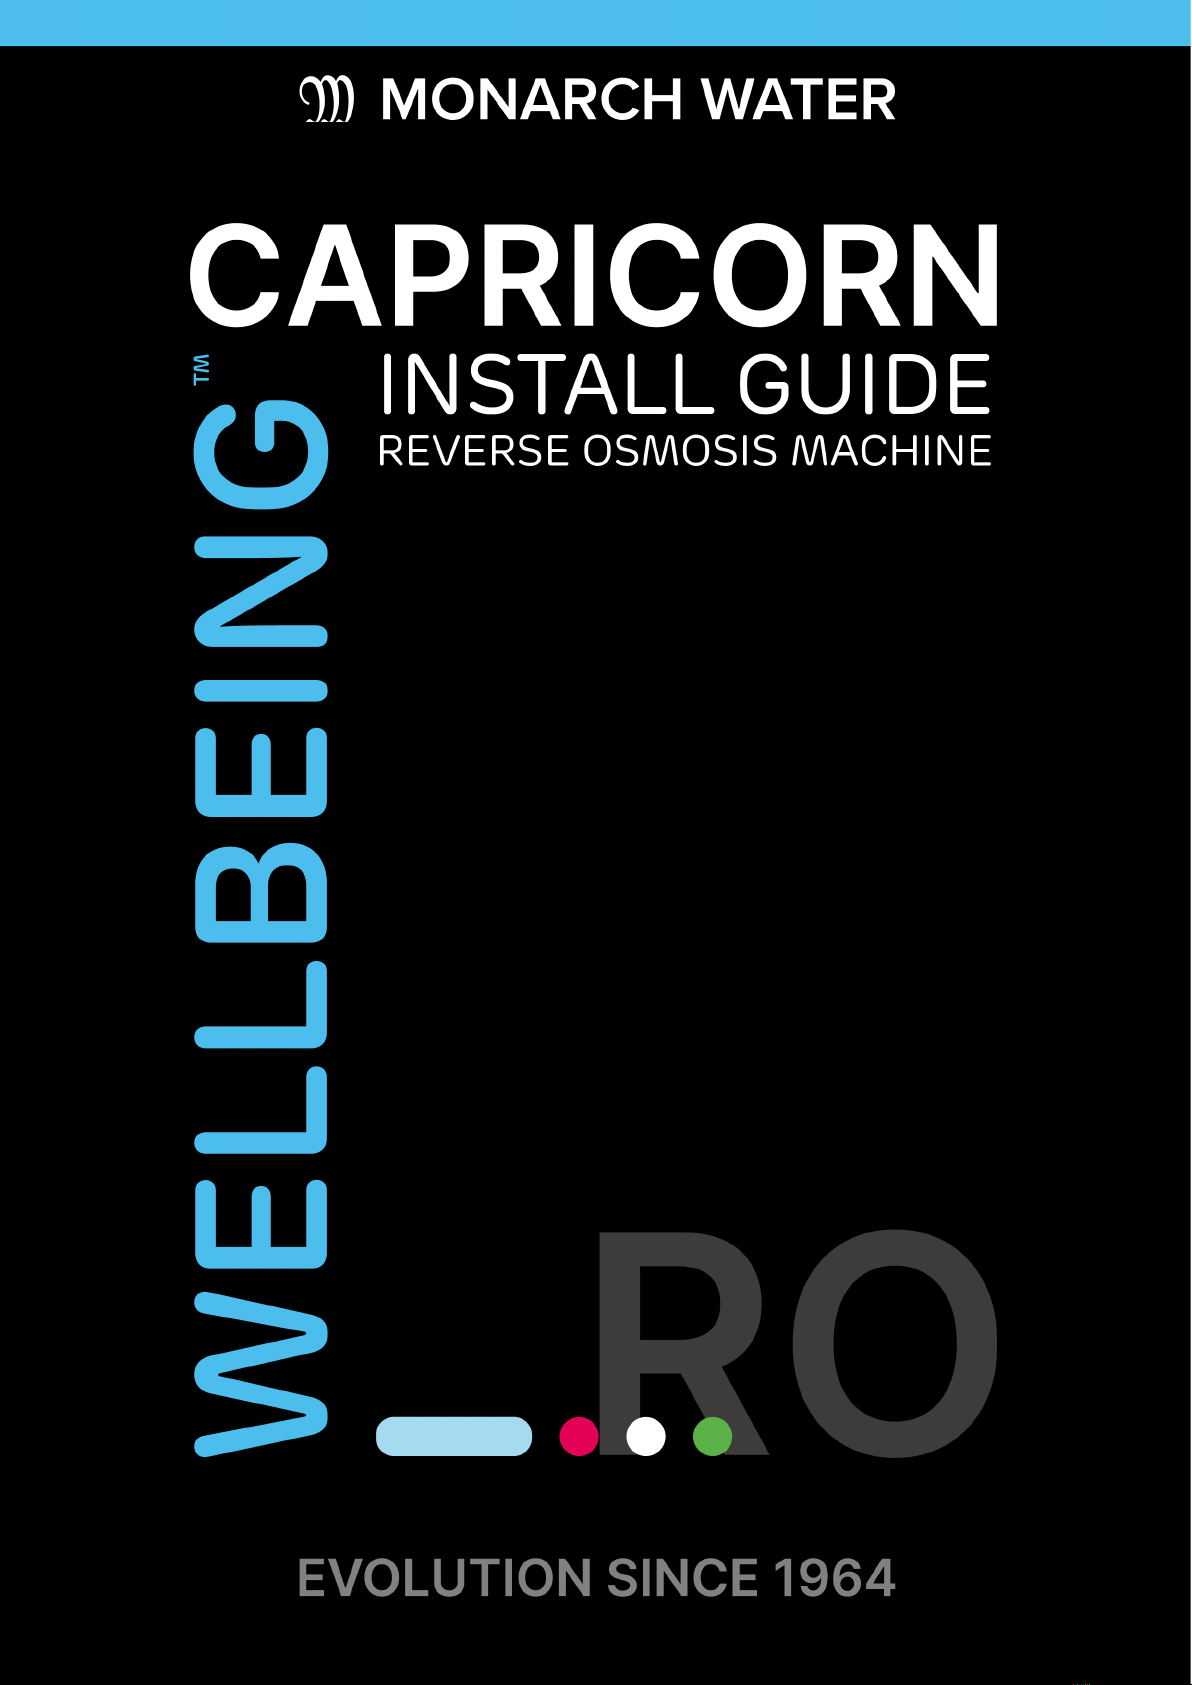
• Fourth Stage / RO Membrane -removes bacteria, heavy metals, dissolved matter, and salinity.
• Fifth Stage / lnline Carbon Filter (post filter) -adjusts the taste of treated water.
Seal tape
Monkey wrench
Scissors
/ HOW YOUR SYSTEM WORKS
2 3monarchwater.co.uk monarchwater.co.uk

/ UNIT PLACEMENT
The unit can be placed flat or upright and on top, inside, or under the cabinet. Feed Water connection
should be as close as possible to unit. However, if due to space or other limitations, this unit can be
placed where it is convenient.
When choosing a location for the unit, remember to have easy access to cold water line, drain pipe,
power outlet, and enough room to change filters. All components and tubing should be located in an
area not exposed to freezing temperatures or direct sunlight.
NOTE: All components and tubing should be located in an area not exposed to freezing temperatures
or direct sunlight.
/ DRAIN CLAMP INTRODUCTION
A Drain Clamp is used to make a wastewater connection with the drain under the sink, and is designed
to fit around a standard
40mm OD drainpipe. The drain saddle valve should always be installed before (above) the p-trap and
on a vertical or horizontal drain. To avoid clooing the drain line with drbris, do not install the drain sad-
dle near a garbage disposal.
/ DRAIN CLAMP INSTALLATION
Position drain clamp on drain pipe above the drain trap and tighten securely.
Using the drain clamp as a guide, drill a 6mm hole, enough for the 1/4” tubing to pass, through one
side of the drain pipe. DO NOT drill through both sides.
Connect Red Waste Water Tubing from unit to Drain Clamp.
/ NOTE
When cutting the tubing make clean, square, cuts, failing to do so result in poor connection and
possible leaks.
/ WARNING
The lowest point of the line should be the point of connection to the Drain Clamp. There should be no
sag in the line as this may cause excessive noise as the reject water is flowing to drain.
/ FEED WATER VALVE AND TEE FITTING
• Install Tee Fitting Valve shown below to your 15mm cold water pipe.
• Attach the grey plastic adapter to the male thread on the tee fitting.
• Apply sealant to olive as shown in right hand picture below.
• Ensure the compression fittings and the grey fitting are secured tight to seal
• Connect White Feed Water Tubing from unit to Feed Water Valve.
/ WARNING
Ensure chrome nut compression and grey plastic adapter are tight to seal.
/ NOTE
Use only a cold potable water supply as Feed Water, hot water will damage your unit. Softened
Feed Water will extend the life of the RO Membrane.
/ DRAIN CLAMP ASSEMBLY
4 5monarchwater.co.uk monarchwater.co.uk

/ FAUCET INSTALLATION
/ WHERE TO PLACE YOUR FAUCET
The faucet should be placed in a convenient area near the sink
tap. There should be a reasonable amount of space above and
below the faucet mounting position to allow to connections to
the RO unit.
There should be a 2” diameter area for the faucet to be
mounted.
The thickness of mounting surface should not exceed 32mm.
Select a convenient location near your sink to place the faucet.
Drill a hole 12mm in diameter into the counter top.
Place washers, plates, seals and nuts in order as per diagram
and tighten on the countertop. Screw the grey plastic adapter
on the bottom of the faucet.
Attach the Blue Pure Water tubing to the grey plastic adapter
on the bottom of faucet and connect tubing to unit.
/ PRESSURE TANK
Keep pressure tank within 10 feet of faucet.
If longer length of tubing is needed, use 3/8” tubing only to prevent
pressure drop. Tank can weigh up to 30lbs when full, find firm and level
flooring.
Install Ball Valve by screwing Valve on to Tank and apply Teflon tape to
prevent leaking.
Connect Yellow tubing from post filter to Pressure Tank.
/ INSTALL PRE-FILTERS
- Remove Pre-Filters from packaging.
- Place filters in appropriate housings according to labels and install filter housing from right to
left in the following order: PP, GAC, CTO.
- Tightening housings with wrench provided.
/ NOTE
RO membrane is not to be installed until after pre-filter flush has been complete.
/ NOTE
When installing housings make sure housing is level and even to avid leaking.
/ OPERATION AND MAINTENANCE
Pre-filter Flushing (initial setup, before installing RO Element)
Prepare system for operation by flushing pre-filters:
• Disconnect RO element inlet tube on element housing cap. Open water main and inlet valve and
allow system to run through the 3 pre-filters.
• Discard output water into container or drain.
• Continue flushing until output water is visibly clean. Reconnect tube.
Note: Pump and membrane may be severely damaged if system is run without flushing pre-filters.
Discard all water from flush, it is not suitable for use or consumption.
• After flushing pre-filters connect and open all valves.
• Wait approximately 2 minutes before opening faucet.
• Allow system to flush for first 10-15 minutes with faucet open. Do not use water from RO unit at
this time.
/ TANK INSTALLATION
• Hand tighten plastic.
• Shut-off valve to tank.
6 7monarchwater.co.uk monarchwater.co.uk

/ RO MEMBRANE INSTALLATION
/ NOTE
Before proceeding with membrane element installation, please flush pre-filters thoroughly. (See previ-
ous step)
• Remove RO housing cap using wrench.
• Remove RO element from packaging.
• Insert RO element into housing with the small double O rings facing inward.
• Install membrane housing cap and tighten with wrench provided.
/ FLUSHING THE PRESSURE TANK
• After flushing the Pre-Filters, allow the unit to operate and fill the Pressure Tank.
• Tank will take approximately 3.5 hours to fill. Once tank is full, discharge Pressure Tank by leaving
faucet open.
• Once Tank is completely empty, close faucet and allow tank to fill again.
After the Pressure Tank has been flushed, the unit is ready for use.
/ FILTER MAINTENANCE
To ensure the unit operates at its optimum level, routine maintenance is required. The frequency of
maintenance depends on the feed water quality and amount if system usage. The follow are some
guidelines for scheduled filter changes, keep in mind the frequency of filter changes may vary. If in
doubt, contact your local dealer or service
technician.
• Change all cartridges every 6 months.
• Change membrane as requested.
If you will be away or not using the unit for an extended period of time, please disconnect unit from
power supply. If the unit has been shut down and not used for an extended period of time, perform the
same flushing procedure as in the initial set up.
/ FILTER REPLACEMENT
• Close Feed Water Valve.
• Close Tank Ball Valve on Pressure Tank.
• Open Faucet and drain any remaining water from system.
• Disconnect quick connect filters.
• Replace filters, reconnect, and open valves.
• Perform pre-filter flush after filters have been changed
/ NOTE
Diagrams on how to connect using quick connect fittings
can be found in the installation section.
/ MEMBRANE REPLACEMENT
Close Feed Water Valve.
Close Tank Ball Valve on Pressure Tank.
• Open Faucet and drain any remaining water from system.
• Open membrane housing and remove used membrane.
• Follow the same procedure as RO membrane installation to replace RO membrane.
8 9monarchwater.co.uk monarchwater.co.uk

/ SAFETY INSTRUCTIONS
This appliance is intended to operate and function as per the instructions in this manual. It is not
designed to operate outside of the specifications listed and any attempt to do so or tamper with the
unit can cause damage to the unit and/or bodily harm. This unit is not a toy, keep out of reach from
small children. If the unit requires service or repair, please contact your local service technician or
sales representative.
• Please ensure feed water temperature is over 4 °C. Using water below 4 °C can cause ice to form
and damage the unit.
• Please ensure power source is correct before connecting unit. Incorrect voltage could result in
damage to unit and/or fire hazard.
• Do not cause damage to or use unit if the power cord is damaged. A damaged power cord could
cause an electrical shock or fire hazard. If power cord is damaged, unplug and discontinue use
immediately.
/ TROUBLESHOOTING / DISCLAIMER
In case of special circumstances during installation, you need to use accessories not included in the
packing list of this product. Consumers are asked to purchase quality-guaranteed accessories through
regular channels.
Monarch Water is not responsible for the quality of non-original accessories because of the quality
problems of the accessories purchased by consumers. Monarch Water assumes no responsibility for
any water leakage accident.
/ REGULAR MAINTENANCE
Please ensure you change your filters when recommend. Failure to change your filters regularly may
invalidate your warranty. Regularly check the TDS level of your output water.
Ensure that you change your Reverse Osmosis Membrane when recommend or when the TDS level
starts to rise.
For best performance, supply unit with softened water, as this will achieve maximum life expectancy
of the membrane.
10 11monarchwater.co.uk monarchwater.co.uk

TO ORDER SPARE PARTS
Please contact your dealer for more information.
+ 44 (0) 1986 784759
monarchwater.co.uk
info@monarchwater.co.uk
Table of contents
Other Monarch Water Water Filtration System manuals

Monarch Water
Monarch Water WELLBEING GEMINI User manual

Monarch Water
Monarch Water SCALEOUT ADVANCE SA-15 User manual

Monarch Water
Monarch Water PRORO 120 User manual

Monarch Water
Monarch Water MA12CH User manual

Monarch Water
Monarch Water MAGNESIO MG-1 User manual

Monarch Water
Monarch Water PRISM COFFEE 10 User manual
Popular Water Filtration System manuals by other brands

Philips
Philips AWP1775WH user manual

Judo
Judo PROFIMAT-PLUS JPF+-AT 3/4" Installation and operating instructions

guzzle H2O
guzzle H2O Stream user manual

Filtration Group
Filtration Group Pi 370 TRANSLATION OF ORIGINAL INSTRUCTIONS

Hayward
Hayward AquaRite + owner's manual

Pentair
Pentair GS-210RO-MF Installation and operating instructions