Morgan MFS-29 NUTRISTEAM BK User manual
USER MANUAL
F d
Steamer
MFS-29 NUTRISTEAM
(BK)/(WH)
E-mail: electrical.appliance@dksh.com
www.morgan.my
Market Expansion
Services by
www.dksh.com.my
facebook.com/morganappliances
3
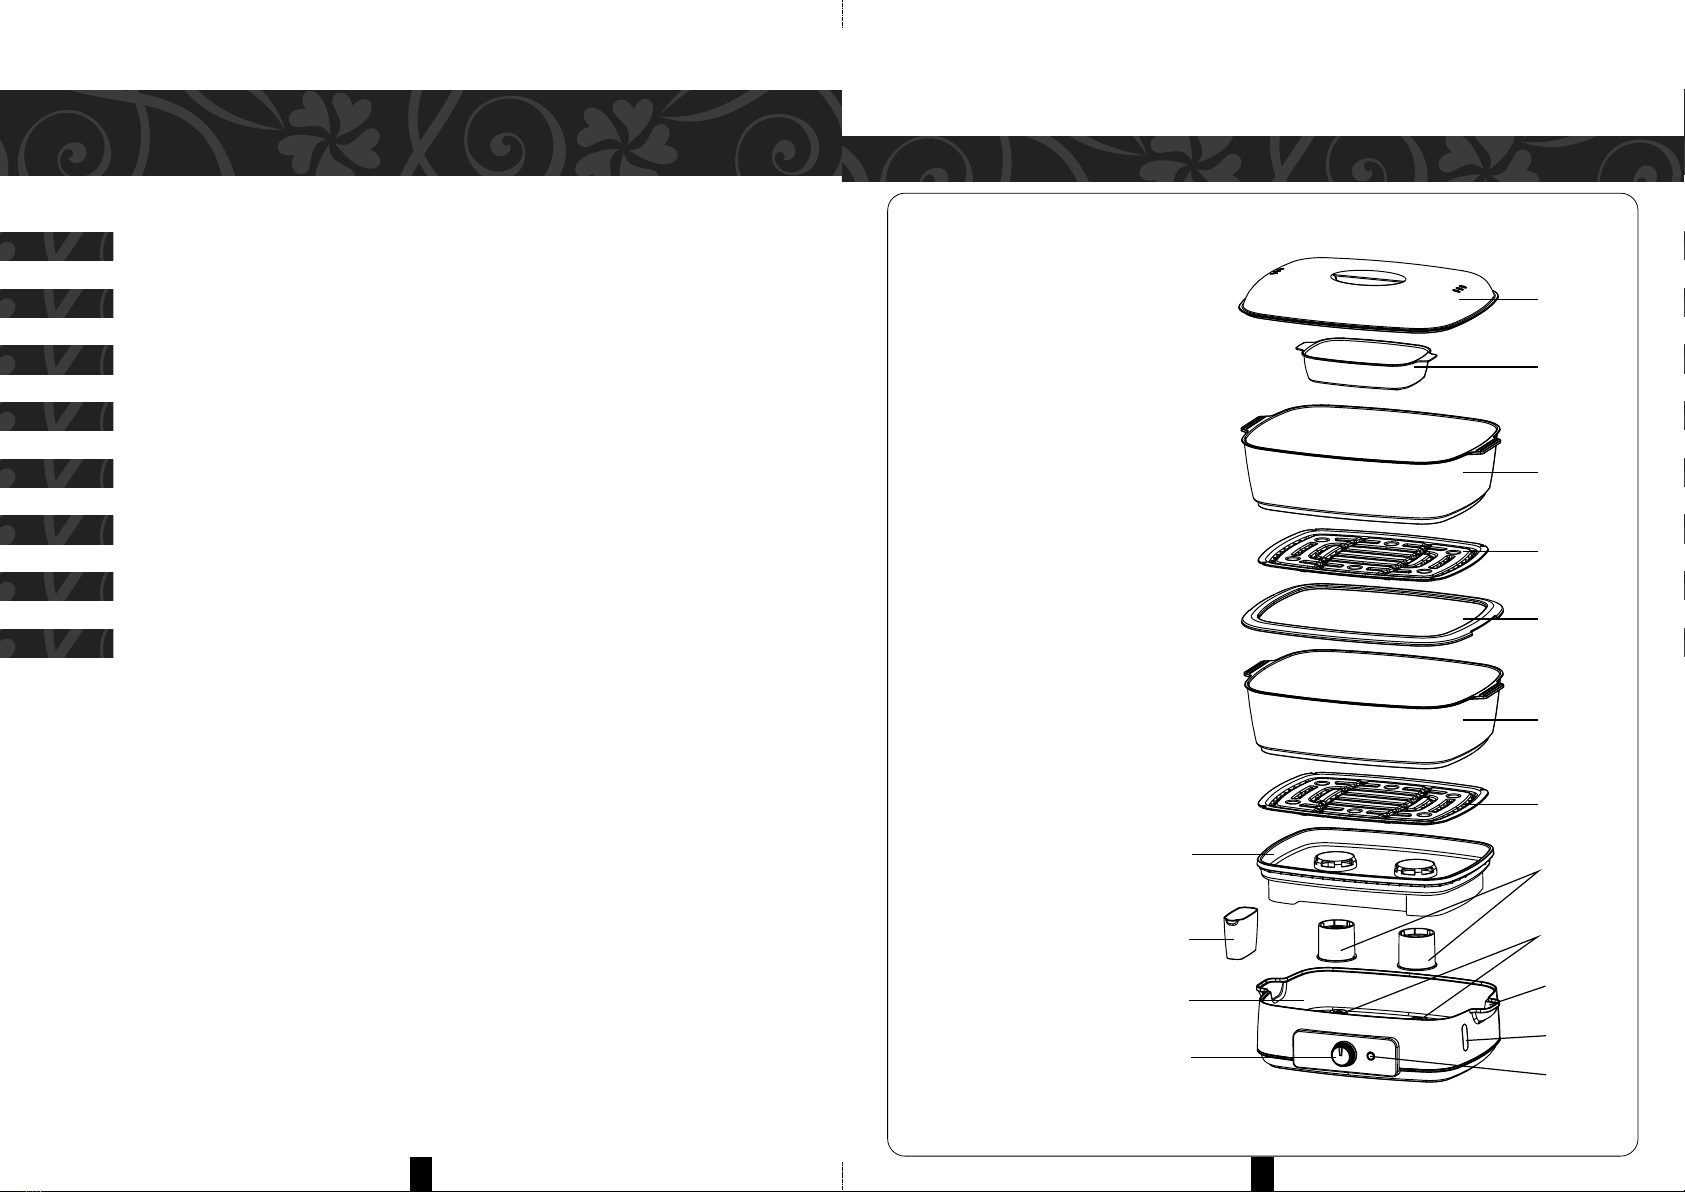
PARTS IDENTIFICATION
1
2
4
3
3
6
7
9
10
14
13
12
11
5
5
8
1. Lid
2. ice Steaming Container
3. Steam Tray Bottom
4. Steam Tray Holder
5. 12L Steam Tray (106mm Height)
6. Frame ing
7. Heating Element
8. Exterior Water efill Funnel
9. Water Level Indicator
10. Power Indicator Light
11. Timer Control Knob
12. Water Tank
13. Water Cup
14. Drip tray
Thank you for purchasing a quality MORGAN appliance. We trust that you will have a
pleasant experience with your new product. To guarantee safety and best efficiency,
please read this manual carefully and keep a copy for future reference.
2
C O N T E N T S
3
4
5
6
6
7
7
7
PA TS IDENTIFICATION
IMPO TANT SAFEGUA DS
OPE ATING INST UCTIONS
SPECIFICATIONS
D Y P OTECTION
CA E & CLEANING
DESCALING
STO ING THE STEAM T AY

4
IMPORTANT SAFEGUARDS
5
When using electric appliances, basic safety precautions should always be
followed including the following:
1. ead all instructions carefully and retain them for future reference.
2. Before connecting to the power supply, ensure that the voltage of the appliance
corresponds to the voltage indicated on the power supply rating label at the bottom of
the appliance.
3. Always disconnect appliance from the power supply when not in use or before cleaning.
4. Always attach the power cord to the appliance BEFO E connecting it to the power
supply. To disconnect, switch off appliance first before detaching the power plug from
the power supply.
5 Close supervision is necessary when any appliance is used by or near children.
6. To protect against electric shock, do not immerse appliance or power cord, power plug,
and electrical parts of the steamer in water or other liquids.
7. Do not allow power cord to hang over edge of table or counter or touch hot surfaces.
8. Do not operate appliance with damaged power cord or power plug or after the
appliance malfunctions or has been damaged in any manner. In such a situation, it is
recommended to return the appliance to your nearest Authorized Service Center for
examination, repair, or adjustment.
9. The use of accessory attachments not recommended by the appliance manufacturer
may cause hazard or injury.
10. Always operate appliance on a flat, stable and sturdy surface.
11. When moving the appliance, always be aware not to touch hot surfaces to avoid the
possible spillage of hot liquids it may contain.
12. Do not place on or near a hot gas, electric burner, or heated oven.
13. This appliance is for HOUSEHOLD USE ONLY. Do not use outdoors.
14. Do not use appliance for other than its intended use.
15. This appliance is not intended for use by persons (including children) with reduced
physical, sensory or mental capabilities or lack of experience and knowledge, unless
they have been given supervision or instruction concerning use of the appliance by a
person responsible for their safety.
16. Children should be supervised to ensure that they do not play with the appliance.
SAFETY PRECAUTIONS FOR FOOD STEAMER
1. When operating the appliance, ensure the water level in the water tank is between the
MIN and MAX level.
2. Do not add any salt, pepper, flavoring, essence, wine or any other liquids EXCEPT
water into the water tank.
OPERATING INSTRUCTIONS
Frame ring
Heating element
A
B
BEFORE FIRST USE
l Wash all removable parts and the interior of the water tank.
FITTING THE FRAME RING
l Place the frame ring as indicated in B below. The correct way to place the frame ring into
the water tank is as B. The incorrect way is as A below.
FILLING THE WATER TANK
l Pour water directly into water tank. ensure the water level in the water tank is between
the MIN and MAX level.
POSITIONING THE DRIP TRAY
l Place the drip tray on the water tank. Next, place the 12L steam tray on top of the drip
tray followed by the detachable steam tray bottom.
l Place the lid on.
l The steam tray may be placed in any manner as desired.
l Place food into the steam tray.
3. To detach the appliance from the power supply, always hold on the power plug and
detach. Never pull the power cord.
4. Ensure that the base of the food steamer is not immersed in water.
5. Ensure the air vents around the air vents are not obstructed in any manner.
CAUTION: Hot steam may escape from air vents during operation. Keep hands away.
6. Do not place the appliance close to wall, furniture or other electrical appliances as steam
and heat generated during operation may damage these items after prolonged use.
7. Always allow appliance to cool to room temperature before cleaning.
8. NEVER TOUCH the appliance during operation. Always use oven mitts or gloves to
remove lid, rice bowl and steam baskets.
9. NEVER OPERATE the appliance without water in the water tank.

76
OPERATING INSTRUCTIONS
1. Detach the power plug from the power supply and let the appliance to cool down
completely before cleaning.
2. Empty water inside the water tank and clean with a damp cloth.
3. All other removable parts can be washed in warm sudsy water or cleaned in the
dishwasher.
4. Clean the frame ring after every use.
5. Clean the exterior body using a moist cloth.
6. NOTE: some natural coloured juices from food such as carrots or beetroot may stain the
drip tray and water tank. This is normal and will not affect performance. To prevent
staining, wash these two parts IMMEDIATELY after every use. Apply a little mild bleach
if necessary and rinse thoroughly.
7. Never use scouring pads, abrasive cleaning agents or aggressive liquids such as petrol
or acetone to clean the appliance.
8. Never immerse the appliance in water, nor rinse it under the tap.
STEAM RICE
l Put washed rice and add water as desired into the rice bowl.
l Place the rice bowl into the steam tray and cover with the lid.
l Set the recommended cooking time for steaming rice.
STEAM COOKING
l Set timer for the recommended cooking times.
l The indicator light will illuminate to indicate that cooking has begun.
l Inspect water level during cooking.
l Add water, if required via the exterior water refill funnel.
l When cooking completes, the appliance will power off automatically.
l Timer will sound and the indicator light will turn off.
l To terminate operation ahead of time, turn the timer to “0” position.
l emove food from steam tray. Exercise caution when opening the lid as escaping steam
is hot.
l Disconnect power from the power supply.
l Allow appliance to cool down completely before cleaning.
SPECIFICATIONS
DRY PROTECTION
This appliance features a dry protection function with a built-in thermostat to protect dry
boiling. In the event of water drying up – do not operate the appliance when water is below
the minimum level to avoid discoloration.
The pilot lamp will power on and off repeatedly when water is below the minimum level. It
is strongly recommended to add in water to continue operation and to avoid damaging the
appliance.
1. After using for about 2-3 months, some chemical deposits may build up in the water tank,
or on the heating element. This is normal. The amount of deposits depends on the
hardness of water in your area.
2. It is important to descale the reservoir for the purpose of prolonging its life cycle.
3. Fill the water tank up to the “MAX” level.
4. Add a teaspoon of citric acid or 6 – 10 slices of lemon and operate the appliance for
about 30 minutes.
5. Do not use any other chemical or detergent.
6. When boiling is complete, unplug from the power supply and allow the unit to cool down
before pouring the mixture out of the water tank.
7. inse the reservoir several times with cold water. Clean other parts and allow to dry
before storing.
8. egular descaling should be performed once every 6 months.
MODEL NO. MFS-29 NUTRISTEAM (BK)/(WH)
RATED VOLTAGE 220-240V~
FREQUENCY 50/60HZ
RATED WATTAGE 1600W
CA ACITY 28L
CARE & CLEANING
DESCALING
1. Place the rice bowl upside down in the drip tray.
2. Avoid stacking two baskets together as they may stick to one and another.
3. Turn all parts over on the base unit.
4. Cover the parts with the lids.
STORING THE STEAM TRAY
This manual suits for next models
1
Other Morgan Electric Steamer manuals


