Motomaster 299-6962-4 User manual
headline bars
tabs
continuation tabs
notes
warnings
headline bars
tabs
continuation tabs
notes
warnings
model no. 299-6962-4
IMPORTANT:
Please read this manual carefully before using this product and save it
for reference.
INSTRUCTION
MANUAL
TIRE DOLLY

headline bars
tabs
continuation tabs
notes
warnings
headline bars
tabs
continuation tabs
notes
warnings
model no. 299-6962-4 | contact us 1-888-942-6686
2
IF ANY PARTS ARE MISSING OR DAMAGED, OR IF YOU HAVE ANY QUESTIONS, PLEASE
CALL OUR TOLL-FREE HELPLINE AT 1-888-942-6686.
Read and understand this instruction manual thoroughly before using the product. It contains
important information for your safety as well as operating and maintenance advice.
Keep this instruction manual for future use. Should this product be passed on to a third party,
this instruction manual must be included.
This MotoMaster product carries a one (1) year warranty against defects in workmanship and materials. At
its discretion, MotoMaster Canada agrees to have any defective part(s) repaired or replaced free of charge,
within the stated warranty period, when returned by the original purchaser with proof of purchase. This
product is not guaranteed against wear or breakage due to misuse and/or abuse.
WARRANTY INFORMATION

headline bars
tabs
continuation tabs
notes
warnings
headline bars
tabs
continuation tabs
notes
warnings
headline bars
tabs
continuation tabs
notes
warnings
3
TABLE OF CONTENTS
TABLE OF CONTENTS
Safety Information 4
Introduction 4
Safety Information 4
Personal Safety Instructions 4
Technical Specifications 4
Parts List 5
Assembly 6
Operation 8
Maintenance 8
headline bars
tabs
continuation tabs
notes
warnings
IMPORTANT:
This manual contains important safety and operating instructions.
Read all instructions and follow them while using the product.

headline bars
tabs
continuation tabs
notes
warnings
headline bars
tabs
continuation tabs
notes
warnings
model no. 299-6962-4 | contact us 1-888-942-6686
4
SAFETY INFORMATION
INTRODUCTION
The MotoMaster®Tire Dolly is mainly designed
and great for moving car, light truck and SUV tires
and wheels. Attach two or more dollies together to
use as a creeper or for moving furniture. High-
impact molded polyethylene construction of the
tire dolly can load up to 300 lb (136 kg) (evenly
distributed). Swivel casters let you move the tire
dolly easily with 360 degree rotation.
SAFETY INFORMATION
• Do not exceed the rated capacity. Be aware
of dynamic loading! Dropping or bouncing
load may briefly create excess load causing
product failure.
• Use only on flat, hard, level surfaces.
• Use as intended only. Never step on the dolly.
• Make sure the loads are centred, evenly
distributed and secured with a load restraint
device before moving. Do not use the dolly to
move unstable or top-heavy objects.
• Always move the dolly with load carefully and
slowly to prevent load from tipping.
• Make sure castor wheel is locked after
moving.
• Do not modify product.
• Wear ANSI-approved safety goggles and
heavy-duty work gloves during use.
• Inspect before every use; do not use if parts
are loose or damaged.
• Keep your work area clean and well lit.
Cluttered work areas invite accidents.
• Keep bystanders, children, and visitors away
while using the tire dolly. Distractions can
cause you to lose control.
• Stay alert. Watch what you are doing, and
use common sense when using the tire dolly.
• The warnings, precautions, and instructions
discussed in this manual cannot cover all
possible conditions and situations that may
occur. The operator must understand that
common sense and caution are factors which
cannot be built into this product but must be
supplied by the operator.
PERSONAL SAFETY INSTRUCTIONS
• It is the owner’s and/or operator’s
responsibility to read and understand all
WARNINGS and operating instructions
contained on the product labels and within
the instruction manual prior to operation of
this product.
• It is also the owner’s and/or operator’s
responsibility to periodically inspect and
maintain this product and its labels. Read the
product labels and instruction manual prior to
operation of this product.
TECHNICAL SPECIFICATIONS
Model 299-6962-4
Maximum Capacity 300 lb (136 kg)
evenly distributed.
Dolly Diameter 25” (63.5 cm)
Tire Capacity
Car, light truck and SUV
tires.
Up to five tire and
wheel assemblies or
eight tires.
SAFETY INFORMATION
headline bars
tabs
continuation tabs
notes
warnings
TECHNICAL SPECIFICATIONS

headline bars
tabs
continuation tabs
notes
warnings
headline bars
tabs
continuation tabs
notes
warnings
headline bars
tabs
continuation tabs
notes
warnings
5
PARTS LIST
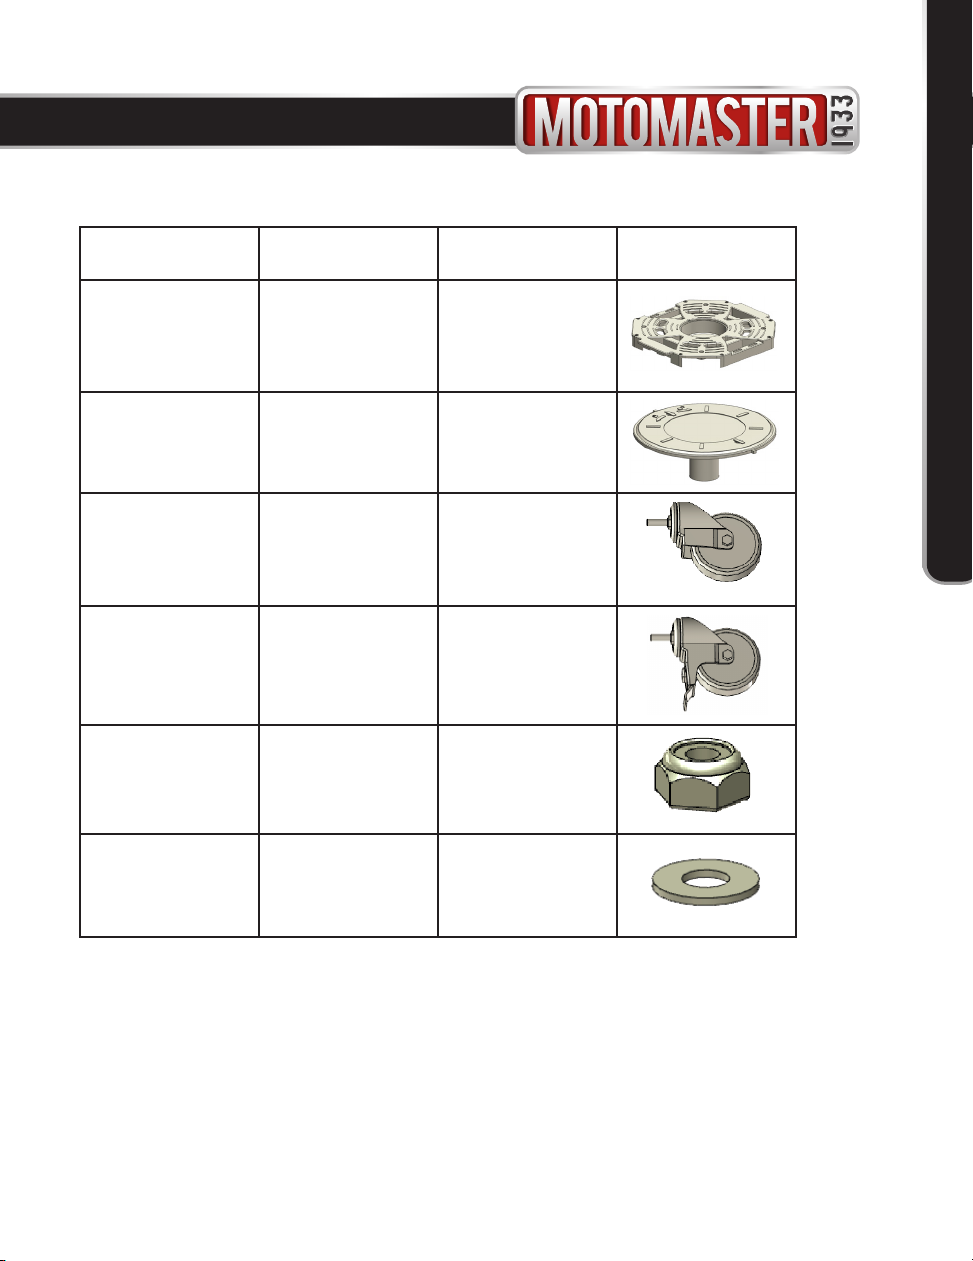
PART NUMBER DESCRIPTION QUANTITY ILLUSTRATION
A Main Body 1
B Lid 1
C Swivel Castor 3
DSwivel Castor with
Brake 1
E Lock Nut 4
FFlat Washer 4
TOOLS REQUIRED
14 mm socket wrench (not included)
PARTS LIST
headline bars
tabs
continuation tabs
notes
warnings
headline bars
tabs
continuation tabs
notes
warnings
headline bars
tabs
continuation tabs
notes
warnings
model no. 299-6962-4 | contact us 1-888-942-6686
6
ASSEMBLY
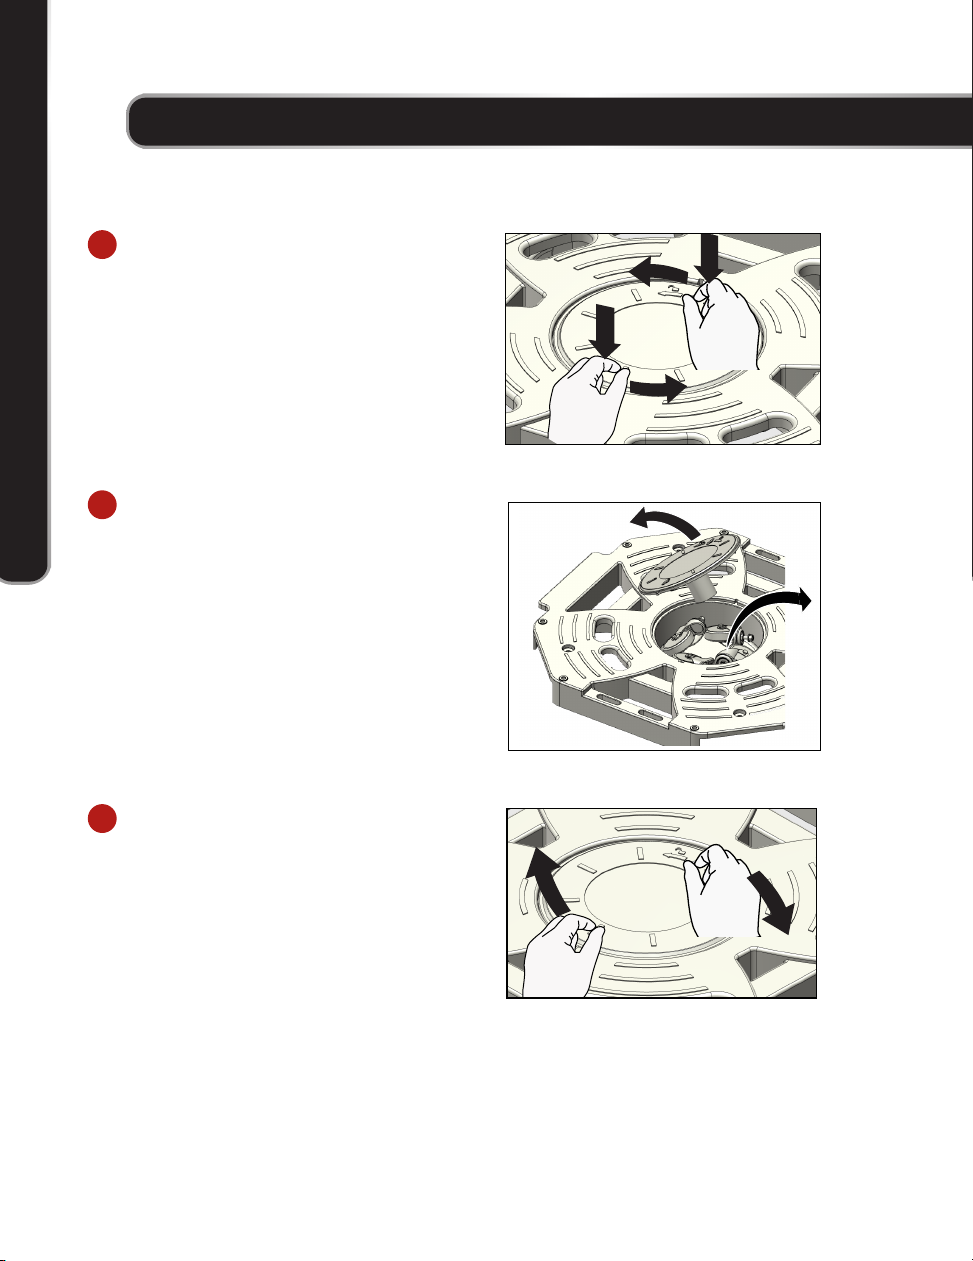
Press down on the lid in the centre of the main
body. Hold and turn the lid counter-clockwise
to unlock the lid.
Remove the lid and take out four swivel
castors.
Replace the lid in the centre of the main body,
and turn the lid clockwise to lock it. Make
sure to turn the lid completely to the locked
location.
1
1
3
2
ASSEMBLY
headline bars
tabs
continuation tabs
notes
warnings
headline bars
tabs
continuation tabs
notes
warnings
7
headline bars
tabs
continuation tabs
notes
warnings
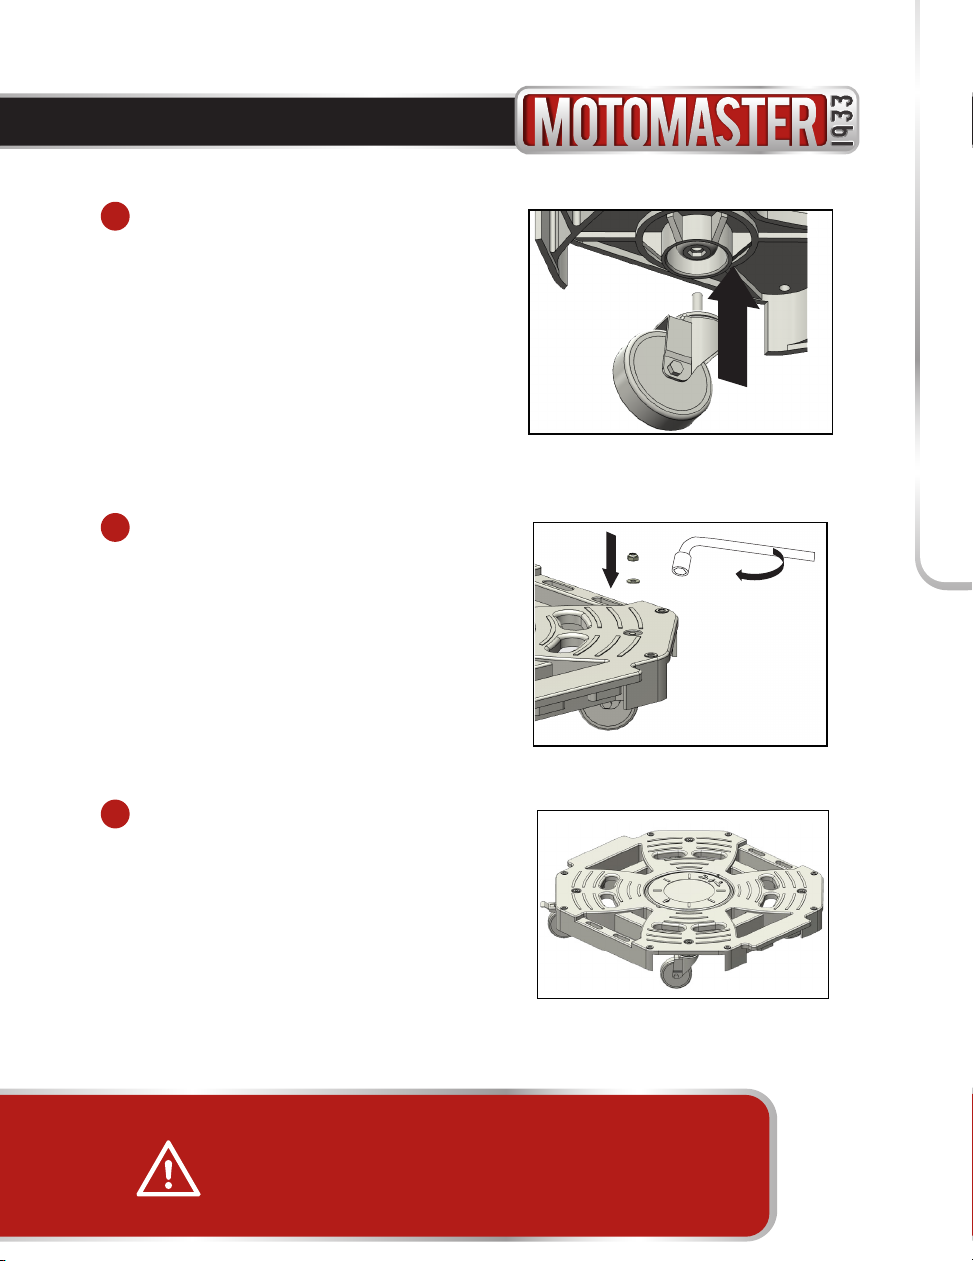
Remove lock nut and flat washer on the top
screw rod of the castor. Insert the castor rod
from underneath the main body ensuring the
hexagonal head of the castor fits snugly into
the hexagonal hole.
Hold the castor by hand. Place the flat washer
and lock nut over the top screw rod of the
castor. Tighten securely using the 14 mm
socket wrench (not included).
Repeat for other castors.
Now the tire dolly is ready to use.
4
5
6
ASSEMBLY
headline bars
tabs
continuation tabs
notes
warnings
WARNING!
Never step on the dolly during assembly. Make sure parts are tightened before use. Do not use
if parts are loose or damaged.
FPO

headline bars
tabs
continuation tabs
notes
warnings
headline bars
tabs
continuation tabs
notes
warnings
model no. 299-6962-4 | contact us 1-888-942-6686
8
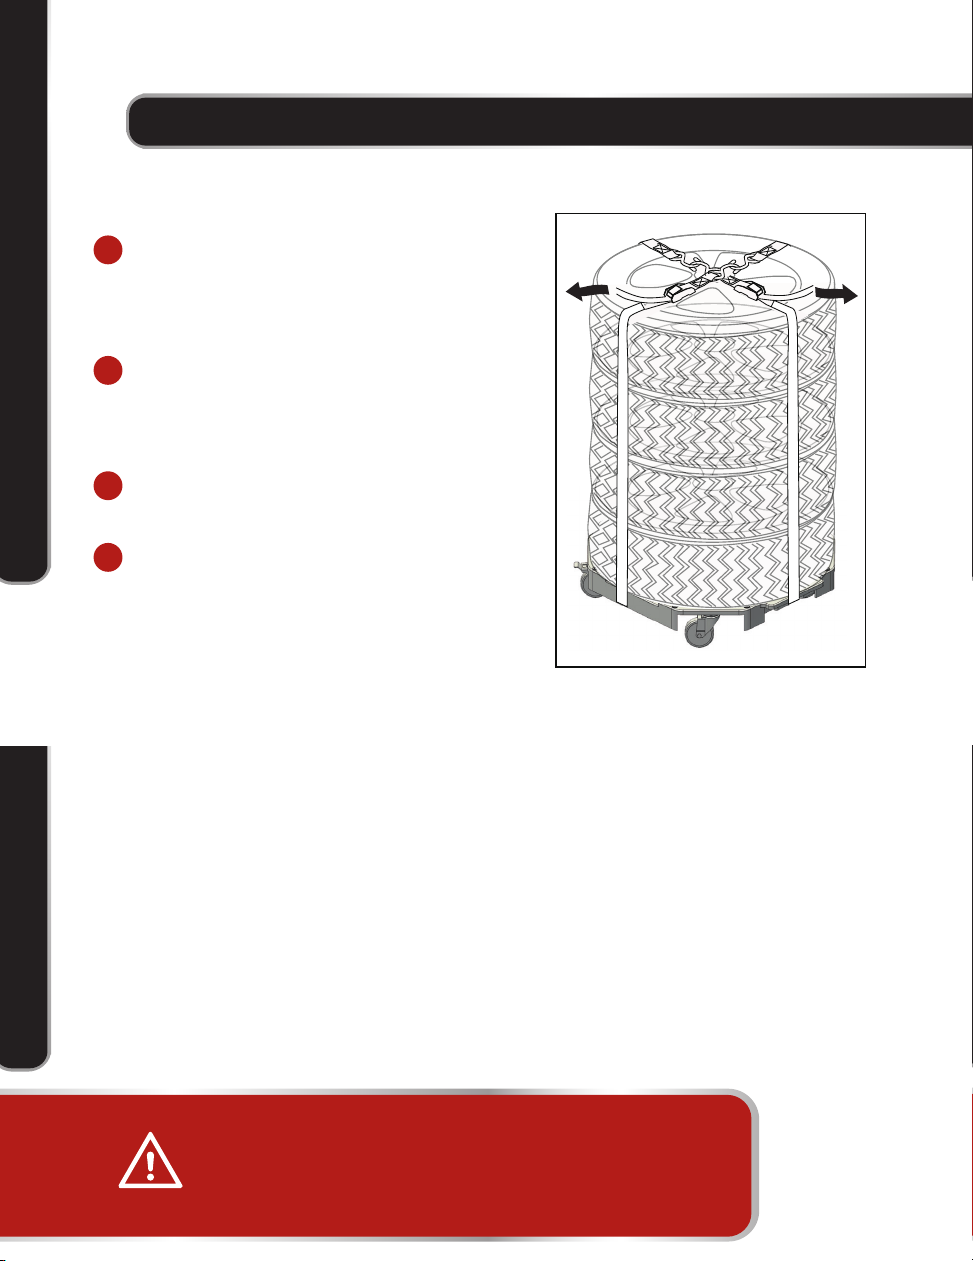
OPERATION
Stack your tire and wheel assemblies or tires
only (not included) on the dolly. Make sure
loads are centred and evenly distributed on
the dolly. Make sure all the tires are aligned
vertically.
Use a load restraint device (not included).
This may be two tie downs, as shown in the
illustration, wrapped around the tires and
tightened to hold the tires securely to the dolly.
Move the loaded dolly carefully and slowly to
the desired place.
Make sure castor wheel is locked after moving.
MAINTENANCE
• Before each use, inspect the general
condition of the tire dolly. Check for
broken, cracked, or bent parts, loose or
missing parts, and any condition that may
affect the proper operation of the product.
If a problem occurs, have the problem
corrected before further use. Do not use
damaged equipment.
• After every use, wipe dry with a clean
cloth. Store the tire dolly in a safe, dry
location out of reach of children.
1
2
3
4
OPERATION
headline bars
tabs
continuation tabs
notes
warnings
MAINTENANCE
headline bars
tabs
continuation tabs
notes
warnings
WARNING!
Never step on the dolly during use. Make sure the load is centred and secured with a load
restraint device (not included) before moving.
FPO

headline bars
tabs
continuation tabs
notes
warnings
headline bars
tabs
continuation tabs
notes
warnings
N° de modèle : 299-6962-4
IMPORTANT:
Veuillez lire attentivement ce guide d’utilisation avant d’utiliser cet
article et le conserver aux fins de consultation ultérieure.
GUIDE
D’UTILISATION
CHARIOT À PNEUS

headline bars
tabs
continuation tabs
notes
warnings
headline bars
tabs
continuation tabs
notes
warnings
N° de modèle : 299-6962-4 | Communiquez avec nous au 1 888 942-6686
2
SI DES PIÈCES SONT MANQUANTES OU ENDOMMAGÉES, OU POUR TOUTE QUESTION,
VEUILLEZ COMMUNIQUER AVEC NOTRE SERVICE D’ASSISTANCE TÉLÉPHONIQUE SANS
FRAIS AU 1 888 942-6686.
Avant d’utiliser le produit, veuillez lire attentivement et bien comprendre ce guide d’utilisation.
Ce guide contient des consignes de sécurité importantes ainsi que des consignes relatives à
l’utilisation et à l’entretien du produit.
Conservez ce guide d’utilisation pour toute consultation ultérieure. Si vous remettez ce produit
à un tiers, ce guide d’utilisation doit l’accompagner.
Ce produit MotoMaster comprend une garantie d’un (1) an contre les défauts de fabrication et de
matériaux. MotoMaster Canada consent, à sa discrétion, à réparer ou à remplacer gratuitement toute pièce
défectueuse lorsque celle-ci est retournée avec la preuve d’achat par l’acheteur original, au cours de la
période de garantie convenue. Ce produit n’est pas garanti contre l’usure ou le bris causés par un usage
abusif ou inapproprié.
GARANTIE

headline bars
tabs
continuation tabs
notes
warnings
headline bars
tabs
continuation tabs
notes
warnings
headline bars
tabs
continuation tabs
notes
warnings
3
TABLE DES MATIÈRES
TABLE DES MATIÈRES
Consignes de sécurité 4
Introduction 4
Consignes de sécurité 4
Consignes de sécurité personnelle 4
Fiche technique 4
Liste des pièces 5
Assemblage 6
Fonctionnement 8
Entretien 8
headline bars
tabs
continuation tabs
notes
warnings
IMPORTANT:
Le présent guide d’utilisation contient un mode d’emploi et des
consignes de sécurité importants. Lisez toutes les instructions et suivez-
les lorsque vous utilisez cet article.

headline bars
tabs
continuation tabs
notes
warnings
headline bars
tabs
continuation tabs
notes
warnings
N° de modèle : 299-6962-4 | Communiquez avec nous au 1 888 942-6686
4
CONSIGNES DE SÉCURITÉ
INTRODUCTION
Le chariot à pneus MotoMasterMD est idéal pour
déplacer des pneus et des roues de voitures, de
camionnettes ainsi que de VUS. Fixez deux chariots
ou plus ensemble pour vous en servir comme
sommier roulant ou déplacer des meubles. Le
polyéthylène moulé assure une résistance élevée
aux chocs et peut supporter une charge allant
jusqu’à 300 lb (136 kg) (uniformément répartie).
Les roulettes pivotantes permettent de manœuvrer
facilement le chariot à 360 degrés.
CONSIGNES DE SÉCURITÉ
• Ne dépassez pas la capacité nominale indiquée.
Faites attention aux charges dynamiques.
La chute ou le rebond d’une charge sur le
chariot peuvent créer une brève surcharge et
endommager l’article.
• Utilisez-le sur une surface plane, dure et de
niveau.
• Ne l’utilisez qu’aux fins pour lesquelles il a été
conçu. Ne montez jamais sur le chariot.
• Assurez-vous que la charge est centrée,
uniformément répartie et sécurisée au moyen
d’un appareil de retenue de charge avant de
déplacer le chariot. N’utilisez pas le chariot pour
déplacer des objets instables ou très lourds.
• Déplacez toujours le chariot chargé
prudemment et lentement pour éviter que la
charge ne bascule.
• Assurez-vous de verrouiller les roulettes après
avoir déplacé le chariot.
• Ne modifiez pas cet article.
• Portez toujours des lunettes de sécurité et des
gants de travail résistants homologués par
l’ANSI lorsque vous utilisez cet article.
• Examinez l’article avant chaque utilisation.
Ne l’utilisez pas si une pièce est desserrée ou
endommagée.
• Veillez à ce que l’aire de travail soit propre et
bien éclairée. Une zone de travail encombrée
est propice aux accidents.
• Tenez les enfants et toute autre personne à
distance lorsque vous utilisez le chariot à pneus.
Les distractions peuvent entraîner la perte de
son contrôle.
• Restez vigilant. Soyez concentré et faites preuve
de bon sens lorsque vous utilisez le chariot à
pneus.
• Les avertissements, les mises en garde et les
instructions décrits dans ce guide d’utilisation
ne peuvent pas couvrir toutes les conditions et
situations qui peuvent survenir. L’utilisateur doit
comprendre que c’est à lui de faire preuve de
bon sens et de prudence.
CONSIGNES DE SÉCURITÉ PERSONNELLE
• Il incombe au propriétaire et/ou à l’utilisateur de
lire et de comprendre tous les AVERTISSEMENTS
et instructions contenus sur les étiquettes et
dans le guide d’utilisation avant d’utiliser cet
article.
• Il incombe également au propriétaire et/ou
à l’utilisateur d’inspecter périodiquement et
d’entretenir cet article et ses étiquettes pour
qu’ils restent en bon état. Lisez les étiquettes et
le guide d’utilisation avant d’utiliser cet article.
FICHE TECHNIQUE
Modèle 299-6962-4
Capacité maximum 300 lb (136 kg) unifor-
mément réparties
Diamètre du chariot 25 po (63,5 cm)
Capacité
Pneus de voiture, de
camionnette et de VUS
Jusqu’à huit pneus ou
cinq roues
headline bars
tabs
continuation tabs
notes
warnings
FICHE TECHNIQUE
headline bars
tabs
continuation tabs
notes
warnings
headline bars
tabs
continuation tabs
notes
warnings
headline bars
tabs
continuation tabs
notes
warnings
5
LISTE DES PIÈCES
NUMÉRO DE PIÈCE DESCRIPTION QUANTITÉ ILLUSTRATION
A Élément principal 1
B Couvercle 1
C Roulette pivotante 3
DRoulette pivotante
avec frein 1
E Écrou autobloquant 4
F Rondelle plate 4
OUTILS REQUIS
Clé à douille de 14 mm (non incluse)
LISTE DES PIÈCES

headline bars
tabs
continuation tabs
notes
warnings
headline bars
tabs
continuation tabs
notes
warnings
headline bars
tabs
continuation tabs
notes
warnings
N° de modèle : 299-6962-4 | Communiquez avec nous au 1 888 942-6686
6
ASSEMBLAGE
Appuyez sur le couvercle situé au centre de
l’élément principal. Maintenez et tournez le
couvercle dans le sens inverse des aiguilles
d’une montre pour déverrouiller le couvercle.
Retirez le couvercle et sortez les quatre
roulettes pivotantes.
Replacez le couvercle au centre de l’élément
principal et tournez-le dans le sens des
aiguilles d’une montre pour le verrouiller.
Assurez-vous de tourner le couvercle jusqu’à
sa position verrouillée.
1
1
3
2
ASSEMBLAGE

headline bars
tabs
continuation tabs
notes
warnings
headline bars
tabs
continuation tabs
notes
warnings
7
headline bars
tabs
continuation tabs
notes
warnings
Retirez l’écrou autobloquant et la rondelle plate
sur la tige supérieure de la roulette. Insérez
la tige de la roulette sous l’élément principal
en vous assurant que la tête hexagonale de
la roulette rentre parfaitement dans le trou
hexagonal.
Tenez la roulette dans votre main. Placez
la rondelle plate et l’écrou autobloquant
sur la tige supérieure de la roulette. Serrez
fermement à l’aide de la clé à douille de 14
mm (non incluse). Procédez de même pour les
autres roulettes.
Le chariot à pneus est maintenant prêt à être
utilisé.
4
5
6
ASSEMBLAGE
headline bars
tabs
continuation tabs
notes
warnings
AVERTISSEMENT!
Ne montez jamais sur le chariot pendant l’assemblage. Assurez-vous que les pièces sont
correctement serrées avant d’utiliser le chariot. Ne l’utilisez pas si une pièce est desserrée ou
endommagée.
FPO
headline bars
tabs
continuation tabs
notes
warnings
headline bars
tabs
continuation tabs
notes
warnings
N° de modèle : 299-6962-4 | Communiquez avec nous au 1 888 942-6686
8
FONCTIONNEMENT
Empilez vos pneus ou vos roues (non inclus)
sur le chariot. Assurez-vous que la charge est
centrée et uniformément répartie. Veillez à
bien aligner les pneus à la verticale.
Utilisez un appareil de retenue de charge (non
inclus). Vous pouvez entourer les pneus au
moyen de deux attaches, comme illustré ci-
contre, pour les sécuriser sur le chariot.
Déplacez toujours le chariot chargé
prudemment et lentement.
Assurez-vous de verrouiller les roulettes après
avoir déplacé le chariot.
ENTRETIEN
• Examinez le chariot à pneus avant chaque
utilisation. Vérifiez s’il y a des pièces
cassées, fêlées, courbées, desserrées ou
manquantes ou tout autre état qui pourrait
affecter le bon fonctionnement de l’article.
Si un problème survient, corrigez-le avant
de réutiliser l’article. N’utilisez pas un
équipement endommagé.
• Après chaque utilisation, essuyez le
chariot à l’aide d’un chiffon propre et sec.
Entreposez le chariot à pneus dans un
endroit sûr et sec, hors de la portée des
enfants.
1
2
3
4
FONCTIONNEMENT
headline bars
tabs
continuation tabs
notes
warnings
ENTRETIEN
headline bars
tabs
continuation tabs
notes
warnings
AVERTISSEMENT!
Ne montez jamais sur le chariot pendant que vous l’utilisez. Assurez-vous que la charge
est centrée et sécurisée au moyen d’un appareil de retenue de charge (non inclus) avant de
déplacer le chariot.
FPO
Table of contents
Languages:
Other Motomaster Service Equipment manuals

Popular Service Equipment manuals by other brands

Magneti Marelli
Magneti Marelli ATF EXTRA PRO user manual

Hyundai
Hyundai Midtronics GRX-5100 instruction manual

Tronair
Tronair 01-1229-0011 Operation & service manual

ULTIMATE SPEED
ULTIMATE SPEED HG02236 Assembly and Safety Advice

CEMB
CEMB DWA1000CWAS manual

Invacare
Invacare TDX SP Assembly, installation and operating instructions


