manuals.online logo
Brands
  1. Home
  2. •
  3. Brands
  4. •
  5. Motorline professional
  6. •
  7. Control System
  8. •
  9. Motorline professional Sintact User manual

Motorline professional Sintact User manual

PHOTOCELLS
v1.0 REV. 08/2020
• Technology Microwave Motion
Sensor
• Transmission
frequency 24.125GHz
• Detection type Movement
• Detection distance 20 to 40 cm
• Movement speed Min. ±5cm/s
Max. ±1m/s
• Power supply 12V - 24V ac/dc
+30% /-10%
• Frequency 50 - 60Hz
• Consumption <2W (VA)
• Relay actuation
time 1.2 Seconds
• Operating
temperature -25°C to 55°C
• Degree of protection
IP54
• Standards R&TTE 1999/5/EC;
EMC89/336/EEC
• Material ABS
• Color Black
• Dimensions 66 x 110 x 30 mm
• Weight 0.265kg
• Cable length 2500mm
RELAY OUTPUT
• Maximum output
contact voltage Relay Contact
(1A/24Vdc)
CARACTERÍSTICAS TÉCNICAS | TECHNISCHE EIGENSCHAFTEN | ТЕХНИЧЕСКИЕ ХАРАКТЕРИСТИКИ
OPERATION MANUAL
BEDIENUNGSANLEITUNG | ИНСТРУКЦИЯ ПО ЭКСПЛУАТАЦИИ
SINTACT
EN Microwave sensor for opening automated doors by approach, thus avoiding the touch of handles and knobs. It
can be applied to any automatic door, in order to guarantee access in a practical and safe way.
DE Mikrowellen Sensor zum Öffnen automatisierter Türen durch Annäherung, wodurch das Berühren von Griffen
und Knöpfen vermieden wird. Es kann an jeder automatischen Tür angebracht werden, um den Zugang auf
praktische und sichere Weise zu gewährleisten.
RU Микроволновый датчик для открытия автоматических дверей при приближении, что позволяет
избежать прикосновения ручек. Может быть применен к любой автоматической двери, чтобы
гарантировать доступ практичным и безопасным способом.
EN DE
Technologie Mikrowellenbewe-
gungs Sensor
• Übertragungsfrequenz 24.125GHz
• Erkennungstyp Bewegung
• Erkennungsentfernung 20 bis 40 cm
• Bewegungsgeschwin-
digkeit Min. ±5cm/s
Max. ±1m/s
• Stromversorgung 12V - 24V ac/dc
+30% /-10%
• Frequenz 50 - 60Hz
• Verbrauch <2W (VA)
• Betätigungszeit des
Relais 1.2 Sekunden
• Betriebstemperatur -25°C bis 55°C
• IP Schutzes
IP54
• Normen R&TTE 1999/5/EC;
EMC89/336/EEC
• Material ABS
• Farbe Schwarz
• Masse 66 x 110 x 30 mm
• Gewicht 0.265kg
• Kabellänge 2500mm
RELAISAUSGANG
• Maximale
Kontaktspannung Relaiskontakt
(1A/24Vdc)
• Технология Микроволновый
датчик движения
• Частота передачи 24.125GHz
• Тип обнаружения Движение
• Расстояние
обнаружения от 20 до 40 см
• Скорость движения Мин. ±5см/сек,
Макс. ±1м/сек
• Питание 12V - 24V ac/dc
+30% /-10%
• Частота 50 - 60Hz
• Потребление <2W (VA)
• Время срабатывания
реле 1.2 сек
• Рабочая температура -25°C à 55°C
• Степень защиты IP54
• Стандарты R&TTE 1999/5/EC;
EMC89/336/EEC
• Материал ABS
• Цвет Черный
• Размеры 66 x 110 x 30 mm
• Вес 0.265kg
• Длина кабеля 2500mm
ВЫХОД РЕЛЕ
• Максимальное
напряжение выхода
контакта
Реле контакт
(1A/24Vdc)
RU
RUDEEN
CONNECTION SCHEME | VERDRAHTUNGSSCHEMA | СХЕМА СОЕДИНЕНИЯ
POTENTIOMETER | POTENTIOMETER | ПОТЕНЦИОМЕТР
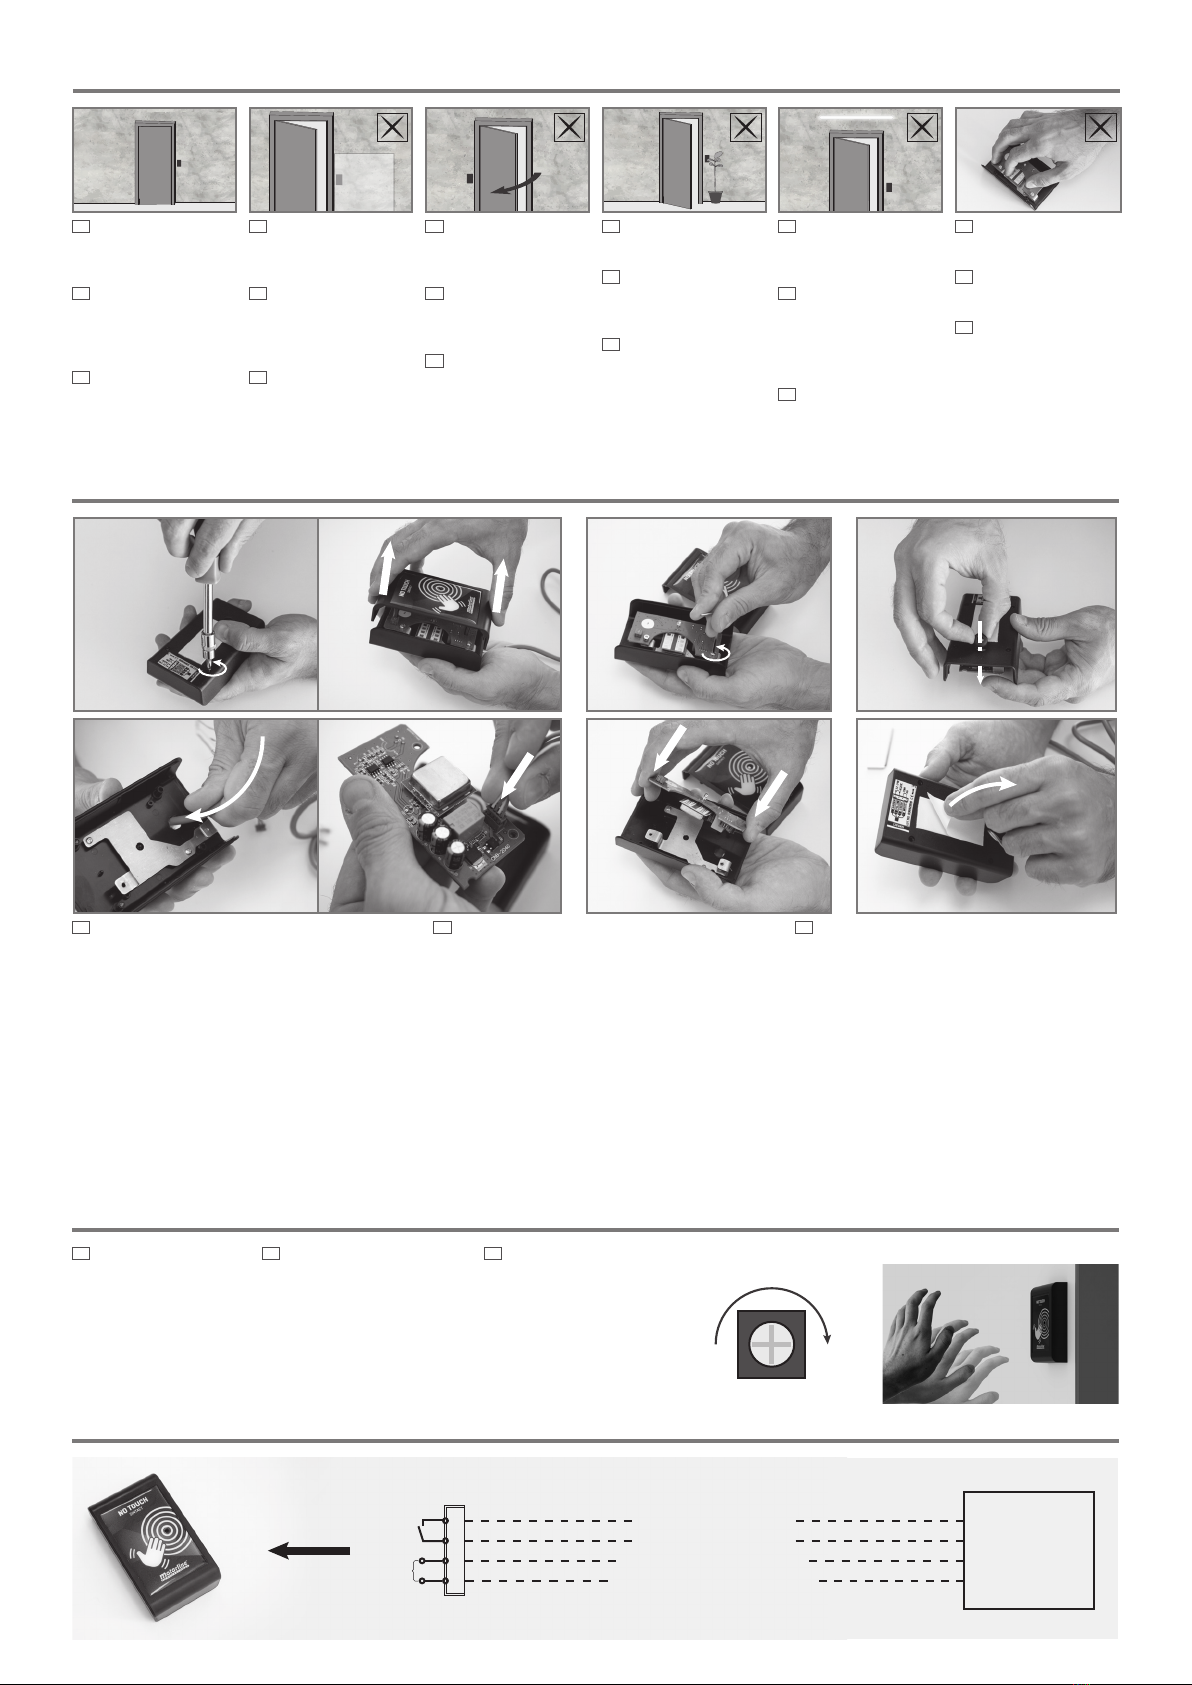
EN 1 • Loosen the 4 screws and remove the device
cover.
2 • Loosen the 2 screws on the pcb and remove it.
3 • Place the seal.
4 • Insert the cable and connect the plug.
5 • Retighten the pcb screws.
6 • Make the connections from the sintact to the
controller (see wiring diagram).
7 • Test the sensitivity of the sensor and adjust the
potentiometer if necessary (see potentiometer
information).
8 • When the adjustment is complete, close the box
and tighten the screws.
9 • Remove the adhesive film and stick it in the
desired location.
DE 1 • Lösen Sie die 4 Schrauben und entfernen Sie die
Geräteabdeckung.
2 • Lösen Sie die 2 Schrauben an der Platine und
entfernen Sie sie.
3 • Platzieren Sie die Dichtung.
4 • Stecken Sie das Kabel ein und schließen Sie den
Stecker an.
5 • Ziehen Sie die Leiterplattenschrauben wieder an.
6 • Stellen Sie die Verbindungen vom Sintact zum
Controller her (siehe Schaltplan).
7 • Testen Sie die Empfindlichkeit des Sensors und
stellen Sie das Potentiometer gegebenenfalls ein (siehe
Informationen zum Potentiometer).
8 • Wenn die Einstellung abgeschlossen ist, schließen Sie
die Box und ziehen Sie die Schrauben fest.
9 • Entfernen Sie den Klebefilm und kleben Sie ihn an die
gewünschte Stelle.
RU 1 • Ослабьте 4 винта и снимите крышку
устройства.
2 • Ослабьте 2 винта на плате и снимите ее.
3 • Установите уплотнитель.
4 • Вставьте кабель и включите вилку.
5 • Снова затяните винты на плате.
6 • Выполните подключения от датчика к
контроллеру (см. схему подключения).
7 • Проверьте чувствительность датчика и при
необходимости отрегулируйте потенциометр
(см. информацию потенциометра).
8 • По завершении регулировки закройте
коробку и закрутите винты.
9 • Снимите клейкую пленку и приклейте ее в
желаемом месте.
EN The potentiometer
allows you to adjust the
sensitivity for detecting the
speed of hand movement.
Note • To access the
potentiometer, remove the
front cover.
DE Mit dem Potentiometer
können Sie die Empfindlichkeit für
die Erfassung der Geschwindigkeit
der Handbewegung einstellen.
Hinweis • Um auf das
Potentiometer zuzugreifen,
entfernen Sie die vordere
Abdeckung.
RU Потенциометр позволяет
настроить чувствительность
для определения скорости
движения руки.
Примечание • Чтобы
получить доступ к
потенциометру, снимите
переднюю крышку.
INSTALLATION OF SENSOR | INSTALLATION DES SENSOR | УСТАНОВКА ДАТЧИКОВ
1 2 3
4 5 8
White | Weiss | Белый AUTOMATION
AUTOMATISMUS
АВТОМАТИКА
Green | Grün | Зеленый
Yellow | Gelb | Желтый
Brown | Braun | Коричневый
NO
COM
AC/DC
12-24V
EN It can be fixed on
surfaces such as wood,
plaster, plastic and glass.
DE
Kann an verschiedenen
Arten von Oberflächen wie
Holz, Gips, Kunststoff und
Glas befestigt werden.
RU
Устройство может быть
закреплено на различных
типах поверхностей, таких
как дерево, штукатурка,
пластик и стекло.
EN Do not move objects in
front of the device.
DE Vermeiden Sie es,
Gegenstände vor dem
Gerät zu bewegen.
RU Избегайте
перемещения предметов
перед устройством.
EN Do not cover or
block the sensor’s
detection area.
DE Decken Sie den
Erfassungsbereich des
Sensors nicht ab oder
blockieren Sie ihn nicht.
RU Не закрывайте и
не блокируйте зону
обнаружения датчика.
EN Do not install the
device in the door
opening angle.
DE
Installieren Sie
das Gerät nicht im
Türöffnungswinkel.
RU Не устанавливайте
устройство под углом
открытия двери.
WARNING | WARNUNG | ПРЕДУПРЕЖДЕНИЕ
EN Fluorescent lamps
close to the sensor are
not recommended.
DE Es wird nicht
empfohlen,
Leuchtstofflampen in
der Nähe des Sensors zu
platzieren.
RU Не рекомендуется
использовать
люминесцентные лампы
рядом с датчиком.
EN Do not touch the
electronic components.
DE Berühren Sie keine
elektronischen Komponenten.
RU
Не прикасайтесь к
электронным компонентам.
- +

Other Motorline professional Control System manuals

Motorline professional MPIE10 Operation and installation manual

Motorline professional

Motorline professional MPIE10 Operation and installation manual

Motorline professional MPIE5 Operation and installation manual

Motorline professional

Motorline professional MPIE5 Operation and installation manual

Motorline professional MR-12 Use and care manual

Motorline professional

Motorline professional MR-12 Use and care manual

Motorline professional mbm6 Operation and installation manual

Motorline professional

Motorline professional mbm6 Operation and installation manual

Motorline professional MPIE10 Operation and installation manual

Motorline professional

Motorline professional MPIE10 Operation and installation manual

Motorline professional CHAINLIFT Instruction Manual

Motorline professional

Motorline professional CHAINLIFT Instruction Manual

Motorline professional MC62 Use and care manual

Motorline professional

Motorline professional MC62 Use and care manual

Motorline professional MPIE10 User instructions

Motorline professional

Motorline professional MPIE10 User instructions

Motorline professional SIGMA 4M Instruction Manual

Motorline professional

Motorline professional SIGMA 4M Instruction Manual

Motorline professional PHOTOCELLS MF101 User manual

Motorline professional

Motorline professional PHOTOCELLS MF101 User manual

Popular Control System manuals by other brands

Huawei LUNA2000-200KTL-H0 user manual

Huawei

Huawei LUNA2000-200KTL-H0 user manual

OBSIDIAN CONTROL SYSTEMS NETRON EN12 installation guide

OBSIDIAN CONTROL SYSTEMS

OBSIDIAN CONTROL SYSTEMS NETRON EN12 installation guide

Express ASX-31003-C Installation, operating and maintenance instructions

Express

Express ASX-31003-C Installation, operating and maintenance instructions

Siemens simatic c7-621 Guide

Siemens

Siemens simatic c7-621 Guide

A-T Controls TRIAG M-3POS-115 Installation & maintenance manual

A-T Controls

A-T Controls TRIAG M-3POS-115 Installation & maintenance manual

HORNER HE500OCS050 user manual

HORNER

HORNER HE500OCS050 user manual

EOS LSG 18 Assembly and operating instruction

EOS

EOS LSG 18 Assembly and operating instruction

RuiDa RDC6585G manual

RuiDa

RuiDa RDC6585G manual

WABCO OptiTire System description

WABCO

WABCO OptiTire System description

Crestron 4 Series quick start

Crestron

Crestron 4 Series quick start

Beninca EVA.7 instruction manual

Beninca

Beninca EVA.7 instruction manual

Simu TSA Hz 2 Programming manual

Simu

Simu TSA Hz 2 Programming manual

Crestron 4 Series quick start

Crestron

Crestron 4 Series quick start

HEIDENHAIN ITNC 530 - CONVERSATIONAL PROGRAMMING Service manual

HEIDENHAIN

HEIDENHAIN ITNC 530 - CONVERSATIONAL PROGRAMMING Service manual

Crestron FlipTop FT2 Series quick start

Crestron

Crestron FlipTop FT2 Series quick start

SPINOGY Xcontrol-E operating manual

SPINOGY

SPINOGY Xcontrol-E operating manual

MA grandMA2 user manual

MA

MA grandMA2 user manual

Technisonic Industries Limited A710 Installation & operating instructions

Technisonic Industries Limited

Technisonic Industries Limited A710 Installation & operating instructions

manuals.online logo
manuals.online logoBrands
  • About & Mission
  • Contact us
  • Privacy Policy
  • Terms and Conditions

Copyright 2025 Manuals.Online. All Rights Reserved.