Motorola solutions edesix VIDEOBADGE VB-400 User manual

USER GUIDE | VB400 BODY-WORN CAMERA DEMO KIT SETUP GUIDE
Motorola Solutions Confidential - Do Not Redistribute - PartnerEmpowerTM Member Use Only
VB400 BODY-WORN CAMERA
DEMO KIT SETUP GUIDE
INSTALLING VIDEOMANAGER EX ON-PREMISES,
CONNECTING BODY-WORN CAMERAS, AND
DEMONSTRATING KEY FUNCTIONALITY TO
CUSTOMERS
11

USER GUIDE | VB400 BODY-WORN CAMERA DEMO KIT SETUP GUIDE
Motorola Solutions Confidential - Do Not Redistribute - PartnerEmpowerTM Member Use Only
CONTENTS
22
INTRODUCTION 3
DEMO KIT OVERVIEW 3
PRE-DEMONSTRATION SETUP
INSTALL VIDEOMANAGER EX 4
SET UP VIDEOMANAGER EX 5
IMPORT YOUR LICENSE 6
OPTIONALLY DISABLE AUDIO RECORDING 7
CONNECT YOUR VB400 TO VIDEOMANAGER EX 7
DEMONSTRATION WALKTHROUGHS
HARDWARE OVERVIEW 8
ASSIGN A VB400 10
RECORD FOOTAGE WITH THE VB400 11
DOWNLOAD & WATCH FOOTAGE 12
CREATE AN INCIDENT & REDACT AN INCIDENT CLIP 13
SHARE AN INCIDENT 15

USER GUIDE | VB400 BODY-WORN CAMERA DEMO KIT SETUP GUIDE
Motorola Solutions Confidential - Do Not Redistribute - PartnerEmpowerTM Member Use Only
33
INTRODUCTION
Thank you for purchasing the VB400 Body-Worn Camera Demo Kit, which contains everything you need to demonstrate crucial
body-worn camera functionality to prospective customers.
This document will walk you through the initial configuration steps, which should be completed immediately as soon as you
have received your kit. It will also provide you with a suggested walkthrough to perform in real-time for customers, along with
key talking points.
DEMO KIT OVERVIEW
In addition to the equipment provided below, you now have access to a demo license for VideoManager EX, the backend
software which administers VB400s. More information about where to find this license, and how to activate it once you have
installed VideoManager EX, is provided on p6.
1 x VB400-to-USB Adaptor and Charging Cable 1 x VB400 Solo Dock and Charging Cable
2 x VB400 MOLLE Mounts
2 x VB400 Cameras (Close-Fit) 2 x VB400 Magnetic Mounts

USER GUIDE | VB400 BODY-WORN CAMERA DEMO KIT SETUP GUIDE
Motorola Solutions Confidential - Do Not Redistribute - PartnerEmpowerTM Member Use Only
44
INSTALL VIDEOMANAGER EX
VideoManager EX is the backend software for VB400s. Ensure you have downloaded it from the Motorola Solutions website.
1. On your PC, navigate to the Downloads folder (or your nominated downloads location). If your organization’s IT policies do
not allow you to install software directly from the Downloads folder, move the videomanager-setup-xxx.exe file to another
appropriate location.
2. Double-click on videomanager-setup-xxx.exe.
3. You will be asked to confirm that VideoManager EX can run on your PC. Click Yes. The installer will open.
4. Click Next >.
5. In the Destination Folder field, you can specify where VideoManager EX will be installed on your PC.
By default, this is C:\Program Files (x86)\Motorola Solutions VideoManager EX.
6. Click Install. The installation will take less than a minute to complete.
7. Click Finish.
8. Three device driver installation wizards will open. Click Next > and Finish for each one.
You can now open VideoManager EX. To do so:
9. Type VideoManager EX into your PC’s search bar.
10. Click VideoManager EX administrator.
11. Once the database has finished loading, VideoManager EX will automatically open in your browser.

USER GUIDE | VB400 BODY-WORN CAMERA DEMO KIT SETUP GUIDE
Motorola Solutions Confidential - Do Not Redistribute - PartnerEmpowerTM Member Use Only
55
SET UP VIDEOMANAGER EX
Once you have installed VideoManager EX and launched the administrator app, you will be directed to VideoManager EX’s
login page.
1. Click Setup.
2. You will be presented with the Software License Agreement. Read it carefully, and click Accept.
3. Select Use built-in database server (recommended) and click Confirm.
4. Enter a username and password for your administrative user. Make a note of these credentials.
5. If desired, you can now change the default storage location for all data on VideoManager EX. Click Confirm.
6. You must now log in again. Refresh the page, enter your username and password, and click Sign in.

USER GUIDE | VB400 BODY-WORN CAMERA DEMO KIT SETUP GUIDE
Motorola Solutions Confidential - Do Not Redistribute - PartnerEmpowerTM Member Use Only
66
IMPORT YOUR LICENSE
Before you can use your VB400s, you must import your demo license. To do so:
1. Follow this link. The license will be downloaded to your PC automatically in a zipped folder.
2. Unzip the folder containing the license.
3. Navigate to the Admin tab.
4. Select the System pane.
5. Click the Licenses section.
6. Click Import License.
7. Click Choose file, and select your license.
8. In the Activation Key field, enter: demo_only_msi_channel
9. Click Import.
10. Click Click to restart at the top of the page.
11. Click Restart.
12. Click Yes.
VideoManager EX will restart and enable all functionality associated with your license. This may take a few minutes.
PLEASE NOTE: Your license is valid for one year. VideoManager EX will warn you 30 days before
your license expires - you must return to this document and download the new license from the
link provided above. Alternatively, if you would like to receive the new license via email, please
complete this form.

USER GUIDE | VB400 BODY-WORN CAMERA DEMO KIT SETUP GUIDE
Motorola Solutions Confidential - Do Not Redistribute - PartnerEmpowerTM Member Use Only
77
OPTIONALLY DISABLE AUDIO RECORDING
Device profiles enable you to configure almost every aspect of your VB400’s recording behavior. If you are in a state which
requires two-party consent, you can configure your VB400s to only record audio when manually prompted to do so.
1. Navigate to the Admin tab.
2. Select the Devices pane.
3. Click the Device Profiles section.
4. Next to the Hi-res (VB400) device profile, click Go to profile.
5. In the Recording behavior section, set Audio initially muted to Yes.
6. Scroll down to the Controls section. Identify a control (e.g. front button) and associated gesture (e.g. press, hold or
double-click) which will prompt the VB400 to either start or stop recording audio.
8. From the corresponding dropdown, select Toggle mute audio.
9. Click Save settings.
CONNECT YOUR VB400 TO VIDEOMANAGER EX
You can now connect your VB400 to VideoManager EX.
1. Dock your VB400 in its docking station, and plug the supplied USB cable into the docking station and your PC.

USER GUIDE | VB400 BODY-WORN CAMERA DEMO KIT SETUP GUIDE
Motorola Solutions Confidential - Do Not Redistribute - PartnerEmpowerTM Member Use Only
88
The C LED will flash green quickly to notify you that the VB400 is attempting to connect to VideoManager EX. On successful
connection, the VB400 will beep quickly and the C LED will turn solid green, then go out. The A LED will flash green slowly to
indicate that the VB400 is charging.
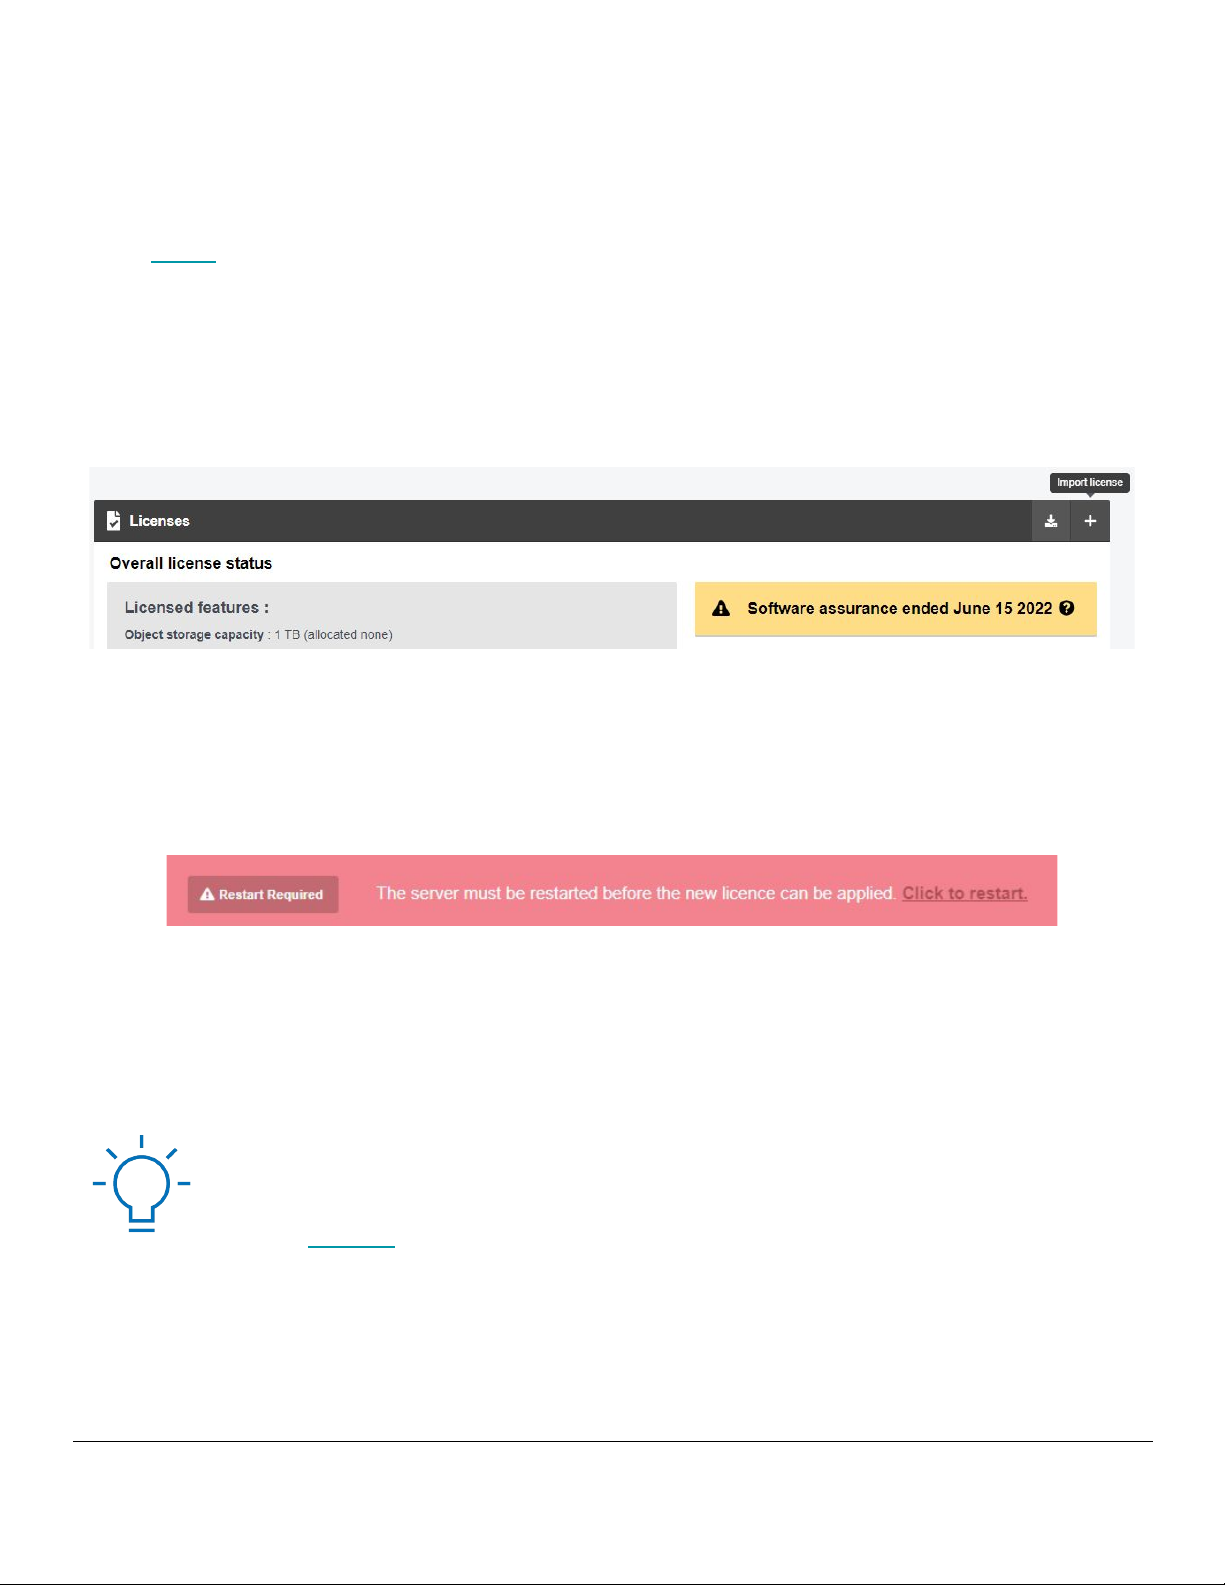
PLEASE NOTE: This document assumes you are using the solo dock to charge your VB400.
Alternatively, you can use the provided USB adaptor. To do so, dock the VB400 in the adaptor
and plug the USB cable into your PC.
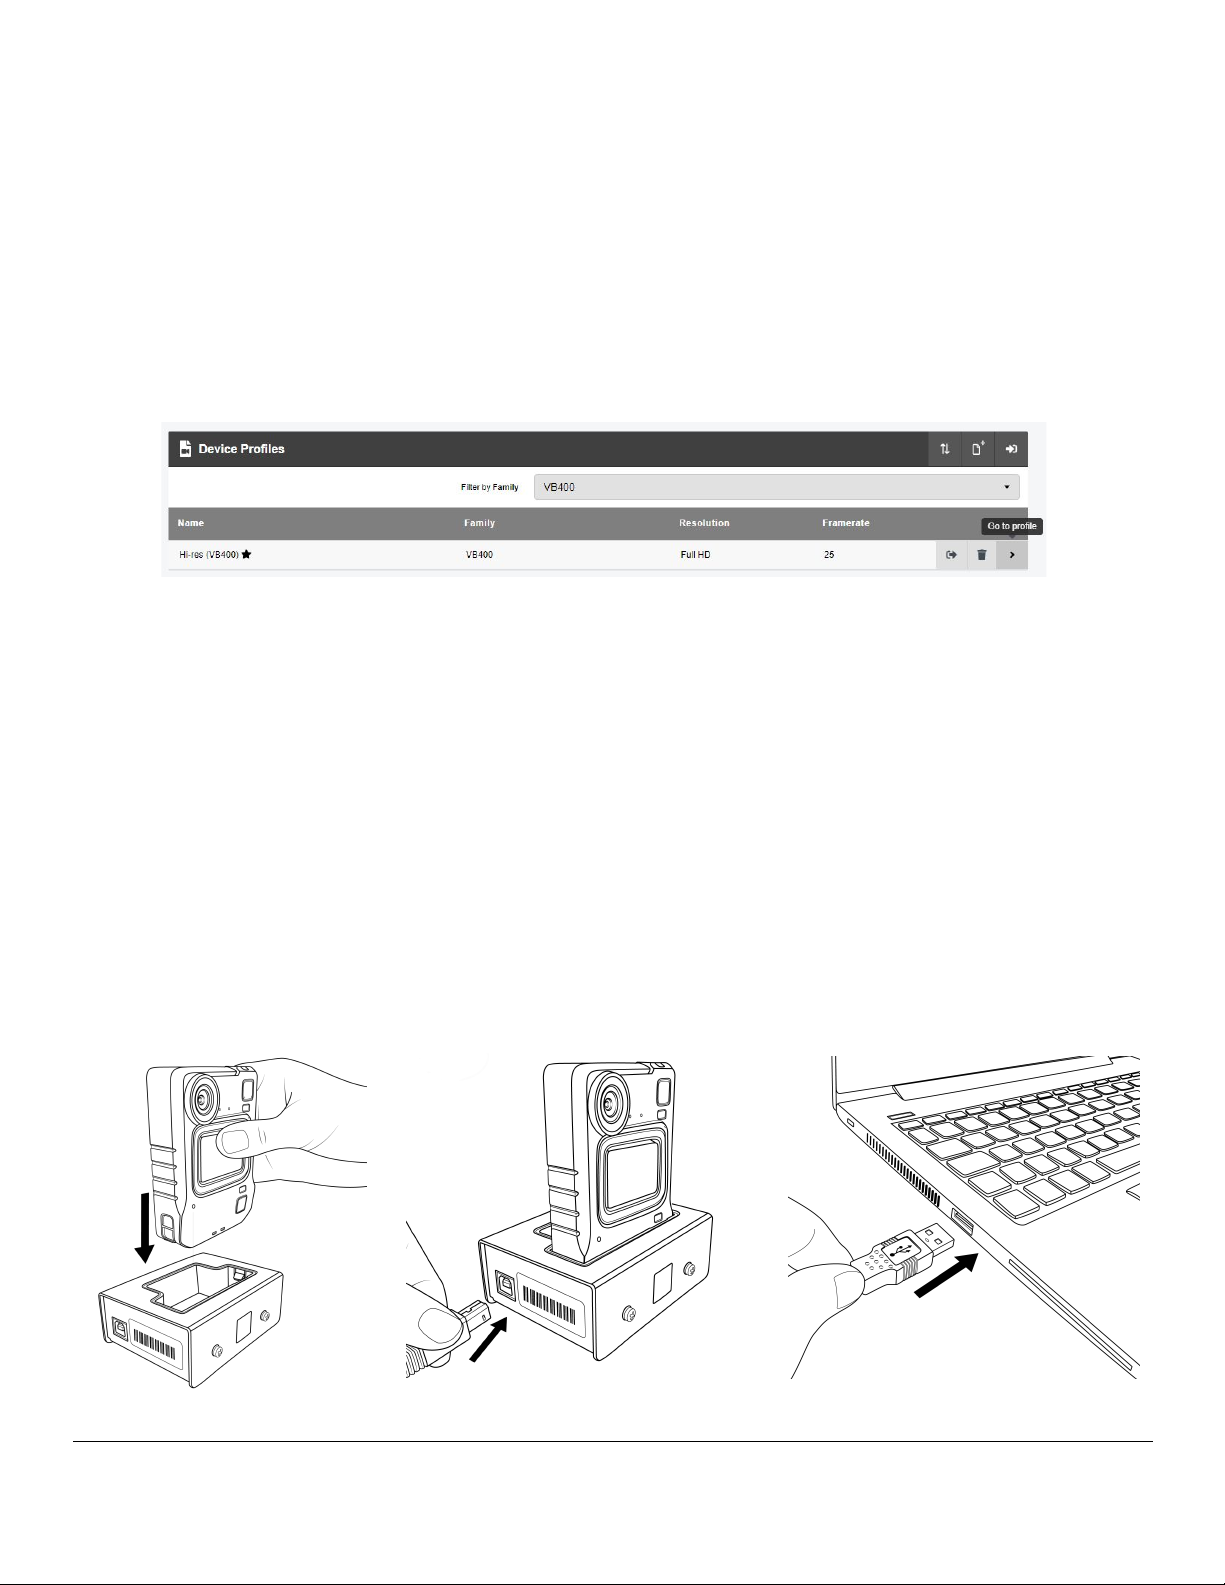
2. On VideoManager EX, navigate to the Devices tab.
3. Select the Search Devices pane, and click Find devices.
You should see your VB400. You are now ready to demonstrate key functionality to customers.
HARDWARE OVERVIEW
The goal for this demonstration is to familiarize the customer with the VB400.
SUGGESTED WALKTHROUGH & TALKING POINTS TO CONSIDER
1. Hand the VB400 to the customer so they can feel its weight and ruggedized exterior.
●The VB400’s lightweight (5.7oz) and streamlined (2.7 x 3.5 x 1.04 inches)
design ensures that customers aren’t overburdened with more equipment.
●The VB400 can withstand environmental factors including rain, wind and
dust (IP67 rating) and confrontations (MIL STD 810G drop tested).
2. Encourage the customer to swap out the mounts on the back of the VB400.
●MOLLE & Magnetic Mounts accommodate a variety of uniforms
(bulletproof vests, bulky coats) and ensure the VB400 won’t be
dislodged during vigorous movement.

USER GUIDE | VB400 BODY-WORN CAMERA DEMO KIT SETUP GUIDE
Motorola Solutions Confidential - Do Not Redistribute - PartnerEmpowerTM Member Use Only
99
To attach a mount to the VB400, align the back of the VB400 with the mount and rotate the mount left by 90°.
To detach a mount, rotate the mount right by 90°.

USER GUIDE | VB400 BODY-WORN CAMERA DEMO KIT SETUP GUIDE
Motorola Solutions Confidential - Do Not Redistribute - PartnerEmpowerTM Member Use Only
1010
3. Point out the four software-configurable buttons and three software-configurable LEDs.
●The large front button is easy to use with gloves.
●The LEDs can be configured with different patterns or disabled entirely, if recording should be discreet.
ASSIGN A VB400
The goal for this demonstration is to familiarize the customer with how the VB400 is assigned to a user.
Assignment ensures that all footage can be traced back to a specific user on the system, to maintain evidential integrity. If a
VB400 has not been assigned, it cannot be used to record footage. An administrator can assign VB400s ahead of time, so
users can simply undock their cameras at the start of their shift - without needing access to VideoManager EX at all.
SUGGESTED WALKTHROUGH & TALKING POINTS TO CONSIDER
1. Redock the VB400 in its solo dock or USB adaptor.
●The VB400’s solo dock and USB adaptor are compact and take up minimal space on a desk.
2. Navigate to the Devices tab.
3. Select the Search Devices pane, and click Find devices.
4. Your VB400 will be visible and its status will read as Charging.
●VideoManager EX provides an easy-to-understand overview of all VB400s connected to it.
5. In the Operator name field, enter Default Operator. This is the default body-worn camera user which VideoManager EX is
installed with by default..

USER GUIDE | VB400 BODY-WORN CAMERA DEMO KIT SETUP GUIDE
Motorola Solutions Confidential - Do Not Redistribute - PartnerEmpowerTM Member Use Only
1111
6. Choose either Single Issue or Permanent Issue.
●With Single Issue, a VB400 will become unassigned once it has been redocked at the end of a shift.
●With Permanent Issue, a VB400 will remain assigned to the same user once it has been redocked - this
makes it extremely low-maintenance.
●If the customer purchases a DockController and RFID RF-220 Reader, they can also use Single Issue with
RFID Touch Assign. In this scenario, a user can assign themselves a VB400 with their RFID card.
7. Click Assign Device.
8. The VB400’s status on VideoManager EX will change to Ready. You can now undock it.
RECORD FOOTAGE WITH THE VB400
The goal for this demonstration is to familiarize the customer with how the VB400 records footage.
SUGGESTED WALKTHROUGH & TALKING POINTS TO CONSIDER
1. To start recording, press the front button once. The VB400 will emit a beep, and its A and B LEDs will glow solid red.
●Remind the customer that these gestures (i.e. click, double-click, press + hold) and behavior (i.e. LEDs,
beeps, vibration) are configurable.
2. Let the VB400 record for 10 - 20 seconds.
●The VB400 can record for up to 12 hours on a single charge in optimal conditions.
●By default, the VB400 records in 1080p (although this can be changed to 720p or 360p) and 25fps (although
this can be changed to 30fps).
3. To stop recording, press and hold the front button. The VB400 will emit a loud beep, and its A and B LEDs will go out.

USER GUIDE | VB400 BODY-WORN CAMERA DEMO KIT SETUP GUIDE
Motorola Solutions Confidential - Do Not Redistribute - PartnerEmpowerTM Member Use Only
1212
DOWNLOAD & WATCH FOOTAGE
The goal for this demonstration is to familiarize the customer with how the VB400 offloads footage.
SUGGESTED WALKTHROUGH & TALKING POINTS TO CONSIDER
1. Redock the VB400 to its solo dock or adaptor. Any footage stored on it will immediately start downloading.
●Users do not need to access VideoManager EX or manually prompt their VB400 in order to offload recorded
footage - it happens automatically once the VB400 has been docked to an authorized instance of
VideoManager EX (i.e. an instance which has the correct access control key).
●All footage is stored on the VB400 with symmetric at-rest AES-256 encryption, and is transmitted with a
TLS1.2 protocol.
2. Navigate to the Media tab.
3. Select the Search media pane.
4. In the Source field, enter the VB400’s serial number (this can be found on the side of the VB400).
●It is easy to filter media based on a variety of parameters including location, serial number, and date/time.
●Footage is offloaded quickly from the VB400.
5. Click Find media.
6. Click ⏵ in the top left-hand corner of the video.
●To make it easier to identify important details, the video’s size, video quality and playback speed can be
adjusted from the bottom menu bar.

USER GUIDE | VB400 BODY-WORN CAMERA DEMO KIT SETUP GUIDE
Motorola Solutions Confidential - Do Not Redistribute - PartnerEmpowerTM Member Use Only
1313
CREATE AN INCIDENT & REDACT AN INCIDENT CLIP
The goal for this demonstration is to familiarize the customer with how footage from a VB400, along with other media, can be
added to an incident for categorization, redaction and sharing purposes.
An incident is a collection of media and metadata which can be shared, either externally or internally, for review. Once a video
has been added to an incident, it becomes an incident clip.
SUGGESTED WALKTHROUGH & TALKING POINTS TO CONSIDER
1. Navigate to the Media tab.
2. Locate the footage you have previously recorded on your VB400, and click Create new incident.
3. In the Title field, enter a name for the incident.
●Remind the customer that all of these fields are completely customizable and can be adapted to fit their
organization’s workflows. Administrators can add as many new fields as necessary - including dropdowns, text boxes,
check boxes, and date/time fields.
4. Scroll down to the Incident clips section.
5. Click Redact parts of this clip.

USER GUIDE | VB400 BODY-WORN CAMERA DEMO KIT SETUP GUIDE
Motorola Solutions Confidential - Do Not Redistribute - PartnerEmpowerTM Member Use Only
1414
6. Using the bottom menu bar, scroll through the video to the point where a redaction should start.
7. In the top left-hand corner, select a shape for the redaction.
●There are three options for redaction, depending on the shape the customer wants to redact - oval (e.g. for faces),
square (e.g. for sentences in documents) or quadrilateral (e.g. for irregularly-shaped objects, such as license plates).
8. Drag your cursor over the object which should be redacted.
9. In the right-hand Redaction menu pane, you can select how the object is redacted - either by blurring, pixelating, solidly
covering, or not redacting at all.
●Customers may want to leave an object unredacted to draw attention to it - for example, one car on a highway. If this
is the case, they can blur/pixelate/solidly cover the background of the video instead.
●The following actions are also available:
○Add a text annotation (e.g. to distinguish between multiple suspects).
○Mute audio for an the incident clip (e.g. to redact sensitive conversations).
○Change the brightness of the incident clip (e.g. to improve visibility if a video was captured at night).
○Zoom in or center the incident clip (e.g. to draw attention to an object).
10. If the redacted object is moving, step through the incident clip using ⏮ and ⏭ and manually move the redaction.
11. At the point where the redaction should end, click End in the right-hand menu pane.
12. Click Confirm.
You can watch the redacted video in the video player, in the top right-hand corner of the page.

Motorola Solutions, Inc. 500 West Monroe Street, Chicago, IL 60661 U.S.A.
Availability is subject to individual country law and regulations. All specifications shown are typical unless otherwise stated and are subject to
change without notice. MOTOROLA, MOTO, MOTOROLA SOLUTIONS and the Stylized M Logo are trademarks or registered trademarks of
Motorola Trademark Holdings, LLC and are used under license. All other trademarks are the property of their respective owners.
© 2022 Motorola Solutions, Inc. All rights reserved. 07-2022 15
SHARE AN INCIDENT
The goal for this demonstration is to show the customer that incidents can be shared with people outside of their organization.
The ability to share media externally is crucial for review and prosecutorial purposes. VideoManager EX offers incident links,
which gives the recipient access to an incident, without giving them access to VideoManager EX itself. This maintains the
incident’s chain of custody, and also protects the security of the customer’s system.
SUGGESTED WALKTHROUGH & TALKING POINTS TO CONSIDER
1. Navigate to the Incidents tab.
2. Locate the incident you have previously created, and click View incident.
3. In the Links field, click ➕ Create link.
4. In the Recipient email field, enter the customer’s email address.
5. Click Create.
Ask the customer to check their email. They will be able to view the incident on their own phone or PC, via the link.
Other manuals for edesix VIDEOBADGE VB-400
3
Table of contents
Other Motorola solutions Digital Camera manuals

Motorola solutions
Motorola solutions Avigilon 8.0C-H5A-FE-DO1 User manual

Motorola solutions
Motorola solutions edesix VIDEOBADGE VB-400 User manual

Motorola solutions
Motorola solutions L5Q User manual

Motorola solutions
Motorola solutions PELCO IDL302-FXI User manual

Motorola solutions
Motorola solutions V300 User manual

Motorola solutions
Motorola solutions edesix VIDEOBADGE VB-400 User manual

Motorola solutions
Motorola solutions L6Q User manual

Motorola solutions
Motorola solutions L6Q User manual

Motorola solutions
Motorola solutions PELCO Sarix Multi Pro User manual

Motorola solutions
Motorola solutions V700 User manual