Motorvac CarbonClean Dual User manual

1324 Blundell Rd. Mississauga ON Tel. 905.615.8620 Fax. 905.615.9745 www.motorvac.com
CarbonClean® Dual
Complete Fuel System Cleaning Center
Part No. 500-0352
USER MANUAL

[email protected] www.motorvac.com
Introduction
Congratulations on your selection of the CARBONCLEAN® DUAL SYSTEM. By choosing this product, you
are acquiring the most technologically advanced method available for cleaning harmful fuel system contami-
nants from gasoline & diesel engines.
The MCS 352 is a self-contained cleaning system, designed to connect to any gasoline or diesel engine (up
to 7.3L). Once the unit is connected, it temporarily replaces the regular fuel supply with a mixture of fuel and
the specially formulated CarbonClean® Cleaning Detergent.
With the engine idling, the unit pumps the fuel/detergent mixture through the vehicle’s fuel system. As the
mixture passes through the fuel system, it loosens and dissolves accumulated deposits, which then pass
harmlessly out through the exhaust system or are removed by the unit’s fuel lter. Removing contaminants
from the combustion chamber creates a more even burn of fuel, which improves horsepower, increases fuel
economy, and reduces exhaust emissions.
Please refer to the chart below for the recommended service intervals:
RECOMMENDED SERVICE INTERVALS
Type of Vechicle Mileage
Automotive - Gasoline 12,000 - 15,000 miles or 19,000 - 24,000 kilometers or once a year
Automotive - Diesel
Light-Duty Trucks 12,000 - 15,000 miles or 19,000 - 24,000 kilometers or once a year
Automotive - Diesel
Medium to Heavy Trucks
60,000 - 100,000 miles or 97,000 - 161,000 kilometers or
1600 to 1800 hours of operation
IMPORTANT
The MCS 352 Fuel System Machines are designed to work
EXCLUSIVELY
With CarbonClean® Cleaning Detergents.
Use of any other chemicals during this process may cause
operational failure
of the MCS 352 and voids the manufacturer’s warranty.
See warranty card for details.

[email protected] www.motorvac.com
Table of Contents
Page
Getting to Know the CarbonClean® Dual …………………………………………......................…………
Control Panel Features and Functions ….......................……………………………………………...……..
Safety Information ……..……………………………...........................………………..……………….........
Safety During Service ………………………....……………………………………......................................
Gas (Petrol) Service ………………………....…………………………………….........................................
First Time Operation ………………………....…………………………………......…....................
Fuel System Types ………………………....…………………………………......….......................
Returnless Fuel System ………………………....……………………………….........................…
Filling and Mixture Setup …………………........................……....………………....….................
Reservoir Filling Connection ………………………....…………………………………...................
Vehicle Connection Procedure (General) ………………………....………………………......….....
Return System Cleaning Service ………………………....……………………..............................
Returnless System Connection ………………………....……………………................................
Diesel Service ………………………....…………………….......................................................................
First Time Operation ………………………....……………………................................................
Return System Cleaning Service ………………………....……………………..............................
Filling and Mixture Setup ………………………....……………………..........................................
Service Procedure ………………………....……………………...................................................
Accessories ………………………....……………………..........................................................................
Troubleshooting ………………………....……………………....................................................................
Parts ………………………....…………………………………......….........................................................
1
2
3
4
4-11
4
5
6
7
8
9
10
11
12-14
12
13
13
14
15-16
17
17

Getting to Know the CarbonClean® Dual
[email protected] www.motorvac.com
1
Front Features
Control panel – All of the electronic and uid controls are
located here
Gasoline/Petrol Side – All of the controls, hoses, tank and
lter are located on the left side of the machine.
Diesel Side – All of the controls, hoses, tank and lter are
located on the right side of the machine.
Adapter Storage
Rear Features
Power Cable – Connect to vehicle’s battery to power
the machine
Gasoline/Petrol Side – Gasoline/Petrol tank and spin
on lter
Diesel Side – Diesel tank and spin on lter

Control Panel Features and Functions
[email protected] www.motorvac.com
2
A B
C D
E F
G H
AGasoline/Petrol pressure control - Always start the machine with the regulator turned counter
clockwise. Do not exceed 100psi.
BDiesel pressure control - Always start the machine with the regulator turned counter clockwise. Do
not exceed 100psi.
COn/Off switch – Turn on or off main power to the unit. Amber light is illuminated when on.
DStart button - Press and hold to begin a service cycle. Pressure must be greater than 5 psi to
perform a service. Green light illuminates when the pump is on.
EService Selector button – Press to the left before performing a gasoline/petrol service or press to
the right before performing a diesel service.
FService timer – The timer must be set before beginning a service, the timer can be set between
1-60 minutes. Typical service time 30 mins.
GAlarm – The alarm sounds when the unit is turned on and pressure is less than 5psi or the timer has
expired.
HCircuit breaker.

[email protected] www.motorvac.com
3
Safety Information
Please become familiar with all safety procedures described in this chapter.
When using chemicals always refer to the MSDS sheets and manufacturer’s instructions for the proper pro-
cedure for emergency medical treatment, cleanup, handling and storage requirements.
Safety Before Starting
Follow these safety procedures before starting any service with the unit.
Ventilate the Work Area.
To avoid breathing harmful fumes and exhaust, make sure the unit is always used in a well ventilated area,
away from all ames, sparks, and other ignition sources.
Keep a Fire Extinguisher On Hand.
Keep an approved re extinguisher within easy reach.
Check Oil and Coolant Levels.
Check engine oil and coolant levels and add oil or coolant if necessary.
Check Polarity.
Always use proper polarity on battery posts. When connecting the unit to a battery, connect the positive (red)
battery lead to the positive (+) battery terminal. Connect the negative (black) lead to the negative (-) battery
terminal (11-15 VOLTS DC).
Avoid Open Flames and Sparks.
Keep lighted cigarettes, open ames, or other ignition sources away from the battery.
Use Caution at All Times.
Use safety goggles and keep hands, hair, loose clothing, and jewelry away from the battery, fan blades, belts,
and other moving parts of the vehicle engine.
Ensure Vehicle is safe
Before beginning a service ensure the vehicle is in satisfactory condition (i.e. broken or loose fuel lines, igni-
tion wires, battery cables, electrical wires, fuses and relays.)
Safety When Connecting/Disconnecting Hoses
Fuel systems maintain residual pressure in fuel lines even after the engine has been turned off.
Use caution when opening any fuel line.
Avoid Spills.
To avoid fuel spills, wrap a clean shop cloth around ttings when connecting or disconnecting any hoses or
adapters.
Remove Ignition Sources.
Remove all ignition sources such as lit cigarettes, matches, etc., when working with fuels and detergents.
IMPORTANT
Failure to observe these precautions, or the improper use of equipment, could result in property damage or
serious injury. Follow the safety procedures in this chapter each time the unit is used

[email protected] www.motorvac.com
Safety During Service
Follow these safety instructions whenever the unit is being operated.
Consult Manufacturers Service Manual
Use manufacturer’s service manual for test procedures and fuel system specications (i.e. fuel pressure).
Clean Spills Immediately.
Clean up all gasoline or detergent spills immediately and make sure to use a proper container for disposal.
Check All Fittings.
Check all ttings and fuel lines for leaks before, during, and after performing a cleaning service.
Secure Fuel Lines.
Keep fuel lines away from hot manifolds and all moving components.
Gas (Petrol) Service
First Time Operation
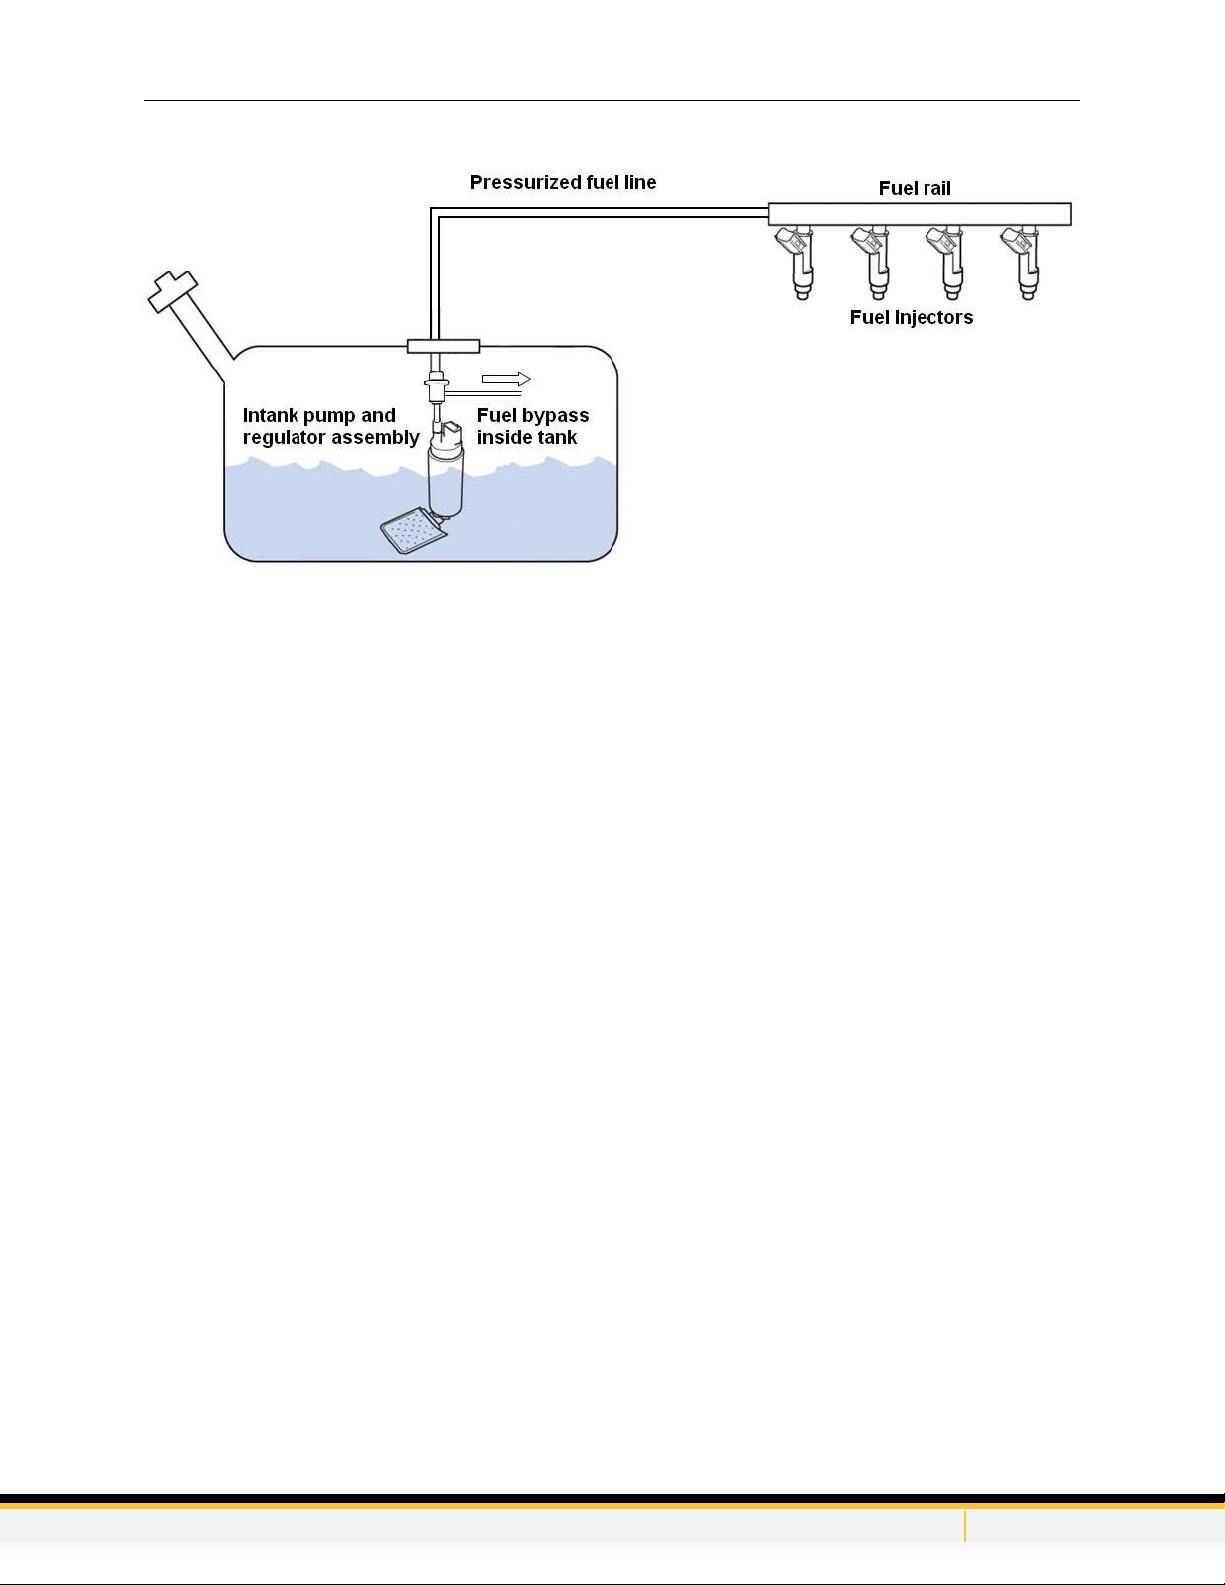
1. Remove the lter from below the Gasoline (Petrol) tank and ll it completely with fuel and replace it on the
unit
2. Turn the Gas (Petrol) PRESSURE REGULATOR on the unit’s control panel counterclockwise until it is
completely open.
3. Attach the unit to the vehicle’s battery by connecting the red battery clip to the positive (+) battery
terminal and the black battery clip to a solid ground point as far from the battery as possible.
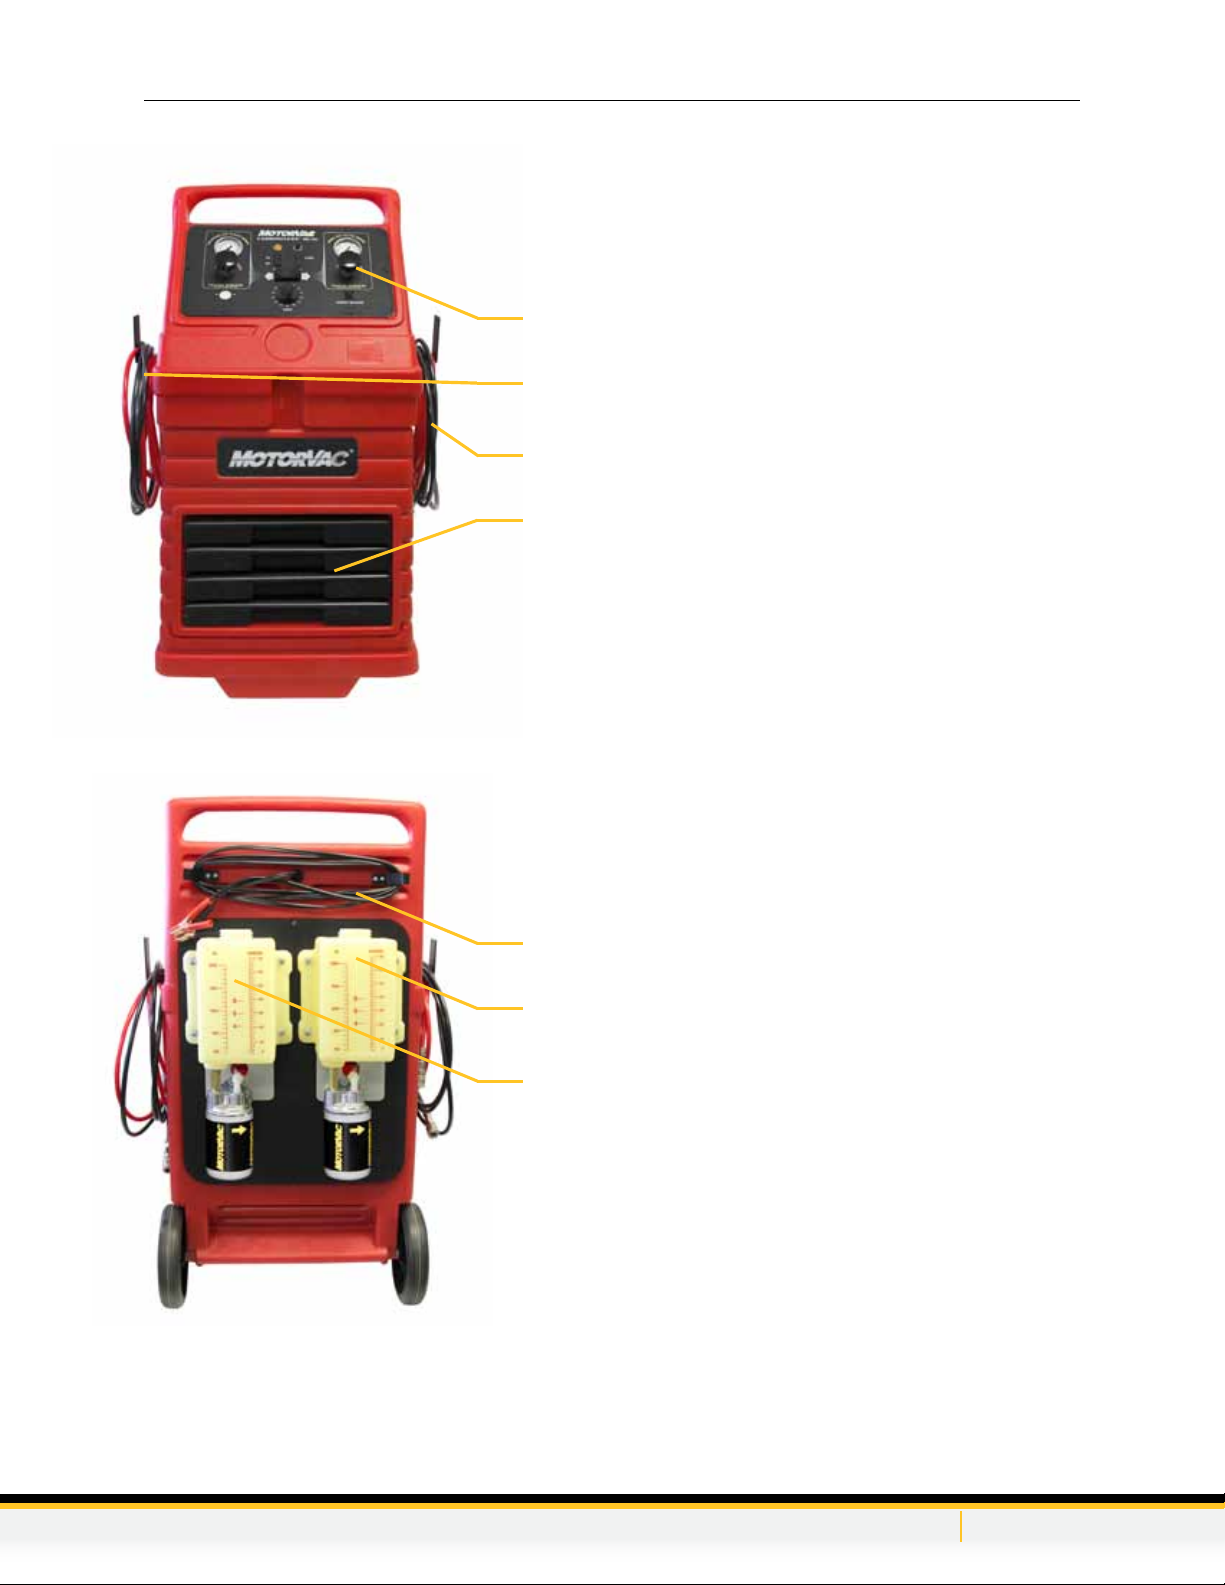
4. Fill the reservoir on the Gas (Petrol) side (LHS when facing the front of the machine) with clean gasoline
(petrol) until the tank level indicates 1/4 tank. See notes on page 8 for alternate lling procedure.
5. Connect the output (red) hose and return (black) hose together by any 2 mating adapters.
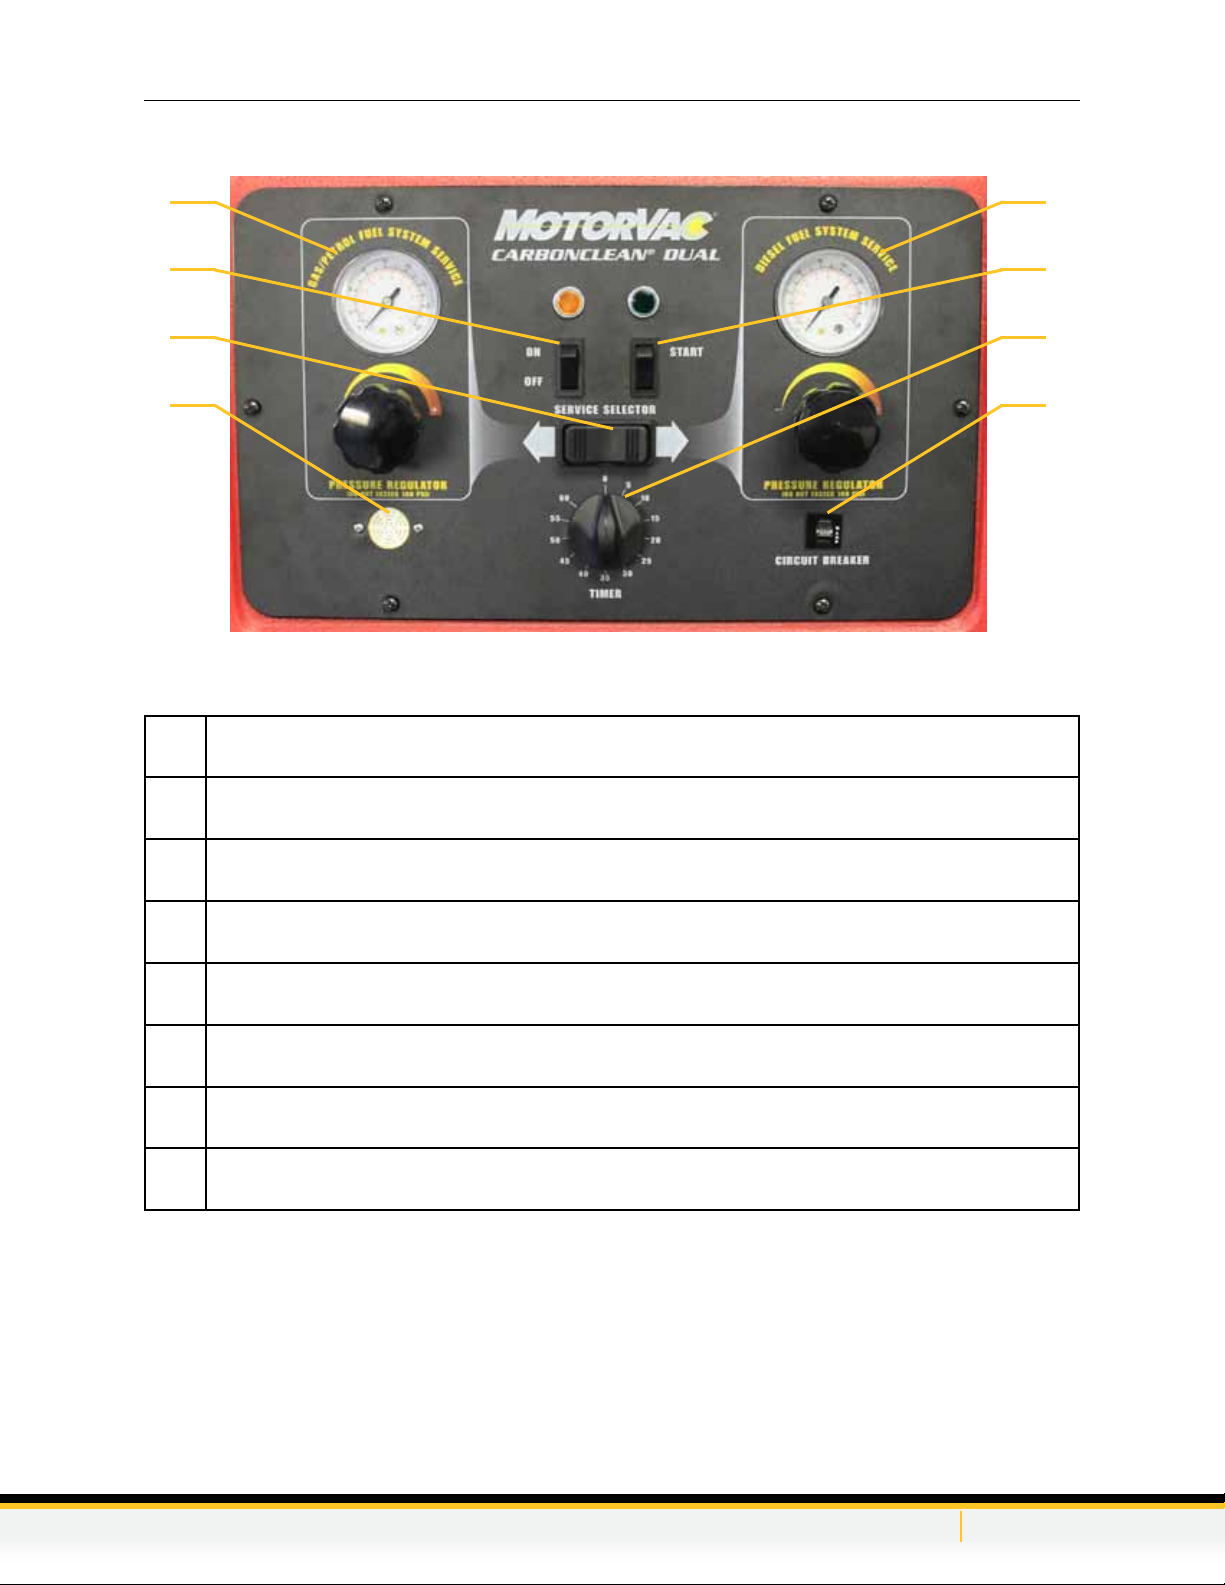
6. Press the SERVICE SELECTOR switch to the left to select Gasoline (Petrol) FUEL SYSTEM SERVICE.
7. Set the TIMER knob for ve minutes (the pump will not run unless the timer is on)
8. Press the ON/OFF switch to the ON position. NOTE: Alarm will sound continually until pump starts.
9. Press and hold the START switch for a minute.
10. Release the START switch and turn the ON/OFF switch to the OFF position.
11. Disconnect the output and return lines.
12. To drain the Gas (Petrol) disconnect the adapter from the return (black) hose.
13. Direct the adapter on the end of the output (red) hose to an appropriate reservoir.
14. Turn ON/OFF switch to ON position and press and hold START switch. When all the gas is pumped out
release the START switch and turn the ON/OFF switch to the OFF position.
15. Dispose of the fuel in an environmentally approved method.
4
WARNING
Flammable Liquid can squirt out of pressurized lines when connecting or disconnecting.
Verify that engine and machine are both off before connecting or disconnecting fuel
lines or adapters.
Wear safety goggles.
Wear chemical resistant gloves when connecting or disconnecting ttings and adapters.
Wrap a shop towel around pressure ttings and adapters when disconnecting.
Avoid exposure to ames, sparks, hot engine parts, and other ignition sources.
Explosion or ame or exposure to ammable liquid and vapors can cause injury.
The following process is used to ush factory testing uids out of your new machine, and is only necessary
before the rst time you use the unit.

Gas (Petrol) Service
Fuel System Types
Before beginning a service determine if the vehicle being serviced has a return or returnless fuel system.
Return Fuel System
A return system has 2 fuel lines, one from the fuel tank to the fuel rail and one returning to the fuel tank.
A regulator maintains the correct fuel rail pressure by returning any excess fuel back to the tank. These
systems work by having a pressure regulator at the end of the fuel rail that returns any excess ow back to
the tank. The regulator has a connection to the intake manifold to allow for a slight boost of pressure as the
throttle is opened. It is never recommended to deadhead a pump on a vehicle with a return fuel system.
[email protected] www.motorvac.com
5

Gas (Petrol) Service
Returnless Fuel System
The main advantage of this type of system is a reduction in evaporative emissions as excess fuel does not
get heated and returned to the tank. There are 2 sub categories of returnless fuel systems. Mechanically
controlled and electronically controlled.
Returnless (pressure controlled mechanically)
This is a typical returnless system seen on most vehicles since the late 90s. In this type of fuel system the
pressure regulator is part of the pump module, and all excess fuel bleeds off internally within the tank. It is
completely safe to ‘dead head’ the pump when connecting at the fuel rail because the connection is after the
regulator. This is essentially how the fuel system functions with the fuel rail being a dead end that only uses a
small amount of fuel under conditions such as idling.
Returnless (electronically controlled)
This type of system has pressure sensors at the fuel rail that feed back information to the PCM (power-train
control module). The PCM controls the pump speed with pulse width modulation to supply more fuel when
it is needed and less when it is not. The pressure is not constant in these fuel systems as the pressure target
changes based on engine speed, throttle position and ambient conditions. There is still a mechanical relief
in the fuel pump module but it will be set at the peak system pressure. Deadheading the pump on a vehicle
like this will not damage the pump but will likely result in unexpected behaviour from the vehicle as the PCM
will modulate the speed of the pump and not see the pressure it expects. It is never recommended to dead
head a pump in this type of system.
[email protected] www.motorvac.com
6

Gas (Petrol) Service
Filling and Mixture Setup
The proper ratio of Detergent : Gasoline (Petrol) is 1:3
Gasoline can be with poured into the Carbon Clean Dual’s tank or extracted from the vehicle being serviced.
The following steps show how to extract Gasoline (Petrol) from the vehicle to mix in the ratio listed above.
1. Connect appropriate adapters to the fuel rail.
2. Connect TEE adapter 060-4501 to adapters and to outlet hose (red) see pg 8.
3. Turn Gas (Petrol) regulator on control panel fully counter clockwise (open)
4. Open Valve 1 (valve inline with fuel rail)
5. Close the Valve 2 (on TEE where the outlet hose is connected).
6. Turn vehicle on.
7. Partially open Valve 2 to allow Gas (Petrol) into the Carbon Clean Dual tank. If the valve is opened too
much vehicle fuel line pressure will drop and the engine will stall.
8. When desired amount of gas has entered the tank, close Valve 2.
9. Turn off vehicle.
[email protected] www.motorvac.com
7

[email protected] www.motorvac.com
8
Gas (Petrol) Service
Reservoir Filling Connection
Return System
Returnless System

Gas (Petrol) Service
Vehicle Connection Procedure (General)
1. For best results ensure vehicle is at operating temperature before performing a service.
2. Turn vehicle off.
3. Fill on board tank with mixed Gas (Petrol) see pg 8 for details.
4. Turn the Gasoline (Petrol) PRESSURE REGULATOR counterclockwise until the regulator is completely
open. Verify that the ON/OFF switch is turned off.
5. Attach the unit to the vehicle’s battery by connecting the red battery clip to the positive battery terminal
and the black battery clip to a solid ground point on the chassis.
6. Press the service selector to the Gas (Petrol) side.
7. Remove the vehicle’s gas cap to relieve tank pressure.
8. Connect the Carbon Clean Dual to the vehicle using appropriate adapters.
9. Go to next service procedure step based on connection method
[email protected] www.motorvac.com
9
WARNING
Flammable Liquid can squirt out of pressurized lines when connecting or disconnecting.
Verify that engine and machine are both off before connecting or disconnecting fuel
lines or adapters.
Wear safety goggles.
Wear chemical resistant gloves when connecting or disconnecting ttings and adapters.
Wrap a shop towel around pressure ttings and adapters when disconnecting.
Avoid exposure to ames, sparks, hot engine parts, and other ignition sources.
Explosion or ame or exposure to ammable liquid and vapors can cause injury.

[email protected] www.motorvac.com
10
Gas (Petrol) Service
Return System Cleaning Service
Follow this procedure if performing a service on a vehicle with a Gas (Petrol) return fuel system
1. Connect as shown in gure below.
2. Refer to the vehicle’s service manual for the manufacturer’s recommended pressure.
3. Press the service selector to the Gas (Petrol) side.
4. Adjust timer knob to desired service time. (30 minutes typical)
5. Turn ON/OFF switch to ON position.
6. Press and hold RUN switch. (Switch can be released when pressure > 5psi).
7. Turn pressure regulator clockwise to increase the pressure to the manufacturer’s specication. (Note: On
a return system the vehicle’s regulator will ensure you cannot over pressurize the system).
8. Allow the fuel to circulate through the system to clear any air out. Start the vehicle.
9. When the run time expires, the cleaning is complete. The unit will automatically shut off and the alarm will
sound. Switch the ON/OFF switch to the OFF position to silence the alarm.
10. Turn the vehicle off.
11. Turn the Gas (Petrol) pressure regulator counterclockwise on the unit to release any residual pressure.
12. Disconnect the battery leads, hoses, and adaptors. Return the vehicle’s fuel system to its normal
operating condition by re-connecting the vehicle’s fuel lines.
13. Re-install the vehicle’s gas cap.
14. Start the vehicle and verify that there are no leaks.

[email protected] www.motorvac.com
11
Gas (Petrol) Service
Returnless System Connection
1. Connect as shown in gure below.
2. Refer to the vehicle’s service manual for the manufacturer’s recommended pressure.
3. Press the service selector to the Gas (Petrol) side.
4. Adjust timer knob to desired service time. (30 minutes typical)
5. Turn ON/OFF switch to ON position.
6. Press and hold RUN switch. (Switch can be released when pressure > 5psi).
7. Turn pressure regulator clockwise to increase the pressure to the manufacturer’s specication.
8. Allow the fuel to circulate through the system to clear any air out. Start the vehicle.
9. When the run time expires, the cleaning is complete. The unit will automatically shut off and the alarm will
sound. Switch the ON/OFF switch to the OFF position to silence the alarm.
10. Turn the vehicle off.
11. Turn the Gas (Petrol) pressure regulator counterclockwise on the unit to release any residual pressure.
12. Disconnect the battery leads, hoses, and adaptors. Return the vehicle’s fuel system to its normal
operating condition by re-connecting the vehicle’s fuel lines.
13. Re-install the vehicle’s gas cap.
14. Start the vehicle and verify that there are no leaks.

[email protected] www.motorvac.com
12
Diesel Service
First Time Operation
The unit is tested at the factory with special test uids then completely drained. These test uids are
compatible with diesel engine systems. Because the unit is dry during shipping, it will be necessary to prime
the machine before it is put into service.
1. Remove the lter from below the diesel tank and ll it completely with diesel fuel and replace it on
the unit.
2. Connect the red battery clip to the positive (+) battery terminal and connect the black battery clip to a
solid chassis ground.
3. Pour 3 bottles of MV3D detergent into the diesel tank on the back right of the machine. See pg 13, for
alternate lling procedure.
4. Connect the DIESEL SIDE output (red) hose and the return (black) hose to each other using a matched
pair of adapters. This will allow the fuel to circulate and ll the system with solution.
5. Switch the ON/OFF switch to the ON position. NOTE: Alarm will sound continually until pump starts.
6. Press and hold the START switch for 3 minutes to circulate uid through the machine.
7. Switch ON/OFF to OFF position to silence alarm.
8. Disconnect battery connections if unit is not to put into immediate use.

[email protected] www.motorvac.com
13
Diesel Service
Filling and Mixture Setup
The desired ratio of MV3D cleaning detergent to diesel fuel is 1:1. This can be done either in a suitable
external container that is sealed between uses or in the Carbon Clean Dual’s on board diesel tank.
To ll the on board tank with diesel fuel from a vehicle follow the procedure below.
1. Connect appropriate adapters to the fuel rail.
2. Connect TEE adapter 060-4501 to adapters and to outlet hose (red) (see gure below).
3. Turn Gas Diesel regulator on control panel fully counter clockwise (open)
4. Open Valve 1 (valve inline with fuel rail)
5. Close the Valve 2 (on TEE where the outlet hose is connected).
6. Turn vehicle on.
7. Partially open Valve 2 to allow Diesel to enter the Carbon Clean Dual diesel tank. If the valve is opened
too much vehicle fuel line pressure will drop and the engine will stall.
8. When desired amount of gas has entered the tank, close Valve 2.
9. Turn off vehicle.

[email protected] www.motorvac.com
14
Diesel Service
Service Procedure
1. Connect to the vehicle according to the gure below.
2. Refer to the vehicle’s service manual for the manufacturer’s recommended pressure.
3. Adjust timer knob to desired service time. (30 minutes typical)
4. Press the service selector to the Diesel side
5. Turn ON/OFF switch to ON position.
6. Press and hold RUN switch. (Switch can be released when pressure > 5psi).
7. Turn pressure regulator clockwise to increase the pressure to the manufacturer’s specication.
8. Allow the diesel to circulate through the system to clear any air out. Start the vehicle.
9. When the run time expires, the cleaning is complete. The unit will automatically shut off and the alarm will
sound. Switch the ON/OFF switch to the OFF position to silence the alarm.
10. Turn the vehicle off.
11. Turn the Gas (Petrol) pressure regulator counterclockwise on the unit to release any residual pressure.
12. Disconnect the battery leads, hoses, and adaptors. Return the vehicle’s fuel system to its normal
operating condition by re-connecting the vehicle’s fuel lines.
13. Re-install the vehicle’s gas cap.
14. Start the vehicle and verify that there are no leaks.

[email protected] www.motorvac.com
15
Accessories
See Motorvac.com for full list of adapters
I.C.S. (Intake Cleaning System) Kit
Part Number - (200-8667, Red Bottle)
One Kit Includes All Components Shown Below:
Air Filter Housing 100-5009
(includes Viton Valve Core, 100-5010)
(Includes Nylon Washer/Seal)
Spray Nozzle 100-5043
(included with 6” Spray Tube)
Base O’Ring 100-5035
Black Plastic Bottle Neck 100-5034
Spray Tube 30” with Nozzle 100-5044
Spray Tube 6” 100-5043
(Included with Spray Nozzle)
Valve with 9’ Siphon Tube 100-5019
Intake Cleaning Procedure using the ICS Kit Part# 200-8667 and
CarbonClean® MV4 Intake System Cleaner Part# 400-0030
1. Warm up vehicle to operating temperature.
2. Shut off vehicle.
3. Fill the ICS container with a MAXIMUM of 4 ounces of CarbonClean® MV4 Intake System Cleaning
Detergent.
4. Pressurize the container with shop air to a minimum of 80 PSI. Do not exceed 185 PSI.
5. Shake the ICS container to aerate the mixture.
CAUTION:
Always wear gloves and safety glasses when performing this service

[email protected] www.motorvac.com
16
NOTE: If the ICS container has too much cleaner in it, there may not be enough air volume to
force the cleaner out with sufcient velocity to contact the intake air plenum walls. Always be
sure to maintain at least 80 pounds of pressure in the ICS container.
6. Be certain that the ICS 30-inch spray tube is free from any kinks or bends.
7. Attach the spray tube to the end of the ICS container.
8. Measure the length of the engine air intake manifold by laying the spray tube outside the manifold.
9. At the throttle plate, grip and hold the tube.
Note: This will be the maximum length that the tube may be inserted into the manifold.
CAUTION: CIS FUEL SYSTEMS
Do not open or move sensor plate / air door on the engine when the fuel distributor is pressurized. The
CIS system will spray fuel into the engine while it is not running.
10. With the engine off and the engine’s air duct removed, open the throttle plate wide open or have
someone hold it open.
11. Insert the ICS spray tube into the manifold up to the point measured in step 8 and 9.
12. While holding the container upright, press and hold the nozzle of the ICS container and quickly pull the
spray tube to the open end of the manifold near the throttle plate.
13. Release the nozzle once the tip of the spray tube gets near the throttle plate.
Note: Do not spray outside of the throttle bore housing.
14. If the MotorVac CarbonClean® System is in use at the time, press the STOP button or Turn the timer
knob to the zero position to depressurize the engine’s fuel system.
Warning It is recommended that after each pass with the ICS container, the engine should be
“bumped over” using the starter. DO NOT ALLOW THE ENGINE TO START. Premature hydro
lock condition may be present if excess uid is present.
Note: Allow 15 minutes of soak time before starting the vehicle.
15. Quickly turn the ignition to the start position then back to the off position to rotate the engine over
slightly.
The continuation of the cleaning service will require the installation of the 6-inch spray tube to clean the
Idle Air Control passage while the engine is running.
Note: Disconnecting and grounding the secondary ignition will also keep the engine from
starting.
16. Repeat these procedures a maximum of three times
17. After the air intake has been cleaned it will be necessary to start the engine and continue with the
cleaning process.
Note: If you do not understand these instructions completely or have any questions contact
MotorVac Technical support at 800-841-8810 BEFORE performing this procedure.
I.C.S. Repair Kit available Separtely
Part Number - (200-5046)
One Kit Includes All Components Listed Below:
• Valvw with 9’ Siphon Tube (100-5019)
• Base O’Ring (100-5035)

Troubleshooting
Parts
Service Parts for the TranTech™ III+ Transmission System.
Please refer to the part numbers below when ordering parts.
Part # Description
010-6060 Reservoir Cap
020-8043 Main power wires with battery clips
050-0095 Filter spin on
050-0043 Pump (Diesel and Gas/Petrol)
080-0230 Female Quick Coupler
200-8667 ICS (Intake System Cleaning) Kit -Complete
050-0016 Pressure switch
ORDERING PARTS
Parts for the unit may be ordered by calling MotorVac Customer Service at (800) 841-8810 or
(905) 615-8620 Please have your model and serial numbers available.
www.motorvac.com
[email protected] www.motorvac.com
17
Symptom Solution
The MCS 352 is not operational or trips breaker
immediately.
Polarity is reversed on vehicle battery connection.
Check connections for correct polarity. Check circuit
breaker on the side of the cabinet.
Pressure Gauge on the MCS 352 displays maximum
pressure upon start up.
Output and Return hoses may be reversed.
Pressure regulator may be fully closed. Turn
pressure regulator counterclockwise, turn timer to
zero and check hoses for correct connection.
Rapid loss of fuel from the MCS 352 reservoir. Return hose connection may be incorrect, allowing
fuel/detergent to return to the vehicle's fuel tank.
Start/Run switch is on but operation does not
commence. Check Timer.
If no time is set, then turn the Time knob to set the
run time.
The MCS 352 performs poorly. Replace lter. Check all hoses and wires for cuts or
frays.
This manual suits for next models
1
Table of contents
Other Motorvac Cleaning Equipment manuals