MRF Quick-Tach MQTP User manual

COPYRIGHT © 2021
MESSER REPAIR AND FABRICATING, LLC
SAUK CENTRE, MN
PRINTED IN USA
ALL RIGHTS RESERVED
OPERATOR’S MANUAL
Quick-Tach Adapters
Models MQTP, MQTP-GLOBAL, MQTP-CHALM-
ERS-500, MQTP-MASSEY/AGCO, MQTP-TV140
Serial Number 13105-
Manual# 96412 JULY 2021 ENGLISH

2
Introducon
Using This Manual
Your tractor loader operator’s manual contains instructions to safely
operate the tractor loader. Anyone who operates a tractor loader with this
attachment installed must rst read, understand and follow the instruc-
tions in the tractor loader operator’s manual.
This manual contains instructions to safely operate and service the
attachment. Anyone who operates or services the attachment must rst
read, understand and follow the instructions in this manual.
Additional operating or servicing information for the attachment may be
provided online, in video, or in other publications. This additional infor-
mation does not replace, and is not a substitute for reading and following,
the instructions in this manual.
The safety alert symbol is shown in WARNING statements to alert users
to hazards which could cause death or injury. Carefully read and follow
the messages.
IMPORTANT notices alert users to instructions which, if not followed,
could result in damage. Carefully read and follow the messages.
There may be times when the attachment and tractor loader shown in this
manual may not be your exact model. The model shown will be close
enough to your attachment or tractor loader to accurately convey the
information.
The most current information available is included in this manual. The
publisher may revise this manual at any time and is not required to notify
users of revisions.
Replacement Manuals
Be sure to include this operator’s manual if you sell or transfer owner-
ship of the attachment.
Contact Messer Repair and Fabricating, LLC for a printed manual, or
nd a downloadable manual on our website.
Using This Aachment
The attachment is designed to be installed on your tractor loader to attach
a skid-steer attachment to your tractor loader.
The attachment is designed for installation specic tractor loader models.
The manufacturer reserves the right to make improvements, and to dis-

3
Introducon
continue or change specications, models or design without notice and
without incurring obligation.
Loader Compability
Conrm your tractor loader’s Rated Operating Capacity (ROC) in the
tractor loader operator’s manual. Conrm your attachment’s ROC in
SPECIFICATIONS in this manual.
Do not install the attachment on the tractor loader if the combined weight
of the attachment and attachment load will exceed the tractor loader ROC
during operation because this may cause diculty in controlling the trac-
tor loader or may cause tractor loader damage.
Do not exceed the attachment’s ROC because this may damage the
attachment.
Product Misuse
Product misuse can cause accidents, injury and death.
The manufacturer of the attachment is not responsible for any harm or
injury resulting from product misuse.
Product misuse includes operating or servicing the attachment without
following the instructions in this manual, using the attachment in any
way for which it was not designed, and modifying the attachment.
Modicaons
Do not modify the attachment in any way.
Manufacturer Contact
Call Messer Repair and Fabricating, LLC at (833) 352-3477, or see us at
www.messerrepair.com.

4
Idencaon Numbers
Record your product information to provide when you contact the dealer
or manufacturer.
Quick-Tach Adapters
MQTP, MQTP-GLOBAL, MQTP-CHALMERS-500, MQTP-MASSEY/AGCO,
MQTP-TV140
Serial Number 13105-
Serial Number Locaon
Purchase Date
Dealer
Dealer Phone
Model
Serial #
Product Idencaon

5
Specicaons
Model MQTP
Length x Width x Height 112 x 46 x 10 cm
(44 x 18 x 4 in.)
Weight 45 kg (100 lbs.)
Rated Operang Capacity 2268 kg (5000 lbs.)
Model MQTP-GLOBAL
Length x Width x Height 114 x 53 x 15 cm
(45 x 21 x 6 in.)
Weight 57 kg (126 lbs.)
Rated Operang Capacity 2268 kg (5000 lbs.)
Model MQTP-CHALMERS-500
Length x Width x Height 114 x 46 x 18 cm
(45 x 18 x 7 in.)
Weight 57 kg (125 lbs.)
Rated Operang Capacity 1361 kg (3000 lbs.)
Model MQTP-MASSEY/AGCO
Length x Width x Height 119 x 56 x 18 cm
(47 x 22 x 7 in.)
Weight 61 kg (135 lbs.)
Rated Operang Capacity 2268 kg (5000 lbs.)
Model MQTP-TV140
Length x Width x Height 180 x 66 x 38 cm
(71 x 26 x 15 in.)
Weight 163 kg (360 lbs.)
Rated Operang Capacity 2268 kg (5000 lbs.)

6
Wear Protecve Equipment
• Wear gloves to protect hands from burns if hydraulic couplers be-
come hot during operation.
• Never wear sandals or other light footwear when operating or servic-
ing the attachment. Wear protective footwear when handling blades
or heavy parts.
• Do not wear loose tting clothing which may become entangled
when operating or servicing the attachment.
Parking Safely
1. Follow the instructions in the tractor operator’s manual to park the
tractor loader safely.
2. Fully lower the attachment to level ground.
3. Stop the tractor engine and remove the key from the switch.
4. Do not leave the tractor operator seat until the engine and all other
moving tractor and attachment parts have stopped.
5. Follow the instructions in the tractor operator’s manual to exit the
tractor safely.
Operang Aachments Safely
• Do not allow anyone to operate the attachment unless they have rst
read and understood the tractor loader and the attachment operator’s
manuals.
• Do not allow anyone to operate the attachment unless they have rst
read and understood the safety and warning decals on the tractor
loader and on the attachment.
• The attachment owner is responsible for training others to safely
operate the attachment, and is responsible for any injuries or harm
which occurs while the attachment is being operated.
• Before operating, replace any worn or damaged safety decals.
• Before operating, thoroughly inspect the attachment to be sure all
hardware (bolts, nuts, etc.) is installed and tightened.
• Before operating, thoroughly inspect the attachment to be sure it is
in working order. If the attachment is damaged or otherwise not in
working order, do not operate until it has been repaired by a qualied
Safety

7
Safety
technician.
• Before raising or lowering the attachment be sure the area is clear of
bystanders.
• Do not operate the tractor loader or the attachment if you are under
the inuence of alcohol, drugs, or medications which may cause
drowsiness.
• Do not allow children to operate the tractor loader or the attachment.
• Do not allow anyone who has not been trained to operate the tractor
loader or the attachment.
• Never allow riders on the attachment.
• Keep hands, feet or other objects away from underneath the attach-
ment while operating.
• Fully lower the attachment to level ground when you are done oper-
ating.
• Never leave the attachment unattended while in a raised position.
• When transporting the attachment installed on the tractor loader,
travel at a slower speed to maintain control.
Servicing Safely
• Disconnect the attachment hydraulic hoses from the tractor loader
before servicing. Do not service the attachment when the hydraulic
hoses are installed on the tractor loader.
• Remove the attachment from the tractor loader before servicing
when instructed to do so in this manual.
• Do not allow anyone to service the attachment unless they have rst
read and understood the tractor loader and the attachment operator’s
or service manuals.
• Do not allow anyone to service the attachment unless they have rst
read and understood the safety and warning decals on the tractor
loader and on the attachment.
• The attachment owner is responsible for training others to safely
service the attachment, and is responsible for any injuries or harm
which occurs while the attachment is being serviced.
• Before inspecting or servicing the attachment, follow the Parking
Safely instructions in this manual and disconnect the attachment

8
Safety
hydraulic hoses from the tractor loader.
• Always securely block the attachment to prevent accidental release
of the lifting mechanism when inspecting or servicing the attach-
ment.
Hydraulic Fluid Safety
• Read and understand the hydraulic safety information in the tractor
loader operator’s manual before operating or servicing the attach-
ment.
• Use cardboard or a board when you check for a leak.
• Fluid in hydraulic hoses is under extreme pressure. If uid is injected
into your skin seek medical treatment immediately.
• Do not handle any hydraulic components until pressure has been
relieved from the system.
• Disconnect the attachment hydraulic hoses from the tractor loader
before inspection or service.
• Inspect attachment hydraulic hoses and hose shields for damage or
wear before attaching to the tractor loader.
Safety Decals
Safety decals may be installed on the attachment to warn users of safety
hazards:
• DANGER decals provide warnings about hazardous situations which
will result in death or serious injury if not avoided.
• WARNING decals provide warnings about hazardous situations
which could result in death or serious injury if not avoided.
• CAUTION decals provide warnings about hazardous situations
which could result in injury if not avoided.
Read and understand all safety decals before operating or servicing the
attachment.
See the Safety Decal Location illustration in this manual to conrm
where decals are installed on the attachment.
Safety decals which are missing, worn or faded must be replaced. Re-
placement safety decal part numbers are included in this manual. Contact
the attachment manufacturer for replacement decals.

9
Installing the Quick-Tach Adapter on the Tractor Loader
Picture Note: For easier installation on some loader models you may
need to tilt the Adapter at an angle as shown.
1. Move the wedge levers (A) to the upright position as shown before
installing on the tractor loader.
IMPORTANT
AVOID DAMAGE!
The wedge pins in the Adapter may be damaged
if they are extended during installaon. Move the
wedge levers to the unlocked (up) posion before
installaon on, and aer removal from, the loader.
Installing and Removing

10
Installing on Tractor Loader (Model MQTP, MQTP-GLOBAL)
1. Follow the instructions in the tractor loader operator’s manual to
install the attachment and exit the operator station safely.
2. Follow the instructions to attach the tractor loader to the Adapter at
the attaching points (A).
Installing on Tractor Loader (Model MQTP-CHALMERS-500)
1. Follow the instructions in the tractor loader operator’s manual to
install the attachment and exit the operator station safely.
2. Follow the instructions to attach the tractor loader to the Adapter at
the attaching points (A).
Installing and Removing

11
Installing on Tractor Loader (Model MQTP-MASSEY/AGCO)
1. Follow the instructions in the tractor loader operator’s manual to
install the attachment and exit the operator station safely.
2. Follow the instructions to attach the tractor loader to the Adapter at
the attaching points (A).
Installing on Tractor Loader (Model MQTP-TV140)
1. Follow the instructions in the tractor loader operator’s manual to
install the attachment and exit the operator station safely.
2. Follow the instructions to attach the tractor loader to the Adapter at
the attaching points (A).
Installing and Removing

12
Installing and Removing
Aaching Quick-Tach Adapter on Tractor Loader to Skid
Steer Aachment (All Models)
1. Move the wedge levers (A) to the unlocked (up) position.
2. Tilt the Adapter forward, and drive the tractor forward until the top
edge of the Adapter attaching plate is under the top ange (B) of the
skid steer attachment.
3. Raise the loader arms slightly until the Adapter attaching plate is
fully seated under the top ange.
4. Tilt the Adapter backward to raise the front of the skid steer attach-
ment.
IMPORTANT
AVOID DAMAGE!
Adapter wedge levers may be damaged if they
strike the aachment. Be sure the wedge levers do
not hit the aachment during installaon.
13
Installing and Removing
5. Move the Adapter wedge levers (A) to the locked (down) position.
6. Follow the instructions in the tractor operator’s manual to park the
tractor and exit the operator station safely.
Picture Note: Adapter wedge pin on left side of skid steer attachment
shown. Check the wedge pins on both sides of the attachment.
IMPORTANT
AVOID DAMAGE!
The skid steer aachment may come o the
Adapter if it is not secured to the aaching plate.
The Adapter wedge pins must be extended into the
skid steer aachment with the levers fully down.

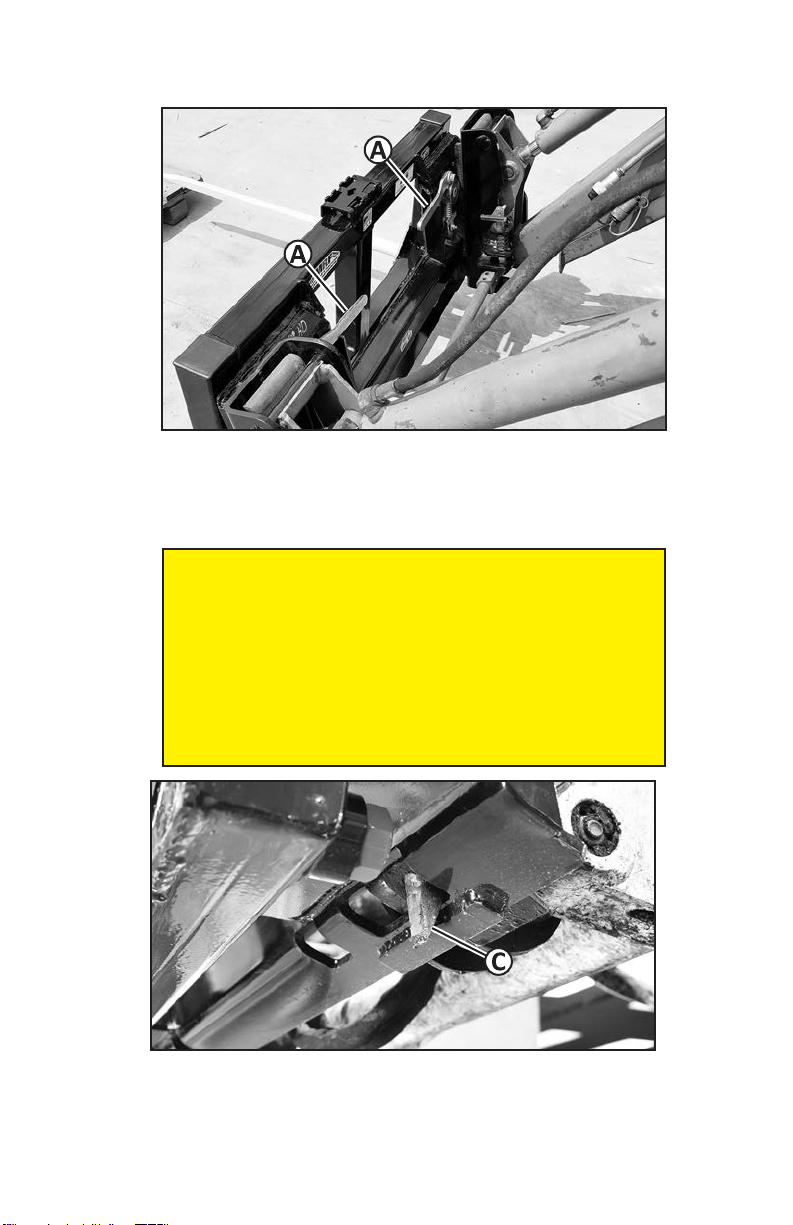
14
Installing and Removing
7. Check to be sure the Adapter wedge pins (C) extended into the holes
in the bottom of the skid steer attachment mounting frame. If not,
move the Adapter wedge levers to the unlocked (up) position and
repeat installation.
8. Follow instructions in the skid steer attachment operator manual to
connect the attachment hydraulic hoses to the tractor loader.
Removing the Quick-Tach Adapter From the Skid Steer
Aachment (All Models)
1. Follow the instructions in the tractor loader operator’s manual to
remove the attachment and exit the operator station safely.
2. Fully lower the tractor loader arms and the attachment to level
ground.
3. Follow instructions in the skid steer attachment operator manual to
disconnect the attachment hydraulic hoses from the tractor loader.
4. Move the Adapter wedge levers (A) to the unlocked (up) position as
shown.
5. Tilt the loader attaching plate forward slightly and drive the tractor
backward until the top edge of the Adapter attaching plate clears the
top ange (B) of the skid steer attachment mounting frame.
Removing the Quick-Tach Adapter From the Tractor
Loader (to Stay on the Skid Steer Aachment)

15
1. Follow the instructions in the tractor loader operator’s manual to
remove the attachment and exit the operator station safely.
2. Fully lower the tractor loader arms and the attachment to level
ground.
Removing from Tractor Loader (Model MQTP, MQTP-GLOBAL)
1. Follow the instructions in the tractor loader operator’s manual to
remove the attachment and exit the operator station safely.
2. Follow the instructions to remove the tractor loader from the Adapter
at the attaching points (A).
Removing from Tractor Loader (Model MQTP-CHALMERS-500)
1. Follow the instructions in the tractor loader operator’s manual to
remove the attachment and exit the operator station safely.
2. Follow the instructions to remove the tractor loader from the Adapter
at the attaching points (A).
Installing and Removing

16
Removing from Tractor Loader (Model MQTP-MASSEY/AGCO)
1. Follow the instructions in the tractor loader operator’s manual to
remove the attachment and exit the operator station safely.
2. Follow the instructions to remove the tractor loader from the Adapter
at the attaching points (A).
Removing from Tractor Loader (Model MQTP-TV140)
1. Follow the instructions in the tractor loader operator’s manual to
remove the attachment and exit the operator station safely.
2. Follow the instructions to remove the tractor loader from the Adapter
at the attaching points (A).
Installing and Removing

17
Pre-Operaon Inspecon
Before starting operation, inspect the area you will be operating in and
inspect the attachment.
Inspect the Work Area
1. Conrm the area is clear of bystanders including animals. Establish
a safety zone by keeping bystanders and animals beyond a 100 foot
radius around the attachment when operating.
Inspect the Aachment
1. Inspect the attachment to be sure it is in working order. If the attach-
ment is damaged or not in working order, do not operate until it has
been repaired by a qualied technician.
Descripon
Theory of Operaon
The tractor’s hydraulic controls are used to raise, tilt and operate the
Quick-Tach Adapter with the installed skid steer attachment.
Operaon
1. Follow the instructions in the Installing and Removing section to
install the attachment.
A - Wedge Lever (Right) D - Aaching Point (Boom)
B - Wedge Lever (Le) E - Wedge Pins
C - Aaching Point (Top)
Operang

18
Operang
2. Follow the instructions in the tractor operator’s manual to park the
tractor and exit the operator station safely.
3. Perform the pre-operation inspection.
4. Follow the instructions in your skid steer attachment operator manual
to operate the attachment.
Transporng the Aachment
On the Loader
Check to be sure the attachment is correctly installed on the tractor load-
er before hauling on a trailor or truck. Follow all tractor loader, truck or
trailer operator’s manual instructions to safely haul the attachment.
Hauling the Aachment
Follow all truck or trailer operator’s manual instructions to securely fas-
ten the attachment to the truck or trailer with straps or chains.

19
Servicing
Service Intervals
Every 8 hours or daily:
• Grease the wedge pins.
• Inspect the attachment for damage and wear. Replace parts as need-
ed.
• Check and tighten all hardware.
Lubricaon
Recommended Grease
Standard Lithium
Lubricang the Wedge Pins
1. Lubricate the two grease ttings (A) until grease appears in the
joints.

20
Replacement Parts
Model MQTP
This manual suits for next models
5
Table of contents
Other MRF Tractor Accessories manuals


Popular Tractor Accessories manuals by other brands


GREAT PLAINS
GREAT PLAINS PL5700 Operator's manual

J&M
J&M 1520 Operator's manual

Toro
Toro 136-8545 installation instructions

GRIBALDI & SALVIA
GRIBALDI & SALVIA ROTOR R 4 204 Operator's manual

Gearmore
Gearmore 12 UNIV Operation, service & parts manual

Grouser Products
Grouser Products FH-443 Owner's manual & parts book