manuals.online logo
Brands
  1. Home
  2. •
  3. Brands
  4. •
  5. MRP
  6. •
  7. Bicycle Accessories
  8. •
  9. MRP hazzard User manual

MRP hazzard User manual

MAINTENANCE SCHEDULE
Maintenance frequency may vary depending on the number of hours
the shock is ridden and the condition under which it is ridden. Heat,
frame design, dust, mud, and adjustment settings are all factors that
need to be taken into consideration in determining the frequency of
basic maintenance and oil changes.
AFTER EACH
USE
END OF EACH
SEASON ANNUALLY
Clean under
the bottom-out
bumper
Ye s Ye s Ye s
Clean shock
exterior Ye s Ye s Ye s
Check shaft
for damage or
rust
Inspect Inspect Inspect
Check seal
head for leaks
or loosening
Inspect Inspect/Replace Replace
Check nuts for
loosening Inspect Inspect Inspect
Check DU
bushings Inspect Inspect Inspect
Check spring Inspect Inspect Inspect
Change oil,
piston and
wearband,
clean interior
parts, check
nitrogen
Recommended
IMPORTANT NOTE:
NOTE: MRP RECOMMENDS SENDING YOUR SHOCK EXCLUSIVELY TO MRP OR
A RECOMMENDED SERVICE CENTER FOR ALL YOUR OIL CHANGE AND SEAL
REPLACEMENT MAINTENANCE.
MORE TUNING INFORMATION AT OWNER’S
MANUAL
Congratulations on your purchase of another cutting-edge
suspension product from MRP! Please read this manual completely
before you ride. It will help you to set your shock for optimum
performance.
IMPORTANT CONSUMER SAFETY INFORMATION
WARNING: RIDING A BIKE IS DANGEROUS. NOT PROPERLY
MAINTAINING OR INSPECTING YOUR BIKE AND ITS COMPONENTS
IS EVEN MORE DANGEROUS. IT IS ALSO DANGEROUS TO NOT READ
AND FOLLOW THESE INSTRUCTIONS.
Thank you for choosing MRP. This owner’s manual is your
reference guide to using and fine-tuning your shock for optimum
suspension performance and comfort. It also provides important
information about the proper maintenance of your shock. Carefully
read this manual before installing your shock. If you need further
assistance, our experienced team is able to advise and assist you to
find the exact set up to meet your personal needs.
The shock is an important part of your mountain bike and
this owner’s manual explains how to install and use it properly. We
recommend that it be installed by a qualified bicycle mechanic.
Improperly installed shocks might cause serious harm to you and may
severely damage your mountain bike. Never take any chances with
your safety. Before installing and using your new shock, carefully read
this owner’s manual to learn the correct installation and adjustment
procedures and avoid the consequences of an incorrect installation or
improper adjustment.
When your shock requires an oil change or other internal
maintenance, MRP and experienced suspension service centers are
best qualified to provide the necessary service or repairs.
WARRANTY:
MRP suspension products are the highest quality and as such are
warranted to be free from defects in materials and workmanship
for a period of one year from the date of purchase for the original
purchaser. If date of purchase cannot be verified by product
registration or proof of purchase then the warranty is one year
from the date of manufacture. On receipt of the product by MRP,
if it is found to be defective, MRP will determine replacement or
repair of the product at its sole discretion. MRP shall not be liable
for any indirect, special or consequential damages. Warranty
does not apply to any product that has been installed improperly
eectively absorb impacts, thus making the ride harsh.
To reduce the high-speed compression threshold, thus
decreasing the level of force to activate the blow-o valve, turn the
silver high-speed compression adjuster knob counterclockwise
(unscrew). When the high-speed setting gets too soft, the suspension
will use more travel upon impacts and become more prone to
bottoming out.
IMPORTANT NOTE:
WHEN TURNING THE HIGH-SPEED COMPRESSION ADJUSTMENT KNOB, THE
LOW-SPEED COMPRESSION ADJUSTMENT KNOB WILL FOLLOW ALONG WITHOUT
AFFECTING ITS SETTING.
SHRED LEVER ADJUSTMENT
The Hazzard features the Shred Lever, a two position switch
that quickly boosts low-speed compression damping significantly in
the “on” position. Between the shock body and reservoir (piggyback),
the Hazzard has two available flowpaths for the damping oil. The
Shred Lever allows you to toggle between them. In the “on” position
(when the lever pushed towards a positon parallel with body and
reservoir), oil must pass through an additonal shim that provides firm
resistance to low-speed compression events.
The Shred Lever is best utilized to improve eciency by
reducing pedal bob and wasted energy on long, smooth climbs or
particularly tame terrain. Although there is no risk of damage if the
shock is ridden aggressively while the feature is “on,” it will result
in a harsh ride over very rough terrain. For that reason, we do not
recommend you descend while the Shred Lever is on.
SHRED LEVER
“OFF” POSITION
SHRED LEVER “ON”
POSITION
or adjusted using methods not outlined in this manual. Warranty
also does not cover products that have been misused or products
that have missing/altered serial numbers. The product is not
warrantied against damage in the appearance of the product or for
modifications not outlined in this manual. This warranty does not
cover breakage, bending, or damage that may result from crashes,
falls, or abuse. Normal wear and tear items such as; seals, wipers,
bushings, stanchion coating, stanchions, piston bands, foam rings,
bottom out and top out bumpers, or damage caused by lack of
proper maintenance as outlined in this manual is not covered by this
warranty.
What to do if you need warranty inspection or service:
1. Go to MRPbike.com and locate the warranty contact form in
the support section of the site. Alternatively, call or e-mail MRP
about the troubles you are having and to set up a RA# (Return
Authorization Number).
2. Carefully pack and ship your product, be sure to insure the
package in case it is lost or damaged in transit. (Only the return
shipping to the customer is covered under warranty)
3. Wait for an e-mail confirming MRP has received your shipment.
DISCLAIMER
BECAUSE MRP SUSPENSION PRODUCTS ARE DESIGNED FOR USE IN RACING AND
EXTREME RIDING CONDITIONS, MRP SUSPENSION CANNOT GUARANTEE ANY OF
ITS SUSPENSION PRODUCTS, OTHER THAN FROM MANUFACTURING DEFECTS,
BECAUSE WE HAVE NO CONTROL OVER HOW THE PRODUCTS ARE USED AFTER
INSTALLATION. IN ADDITION, THE PURCHASER ASSUMES FULL RESPONSIBILITY
TO THE EXTENT LEGALLY PERMITTED FOR THE RISKS OF PERSONAL INJURY AND/
OR DAMAGE TO THE PURCHASER’S BIKE OR TO ANY THIRD PARTY THAT MAY BE
INVOLVED IN AN INCIDENT WITH THE PURCHASER.
MOUNTING HARDWARE
MRP uses 1/2” (12.7mm) DU bushings on both ends, which
is compatible with the original mounting hardware found on many
recent mountain bikes. Ordering new hardware with your shock is
recommended as this will ensure you have the proper hardware for
your shock and bike. If you contact MRP or your local MRP dealer, we
can verify if you can use the original mounting hardware that came
with your bike.
Before installing your mounting hardware check the direction
the piggy back should face on your frame. This is important so as
setting gets too firm, the shock absorber will
not be able to absorb low-velocity impacts
and weight transfers, thus making the ride
harsher. When the low-speed setting gets
too soft, the shock absorber will be too
active, wallowing more under pedaling and
more prone to bottoming out.
To increase low-speed compression
damping, thus making the suspension stier, turn the black low-
speed compression adjuster knob clockwise (screw in). There are
approximately 30 clicks of low-speed compression adjustment.
To reduce the low-speed compression damping, thus making
the suspension softer, turn the low-speed compression adjuster
counterclockwise (unscrew).
HIGH-SPEED COMPRESSION
The Hazzard’s high-speed compression circuit is an adjustable
blow-o valve that momentarily relieves the pressure building up
inside the shock upon a harsh impact, instantly providing additional
plushness then increasing resistance as needed. The adjustment
controls the level of force (threshold) required to open the blow-o
valve upon fast movements of the shock’s shaft (high velocity) which
can be caused by square-edged impacts, roots, rocks, potholes,
vibrations or brake bumps. When set properly, the high-speed
compression circuit allows the wheel to eectively absorb all impacts
without bottoming out or using too much travel.
Start with the adjustment in the fully open position (completely
turned counterclockwise) and take a test ride. If you tend to bottom
out often or use too much travel upon impacts or repetitive bumps
(but your sag is set appropritely), add more resistance by turning the
adjuster one click (approximately 1/8th of a turn) at a time until you
bottom out only once in a while upon major impacts.
To increase the high-speed compression threshold, thus
increasing the level of force to activate
the blow-o valve, turn the silver
high-speed compression adjuster
knob clockwise (screw in). There are
appoximately 14 clicks (two complete
rotations) of high-speed compression
adjustment. When the high-speed setting
gets too firm, the shock will not be able to
REBOUND
The rebound adjustment controls the speed with which the
shock will return to its initial extended state after being compressed
by an impact. If the rebound adjustment properly set, the rear wheel
should keep maximum traction by tracking the ground without
catapulting the rider o the bike.
gets too slow, the shock absorber will not have time to returne to its
initial position when a series of close bumps is encountered. In this
case, the bike will run out of travel (packing), possibly bottoming out,
and may give the impression of the compression being too soft. When
the rebound adjustment is set too fast, the rear end of the bike will kick
and move from side to side after hitting a series of close bumps and
the rider will feel catapulted by the bike.
To increase the rebound damping, thus making the shock
return slower upon an impact, turn the rebound adjustement
clockwise (screw in). To reduce the rebound damping, thus making
the shock return faster upon an impact, turn the rebound adjuster
knob counterclockwise (unscrew). The rebound adjustment range is
appoximtely two complete rotations.
If you cannot achieve appropriate rebound speeds, a change
to the internal shimstack may be needed. Contact MRP if this is the
case.
IMPORTANT NOTE:
MRP’S REBOUND VALVING IS TUNED IN SUCH A WAY THAT IT PROVIDES MORE
DAMPING (SLOWER RETURN) WHEN DEEP WITHIN THE STROKE TO PREVENT THE
RIDER FROM BEING CATAPULTED OFF THE BIKE UPON MAJOR IMPACTS.
LOW-SPEED COMPRESSION
The low-speed compression adjustment controls the damping
level (resistance) for slow movement of the shock’s shaft (low velocity),
such as under pedaling, when cornering and when preloading the
suspension for jumping. The low-speed compression damping level
provides the overall stiness feeling of the bike’s suspension, making it
either plush and comfortable or firm and fast rolling.
You should start in the middle of the adjustment range
(approximately 15 clicks
back
from max). To adjust properly, turn the
adjuster one click at a time and take a test ride. The adjustment is
more sensitive towards the max position (firmest). When the low-speed
not to damage your frame, and also for frames that require dierent
mounting hardware sizes for each end of the shock. For three piece
hardware, start with the steel sleeve and insert it through (the correct
side) the bushing in the eyelet and center it on the eyelet as best as
you can. Take the frame spacers and insert the provided seals into
the flanged side of the spacer. With the seals installed slide the frame
spacers over the sleeve so that the seal rests against the eyelet of the
SPRING REMOVAL & INSTALLATION
To remove the spring, start by turning the preload adjuster ring
counterclockwise to remove all preload until the spring become loose.
Push down on the spring retainer clip then slide it o the shock, being
careful not to damage the shaft with the sharp sides of the spring clip.
Once the clip is removed, you can slide the spring o the shock.
IMPORTANT NOTE:
ALWAYS MAKE SURE THAT THE END OF THE SPRING’S COIL IS ALIGNED ON
THE OPPOSITE SIDE OF THE SLOT IN THE SPRING RETAINING CLIP. THIS WILL
PREVENT THE SPRING FROM BENDING THE CLIP.
PRELOAD
Spring preload is the compression applied to the shock’s spring
when at rest, using the preload adjuster ring. The preload adjustment
is used to achieve the optimal amount of sag and proper ride height.
To increase the preload on your spring, turn the preload
ring clockwise. Increasing the preload will increase the ride height,
thus reducing the sag. This will result in a more responsive ride. Be
careful not to apply too much preload. This can cause “coil binding”,
which is when the coils of the spring rub against each other under
full compression. This can damage the spring, the shock, and can be
dangerous for the rider.
To reduce the preload on your spring, turn the preload ring
counter-clockwise. Reducing the preload will decrease the ride height,
thus increasing the sag. This will result in a more comfortable ride.
Make sure to apply enough preload so the spring is firmly held in place
and does not spin freely on the shock.
IMPORTANT NOTE:
IF MORE THAN 5MM OF PRELOAD (5 TURNS) IS NEEDED TO ACHIEVE PROPER
SAG, IT IS RECOMMENDED TO CHANGE TO A HIGHER SPRING RATE. IF SAG
IS NOT ENOUGH WITHOUT ANY PRELOAD APPLIED TO THE SPRING, IT IS
RECOMMENDED TO CHANGE TO A LIGHTER SPRING RATE.
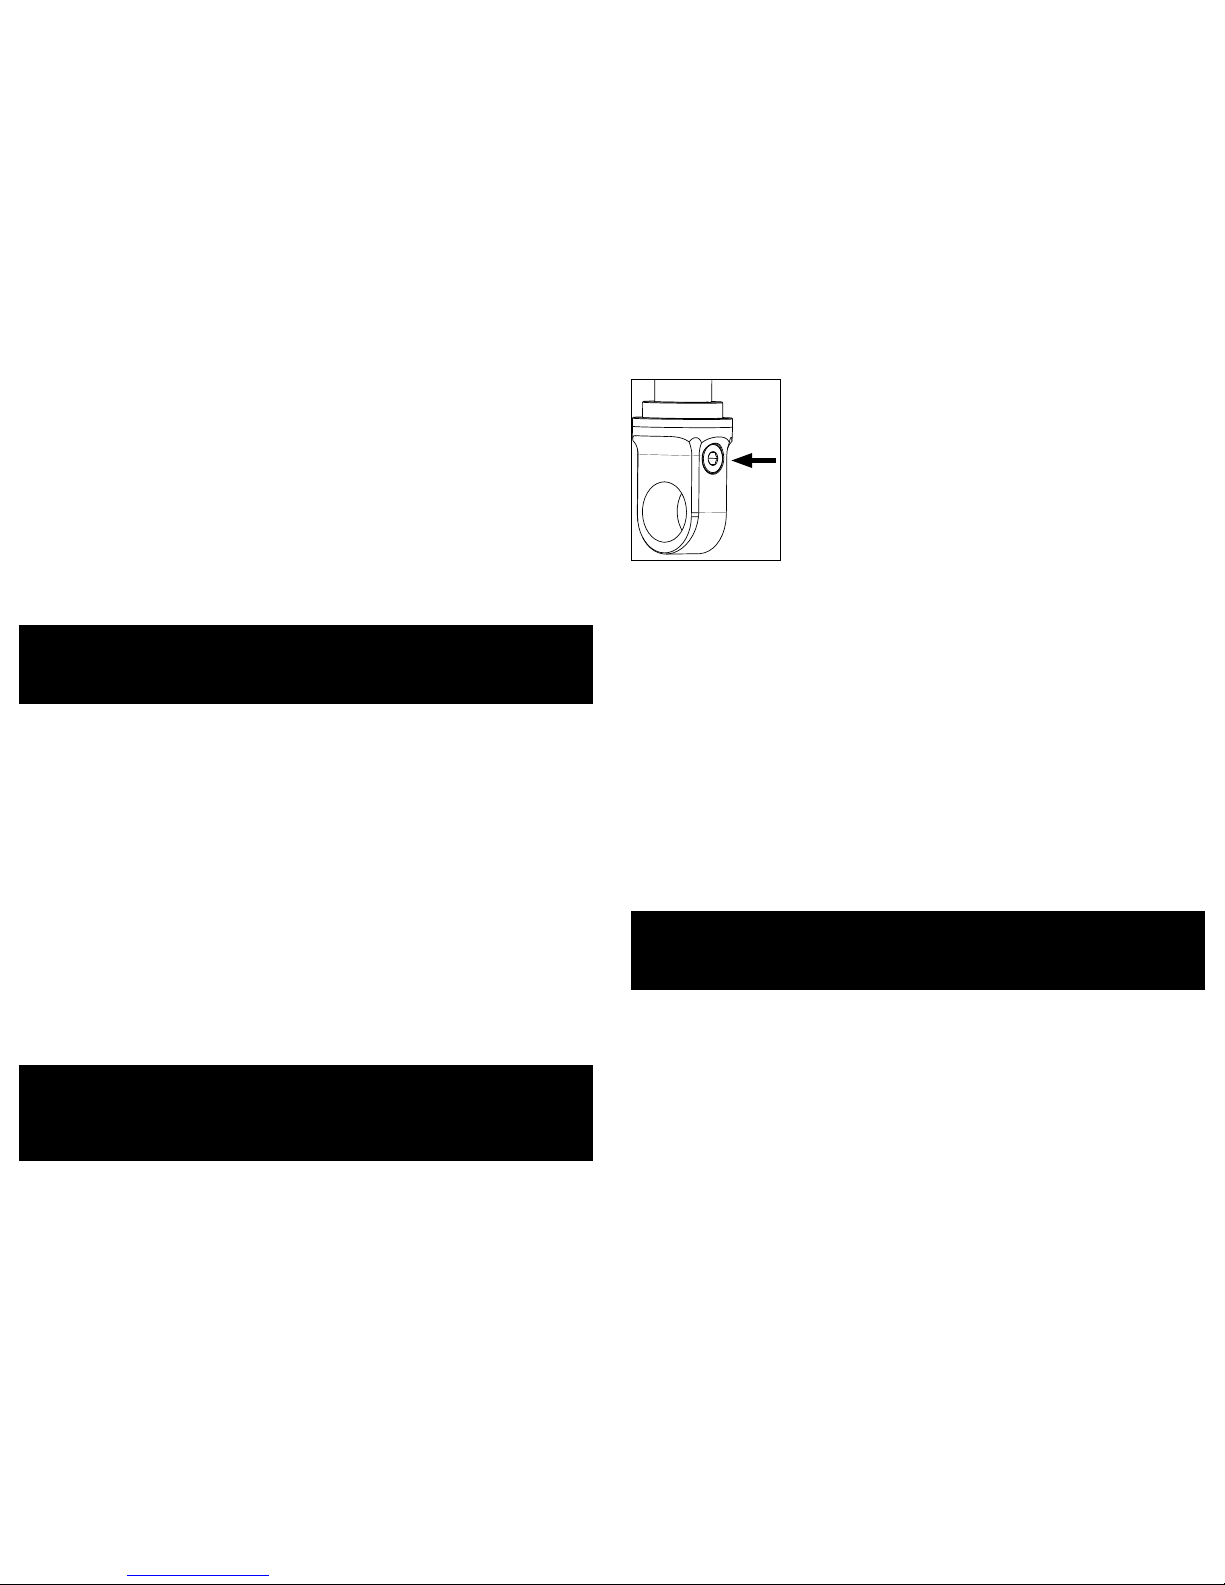
The rebound adjustment on the Hazzard
uses requires a 3mm hex key. You should start in
the middle of the adjustment range, one complete
rotation counterclockwise from max rebound
(fully in). To adjust properly, turn the adjustment
appoximately 1/8 of a turn at a time and take a test
ride. The adjustment is more sensitive towards the
fully in position (slowest). When the rebound setting

Other MRP Bicycle Accessories manuals

MRP ribbon User manual

MRP

MRP ribbon User manual

MRP BAXTER User manual

MRP

MRP BAXTER User manual

MRP SXg User manual

MRP

MRP SXg User manual

MRP bartlett User manual

MRP

MRP bartlett User manual

MRP D-Mount 1x User manual

MRP

MRP D-Mount 1x User manual

MRP G3 Steel User manual

MRP

MRP G3 Steel User manual

MRP S4 User manual

MRP

MRP S4 User manual

MRP raven User manual

MRP

MRP raven User manual

MRP LOOP TR User manual

MRP

MRP LOOP TR User manual

Popular Bicycle Accessories manuals by other brands

Xplova X5 user manual

Xplova

Xplova X5 user manual

Ruff Cycles BIGGIE MUDGUARDS Assembly manual

Ruff Cycles

Ruff Cycles BIGGIE MUDGUARDS Assembly manual

Conquer 400-STFLD instructions

Conquer

Conquer 400-STFLD instructions

Qstarz SR-Q2100 Quick installation guide

Qstarz

Qstarz SR-Q2100 Quick installation guide

Shimano FC-M590-S user manual

Shimano

Shimano FC-M590-S user manual

Shimano SLX BR-M7000 Dealer's manual

Shimano

Shimano SLX BR-M7000 Dealer's manual

Thule Yepp Nexxt Mini 12080101 instructions

Thule

Thule Yepp Nexxt Mini 12080101 instructions

Asaklitt 1998 instruction manual

Asaklitt

Asaklitt 1998 instruction manual

Yamaha PW45 Original instructions

Yamaha

Yamaha PW45 Original instructions

BASETech 1534910 operating instructions

BASETech

BASETech 1534910 operating instructions

Iget C210 user manual

Iget

Iget C210 user manual

SIGMA SPORT ROX 4.0 Short manual

SIGMA SPORT

SIGMA SPORT ROX 4.0 Short manual

VDO Cyclecomputing C1DS instruction manual

VDO Cyclecomputing

VDO Cyclecomputing C1DS instruction manual

Ananda D15 manual

Ananda

Ananda D15 manual

Confidence Baby Jogger manual

Confidence

Confidence Baby Jogger manual

ROSE Bikes 2335609 owner's manual

ROSE Bikes

ROSE Bikes 2335609 owner's manual

DAHON BIOLOGIC owner's manual

DAHON

DAHON BIOLOGIC owner's manual

Tern QuadStruts quick start guide

Tern

Tern QuadStruts quick start guide

manuals.online logo
manuals.online logoBrands
  • About & Mission
  • Contact us
  • Privacy Policy
  • Terms and Conditions

Copyright 2025 Manuals.Online. All Rights Reserved.