MSW MSW-PTM-02 User manual

EXPONDO.DE
MANUAL AXIAL PRESS TOOL
MSW-PTM-02
BEDIENUNGSANLEITUNG
User manual | Instrukcja obsługi | Návod k použití | Manuel d´utilisation | Istruzioni per l‘uso | Manual de instrucciones

Rev. 06.02.2020 3
Rev. 06.02.2020
2
Rev. 06.02.2020
2
Deutsch
English
Polski
Česky
Français
Italiano
Español
3
7
11
15
19
23
27
INHALT | CONTENT | TREŚĆ | OBSAH | CONTENU | CONTENUTO | CONTENIDO
PRODUKTNAME SCHIEBEHÜLSENWERKZEUG
PRODUCT NAME MANUAL AXIAL PRESS TOOL
NAZWA PRODUKTU ZACISKARKA OSIOWA
NÁZEV VÝROBKU AXIÁLNÍ KRIMPOVACÍ NÁSTROJ
NOM DU PRODUIT SERTISSEUSE AXIALE
NOME DEL PRODOTTO ATTREZZO CRIMPATURA ASSIALE
NOMBRE DEL PRODUCTO HERRAMIENTA CRIMPADORA AXIAL
MODELL
MSW-PTM-02
PRODUCT MODEL
MODEL PRODUKTU
MODEL VÝROBKU
MODÈLE
MODELLO
MODELO
IMPORTEUR
EXPONDO POLSKA SP. Z O.O. SP. K.
IMPORTER
IMPORTER
DOVOZCE
IMPORTATEUR
IMPORTATORE
IMPORTADOR
ADRESSE VON IMPORTEUR
UL. NOWY KISIELIN-INNOWACYJNA 7, 66-002 ZIELONA GÓRA | POLAND, EU
IMPORTER ADDRESS
ADRES IMPORTERA
ADRESA DOVOZCE
ADRESSE DE L'IMPORTATEUR
INDIRIZZO DELL'IMPORTATORE
DIRECCIÓN DEL IMPORTADOR
TECHNISCHE DATEN
Parameter Werte
Produktname Schiebehülsenwerkzeug
Modell MSW-PTM-02
Gewicht [kg] 5,5
Spannkraft [kN] 40
Die Abmessungen des
Geräts zum Aufweiten der
Löcher [mm]
40x16x4,7
Pressenabmessungen [mm] 400x195x63
Messerabmessungen [mm] 250x150x20
Reichweite erweitern [mm] 16-32
Schnittbereich [mm] Max 40
2.1. SICHERHEIT AM ARBEITSPLATZ
a) Halten Sie Ihren Arbeitsplatz sauber und gut
beleuchtet. Unordnung oder schlechte Beleuchtung
kann zu Unfällen führen. Handeln Sie vorausschauend,
beobachten Sie, was getan wird, und nutzen Sie Ihren
gesunden Menschenverstand bei der Verwendung
des Gerätes.
b) Bei Zweifeln, ob das Produkt ordnungsgemäß
funktioniert, oder wenn Schäden festgestellt werden,
wenden Sie sich bitte an den Kundendienst des
Herstellers.
c) Das Produkt darf nur vom Hersteller repariert werden.
Reparieren Sie es nicht selbst!
d) Bewahren Sie die Gebrauchsanleitung für den
weiteren Gebrauch auf. Sollte das Gerät an Dritte
weitergegeben werden, muss die Gebrauchsanleitung
mit ausgehändigt werden.
e) Verpackungselemente und kleine Montageteile
außerhalb der Reichweite von Kindern aufbewahren.
f) Halten Sie das Gerät von Kindern und Tieren fern.
g) ImLaufederNutzungdiesesWerkzeugseinschlieβlich
anderer Werkzeuge soll man sich nach übrigen
Betriebsanweisungen richten.
Die Begrie "Gerät" oder "Produkt" in den Warnungen
und Beschreibung des Handbuchs beziehen sich auf
Schiebehülsenwerkzeug. Legen Sie keine Hände oder
Gegenstände in das laufende Gerät!
Gebrauchsanweisung beachten.
Handschutz benutzen.
ACHTUNG! Warnung vor Handverletzungen!
1. ALLGEMEINE BESCHREIBUNG
Diese Anleitung ist als Hilfe bei der sicheren und zuverlässigen
Nutzung gedacht. Das Produkt wurde strikt nach den
technischen Vorgaben und unter Verwendung modernster
Technologien und Komponenten sowie unter Wahrung der
höchsten Qualitätsstandards entworfen und angefertigt.
VOR INBETRIEBNAHME MUSS DIE ANLEITUNG
GENAU DURCHGELESEN
UND VERSTANDEN WERDEN.
Für einen langen und zuverlässigen Betrieb des Geräts muss
auf die richtige Handhabung und Wartung entsprechend
den in dieser Anleitung angeführten Vorgaben geachtet
werden. Die in dieser Anleitung angegebenen technischen
Daten und die Spezikation sind aktuell. Der Hersteller
behält sich das Recht vor, im Rahmen der Verbesserung der
Qualität Änderungen vorzunehmen.
ERLÄUTERUNG DER SYMBOLE
HINWEIS! In der vorliegenden Anleitung
sind Beispielbilder vorhanden, die von dem
tatsächlichen Aussehen der Maschine abweichen
können.
Die originale Anweisung ist die deutschsprachige Fassung.
Sonstige Sprachfassungen sind Übersetzungen aus der
deutschen Sprache.
2. NUTZUNGSBEDINGUNGEN
ACHTUNG! Lesen Sie alle Sicherheitshinweise und
alle Anweisungen durch. Die Nichtbeachtung der
Warnungen und Anweisungen kann zu elektrischen
Schlägen, Feuer und/oder schweren Verletzungen
oder Tod führen.
2.2. PERSÖNLICHE SICHERHEIT
a) Es ist nicht gestattet, das Gerät im Zustand der
Ermüdung, Krankheit, unter Einuss von Alkohol,
Drogen oder Medikamenten zu betreiben, wenn das
die Fähigkeit das Gerät zu bedienen, einschränkt.
b) Das Gerät darf nicht von Kindern oder Personen
mit eingeschränkten physischen, sensorischen und
geistigen Fähigkeiten oder ohne entsprechende
Erfahrung und entsprechendes Wissen bedient
werden. Dies ist nur unter Aufsicht einer für die
Sicherheit zuständigen Person und nach einer
Einweisung in die Bedienung der Maschine gestattet.
c) Das Gerät darf nur von körperlich geeigneten
Personen bedient werden, die zu ihrem Benutzen
fähig und entsprechend geschult sind und die
diese Bedienungsanleitung gelesen und verstanden
haben und im Rahmen der Sicherheit und des
Gesundheitsschutzes am Arbeitsplatz geschult
wurden.
d) Seien Sie aufmerksam und verwenden Sie Ihren
gesunden Menschenverstand beim Betreiben des
Gerätes. Ein Moment der Unaufmerksamkeit während
der Arbeit kann zu schweren Verletzungen führen.
e) Benutzen Sie eine persönliche Schutzausrüstung,
die den in Punkt 1 der Symbolerläuterungen
vorgegebenen Maßgaben entspricht. Die Verwendung
einergeeignetenundzertiziertenSchutzausrüstung
verringert das Verletzungsrisiko.
f) Überschätzen Sie Ihre Fähigkeiten nicht. Sorgen Sie
für einen sicheren Stand während der Arbeit. Dies gibt
Ihnen eine bessere Kontrolle über das Gerät im Falle
unerwarteter Situationen.
g) Tragen Sie keine weite Kleidung oder Schmuck.
Halten Sie Haare, Kleidung und Handschuhe von
beweglichen Teilen fern. Lose Kleidung, Schmuck
oder lange Haare können durch sich bewegende Teile
erfasst werden.
h) Das Gerät ist kein Spielzeug. Kinder sollten in der
Nähe des Geräts unter Aufsicht stehen, um Unfälle zu
vermeiden.
HINWEIS! Kinder und Unbeteiligte müssen bei der
Arbeit mit diesem Gerät gesichert werden.
BEDIENUNGSANLEITUNG

4Rev. 06.02.2020 5
Rev. 06.02.2020
3. NUTZUNGSBEDINGUNGEN
Das Kit enthält Werkzeuge zum Schneiden und Spreizen
von Rohren sowie ein Gerät zum Verpressen des
Verbindungsstücks.
Für alle Schäden bei nicht sachgemäßer Verwendung
haftet allein der Betreiber.
3.1. GERÄTEBESCHREIBUNG
KOMPONENTEN DES SETS
1. Bewegliche Backen
2. Feste Backen
3. Bolzen
4. Führungsrohr
5. FesterGri
6. Abzug
7. Haltegri
8. BeweglicherGri
9. Rohrabschneider (Kutter)
10. Expansionsmatrix
11. Rohrerweiterungswerkzeug
AUFBAU EINES AXIALEN SCHIEBEHÜLSENWERKZEUGS
Nummer Bezeichnung Menge
1 Beweglicher Stift 1
2 Feder 1
3 C4 Stahlkugel 1
4 Stationäre Matrix 1
5 Lager 32.6x29.6x15 2
6 Bewegliche Matrix 1
7 Beweglicher Stift 1
8Kunststodeckel 1
9 Führungsrohr 1
10 Feststellschraube M5x10 1
11 Führungsplatte 1
12 Schraube M6x20 1
13 Angespannte Feder 1
14 Federbasis 1
15 Sicherungsstift 2
16 Korpus 1
17 Verriegelungszangen 1
18 Lager 28x25x6 2
19 Beweglicher Kopfhalter (I) 1
20 Ersatzring 30 2
21 Druckschraube 1
22 Bolzen 1
23 Zusatzstift 1
24 Lager 14x12x12 1
25 Zylinderstift 4x24 1
26 Angespannte Feder 1
27 Sperrklinke 1
28 BeweglicherGri 1
29 Sechskantschraube M6x32 2
30 Beweglicher Kopfhalter (II) 1
31 Haltegri 2
32 Gabelverbindungsstück 1
33 Federung 1
34 Federbasis 1
35 Führungsrolle 1
36 Gewindespindel M6x28 1
37 StationärerGri 1
38 Angespannte Feder 1
39 Klemmring 1
40 Führungsplatte 1
41 Schraube M5x6 2
42 Reset-Taste 1
1. Messerklinge der Rohrabschneiders
2. Auslöseknopf
3. Klemme
3.2. VORBEREITUNG ZUR VERWENDUNG
ARBEITSPLATZ DES GERÄTES:
Die Umgebungstemperatur sollte nicht unter -20 ° C und
nicht über 40 ° C liegen. Das Gerät sollte immer auf einer
ebenen,stabilen,sauberenundtrockenenOberächeund
außerhalb der Reichweite von Kindern und Personen mit
eingeschränkten geistigen, sensorischen und psychischen
Fähigkeiten verwendet werden.
3.3. ARBEIT MIT DEM GERÄT
1. Schneiden von Rohren
a) Drücken Sie die Grie zusammen, die
Verbindungsklemmeönetsichautomatisch.
b) Drücken Sie den Auslöser (Abb. 3, 3).
c) ÖnenSiedieGrie.
d) Legen Sie das Rohr wie abgebildet in den
Rohrabschneider und drücken Sie die Grie
zusammen.
e) "Pumpen",bisdasRohrgeschnittenist.
ACHTUNG: Stellen Sie sicher, dass das Rohr senkrecht
zum Messer steht.
AUFBAU EINES ROHRABSCHNEIDERS
ACHTUNG: Der Rohrschnitt muss glatt und gratfrei sein. Dies
stellt die Dichtheit der Verbindung sicher.
2. Rohre erweitern
a) Wählen Sie die entsprechende Matrix aus.
b) ÖnenSiedieWerkzeughalter fürdieRohrdehnung
vollständig (Abb. 1, 11).
c) Verschrauben Sie die Matrix.
d) Setzen Sie die Hülse auf das expandierte Rohr
(stellen Sie sicher, dass sich die Hülse nicht auf dem
expandierten Abschnitt des Rohrs bendet) und
bringen Sie das abgeschnittene Ende wie gezeigt auf
das Rohr auf der Matrize auf.
90°
e) Schließen Sie die Werkzeughalter, um das Rohr zu
erweitern.
ACHTUNG: Um eine gleichmäßige Rohrausdehnung
zu gewährleisten, halten Sie die Grie eine Weile
geschlossen, önen Sie sie dann vorsichtig, drehen
Sie das Rohr oder Werkzeug um ca. 30 ° und
wiederholen Sie den Vorgang. Es sollte ausreichen,
den Erweiterungsvorgang zweimal durchzuführen.
ACHTUNG: Eine übermäßige oder unzureichende
Verbreiterung des Rohrs kann zu einer Undichtigkeit
des Anschlusses führen.
3. Montage des Verbindungsstücks
a) Setzen Sie das Verbindungsstück so in den
verlängerten Teil des Rohrs ein, dass es die Hülse
erreicht (es muss nicht den Flansch erreichen). Nach
einer Weile schrumpft das Rohr und haftet an der
Armatur.
b) Bewegen Sie dann die Hülse so nah wie möglich an
das Verbindungsstück heran.
4. Verpressen bzw. Zusammenklemen des
Verbindungsstücks
a) Wählen Sie die entsprechenden Backen (Abb. 2; 1,2)
und verriegeln Sie sie gemäß der Zeichnung.
1
2
3
2.3. SICHERE ANWENDUNG DES GERÄTS
a) Überhitzen Sie das Gerät nicht. Verwenden
Sie nur geeignete Werkzeuge für die jeweilige
Anwendung. Richtig ausgewählte Geräte und der
sorgsame Umgang mit ihnen führen zu besseren
Arbeitsergebnissen.
b) Nicht verwendete Werkzeuge sind außerhalb
der Reichweite von Kindern sowie von Personen
aufzubewahren, welche weder das Gerät noch die
Anleitung kennen. In den Händen unerfahrener
Personen können diese Geräte eine Gefahr darstellen.
c) Halten Sie das Gerät stets in einem einwandfreien
Zustand. Prüfen Sie vor jeder Inbetriebnahme, ob
am Gerät und seinen beweglichen Teilen Schäden
vorliegen (defekte Komponenten oder andere
Faktoren, die den sicheren Betrieb der Maschine
beeinträchtigen könnten). Im Falle eines Schadens
muss das Gerät vor Gebrauch in Reparatur gegeben
werden.
d) Halten Sie das Gerät außerhalb der Reichweite von
Kindern.
e) Reparatur und Wartung von Geräten dürfen
nur von qualiziertem Fachpersonal und mit
Originalersatzteilen durchgeführt werden. Nur so wird
die Sicherheit während der Nutzung gewährleistet.
f) Um die Funktionsfähigkeit des Gerätes zu
gewährleisten, dürfen die werksmäßig montierten
Abdeckungen oder Schrauben nicht entfernt werden.
g) Das Gerät muss regelmäßig gereinigt werden, damit
sich nicht dauerhaft Schmutz festsetzt.
h) Bearbeiten Sie nie zwei Elemente gleichzeitig.
i) Das Gerät ist kein Spielzeug. Reinigung und Wartung
dürfen nicht von Kindern ohne Aufsicht durch eine
erwachsene Person durchgeführt werden..
j) Es ist untersagt, in den Aufbau des Geräts einzugreifen,
um seine Parameter oder Konstruktion zu ändern.
ACHTUNG!ObwohldasGerätin Hinblick aufSicherheit
entworfen wurde und über Schutzmechanismen
sowie zusätzlicher Sicherheitselemente verfügt,
besteht bei der Bedienung eine geringe Unfall-
oder Verletzungsgefahr. Es wird empfohlen, bei der
Nutzung Vorsicht und Vernunft walten zu lassen.
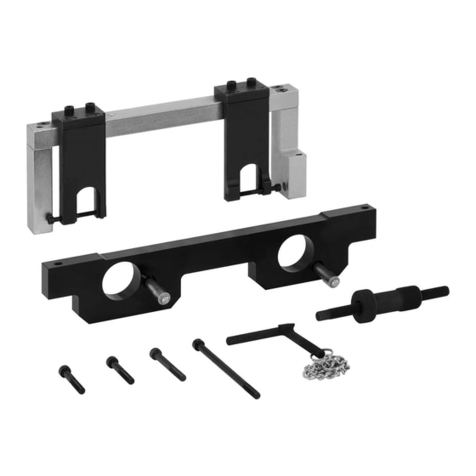
ACHTUNG! Die Zeichnung von diesem
Produkt bendet sich auf der letzte Seite der
Bedienungsanleitung S. 31.

6Rev. 06.02.2020 7
Rev. 06.02.2020
b) PositionierenSiedenKupplungsanschunddieHülse
wie auf der Abbildung gezeigt.
ACHTUNG: Bewegen Sie das Werkzeug nicht, nachdem
Sie das Verbindungsstück auf das Schiebehülsenwerkzeug
gesteckt haben.
c) Drücken Sie den Auslöser.
d) SchiebenSiedenbeweglichenGriineinestationäre
Richtung. Die Backen bewegen die Hülse zum
Verbindungsstück.
e) Das verbindungsstück ist fertig, wenn die Hülse den
Kupplungsanschberührt.
f) Heben Sie den Auslöseknopf an.
g) ÖnenSiedenbeweglichenGrium90°.
3.4. REINIGUNG UND WARTUNG
a) Verwenden Sie zur Reinigung der Oberäche
ausschließlichMittelohneätzendeInhaltsstoe.
b) Lassen Sie nach jeder Reinigung alle Teile gut trocknen,
bevor das Gerät erneut verwendet wird.
c) Bewahren Sie das Gerät an einem trockenen, kühlen,
vor Feuchtigkeit und direkter Sonneneinstrahlung
geschütztem Ort auf.
d) Es ist verboten, das Gerät mit einem Wasserstrahl zu
besprühen oder in Wasser zu tauchen.
e) In Hinblick auf technische Ezienz und zur
Vorbeugung vor Schäden sollte das Gerät regelmäßig
überprüft werden.
f) Um das Produkt zu pegen bzw. zu warten, sollten
Metallteile mit einem Korrosionsschutzmittel
geschmiert werden.
g) Um das Produkt zu pegen bzw. zu warten, sollten
Metallteile mit einem Korrosionsschutzmittel
geschmiert werden.
TECHNICAL DATA
Parameter description Parameter value
Product name Manual axial press tool
Model MSW-PTM-02
Weight [kg] 5,5
Crimping force [kN] 40
The dimensions of the
device for expanding holes
[mm]
40x16x4,7
Press dimensions [mm] 400x195x63
Knife dimensions [mm] 250x150x20
Expansion range [mm] 16-32
Cutting range [mm] Max 40
USER MANUAL
2.1. SAFETY IN THE WORKPLACE
a) Make sure the workplace is clean and well lit. A messy
or poorly lit workplace may lead to accidents. Try
to think ahead, observe what is going on and use
common sense when working with the device.
b) If you are unsure about whether the product is
operating correctly or if you nd damage, please
contact the manufacturer’s service centre.
c) Only the manufacturer’s service centre may make
repairs to the product. Do not attempt to make repairs
yourself!
d) Please keep this manual available for future reference.
If this device is passed on to a third party, the manual
must be passed on with it.
e) Keep packaging elements and small assembly parts in
a place not available to children.
f) Keep the device away from children and animals.
g) If this device is used together with another equipment,
the remaining instructions for use shall also be
followed.
2.2. PERSONAL SAFETY
a) Do not use the device when tired, ill or under the
inuence of alcohol, narcotics or medication which
can signicantly impair the ability to operate the
device.
b) The device is not designed to be handled by persons
(including children) with limited mental and sensory
functions or persons lacking relevant experience and/
or knowledge unless they are supervised by a person
responsible for their safety or they have received
instruction on how to operate the device.
c) The device can be handled only by physically t
persons who are capable of handling it, properly
trained, familiar with this manual and trained within
the scope of occupational health and safety.
d) When working with the device, use common sense
and stay alert. Temporary loss of concentration while
using the device may lead to serious injuries.
e) Use personal protective equipment as required
for working with the device, specied in section 1
(Legend). The use of correct and approved personal
protective equipment reduces the risk of injury.
f) Do not overestimate your abilities. When using the
device, keep your balance and remain stable at all
times. This will ensure better control over the device
in unexpected situations.
g) Do not wear loose clothing or jewellery. Keep hair,
clothes and gloves away from moving parts. Loose
clothing, jewellery or long hair may get caught in
moving parts.
h) The device is not a toy. Children must be supervised
to ensure that they do not play with the device.
2.3. SAFE DEVICE USE
a) Do not overload the device. Use the appropriate tools
for the given task. A correctly-selected device will
perform the task for which it was designed better and
in a safer manner.
b) When not in use, store in a safe place, away from
children and people not familiar with the device who
have not read the user manual. The device may pose
a hazard in the hands of inexperienced users.
Theterms"device"or"product"areusedinthewarnings
and instructions to refer to Manual axial press tool. Do not
put your hands or other items inside the device while it is
in use!
Read instructions before use.
Wear protective gloves.
ATTENTION! Hand crush hazard!
1. GENERAL DESCRIPTION
The user manual is designed to assist in the safe and
trouble-free use of the device. The product is designed
and manufactured in accordance with strict technical
guidelines, using state-of-the-art technologies and
components. Additionally, it is produced in compliance
with the most stringent quality standards.
DO NOT USE THE DEVICE UNLESS YOU HAVE
THOROUGHLY READ AND UNDERSTOOD THIS
USER MANUAL.
To increase the product life of the device and to ensure
trouble-free operation, use it in accordance with this user
manual and regularly perform maintenance tasks. The
technical data and specications in this user manual are
up to date. The manufacturer reserves the right to make
changes associated with quality improvement.
LEGEND
PLEASE NOTE! Drawings in this manual are for
illustration purposes only and in some details may
dierfromtheactualmachine.
The original operation manual is in German. Other
language versions are translations from German.
2. USAGE SAFETY
ATTENTION! Read all safety warnings and all
instructions. Failure to follow the warnings and
instructionsmayresultinanelectricshock,reand/
or serious injury or even death.
REMEMBER! When using the device, protect children
and other bystanders.

8Rev. 06.02.2020 9
Rev. 06.02.2020
1
2
3
1. Ratchet cutter knife
2. Trigger
3. Buckle
3.2. PREPARING FOR USE
APPLIANCE LOCATION
The ambient temperature should not be lower than -20°C
and higher than 40°C. The device should always be used
when positioned on an even, stable, clean and dry surface,
and be out of the reach of children and persons with limited
mental and sensory functions.
3.3. DEVICE USE
1. Cutting pipes
a) Squeeze the handles, the connecting clamp will open
automatically.
b) Pressthetrigger(g.3,3).
c) Open the handles.
d) Place the pipe in the cutter as shown and squeeze the
handles.
e) "Pump"untilthepipeiscut.
NOTE: make sure the pipe is perpendicular to the
knife.
PIPE CUTTER
NOTE: The cut pipe edge must be smooth and free from
burrs. This will ensure tightness of the pipe connection.
2. Expanding pipes
a) Select the appropriate die.
b) Completely open the handles of the pipe expansion
tool (Fig. 1, 11).
c) Screw the die down.
d) Slide the sleeve onto the pipe to be expanded (make
sure that the sleeve is not on the section of the pipe to
be expanded) and slide the cut end of the pipe onto
the die as shown.
90°
e) Close the tool handles to expand the pipe.
NOTE: To ensure uniform pipe expansion, keep the
handles closed for a while, then gently open them,
turn the pipe or tool by about 30° and repeat the
process. Performing the extension operation twice
shouldbesucient.
NOTE:Excessiveorinsucientexpansionofthepipe
may result in a leak in the pipe connection.
3. Assemblingthetting
a) Insertthettingintotheexpandedportionofthepipe
so that it reaches the sleeve (it does not have to reach
theange).Afterawhile,thepipewillshrinkandstick
tothetting.
b) Then move the sleeve as close as possible to the
tting.
4. Crimpingthetting
a) Select the appropriate jaws (Fig. 2; 1,2) and lock in
accordance with the drawing.
3. USE GUIDELINES
The kit includes tools for cutting and expanding pipes and
adeviceforcrimpingthetting.
The user is liable for any damage resulting from
unintended use of the device.
3.1. DEVICE DESCRIPTION
ELEMENTS OF THE SET
1. Movable jaws
2. Fixed jaws
3. Pin
4. Guide tube
5. Stationary handle
6. Trigger
7. Handle
8. Movable handle
9. Cutter
10. Expansion die
11. Tool for expanding pipes
THE MANUAL AXIAL PRESS TOOL
Number Name Quantity
1 Moving pin 1
2 Spring 1
3 C4 steel ball 1
4 Fixed die 1
5 Bearing 32.6x29.6x15 2
6 Movable die 1
7 Moving pin 1
c) Keep the device in perfect technical condition. Before
each use check for general damage and especially
check for cracked parts or elements and for any other
conditions which may impact the safe operation of the
device. If damage is discovered, hand over the device
for repair before use.
d) Keep the device out of the reach of children.
e) Device repair or maintenance should be carried out by
qualiedpersons,onlyusingoriginalspareparts.This
will ensure safe use.
f) To ensure the operational integrity of the device, do
notremovefactory-ttedguardsanddonotloosen
any screws.
g) Clean the device regularly to prevent stubborn grime
from accumulating.
h) Do not work on two workpieces at the same time.
i) The device is not a toy. Cleaning and maintenance may
not be carried out by children without supervision by
an adult person.
j) It is forbidden to interfere with the structure of
the device in order to change its parameters or
construction.
ATTENTION! Despite the safe design of the device
and its protective features, and despite the use of
additional elements protecting the operator, there is
still a slight risk of accident or injury when using the
device. Stay alert and use common sense when using
the device.
ATTENTION! This product‘s view can be found on the
last pages of the operating instructions (pp. 31).
8 Plastic lid 1
9 Guide tube 1
10 Locking screw M5x10 1
11 Guide plate 1
12 Screw 1
13 Loaded spring 1
14 Spring base 1
15 Locking pin 2
16 Body 1
17 Locking forceps 1
18 Bearing 28x25x6 2
19 Movable head holder (I) 1
20 Spare ring 30 2
21 Forcing screw 1
22 Pin 1
23 Auxiliary bolt 1
24 Bearing 14x12x12 1
25 Cylindrical pin 4x24 1
26 Loaded spring 1
27 Ratchet 1
28 Movable handle 1
29 Hex bolt M6x32 2
30 Movable head holder (II) 1
31 Handle 2
32 Spade connection 1
33 Spring 1
34 Spring base 1
35 Guide roller 1
36 Lead screw M6x28 1
37 Fixed handle 1
38 Loaded spring 1
39 Clamping ring 1
40 Guide plate 1
41 Screw M5x6 2
42 Reset button 1 b) Positionthettingangeandsleeveonthejawsas
shown.

10 Rev. 06.02.2020 11
Rev. 06.02.2020
DANE TECHNICZNE
1. OGÓLNY OPIS
Instrukcja przeznaczona jest do pomocy w bezpiecznym
iniezawodnymużytkowaniu.Produktjestzaprojektowany
i wykonany ściśle według wskazań technicznych przy
użyciunajnowszychtechnologiiikomponentóworazprzy
zachowaniunajwyższychstandardówjakości.
PRZED PRZYSTĄPIENIEM DO PRACY NALEŻY
DOKŁADNIE PRZECZYTAĆ I ZROZUMIEĆ NINIEJSZĄ
INSTRUKCJĘ.
Dla zapewnienia długiej i niezawodnej pracy urządzenia
należydbaćojegoprawidłowąobsługęorazkonserwację
zgodniezewskazówkamizawartymiwtejinstrukcji.Dane
techniczneispecykacjezawartewtejinstrukcjiobsługisą
aktualne. Producent zastrzega sobie prawo dokonywania
zmianzwiązanychzpodwyższeniemjakości.
OBJAŚNIENIESYMBOLI
UWAGA! Ilustracje w niniejszej instrukcji obsługi
mają charakter poglądowy i w niektórych
szczegółach mogą różnić się od rzeczywistego
wygląduproduktu.
Instrukcją oryginalną jest niemiecka wersja instrukcji.
Pozostałe wersje językowe są tłumaczeniami z języka
niemieckiego.
Opis parametru Wartośćparametru
Nazwa produktu Zaciskarka osiowa
Model MSW-PTM-02
Ciężar[kg] 5,5
Siłazaciskania[kN] 40
Wymiaryurządzeniado
rozszerzaniaotworów[mm] 40x16x4,7
Wymiary prasy [mm] 400x195x63
Wymiarynoża[mm] 250x150x20
Zakres rozszerzania [mm] 16-32
Zakrescięcia[mm] Max 40
INSTRUKCJAOBSŁUGI
2.BEZPIECZEŃSTWOUŻYTKOWANIA
UWAGA! Przeczytaj wszystkie ostrzeżenia
dotyczącebezpieczeństwaorazwszystkieinstrukcje.
Niezastosowaniesiędoostrzeżeńiinstrukcjimoże
spowodowaćporażenieprądem,pożari/lubciężkie
obrażeniaciałalubśmierć.
Termin „urządzenie” lub „produkt” w ostrzeżeniach
i w opisie instrukcji odnosi się do < Zaciskarka osiowa.
Nie wkładać rąk, przedmiotów do wnętrza pracującego
urządzenia!
PAMIĘTAJ! Należy chronić dzieci i inne osoby
postronnepodczaspracyurządzeniem.
2.1BEZPIECZEŃSTWOWMIEJSCUPRACY
a) Utrzymywać porządek w miejscu pracy i dobre
oświetlenie. Nieporządek lub złe oświetlenie może
prowadzićdowypadków.Należybyćprzewidującym,
obserwować co się robi i zachowywać rozsądek
podczasużywaniaurządzenia.
b) Wraziewątpliwościczyproduktdziałapoprawnielub
stwierdzenia uszkodzenia należy skontaktować się
z serwisem producenta.
c) Naprawę produktu może wykonać wyłącznie
serwis producenta. Nie wolno dokonywać napraw
samodzielnie!
d) Zachować instrukcję użytkowania w celu jej
późniejszegoużycia.Wrazie,gdybyurządzeniemiało
zostać przekazane osobom trzecim, to wraz z nim
należyprzekazaćrównieżinstrukcjęużytkowania.
e) Elementy opakowania oraz drobne elementy
montażowe należy przechowywać w miejscu
niedostępnymdladzieci.
f) Urządzenietrzymaćzdalaoddzieciizwierząt.
g) Wtrakcieużytkowaniategourządzeniawrazzinnymi
urządzeniami należy zastosować się również do
pozostałychinstrukcjiużytkowania.
2.2BEZPIECZEŃSTWOOSOBISTE
a) Niedozwolone jest obsługiwanie urządzenia
wstaniezmęczenia,choroby,podwpływemalkoholu,
narkotykówlubleków,któreograniczająwistotnym
stopniuzdolnościobsługiurządzenia.
b) Urządzenie nie jest przeznaczone do tego, by było
użytkowaneprzezosoby(wtymdzieci)oograniczonych
funkcjachpsychicznych,sensorycznychiumysłowych
lub nieposiadające odpowiedniego doświadczenia
i/lub wiedzy, chyba że są one nadzorowane przez
osobę odpowiedzialną za ich bezpieczeństwo lub
otrzymały od niej wskazówki dotyczące tego, jak
należyobsługiwaćurządzenie.
c) Urządzenie mogą obsługiwać osoby sprawne
zycznie, zdolne do jego obsługi i odpowiednio
wyszkolone,którezapoznałysięzniniejsząinstrukcją
orazzostałyprzeszkolonewzakresiebezpieczeństwa
i higieny pracy.
d) Należy być uważnym, kierować się zdrowym
rozsądkiem podczas pracy urządzeniem. Chwila
nieuwagi podczas pracy, może doprowadzić do
poważnychobrażeńciała.
e) Należy używać środków ochrony osobistej
wymaganych przy pracy urządzeniem
wyszczególnionychwpunkcie1objaśnieniasymboli.
Stosowanie odpowiednich, atestowanych środków
ochrony osobistej zmniejsza ryzyko doznania urazu.
f) Nienależyprzeceniaćswoichmożliwości.Utrzymywać
balans i równowagę ciała przez cały czas pracy.
Umożliwia to lepszą kontrolę nad urządzeniem
w nieoczekiwanych sytuacjach.
g) Nie należy nosić luźnej odzieży ani biżuterii. Włosy,
odzież i rękawice utrzymywać z dala od części
ruchomych.Luźnaodzież,biżuterialubdługiewłosy
mogązostaćchwyconeprzezruchomeczęści.
h) Urządzenie nie jest zabawką. Dzieci powinny być
pilnowane,abyniebawiłysięurządzeniem.
Przedużyciemnależyzapoznaćsię
zinstrukcją.
Stosowaćrękawiceochronne.
UWAGA!Niebezpieczeństwozgnieceniadłoni!
d) Pressthemovablehandletowardsthexedone.The
jawswillmovethesleevetowardthetting.
e) Thettingisreadywhenthesleevetouchesthetting
ange.
f) Lift the trigger.
g) Open the movable handle to 90°.
3.4. CLEANING AND MAINTENANCE
a) Use only non-corrosive cleaners to clean the surface.
b) After cleaning the device, all parts should be dried
completely before using it again.
c) Store the unit in a dry, cool place, free from moisture
and direct exposure to sunlight.
d) Do not spray the device with a water jet or submerge
it in water.
NOTE:After placingthettingonthe crimp tool,donot
move the tool.
c) Press the trigger.
e) The device must be regularly inspected to check its
technicaleciencyandspotanydamage.
f) Use a soft cloth for cleaning.
g) To maintain the product, lubricate metal parts with an
anti-corrosive agent

12 Rev. 06.02.2020 13
Rev. 06.02.2020
39 Pierścieńzaciskowy 1
40 Płytaprowadząca 1
41 ŚrubaM5x6 2
42 Przyciskresetujący 1
1. Nóżobcinakazapadkowego
2. Spust
3. Klamra
3.2. PRZYGOTOWANIE DO PRACY
UMIEJSCOWIENIEURZĄDZENIA
Temperatura otoczenia nie powinna być niższa niż -20°C
i wyższa niż 40°C. Urządzenie należy zawsze użytkować
na równej, stabilnej, czystej i suchej powierzchni
ipozazasięgiemdzieciorazosóbograniczonychfunkcjach
psychicznych,sensorycznychiumysłowych.
3.3.PRACAZURZĄDZENIEM
1. Cięcierur
a) Ścisnąć uchwyty, klamra łącząca otworzy się
automatycznie.
b) Wcisnąćspust(rys.3,3).
c) Otworzyćuchwyty.
d) Umieścić rurę w obcinaczu jak na rysunku i ścisnąć
uchwyty.
e) ‘Pompować’należydomomentuobcięciarury.
UWAGA:należyupewnićsię,żeruraumieszczonajest
prostopadledonoża.
BUDOWA OBCINAKA DO RUR
UWAGA: Miejsce przecięcia rury musi być gładkie, bez
zadziorów.Zapewnitoszczelnośćpołączenia.
2. Rozszerzanie rur
a) Wybraćodpowiedniąmatrycę.
b) Całkowicie otworzyć uchwyty narzędzia do
rozszerzania rur (rys.1, 11).
c) Przykręcićmatrycę.
d) Nałożyć tuleję na rozszerzaną rurę (upewnić się, że
tuleja nie znajduje się na rozszerzanym fragmencie
rury) i obciętym końcem nałożyć rurę na matrycę
zgodnie z rysunkiem.
90°
e) Zamknąćuchwytynarzędziaabyrozszerzyćrurę.
UWAGA: Aby zapewnić równomierne rozszerzanie
rury należy przytrzymac przez chwilę zamknięte
uchwyty, następnie delikatnie je otworzyć, obrócić
rurę lub narzędzie o około 30° i powtórzyć proces.
Dwukrotne wykonanie czynności rozszerzania
powinnobyćwystarczające.
UWAGA: Nadmierne lub niedostateczne rozszrzenie
rurymożespowodowaćnieszczelnośćzłącza.
3. Montażzłącza
a) Włożyćzłączkędorozszerzonegofragmentururytak
bydotarładotulei(niemusidosięgaćdokołnierza).
Pochwiliruraskurczysięiprzylgniedozłączki.
b) Następnieprzesunąćtulejęjaknajbliżejzłączki.
4. Zaciskaniezłącza
a) Dobraćodpowiednieszczęki(rys.2;1,2)izablokować,
zgodnie z rysunkiem.
1
2
3
UWAGA! Pomimo iż urządzenie zostało
zaprojektowane tak aby było bezpieczne, posiadało
odpowiednie środki ochrony oraz pomimo użycia
dodatkowych elementów zabezpieczających
użytkownika,nadalistniejeniewielkieryzykowypadku
lubodniesieniaobrażeńwtrakciepracyzurządzeniem.
Zalecasięzachowanieostrożnościirozsądkupodczas
jegoużytkowania.
3.ZASADYUŻYTKOWANIA
Zestawzawieranarzędziasłużącedocięciairozszerzaniarur
orazurządzenieumożliwiającezaciskaniezłącza.
Odpowiedzialność za wszelkie szkody powstałe
w wyniku użytkowania niezgodnego z przeznaczeniem
ponosi użytkownik.
3.1.OPISURZĄDZENIA
ELEMENTY ZESTAWU
1. Ruchomeszczęki
2. Nieruchomeszczęki
3. Sworzeń
4. Ruraprowadząca
5. Nieruchomy uchwyt
6. Spust
7. Rękojeść
8. Ruchomy uchwyt
9. Obcinak
10. Matrycarozszerzająca
11. Narzędziedorozszerzaniarur
2.3.BEZPIECZNESTOSOWANIEURZĄDZENIA
a) Nie należy przeciążać urządzenia. Używać narzędzi
odpowiednichdodanegozastosowania.Prawidłowo
dobraneurządzeniewykonalepiejibezpieczniejpracę
dlaktóregozostałozaprojektowane.
b) Nieużywane urządzenia należy przechowywać
w miejscu niedostępnym dla dzieci oraz osób
nieznających urządzenia lub tej instrukcji
obsługi. Urządzenia są niebezpieczne w rękach
niedoświadczonychużytkowników.
c) Utrzymywaćurządzeniewdobrymstanietechnicznym.
Sprawdzać przed każdą pracą czy nie posiada
uszkodzeń ogólnych lub związanych z elementami
ruchomymi(pęknięciaczęściielementówlubwszelkie
innewarunki,któremogąmiećwpływnabezpieczne
działanie urządzenia). W przypadku uszkodzenia,
oddaćurządzeniedonaprawyprzedużyciem.
d) Urządzenienależychronićprzeddziećmi.
e) Naprawa oraz konserwacja urządzeń powinna być
wykonywana przez wykwalikowane osoby przy
użyciu wyłącznie oryginalnych części zamiennych.
Zapewnitobezpieczeństwoużytkowania.
f) Abyzapewnićzaprojektowanąintegralnośćoperacyjną
urządzenia, nie należy usuwać zainstalowanych
fabrycznieosłonlubodkręcaćśrub.
g) Należyregularnieczyścićurządzenie,abyniedopuścić
dotrwałegoosadzeniasięzanieczyszczeń.
h) Niewolnoobrabiaćdwóchprzedmiotówjednocześnie.
i) Urządzenieniejestzabawką.Czyszczenieikonserwacja
niemogąbyćwykonywaneprzezdziecibeznadzoru
osobydorosłej.
j) Zabrania się ingerowania w konstrukcję urządzenia
celemzmianyjegoparametrówlubbudowy.
UWAGA: Rysunek produktu znajduje się na końcu
instrukcji na stronie: 31.
BUDOWA ZACISKARKI OSIOWEJ
Numer Wartośćparametru Ilość
1Ruchomysworzeń 1
2Sprężyna 1
3 Stalowa kulka C4 1
4 Nieruchoma matryca 1
5Łożysko32.6x29.6x15 2
6 Ruchoma matryca 1
7Ruchomysworzeń 1
8 Plastikowa pokrywka 1
9Ruraprowadząca 1
10 ŚrubablokującaM5x10 1
11 Płytaprowadząca 1
12 ŚrubaM6x20 1
13 Napiętasprężyna 1
14 Podstawasprężyny 1
15 Sworzeńblokujący 2
16 Korpus 1
17 Kleszczeblokujące 1
18 Łożysko28x25x6 2
19 Ruchomyuchwytgłowicy(I) 1
20 Pierścieńzapasowy30 2
21 Śrubawymuszająca 1
22 Trzpień 1
23 Sworzeńpomocniczy 1
24 Łożysko14x12x12 1
25 Sworzeńcylindryczny4x24 1
26 Napiętasprężyna 1
27 Zapadka 1
28 Uchwyt ruchomy 1
29 ŚrubasześciokątnaM6x32 2
30 Ruchomyuchwytgłowicy(II) 1
31 Rękojeść 2
32 Przyłączewidełkowe 1
33 Sprężyna 1
34 Bazasprężyny 1
35 Rolkaprowadząca 1
36 ŚrubaprowadzącaM6x28 1
37 Uchwyt nieruchomy 1
38 Napiętasprężyna 1

14 Rev. 06.02.2020 15
Rev. 06.02.2020
b) Ustawićkołnierzzłączkiitulejęnaszczękach,zgodnie
z rysunkiem.
UWAGA:Poułożeniuzłączanazaciskarcenienależy
ruszaćnarzędziem.
c) Wcisnąćspust.
d) Docisnąćuchwytruchomywkierunkunieruchomego.
Szczękiprzesunąłtulejęwkierunkuzłączki.
e) Złączebędziegotowekiedytulejadotkniekołnierza
złączki.
f) Podnieśćspust.
g) Otworzyćruchomyuchwytdo90°.
3.4. CZYSZCZENIE I KONSERWACJA
a) Doczyszczeniapowierzchninależystosowaćwyłącznie
środkiniezawierającesubstancjiżrących.
b) Po każdym czyszczeniu wszystkie elementy należy
dobrze wysuszyć, zanim urządzenie zostanie
ponownieużyte.
c) Urządzenie należy przechowywać w suchym
i chłodnym miejscu chronionym przed wilgocią
ibezpośrednimpromieniowaniemsłonecznym.
d) Zabrania się spryskiwania urządzenia strumieniem
wodylubzanurzaniaurządzeniawwodzie.
e) Należy wykonywać regularne przeglądy urządzenia
podkątemjegosprawnościtechnicznejorazwszelkich
uszkodzeń.
f) Doczyszczenianależyużywaćmiękkiejściereczki.
g) Wcelukonserwacjiproduktu,metaloweczęścinależy
smarowaćśrodkiemantykorozyjnym.
TECHNICKÉ ÚDAJE
Popis parametru Hodnota parametru
Název výrobku Axiální krimpovací nástroj
Model MSW-PTM-02
Hmotnost [kg] 5,5
Síla lisování [kN] 40
Rozměryzařízenípro
rozšířeníotvorů[mm] 40x16x4,7
Rozměrylisu[mm] 400x195x63
Rozměrynože[mm] 250x150x20
Rozsahrozšíření[mm] 16-32
Rozsahřezu[mm] Max 40
NÁVOD K OBSLUZE
2.2.OSOBNÍBEZPEČNOST
a) Zařízenínepoužívejte,jste-liunaveninebopodvlivem
drog, alkoholu nebo léků, které významně snižují
schopnostzařízeníovládat.
b) Zařízenínení určen k tomu, aby jej používaly osoby
(včetně dětí) s omezenými psychickými, smyslovými
nebo duševními schopnostmi nebo osoby bez
příslušných zkušeností a/nebo znalostí, ledaže
jsou pod dohledem osoby zodpovědné za jejich
bezpečnostneboodníobdrželypokyny,jakzařízení
obsluhovat.
c) S výrobkem mohou pracovat pouze fyzicky zdravé
osoby, které jsou schopné ho obsluhovat. Musejí být
náležitěproškolenézhlediskabezpečnostiaochrany
zdravípřipráciaseznámenéstímtonávodem.
d) Připrácisezařízenímbuďtepozorní,řiďtesezdravým
rozumem.Chvilkanepozornostipřiprácimůževéstk
vážnémuúrazu.
e) Používejteosobníochrannépomůckyvyžadovanépro
prácisezařízením,specikovanévbodě1vysvětlením
symbolů.Používánívhodných,atestovanýchosobních
ochrannýchprostředkůsnižujenebezpečíúrazu.
f) Nepřeceňujtesvéschopnosti.Udržujtestabilnípostoj
a rovnováhu po celou dobu práce. To vám umožní
lépeovládatzařízenívneočekávanýchsituacích.
g) Nenoste volné oblečení nebo šperky. Vlasy, oděv
a rukavice udržujte v bezpečné vzdálenosti od
rotujícíchdílů.Volnýoděv,šperkynebodlouhévlasy
mohou zachytit rotující díly.
h) Zařízeníneníhračka.Dohlížejtenaděti,abysinehrály
sezařízením.
2.3. BEZPEČNÉPOUŽÍVÁNÍZAŘÍZENÍ
a) Zařízenínepřetěžujte.Prodanýúkolpoužívejtevždy
správný typ nářadí. Správně zvolené nářadí lépe
abezpečnějiprovedepráci,prokteroubylonavrženo.
b) Nepoužívaná zařízení uchovávejte mimo dosah dětí
a osob, které nejsou seznámeny se zařízením nebo
návodemkobsluze.Zařízeníjsounebezpečnávrukou
nezkušenýchuživatelů.
c) Zařízení udržujte v dobrém technickém stavu.
Kontrolujte před každou prací jeho celkový stav
ijednotlivédílyaujistětese,žejevševdobrémstavu,
a uživateli tak při práci se zařízením nehrozí žádné
nebezpečí. V případě, že zjistíte poškození, nechte
zařízeníopravit.
d) Udržujtezařízenímimodosahdětí.
Pojem „zařízení“ nebo „výrobek“ v bezpečnostních
pokynech a návodu se vztahuje na Axiální krimpovací
nástroj.Pokudjezařízenívprovozu,nevkládejtedonějruce
anižádnépředměty!
2.1.BEZPEČNOSTNAPRACOVIŠTI
a) Na pracovišti udržujte pořádek a mějte dobré
osvětlení. Nepořádek nebo špatné osvětlení mohou
vést k úrazům. Buďte předvídaví a sledujte, co se
během práce kolem vás děje. Při práci se zařízením
vždyzachovávejtezdravýrozum.
Předpoužitímvýrobkuseseznamtes
návodem.
Používejteochrannérukavice.
VAROVÁNÍ!Nebezpečípohmožděnírukou!
1.VŠEOBECNÝPOPIS
Návod slouží jako nápověda pro bezpečné a spolehlivé
používánívýrobku. Výrobek jenavržen avyrobenpřesně
podletechnickýchúdajůzapoužitínejnovějšíchtechnologií
akomponentůazadodrženínejvyššíchjakostníchnorem.
PŘED ZAHÁJENÍM PRÁCE SI DŮKLADNĚ PŘEČTĚTE
TENTO NÁVOD A UJISTĚTE SE, ŽE JSTE POCHOPILI
VŠECHNY POKYNY.
Pro zajištění dlouhého a spolehlivého fungování zařízení
pravidelněprovádějterevizeaúdržbuvsouladuspokyny
uvedenýmivtomtonávodu.Technickéúdajeaspecikace
uvedené v návodu jsou aktuální. Výrobce si vyhrazuje právo
provádětzměnyzaúčelemzvýšeníkvality.
VYSVĚTLENÍSYMBOLŮ
POZOR! Ilustrace v tomto návodu mají náhledovou
povahu,avněkterýchdetailechseodskutečného
vzhledu stroje mohou lišit.
Originálním návodem je německá verze návodu. Ostatní
jazykovéverzejsoupřeklademzněmeckéhojazyka.
2.BEZPEČNOSTPOUŽÍVÁNÍ
POZNÁMKA! Přečtětesipečlivětentonávodvčetně
všech bezpečnostních pokynů. Nedodržování
pokynů může vést k úrazu elektrickým proudem,
požárua/nebotěžkémuúrazunebosmrti.
b) Budete-li mít pochybnosti, zda výrobek funguje
správně, nebo zjistíte poškození, kontaktujte servis
výrobce.
c) Výrobek může opravovat pouze servis výrobce.
Opravyneprovádějtesami!
d) Návod k obsluze uschovejte za účelem jeho
pozdějšího použití. V případě předánání zařízení
třetím osobám musí být spolu se zařízením předán
rovněžnávodkobsluze.
e) Obalový materiál a drobné montážní prvky
uchovávejtenamístěnedostupnémproděti.
f) Zařízení mějte v dostatečné vzdálenosti od dětí
azvířat.
g) Pokudspolečně s tímtonástrojem používátenějaké
dalšínářadí,pakmusítedodržovattakéjehonávodk
použití.
PAMATUJTE! Při práci se zařízením chraňte děti
a jiné nepovolané osoby.

16 Rev. 06.02.2020 17
Rev. 06.02.2020
1
2
3
3.2.PŘÍPRAVAKPRÁCI
UMÍSTĚNÍZAŘÍZENÍ
Okolní teplota by neměla být nižší než -20°C a vyšší než
40°C.Zařízenívždypoužívejtenarovnoměrném,stabilním,
čistém povrchu, mimo dosah dětí a osob s omezenými
psychickými, smyslovými a duševními funkcemi.
3.3.PRÁCESEZAŘÍZENÍM
1. Řezánítrubek
a) Stiskněte rukojeti, spojovací spona se automaticky
otevře.
b) Stisknětespoušť(obr.3,3).
c) Otevřeterukojeti.
d) Umístětetrubkudořezačkytak,jakjetoznázorněno
naobrázku,astlačterukojeti.
e) „Pumpujte“,dokudnenítrubkauříznuta.
POZOR:Ujistětese,žetrubkajeumístěnakolmona
nůž.
KONSTRUKCEŘEZAČKYTRUBEK
POZOR:Řezpotrubímusíbýthladkýabezotřepů.Tozajistí
těsnostspojení.
2. Rozšiřovánítrubek
a) Vybertepožadovanoumatrici.
b) Úplněotevřete rukojetinástrojeprorozšířenítrubek
(obr. 1, 11).
c) Zašroubujte matrici.
d) Umístěteobjímkunatrubku,kterouchceterozšiřovat.
Ujistěte se, že objímka není na rozšiřované části
trubkyaodřezanýkonectrubkyzaložtenamatrici(viz
obrázek).
90°
e) Sevřeterukojetinástrojeatímrozšířítetrubku.
POZOR: Chcete-li zajistit rovnoměrné roztažení
trubky, držte rukojeti na chvíli uzavřené, poté je
jemně otevřete, otočte trubku nebo nástroj o asi
30° a postup opakujte. Dvojnásobné provedení této
operacebymělobýtdostatečné.
POZOR: Nadměrné nebo nedostatečné rozšíření
trubkymůžezpůsobitnetěsnostspoje.
3. Montážspoje
a) Vložtespojdorozšířenéčástitrubkytak,abydosáhl
k objímce (nemusí se dostat k přírubě). Po chvíli se
trubkasmrštíapřilnekespoji.
b) Potépřesuňteobjímkuconejblížekespoji.
4. Lisování spoje
a) Vybertepříslušnéčelisti(obr.2;1,2)azajistěteje(viz
obrázek).
b) Umístěte přírubu spoje a objímku na čelisti (viz
obrázek).
3.ZÁSADYPOUŽÍVÁNÍ
Sada obsahuje nástroje pro řezání a rozšiřování trubek
azařízeníprolisováníspoje.
Odpovědnost za veškeré škody vzniklé v důsledku
použití zařízení v rozporu s určením nese uživatel.
3.1.POPISZAŘÍZENÍ
PRVKY SOUPRAVY
1. Pohyblivéčelisti
2. Nepohyblivéčelisti
3. Pístníčep
4. Vodicí trubka
5. Nepohyblivárukojeť
6. Spoušť
7. Rukojeť
8. Pohyblivárukojeť
9. Řezačka
10. Rozšiřujícímatrice
11. Nástrojprorozšiřovánítrubek
KONSTRUKCE AXIÁLNÍHO LISU
Číslo Název Počet
1Pohyblivýčep 1
2Pružina 1
3 Ocelový prstenec C4 1
4 Nepohyblivá matrice 1
5Ložisko32.6x29.6x15 2
6 Pohyblivá matrice 1
7Pohyblivýčep 1
8 Plastové víko 1
9 Vodicí trubka 1
10 ZajišťovacíšroubM5x10 1
11 Vodicí deska 1
12 ŠroubM6x20 1
13 Napjatápružina 1
e) Opravu a údržbu zařízení by měly provádět pouze
kvalikovanéosobyzavýhradníhopoužitíoriginálních
náhradníchdílů.Zajistítobezpečnépoužívánízařízení.
f) Prozachovánínavrženémechanickéintegrityzařízení
neodstraňujte předem namontované kryty nebo
neuvolňujtešrouby.
g) Pravidelně čistěte zařízení, aby nedošlo k trvalému
usazovanínečistot.
h) Neobrábějedvapředmětynajednou.
i) Zařízeníneníhračka.Čištěníaúdržbunesmíprovádět
dětibezdohledudospěléosoby.
j) Nezasahujtedozařízeníscílemzměnitjehoparametry
nebo konstrukci.
14 Základnapružiny 1
15 Pojistný kolík 2
16 Korpus 1
17 Uzamykacíkleště 1
18 Ložisko28x25x6 2
19 Pohyblivýdržákhlavice(I) 1
20 Náhradníkroužek 2
21 Zatlačovacíšroub 1
22 Kolík 1
23 Pomocnýčep 1
24 Ložisko14x12x12 1
25 Válcovýčep4x24 1
26 Napjatápružina 1
27 Patka 1
28 Pohyblivárukojeť 1
29 ŠestihrannýšroubM6x32 2
30 Pohyblivýdržákhlavice(II) 1
31 Rukojeť 2
32 Vidlicovitépřipojení 1
33 Pružina 1
34 Základnapružiny 1
35 Vodicí válec 1
36 Vodící šroub M6x28 1
37 Nepohyblivárukojeť 1
38 Napjatápružina 1
39 Upínacíkroužek 1
40 Vodicí deska 1
41 ŠroubM5x6 2
42 Resetovacítlačítko 1
POZNÁMKA! Ikdyžzařízení bylo navrženotak,aby
bylobezpečné,tedymávhodnébezpečnostníprvky,
tak i přes použití dodatečné ochrany uživatelem při
práci se zařízením nadále existuje malé riziko úrazu
nebo poranění. Doporučuje se zachovat opatrnost
azdravýrozumpřijehopoužívání.
POZNÁMKA! Nákres tohoto produktu naleznete na
konci návodu na str. 31.
1. Řezacínůž
2. Spoušť
3. Spona

18 Rev. 06.02.2020 19
Rev. 06.02.2020
d) Zatlačtepohyblivourukojeťvesměruknepohyblivé
rukojeti.Čelistiposunouobjímkusměremkespojce.
e) Spoj bude připraven, jakmile se objímka dotkne
přírubyspojky.
f) Zvednětespoušť.
g) Otevřetepohyblivourukojeťo90°.
3.4.ČIŠTĚNÍAÚDRŽBA
a) K čištění povrchu zařízení používejte výhradně
prostředkyneobsahujícížíravélátky.
b) Po každém čištění je nutno všechny prvky dobře
osušit,nežbudezařízeníopětpoužito.
c) Zařízení skladujte na suchém a chladném místě,
chráněnémprotivlhkostiapřímémuslunečnímusvitu.
d) Jezakázánozařízenípolévatvodounebojedovody
ponořovat.
e) Pravidelněprovádějterevizezařízeníakontrolujte,zda
jetechnickyzpůsobiléanenípoškozeno.
f) Kčištěnípoužívejteměkkýhadřík.
g) V rámci údržby nástroje je třeba kovové díly mazat
antikoroznímprostředkem.
POZOR:Poumístění spoje na lisovací nástroj nepohybujte
nástrojem.
c) Stisknětespoušť.
DÉTAILS TECHNIQUES
Description des paramètres Valeur des paramètres
Nom du produit Sertisseuse axiale
Modèle MSW-PTM-02
Poids [kg] 5,5
Force de sertissage [kN] 40
Dimensions de l'appareil
d’élargissement de trous
[mm]
40x16x4,7
Dimensions de la presse [mm] 400x195x63
Dimensions du couteau [mm] 250x150x20
Plage d'élargissement [mm] 16-32
Plage de coupe [mm] Max 40
2.1. SÉCURITÉ AU POSTE DE TRAVAIL
a) Veillez à ce que votre poste de travail soit toujours
propre et bien éclairé. Le désordre ou un éclairage
insusant peuvent entraîner des accidents. Soyez
prévoyant, observez les opérations et faites preuve de
bon sens lorsque vous utilisez l’appareil.
b) En cas de doute quant au bon fonctionnement de
l'appareil ou si vous constatez des dommages sur
celui-ci, veuillez communiquer avec le service client
du fabricant.
c) Seul le fabricant doit réparer le produit. Ne tentez pas
de réparer le produit par vous-même !
d) Conservez le manuel d’utilisation an de pouvoir
le consulter ultérieurement. En cas de cession de
l’appareil à un tiers, l’appareil doit impérativement
être accompagné du manuel d’utilisation.
e) Tenez les éléments d’emballage et les pièces de
xationdepetitformathorsdeportéedesenfants.
f) Tenez l’appareil hors de portée des enfants et des
animaux.
g) Lors de l’utilisation combinée de cet appareil avec
d’autres outils, respectez également les consignes se
rapportant à ces outils.
Les notions d'« appareil », de « machine » et de « produit »
gurantdanslesdescriptionsetlesconsignesdumanuelse
rapportent à/au Sertisseuse axiale. N'insérez ni les mains, ni
tout autre objet dans l'appareil lorsqu'il fonctionne !
Respectez les consignes du manuel.
Portez des protections pour les mains.
ATTENTION ! Mise en garde liée à un risque
de blessures des mains !
1. DESCRIPTION GÉNÉRALE
L'objectif du présent manuel est de favoriser une utilisation
sécuritaire et able de l'appareil. Le produit a été conçu
et fabriqué en respectant étroitement les directives
techniques applicables et en utilisant les technologies et
composants les plus modernes. Il est conforme aux normes
de qualité les plus élevées.
LISEZ ATTENTIVEMENT LE PRÉSENT MANUEL ET
ASSUREZ-VOUS DE BIEN LE COMPRENDRE AVANT
LA PREMIÈRE UTILISATION.
An de garantir le fonctionnement able et durable de
l'appareil, il est nécessaire d'utiliser et d'entretenir ce
dernier conformément aux consignes gurant dans le
présent manuel. Les caractéristiques et les spécications
contenues dans ce document sont à jour. Le fabricant se
réserveledroitdeprocéderàdesmodicationsàdesns
d’amélioration du produit.
SYMBOLES
ATTENTION! Certaines illustrations, présentes
danscette notice,peuventdiérerdela véritable
apparence de l‘appareil.
La version originale de ce manuel a été rédigée en
allemand. Les autres versions sont des traductions de
l‘allemand.
2. CONSIGNES DE SÉCURITÉ
ATTENTION! Lisez attentivement toutes les
consignes de sécurité et toutes les instructions. Le
non-respect des avertissements et instructions peut
entraîner des chocs électriques, des incendies et/
ou des blessures graves ou la mort.
2.2. SÉCURITÉ DES PERSONNES
a) N'utilisez pas l'appareil lorsque vous êtes fatigué,
malade,sousl'eetdedroguesoudemédicaments
et que cela pourrait altérer votre capacité à utiliser
l'appareil.
b) Cetappareiln'estpasconçupourêtreutiliséparles
personnes dont les facultés physiques, sensorielles
ou mentales sont limitées (enfants y compris), ni par
des personnes sans expérience ou connaissances
adéquates, à moins qu'elles se trouvent sous
la supervision et la protection d'une personne
responsable ou qu'une telle personne leur ait transmis
des consignes appropriées en lien avec l'utilisation de
l’appareil.
c) Seules des personnes aptes physiquement à se servir
de l'appareil, qui ont suivi une formation appropriée
et ont lu ce manuel d'utilisation peuvent utiliser le
produit.Enoutre,cespersonnesdoiventconnaîtreles
exigences liées à la santé et à la sécurité au travail.
d) Soyez attentif et faites preuve de bon sens lors que
vous utilisez l’appareil. Un moment d'inattention
pendantletravailpeutentraînerdesblessuresgraves.
e) Utilisez l'équipement de protection individuel
approprié pour l'utilisation de l'appareil,
conformément aux indications faites dans le tableau
des symboles, au point 1. L'utilisation de l'équipement
de protection individuel adéquat certié réduit le
risque de blessures.
f) Ne surestimez pas vos capacités. Adoptez toujours
une position de travail stable vous permettant de
garder l'équilibre. Vous aurez ainsi un meilleur
contrôle en cas de situations inattendues.
g) Ne portez ni vêtements amples ni bijoux. Tenez vos
cheveux, vos vêtements et vos gants à l'écart des
pièces mobiles. Les vêtements amples, les bijoux et
les cheveux longs peuvent être happés par les pièces
mobiles.
h) Cet appareil n'est pas un jouet. Les enfants doivent
demeurersouslasupervisiond’unadultean qu’ils
ne jouent pas avec l’appareil.
REMARQUE ! Veillez à ce que les enfants et les
personnes qui n'utilisent pas l'appareil soient en
sécurité durant le travail.
MANUEL D‘UTILISATION

20 Rev. 06.02.2020 21
Rev. 06.02.2020
39 Bague de serrage 1
40 Plaque de conduite 1
41 Vis M5x6 2
42 Bouton de réinitialisation 1
1. Couteau du coupe-tube à cliquet
2. Gâchette
3. Pince
3.2. PRÉPARATION À L'UTILISATION
CHOIX DE L’EMPLACEMENT DE L’APPAREIL :
La température ambiante doit être supérieure à -20°C et
inférieure à 40°C. Utilisé toujours l’appareil sur une surface
plane, stable, propre et sèche, hors de portée des enfants
et des personnes présentant des capacités physiques,
sensorielles ou mentales diminuées.
3.3. UTILISATION DE L'APPAREIL
1. Coupe des tuyaux
a) Serrez les poignées, la pince de raccordement s'ouvre
automatiquement.
b) Appuyez sur la gâchette (Fig.3, 3).
c) Ouvrez les poignées.
d) Placez le tuyau dans le coupe-tube comme indiqué
surlagureetserrezlespoignées.
e) « Pompez » jusqu'à ce que le tuyau soit coupé.
REMARQUE : Assurez-vous que le tuyau en position
perpendiculaire par rapport au couteau.
STRUCTURE DU COUPE-TUBE
REMARQUE : Les bords du tuyau coupé doivent être lisses.
Cela assurera l'étanchéité du raccordement.
2. Elargissement des tuyaux
a) Choisissez la matrice appropriée.
b) Ouvrez complètement les poignées de l'appareil
d’élargissement de tuyaux (Fig.1, 11).
c) Vissez la matrice.
d) Placez le manchon sur le tuyau à élargir (assurez-vous
que le manchon ne se trouve pas sur la partie à élargir
du tuyau) et placez le tuyau sur la matrice avec son
extrémitécoupée,commeindiquésurlagure.
90°
e) Fermez les poignées de l'appareil pour élargir le
tuyau.
REMARQUE : Pour assurer une expansion uniforme
du tuyau, gardez les poignées fermées pendant un
certain temps, puis les ouvrir doucement, tournez le
tuyau ou l'outil d'environ 30° et répétez le processus.
En général, il sut d’eectuer cette manipulation
à deux reprises. REMARQUE : Un élargissement
excessif ou insusant du tuyau peut entraîner un
défaut d'étanchéité du raccord.
3. Installation du raccord
a) Insérez le raccord dans la partie élargie du tuyau de
façonàcequ'ilarriveaumanchon(iln'apasbesoin
d'arriver à la bride). Après un certain temps, le tuyau
se rétrécit et colle au raccord.
b) Ensuite, déplacez le manchon au plus près du raccord.
4. Sertissage du raccord
a) Choisissez les mâchoires appropriées (Fig. 2 ; 1,2) et
verrouillez-lescommeindiquésurlagure.
1
2
3
3. CONDITIONS D’UTILISATION
Le kit comprend des appareils pour couper et élargir les
tuyaux et un appareil pour sertir les raccords.
L’utilisateur porte l’entière responsabilité pour
l’ensemble des dommages attribuables à un usage
inapproprié.
3.1. DESCRIPTION DE L'APPAREIL
ÉLÉMENTS D’ENSEMBLE
1. Mâchoires mobiles
2. Mâchoiresxes
3. Tige
4. Tuyau de guidage
5. Poignéexe
6. Gâchette
7. Manche
8. Poignée mobile
9. Coupe-tube
10. Matrice d'élargissement
11. Appareil d’élargissement de tuyauterie
CONSTRUCTION DE LA SERTISSEUSE AXIALE
Numéro Nom Quantité
1 Tige mobile 1
2 Ressort 1
3 Bille en acier C4 1
4Matricexe 1
5 Palier 32.6x29.6x15 2
6 Matrice mobile 1
7 Tige mobile 1
8 Couvercle en plastique 1
9 Tuyaux de conduite 1
10 Vis de verrouillage M5x10 1
11 Plaque de conduite 1
12 Vis M6x20 1
13 Ressort tendu 1
14 Base du ressort 1
15 Tige de verrouillage 2
16 Corps 1
17 Pinces de verrouillage 1
18 Palier 28x25x6 2
19 Poignée de tête mobile (I) 1
20 Bague de rechange 30 2
21 Vis de pression 1
22 Goupille 1
23 Tige auxiliaire 1
24 Palier 14x12x12 1
25 Tige cylindrique 4x24 1
26 Ressort tendu 1
27 Cliquet 1
28 Poignée mobile 1
29 Vis à tête hexagonale M6x32 2
30 Poignée de tête mobile (II) 1
31 Manche 2
32 Raccord à fourches 1
33 Ressort 1
34 Base de ressort 1
35 Rouleau de conduite 1
36 Vis de conduite M6x28 1
37 Poignéexe 1
38 Ressort tendu 1
2.3. UTILISATION SÉCURITAIRE DE L'APPAREIL
a) Nefaitespassurchauerl'appareil.Utilisezlesoutils
appropriés pour l'usage que vous en faites. Le choix
d'appareils appropriés et l'utilisation soigneuse de
ceux-ci produisent de meilleurs résultats.
b) Les outils qui ne sont pas en cours d'utilisation
doivent être mis hors de portée des enfants et des
personnes qui ne connaissent ni l'appareil, ni le
manuel d'utilisation s'y rapportant. Entre les mains de
personnes inexpérimentées, ce genre d'appareils peut
représenter un danger.
c) Maintenez l'appareil en parfait état de marche. Avant
chaqueutilisation,vériezl’absencededommagesen
général et au niveau des pièces mobiles (assurez-vous
qu’aucunepiècenicomposantn’estcasséetvériez
que rien ne compromet le fonctionnement sécuritaire
de l’appareil). En cas de dommages, l’appareil doit
impérativement être envoyé en réparation avant
d’être utilisé de nouveau.
d) Tenez l'appareil hors de portée des enfants.
e) La réparation et l'entretien des appareils doivent être
eectués uniquement par un personnel qualié, à
l'aide de pièces de rechange d'origine. Cela garantit la
sécurité d’utilisation.
f) Pour garantir l'intégrité opérationnelle de l'appareil,
les couvercles et les vis posés à l'usine ne doivent pas
être retirés.
g) Nettoyez régulièrement l'appareil pour en prévenir
l’encrassement.
h) Il est défendu de travailler deux pièces simultanément.
i) Cet appareil n'est pas un jouet. Le nettoyage et
l’entretien ne doivent pas être eectués par des
enfants, à moins qu’ils se trouvent sous la supervision
d’un adulte responsable.
j) Ilestdéfendudemodierl’appareilpourenchanger
les paramètres ou la construction.
ATTENTION ! Bien que l'appareil ait été conçu en
accordant une attention spéciale à la sécurité et qu'il
comporte des dispositifs de protection, ainsi que des
caractéristiques de sécurité supplémentaires, il n’est
pas possible d’exclure entièrement tout risque de
blessure lors de son utilisation. Nous recommandons
de faire preuve de prudence et de bon sens lorsque
vous utilisez l’appareil.
ATTENTION! Le plan de ce produit se trouve à la
dernière page du manuel d‘utilisation, p. 31.

22 Rev. 06.02.2020 23
Rev. 06.02.2020
b) Placez la bride du raccord et le manchon sur les
mâchoirescommeindiquésurlagure.
REMARQUE : Ne déplacez pas l'appareil après avoir placé le
raccord sur la sertisseuse.
c) Appuyez sur la gâchette.
d) Appuyez sur la poignée mobile en la déplaçant en
directiondelapoignéexe.Lesmâchoiresdéplacent
le manchon vers le raccord.
e) Le raccord sera prêt lorsque le manchon touchera la
bride du raccord.
f) Soulevez la gâchette.
g) Ouvrez la poignée mobile à 90°.
3.4. NETTOYAGE ET ENTRETIEN
a) Pour nettoyerles diérentes surfaces, n'utilisez que
des produits sans agents corrosifs.
b) Laissez bien sécher tous les composants après chaque
nettoyage avant de réutiliser l’appareil.
c) Conservez l'appareil dans un endroit propre, frais et
sec, à l'abri de l'humidité et des rayons directs du
soleil.
d) Il est interdit d’asperger l'appareil d'eau ou de
l'immerger dans l'eau.
e) Contrôlez régulièrement l'appareil pour vous assurer
qu'il fonctionne correctement et ne présente aucun
dommage.
f) Utilisezunchiondouxlorsdunettoyage.
g) Pour l'entretien du produit, lubriez les parties
métalliques avec un agent anticorrosion.
DATI TECNICI
Parametri - Descrizione Parametri - Valore
Nome del prodotto Attrezzo crimpatura
assiale
Modello MSW-PTM-02
Peso [kg] 5,5
Forza di serraggio [kN] 40
Dimensioni dell' apparecchio
per l'espansione dei fori [mm] 40x16x4,7
Dimensioni della pressa [mm] 400x195x63
Dimensioni del coltello [mm] 250x150x20
Campo di estensione [mm] 16-32
Campo di taglio [mm] Max 40
ISTRUZIONI PER L’USO
2.1. SICUREZZA SUL LAVORO
a) Mantenere il posto di lavoro pulito e ben illuminato. Il
disordine o una scarsa illuminazione possono portare
a incidenti. Essere sempre prudenti, osservare che
cosa si sta facendo e utilizzare il buon senso quando si
adopera il dispositivo.
b) In presenza di dubbi sul corretto funzionamento del
dispositivo o se ci sono dei danni, rivolgersi al servizio
clienti del produttore.
c) Il prodotto può essere riparato soltanto dal fornitore.
Non auto-ripararlo.
d) Conservare le istruzioni d‘uso per uso futuro. Nel caso
incuiildispositivovenisseadatoaterzi,consegnare
anche queste istruzioni.
e) Tenere gli elementi di imballaggio e le piccole parti di
assemblaggio fuori dalla portata dei bambini.
f) Tenere il dispositivo fuori dalla portata dei bambini e
degli animali.
g) Durante l’impiego del dispositivo in contemporanea
con altri dispositivi, è consigliabile rispettare le altre
istruzioni d’uso.
Il termine "apparecchio" o "prodotto" nelle avvertenze
e descrizioni contenute nel manuale si riferisce alla/al
Attrezzo crimpatura assiale. Non mettere mani o oggetti
nel dispositivo in movimento!
Leggere attentamente le istruzioni.
Utilizzare dei guanti protettivi.
ATTENZIONE! Pericolo di lesione alle mani!
1. DESCRIZIONE GENERALE
Queste istruzioni sono intese come ausilio per un uso sicuro
eadabile.Ilprodottoèstatorigorosamenteprogettato
e realizzato secondo le direttive tecniche e l'utilizzo delle
tecnologie e componenti più moderne e seguendo gli
standard di qualità più elevati.
PRIMA DELLA MESSA IN FUNZIONE È NECESSARIO
AVER LETTO E COMPRESO LE ISTRUZIONI D'USO.
Perunfunzionamentoduraturoeadabiledeldispositivo
assicurarsi di maneggiarlo e curarne la manutenzione
secondo le disposizioni presentate in questo manuale.
Idati e lespecichetecniche indicati inquestomanuale
sono attuali. Il fornitore si riserva il diritto di apportare
delle migliorie nel contesto del miglioramento dei propri
prodotti.
SPIEGAZIONE DEI SIMBOLI
IMPORTANTE! Le immagini contenute in questo
manuale sono puramente indicative e potrebbero
dieriredalprodotto.
Il manuale originale è stato scritto in tedesco. Le versioni in
altre lingue sono traduzioni dalla lingua tedesca.
2. NORME DI SICUREZZA
ATTENZIONE! Leggere le istruzioni d'uso e di
sicurezza. Non prestare attenzione alle avvertenze
e alle istruzioni può condurre a gravi lesioni
o addirittura al decesso.
2.2. SICUREZZA PERSONALE
a) Non è consentito l'uso del dispositivo in uno stato
di aaticamento, malattia, sotto l'inuenza di alcol,
droghe o farmaci, se questi limitano la capacità di
utilizzare il dispositivo.
b) Questo dispositivo non è adatto per essere utilizzato
da persone, bambini compresi, con ridotte capacità
siche, sensoriali o mentali, così come da privi di
adeguata esperienza e/o conoscenze. Si fa eccezione
per coloro i quali siano sorvegliati da un responsabile
qualicatochesiprendacaricodellalorosicurezzae
abbia ricevuto istruzioni dettagliate al riguardo.
c) Il dispositivo può essere usato solo da persone
con capacità siche adeguate che sono state
adeguatamente istruite e che hanno letto queste
istruzioni, le hanno capite e hanno appreso le norme
di sicurezza e di protezione sul posto di lavoro.
d) Prestare attenzione e usare il buon senso quando si
utilizza il dispositivo. Un momento di disattenzione
durante il lavoro può causare gravi lesioni.
e) Utilizzare dispositivi di protezione individuale adeguati
quando si utilizza il dispositivo, conformemente alle
speciche indicate nella spiegazione dei simboli al
punto 1. L'uso di dispositivi di protezione individuale
adeguatiecerticatiriduceilrischiodilesioni.
f) Non sopravvalutare le proprie capacità. Mantenere
l'equilibrio durante il lavoro, in questo modo è
possibile controllare meglio il dispositivo in caso di
situazioni impreviste.
g) Non indossare indumenti larghi o gioielli. Tenere
capelli, indumenti e guanti lontano da parti in
movimento. Vestiti sciolti, gioielli o capelli lunghi
possono impigliarsi nelle parti in movimento.
h) Questo dispositivo non è un giocattolo. I bambini
devonoesseresorvegliatianchénongiochinoconil
prodotto.
2.3. USO SICURO DEL DISPOSITIVO
a) Non far surriscaldare il dispositivo. Utilizzare strumenti
appropriati. Dispositivi scelti correttamente e un
attento utilizzo degli stessi portano a risultati migliori.
AVVERTENZA! Quando si lavora con questo
dispositivo, i bambini e le persone non coinvolte
devono essere protetti.

24 Rev. 06.02.2020 25
Rev. 06.02.2020
41 Vite M5x6 2
42 Pulsante Reset 1
1. Coltello di tagaliatubi a cricchetto
2. Grilletto
3. Morsetto
3.2. PREPARAZIONE AL FUNZIONAMENTO
POSIZIONAMENTO DEL DISPOSITIVO:
La temperatura ambiente non deve essere inferiore a -20°C
e superiore a 40°C. Il dispositivo va sempre utilizzato su una
superciepiana,stabile,pulitaasciutta,lontanodallaportata
dei bambini e di persone con capacità psichiche, sensoriali
e mentali ridotte.
3.3. LAVORARE CON IL DISPOSITIVO
1. Taglio dei tubi
a) Premere le maniglie, il morsetto di collegamento si
apre automaticamente.
b) Premere il grilletto (Fig.3, 3).
c) Aprire le maniglie.
d) Posizionare il tubo nel tagliatubi come mostrato in
guraestringerelemaniglie.
e) "Pompare"noalcompletamentodeltaglio.
NOTA: assicurarsi che il tubo sia posizionato
perpendicolarmente al coltello.
COSTRUZIONE DI UN TAGLIATUBI
NOTA: Il tubo deve essere tagliato in posto liscio e senza
bavature per garantire una connessione stretta.
2. Espansione dei tubi
a) Selezionare la matrice adatta.
b) Aprire completamente le impugnature dell’attrezzo
per espansione per tubi (Fig.1, 11).
c) Avvitare la matrice.
d) Applicare il manicotto sul tubo da espandere
(assicurarsi che il manicotto non sia sulla parte del tubo
che viene espansa) e con l'estremità tagliata applicare il
tubosullamatricecomemostratoingura.
90°
e) Chiudere i manici dell'attrezzo per espandere il tubo.
NOTA: Per garantire un'espansione uniforme del tubo,
tenere i manici chiusi per un po' di tempo, quindi
aprirli delicatamente, ruotare il tubo o l'utensile di
circa 30° e ripetere il processo. Una doppia espansione
dovrebbeesseresuciente.
NOTA: Un'espansione eccessiva o insuciente del
tubo può causare la perdita del giunto.
3. Montaggio del giunto
a) Inserire il raccordo nel pezzo di tubo esteso in modo
che raggiunga il manicotto (non deve raggiungere la
angia).Dopounpo'iltubosirestringeesiaderisce
al giunto.
b) Quindi spostare il manicotto il più vicino possibile al
raccordo.
4. Bloccaggio del giunto
a) Selezionare le ganasce adatte (Fig. 2; 1,2) e bloccarle
come illustrato.
1
2
3
3. CONDIZIONI D'USO
Il kit include strumenti per il taglio e l'espansione dei tubi e
un dispositivo per la crimpatura del giunto.
L'operatore è responsabile di tutti i danni derivanti da
un uso improprio.
3.1. DESCRIZIONE DEL DISPOSITIVO
ELEMENTI DEL KIT
1. Ganasce mobili
2. Ganascesse
3. Perno
4. Tubo di guida
5. Impugnaturassa
6. Grilletto
7. Manico
8. Impugnatura mobile
9. Tagliatubi
10. Matrice di estensione
11. Strumento di estensione per tubi
STRUTTURA DELL’ ATTREZZO CRIMPATURA ASSIALE
Numero Denominazione Quanti
1 Perno mobile 1
2 Molla 1
b) Gli strumenti inutilizzati devono essere tenuti fuori
dalla portata dei bambini e delle persone che non
hanno familiarità con il dispositivo e le istruzioni
d’uso. Nelle mani di persone inesperte, questo
dispositivo può rappresentare un pericolo.
c) Mantenere il dispositivo in perfette condizioni. Prima
di ogni utilizzo, vericare che non vi siano danni
generali o danni alle parti mobili (frattura di parti
e componenti o altre condizioni che potrebbero
compromettere il funzionamento sicuro del prodotto).
In caso di danni, l'unità deve essere riparata prima
dell'uso.
d) Tenere il dispositivo fuori dalla portata dei bambini.
e) La riparazione e la manutenzione dell'attrezzatura
devono essere eseguite esclusivamente da personale
specializzato qualicato e con pezzi di ricambio
originali. Ciò garantisce la sicurezza durante l'uso.
f) Per garantire l'integrità di funzionamento
dell'apparecchio, i coperchi o le viti installati in
fabbrica non devono essere rimossi.
g) Pulire regolarmente l'apparecchio in modo da evitare
l'accumulo di sporcizia.
h) Due elementi separati non possono essere lavorati
contemporaneamente.
i) Questo apparecchio non è un giocattolo! La pulizia
e la manutenzione non devono essere eseguite da
bambini a meno che non siano sotto la supervisione
di un adulto.
j) È vietato intervenire sulla costruzione del dispositivo
permodicareisuoiparametriolasuacostruzione.
ATTENZIONE! Anche se l'apparecchiatura è
stata progettata per essere sicura, sono presenti
degli ulteriori meccanismi di sicurezza. Malgrado
l'applicazione di queste misure supplementari di
sicurezza sussiste comunque il rischio di ferirsi. Si
raccomanda inoltre di usare cautela e buon senso.
ATTENZIONE: L´esploso di questo prodotto si trova
nell´ultima pagina del manuale d´uso, p. 31.
3 Sfera in acciaio C4 1
4Matricessa 1
5 Cuscinetto 32.6x29.6x15 2
6 Matrice mobile 1
7 Perno mobile 1
8 Coperchio di plastica 1
9 Tubo di guida 1
10 Vite di bloccaggio M5x10 1
11 Piastra di guida 1
12 Vite M6x20 1
13 Molla tesa 1
14 Base a molla 1
15 Perno di bloccaggio 2
16 Corpo 1
17 Pinze di bloccaggio 1
18 Cuscinetto 28x25x6 2
19 Impugnatura mobile della
testata (I) 1
20 Anello di riserva 30 2
21 Vite forzata 1
22 Perno 1
23 Spinotto ausiliario 1
24 Cuscinetto 14x12x12 1
25 Spinotto cilindrico 4x24 1
26 Molla tesa 1
27 Nottolino 1
28 Impugnatura mobile 1
29 Vite esagonale M6x32 2
30 Impugnatura mobile della
testata (II) 1
31 Maniglia 2
32 Terminale a forcella 1
33 Molla 1
34 Base della molla 1
35 Rulla di guida 1
36 Vite di guida M6x28 1
37 Impugnaturassa 1
38 Molla tesa 1
39 Anello di serraggio 1
40 Piastra di guida 1

26 Rev. 06.02.2020 27
Rev. 06.02.2020
b) Posizionarelaangiadelraccordoeilmanicottosulle
ganascecomemostratoingura.
NOTA: Non spostare l'attrezzo dopo aver posizionato il
giunto sulla pinza.
c) Premere il grilletto.
d) Premere l'impugnatura mobile in direzione di quella
ssa. Le ganasce spostano il manicotto verso il
raccordo.
e) Il giunto sarà pronto quando il manicotto toccherà la
angiadelraccordo.
f) Alzare il grilletto.
g) Aprire la maniglia mobile a 90°.
3.4. PULIZIA E MANUTENZIONE
a) Perpulirelasupercieutilizzaresolodetergentisenza
ingredienti corrosivi.
b) Dopo la pulizia, prima di riutilizzare l'apparecchio,
asciugare tutte le parti.
c) Tenere l'apparecchio in un luogo asciutto, fresco,
protetto dall'umidità e dalla luce diretta del sole.
d) È vietato spruzzare il dispositivo con un getto d'acqua
o immergere il dispositivo in acqua.
e) Eettuare controlli regolari del dispositivo per
mantenerloecienteeprivodidanni.
f) Per la pulizia utilizzare un panno morbido.
g) Per la manutenzione del prodotto, le parti
metalliche devono essere lubricate con un agente
anticorrosione.
Parámetro-Descripción Parámetro - Valor
Nombre del producto Herramienta
crimpadora axial
Modelo MSW-PTM-02
Peso [kg] 5,5
Fuerza de mordazas [kN] 40
Dimensiones del dispositivo
para expandir los agujeros
[mm]
40x16x4,7
Dimensiones de la prensa [mm] 400x195x63
Dimensiones de la cuchilla [mm] 250x150x20
Rangodeextensión[mm] 16-32
Rango de corte [mm] Max 40
2.1. SEGURIDAD EN EL PUESTO DE TRABAJO
a) Mantenga el lugar de trabajo limpio y bien iluminado.
Eldesordeno la malailuminación puedenprovocar
accidentes.Tengacuidado,presteatenciónaltrabajo
queestá realizando y use el sentido comúncuando
utilice el dispositivo.
b) En caso de duda sobre si el producto funciona
correctamente o si detectara daños, póngase en
contacto con el servicio de atención al cliente del
fabricante.
c) El producto solamente puede ser reparado por el
fabricante. ¡No intente repararlo usted mismo!
d) Conserve el manual de instrucciones para futuras
consultas. Este manual debe ser entregado a toda
persona que vaya a hacer uso del dispositivo.
e) Los elementos de embalaje y pequeñas piezas de
montaje deben mantenerse alejados del alcance de
los niños.
f) Mantenga el equipo alejado de niños y animales.
g) Al utilizar este equipo junto con otros, también deben
observarse otras instrucciones de uso.
Conceptoscomo"aparato"o"producto"enlasadvertencias
ydescripcionesdeestemanualsereerenaHerramienta
crimpadora axial. ¡No coloque las manos ni otros objetos
sobre el aparato en funcionamiento!
2.2. SEGURIDAD PERSONAL
a) No está permitido utilizar el aparato en estado de
fatiga, enfermedad, bajo la inuencia del alcohol,
drogas o medicamentos, ya que estos limitan la
capacidad de manejo del aparato.
b) Este aparato no debe ser utilizado por personas
(entre ellas niños) con capacidades físicas, sensoriales
o mentales reducidas, o con falta de la experiencia
y/o los conocimientos necesarios, a menos que
sean supervisadas por una persona responsable de
su seguridad o que hayan recibido de esta persona
responsablelasindicacionespertinentes en relación
al manejo del aparato.
c) El producto solamente puede utilizarse por personas
con la forma física adecuada para el trabajo, con el
equipodeprotecciónpersonalapropiado,quehayan
leído atentamente y comprendido este manual
de instrucciones y que cumplan con la normativa
en materia de seguridad y salud para el trabajo
correspondiente.
d) Actúeconprecauciónyuseelsentidocomúncuando
manejeesteproducto.Lamásbrevefaltadeatención
durante el trabajo puede causar lesiones graves.
e) Utilice el equipo de protección personal necesario
para el empleo de este dispositivo, de acuerdo con
lasespecicacionesdelpunto1delasexplicaciones
delossímbolos.Elusodeunequipodeprotección
personalapropiadoycerticadoreduceelriesgode
lesiones.
f) No sobrestime sus habilidades. Mantenga el equilibrio
durante el trabajo. Esto le da un mejor control sobre el
dispositivo en caso de situaciones inesperadas.
g) No utilice ropa holgada o adornos tales como joyas.
Mantenga el cabello, la ropa y los guantes alejados
delaspiezasmóviles.Laropaholgada,lasjoyasoel
cabello largo pueden quedar atrapados en las piezas
móviles.
h) Este aparato no es un juguete. Debe controlar que los
niños no jueguen con él.
MANUAL DE INSTRUCCIONES
DATOS TÉCNICOS
Respetar las instrucciones de uso.
Utilizarguantesdeprotección.
¡ATENCIÓN! ¡Advertencia de lesiones en
manos!
1. DESCRIPCIÓN GENERAL
Este manual ha sido elaborado para favorecer un empleo
seguroyable.Elproductohasidoestrictamentediseñado
yfabricadoconformealasespecicacionestécnicasypara
ellosehanutilizadolasúltimastecnologíasycomponentes,
manteniendo los más altos estándares de calidad.
ANTES DE LA PUESTA EN FUNCIONAMIENTO,
LEA LAS INSTRUCCIONES MINUCIOSAMENTE Y
ASEGÚRESE DE COMPRENDERLAS.
Para garantizar un funcionamiento duradero y able del
aparato, el manejo y mantenimiento deben llevarse a cabo
de acuerdo con las instrucciones de este manual. Los
datostécnicosylasespecicacionesdeestemanualestán
actualizados. El fabricante se reserva el derecho de realizar
modicacionesparamejorarlacalidad.
EXPLICACIÓN DE LOS SÍMBOLOS
¡ADVERTENCIA! En este manual se incluyen fotos
ilustrativas, que podrían no coincidir exactamente
con la apariencia real del dispositivo.
Eltextoenalemáncorrespondealaversiónoriginal.Lostextos
en otras lenguas son traducciones del original en alemán.
2. SEGURIDAD
¡ATENCIÓN! Lea todas las instrucciones
e indicaciones de seguridad. La inobservancia de
las advertencias e instrucciones al respecto puede
provocar descargas eléctricas, incendios, lesiones
graves o incluso la muerte.
¡ADVERTENCIA!Los niños y las personas no
autorizadas deben estar asegurados cuando trabajen
con esta unidad.

28 Rev. 06.02.2020 29
Rev. 06.02.2020
39 Anillodesujeción 1
40 Placadeconducción 1
41 Tornillo M5x6 2
42 Botóndereinicio 1
1. Cuchilla de trinquete
2. Drenaje
3. Hebilla
3.2. PREPARACIÓN PARA LA PUESTA EN MARCHA
LUGAR DE TRABAJO
La temperatura ambiente no debe ser inferior a -20°C ni
superior a 40°C. El aparato se debe usar siempre en una
supercieplana,estable, limpia seca,fuera delalcance de
los niños y de personas con funciones psíquicas, mentales y
sensoriales limitadas.
3.3. MANEJO DEL APARATO
1. Corte de tuberías
a) Apriete los mangos, la abrazadera de conexión se
abrirá automáticamente.
b) Presioneelgatillo(g.3,3).
c) Abra los mangos.
d) Coloque el tubo en el cortador como se muestra en la
gurayaprietelosmangos.
e) 'Bombear' hasta que se corte el tubo.
ATENCIÓN:asegúresedequeeltuboestéorientado
perpendicularmente al a la cuchilla.
CONSTRUCCIÓN DEL CORTATUBOS
ATENCIÓN: El corte del tubo debe ser suave y sin rebabas.
Estoasegurarálaestanqueidaddelaconexión.
2. Expansióndetubos
a) Seleccione la matriz apropiada.
b) Abra completamente los mangos de la herramienta
para expandir el tubo (Fig. 1, 11).
c) Atornille la matriz.
d) Coloqueelmanguitoeneltuboexpandido(asegúrese
dequeelmanguitonoestéenlasecciónexpandidadel
tubo) y usando el extremo cortado ponga el tubo en la
matrizcomosemuestraenlagura.
90°
e) Cierre los mangos de la herramienta para expandir el
tubo.
ATENCIÓN: Para garantizar una expansión uniforme
del tubo. mantenga los mangos cerrados por un
tiempo, después ábralos suavemente, gire el tubo o la
herramienta unos 30 ° y repita el proceso. Debe ser
sucienterepetirlaaccióndosveces.
ATENCIÓN:Elensanchamientoexcesivooinsuciente
del tubo puede causar fugas en el conector.
3. Montaje del conector
a) Inserte el racor en el fragmento extendido del tubo
para que llegue al manguito (no tiene que llegar a la
brida). Después de un tiempo, el tubo se encogerá y
se adherirá al racor.
b) Después, mueva el manguito lo más cerca posible
del racor.
4. Apretar el conector
a) Seleccione las mordazas apropiadas (Fig. 2; 1,2) y
bloquéelas,,comosemuestraenlagura.
1
2
3
3. INSTRUCCIONES DE USO
El conjunto incluye herramientas para cortar y expandir
tuberías y un dispositivo para apretar conectores.
El usuario es responsable de los daños derivados de un
uso inadecuado del aparato.
3.1. DESCRIPCIÓN DEL APARATO
ELEMENTOS DEL KIT
1. Mordazasmóviles
2. Mordazasjas
3. Pasador
4. Tubodeconducción
5. Mangojo
6. Drenaje
7. Mango
8. Mangomóvil
9. Cortador
10. Matrizdeexpansión
11. Herramientadeexpansióndetuberías
2.3. MANEJO SEGURO DEL APARATO
a) No permita que el aparato se sobrecaliente. Utilice
las herramientas apropiadas para cada trabajo.
Debe seleccionarse el aparato adecuado para cada
aplicación y utilizarse conforme al n para el que
ha sido diseñado, para conseguir así los mejores
resultados.
b) Mantenga las herramientas fuera del alcance de los
niños y de las personas que no estén familiarizadas
con el equipo en sí o no hayan recibido las
instrucciones pertinentes al respecto. En manos de
personas inexpertas este equipo puede representar
un peligro.
c) Mantenga el aparato en perfecto estado de
funcionamiento. Antes de cada trabajo, compruébelo
en busca de daños generales o de piezas móviles
(fractura de piezas y componentes u otras
condiciones que puedan perjudicar el funcionamiento
seguro de la máquina). En caso de daños, el aparato
debe ser reparado antes de volver a ponerse en
funcionamiento.
d) Mantenga la unidad fuera del alcance de los niños.
e) La reparación y el mantenimiento de los equipos
solopueden serrealizados por personalcualicado
y siempre empleando piezas de repuesto originales.
Esto garantiza la seguridad durante el uso.
f) A n de asegurar la integridad operativa del
dispositivo, no se deben retirar las cubiertas o los
tornillos instalados de fábrica.
g) Limpie regularmente el dispositivo para evitar que la
suciedad se incruste permanentemente.
h) No trabaje con dos elementos simultáneamente.
i) Este aparato no es un juguete. La limpieza y el
mantenimiento no deben ser llevados a cabo por
niñosquenoesténbajolasupervisióndeadultos.
j) Se prohíbe realizar cambios en la construcción del
dispositivoparamodicarsusparámetrosodiseño.
Número Nombre Cantidad
1Pasadormóvil 1
2 Resorte 1
3 Bola de acero C4 1
4Matrizja 1
5 Cojinete 32.6x29.6x15 2
6Matrizmóvil 1
7Pasadormóvil 1
8 Tapa de plástico 1
9Tubodeconducción 1
10 Tornillo de bloqueo M5x10 1
11 Placadeconducción 1
12 Tornillo M6x20 1
13 Resorte tensionado 1
14 Base del resorte 1
15 Pasador de bloqueo 2
16 Cuerpo 1
17 Pinzas de bloqueo 1
18 Cojinete 28x25x6 2
19 Asamóvildelcabezal(I) 1
20 Anillo de repuesto 30 2
21 Tornillo de fuerza 1
22 Mandril 1
23 Pasador auxiliar 1
24 Cojinete 14x12x12 1
25 Pasador cilíndrico 4x24 1
26 Resorte tensionado 1
27 Trinquete 1
28 Mangomóvil 1
29 Tornillo hexagonal M6x32 2
30 Asamóvildelcabezal(II) 1
31 Mango 2
32 Conexióndehorquilla 1
33 Resorte 1
34 Base del resorte 1
35 Rodillodeconducción 1
36 TornillodeconducciónM6x28 1
37 Mangojo 1
38 Resorte tensionado 1
¡ATENCIÓN!Aunqueenlafabricacióndeesteaparato
se ha prestado gran importancia a la seguridad,
dispone de ciertos mecanismos de protección
extras. A pesar del uso de elementos de seguridad
adicionales, existe el riesgo de lesiones durante el
funcionamiento, por lo que se recomienda proceder
conprecauciónysentidocomún.
¡ATENCIÓN! La ilustración de este producto se
encuentraenlaúltimapáginadelasinstruccionesp.31.
CONSTRUCCIÓN DE LA CRIMPADORA AXIAL

30 Rev. 06.02.2020 31
Rev. 06.02.2020
PRODUKTZEICHNUNGEN | PRODUCT’S VIEW | RYSUNKI PRODUKTU | NÁKRESY PRODUKTU | SCHÉMAS DU PRODUIT
LE ILLUSTRAZIONI DI PRODOTTO | LAS ILUSTRACIONES DE PRODUCTO
8
9
1011 12
13
14 15 18
19
20
21
16
17
25
22
23
24
26
27
28
31
30
29
37
32
33
34
35
36
38
39
40 41 42
7
2
3
1
4
5
6
1
2
7
6
5
8
34
9
11
10
b) Coloque la brida del racor y el manguito en las
mordazas,comosemuestraenlagura.
ATENCIÓN: Después de colocar el conector en la crimpadora
axial, no mueva la herramienta.
c) Presione el gatillo.
d) Apriete el mango móvil hacia el mango jo. Las
mordazas moverán el manguito hacia el racor.
e) El conector estará listo cuando el manguito toque la
brida del racor.
f) Levante el gatillo.
g) Abraelmangomóvila90°.
3.4. LIMPIEZA Y MANTENIMIENTO
a) Paralimpiarlasupercie,utilicesoloproductosqueno
contengan sustancias corrosivas.
b) Después de cada limpieza, deje secar bien todas las
piezas antes de volver a utilizar el aparato.
c) Guarde el aparato en un lugar seco, fresco y protegido
delahumedadylaradiaciónsolardirecta.
d) Prohibido rociar agua sobre el dispositivo o sumergirlo
en agua.
e) Enlo que respectaa la ecienciatécnica yposibles
daños, el dispositivo debe ser revisado regularmente.
f) Por favor, utilice un paño suave para la limpieza.
g) Para un buen mantenimiento del producto, las
partes de metal deben lubricarse con un agente
anticorrosivo.

expondo.de
CONTACT
expondo Polska sp. z o.o. sp. k.
ul. Nowy Kisielin-Innowacyjna 7
66-002 Zielona Góra | Poland, EU
e-mail: info@expondo.de
UNSER HAUPTZIEL IST DIE ZUFRIEDENHEIT UNSERER KUNDEN!
BEI FRAGEN KONTAKTIEREN SIE UNS BITTE UNTER:
OUR CUSTOMERS‘ SATISFACTION IS OUR MAIN GOAL!
PLEASE CONTACT US WITH QUESTIONS AT:
NASZYM GŁÓWNYM CELEM JEST SATYSFAKCJA KLIENTÓW
W PRZYPADKU PYTAŃ PROSIMY O KONTAKT Z PRZEDSTAWICIELEM
W DANYM KRAJU:
NAŠÍM HLAVNÍM CÍLEM JE SPOKOJENOST NAŠICH ZÁKAZNÍKŮ! V PŘÍPADĚ OTÁZEK
NÁS PROSÍM KONTAKTUJTE NA:
NOTRE BUT PREMIER EST VOTRE SATISFACTION!
POUR TOUTE QUESTION, CONTACTEZ NOUS SUR:
NUESTRO OBJETIVO PRINCIPAL ES LA SATISFACCIÓN DE NUESTROS CLIENTES!
SI TIENE PREGUNTAS, POR FAVOR PÓNGANSE EN CONTACTO CON NOSTROS EN:
I NOSTRO PRINCIPALE OBIETTIVO È LA SODDISFAZIONE DEI NOSTRI CLIENTI!
PER EVENTUALI DOMANDE PER FAVORE, CI CONTATTINO SOTTO:
Table of contents
Languages:
Other MSW Tools manuals

MSW
MSW MSW-HT2 User manual

MSW
MSW MSW-ETTVAG-01 User manual

MSW
MSW MSW-TRB-200 User manual

MSW
MSW MSW-OPG-12.2 User manual

MSW
MSW MSW-DENTPULLER.SET13 User manual

MSW
MSW MSW-ETTBMW-05 User manual

MSW
MSW MSW-PRO-A 30-2 User manual

MSW
MSW MSW-ETTBMW-06 User manual

MSW
MSW MSW-ETT-27 User manual

MSW
MSW MSW-ETTDBZ-01 User manual

MSW
MSW MSW-ETT-VW-109 User manual

MSW
MSW WIRESTRIPPER-006 User manual

MSW
MSW MSW-ETT-BMW-107 User manual

MSW
MSW MSW-OBG80B User manual

MSW
MSW MSW-HFT-01 User manual

MSW
MSW MSW-SPS-15 User manual

MSW
MSW MSW-MPS-01 User manual

MSW
MSW MSW-ARC-11 User manual

MSW
MSW ACC-LKH1 User manual

MSW
MSW MSW-DSGCI-01 User manual