Multitool MT482 User manual

1
SAFETY INSTRUCTIONS
1. ALWAYS WEAR EYE PROTECTION. A full-face visor is preferred. Any Belt/Disc Grinder can throw
foreign objects into the eyes.
2. AVOID CONTACT WITH BELT OR DISC. The abrasive belt when running is an aggressive cung tool.
Extra care should be exercised when using coarse grit belts because of their rapid cung acon.
3. KEEP CHILDREN AWAY. All visitors should be kept a safe distance from the work area.
4. BOLT THE BENCH GRINDER securely to the bench or supporng surface to stop it from pping over
or moving when in use.
5. DO NOT MOUNT the aachment protruding into walkways.
6. KEEP WORK AREA CLEAN. Cluered areas and benches invite accidents.
7. ALWAYS WEAR A DUST MASK to prevent dust inhalaon when adequate venlaon or extracon is
not available.
8. DO NOT WEAR LOOSE CLOTHING which may become entangled in the machine. Wear protecve
hair covering to contain long hair.
9. ALWAYS HOLD the work piece rmly when grinding and apply a light and steady pressure against
abrasive disc or belt.
10. ALWAYS GRIND ON THE DOWNWARD SIDE of the grinding disc. Grinding on the upward side of
the disc could cause the work piece to y out of posion, resulng in injury.
11. DO NOT USE BELTS THAT ARE DAMAGED, TORN, OR SHOW SIGNS OF WEAR.
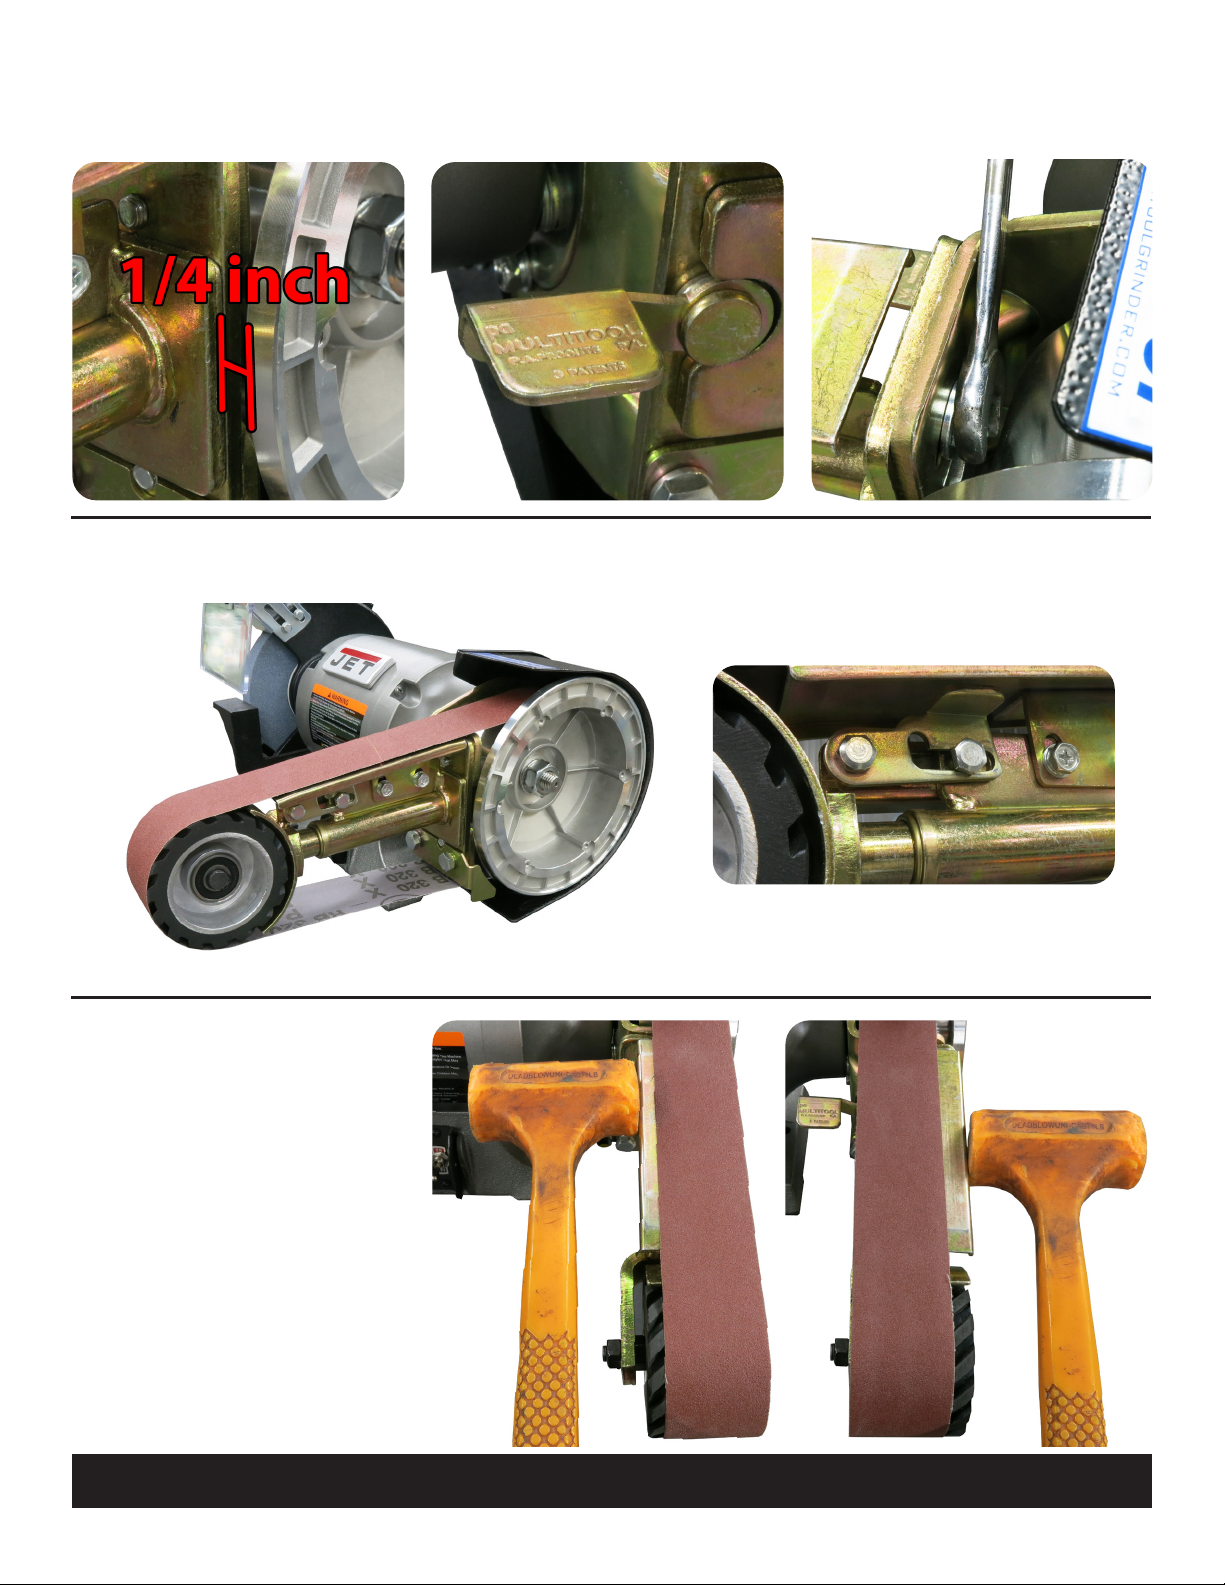
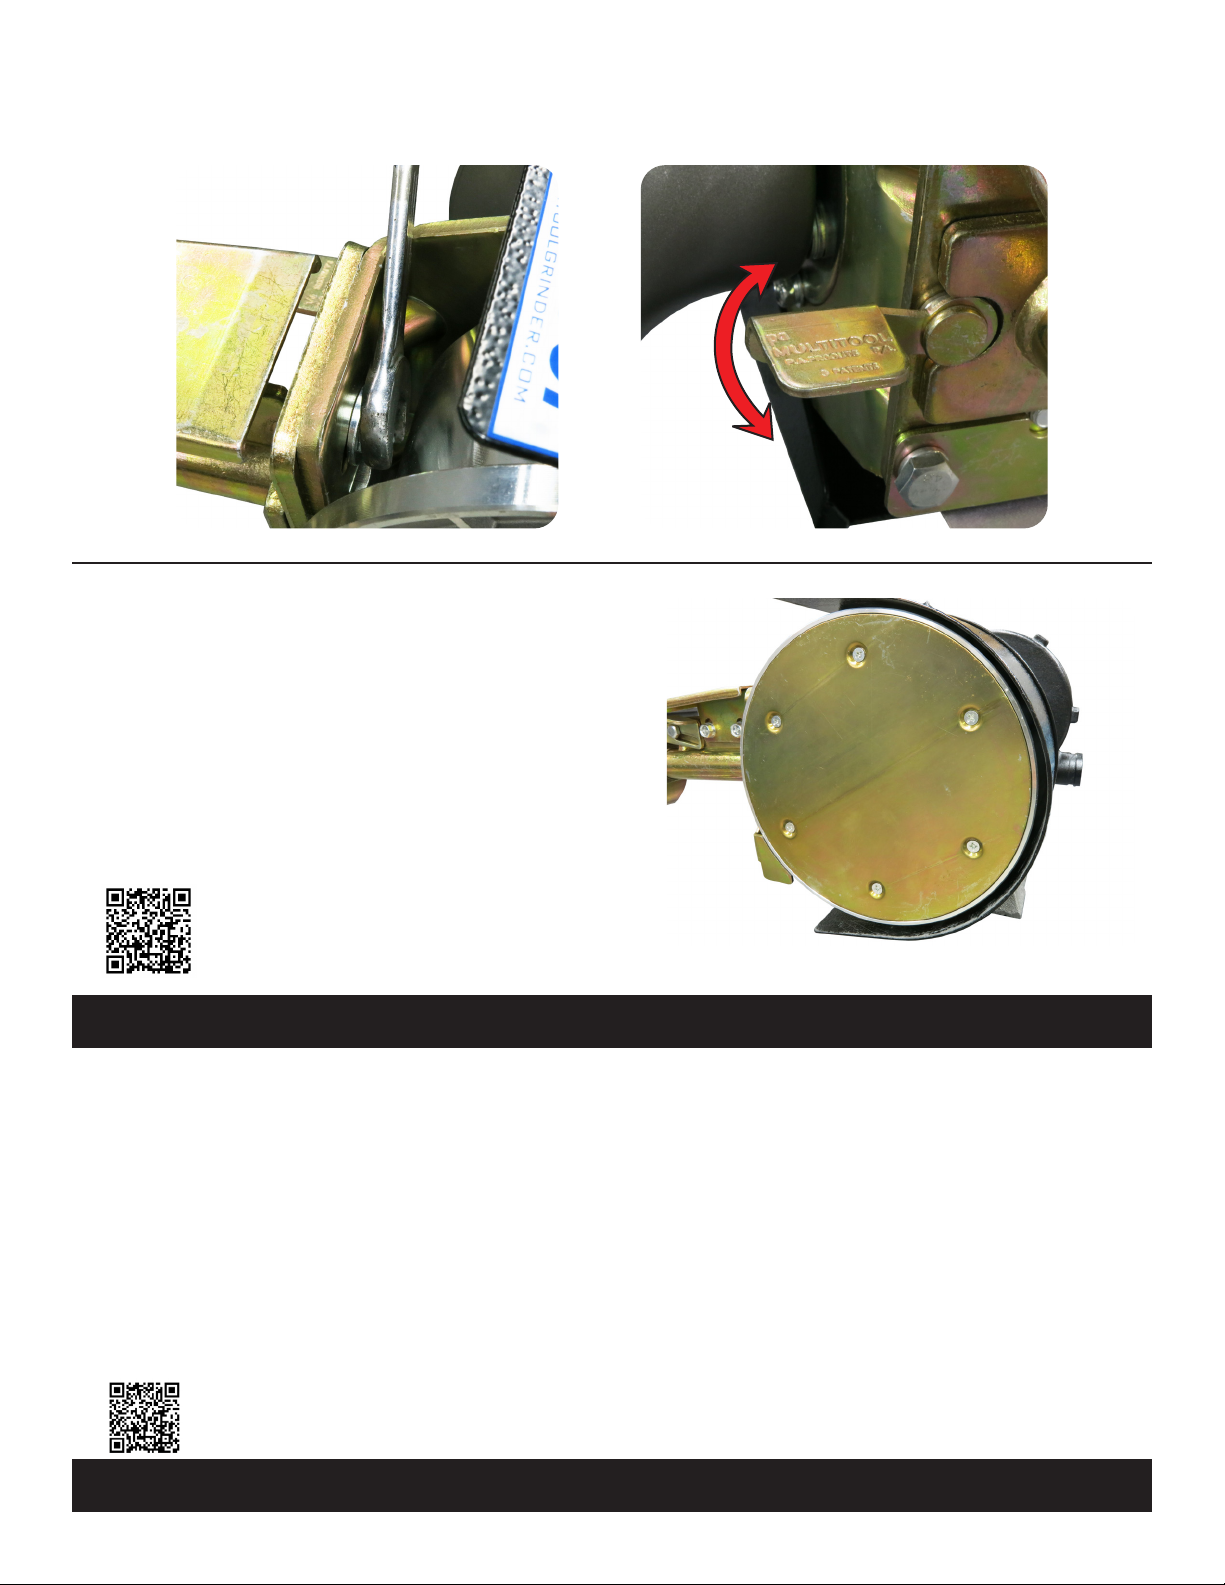
12. ALWAYS INSTALL BELTS with arrows in the back of the belts poinng the correct direcon. Belts
with lap joints must be ed facing the correct direcon.
WARNING:
To avoid mistakes that could cause injury, do not use the Multool unl you have
read and understood the following:
The words “us”, “we” or “our” refers to Multool Grinders or
their authorized agent.
A.) The warranty will only apply if the ng and operang
instrucons are followed.
B.) The warranty will only apply for a period of 1 year from the
date of original purchase against any defect in our product,
which can be proved, to our sasfacon to have been caused
by faulty materials or workmanship. Our liability is limited
to the cost of repairing or at our opon, replacement of the
defecve goods or parts of the goods. We will not be liable for
any defect caused by unauthorized repair.
1. If warranty claim is made, we must be noed as soon as
possible aer assumed defect has become apparent.
2. Goods may only be returned with the approval and RGA # from
Multool Grinders. Contact Multool Grinders at 641-628-4253
or email us at sales@multoolgrinders.com to obtain RGA# and
return approval.
3. The customer must prepay all freight charges for returned goods.
4. We will contact the customer with a suggeson aer inspecng
the goods to determine with the customer what acon should be
taken in the circumstances.
INSTRUCTIONS TO FOLLOW FOR WARRANTY CLAIMS:
WARRANTY AND CONDITIONS OF SALE
For parts, tech support, belts, or discs contact Multool Grinders at 641-628-4253 or sales@multoolgrinders.com
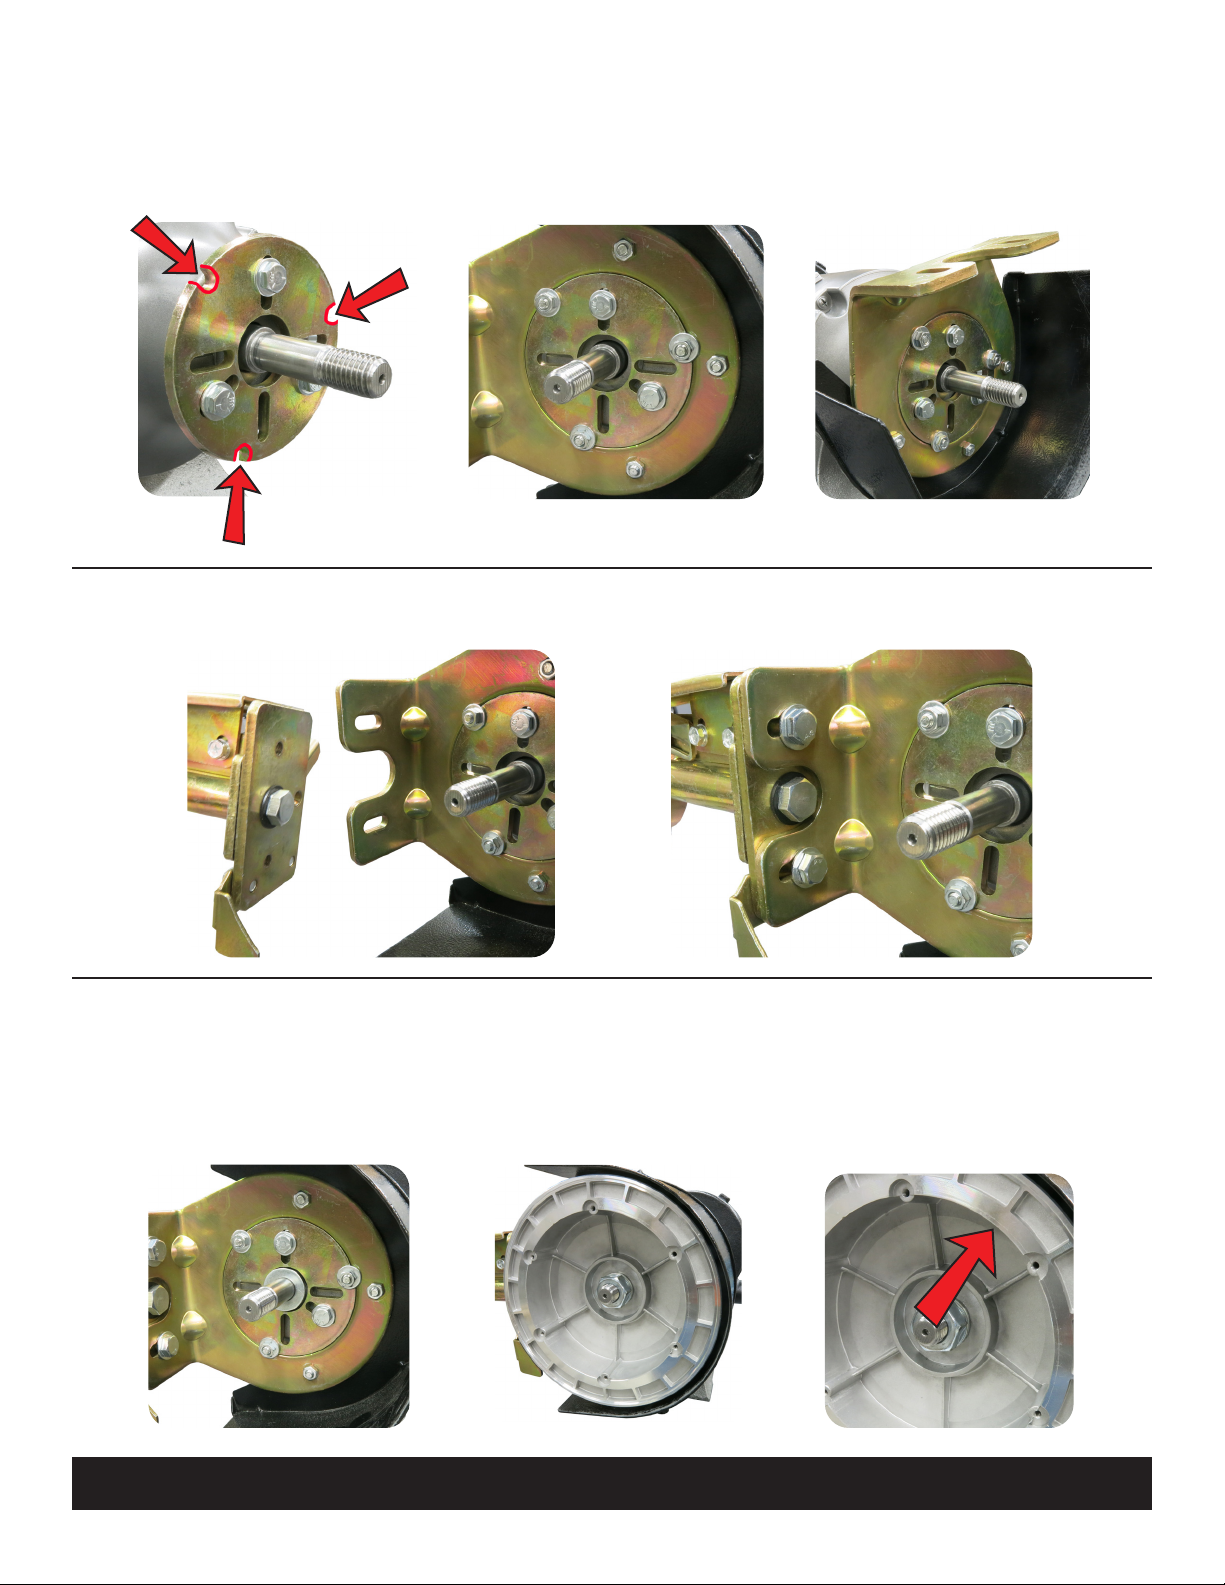
Installaon Instrucons for Belt Grinder Aachment
Models MT362, MT364, MT482 and MT484
USER IS RESPONSIBLE TO HAVE WORKING KNOWLEDGE OF BELT GRINDER
USAGE. MULTITOOL GRINDERS IS NOT RESPONSIBLE FOR ANY DAMAGES OR
INJURIES INCURRED WHILE USING THE MULTITOOL PRODUCT LINE.
!

2
OPERATING INSTRUCTIONS
BELT CHANGING
To remove the belt, simply push down on the underside of belt to compress the tensioner assembly. The
catch will automacally hold the slide in the retracted posion. When replacing the belt simply release the
catch. Make sure that direconal belts are turning the correct direcon.
BELT TRACKING
Ensure the belt enrely covers the rubber contact wheel. Adjustments can be made when running or when
belt is rotated by hand. To adjust le, move tracking lever down. To adjust right, move lever up.
PLATEN GRINDING (HORIZONTAL OR VERTICAL)
It is important that the platen is not set too high. If belt is deected and rides up over the platen, this creates
an undue strain on the grinder, especially when starng. If platen is not oen used, it is beer to adjust it
slightly below the belt. A simple method to adjust the platen is to place a straight edge on top of the belt
between the contact wheel and drive pulley and raise platen so that it just touches the under side of belt.
DISC GRINDING
Disc grinding is well suited for shaping and general deburring work. Grind parts on the downward side of
the disc’s rotaon, so that dust and sparks are directed away from the operator’s face. For grinding small
parts, a secure work holding tool should be used to help prevent operator from contact with the grinding
disc surface. Abrasive disc grit should be matched to the amount of material intended to be removed. The
more quickly material can be removed, the less heat will build up in the part being ground. This will also
help preserve abrasive life. 80 – 180 grit discs are good for general deburring and chamfering operaons. For
heavy material removal use more aggressive 40 grit abrasive discs.
CONTACT WHEEL GRINDING, POLISHING, AND SANDING
Always grind on the lower half of the contact wheel, so that dust and sparks are directed away from the
operator’s face. For grinding small parts, a secure work holding tool should be used to help prevent operator
contact with the grinding belt surface. Abrasive belt grit should be matched to the amount of material
intended to be removed. The more quickly material can be removed, the less heat will build up in the part
being ground. This will also help preserve abrasive life. 80 – 180 grit belts are good for general deburring
and chamfering operaons. For heavy material removal use aggressive (24 – 40 grit) abrasive belts unl
desired shape is achieved. Finer grit belts should be ulized for removal of coarser grinding marks and
polishing operaons. Scotchbrite® belts are ideally suited for paint and rust removal operaons.
SLACK BELT
Slack Belt grinding is a method of belt grinding, sanding, or polishing where no backing is used behind the
belt. It is especially suitable for round and contoured work and some sharpening operaons. Slack belt
grinding can be performed on the underneath side of the belt opposite the platen. Belt grits of 180 to 400
are recommended due to the rapid cung acon of this method of grinding.
For parts, tech support, belts, or discs contact Multool Grinders at 641-628-4253 or sales@multoolgrinders.com

3
Hardware Kit
(Refer to this image for numbered
hardware throughout the instrucons)
Adaptor Plate Drive DrumMain Bracket Tensioner Arm
Belt and Disk
CONTENTS
·1/2” Wrench · #2 Phillips
Screw Driver
· Socket Wrench
·15/16” Socket
REQUIRED TOOLS
For parts, tech support, belts, or discs contact Multool Grinders at 641-628-4253 or sales@multoolgrinders.com
FITTING INSTRUCTIONS
1.
Install sloed adaptor plate using either 6mm bolt (3), 5mm bolt (5), or 4.8mm bolt (9) provided (image
2A). Use appropriate size washers under heads (1 or 12). The outer edge of the adaptor plate is tapered.
Face smallest side of taper away from grinder motor (image 2B).
Di
sconnect grinder from power source. From the
right side of the grinder, remove wheel guards,
grinding stone, and any anges or washers used
with the factory stone. Retain factory arbor nut
for use with Multool drive drum.
2.
11
2A2A 2B2B
NOTE: Some grinders may require the
use of addional washers between the
grinder and adaptor plate to clear bolt
heads in step 3. This may require the
use of longer bolts to get full thread
engagement in motor housing.

4
Install the tensioner arm using 8mm bolts (2) and washers (7) into the slots on the main bracket, keeping
the bolts slightly loose for future adjustments in step 6.
5. Install a 1/2” washer (13) or a 5/8” washer (11) on the grinder sha (image 5A). The drive drum features
a 5/8” bore, however a nylon bushing (10) is provided for 1/2” shas. Fit the drive drum by sliding over
the sha of the grinder (image 5B). If there is interference between the adapter plate bolts and drive
drum, add addional washers behind the drum to gain acceptable clearance. Use 1/2” (13) or 5/8” (11)
diameter washers under the arbor nut and ghten. If drive drum does not run true, use rubber or leather
mallet to tap on the inside edge of rim (image 5C) where run-out may occur.
5A5A 5B5B 5C5C
For parts, tech support, belts, or discs contact Multool Grinders at 641-628-4253 or sales@multoolgrinders.com
Install the main bracket using bolts (8) through the three cut outs shown in image 3A. With head of
bolt facing the grinder motor, use 6mm nuts (6) and washers (12) and ght en evenly. The adaptor plate
should be ush with the main bracket as shown image 3B. If the Multool is to be used in a vercal
posion simply loosen nuts and tap main bracket to loosen. Swivel to desired posion and reghten
nuts (image 3C).
3.
3A3A 3B3B 3C3C
4.
4A4A 4B4B

5
Collapse tensioner arm unl the catch lever engages. Install the belt and release spring loaded tensioner
arm by liing the catch.
7.
The tensioner arm plate should now be set 1/4” (6mm) from the inside edge of the drive drum (image 6A).
Set tracking lever in horizontal posion as shown in image 6B. Use a 1/2” wrench to ghten the two bolts
securing the tensioner arm to the main bracket (image 6C).
6.
6A6A 6B6B
77
For parts, tech support, belts, or discs contact Multool Grinders at 641-628-4253 or sales@multoolgrinders.com
Spin the belt over a few
revoluons by hand. If the belt
wanders towards the drive
drum, remove belt, loosen the
top bolt of the tensioner arm
(image 6C) and tap the edge of
the platen in small amount on
the le using a mallet (image
8A). If the belt moves towards
the grinder, tap the edge of
platen on the right (image 8B).
Reinstall belt and repeat test.
8. 8A8A 8B8B
6C6C

6
Vibraon or wobble from the drive drum
Vibraon is oen related to the hardware, installaon, or the grinder itself. It is best to remove the stone
or wheel on the opposite side of the grinder to be sure that is not the source of the problem. Runout at the
edge of the drum of approximately 1/16” is within the standard tolerances for this aachment. This small
amount of runout has virtually no impact on how the aachment operates.
The most common issue we have found is that ghtening the arbor nut can somemes cause the drum to
wobble. You may noce that as the nut is ghtened, runout increases. It may be necessary to use a so face
mallet or hammer and block of wood to take out the bind created by ghtening and true the drum on the
sha. Rotate the drum unl the high spot is idened and strike the drum on the inside edge near the screw
bosses for the cover disc. A substanal strike with a dead blow mallet is required to adjust runout. Light
tapping will generally not have an eect.
For more informaon on how to perform the drive drum troubleshoong x, scan the
QR Code on the le or visit our website: hps://multoolgrinders.com/pages/support/videos.html
MULTITOOL TROUBLESHOOTING
For parts, tech support, belts, or discs contact Multool Grinders at 641-628-4253 or sales@multoolgrinders.com
Install the cover plate using screws (4).
Clean face of cover disc with a solvent
and install adhesive backed abrasive
disc provided.
10. 1010
When the belt runs evenly on the contact wheel, re-ghten bolt (image 9A). Briey turn grinder on to
perform nal check. Final tracking adjust ments can be done with the tracking lever (image 9B). Pulling
the tracking lever down moves the belt to the le, while moving it up moves the belt to the right.
9.
9A9A 9B9B
For a short instrucon video, see
hps://multoolgrinders.com/pages/support/videos.html

7
Grit Type Abrasive Part Number
24 Premium Aluminum
zirconia BLT36224-P
40 Premium Aluminum
zirconia BLT36240-P
40 Standard Aluminum
oxide BLT36240-S
80 Premium Aluminum
zirconia BLT36280-P
80 Standard Aluminum
oxide BLT36280-S
120 Premium Aluminum
zirconia BLT362120-P
120 Standard Aluminum
oxide BLT362120-S
180 Premium Aluminum
zirconia BLT362180-P
180 Standard Aluminum
oxide BLT362180-S
220 (A80) Premium Trizact BLT362TZ220
240 Standard Aluminum
oxide BLT362240-S
320 Standard Aluminum
oxide BLT362320-S
400 (A45) Premium Trizact BLT362TZ400
700 (A30) Premium Trizact BLT362TZ700
1200 (A16) Premium Trizact BLT362TZ1200
Coarse Premium Scotch-Brite BLT362SBC-S
Medium Premium Scotch-Brite BLT362SBM
Fine Premium Scotch-Brite BLT362SBVF
Polishing Standard -BLT362SBP
Grit Type Abrasive Part Number
40 Standard Aluminum
oxide BLT48440-S
80 Standard Aluminum
oxide BLT48480-P
120 Standard Aluminum
oxide BLT484120-S
180 Standard Aluminum
oxide BLT484180-P
240 Standard Aluminum
oxide BLT484240-S
320 Standard Aluminum
oxide BLT484320-S
Belts for Model 362
Belts for Model 484
Grit Type Abrasive Part Number
24 Premium Aluminum
zirconia BLT48224-P
40 Premium Aluminum
zirconia BLT48240-P
40 Standard Aluminum
oxide BLT48240-S
80 Premium Aluminum
zirconia BLT48280-P
80 Standard Aluminum
oxide BLT48280-S
120 Premium Aluminum
zirconia BLT482120-P
120 Standard Aluminum
oxide BLT482120-S
180 Premium Aluminum
zirconia BLT482180-P
180 Standard Aluminum
oxide BLT482180-S
220 (A80) Premium Trizact BLT482TZ220
240 Standard Aluminum
oxide BLT482240-S
320 Standard Aluminum
oxide BLT482320-S
400 (A45) Premium Trizact BLT482TZ400
700 (A30) Premium Trizact BLT482TZ700
1200 (A16) Premium Trizact BLT482TZ1200
Medium Premium Scotch-Brite BLT482SBM
Fine Premium Scotch-Brite BLT482SBVF
Polishing Standard -BLT482SBP
Belts for Model 482
Grit Type Abrasive Part Number
40 Standard Aluminum
oxide BLT36440-S
80 Standard Aluminum
oxide BLT36480-S
120 Standard Aluminum
oxide BLT364120-S
180 Standard Aluminum
oxide BLT364180-S
240 Standard Aluminum
oxide BLT364240-S
320 Standard Aluminum
oxide BLT364320-S
Belts for Model 364
BELTS FOR EACH ATTACHMENT
For parts, tech support, belts, or discs contact Multool Grinders at 641-628-4253 or sales@multoolgrinders.com
This manual suits for next models
3
Table of contents
Other Multitool Power Tools Accessories manuals
Popular Power Tools Accessories manuals by other brands

Rosenberger
Rosenberger 60W010-C09 Technical data sheet

Atlas Copco
Atlas Copco 4250327580 Instruction supplement

HOLZMANN MASCHINEN
HOLZMANN MASCHINEN SSAT 1000 user manual

Sherline Products
Sherline Products 1074 quick start guide

Stihl
Stihl 4850 490 0500 quick start guide

Husqvarna
Husqvarna BV 30 Operator's manual