Munsch Wedge It ECO User manual

1/13 Ausgabe 01.2016/Rev.0 MUNSCH Kunststoff-Schweißtechnik GmbH
Operating Instructions
Automatic Wedge Welder
Wedge It ECO
Serial No.:
Typenschild klein
MUNSCH Kunststoff-Schweißtechnik GmbH
Im Staudchen D-56235 Ransbach-Baumbach
Tel.: +49 (0) 2623 898-80
Fax: +49 (0) 2623 898-85
E-Mail: [email protected]
http://munschwelding.com
Firmensitz/Registered Office: Im Staudchen, D-56235 Ransbach-Baumbach
Registergericht/Registration Court: Amtsgericht Montabaur, HRB 3959
Geschäftsführer/Managing Director: Stefan Munsch

MUNSCH Kunststoff-Schweißtechnik GmbH Ausgabe 01.2016/Rev.0 2/13
Introduction
Wedge It ECO, developed and manufactured by MUNSCH Kunststoff-Schweißtechnik GmbH, is
a machine with an own actuator, joining thermoplastic foils and similar materials by heat and
pressure. The Wedge It ECO is developed for outdoor use, but may also be used indoor.
Attention
This machine is an electromechanical unit with moveable parts, operated by high pressure. Take
care in using the Wedge It Multi, especially the moveable parts (no contact with clothes, hair,
bodily parts).
Crushing hazard!!!

3/13 Ausgabe 01.2016/Rev.0 MUNSCH Kunststoff-Schweißtechnik GmbH
Contents
Technical data: .............................................................................................................................3
Safety............................................................................................................................................4
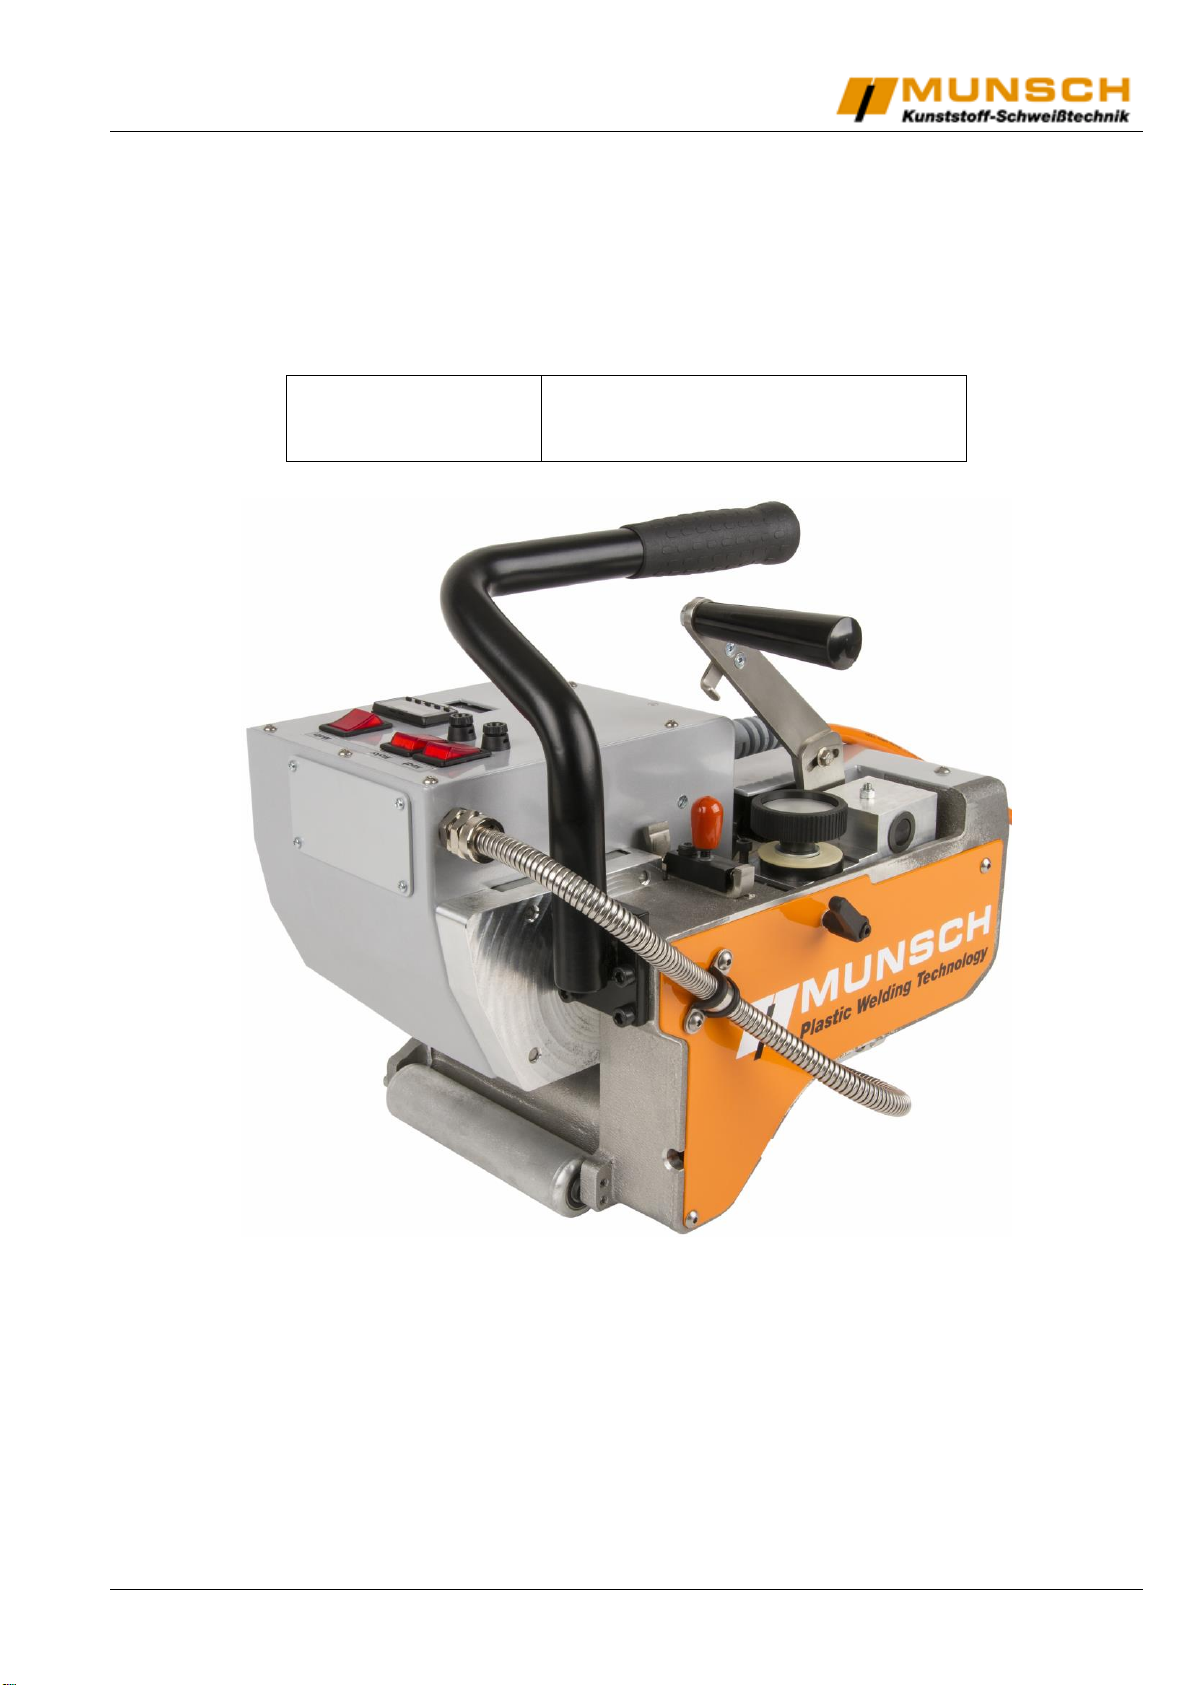
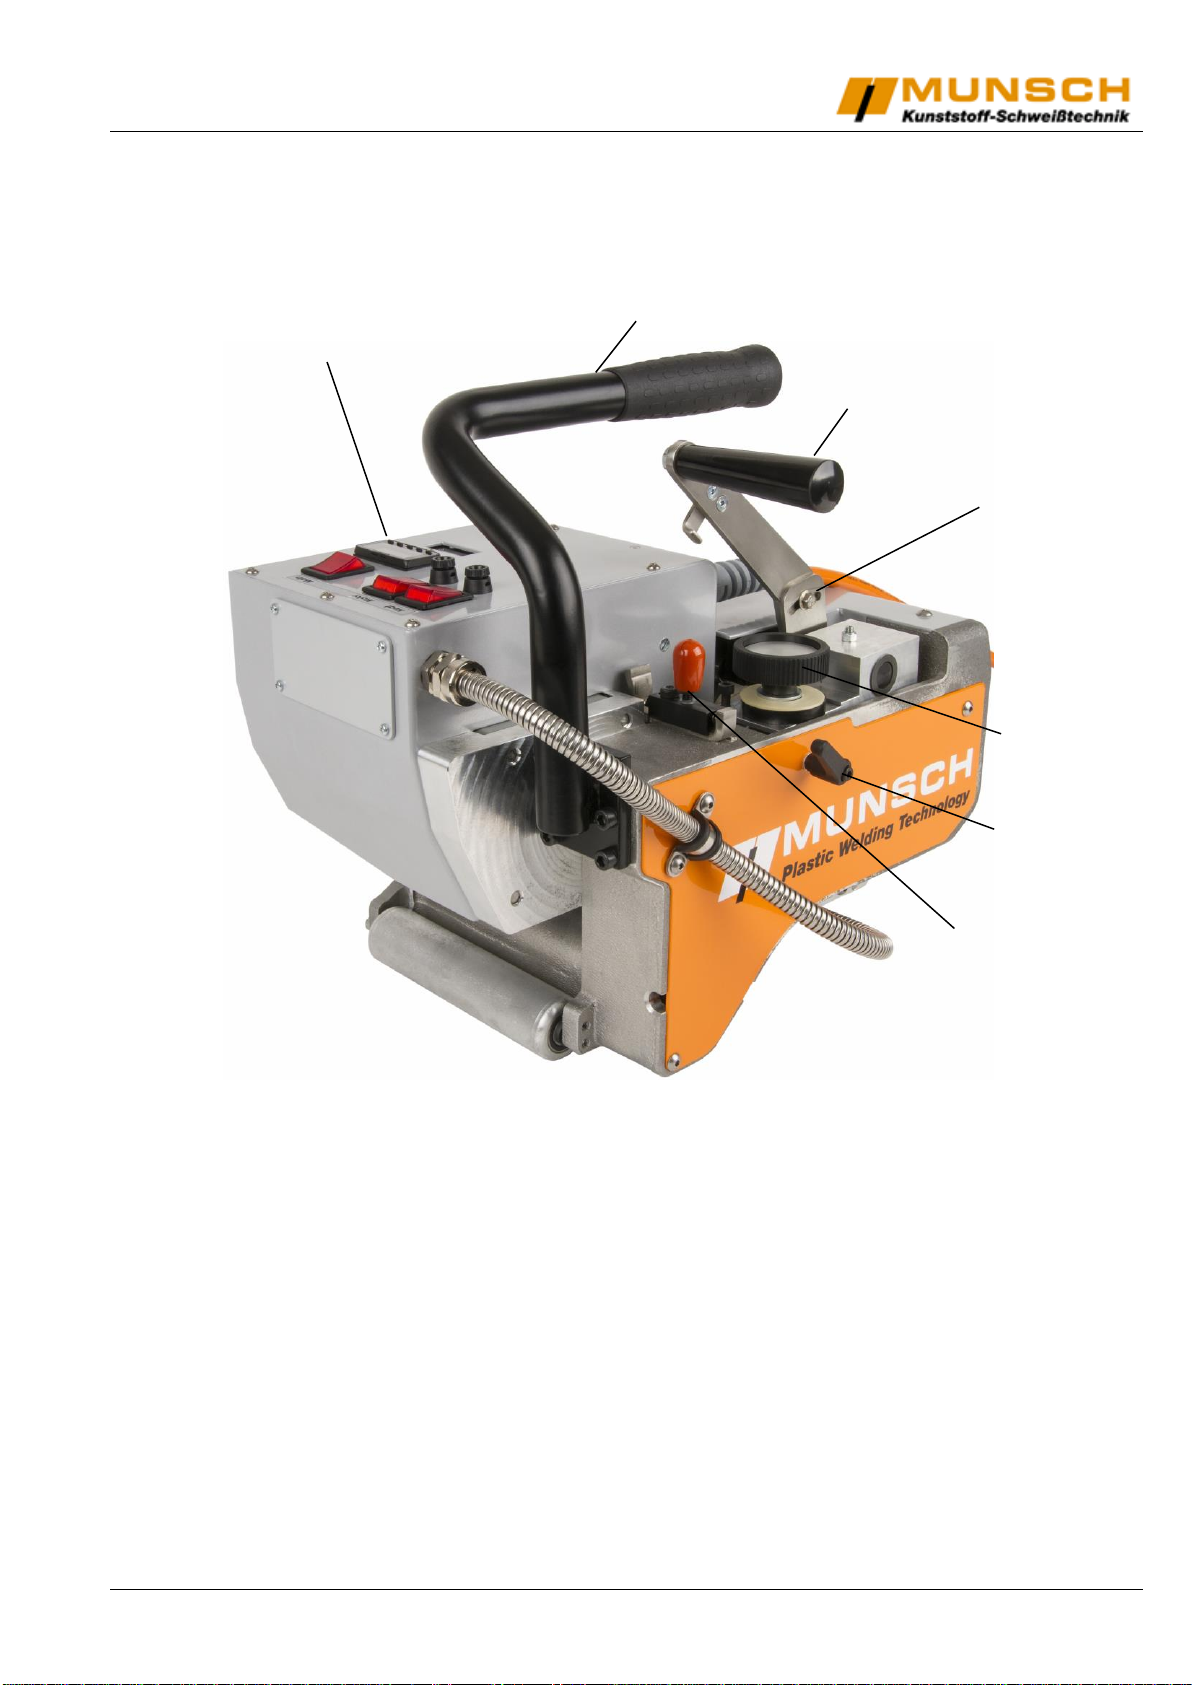
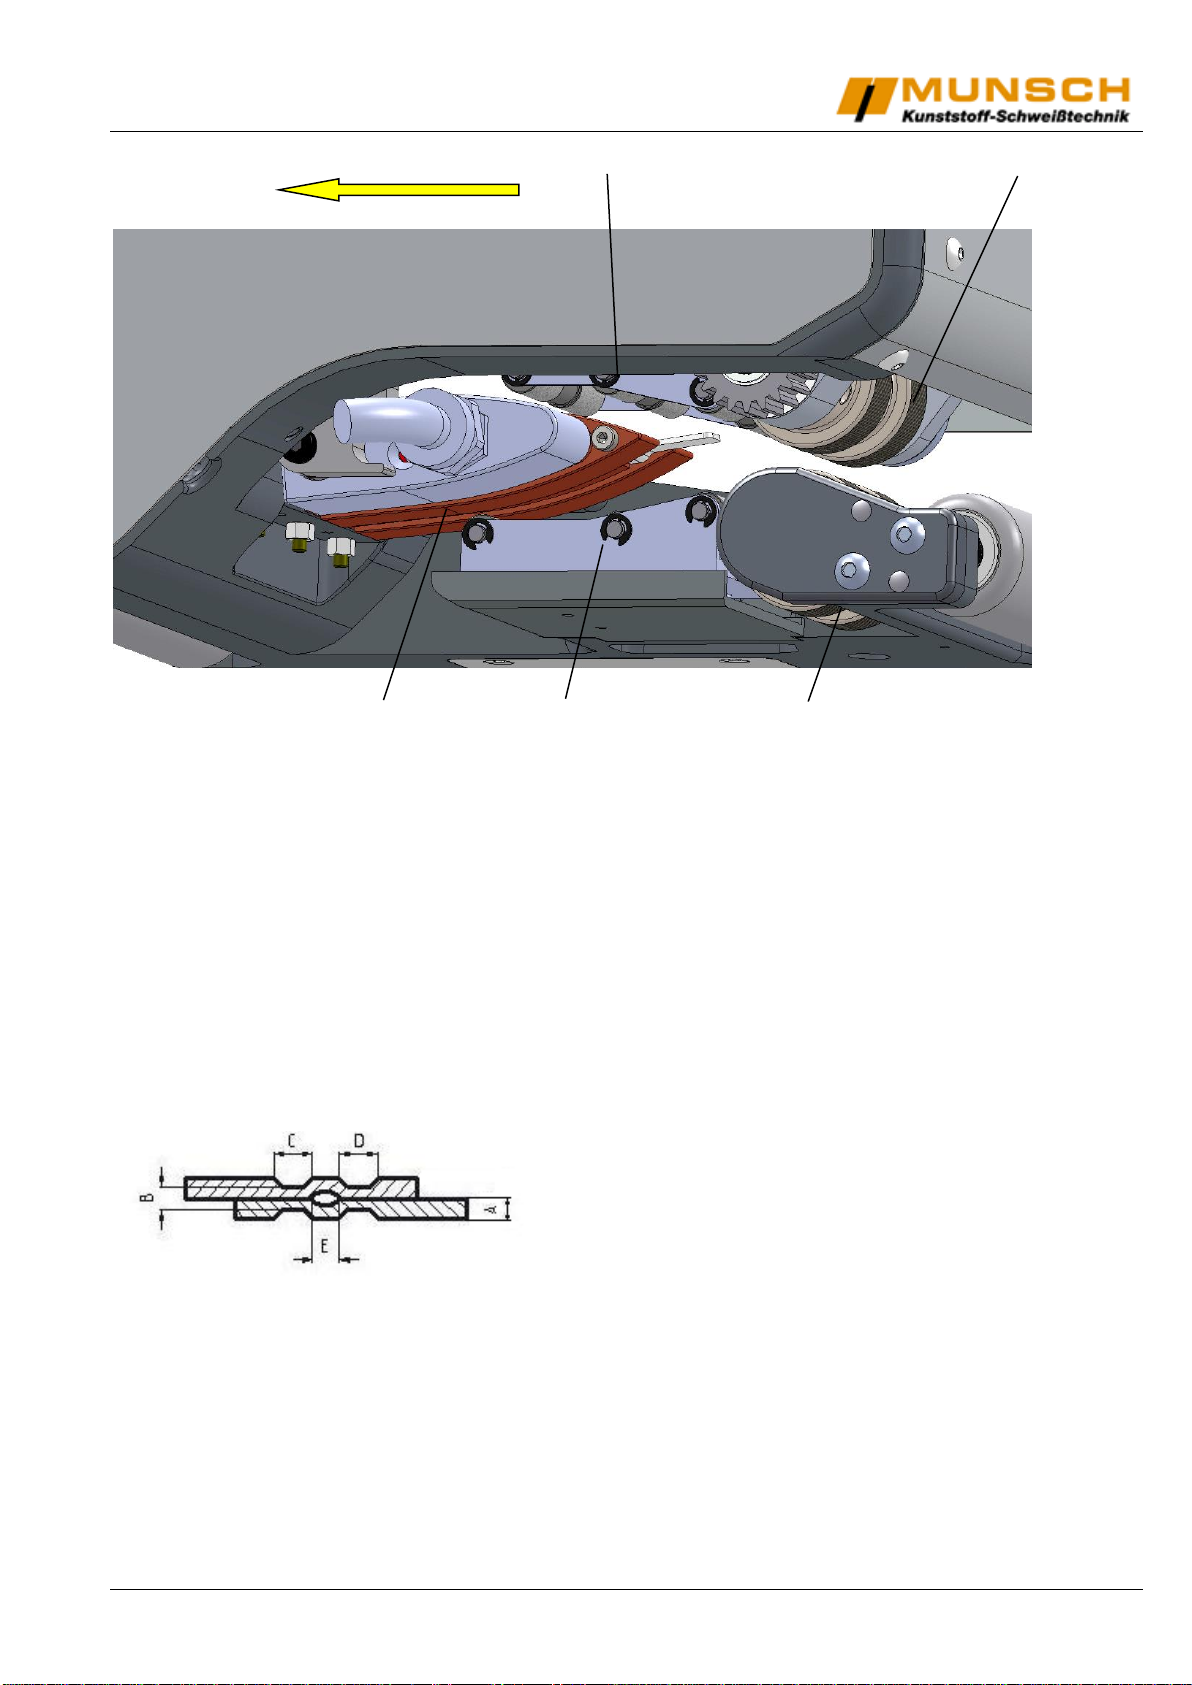
Product description.......................................................................................................................5
Function........................................................................................................................................7
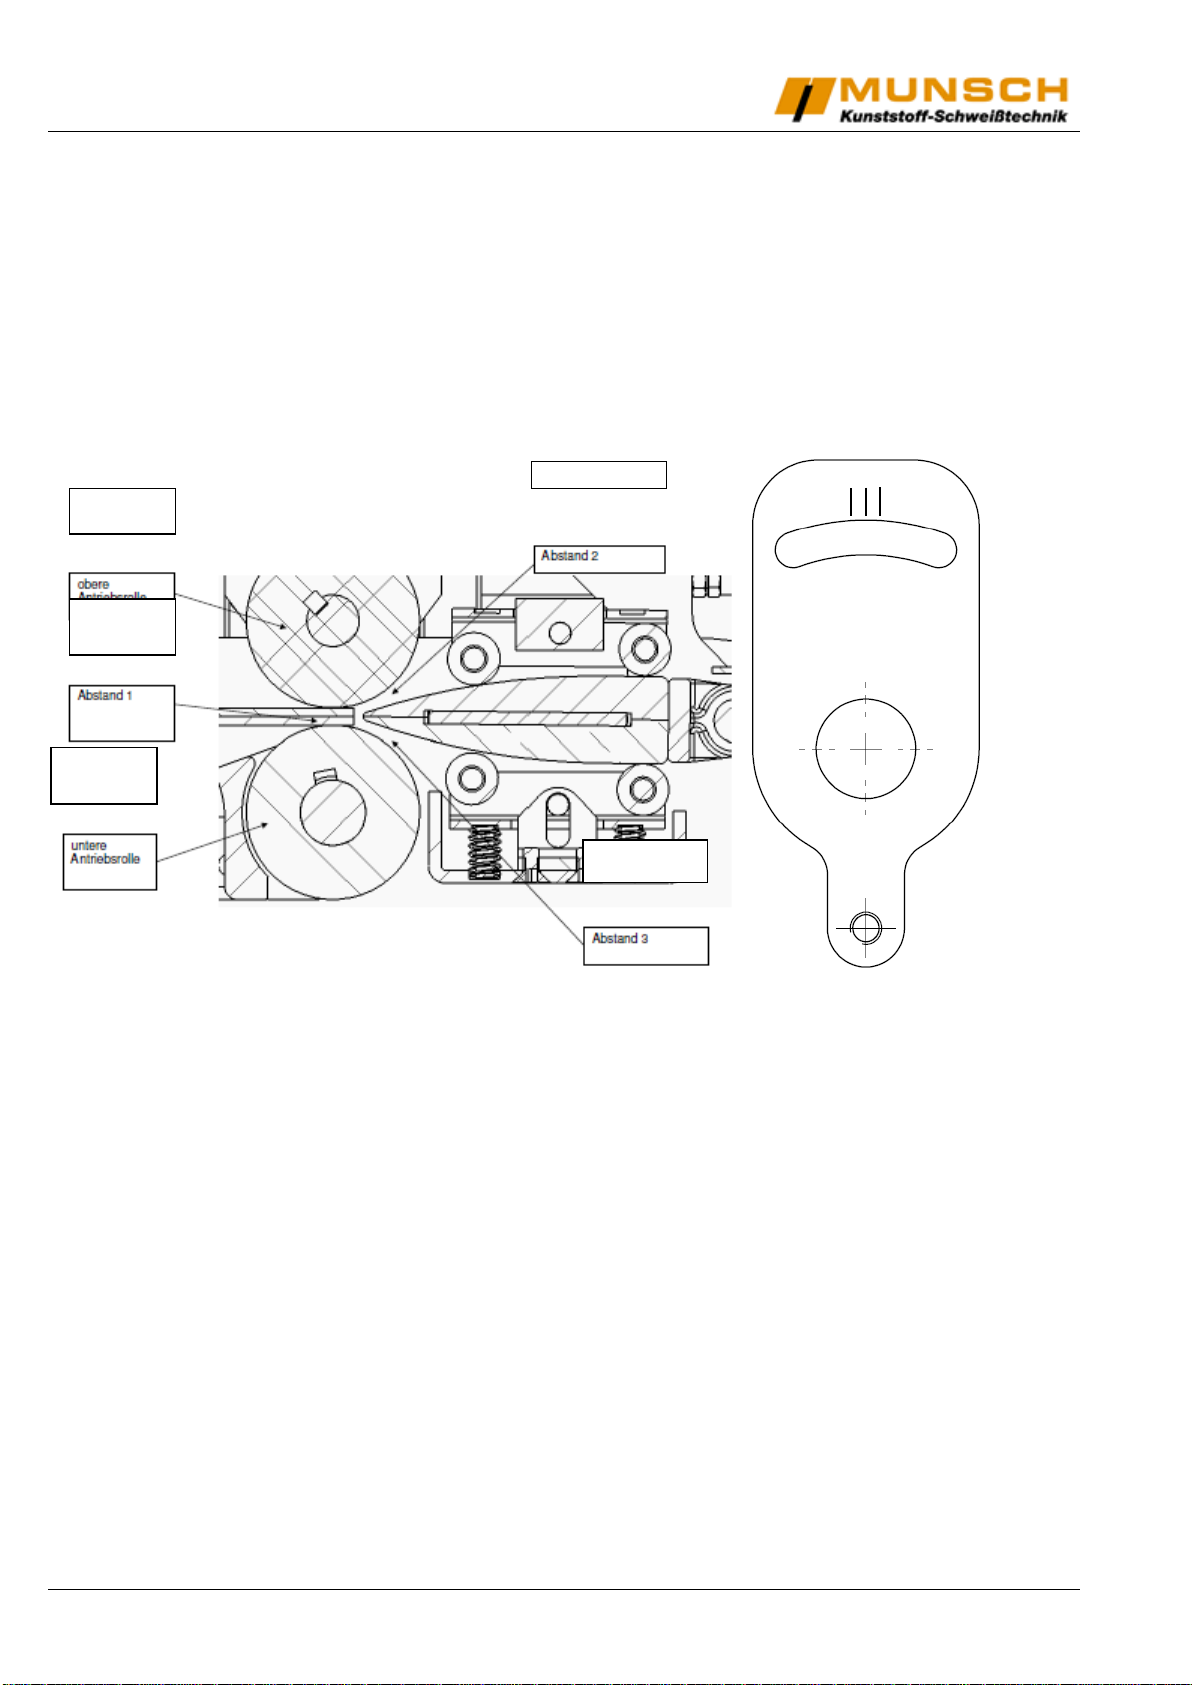
Preparation of the Unit..................................................................................................................8
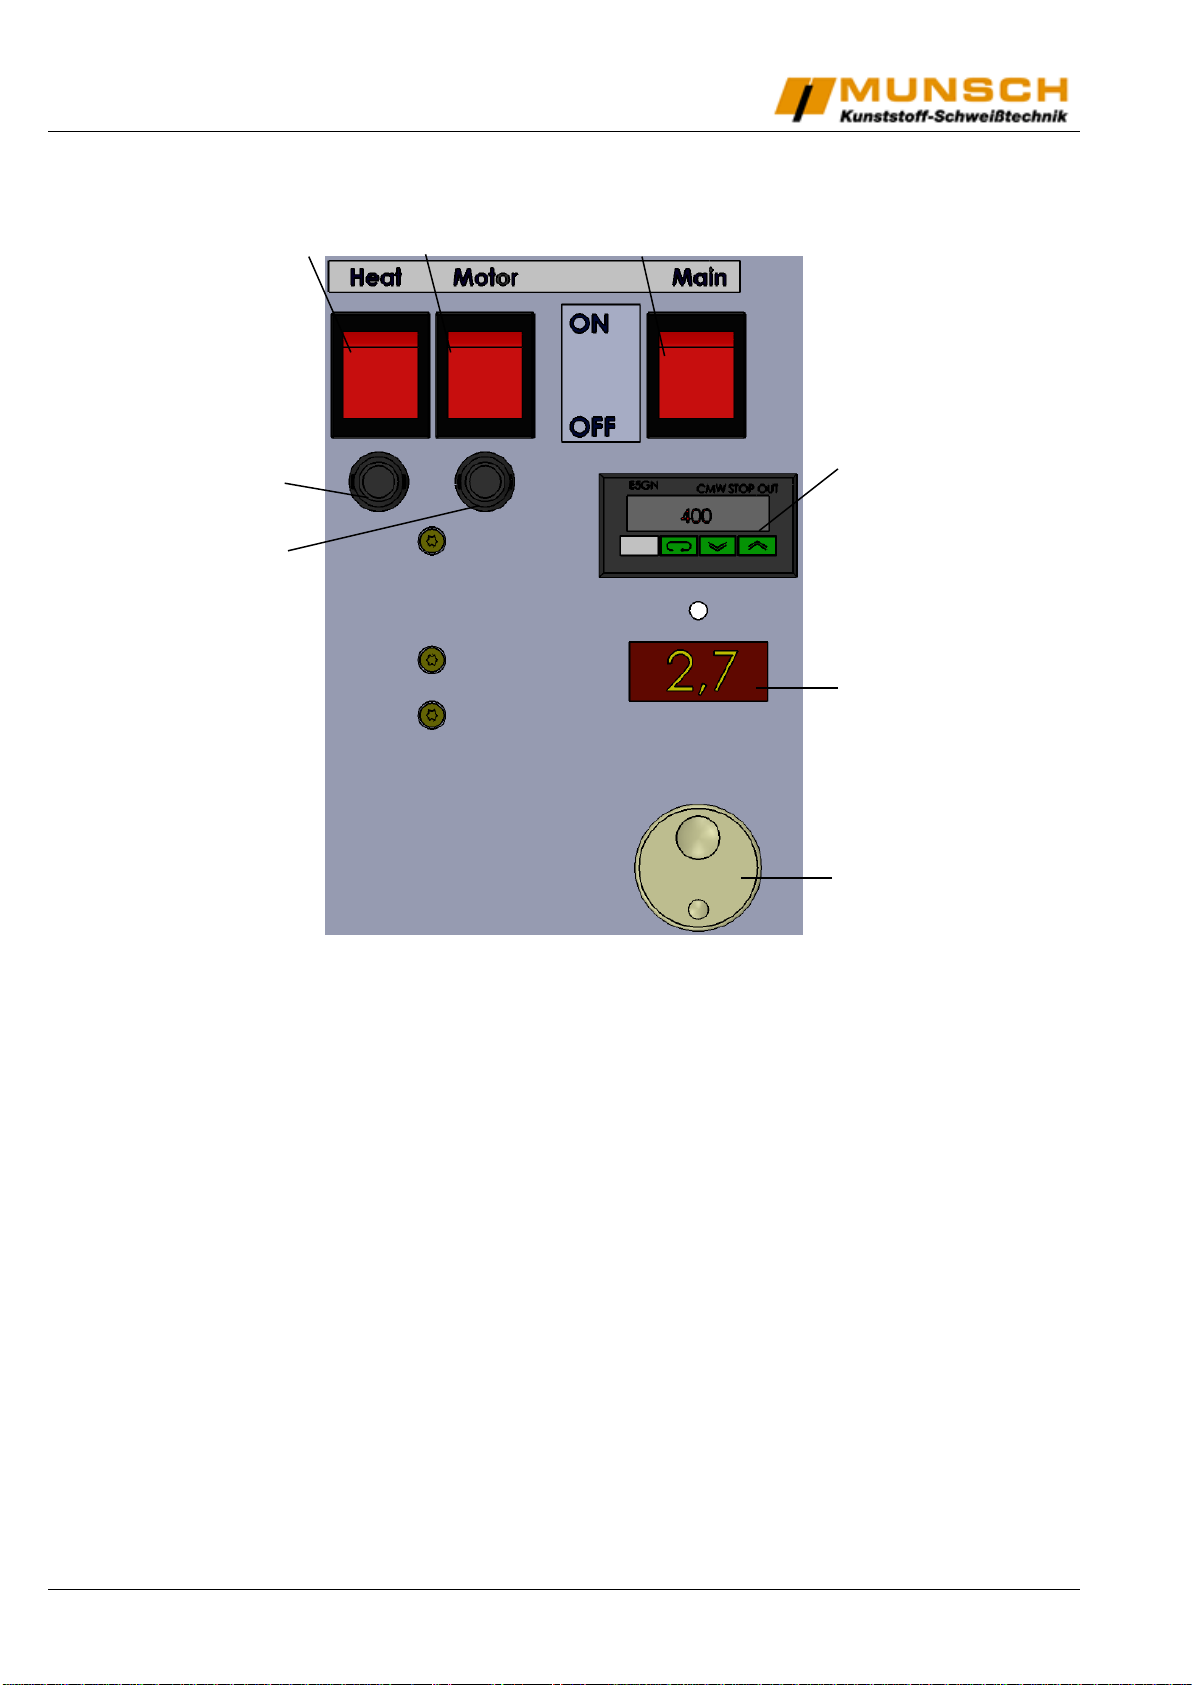
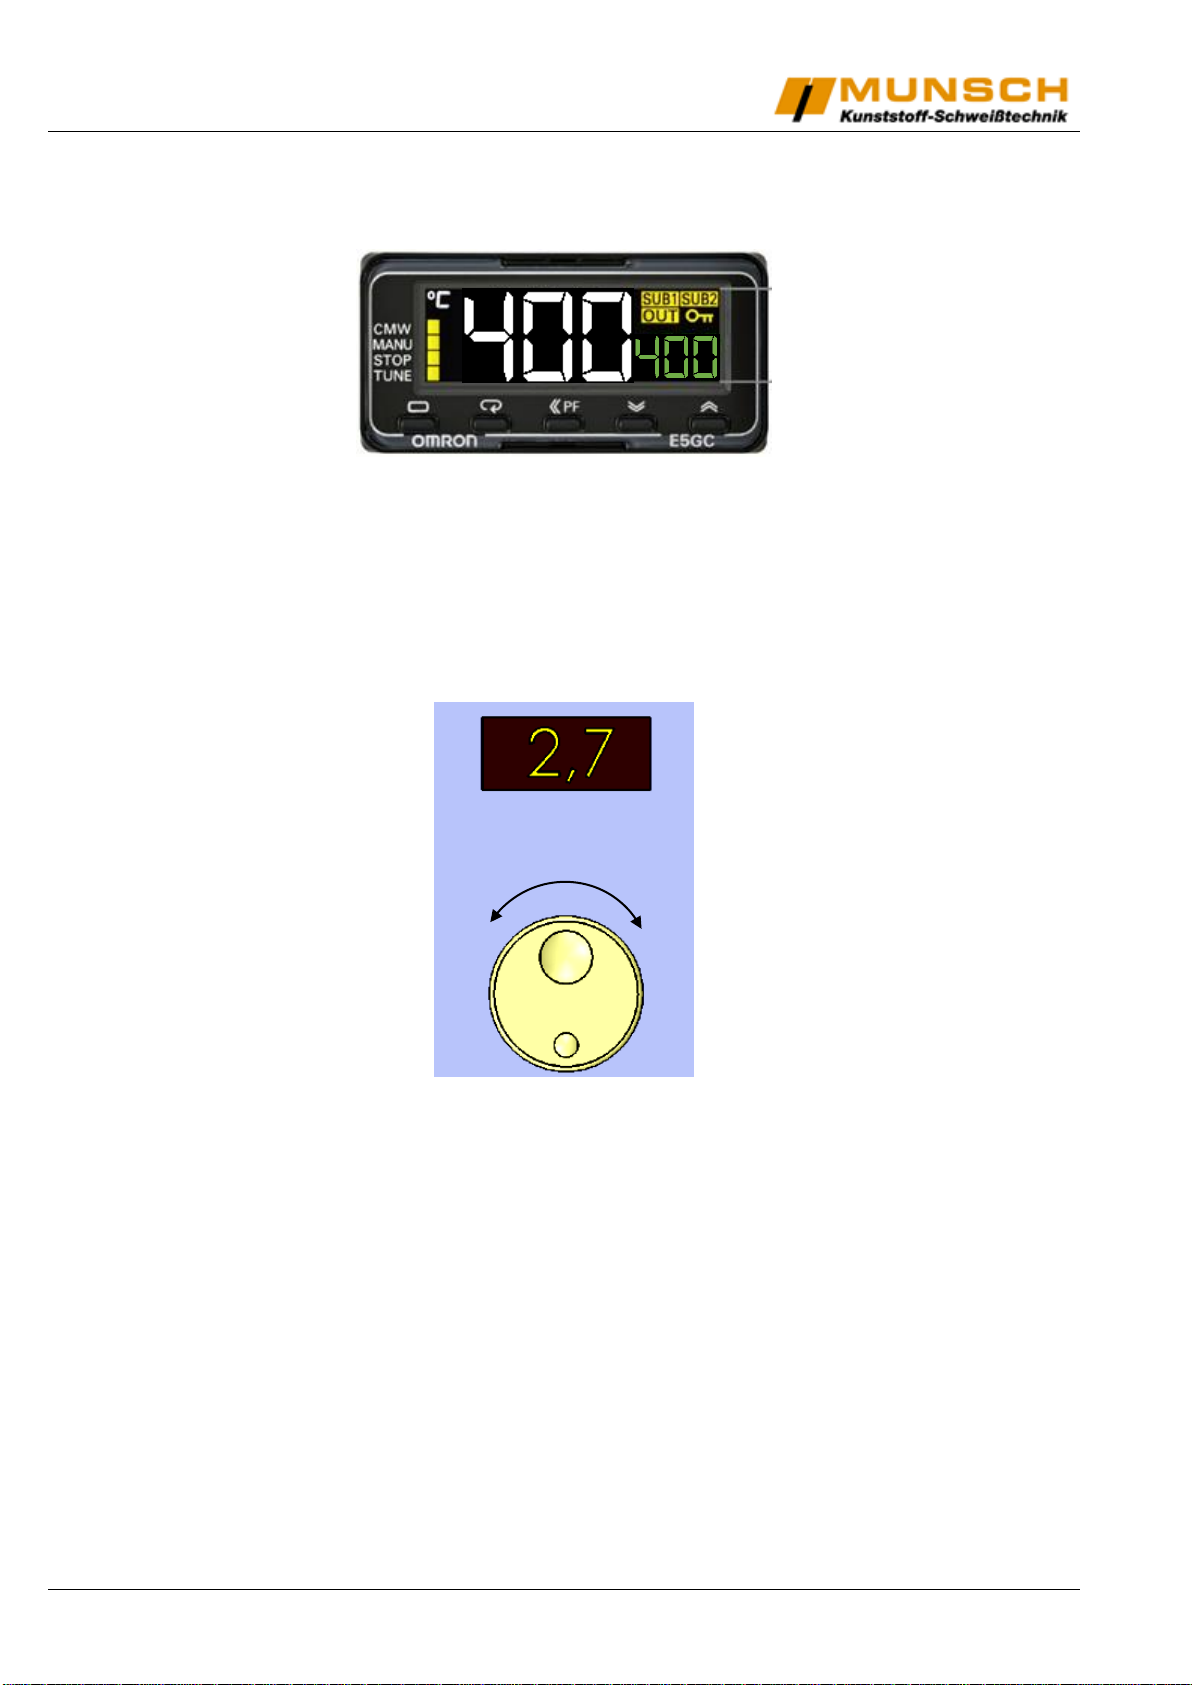
Temperature setting....................................................................................................................10
Speed setting..............................................................................................................................10
Welding.......................................................................................................................................10
Temperature alignment...............................................................................................................11
Transport / Storage.....................................................................................................................12
Service and repair.......................................................................................................................12
EC-Declaration of Conformity by the Manufacturer ....................................................................13
Note: These operating instructions must always be available to the machine operators.
Make sure to read them carefully before placing the unit in service.
Very important!
Switch off the heating wedge whenever the unit is out of service for prolonged periods.
This will prevent heating up of the machine due to radiating heat. Otherwise some ma-
chine components may develop high surface temperatures.
Additional cooling of the heating wedge is not allowed
(water, chilling agents or similar).
Technical data:
Voltage
V
230
Frequency
HZ
50/60
Heating capacity
W
1500
Motor rating (brushless)
W
100
Temperature
°C (°F)
Max. 450 (842), infinitely variable
Max. travel speed
m/min
4.3, infinitely variable
Max. welding pressure
N
1200
Dimensions LxWxH
mm
380x300x320
Weight
kg
19.5
Materials
PE-HD, PE-LD, PE-C,PP,
PVC (with stainless steel wedge)
Material thicknesses
mm (mil)
0.5-3.0 (20-120)

MUNSCH Kunststoff-Schweißtechnik GmbH Ausgabe 01.2016/Rev.0 4/13
Safety
Danger to life when opening the unit due to exposure to live components. Discon-
nect the power supply (all poles) before opening the unit. A damaged connecting
cable may cause fatal electrical shock. The rated voltage indicated on the unit type
tag must match the mains voltage. If required, check with your electric utility.
Improper use of the welding unit poses a fire and explosion hazard, especially when
working in the vicinity of flammable materials and explosive gases.
Not suitable for use in explosion hazard areas!!!
Risk of burns!!!
Do not touch the heating wedge when hot. Always allow unit to cool down.
Protection Class I equipment
Connect the unit only to power outlets equipped with a protective conductor. Each
interruption of the protective conductor presents a hazard. Only use extension ca-
bles with the correct conductor cross-section and a protective conductor.
FI
FI switch required for personal protection.
Unit may only be operated under observation. Heat may propagate to flammable
materials outside the range of vision.
Protect the unit from moisture and direct rainfall!

5/13 Ausgabe 01.2016/Rev.0 MUNSCH Kunststoff-Schweißtechnik GmbH
Product description
Abb. 1
1 - Actuating lever
2 - Support bracket
3 - Adjusting wheel for fine-jacking force
4 - Locking lever for 3
5 - Locking bolt for actuating lever
6 - Front panel
7 - Adjusting for hot wedge position
6
1
2
5
4
3
7

MUNSCH Kunststoff-Schweißtechnik GmbH Ausgabe 01.2016/Rev.0 6/13
Abb. 2
8 - Switch for heating cartridges
9 - Switch for motor / speed control
10 - Mains switch
11 - Fuse for heating cartridges
12 - Fuse for motor
13 - Temperature control
14 - Display welding speed
15 - Adjustment wheel welding speed
13
8
9
10
14
11
12
15

7/13 Ausgabe 01.2016/Rev.0 MUNSCH Kunststoff-Schweißtechnik GmbH
Welding direction
Abb.3
16 - Lower pressure rolls
17 - Upper pressure rolls
18 - Lower actuator roll
19 - Upper actuator roll
20 - Hot wedge Function
Overlap weld with air channel
The Wedge It Multi produces an overlap seam with a
width of 45 mm (including air channel) at an overlap
of approx. 130 mm.
Abb. 4
Abb.4
A: Sheet thickness
B: Thickness of weld seam
C: Part seam 1
D: Part seam 2
E: Air channel
17
19
20
16
18
(Other weld widths and welding seams
without air channel are possible by using
different hot wedges and pressure rolls.)

MUNSCH Kunststoff-Schweißtechnik GmbH Ausgabe 01.2016/Rev.0 8/13
Preparation of the Unit
A special preparation or configuration of the working unit is not absolutely necessary. Only the
working temperature and the welding speed have to be adjusted and you have to do a test weld-
ing.
The joining pressure is created automatically with a spring packet by the machine.
Take a slat out of the test welding and check it (deep injection, continuity of the welding joint,
fracture behaviour). After this test, please adjust temperature and welding speed.
fig. 5 fig. 5a
After changing the material thickness, the distance of the wedge to the actuator rolls has to be
checked and adjusted.
Proceed as follows:
Please cut off two stripes of 50mm width and two stripes of 20mm width from the welding mate-
rial.
Put the 50mm stripes between the rolls (distance 1).
Please make sure, that the material does not project too much into the machine. Otherwise it
would get in contact with the wedge. Now close the machine by pushing the actuating lever (pos.
1, fig. 1), until it snaps into the locking bolt. Loosen the screw on the hot wedge positioning (pos.
7). Set the desired thickness of the geomembrane according to the marks on the metal (fig. 5a).
Please check, whether the 20mm stripes now can easily get inserted above and below the hot
wedge (distance 2 and 3) and make sure that the wedge does not get into contact with the actu-
ator rolls.
upper
actuator roll
lower
actuator roll
distance 1
distance 2
distance 3
3 2 1

9/13 Ausgabe 01.2016/Rev.0 MUNSCH Kunststoff-Schweißtechnik GmbH
ATTENTION!!!
If the distance between hot wedge and actuator rolls is too high, your
welding will be of low quality.
If it is too low, the machine gets too high impact.
NOTE:
Before every welding procedure, check the machine for damages.
Check the actuator rolls and the hot wedge for pollution and remainders.
The welding joint must be clean in the area of the overlapping between
the foils as well as above and below the foils.
When operating the unit with power supply from a generator
set, make sure that the generating capacity is sufficient.
Attention!!
Never leave the unit unattended and never lay it down
for prolonged periods with the heating current activated.
This will cause unnecessary heat development and
ultimately damage to the machine components.
Attention!!
Never allow the machine to run with the nip rollers
locked in place and no material in the machine. This
will destroy the nip rollers and the wedge assembly.

MUNSCH Kunststoff-Schweißtechnik GmbH Ausgabe 01.2016/Rev.0 10/13
Temperature setting
Abb. 6
Please set the desired welding temperature on the temperature controller, using the up and
down arrows.
Speed setting
Abb. 7
Please set the desired welding speed (USA: feet/min; Rest meter/min) spinning the adjustment
wheel of the speed. Confirm the setting by pushing the wheel shortly.
After reaching the set welding temperature, you can start welding.
Welding
Please put the machine into the geomembranes, start the motor and close the actuating lever.
Reopen the actuating lever when reaching the end of the line.
Please put the welding automate on the face looking into the travelling direction, if you stop
welding or if you have reached the end of the line, to have a well heat dissipation.
-+

11/13 Ausgabe 01.2016/Rev.0 MUNSCH Kunststoff-Schweißtechnik GmbH
Temperature alignment
If outer temperatures have changed heavily or if you have changed the wedge, it is recommend-
able, to check the temperature of the wedge.
Please set the desired temperature on the controller and wait until the machine has reached this
temperature.
Please take a surface probe and measure the the real temperature of the wedge. Please note
down the difference.
Please make a temperature alignment according to following steps.
1. Please hold down the left two buttons of the controller for at least 3 seconds.
2. Please go to Value , using the second button from the left. Set it to „0“.
3. Please go to Value , using the second button from the left. Set it to „1“.
4. Please hold down the left two buttons for at least 1 second.
Now all Values of the controller are unlocked!!!
5. Please press shortly the left button.
6. Please go to Value , using the second button from the left. Change the set value
by your noted difference. If the wedge is hotter than the set temperature, please higher
the value (first button from the right). If the wedge is cooler than the set temperature,
please lower the value (second button from the right).
7. Please press shortly the left button.
8. Please hold down the left two buttons of the controller for at least 3 seconds.
9. Please go to Value , using the second button from the left. Set it to „2“.
10.Please go to Value , using the second button from the left. Set it to „2“.
11.Please hold down the left two buttons for at least 1 second.
Now you can start welding.

MUNSCH Kunststoff-Schweißtechnik GmbH Ausgabe 01.2016/Rev.0 12/13
Transport / Storage
The welding automate may only be stored and transported within the delivered transport case.
Before packing the machine into its case, it has to cool down to maximum hand temperature.
Service and repair
Repairs shall be carried out exclusively by MUNSCH Kunststoff-Schweißtechnik GmbH or li-
censed service centres. Any warranties for units which are no longer in the original condition
shall be expressly excluded. The units may not be modified and/or changed in any way whatso-
ever. Any liability for damage resulting from improper use or normal wear and tear of the units
shall be excluded.
Typenschild groß
Date
Operating hours
Type of repair
Carried out by:

13/13 Ausgabe 01.2016/Rev.0 MUNSCH Kunststoff-Schweißtechnik GmbH
EG-Konformitätserklärung des Herstellers
nach der EG-Maschinenrichtlinie 2006/42/EG Anhang II, Nr. 1 A
EC-Declaration of Conformity by the Manufacturer
as defined by machinery directive 2006/42/EC, Annex II, No. 1 A
MUNSCH Kunststoff-Schweißtechnik GmbH
Im Staudchen
D-56235 Ransbach-Baumbach
Deutschland
Mr. Johann Dausenau,
Fa. Kunststoffschweißtechnik GmbH,
is authorised to compile the technical documentation.
We hereby declare that the wedge welders
Machine type:
Wedge welder
Wedge welder
Wedge welder
Wedge welder
Type designation:
WEDGE-IT-MICRO
WEDGE-IT
WEDGE-IT-PLUS
WEDGE-IT-LE
WEDGE-IT-MULTI
WEDGE-IT-ECO
are in accordance with all relevant provisions of the EC Machinery Directive.
The following harmonised standards (or parts of these standards) were applied:
EU Machinery Directive 2006/42/EC
DIN EN 13732-1: 2008
DIN EN ISO 12100: 2010
The wedge welders are in accordance with the following EC-directives:
EU Low-Voltage Directive 73/23/EC
EU EMC Directive 89/336/EC
EN 60204-1 (VDE 0113 Part 1): 2011
DIN EN 55014-1: 2012
EN 61029-1 (VDE 0740 Part 500): 2010
DIN EN 55014-2: 2009
EN 61000-4-11:2004
This industrial tool complies with the aforesaid standards insofar as it is used at the contractually agreed
conditions. The operator is responsible for this.
In the event of any modifications to the machine/unit or use not as intended, this declaration becomes invalid
unless the manufacturer’s prior written approval has expressly been given.
Ransbach-Baumbach, 31.01.2013 Dipl.-Ing. Stefan Munsch
Managing Director
Table of contents
Other Munsch Welding System manuals
Popular Welding System manuals by other brands

Lincoln Electric
Lincoln Electric RANGER 10,000 PLUS Operator's manual

Lincoln Electric
Lincoln Electric INVERTEC V205-T AC/DC TIG Operator's manual

GYS
GYS TIG 207FV manual

CIGWELD
CIGWELD A-12030 operating manual

Red-D-Arc
Red-D-Arc EXTREME 360 CC/CV Auto-Line owner's manual

iWeld
iWeld MIG 5200 SYNERGIC user manual

Thermal Arc
Thermal Arc TA20/500-DZ instruction manual

WARPP
WARPP COMBO-401 i Operator's manual

Castolin
Castolin 2000 FLEX Instructions for use and maintenance

Thermal Dynamics
Thermal Dynamics ULTRA-CUT 200 XT operating manual

EWM
EWM MTR500W PP operating instructions

Lincoln Electric
Lincoln Electric COOARC 21 Operator's manual