MV LINE EVO ZIP Assembly instructions

Istruzioni di montaggio / Instructions for assembly
EVO ZIP EVO ZIP Incas

Legenda / key
Metro a rullo
Roller tape measure
Trapano/avvitatore
Drill / screw gun
Livella
Spirit level
Chiavino/brugola n°3
Allen wrench no.3
Min. 2 persone
Min. 2 people
Entrambi i lati
Both sides
R
L
Sostituzione componenti
Replace components
Telo non teso
Fabric not stretched
Posizione non corretta
Uncorrect position
Pulizia
Cleaning
Tenda bloccata
Blind stuck
Salita / Discesa telo non regolare
Fabric moves up / down with diculty
Simboli indicazioni, utensili e mezzi ausiliari
Symbols for instructions, tools and auxiliary means
Simboli manutenzione
Symbols for maintenance

Indice / Index
35
37
DoP
Declaration of Performance
34
Codice prodotto e garanzia
Product code and warranty
34
Manutenzione - ispezione cassonetto
Maintenance - Inspection box
32
5Esploso componenti principali
Exploded main components
6Stato alla consegna
Delivery status
7Misure di fissaggio e composizione guide
Fastening measurements and composition of guides
9Istruzioni di montaggio
Instructions for assembly
EVO ZIP
Esploso componenti principali
Exploded main components
14
Esploso componenti principali
Exploded main components
23
Misure di fissaggio e composizione guide
Fastening measurements and composition of guides
16
Misure di fissaggio e composizione guide
Fastening measurements and composition of guides
25
18 Istruzioni di montaggio
Instructions for assembly
26 Istruzioni di montaggio
Instructions for assembly
Stato alla consegna
Delivery status
15
Stato alla consegna
Delivery status
24
EVO ZIP
Guide Plus
EVO ZIP Incas
Suggerimenti per l’installatore
Tips for the installer
Suggerimenti per l’utente
Tips for the user


5
Esploso componenti principali
Exploded main components
EVO ZIP
Cassonetto ispezionabile / Inspectable box
Profilo cielino / Ceiling profile
Testata autoportante DX-SX / RH-LH self-bearing head with holes
Guida laterale Evo Zip DX-SX / RH-LH lateral guide
Guida in PVC per sistema zip / PVC guide for zip system
Profilo ferma-guida Evo Zip DX-SX / RH-LH zip guide-holder profile
Profilo cover ferma-guida Evo Zip DX-SX / RH-LH zip guide-holder cover profile
Rete o telo con zip laterali / Mesh or fabric with lateral zips
Terminale a scomparsa / Retractable terminal
1
2
3
4
5
6
8
7
9
1
2
4
9
8
6
5
3
7
Distinta macro-componenti Evo Zip
Num. articolo
Descrizione
1
Cassonetto ispezionabile
2
Profilo celino cassonetto
3
Testata autoportante DX/SX
4
Guida laterale DX/SX
5
Guida in PVC per sistema Zip
6
Profilo Fermarete DX/SX
7
Prolo compensatore fermarete DX/SX
8
Rete/telo con zip laterali
9
Terminale a scomparsa
MODIFICA
NUOVO PROGETTO
DATA
This drawing is MVLINE's exclusive ownership, protected by law. Cannot be reproduced or handed over without preventive written consent.
FORMATO
A3
FOGLIO 1 DI 1
SCALA 1:5
REVISIONE N.
CODICE ARTICOLO
DESCRIZIONE
/
Evo Zip
7

Stato alla consegna
Delivery status
B
C
D
E
F
G
H
J
K
L
M
N
P
Q
2
3
4
5
6
7
8
9
10
11
12
13
14
15
16
17
18
19
20
24
23
22
21
R
EvoZip Incas IM n.1
01
MODELLO
CATEGORIA
ANNO
REVISIONE N.
DATA
/ /
DESCRIZIONE
SCALA 1:2
FOGLIO 1 DI 1
FORMATO
A0
Thisdrawing is MVLINE's exclusive ownership, protected by law. Cannot be reproduced or handed over without preventive written consent.
!
Si raccomanda di eettuare le operazioni di premontaggio su superfici morbide;
Verificare preventivamente che il vano non abbia fuori squadro, per assicurare una corretta
installazione del prodotto;
Assicurarsi di avere a disposizione la viteria idonea all’installazione;
Si consiglia l’installazione del prodotto da parte di personale qualificato (min. 2)
We recommend performing the pre-assembly operations on soft surfaces;
First of all check that the compartment is not squared, in order to install the product correctly;
Be sure to have the hardware required for the installation;
Qualified personnel should install the product (at least 2 people)
6
EVO ZIP

7
Misure di fissaggio e composizione guide
Fastening measurements and composition of guides
A
B
EVO ZIP 100/125
Esempio di fissaggio laterale cassonetto con avvolgimento STANDARD
Example of box attached to the side with STANDARD winding
EVO ZIP 100/125
Esempio fissaggio frontale cassonetto con avvolgimento REVERSE
Example of box attached to the front with REVERSE winding
Misure in millimetri / Measures in millimeters
35
EVO ZIP 100/125
Fissaggio laterale - cassonetto con avvolgimento STANDARD
Misure in mm
A
Cassonetto da 125
Cassonetto da 100
50
100
125
25
50
100
125
Cassonetto da 125
Cassonetto da 100
L- (20+20mm)
20
35
EVO ZIP

Specifiche per il montaggio
Specifications for assembly
R
LDettaglio del fissaggio STANDARD e REVERSE delle guide
Detail of the STANDARD and REVERSE attached of the guides
A
B
Rimuovere il profilo cielino prima dell’installazione.
Remove the ceiling profile before installing the product.
8
EVO ZIP

9
Istruzioni di montaggio
Instructions for assembly
12
H
G
F
E
D
C
B
A
J
K
L
M
N
P
Q
R
A
B
C
D
E
F
G
H
J
K
L
M
N
P
Q
11
10
9
8
7
6
5
4
3
2
1
13
14
15
16
17
18
19
20
21
22
23
24
1
2
3
4
5
6
7
8
9
10
11
12
13
14
15
16
17
18
19
20
24
23
22
21
R
EvoZip Incas IM n.1
01
MODELLO
CATEGORIA
ANNO
REVISIONE N.
DATA
/ /
DESCRIZIONE
SCALA 1:2
FOGLIO1 DI 1
FORMATO
A0
Thisdrawing is MVLINE's exclusive ownership, protected by law. Cannot be reproduced or handed over without preventive written consent.
1.
2.
Le immagini rappresentate simulano una installazione di tipo A / The pictures shown simulate a type A installation
R
L
R
L
12
H
G
F
E
D
C
B
A
J
K
L
M
N
P
Q
R
A
B
C
D
E
F
G
H
J
K
L
M
N
P
Q
11
10
9
8
7
6
5
4
3
2
1
13
14
15
16
17
18
19
20
21
22
23
24
1
2
3
4
5
6
7
8
9
10
11
12
13
14
15
16
17
18
19
20
24
23
22
21
R
EvoZip Incas IM n.1
01
MODELLO
CATEGORIA
ANNO
REVISIONE N.
DATA
/ /
DESCRIZIONE
SCALA 1:2
FOGLIO 1 DI 1
FORMATO
A0
Thisdrawing is MVLINE's exclusive ownership, protected by law. Cannot be reproduced or handed over without preventive written consent.
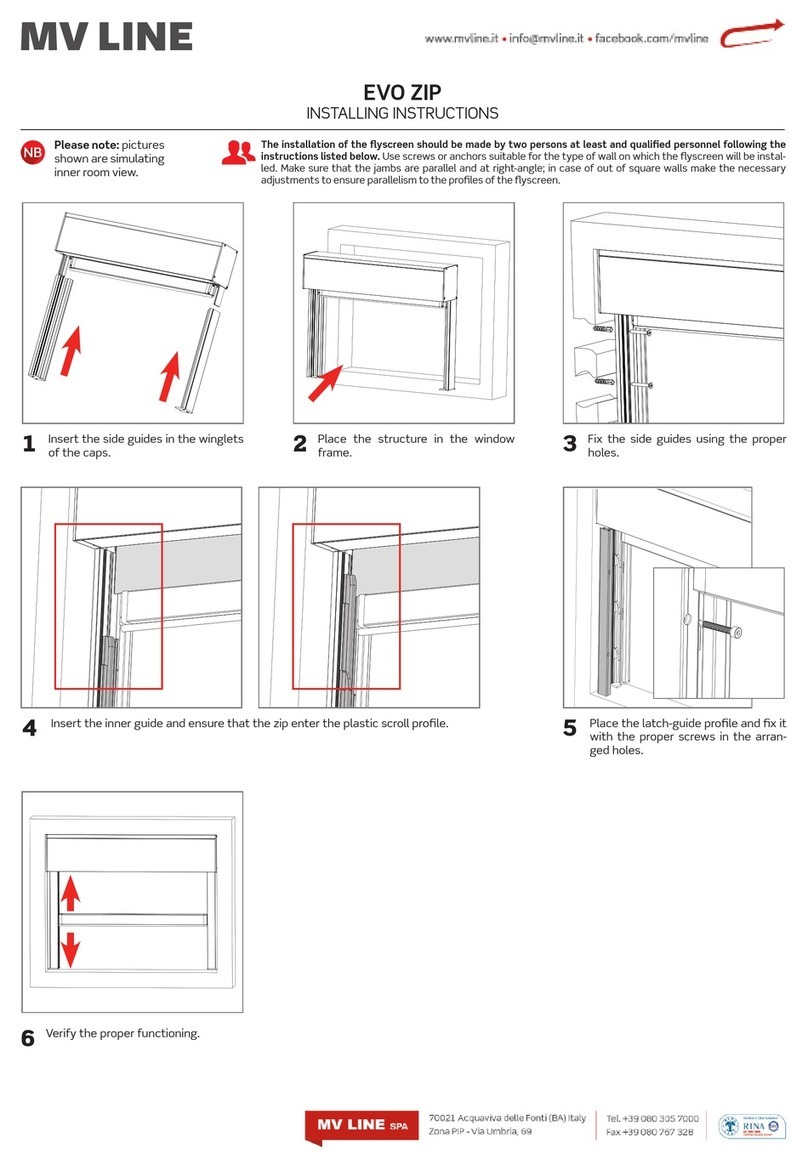
Inserire le guide nelle alette autoportanti delle testate.
Insert the guides into the self-bearing fins of the heads.
Posizionare la struttura assemblata nel vano. Fissare le guide al vano utilizzando gli appositi fori accertandosi che
l’installazione sia perfettamente in squadro.
Place the assembled structure in the compartment. Attach the guides to the compartment using the dedicated holes
and making sure that the installation is perfectly squared.
Predisporre i fori al vano, utilizzando accessori di fissaggio adatti al tipo di supporto o superficie!
Prepare holes in the compartment, using fastening elements suitable for the type of media or surface!
!
EVO ZIP

Istruzioni di montaggio
Instructions for assembly
3.
Le immagini rappresentate simulano una installazione di tipo A / The pictures shown simulate a type A installation
R
L
R
L
B
C
D
E
F
G
H
J
K
L
M
N
P
Q
9
10
11
12
13
14
15
16
17
18
19
20
24
23
22
21
R
EvoZip Incas IM n.1
01
MODELLO
CATEGORIA
ANNO
REVISIONE N.
DATA
/ /
DESCRIZIONE
SCALA 1:2
FOGLIO1 DI 1
FORMATO
A0
Thisdrawing is MVLINE's exclusive ownership, protected by law. Cannot be reproduced or handed over without preventive written consent.
1
2
3
4
5
6
7
8
9
10
11
12
13
14
15
16
17
18
19
20
24
23
22
21
EvoZip Incas IM n.1
01
MODELLO
CATEGORIA
ANNO
REVISIONE N.
DATA
/ /
DESCRIZIONE
SCALA 1:2
FOGLIO1 DI 1
FORMATO
Thisdrawing is MVLINE's exclusive ownership, protected by law. Cannot be reproduced or handed over without preventive written consent.
Far scivolare le guide interne verso l’alto per far si che le cerniere a bordo telo si intersechino.
Slide the inner guides upwards, so that the hinges on the edge of the fabric are inserted.
Per un funzionamento cor-
retto, verificare che le guide
interne siano nella giusta
posizione (fig. 1), in caso con-
trario inserirle nuovamente
con una leggera rotazione e
farle aderire alla guida (fig. 2).
For correct operation, make
sure that the inner guides are in
the right position (fig. 1). If not,
insert them again, turning them
slightly, and make them adhere
to the guide-profile (fig. 2).
12
H
G
F
E
D
C
B
A
J
K
L
M
N
P
Q
R
A
B
C
D
E
F
G
H
J
K
L
M
N
P
Q
11
10
9
8
7
6
5
4
3
2
1
13
14
15
16
17
18
19
20
21
22
23
24
1
2
3
4
5
6
7
8
9
10
11
12
13
14
15
16
17
18
19
20
24
23
22
21
R
EvoZip Incas IM n.1
01
MODELLO
CATEGORIA
ANNO
REVISIONE N.
DATA
/ /
DESCRIZIONE
SCALA 1:2
FOGLIO 1 DI 1
FORMATO
A0
This drawing is MVLINE's exclusive ownership, protected by law. Cannot be reproduced or handed over without preventive written consent.
!
10
EVO ZIP

11
EVO ZIP
R
L
R
L
12
H
G
F
E
D
C
B
A
J
K
L
M
N
P
Q
R
A
B
C
D
E
F
G
H
J
K
L
M
N
P
Q
11
10
9
8
7
6
5
4
3
2
1
13
14
15
16
17
18
19
20
21
22
23
24
1
2
3
4
5
6
7
8
9
10
11
12
13
14
15
16
17
18
19
20
24
23
22
21
R
EvoZip Incas IM n.1
01
MODELLO
CATEGORIA
ANNO
REVISIONE N.
DATA
/ /
DESCRIZIONE
SCALA 1:2
FOGLIO1 DI 1
FORMATO
A0
Thisdrawing is MVLINE's exclusive ownership, protected by law. Cannot be reproduced or handed over without preventive written consent.
Istruzioni di montaggio
Instructions for assembly
4. Inserire il profilo ferma-guida e fissarlo con le viti predisposte. Infilare il profilo cover sul profilo ferma-guida.
Insert the guide-holder profile and secure it using the screws provided. Insert the cover profile over the guide-holder
profile.
5. Assicurarsi del corretto funzionamento, quindi inserire il profilo cielino e ruotarlo fino alla completa chiusura.
Make sure that it works properly, then insert the ceiling profile and turn it until it is completely closed.
Le immagini rappresentate simulano una installazione di tipo A / The pictures shown simulate a type A installation

12
EVO ZIP
Istruzioni di montaggio
Instructions for assembly
Solo per EVO ZIP 125
Bloccare il profilo cielino con gli agganci di sicurezza, spostandoli verso le testate destra e sinistra.
Lock the ceiling profile with security hooks, moving them towards the cups on both sides.
12
H
G
F
E
D
C
B
A
J
K
L
M
N
P
Q
R
A
B
C
D
E
F
G
H
J
K
L
M
N
P
Q
11
10
9
8
7
6
5
4
3
2
1
13
14
15
16
17
18
19
20
21
22
23
24
1
2
3
4
5
6
7
8
9
10
11
12
13
14
15
16
17
18
19
20
24
23
22
21
R
Sezioni
Valeria 45
Telescopica
laterale
2016
MODELLO
CATEGORIA
ANNO
I.A.R
DESCRIZIONE
SCALA 1:2
FOGLIO 1 DI 1
FORMATO
A0
Thisdrawing is MVLINE's exclusive ownership, protected by law. Cannot be reproduced or handed over without preventive written consent.
REVISIONE N.
DATA
01
/ /
12
H
G
F
E
D
C
B
A
J
K
L
M
N
P
Q
R
A
B
C
D
E
F
G
H
J
K
L
M
N
P
Q
11
10
9
8
7
6
5
4
3
2
1
13
14
15
16
17
18
19
20
21
22
23
24
1
2
3
4
5
6
7
8
9
10
11
12
13
14
15
16
17
18
19
20
24
23
22
21
R
Sezioni
Valeria 45
Telescopica
laterale
2016
MODELLO
CATEGORIA
ANNO
I.A.R
DESCRIZIONE
SCALA 1:2
FOGLIO 1 DI 1
FORMATO
A0
Thisdrawing is MVLINE's exclusive ownership, protected by law. Cannot be reproduced or handed over without preventive written consent.
REVISIONE N.
DATA
01
/ /

13
Stato alla consegna
Delivery status
Disponibili solo per EVO ZIP - libera installazione
Only available for EVOZIP - free installation

14
Esploso componenti principali
Exploded main components
EVO ZIP Incas
Cassonetto ispezionabile / Inspectable box
Profilo cielino / Ceiling profile
Testata autoportante DX-SX / RH-LH self-bearing head
Guida laterale Evo Zip DX-SX / RH-LH lateral guide
Guida in PVC per sistema zip / PVC guide for zip system
Profilo ferma-guida Evo Zip Incas DX-SX / RH-LH compensator net-holder profile
Profilo cover ferma-guida Evo Zip DX-SX / RH-LH net-holder cover profile
Rete o telo con zip laterali / Mesh or towel with side zip
Terminale a scomparsa / Retractable terminal
Num.
articolo
Descrizione
1
2
3
4
5
6
8
7
9
Guide Plus

15
Stato alla consegna
Delivery status
Guide Plus
Evo Zip Plus 100
verticale /grandi dimensioni
2019
MODELLO
CATEGORIA
ANNO
VARIANTE
SCALA 1:5
FOGLIO 1 DI 1
FORMATO
A3
This drawing is MVLINE's exclusive ownership, protected by law. Cannot be reproduced or handed over without preventive written consent.
/ /
01
REVISIONE N.
DATA
I. A. R.
Si raccomanda di eettuare le operazioni di premontaggio su superfici morbide;
Verificare preventivamente che il vano non abbia fuori squadro, per assicurare una corretta
installazione del prodotto;
Assicurarsi di avere a disposizione la viteria idonea all’installazione;
Si consiglia l’installazione del prodotto da parte di personale qualificato (min. 2)
We recommend performing the pre-assembly operations on soft surfaces;
First of all check that the compartment is not squared, in order to install the product correctly;
Be sure to have the hardware required for the installation;
Qualified personnel should install the product (at least 2 people)
!

16
EVO ZIP Incas
Misure di fissaggio e composizione guide
Fastening measurements and composition of guides
Guide Plus
A
B
EVO ZIP 100/125
Esempio di fissaggio laterale cassonetto con avvolgimento STANDARD
Example of box attached to the side with STANDARD winding
EVO ZIP 100/125
Esempio fissaggio frontale cassonetto con avvolgimento REVERSE
Example of box attached to the front with REVERSE winding
Misure in millimetri / Measures in millimeters
EVO ZIP PLUS 100/125
Fissaggio laterale - cassonetto con avvolgimento STANDARD
A
Cassonetto da 125
Cassonetto da 100
25
65
50
100
125
EVO ZIP PLUS 100/125
Fissaggio frontale - cassonetto con avvolgimento REVERSE
Cassonetto da 125
Cassonetto da 100
33
B
L - (33+33mm)
65
125
100
50

17
Guide Plus
Specifiche per il montaggio
Specifications for assembly
R
LDettaglio del fissaggio STANDARD e REVERSE delle guide
Detail of the STANDARD and REVERSE attached of the guides
Rimuovere il profilo cielino prima dell’installazione.
Remove the ceiling profile before installing the product.
B
Evo Zip Plus 100
verticale /grandi dimensioni
2019
MODELLO
CATEGORIA
ANNO
VARIANTE
SCALA 1:5
FOGLIO 1 DI 1
FORMATO
A3
This drawing is MVLINE's exclusive ownership, protected by law. Cannot be reproduced or handed over without preventive written consent.
/ /
01
REVISIONE N.
DATA
I. A. R.
Evo Zip Plus 100
verticale /grandi dimensioni
2019
MODELLO
CATEGORIA
ANNO
VARIANTE
SCALA 1:5
FOGLIO 1 DI 1
FORMATO
A3
This drawing is MVLINE's exclusive ownership, protected by law. Cannot be reproduced or handed over without preventive written consent.
/ /
01
REVISIONE N.
DATA
I. A. R.
A

18
Evo Zip Plus 100
verticale /grandi dimensioni
2019
MODELLO
CATEGORIA
ANNO
VARIANTE
SCALA 1:5
FOGLIO 1 DI 1
FORMATO
A3
This drawing is MVLINE's exclusive ownership, protected by law. Cannot be reproduced or handed over without preventive written consent.
/ /
01
REVISIONE N.
DATA
I. A. R.
Evo Zip Plus 100
verticale /grandi dimensioni
2019
MODELLO
CATEGORIA
ANNO
VARIANTE
SCALA 1:5
FOGLIO 1 DI 1
FORMATO
A3
This drawing is MVLINE's exclusive ownership, protected by law. Cannot be reproduced or handed over without preventive written consent.
/ /
01
REVISIONE N.
DATA
I. A. R.
1.
2.
Le immagini rappresentate simulano una installazione di tipo A / The pictures shown simulate a type A installation
R
L
R
L
Evo Zip Plus 100
verticale /grandi dimensioni
2019
MODELLO
CATEGORIA
ANNO
VARIANTE
SCALA 1:5
FOGLIO 1 DI 1
FORMATO
A3
This drawing is MVLINE's exclusive ownership, protected by law. Cannot be reproduced or handed over without preventive written consent.
/ /
01
REVISIONE N.
DATA
I. A. R.
12
H
G
F
E
D
C
B
A
J
K
L
M
N
P
Q
R
A
B
C
D
E
F
G
H
J
K
L
M
N
P
Q
11
10
9
8
7
6
5
4
3
2
1
13
14
15
16
17
18
19
20
21
22
23
24
1
2
3
4
5
6
7
8
9
10
11
12
13
14
15
16
17
18
19
20
24
23
22
21
R
Sezioni
Valeria 45
Telescopica
laterale
2016
MODELLO
CATEGORIA
ANNO
I.A.R
DESCRIZIONE
SCALA 1:2
FOGLIO 1 DI 1
FORMATO
A0
This drawing is MVLINE's exclusive ownership, protected by law. Cannot be reproduced or handed over without preventive written consent.
REVISIONE N.
DATA
01
/ /
Inserire le guide nelle alette autoportanti delle testate.
Insert the guides into the self-bearing fins of the heads.
Posizionare la struttura assemblata nel vano. Fissare le guide al vano utilizzando gli appositi fori accertandosi che
l’installazione sia perfettamente in squadro.
Place the assembled structure in the compartment. Attach the guides to the compartment using the dedicated holes
and making sure that the installation is perfectly squared.
Predisporre i fori al vano, utilizzando accessori di fissaggio adatti al tipo di supporto o superficie!
Prepare holes in the compartment, using fastening elements suitable for the type of media or surface!
12
H
G
F
E
D
C
B
A
J
K
L
M
N
P
Q
R
A
B
C
D
E
F
G
H
J
K
L
M
N
P
Q
11
10
9
8
7
6
5
4
3
2
1
13
14
15
16
17
18
19
20
21
22
23
24
1
2
3
4
5
6
7
8
9
10
11
12
13
14
15
16
17
18
19
20
24
23
22
21
R
Sezioni
Valeria 45
Telescopica
laterale
2016
MODELLO
CATEGORIA
ANNO
I.A.R
DESCRIZIONE
SCALA 1:2
FOGLIO 1 DI 1
FORMATO
A0
Thisdrawing is MVLINE's exclusive ownership, protected by law. Cannot be reproduced or handed over without preventive written consent.
REVISIONE N.
DATA
01
/ /
!
Guide Plus
A
Istruzioni di montaggio
Instructions for assembly

19
Istruzioni di montaggio
Instructions for assembly
3.
Le immagini rappresentate simulano una installazione di tipo A / The pictures shown simulate a type A installation
R
L
R
L
Far scivolare le guide interne verso l’alto per far si che le cerniere a bordo telo si intersechino.
Slide the inner guides upwards, so that the hinges on the edge of the fabric are inserted.
Per un funzionamento cor-
retto, verificare che le guide
interne siano nella giusta
posizione (fig. 1), in caso con-
trario inserirle nuovamente
con una leggera rotazione e
farle aderire alla guida (fig. 2).
For correct operation, make
sure that the inner guides are in
the right position (fig. 1). If not,
insert them again, turning them
slightly, and make them adhere
to the guide-profile (fig. 2).
!
Guide Plus
Evo Zip Plus 100
verticale /grandi dimensioni
2019
MODELLO
CATEGORIA
ANNO
VARIANTE
SCALA 1:5
FOGLIO 1 DI 1
FORMATO
A3
This drawing is MVLINE's exclusive ownership, protected by law. Cannot be reproduced or handed over without preventive written consent.
/ /
01
REVISIONE N.
DATA
I. A. R.
Evo Zip Plus 100
verticale /grandi dimensioni
2019
MODELLO
CATEGORIA
ANNO
VARIANTE
SCALA 1:5
FOGLIO 1 DI 1
FORMATO
A3
This drawing is MVLINE's exclusive ownership, protected by law. Cannot be reproduced or handed over without preventive written consent.
/ /
01
REVISIONE N.
DATA
I. A. R.
Evo Zip Plus 100
verticale /grandi dimensioni
2019
MODELLO
CATEGORIA
ANNO
VARIANTE
SCALA 1:5
FOGLIO 1 DI 1
FORMATO
A3
This drawing is MVLINE's exclusive ownership, protected by law. Cannot be reproduced or handed over without preventive written consent.
/ /
01
REVISIONE N.
DATA
I. A. R.
Evo Zip Plus 100
verticale /grandi dimensioni
2019
MODELLO
CATEGORIA
ANNO
VARIANTE
SCALA 1:5
FOGLIO 1 DI 1
FORMATO
A3
This drawing is MVLINE's exclusive ownership, protected by law. Cannot be reproduced or handed over without preventive written consent.
/ /
01
REVISIONE N.
DATA
I. A. R.
1 2

20
Evo Zip Plus 100
verticale /grandi dimensioni
2019
MODELLO
CATEGORIA
ANNO
VARIANTE
SCALA 1:5
FOGLIO 1 DI 1
FORMATO
A3
This drawing is MVLINE's exclusive ownership, protected by law. Cannot be reproduced or handed over without preventive written consent.
/ /
01
REVISIONE N.
DATA
I. A. R.
Evo Zip Plus 100
verticale /grandi dimensioni
2019
MODELLO
CATEGORIA
ANNO
VARIANTE
SCALA 1:5
FOGLIO 1 DI 1
FORMATO
A3
This drawing is MVLINE's exclusive ownership, protected by law. Cannot be reproduced or handed over without preventive written consent.
/ /
01
REVISIONE N.
DATA
I. A. R.
Evo Zip Plus 100
verticale /grandi dimensioni
2019
MODELLO
CATEGORIA
ANNO
VARIANTE
SCALA 1:5
FOGLIO 1 DI 1
FORMATO
A3
This drawing is MVLINE's exclusive ownership, protected by law. Cannot be reproduced or handed over without preventive written consent.
/ /
01
REVISIONE N.
DATA
I. A. R.
R
L
R
L
Istruzioni di montaggio
Instructions for assembly
4. Inserire il profilo ferma-guida e fissarlo con le viti predisposte. Infilare il profilo cover sul profilo ferma-guida.
Insert the guide-holder profile and secure it using the screws provided. Insert the cover profile over the guide-holder
profile.
5. Assicurarsi del corretto funzionamento, quindi inserire il profilo cielino e ruotarlo fino alla completa chiusura.
Make sure that it works properly, then insert the ceiling profile and turn it until it is completely closed.
Le immagini rappresentate simulano una installazione di tipo A / The pictures shown simulate a type A installation
Guide Plus
Other manuals for EVO ZIP
1
This manual suits for next models
1
Table of contents
Other MV LINE Window Blind manuals
Popular Window Blind manuals by other brands

Blinds To Go
Blinds To Go Valance installation guide

SelectBlinds
SelectBlinds Aluminum Blind installation instructions

MADECO
MADECO INST-792002 quick start guide

Ametek
Ametek Dunkermotoren D259 Original guide

Schenker Storen
Schenker Storen VSe Series installation instructions

Benthin
Benthin RL61 quick start guide