MyTana MSA-NG2 User manual

Manufacturers of Quality
Sewer and Drain Cleaning
Equipment since 1957
(800) 328-8170
Factory Direct Customer Service
M –F 7am – 5pm CST
Competent • Polite • Clear
www.MyTana.com
746 Selby Ave • St. Paul, MN 55104
fax: (651) 222-1739
User Guide for MSA-, MS9-,
MS11-NG2 and MS11+ Combo Kit
Inspect your system carefully
upon receipt.
Let us know right away of any
damage you note.
Included with your purchase are:
• Removable USB (ash) drive
• WiFi Router (dongle) to
establish wireless connection
to your phone or tablet with
our Viewer APP. Plugs in to
USB port, see separate instructions
for using Viewer APP.
• 3 sizes IceBalls (MS11-NG2 only)
• Mini SnoBall (MSA-NG2, MS9 &
Combo Kit only)
• Interchangeable mini camera
head, 4” IceBall, dielectric grease
(Combo Kit only)
042022
M S11- N G 2
MS11+
Combo Kit
MSA-NG2
Please read these instructions and do a TEST RECORDING
before you perform your first inspection in the field.

PG 2 MyTana MS11-NG2 | MS11+ Combo | MS9-NG2 | MSA-NG2 User Manual
Damaged Connector Ends for NG connection style
If the camera head is disconnected
for transport or to swap heads
(using MS11+ Combo Kit), be sure
to carefully align the push rod with
the head and screw on until snug and there are no skipped
threads. Don’t over-tighten or use tools to tighten.
Damaged or Broken Connection Pins
uFor our older systems with pin connectors on the camera
head. We recommend keeping the head attached to the
push rod at all times to avoid accidental damage to the pins.
uFor our current PGR systems with a patch cord:
• Carefully align the patch cord to the Control
Box when connecting or you could break
the pins. Follow instructions included with
your system.
• The patch cord should NOT be disconnected from the
push rod reel. Check occasionally to make sure it is snug.
Broken Sapphire Window
The sapphire is nearly as hard as diamond;
however it can break with extreme impact,
especially on sharp edges of broken concrete
or clay tile. Using our IceBall, Snoball or other
protective guides greatly reduces impact to
the camera head.
Damaged Pushrod
The camera should not be forced through blockages. The
camera won’t work if the wires inside the push rod become
kinked, buckled or severed. Guides and running water can
help reduce friction as you push the camera through a pipe.
Warranty Information
Inspection Systems
All products are warranted against defects
in material and workmanship for one year from date of
purchase. All products are individually tested prior to
shipment. Damage due to negligence, abnormal usage,
accidents, or alteration is not covered by this warranty.
Examples of damage not covered by warranty:
Controls and Ports
CONTROL PANELS
Should repair be necessary, please call us
first so we can issue a return call tag.
Ship your product to:
MyTana 746 Selby Ave Saint Paul, MN 55106
phone: 800-328-8170
POWER
Give the unit 30 seconds to
fully boot up (MyTana logo
will show when unit is ready
to operate)
Blinking Blue light indicates
low battery. It will blink for
5-10 minutes before battery fails.
TRANSMIT Generates 512hz
signal at camera head for use
with a Locator. This has nothing to do with Wi-Fi transmission.
LED CONTROL Full clockwise = full brightness
COUNTER RESET Resets on-screen footage
counter to zero
USB PORTS
Microphone
Ground Screw
can be used for grounding
purposes if needed.
Use these buttons for recording
and working with les, see
instructions on following pages.
The
arrow buttons are
frequently used, and are indicated
as in the instructions
Help prevent
repairs, see our
Care Tips
back cover

PG 3 MyTana MS11-NG2 | MS11+ Combo | MS9-NG2 | MSA-NG2 User Manual
Operating the System
BASICS
We strongly recommend doing a test recording BEFORE you
perform your rst inspection in the eld.
Keep the shipping caps that are on the ends of the camera
head and the push rod. Use them to protect these connections
whenever you remove the camera head in the future.
Files
In this manual, the term
“Files” refers to your
recordings, whether video
(.mp4) or snapshots (.jpg)
File Naming – by default, les are
named with the date (YYYYMMDD) and
a numbering sequence (-XX)
ex: 20180205-02.mp4 – would be the
third video recorded on Feb. 5, 2018
the first will be “20180205-00”,
the second “20180205-01”, etc.
Startup
– Push
POWER
button. Blue light around switch will glow.
Wait about 30 seconds for MyTana logo to appear.
Battery
Recharge the internal battery by plugging the unit in to a
standard wall outlet. Store the unit with half charge and in
cool temperatures to extend battery life.
Transmit mode drains battery more quickly, use this only when
locating 512Hz signal from camera head.
RECORDING VIDEO
– Push
REC/PAUSE
– Use the Control Panel arrow buttons
to choose the
drive you want to record to: Internal, External or Both.
If external, be sure to insert USB (ash) drive in USB port.
You can copy or move recordings to a dierent drive later.
(see File Management menu selections next pages)
– Push
MENU/OK
to start recording.
Red dot appears on screen and timer will start.
– Push
STOP/BACK
to stop recording.
AUDIO
MUTE is the default setting for recording, meaning NO sound
will be recorded (MUTE is ON if you see “MUTE” on the screen).
NG2 units have no speaker for playback, so sound can only
be heard when playing back on a computer.
To Record Sound
– Push
UNMUTE
and “MUTE” will disappear from the screen,
the built-in microphone is now active.
Make sure cover is removed, see image opposite page.
If a wiFi dongle/router is in one of the USB ports, it
could cause sound interference while recording to
either the Internal or an external USB drive.
Remove the dongle to prevent interference
TO TAKE STILL SHOTS
– Press the
SCREEN SHOT
button if you want still shots,
(not available while recording video)
WIRELESS STREAMING
See separate Viewer APP instruction sheet for using WiFi
operations.
You can customize
the names of les
in the Overlay
menu, see pgs 6-7
requires a USB
keyboard

PG 4 MyTana MS11-NG2 | MS11+ Combo | MS9-NG2 | MSA-NG2 User Manual
You can change the COPY option
to MOVE ( read caution below )
Use the buttons to move the cursor to
> Toggle Copy or Move
Press
MENU/OK
Menu items will now say
“Move video from...” etc.
Press
STOP/BACK
to return to previous screen.
COPYING les duplicates le(s) from one drive
(internal or external) to the other.
uThe le(s) remain in the original location
Recommended
MOVING les transfers le(s) from one drive
(internal or external) to the other.
uThe le(s) are then automatically
deleted from the original location.
Do this procedure with care
MAIN MENU
Push
MENU/OK
on the control
panel to bring up the Main Menu
on the screen.
Use the arrow buttons on the
control panel to move the cursor
to select any menu item.
Press
STOP/BACK
repeatedly to exit any menu and return to previous
screens.
Play Video
View recordings by selecting the drive that you recorded to, Internal
or external.
Refer to pg 3 for le naming information.
Use the buttons on the control panel to Fast Forward or
REWIND during playback.
View Snapshots
Lets you see static (.jpg) images – if you took snapshots rather than
full video. See page 3 for instructions on how to take snapshots.
Overlay (see pages 6-7)
Lets you to add, change or move the
overlays that appear on your videos
or images.
Most tasks require a USB
Keyboard to be connected
to one of the USB ports.
File Management (see right)
This is the menu where you will work most with your les.
You can copy, move, or delete les.
Setup
Lets you change the time and date in the unit. Your unit will arrive
preset. If you wish to reset or change the time:
Select
Setup,
then
MENU/OK
Select
Set Date/Time,
then
MENU/OK
Use and
MENU/OK
to set the date and time
Push
STOP/BACK
repeatedly to exit menus
You can change the time format in the Overlay Menu,
see pages 6-7
Screen Menus
= = Menu = =
Play Video
View snapshots
Overlay
> File management
Setup
FILE MANAGEMENT MENU
If an external (ash) drive is NOT inserted
in one of the USB ports, this menu will show
and you can only delete individual les
from the internal drive.
FIRMWARE VERSIONS These instructions are current for
MyTana Firmware ver. 1755. Older versions may have slight-
ly dierent options in the screen menus.
To nd your system’s version, follow this path:
Main Menu > Setup > System Information > Firmware
The default menu gives options to
Copy or Delete les from the either the
internal or external drive.
When a USB ash drive is inserted into one of
the ports, there will be new options to copy
(or move) les from one drive to the other,
and you will be able to work with a group of les.
CAUTION!

PG 5 MyTana MS11-NG2 | MS11+ Combo | MS9-NG2 | MSA-NG2 User Manual
TO COPY/MOVE OR DELETE FILES
There must be a ash drive inserted in the USB port to Copy or Move les.
Read information in previous section (left) before doing these procedures.
Copying/moving les from a selected drive
(internal or external) automatically chooses
the other drive as the destination.
Use the buttons to move
the cursor (>) to the procedure
you want to do
Press
MENU/OK
Your list of les will appear for selection.
Selecting an Individual le: (default)
Use the buttons to move the cursor to the file you want to Copy/Move or Delete
Press
MENU/OK
File will automatically Copy/Move or be Deleted.
**Remember: if you MOVE a le, it will automatically be deleted from the original
location (see CAUTION, opposite page).
Press
STOP/BACK
repeatedly to exit menus.
To select a GROUP of les:
Be sure the Menu shows “Select Files: Group”
(see “change Individual to Group” left)
Use the buttons to move cursor
to the rst le you want to work with
Press
MENU/OK
File will be selected as indicated by [x]
Move cursor to the next le
Press
MENU/OK
Repeat until you have selected all the jobs
you wish to work with
Press
STOP/BACK
A screen will appear to conrm selections,
it also gives options to Change the selection
or Cancel the process.
Press
STOP/BACK
to apply the function and return to previous screens.
You can change INDIVIDUAL
to GROUP so you can select
multiple les to work with at
the same time
Use the
buttons to move
the cursor to
> Select Files: Individual
Press
MENU/OK
Menu changes to
“Select Files: Group”
Press
STOP/BACK
to return
to previous screen.
= = File Management = =
Copy video from internal
Copy video from external
Copy snapshots from internal
Copy snapshots from external
Deletelesfrominternal
Deletelesfromexternal
Toggle Copy or Move
Selectles:Individual
The default menu
is also setup to
work with a single
le (Individual)
= =
Copy video from internal
= =
[ ]20100425-03.mp4 5.30 MB
[ ]20100425-02.mp4 2.94 MB
> [ ]20100425-01.mp4 6.34 MB
[ ]20100425-00.mp4 4.94 MB
= =
Copy video from internal
= =
[ ]20100425-03.mp4 5.30 MB
[ ]20100425-02.mp4 2.94 MB
[ x ]20100425-01.mp4 6.34 MB
> [ ]20100425-00.mp4 4.94 MB
= =
3lesselected
= =
> Copyles
Change selection
Cancel
= =
File Management
= =
Copy video from internal
> Copy video from external
Copy snapshots from internal
Copy snapshots from external
Deletelesfrominternal
Deletelesfromexternal
Toggle Copy or Move
Selectles:Individual
= = File Management = =
Deletelesfrominternal
Selectles:Individual

PG 6 MyTana MS11-NG2 | MS11+ Combo | MS9-NG2 | MSA-NG2 User Manual
WORKING WITH CUSTOM TEXT
OVERLAY MENU
The Overlay menu lets you edit the text eld overlays that appear on your videos or images.
You can also change the time format of the time/date stamp. Most tasks require a USB Keyboard
Connect the keyboard to one of the USB ports on the front of the camera.
Adding Custom Text
Replaces date/time stamp at bottom of screen
– Push
MENU/OK
on control panel to access the Main Screen
– Select
Overlay
, then
MENU/OK
– Select
Set Up Primary Overlay
, then
MENU/OK
– Select
Custom Text
, then
MENU/OK
– 5 custom text lines appear, select one then push
MENU/OK
Each selection allows 2 lines with 20 characters each
You can enter all 5 custom names while you are here, or just
one at a time
– Push
STOP/BACK
repeatedly to return to the Main Screen
Reposition Custom Text on the screen
– Push
MENU/OK
on control panel to access the Main Screen
– Select
Overlay
, then
MENU/OK
– Select
Set Up Primary Overlay
, then
MENU/OK
– Select movement you need, then
press
MENU/OK
repeatedly until the title is in the
desired location.
Use the buttons to toggle between the movement choices
– Push
STOP/BACK
repeatedly to return to the Main Screen
Delete Custom Text on a job
– Push
MENU/OK
on control panel to access the Main Screen
– Select
Overlay
, then
MENU/OK
– Select
Set Up Primary Overlay
, then
MENU/OK
– Select
Custom Text
, then
MENU/OK
– Select custom text to remove,
then
MENU/OK
– Use backspace or Delete/Back keys to delete the title, then
MENU/OK
– Push
STOP/BACK
repeatedly to return to the Main Screen
Replace Custom Text with
the time/date stamp
– Push
MENU/OK
on control panel to access the Main Screen
– Select
Overlay
, then
MENU/OK
Check that
Primary Overlay
at the top of the Overlays
menu has 16 x 16 showing.
16 x 16
is the
display size of
the time stamp
8 x 13
will also
show the stamp but very small
None
will display nothing and the following
steps won’t work
Press the
MENU/OK
while the arrow is next to Primary
Overlay to toggle between these... once it says 16x16,
continue on.
– Select
Set Up Primary Overlay
(2nd menu item)
then
MENU/OK
– Select
Text
, then
MENU/OK
– Select ^
d
^
t
, then
MENU/OK
Time/date stamp will display with CURRENT time/date
– Push
STOP/BACK
repeatedly to return to the Main Screen
Find jobs with Custom Text
– Push
MENU/OK
on control panel to access
the Main Screen
– Select
Overlay
, then
MENU/OK
– Select
Set Up Primary Overlay
,
then
MENU/OK
– Select
Custom Text
, then
MENU/OK
– Choose the job you want to record that you have already
named, then
MENU/OK
To display text, push
MENU/OK
– Push
STOP/BACK
repeatedly to return to the Main Screen
and continue with recording
= = Overlays = =
> PrimaryOverlay:16x16
Set Up Primary Overlay
Secondary Overlay
Tasks that do not
require a keyboard are
indicated >>

PG 7 MyTana MS11-NG2 | MS11+ Combo | MS9-NG2 | MSA-NG2 User Manual
WORKING WITH CUSTOM TITLES
Entering a Custom Title
– Push
MENU/OK
on control panel to access the Main Screen
– Select
Overlay
, then
MENU/OK
– Select
Secondary Overlay
, then
MENU/OK
– Select
Title
, then
MENU/OK
– Enter your title using the keyboard. If a 2nd line is needed,
push
MENU/OK
to move cursor to the second line for typing
– Push
STOP/BACK
repeatedly to return to
the Main Screen
Reposition Title on the screen
– Push
MENU/OK
on control panel to access the Main Screen
– Select
Overlay
, then
MENU/OK
– Select
Title Overlay
, then
MENU/OK
– Select movement you need, then
press
MENU/OK
repeatedly until the title
is in your desired location
Use the buttons to toggle between the movement choices
– Push
STOP/BACK
repeatedly to return to the Main Screen
Remove a Title
– Push
MENU/OK
on control panel to access the Main Screen
– Select
Overlay
, then
MENU/OK
– Select
Title Overlay
, then
MENU/OK
– Select
Edit Text
, then
MENU/OK
– Use backspace or Delete/Back on
the keyboard to delete the title,
then
MENU/OK
– Push
STOP/BACK
repeatedly to return to the Main Screen
CHANGE A FILE NAME
Replaces the default le name (ex: 20171116 - 01. mp 4)
with your own text. Consider using what you use for
Custom Title or Custom Text.
File names appear on your USB drive lists, or will display in Play
Video Screen
– Push
MENU/OK
on control panel to access the Main Screen
– Select
File Management,
then
MENU/OK
– Select
Rename,
then
MENU/OK
– Select
Internal,External
or
Both
, then
MENU/OK
– Rename les
**Important Type in .mp4 at the end of the le name for
videos, or .jpg at the end of the le name for snapshots–
be sure to include the . (dot)
– Press
MENU/OK
– Push
STOP/BACK
repeatedly to return to the Main Screen
CHANGE TIME FORMAT
– Select
Overlays,
then
MENU/OK
– Select
Primary Overlay,
then
MENU/OK
– Select
Time Format,
then
MENU/OK
– There are 7 options to choose from,
Select
HH:MMAM/PM,
then
MENU/OK
– Push
STOP/BACK
repeatedly to return to the Main Screen

MYTANA MS11-NG2 | MS11+ Combo | MSA-NG2 USER MANUAL
(800) 328-8170 |MyTana.com |EMAIL mytana@mytana.com youtube.com/videoMyTana
M–F |7a to 5p CST MYTANA LLC 746 SELBY AVE • ST. PAUL, MN 55104
PG 8
HOUSING
KEEP DRY Be sure to keep a camera
frame or control box (both in-use and
out-of-use) out of the “spray” of cable
machines and jetters.
• Control panels are generally water
resistant, but not waterproof
• Electronics housing has venting
for air circulation, so it too is not
water proof
• Keep reel interiors as dry as
possible
Never use wet/dirty gloves when operating the controls.
This can get dirt/grit into the buttons and cause them to
not function properly.
GENERAL
NEVER USE A CAMERA TO CLEAR BLOCKAGES or
ram it to jump an oset. This can result in kinked or
broken pushrod, or damaged camera head.
TRAPS Don’t use a camera* in any kind of traps.
Even if a trap seems large enough, due to the tight
turns involved, the camera could become lodged and
incur damage.
*The exception is our DrainTracker mini camera which
is designed to go through traps.
If it’s an option, consider running water to reduce push
rod friction as you push the camera through a pipe.
Camera Care Tips Avoid costly repairs!
PUSHROD
Don’t use a camera in the same
line as a cable machine, the
spinning cable can damage both
the push rod and camera head.
Cleanouts and entrances can be
sharp; cover edges with a rag or
useour Tiger Tail guide to avoid
cutting the pushrod.
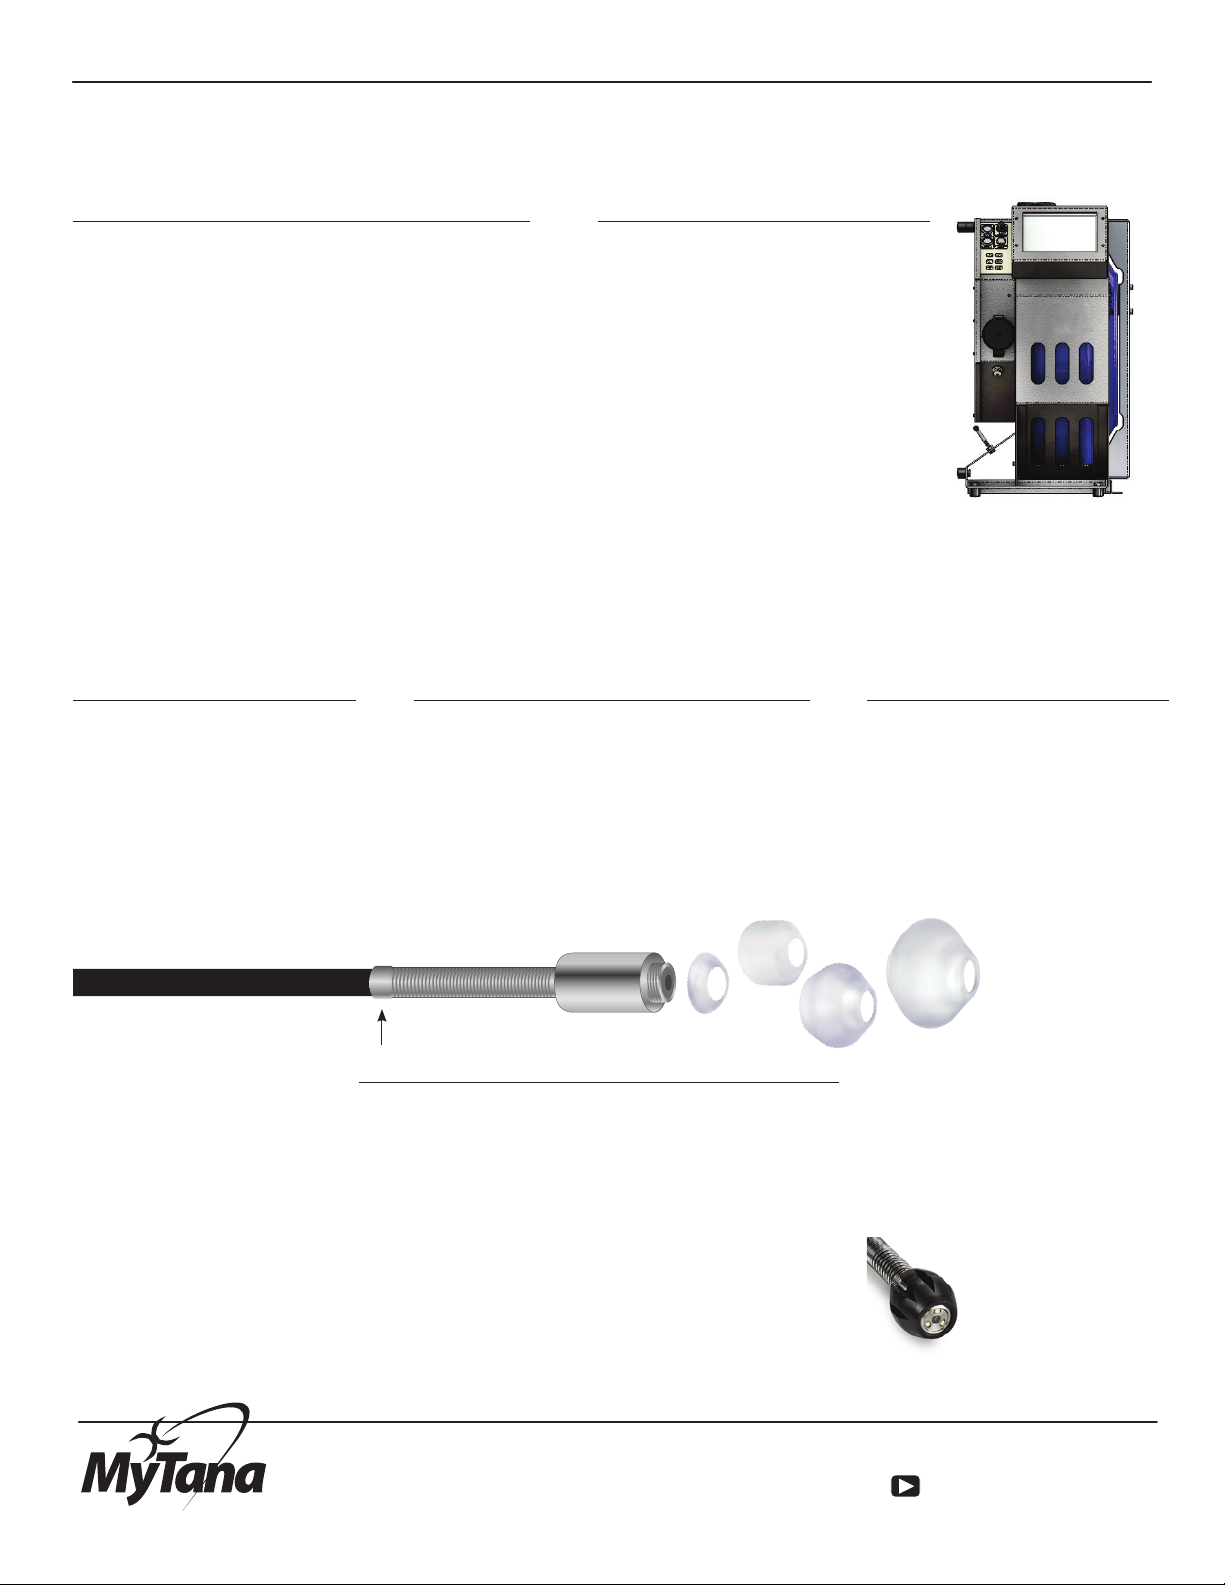
CAMERA HEAD
ALWAYS USE A POLY COVER, like our SnoBall
or IceBall camera guides. They are integral to
the functionality and protection of the camera
head. Keep a cover on the camera during
transport to protect the threads and the head.
At the end of the day, check the camera head
for damage and signs of
water ingress.
GUIDES
ICEBALLS The MS11-NG2 system
includes multiple sizes suited for
dierent sizes of pipes.
• Remove the small IceBall
before adding a larger size.
• The 2.5” and 3” IceBalls are
rounded to help jump osets
Remove and clean
the threads
regularly. Not doing
this can result in
micro amounts of
crud hardening on the
threads making them dicult to
remove.
• Apply dielectric grease to
the threads periodically or
when changing sizes.
A SNOBALL guide is
included with our 1⁄"
camera head. Inspect
regularly for damage,
replace as needed.
CONNECTION
During transport, to avoid jarring the camera head /
push rod connection. Either:
• remove the camera head from the push rod, and
cap both rod and head with the protective caps
that came with the system
• or tuck the camera head inside the reel
To reconnect, align the push rod with the head and screw
on until snug and there are no skipped threads.
• Don’t over-tighten—never use tools to tighten
• Avoid getting grime on the connection components
When pulling the camera out
of the line, wipe the pushrod
down with a cleaning solution
on a rag.
When rewinding, stack the
push rod carefully into the reel
to avoid kinking.
This manual suits for next models
3
Table of contents
Other MyTana Analytical Instrument manuals