manuals.online logo
Brands
  1. Home
  2. •
  3. Brands
  4. •
  5. Nav TV
  6. •
  7. Car Navigation System
  8. •
  9. Nav TV SIR-PCM3 955 User manual

Nav TV SIR-PCM3 955 User manual

SIR-PCM3 955/997
SIRIUS Satellite Radio interface for Porsche PCM 3 radios
NTV-KIT266/285
BHM
04/16/14
NTV-DOC175
rB2
3950 NW 120th Ave, Coral Springs, FL 33065 TEL 561-955-9770 FAX 561-955-9760
BHM
04/16/14
NTV-DOC175
rB2
Agreement: End user agrees to use this product in compliance with all State and Federal laws. NAV-TV Corp. would not be held liable for
misuse of its product. If you do not agree, please discontinue use immediately and return product to place of purchase. This product is
intended for off-road use and passenger entertainment only.
2 | P a g e
Overview
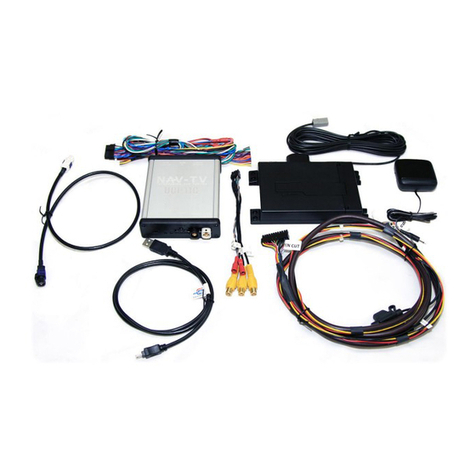
The SIR-PCM3 adds Sirius Satellite radio to the factory MOST fiber optic stereo system in select
Porsche vehicles.
Kit Contents
SIR-PCM 3 Module
NTV-ASY144
Plug & Play
T-Harness
NTV-HAR113: KIT266
NTV-HAR102: KIT285
MOST Fiber Optic Cable & Connector
NTV-ASY03
USB Cable (updates)
NTV-CAB009
PCM3 Filter
NTV-ASY107
SIR-PCM3 Power Harness
NTV-ASY007
SIRIUS Tuner (SCC1)
NTV-INT021
S2P (Signal to Power)
NTV-KIT334
Optional, Recommended for convenience
BHM
04/16/14
NTV-DOC175
rB2
Agreement: End user agrees to use this product in compliance with all State and Federal laws. NAV-TV Corp. would not be held liable for
misuse of its product. If you do not agree, please discontinue use immediately and return product to place of purchase. This product is
intended for off-road use and passenger entertainment only.
3 | P a g e
SIR-PCM3 Interface connector layout
Radio Removal (955: Cayenne)
1. Before removing radio, confirm that the radio
displays ‘CURRENT SYSTEM’ when you press
‘INFO’ & ‘SOURCE’ together (if not, this kit is
NOT compatible).
2. Carefully remove the radio trim with a plastic
tool.
3. Remove (4x) Torx t20 screws that
secure the radio into the sub-dash.
Remove radio, disconnect all plugs
and set the radio aside.
Power Connector
MOST Fiber
Connector
SCC1 Connector
USB Connector (updates)
BHM
04/16/14
NTV-DOC175
rB2
Agreement: End user agrees to use this product in compliance with all State and Federal laws. NAV-TV Corp. would not be held liable for
misuse of its product. If you do not agree, please discontinue use immediately and return product to place of purchase. This product is
intended for off-road use and passenger entertainment only.
4 | P a g e
Note: Not all vehicles will have fiber optics equipped. NAV-TV can provide a fiber kit, contact tech support.
Radio Removal (997: 911, Boxster, Cayman)
1. Before removing radio, confirm that the radio displays
‘CURRENT SYSTEM’ when you press ‘INFO’ & ‘SOURCE’
together (if not, this kit is NOT compatible).
2. Remove the Torx t27 screw on each carpeted panel that
sits in front of the leather side panels (on the sides of
the radio).
3. Remove the now exposed (2x) Torx t20 screws on each
leather panel on each side of the factory radio.
4. While sitting in the driver’s seat, pull each panel straight
towards you (or towards the rear of the vehicle) to expose
the sides of the radio.
5. On each side of the radio, close to the front of the radio, there are (2x) Allen screws.
Turn each of these screws counter clockwise 1/4 turn or until they stop. When all 4
screws have been turned, the radio will be free to pull straight out of the sub-dash.
6. Remove radio, disconnect all plugs and set the radio aside.
SIR-PCM 3 Interface Installation (all vehicles)
1. Remove the factory fiber connector from the
factory 44-pin plug by gently prying up on the
locking tab with a pick tool.
2. Remove the provided Fiber connector from the
fiber cable with a pick tool.
3. Connect the provided Fiber cable into the vehicle’s
MOST loop via the diagram below:
Factory MOST cable
Provided MOST cable
Before
After
Step 2
Step 1
BHM
04/16/14
NTV-DOC175
rB2
Agreement: End user agrees to use this product in compliance with all State and Federal laws. NAV-TV Corp. would not be held liable for
misuse of its product. If you do not agree, please discontinue use immediately and return product to place of purchase. This product is
intended for off-road use and passenger entertainment only.
5 | P a g e
4. Connect the factory 44-pin plug to the female end of the provided
Plug & Play T-Harness and lock it into place.
5. Connect one of the newly made fiber optic pairs (from step 3) to
the male side of the provided Plug & Play T-Harness at the
proper port (it is keyed and will only connect in one direction).
6. If there is a mini plug (usually green) located on the factory 44-
pin harness, it must be removed and re-inserted into the male side
of the provided Plug & Play T-Harness at the proper port.
7. Connect the last free fiber optic pair back into
the provided fiber connector. Connect this fiber
connector to the port on the SIR-PCM3
interface labeled ‘MOST’ (remove dust cover
first).
8. UPDATE: On the 8-pin Molex harness that will connect
to the provided PCM3 Filter (in step 8), locate the Red
wire:
a. Cut this wire in half.
b. Connect the plug-side of this Red wire to a 12v
ACC SOURCE (if you purchased a NAV-TV S2P
with the PCM3 kit, connect the 12v ACC output
to this wire).
c. Insulate the other side of the cut Red wire.
9. Connect the provided PCM3 Filter to the 8-pin Molex plug located on
the Plug & Play T-Harness.
Supply 12v ACC to this wire
BHM
04/16/14
NTV-DOC175
rB2
Agreement: End user agrees to use this product in compliance with all State and Federal laws. NAV-TV Corp. would not be held liable for
misuse of its product. If you do not agree, please discontinue use immediately and return product to place of purchase. This product is
intended for off-road use and passenger entertainment only.
6 | P a g e
10. Connect the following wires from the provided SIR-PCM3 Power Harness to the car:
SIR-PCM3 Power Harness
Connect to car:
Black
Ground (-)
Yellow
12v (+) ACC
11. Connect the power plug from step 9 to the SIR-PCM3 Interface at the port labeled
‘+12v’.
12. IMPORTANT: If this vehicle has a factory reverse camera, you must connect the RCA’s
together located in the middle of the provided Plug & Play T-Harness. If you fail to do
this, you will
lose your
reverse camera
image!
13. From the provided SIRIUS Tuner KIT (SCC1):
a. Mount your Satellite antenna where it has a clear view of the sky (cannot be
mounted beneath metal!, outside of the car is absolute best)
b. Run the antenna cable to the location where you will mount the SCC1 and
connect to the proper port
c. Connect the SCC1-provided mini-DIN data cable from the SCC1 to the port on the
SIR-PCM3 labeled ‘SCC1’.
14. Connect the free end of the provided Plug & Play T-Harness to the radio. Connect the
remaining plugs to the radio and proceed to Programming (next section).
BHM
04/16/14
NTV-DOC175
rB2
Agreement: End user agrees to use this product in compliance with all State and Federal laws. NAV-TV Corp. would not be held liable for
misuse of its product. If you do not agree, please discontinue use immediately and return product to place of purchase. This product is
intended for off-road use and passenger entertainment only.
7 | P a g e
PCM3 (955: Cayenne) Programming
On the steering wheel, find the + button and the MUTE button. With the vehicle’s ignition ON
(but not running):
1. Press and hold the +button.
2. While holding the +button, press and
hold the MUTE button.
3. While holding the MUTE button,
release the + button.
4. Release the MUTE button.
The radio will enter a ‘Service’ mode. While
‘Service’ is displayed on the screen:
5. Press and hold the UP ARROW for 4
seconds to program the PCM3 for
satellite radio. If this module is ever
removed from the original vehicle you
must first enter service mode and press
the DOWN ARROW for 4 seconds to
deprogram the original PCM3 BEFORE
the module is removed. If this is not
performed, the module will not work on
any other vehicle!
6. The Radio will reboot to the Porsche
logo after holding the UP ARROW. The SAT option will become available on the SOURCE
menu or by repeatedly pressing the TUNER button.
PCM3 (997: 911, Boxster, Cayman) Programming
1. Prepare the vehicle for programming:
a. Turn the key ON (don’t start)
b. Turn the headlights ON
c. Engage the Parking Brake
d. Hold down the Brake Pedal
2. Flash the high beams (1 per second):
a. Either 4 or 8 times (vehicles with navigation)
b. 10 times (vehicles without navigation)
De-Program
Enter Service Mode
Program
If this module is ever removed
from the original vehicle you
must first de-program it!
De-Programing:
1. Repeat step 1 from
programming.
2. Flash the high beams 6
times.
After 4 flashes, if ‘Loading Maps’ message does not go away after
about 1 minute, repeat this procedure with 8 flashes instead of 4.

This manual suits for next models

3

Other Nav TV Car Navigation System manuals

Nav TV NNG-Toyota 1 NTV-KIT583 User manual

Nav TV

Nav TV NNG-Toyota 1 NTV-KIT583 User manual

Nav TV NTX-54 User manual

Nav TV

Nav TV NTX-54 User manual

Nav TV NNG-Honda 3 User manual

Nav TV

Nav TV NNG-Honda 3 User manual

Nav TV OPV-1LR User manual

Nav TV

Nav TV OPV-1LR User manual

Nav TV NTV-KIT581 User manual

Nav TV

Nav TV NTV-KIT581 User manual

Nav TV NNG-GM2 NTV-KIT552 User manual

Nav TV

Nav TV NNG-GM2 NTV-KIT552 User manual

Nav TV NTV-KIT625 User manual

Nav TV

Nav TV NTV-KIT625 User manual

Nav TV NTX-54 User manual

Nav TV

Nav TV NTX-54 User manual

Nav TV NTV-KIT553 User manual

Nav TV

Nav TV NTV-KIT553 User manual

Nav TV NNG-HONDA C NTV-KIT599 User manual

Nav TV

Nav TV NNG-HONDA C NTV-KIT599 User manual

Nav TV A3/GOLF 7-CAM User manual

Nav TV

Nav TV A3/GOLF 7-CAM User manual

Nav TV NTV-KIT558 User manual

Nav TV

Nav TV NTV-KIT558 User manual

Nav TV NTV-KIT589 User manual

Nav TV

Nav TV NTV-KIT589 User manual

Nav TV RGB PCM3.1 Kit User manual

Nav TV

Nav TV RGB PCM3.1 Kit User manual

Nav TV DIFF CAM-Switcher Manual

Nav TV

Nav TV DIFF CAM-Switcher Manual

Nav TV RGB-LEXv2 User manual

Nav TV

Nav TV RGB-LEXv2 User manual

Nav TV VOLVO-CAM17 User manual

Nav TV

Nav TV VOLVO-CAM17 User manual

Nav TV NTV-KIT604 User manual

Nav TV

Nav TV NTV-KIT604 User manual

Nav TV OPV-1A3G User manual

Nav TV

Nav TV OPV-1A3G User manual

Nav TV NTV-KIT607 NNG-Toyota 2 User manual

Nav TV

Nav TV NTV-KIT607 NNG-Toyota 2 User manual

Nav TV NTV-KIT597 User manual

Nav TV

Nav TV NTV-KIT597 User manual

Nav TV NNG-Honda 8 NTV-KIT582 User manual

Nav TV

Nav TV NNG-Honda 8 NTV-KIT582 User manual

Nav TV NNG-GM2 2016 User manual

Nav TV

Nav TV NNG-GM2 2016 User manual
Nav TV NNG-Toyota 4s NTV-KIT605 User manual

Nav TV

Nav TV NNG-Toyota 4s NTV-KIT605 User manual

Popular Car Navigation System manuals by other brands

Volkswagen MFD RADIO NAVIGATION SYSTEM Quick reference guide

Volkswagen

Volkswagen MFD RADIO NAVIGATION SYSTEM Quick reference guide

Packard Bell COMPASSEO quick start guide

Packard Bell

Packard Bell COMPASSEO quick start guide

Eclipse AVN726EE installation manual

Eclipse

Eclipse AVN726EE installation manual

Raymarine G-Series system installation instructions

Raymarine

Raymarine G-Series system installation instructions

Lord MicroStrain 3DM-GX4-45 user manual

Lord MicroStrain

Lord MicroStrain 3DM-GX4-45 user manual

Pioneer AVIC-880DVD Hardware manual

Pioneer

Pioneer AVIC-880DVD Hardware manual

Toyota Aygo X-NAV owner's manual

Toyota

Toyota Aygo X-NAV owner's manual

Mopar RB4 user manual

Mopar

Mopar RB4 user manual

Lexus 2015 CT 200h Personalized settings

Lexus

Lexus 2015 CT 200h Personalized settings

ZENEC ZE-NE2010 instruction manual

ZENEC

ZENEC ZE-NE2010 instruction manual

Blaupunkt TravelPilot RNS 3 operating instructions

Blaupunkt

Blaupunkt TravelPilot RNS 3 operating instructions

TomTom VIO manual

TomTom

TomTom VIO manual

Garmin nuvi 705 series owner's manual

Garmin

Garmin nuvi 705 series owner's manual

AIRIS N509 TOMTOM 2005 manual

AIRIS

AIRIS N509 TOMTOM 2005 manual

Kenwood DNX9990HD quick start guide

Kenwood

Kenwood DNX9990HD quick start guide

Alpine X802D-U Series Quick reference guide

Alpine

Alpine X802D-U Series Quick reference guide

Holux Portable Automobile Navigation System Product user manual

Holux

Holux Portable Automobile Navigation System Product user manual

Sanyo NV-E7000 - Portable GPS And Mobile DVD Entertainment... supplementary guide

Sanyo

Sanyo NV-E7000 - Portable GPS And Mobile DVD Entertainment... supplementary guide

manuals.online logo
manuals.online logoBrands
  • About & Mission
  • Contact us
  • Privacy Policy
  • Terms and Conditions

Copyright 2025 Manuals.Online. All Rights Reserved.