NBG Home SMRTLite DS18876 User manual

Item # 311 457 387
Model # DS18876
USE AND CARE GUIDE
SMART LED TAPE LIGHT
Questions, problems, missing parts? Before returning to the store,
call Design Solutions International Customer Service Mon-Fri 9:30 am to 4:00 pm EST
1-800-388-6141
For customer service support and the fastest response, please email us at
www.SMRTLite.com
TM
MR
M

Table of Contents
Safety Information
DANGER: Danger of eye damage! Never look directly at
the LED chips of this LED tape light.
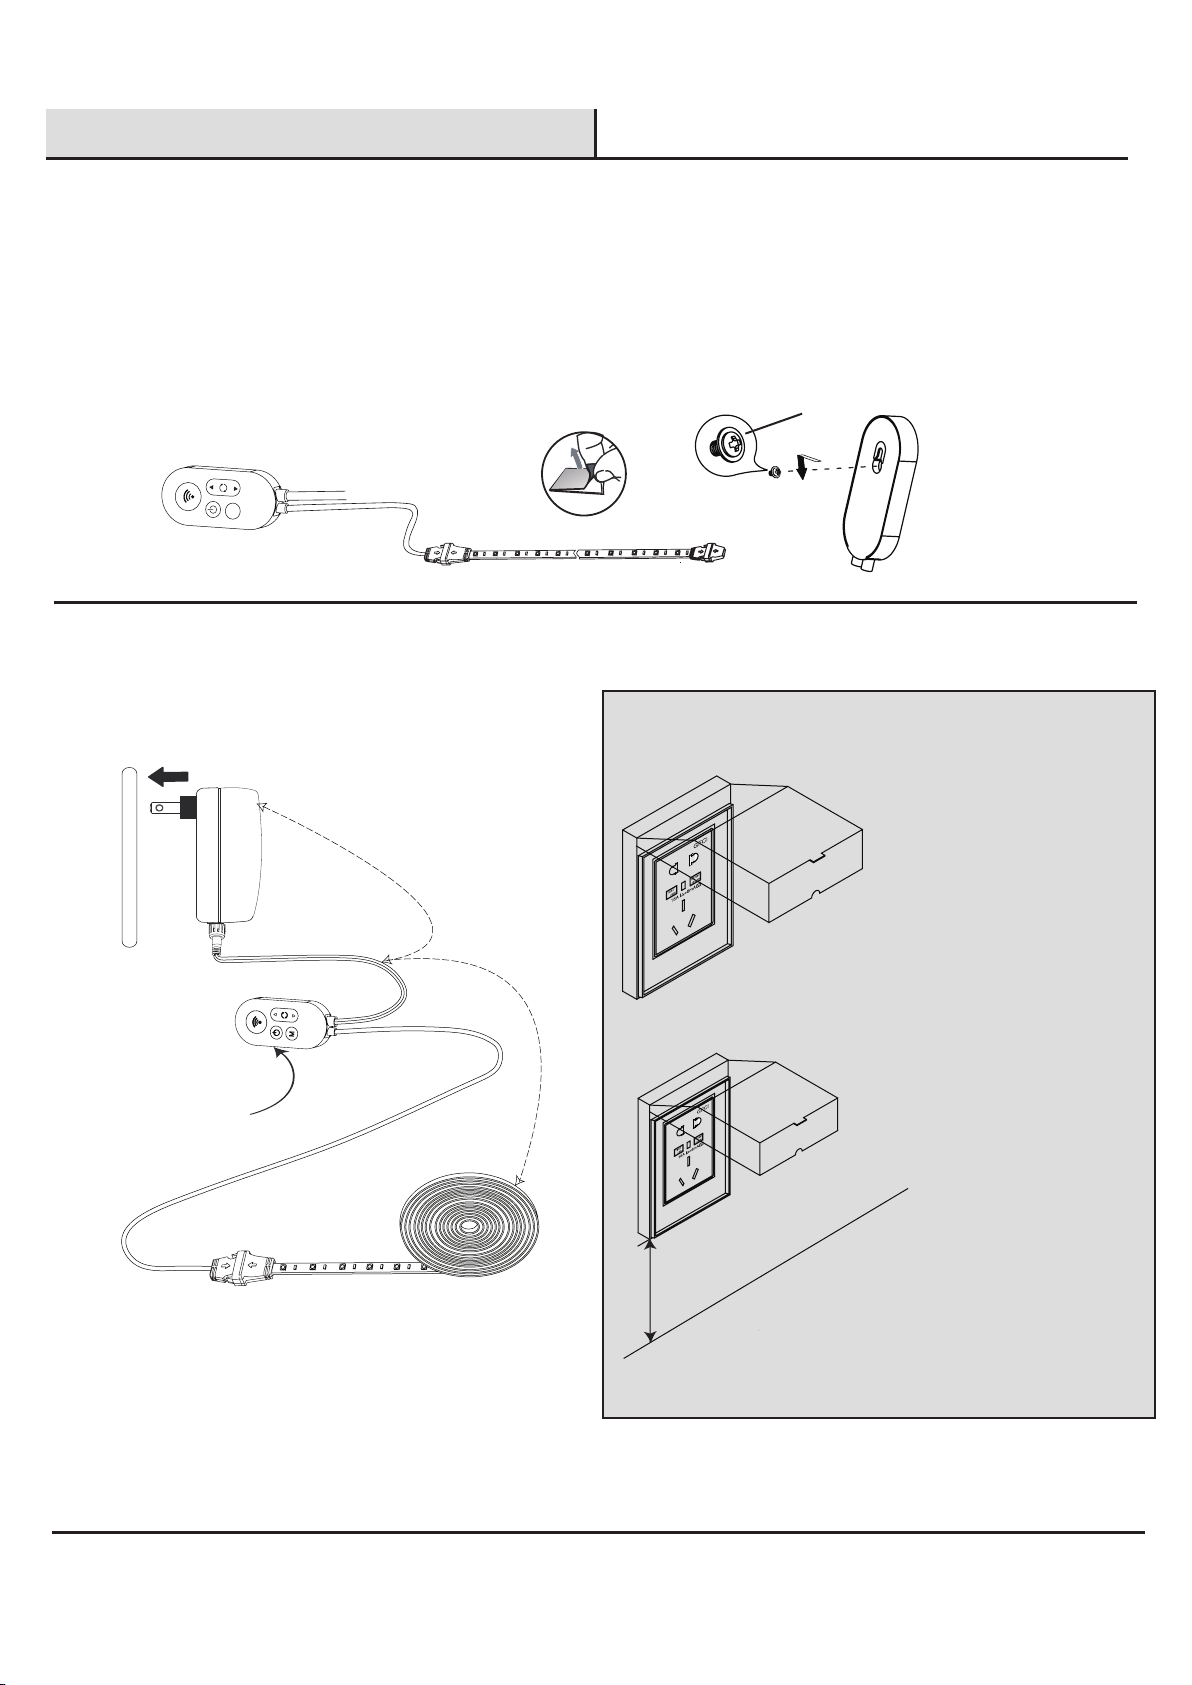
WARNING: If using the adapter outdoors where it could
be exposed to rain, snow, or solid objects less than 1mm,
to protect against electric shock, install the adapter only
in a Class A GFCI receptacle that has a weatherproof
enclosure with the attachment plug cap inserted or
removed.
WARNING: The adapter is not for use with receptacles
that are weatherproof only when the receptacle is
covered (attachment plug cap not inserted and receptacle
cover closed).
WARNING: Risk of electric shock. Mount the adapter
at a height greater than 30 cm / 11.8 in. from the ground
surface.
CAUTION: Do not submerge any part of this unit.
IMPORTANT: Main power voltage and fuse must meet
the technical data specifications. Before starting work,
ensure that the main cable is not live. Switch off the fuse.
NOTICE: LED flexible lighting strip rating : 24VDC 1A.
CAUTION: CONSULT A QUALIFIED ELECTRICIAN IF YOU
HAVE ANY ELECTRICAL QUESTIONS. If you have any non-
electrical questions about this LED tape light, please
call our Customer Service Team at 1-800-388-6141.
Please reference your SKU (311 457 387) or UPC
(802513188769).
Table of Contents ........................................................... 2
Safety Information ......................................................... 2
Warranty ......................................................................... 2
Three (3) Year Warranty ............................................................. 2
What is Covered ........................................................................ 2
What is Not Covered .................................................................. 2
Pre-Installation ...............................................................3
Planning Installation ..................................................................3
Tools Required ........................................................................... 3
Hardware Included .................................................................... 3
Package Contents ..................................................................... 4
Installation ...................................................................... 5
Operation ........................................................................ 10
SMRTLite APP How to ...................................................11
Care and Cleaning ......................................................... 14
Troubleshooting ............................................................. 14
FCC Statement ...............................................................14
Service Parts .................................................................. 15
Model .........................................................................................15
2
Always keep the user manual within reach while installing this LED
tape light. Please read and understand the user manual to ensure
proper installation and use. Always pay attention to the technical
data shown on the product. We reserve the right to make technical
changes.
□Fitting and maintenance work may only be carried out by a
professional or an electrician in accordance with local safety
regulations.
□All electrical connections must have good contact in order for
this product to have a long, useful life.
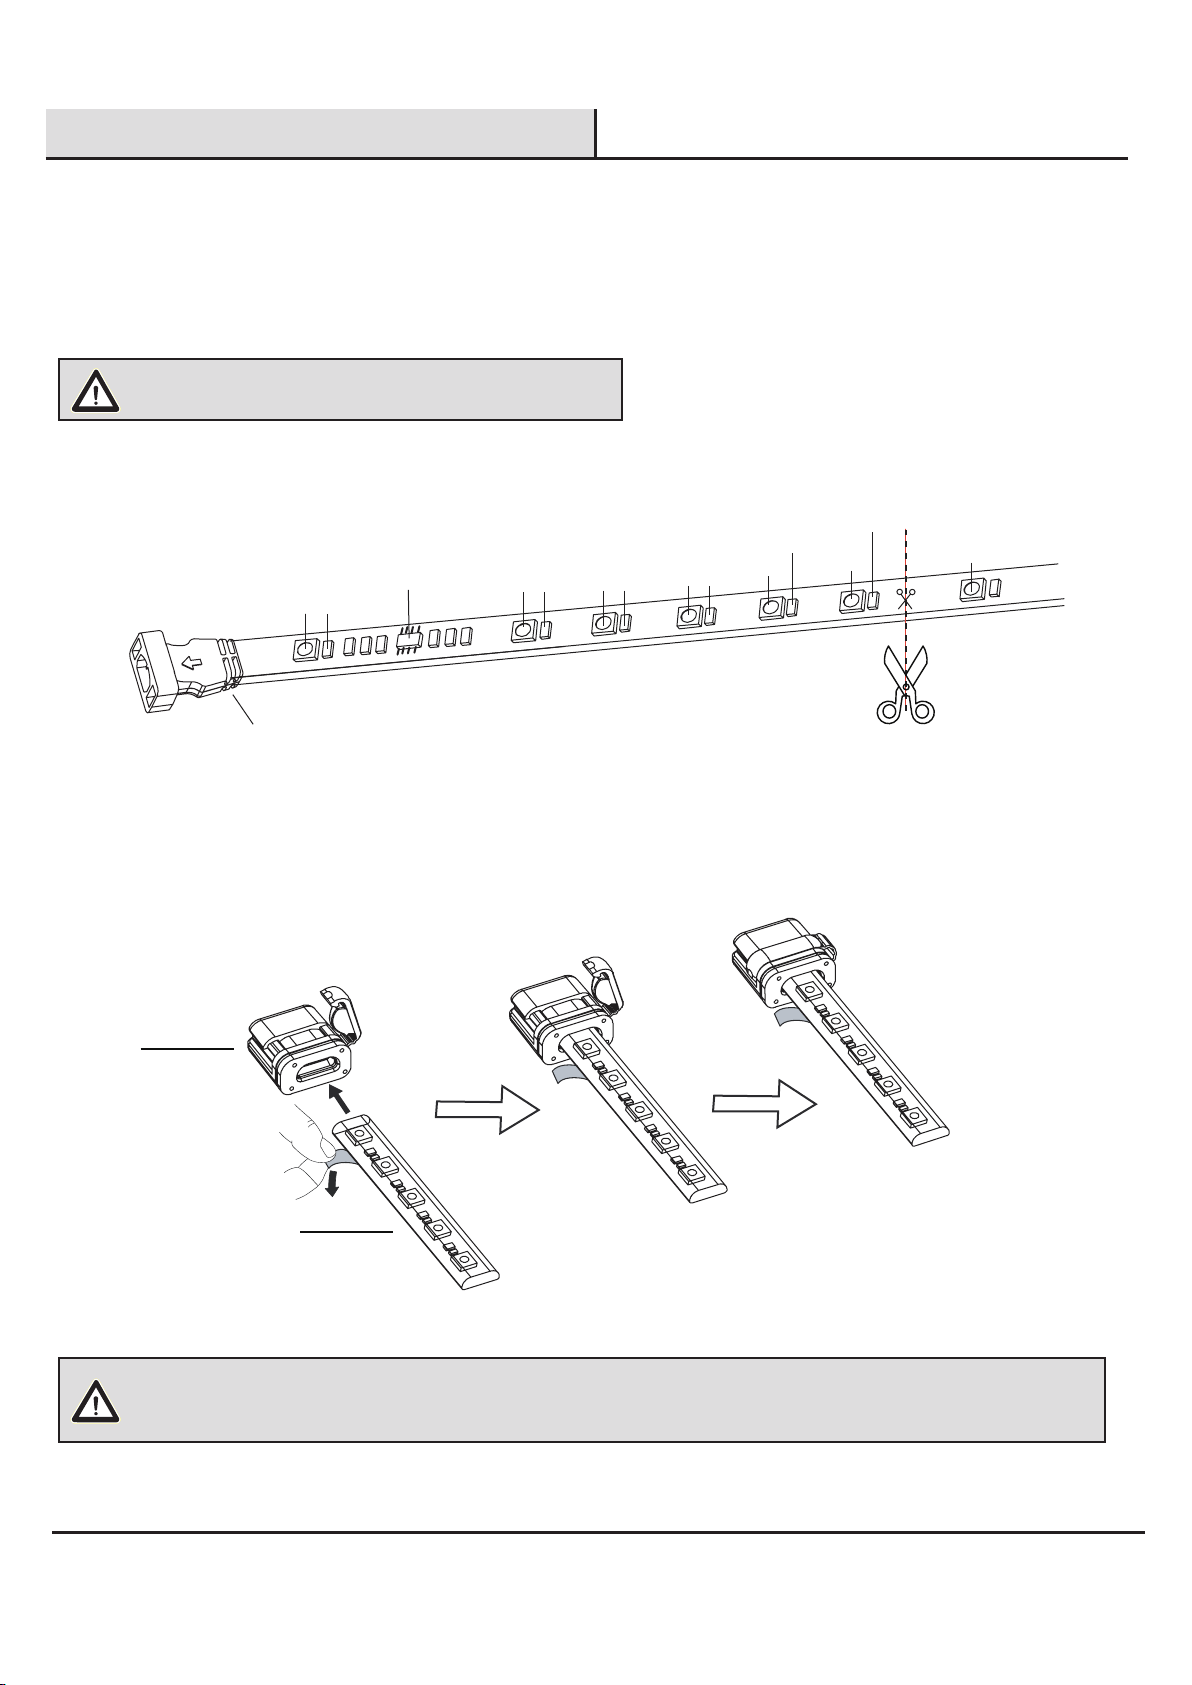
□The LED chips of this LED tape light can not be replaced.
□This LED tape light includes a linkable connector. Only link
a maximum of one LED tape light. Do not link multiple strips
together.
□Please only use the LED driver which has been provided with
this LED tape light.
□Never use the unit in a room where there is a danger of
explosion or in the vicinity of ammable liquids or gases.
□Do not bend, crush or pull the cable. Protect from sharp edges,
oil and heat.
□Do not touch the LED tape light or electrical connector directly
with hands.
□For indoor and outdoor use .
□Ensure the connectors and endcap are securely fastened
before operating the strip.
□Electrical waste should not be disposed of with household
waste. Please recycle where facilities exist.
□The LED tape light and in-line remote can be used outdoors,
but they are not submersible.
□Do not use the LED tape light on a timer, wall switch with
dimming functions, or with an extension cord. Using the LED
tape light with any of these voids the warranty and results in
the LED tape light not functioning properly.
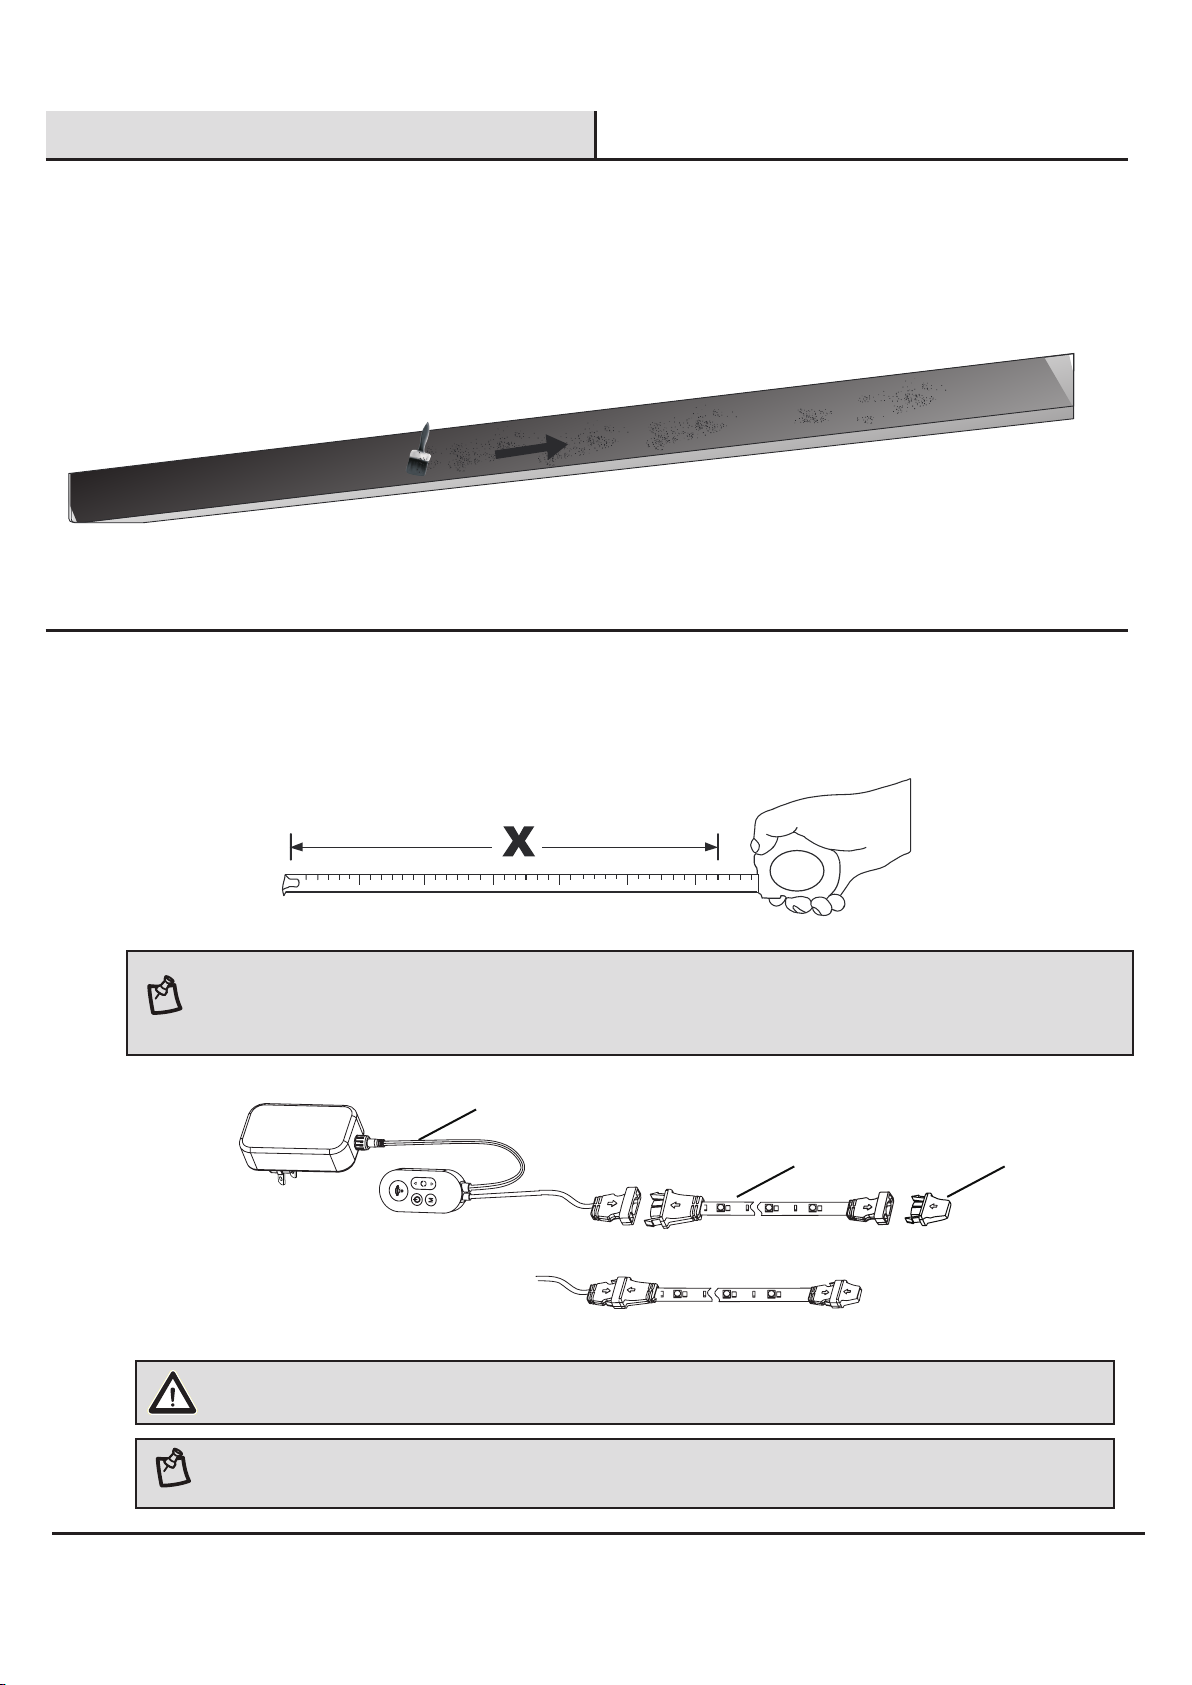
□If you choose to modify the length of the LED tape light, only
cut along the scissors marks.
A. Once the LED tape light is cut, it is no longer waterproof and
it can only be used indoors - away from wet locations. If you
use the provided snap-on end cap, the strip can be used
outdoors.
B. Once the LED tape light is cut, it will lose the connectable
capabilities. You will not be able to add a new connector or
additional strips to the strip that had been cut.

Warranty
THREE (3) YEAR WARRANTY
WHAT IS COVERED
The manufacturer warrants this LED tape light to be free from defects in materials and workmanship for a period of three (3) years from
date of purchase. This warranty applies only to the original consumer purchaser and only to products used in normal use and service. If this
product is found to be defective, the manufacturer’s only obligation, and your exclusive remedy, is the repair or replacement of the product
at the manufacturer’s discretion, provided that the product has not been damaged through misuse, abuse, accident, modifications, alteration,
neglect, or mishandling. This warranty shall not apply to any product that is found to have been improperly installed, set-up, or used in any
way not in accordance with the instructions supplied with the product. This warranty shall not apply to a failure of the product as a result of
an accident, misuse, abuse, negligence, alteration, faulty installation, or any other failure not relating to faulty material or workmanship. This
warranty shall not apply to the finish on any portion of the product, such as surface and/or weathering, as this is considered normal wear and
tear.
WHAT IS NOT COVERED
The manufacturer does not warrant and specifically disclaims any warranty, whether expressed or implied, of fitness for a particular purpose,
other than the warranty contained herein. The manufacturer specifically disclaims any liability and shall not be liable for any consequential or
incidental loss or damage, including but not limited to any labor/expense costs involved in the replacement or repair of said product.
Contact the Customer Service Team at 1-800-388-6141 Eastern Time, Mon-Fri 9:30 am to 4:00 pm EST. For customer service support and the
3

Pre-Installation
IMPORTANT: Personal injury and damage to the LED
tape light and/or mounting surface may result if the
LED tape light is pulled from the surface. To reduce the
likelihood of injury or damage, mount only on a surface
that is structurally sound. Please call the Customer
Service Team at 1-800-388-6141. For customer service
support and the fastest response, please email us at
NOTE: Hardware not shown to actual size.
NOTE: The Smart LED tape light must be installed within
range of your home’s Wi-Fi in order to communicate
properly with the SMRTLite app. Verification before
installation is recommended.
PLANNING INSTALLATION
Read all instructions before installing.
To avoid damaging this product, place it on a soft, non-abrasive surface, such as carpet or cardboard.
Phillips
Screwdriver
Brush
Pencil
Measuring
tape
TOOLS REQUIRED (NOT INCLUDED)
HARDWARE INCLUDED
AA
CC
BB
DD
4
Part Description Quantity
AA Screw 19
BB Clip 8
CC End cap 1
DD Snap-on end cap 1

Pre-Installation (continued)
PACKAGE CONTENTS
A
B
5
Part Description Quantity
AAdapter, in-line remote control and connector
connected as one set 1
B 5.48 m / 18 ft LED exible strip 1
M

Installation
6
□Remove any surface dust from the area where you will be applying the LED tape light. A brush (not included) is
recommended to remove any surface dust.
□Measure the desired space for the LED tape light (B) installation to determine if you need to adjust to the right length of the strip.
1Preparing the assembly location
2Preparing the LED light strip
NOTE: Connect the LED tape light to the in-line remote and adapter by aligning the arrows on the connector leading
from the remote control to the connector on the LED tape light. Connect the end cap to the end of the LED tape light by
aligning at the arrows on the connectors. Please make sure the connectors are securely fastened all the way on both
sides.
WARNING: If you are using one LED tape light, you must connect the end cap to the connector at the end of the
strip. Failure to use end cap at the end of the strip may cause permanent damage to the strip.
NOTE: You can extend the tape light by purchasing an additional Smrtlite LED tape light. You can link together a
maximum 9.75 m /32 ft using the same adapter.
correct
correct correct
correct
A
B CC

Installation (continued)
7
□Unfold the entire LED tape light. Find the end of the LED tape light. Each group of twelve LED chips from the end is considered a
complete circuit as shown (each complete circuit has an IC). You can cut the LED tape light at the center of the 12th and 13th LED
chip as shown, along the scissors marks. If you cut the strip on the incorrect point, the remaining LED chips on the complete circuit
will not work.
3Adjusting the length of the strip with scissors
End of the LED tape light Cut line
□Remove the protective tape from the adhesive back of the LED tape light (B) carefully. Attach the snap-on end cap (DD) to the new
end. Press the snap-on end cap (DD) tightly.
12
1 3 5 7 9 11 13
2 4 6 8
10
IC
WARNING: Once the strip is cut, it cannot be reattached.
WARNING: If you cut the LED tape light, you must use the snap-on end cap on the new end. If you do not use the provided
endcap, the strip can only be used indoors, not outdoors.
DD
B

NOTE:
a. Use an angle greater or equal to 90 degrees when there is an LED chip on the corner while placing the strip in a concave
position. (Angle 90º)
b. Use an angle greater or equal to 60 degrees when there is no LED chip on the corner while placing the strip in a concave
position. (Angle 60º)
c. Use an angle greater or equal to 60 degrees when there is an LED chip on the corner while placing the strip in a convex
position. (Angle 60º) In the convex position the angle should not reach 90 degrees. See above diagram.
NOTE: If you need to secure the connector to the
surface, please remove the protective tape from the red
adhesive of the connector carefully, place the connector
in the desired location and press to ensure proper
adhesion to the surface.
Installation (continued)
8
There are two installation options to choose from:
□4A Tape method: Remove the protective tape from the adhesive back of the LED tape light (B) carefully. Place the LED tape light
(B) onto a clean and dry surface in the desired location, press to ensure proper adhesion to the surface. This method is suitable for
indoor installation and can be used for outdoor installation in conjunction with method 4B.
□4B Tape method: Place the LED tape light (B) in the desired location. Use the clips (BB) and screws (AA) to secure the LED tape
light (B) as shown. Clips (BB) should be placed in open areas of the strip. Do not cover the LED chips.
4Installing the LED tape light
a. b. c.
LED Chip
Angle 90º Correct lncorrect lncorrectAngle 60º
IMPORTANT: Before removing the 3M paper backing, it is important to test the LED tape light in the space you intend to light.
Once the 3M paper backing is removed and the lighting is fully installed, you cannot reposition or move the LED tape light to
another location. The tape may not stick securely.
B
AA
BB B

Installation (continued)
9
There are two installation options to choose from:
□5A: Remove the protective tape from the adhesive back of the remote carefully. Then place the remote control into position and press
to ensure a proper adhesion to the surface.
□5B: Screw the one screw into desired location. Hook the remote control onto the screw as shown in the diagram.
□Connect the adapter to a power outlet.
5Installing the in-line remote
6Connecting to a power supply
5A 5B
Adapter
6a
6b
In-Line remote
LED tape light
NOTE:
6a:
6b: The LED tape light and In-Line Remote can be used
outdoors but are not submersible.
GFCI receptacle with enclosure should ONLY be used.
WARNING: If using the adapter
outdoors, where it could be
exposed to rain, snow, or
solid objects less than 1 mm
plug the adapter into
a Class A GFCI receptacle that
has a weatherproof enclosure.
WARNING: Risk of electric
shock. Mount the adapter
at a height greater than
30 cm / 11.8 in. from the
ground surface.
M
AA
30 cm / 11.8 in.

Operation
10
1Operating the LED tape light
Configuration
ON/OFF
5 Modes: Chase / Horse Race / Meteor /
Pulse / Flash
Operating the remote control:
There are two options for you to choose from:
A: Using the in-line remote:
1) Click on/off button: Turns LED tape light on/off.
2) Click mode button: Choose color mode.
3) Click color option button: Choose color.
4) Configuration button resets smart control access.
B: Using your smart device:
1) Control from the SMRTLite App (see page 11 for download instructions), Amazon Alexa or Google Home
NOTE: Unit is not compatible with all wall dimmer switches. Dimming must be accomplished through
SMRTLite App only.
9 color solid options: Choose last color;
Choose next color.
M

SMRTLite APP How To
11
1Download or open the SMRTLite App
□Turn on the Smart LED tape light while ensuring that your phone is connected to a secure 2.4GHz WiFi network. 5GHz networks are
not supported.
□Download and Open the app by searching for SMRTLite in the Apple App Store or Google Play Store or by visiting one of the URLs
below:
□Tap the “Register” button if you are setting up the app for the rst time or select “Login” to sign in with your existing account.
NOTE: System requirement: iOS 9.0 or higher and Android 4.4 or higher.
http://ios.smrtlite.com http://android.smrtlite.com
1. Press “Add Device” button or tap the
“+” sign
2. Select “Light Strip”
2SMRTLite Network Conguration

SMRTLite APP How To (continued)
12
2SMRTLite Network Conguration (continued)
4. Press “Conrm Rapid Blinking”
3. Press and hold the “conguration”
button on the in-line remote of the LED
tape light for 3 seconds. Once the light
ashes once, release the button and
wait until the LED tape light begins to
ash rapidly.
5. Select WiFi Network and enter network
password then tap “Conrm”.
6. You will see “Connecting.” The light xture will
stop blinking as the connection progresses.

SMRTLite APP How To (continued)
13
7. Once connection is successful, you can
edit name and assign to a room then tap
“Done”.
NOTE: For tutorials on additional features including
sharing your lighting device with family members and how
to control your Smart LED tape light via Amazon Alexa,
Google Assistant or Apple Siri please visit SMRTLite.com.
2SMRTLite Network Conguration (continued)

Care and Cleaning
FCC Statement
Troubleshooting
14
□Do not use any cleaners with chemicals, solvents, or harsh abrasives. Use only a dry, soft cloth to dust or wipe carefully.
□To clean the xture, disconnect power by turning off the circuit breaker or by removing the fuse at the fuse box. Use a dry or
slightly dampened, clean cloth to wipe the exterior surface of the xture.
Design Solutions International Inc.
Model: DS18560
Address: 6 Corporate Parkway Goose Creek, SC 29445
Telephone: 800-388-6141
This device complies with part 15 of the FCC Rules. Operation is subject to the following two conditions:
1. This device may not cause harmful interference, and
2. This device must accept any interference received, including interference that may cause undesired operation.
CAUTION: Any changes or modications not expressly approved by the party responsible for compliance could void the user’s authority
to operate the equipment.
Note: This equipment has been tested and found to comply with the limits for a Class B digital device, pursuant to part 15 of the FCC
Rules. These limits are designed to provide reasonable protection against harmful interference in a residential installation. This equipment
generates, uses and can radiate radio frequency energy and, if not installed and used in accordance with the instructions, may cause
harmful interference to radio communications. However, there is no guarantee that interference will not occur in a particular installation. If
this equipment does cause harmful interference to radio or television reception, which can be determined by turning the equipment off and
on, the user is encouraged to try to correct the interference by one or more of the following measures:
• Reorient or relocate the receiving antenna.
• Increase the separation between the equipment and the receiver.
• Connect the equipment into an outlet on a circuit different from that to which the receiver is connected.
• Consult the dealer or an experienced radio / TV technician for help.
Contains FCC ID: 2ANDL-WR3
Wi-Fi: 2.4GHz IEEE802.11b/g/n
Problem Possible Cause Solution
The LED lights will not light. The LED is burned out. □Discontinue the use of the Smart LED tape light.
The power is off. □Ensure the power supply is turned on.
The power cord is not plugged in. □Ensure the power cord is plugged into the outlet.
The connector has faulty connections. □Check the connectors connections.
The circuit breaker is turned off. □Ensure the circuit breaker is in the “ON” position.
The fuse blows or the circuit breaker
trips when the light is turned on.
A wire is exposed. □Discontinue use of the Smart LED tape light.
□Unplug the unit from the wall.
□Contact a qualied electrician or call the Customer
Care Service Team at 1-800-388-6141. For customer
service support and the fastest response, please email

Service Parts
15
MODEL: DS18876
AA
CC
BB
DD
Part Description
AA Screw
BB Clip
CC End cap
DD Snap-on end cap
AAdapter, in-line remote control and connector
connected as one set
B5.48 m / 18 ft LED exible strip
A
B
M

Questions, problems, missing parts? Before returning to the store,
call Design Solutions International Customer Service
Mon-Fri 9:30 am to 4:00 pm EST
1-800-388-6141
For customer service support and the fastest response, please email us at
www.SMRTLite.com
Retain this manual for future use.
TM
MR

Artículo núm. 311 457 387
Modelo DS18876
GUÍA DE USO Y MANTENIMIENTO
LÁMPARA INTELIGENTE EMPOTRADA QUE CAMBIA DE COLOR
¿Tiene alguna pregunta o algún problema? ¿Le faltan piezas? Antes de volver a la
tienda, llame al Servicio de atención al cliente de Design Solutions International, de
lunes a viernes, de 9.30 a 16h EST
1-800-388-6141
Para obtener ayuda de nuestro Servicio de atención al cliente y la respuesta más
rápida, envíenos un correo electrónico a
www.SMRTLite.com
TM
MR
M

Tabla de contenidos
Información de seguridad
PELIGRO: Peligro de lesiones oculares. Nunca mire
directamente los chips LED de la tira de LED.
ADVERTENCIA: Si utiliza el adaptador en exteriores,
donde puede quedar expuesto a lluvia, nieve u objetos
sólidos de menos de 1 mm, para protegerlo de descargas
eléctricas, instale el adaptador únicamente en un
receptáculo GFCI clase A con una carcasa impermeable y
con el tapón del enchufe colocado o retirado.
ADVERTENCIA: El adaptador no debe utilizarse con
receptáculos que sean impermeables solo cuando se
cubran (el tapón del enchufe no se coloca y la cubierta
del receptáculo se cierra).
ADVERTENCIA: Riesgo de descargas eléctricas.
Instale el adaptador a una altura de más de 30 cm/11,8
pulgadas de la superficie del suelo.
PRECAUCIÓN: No sumerja ninguna parte de esta
unidad.
IMPORTANTE: La tensión de la alimentación principal
y el fusible deben cumplir con las especificaciones de los
datos técnicos. Antes de comenzar a trabajar, asegúrese
de que el cable principal no tiene tensión. Desconecte el
fusible.
AVISO: Potencia de la tira de iluminación LED flexible: 24 V CC 1A.
PRECAUCIÓN: CONSULTE A UN ELECTRICISTA
CALIFICADO SI TIENE ALGUNA PREGUNTA SOBRE
ELECTRICIDAD. Si tiene alguna pregunta sobre esta la
tira de LED que no esté relacionada con la electricidad,
llame al teléfono del equipo del Servicio de atención al
cliente: 1-800-388-6141. Proporcione el código SKU
(311 457 387) o UPC (802513188769).
Tabla de contenidos........................................................2
Información de seguridad.............................................. 2
Garantía........................................................................... 2
Garantía de tres (3) años............................................................ 2
¿Qué cubre?............................................................................... 2
¿Qué no cubre?...........................................................................2
Preinstalación..................................................................3
Planicación de la instalación.................................................... 3
Herramientas necesarias............................................................3
Tornillería incluida...................................................................... 3
Contenidos del paquete.............................................................. 4
Instalación....................................................................... 5
Funcionamiento.............................................................. 10
Cómo utilizar la aplicación SMRTLite...........................11
Mantenimiento y limpieza.............................................. 14
Solución de problemas...................................................14
Declaración de cumplimiento de la FCC (Comisión
Federal de Comunicaciones)......................................... 14
Piezas de repuesto......................................................... 15
Modelo........................................................................................ 15
2
Tenga siempre a mano el manual del usuario mientras instala esta
tira de LED. Lea y comprenda el manual del usuario para asegurar
una instalación y uso correctos. Siempre preste atención a los datos
técnicos indicados en el producto. Nos reservamos el derecho de
realizar modicaciones técnicas.
□Los trabajos de montaje y mantenimiento solo podrán ser
realizados por un electricista o profesional calicado de
acuerdo con las normas de seguridad locales.
□Para que este producto tenga una larga vida útil, todas las
conexiones eléctricas deben hacer buen contacto.
□Los chips LED de esta tira de LED no pueden reemplazarse.
□Esta tira de LED incluye un conector acoplable. No conecte
más de una tira de LED. No conecte múltiples tiras.
□Utilice solamente el controlador LED que se suministra con
esta tira de LED.
□Nunca utilice la unidad en una habitación donde exista peligro
de explosión ni cerca de líquidos o gases inamables.
□No doble, aplaste ni tire del cable. Manténgalo alejado de
bordes alados, aceite y calor.
□No toque la tira de LED ni ninguna conexión eléctrica
directamente con las manos.
□Para uso en interiores y exteriores.
□Asegúrese de que los conectores y el tapón estén rmemente
jados antes de utilizar la tira.
□Los residuos eléctricos no deben desecharse junto con
los residuos domésticos. Recicle en las instalaciones
correspondientes.
□La tira de LED y el mando integrado pueden utilizarse en
exteriores, pero no son sumergibles.
□No utilice la tira de LED en un temporizador, un interruptor de
pared con funciones de regulación o extensión eléctrica. El uso
de la tira de LED con cualquiera de estos dispositivos, anulará
la garantía y provocará fallos de funcionamiento en la tira de
LED.
□Si decide modicar la longitud de la tira de LED, corte
únicamente por las marcas de las tijeras.
A. Una vez que se corta la tira de LED, deja de ser impermeable
y solo puede utilizarse en interiores, lejos de ubicaciones
húmedas. Si utiliza el tapón a presión suministrado, la tira
puede utilizarse en exteriores.
B. Una vez que se haya cortado la tira de LED, perderá las
capacidades de conexión. No podrá añadir un conector
nuevo ni una tira adicional a la tira que se ha cortado.

Garantía
GARANTÍA DE TRES (3) AÑOS
¿QUÉ CUBRE?
El fabricante garantiza que esta la tira de LED no presentará defectos de material ni de mano de obra durante un período de tres (3) años a
partir de la fecha de compra. Esta garantía se aplica solo al comprador original y únicamente a los productos que se utilicen en condiciones
normales y reciban un mantenimiento adecuado. Si este producto resulta defectuoso, la única obligación del fabricante, y la única solución,
es reparar o sustituir el producto a discreción del fabricante, siempre que el producto no se haya dañado por uso indebido, abuso, accidente,
modificaciones, alteración, negligencia o mal manejo. Esta garantía no se aplicará a ningún producto que se haya instalado, configurado
o utilizado de forma incorrecta sin haber seguido las instrucciones que incluye el producto. Esta garantía no se aplicará a ningún fallo
del producto ocasionado por accidentes, mal uso, abuso, negligencia, alteración, instalación defectuosa o cualquier otro fallo que no esté
relacionado con el material defectuoso ni la mano de obra. Esta garantía no se aplicará al acabado de ninguna parte del producto, como la
superficie y/o partes erosionadas, ya que se considera uso y desgaste normal.
¿QUÉ NO CUBRE?
El fabricante no otorga y renuncia expresamente a cualquier garantía, ya sea explícita o implícita, de idoneidad para un fin determinado,
distinta de la garantía que incluye este producto. El fabricante renuncia expresamente a cualquier responsabilidad y no se hará responsable
de ninguna pérdida ni daño consiguientes o imprevistos, incluidos pero sin limitarse a, los costes de mano de obra o los gastos derivados de
la sustitución o la reparación de dicho producto.
Póngase en contacto con el equipo del Servicio de atención al cliente llamando al 1-800-388-6141, hora del este, de lunes a viernes, de 9.30
a 16h EST. Para obtener ayuda de nuestro Servicio de atención al cliente y la respuesta más rápida, envíenos un correo electrónico a
3

Preinstalación
IMPORTANTE: Retirar la tira de LED de la superficie
de montaje podría producir lesiones, así como daños en la
tira de LED y/o en la superficie de montaje. Para reducir la
probabilidad de lesiones o daños, lleve a cabo el montaje
únicamente en una superficie cuya estructura sea sólida.
Llame al 1-800-388-6141, para contactar con el equipo
del Servicio de atención al cliente. Para obtener ayuda de
nuestro Servicio de atención al cliente y la respuesta más
rápida, envíenos un correo electrónico a
OBSERVACIÓN: La tornillería no se muestra en
tamaño real.
OBSERVACIÓN: La tira de LED inteligente debe
instalarse dentro del rango de cobertura de la red wifi
de casa para que pueda comunicarse correctamente con
la aplicación SMRTLite. Se recomienda realizar una
verificación antes de la instalación.
PLANIFICACIÓN DE LA INSTALACIÓN
Lea las instrucciones antes de comenzar la instalación.
Para evitar dañar este producto, colóquelo sobre una supercie suave, no abrasiva, como una alfombra o un cartón.
Destornillador
de estrella
Brocha
Lápiz
Cinta métrica
HERRAMIENTAS NECESARIAS (NO INCLUIDAS)
TORNILLERÍA INCLUIDA
AA
CC
BB
DD
4
Pieza Descripción Cantidad
AA Tornillo 19
BB Enganche 8
CC Tapa 1
DD Tapón a presión 1
This manual suits for next models
1
Table of contents
Languages:
Other NBG Home Lighting Equipment manuals
Popular Lighting Equipment manuals by other brands

Home Accents Holiday
Home Accents Holiday TY323-1914 Assembly instructions

Chauvet
Chauvet Maverick MK2 Wash user manual

Cooper Lighting
Cooper Lighting HALO Series installation instructions

IKEA
IKEA RODRET manual

Seto
Seto ALDEBARAN GLADIUS 2K LED Instructions for use

Lightolier
Lightolier Calculite ProSpec PB1H3870 specification