NEC PX602UL-BK User manual

Projector
PX602UL-WH/PX602UL-BK/
PX602WL-WH/PX602WL-BK
User’s Manual
Model No.
NP-PX602UL-WH/NP-PX602UL-BK/NP-PX602WL-WH/NP-PX602WL-BK

Ver. 1 9/14
• Apple,Mac,MacOS,andMacBookaretrademarksofAppleInc.registeredintheU.S.andothercountries.
• Microsoft,Windows,WindowsVista,Internet Explorer,.NET FrameworkandPowerPointareeitheraregistered
trademarkortrademarkofMicrosoftCorporationintheUnitedStatesand/orothercountries.
• MicroSaverisaregisteredtrademarkofKensingtonComputerProductsGroup,adivisionofACCOBrands.
• Adobe,AdobePDF,AdobeReader,andAcrobatareeitherregisteredtrademarksortrademarksofAdobeSystems
IncorporatedintheUnitedStatesand/orothercountries.
• VirtualRemoteToolusesWinI2C/DDClibrary,©NicomsoftLtd.
• HDMI,theHDMILogoandHigh-DenitionMultimediaInterfacearetrademarksorregisteredtrademarksofHDMI
LicensingLLC.
• DisplayPortandDisplayPortComplianceLogoaretrademarksownedbytheVideoElectronicsStandardsAssocia-
tion.
• HDBaseT™isatrademarkofHDBaseTAlliance.
• DLPandBrilliantColoraretrademarksofTexasInstruments.
• TrademarkPJLinkisatrademarkappliedfortrademarkrightsinJapan,theUnitedStatesofAmericaandother
countriesandareas.
• Wi-Fi®,Wi-FiAlliance®,andWi-FiProtectedAccess(WPA,WPA2)®areregisteredtrademarksoftheWi-FiAlliance.
• Blu-rayisatrademarkofBlu-rayDiscAssociation
• CRESTRONandROOMVIEWareregisteredtrademarksofCrestronElectronics,Inc.intheUnitedStatesandother
countries.
• EthernetiseitheraregisteredtrademarkortrademarkofFujiXeroxCo.,Ltd.
• Otherproductandcompanynamesmentionedinthisuser’smanualmaybethetrademarksorregisteredtrademarks
oftheirrespectiveholders.
• TOPPERSSoftwareLicenses
TheproductincludessoftwarelicensedunderTOPPERSLicense.
Formoreinformationoneachsoftware,see“readme.pdf”insidethe“aboutTOPPERS”folderonthesuppliedCD-
ROM.
NOTES
(1)Thecontentsofthisuser’smanualmaynotbereprintedinpartorwholewithoutpermission.
(2)Thecontentsofthisuser’smanualaresubjecttochangewithoutnotice.
(3)Greatcarehasbeentakeninthepreparationofthisuser’smanual;however,shouldyounoticeanyquestionable
points,errorsoromissions,pleasecontactus.
(4)Notwithstandingarticle(3),NECwillnotberesponsibleforanyclaimsonlossofprotorothermattersdeemed
toresultfromusingtheProjector.

i
Important Information
Safety Cautions
Precautions
PleasereadthismanualcarefullybeforeusingyourNECprojectorandkeepthemanualhandyforfuturereference.
CAUTION
Toturnoffmainpower,besuretoremovetheplugfrompoweroutlet.
Thepoweroutletsocketshouldbeinstalledasneartotheequipmentaspossible,andshouldbeeasily
accessible.
CAUTION
TOPREVENTSHOCK,DONOTOPENTHECABINET.
THEREAREHIGH-VOLTAGECOMPONENTSINSIDE.
REFERSERVICINGTOQUALIFIEDSERVICEPERSONNEL.
Thissymbolwarnstheuserthatuninsulatedvoltagewithintheunitmaybesufcienttocauseelectrical
shock.Therefore,itisdangeroustomakeanykindofcontactwithanypartinsideoftheunit.
Thissymbolalertstheuserthatimportantinformationconcerningtheoperationandmaintenanceofthis
unithasbeenprovided.
Theinformationshouldbereadcarefullytoavoidproblems.
WARNING:TOPREVENTFIREORSHOCK,DONOTEXPOSETHISUNITTORAINORMOISTURE.
DONOTUSETHISUNIT’SPLUGWITHANEXTENSIONCORDORINANOUTLETUNLESSALLTHEPRONGS
CANBEFULLYINSERTED.
DOC Compliance Notice (for Canada only)
ThisClassBdigitalapparatuscomplieswithCanadianICES-003.
Machine Noise Information Regulation - 3. GPSGV,
Thehighestsoundpressurelevelislessthan70dB(A)inaccordancewithENISO7779.
CAUTION
Avoiddisplayingstationaryimagesforaprolongedperiodoftime.
DoingsocanresultintheseimagesbeingtemporarilysustainedonthesurfaceoftheLCDpanel.
Ifthisshouldhappen,continuetouseyourprojector.Thestaticbackgroundfrompreviousimageswill
disappear.
Disposing of your used product
EU-widelegislationasimplementedineachMemberStaterequiresthatusedelectricalandelectronicprod-
uctscarryingthemark(left)mustbedisposedofseparatelyfromnormalhouseholdwaste.Thisincludes
projectorsandtheirelectricalaccessoriesorlamps.Whenyoudisposeofsuchproducts,pleasefollowthe
guidanceofyourlocalauthorityand/orasktheshopwhereyoupurchasedtheproduct.
Aftercollectingtheusedproducts,theyarereusedandrecycledinaproperway.Thiseffortwillhelpus
reducethewastesaswellasthenegativeimpactsuchasmercurycontainedinalamptothehumanhealth
andtheenvironmentattheminimumlevel.
ThemarkontheelectricalandelectronicproductsonlyappliestothecurrentEuropeanUnionMemberStates.

ii
Important Information
WARNING TO CALIFORNIA RESIDENTS:
Handlingthecablessuppliedwiththisproductwillexposeyoutolead,achemicalknowntotheStateofCalifornia
tocausebirthdefectsorotherreproductiveharm.WASHHANDSAFTERHANDLING.
RF Interference (for USA only)
WARNING
TheFederalCommunicationsCommissiondoesnotallowanymodicationsorchangestotheunitEXCEPTthose
speciedbyNECDisplaySolutionsofAmerica,Inc.inthismanual.Failuretocomplywiththisgovernmentregu-
lationcouldvoidyourrighttooperatethisequipment.Thisequipmenthasbeentestedandfoundtocomplywith
thelimitsforaClassBdigitaldevice,pursuanttoPart15oftheFCCRules.Theselimitsaredesignedtoprovide
reasonableprotectionagainstharmfulinterferenceinaresidentialinstallation.Thisequipmentgenerates,uses,and
canradiateradiofrequencyenergyand,ifnotinstalledandusedinaccordancewiththeinstructions,maycause
harmfulinterferencetoradiocommunications.However,thereisnoguaranteethatinterferencewillnotoccurina
particularinstallation.
Ifthisequipmentdoescauseharmfulinterferencetoradioortelevisionreception,whichcanbedeterminedby
turningtheequipmentoffandon,theuserisencouragedtotrytocorrecttheinterferencebyoneormoreofthe
followingmeasures:
• Reorientorrelocatethereceivingantenna.
• Increasetheseparationbetweentheequipmentandreceiver.
• Connecttheequipmentintoanoutletonacircuitdifferentfromthattowhichthereceiverisconnected.
• Consultthedealeroranexperiencedradio/TVtechnicianforhelp.
ForUKonly:InUK,aBSapprovedpowercordwithmouldedplughasaBlack(veAmps)fuseinstalledforusewith
thisequipment.Ifapowercordisnotsuppliedwiththisequipmentpleasecontactyoursupplier.
Important Safeguards
Thesesafetyinstructionsaretoensurethelonglifeofyourprojectorandtopreventreandshock.Pleasereadthem
carefullyandheedallwarnings.
Installation
• Donotplacetheprojectorinthefollowingconditions:
- onanunstablecart,stand,ortable.
- nearwater,baths,ordamprooms.
- indirectsunlight,nearheaters,orheatradiatingappliances.
- inadusty,smokyorsteamyenvironment.
- onasheetofpaperorcloth,rugsorcarpets.
• Ifyouwishtohavetheprojectorinstalledontheceiling:
- Donotattempttoinstalltheprojectoryourself.
- Theprojectormustbeinstalledbyqualiedtechniciansinordertoensureproperoperationandreducetherisk
ofbodilyinjury.
- Inaddition,theceilingmustbestrongenoughtosupporttheprojectorandtheinstallationmustbeinaccordance
withanylocalbuildingcodes.
- Pleaseconsultyourdealerformoreinformation.

iii
Important Information
WARNING
• Donotplaceanyobjects,whichareeasilyaffectedbyheat,infrontoftheprojectorlens.Doingsocouldlead
totheobjectmeltingfromtheheatthatisemittedfromthelightoutput.
Donotusetheprojectorwithitleaningtotheleftandright.Thismayresultinamalfunction,however,portraitinstal-
lation*ispossible.Forportraitinstallation,installtheprojectorwiththeintakeventatthebottom.Observeprecautions
forportraitinstallation.
* Acustomizedstandandasafetycover(soldseparately)needtobeattachedtotheprojector.(→page136)
Fire and Shock Precautions
• Ensurethatthereissufcientventilationandthatventsareunobstructedtopreventthebuild-upofheatinsideyour
projector.Allowenoughspacebetweenyourprojectorandawall.(→pagevii)
• Donottrytotouchtheexhaustventontheleftfront(whenseenfromthefront)asitcanbecomeheatedwhilethe
projectoristurnedonandimmediatelyaftertheprojectoristurnedoff.Partsoftheprojectormaybecometemporarily
heatediftheprojectoristurnedoffwiththePOWERbuttonoriftheACpowersupplyisdisconnectedduringnormal
projectoroperation.
Usecautionwhenpickinguptheprojector.
• Preventforeignobjectssuchaspaperclipsandbitsofpaperfromfallingintoyourprojector.Donotattempttoretrieve
anyobjectsthatmightfallintoyourprojector.Donotinsertanymetalobjectssuchasawireorscrewdriverintoyour
projector.Ifsomethingshouldfallintoyourprojector,disconnectitimmediatelyandhavetheobjectremovedbya
qualiedservicepersonnel.
• Donotplaceanyobjectsontopoftheprojector.
• Donottouchthepowerplugduringathunderstorm.Doingsocancauseelectricalshockorre.
• Theprojectorisdesignedtooperateonapowersupplyof100-240VAC50/60Hz.Ensurethatyourpowersupply
tsthisrequirementbeforeattemptingtouseyourprojector.
• Donotlookintothelenswhiletheprojectorison.Seriousdamagetoyoureyescouldresult.
• Donotlookintothelightsourceusingopticalinstruments(suchasmagnifyingglassesandmirrors).Visualimpair-
mentcouldresult.
• Whenturningontheprojector,makesurenoonewithinprojectionrangeislookingatthelens.
• Keepanyitems(magnifyingglassetc.)outofthelightpathoftheprojector.Thelightpathbeingprojectedfromthe
lensisextensive,thereforeanykindofabnormalobjectsthatcanredirectlightcomingoutofthelens,cancause
anunpredictableoutcomesuchasareorinjurytotheeyes.
• Donotplaceanyobjects,whichareeasilyaffectedbyheat,infrontofaprojectorexhaustvent.
Doingsocouldleadtotheobjectmeltingorgettingyourhandsburnedfromtheheatthatisemittedfromtheexhaust
vent.

iv
Important Information
• Handlethepowercordcarefully.Adamagedorfrayedpowercordcancauseelectricshockorre.
- Donotuseanypowercordotherthantheonesuppliedwiththeprojector.
- Donotbendortugthepowercordexcessively.
- Donotplacethepowercordundertheprojector,oranyheavyobject.
- Donotcoverthepowercordwithothersoftmaterialssuchasrugs.
- Donotheatthepowercord.
- Donothandlethepowerplugwithwethands.
• Turnofftheprojector,unplugthepowercordandhavetheprojectorservicedbyaqualiedservicepersonnelunder
thefollowingconditions:
- Whenthepowercordorplugisdamagedorfrayed.
- Ifliquidhasbeenspilledintotheprojector,orifithasbeenexposedtorainorwater.
- Iftheprojectordoesnotoperatenormallywhenyoufollowtheinstructionsdescribedinthisuser’smanual.
- Iftheprojectorhasbeendroppedorthecabinethasbeendamaged.
- Iftheprojectorexhibitsadistinctchangeinperformance,indicatinganeedforservice.
• Disconnectthepowercordandanyothercablesbeforecarryingtheprojector.
• Turnofftheprojectorandunplugthepowercordbeforecleaningthecabinet.
• Turnofftheprojectorandunplugthepowercordiftheprojectorisnottobeusedforanextendedperiodoftime.
• WhenusingaLANcable:
Forsafety,donotconnecttotheterminalforperipheraldevicewiringthatmighthaveexcessivevoltage.
CAUTION
• Donotplaceyourngersinsidethelenshoodwhileperformingalensshift.Failuretodosocouldresultinngers
beingpinchedbetweenthecabinetandlens.
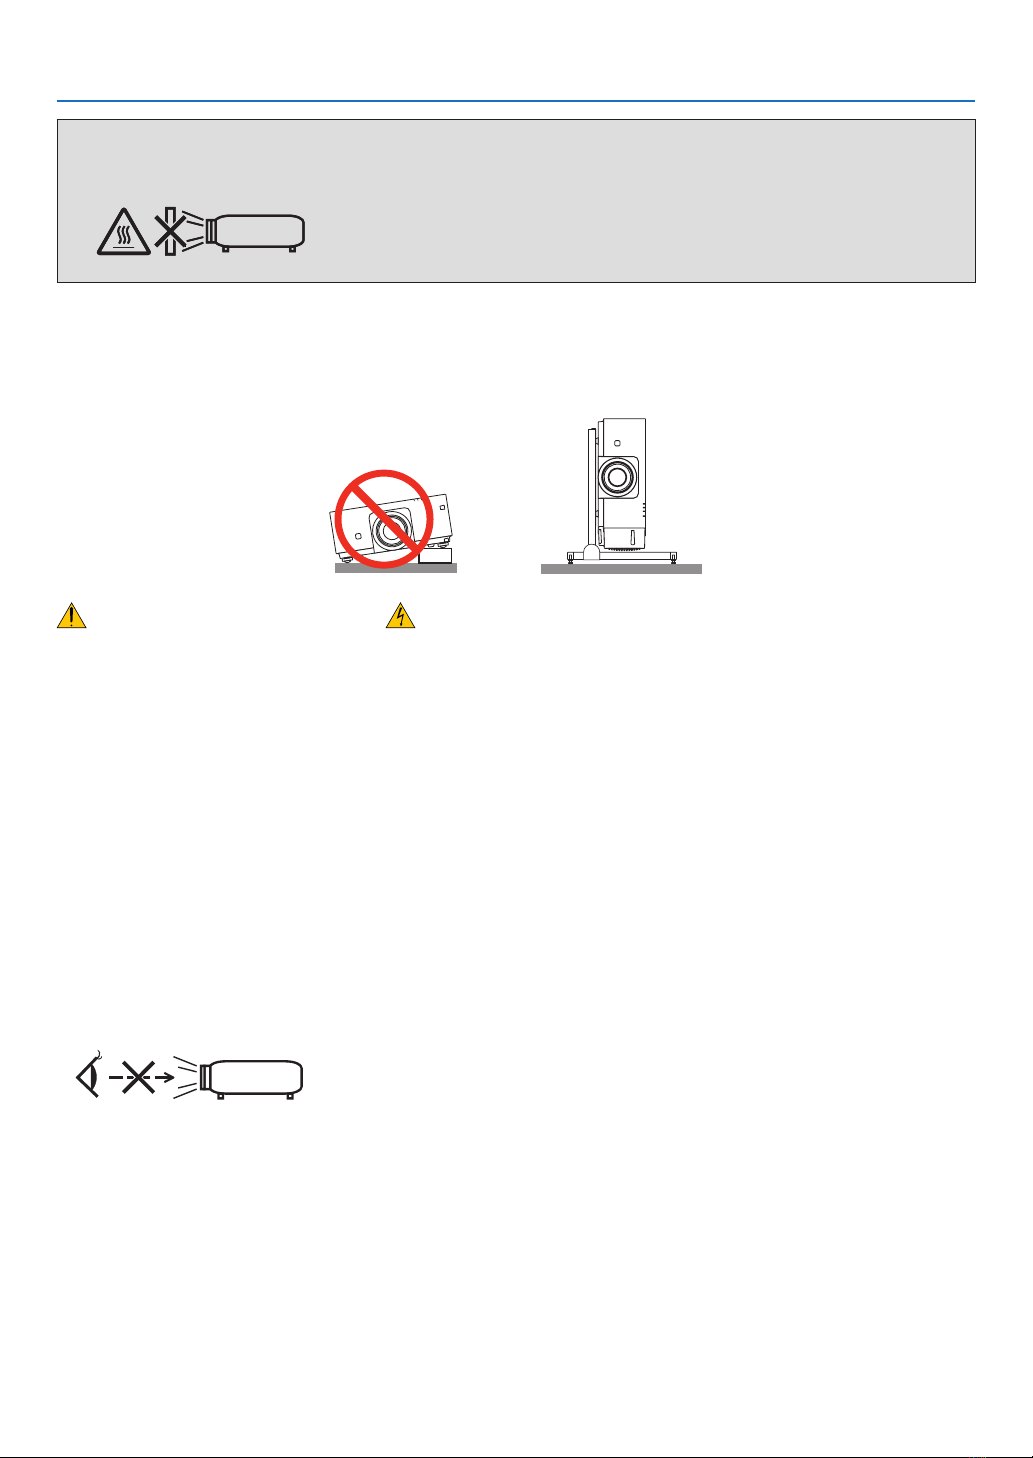
• Donotusethetilt-footforpurposesotherthanoriginallyintended.Misusessuchasgrippingthetilt-footorhang-
ingonthewallcancausedamagetotheprojector.
• Donotsendtheprojectorinthesoftcasebyparceldeliveryserviceorcargoshipment.Theprojectorinsidethe
softcasecouldbedamaged.
• Select[HIGH]inFanmodeifyoucontinuetousetheprojectorforconsecutivedays.(Fromthemenu,select
[SETUP]→[OPTIONS(1)]→[FANMODE]→[MODE]→[HIGH].)
• Donotbringtheprojectorholdingitbythelenshood.Theprojectormaybedroppeddownanditmaybecause
ofhumaninjury.
• Ifasafetycover(soldseparately)isused,donotcarrytheprojectorbythecover.Thesafetycovercancomeoff
andtheprojectormaybedropped,causingpersonalinjury.
• Donotunplugthepowercordfromthewalloutletorprojectorwhentheprojectorispoweredon.Doingsocan
causedamagetotheACINterminaloftheprojectorand(or)theprongplugofthepowercord.
ToturnofftheACpowersupplywhentheprojectorispoweredon,usetheprojector’smainpowerswitch,apower
stripequippedwithaswitch,orabreaker.
Caution on Handling the Optional Lens
Whenshippingtheprojectorwiththelens,removethelensbeforeshippingtheprojector.Alwaysattachthedustcap
tothelenswheneveritisnotmountedontheprojector.Thelensandthelensshiftmechanismmayencounterdamage
causedbyimproperhandlingduringtransportation.
Donotholdthelenspartwhencarryingtheprojector.
Doingsocouldcausethefocusringtorotate,resultinginaccidentaldroppingoftheprojector.
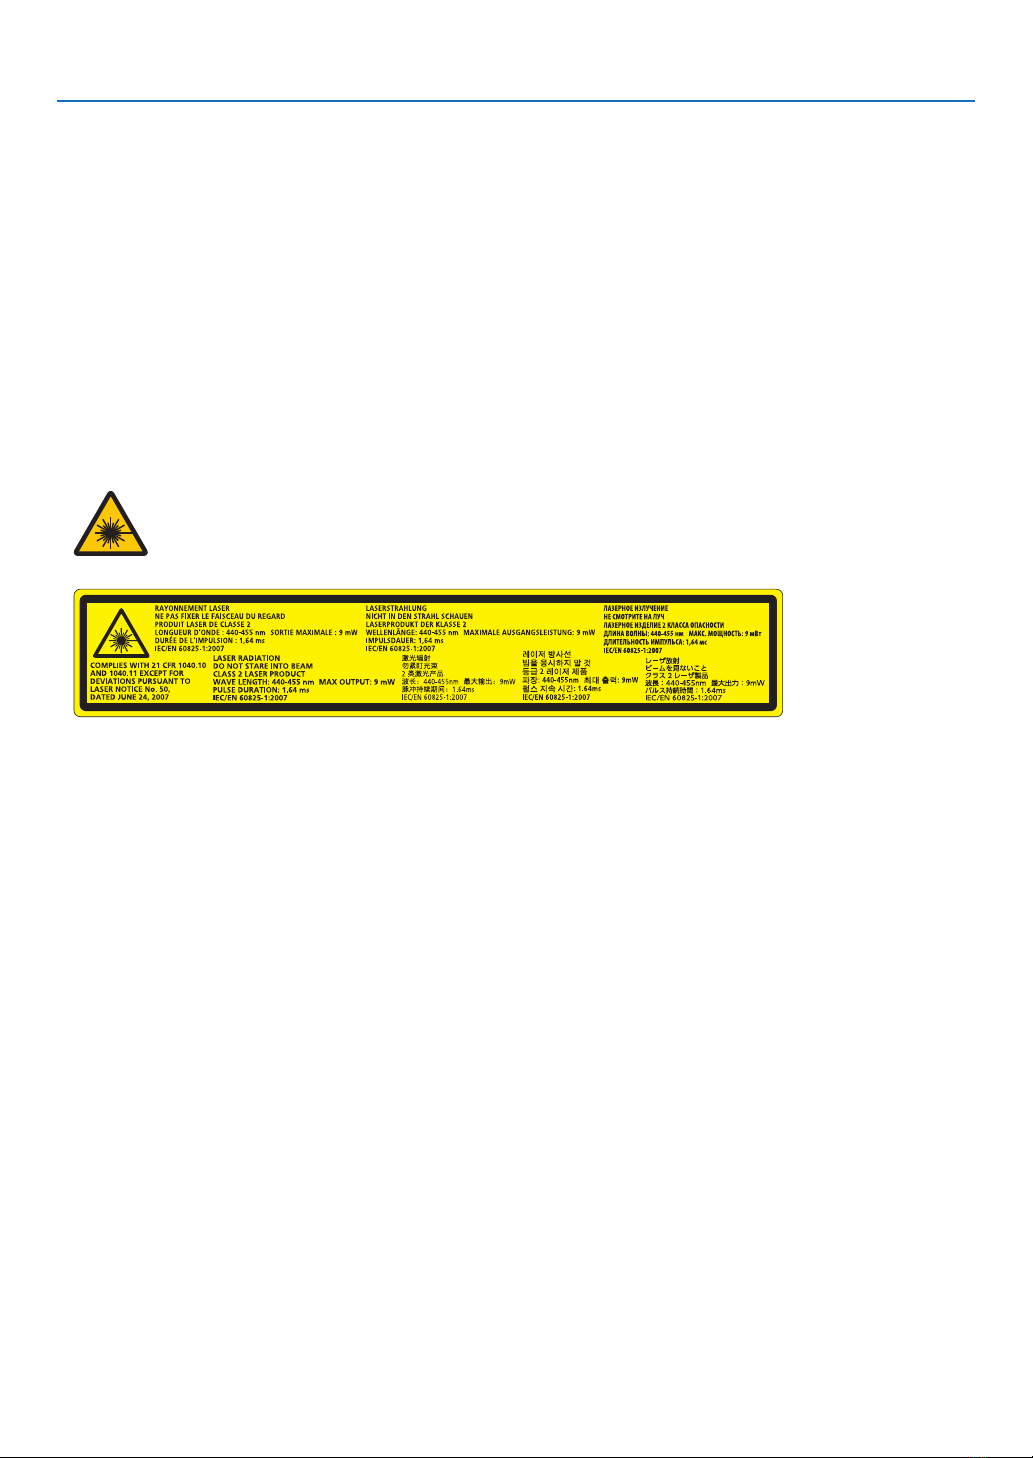
Remote Control Precautions
• Handletheremotecontrolcarefully.
• Iftheremotecontrolgetswet,wipeitdryimmediately.
• Avoidexcessiveheatandhumidity.
• Donotshort,heat,ortakeapartbatteries.
• Donotthrowbatteriesintore.
• Ifyouwillnotbeusingtheremotecontrolforalongtime,removethebatteries.
• Ensurethatyouhavethebatteries’polarity(+/−)alignedcorrectly.
• Donotusenewandoldbatteriestogether,orusedifferenttypesofbatteriestogether.
• Disposeofusedbatteriesaccordingtoyourlocalregulations.

v
Important Information
Light Module
1. Alightmodulecontainingmultiplelaserdiodesisequippedintheproductasthelightsource.
2. Theselaserdiodesaresealedinthelightmodule.Nomaintenanceorserviceisrequiredfortheperformanceof
thelightmodule.
3. Enduserisnotallowedtoreplacethelightmodule.
4. Contactqualieddistributorforlightmodulereplacementandfurtherinformation.
Laser Safety Caution
• ThisproductisclassiedasClass2ofIEC60825-1Secondedition2007-03.
AlsocomplieswithFDAperformancestandards21CFR1040.10and1040.11forlaserproductsexceptfordevia-
tionspursuanttoLaserNoticeNo.50,datedJune24,2007.
Obeythelawsandregulationsofyourcountryinrelationtotheinstallationandmanagementofthedevice.
• Thelasermoduleisequippedinthisproduct.
Useofcontrolsoradjustmentsofproceduresotherthanthosespeciedhereinmayresultinhazardousradiation
exposure.
DONOTSTAREINTOTHELENSWHILEINUSE.
• Thiscautionlabelsareonthesidefaceofthecabinet.
TheexplanatorylabeloftheCLASS2LASERPRODUCTSisontherightsideoftheprojectorbody.
About High Altitude mode
• Set[FANMODE]to[HIGH]whenusingtheprojectorataltitudesapproximately2500feet/760metersorhigher.
Usingtheprojectorataltitudesapproximately2500feet/760metersorhigherwithoutsettingto[HIGH]cancause
theprojectortooverheatandtheprotectorcouldshutdown.Ifthishappens,waitacoupleminutesandturnonthe
projector.
• Usingtheprojectorataltitudesapproximately2500feet/760metersorhighercanshortenthelifeofopticalcompo-
nentssuchasthelightmodule.
About Copyright of original projected pictures:
Pleasenotethatusingthisprojectorforthepurposeofcommercialgainortheattractionofpublicattentioninavenue
suchasacoffeeshoporhotelandemployingcompressionorexpansionofthescreenimagewiththefollowingfunc-
tionsmayraiseconcernabouttheinfringementofcopyrightswhichareprotectedbycopyrightlaw.
[ASPECTRATIO],[KEYSTONE],Magnifyingfeatureandothersimilarfeatures.
Turkish RoHS information relevant for Turkish market
EEE Yönetmeliğine Uygundur.
Thisdeviceisnotintendedforuseinthedirecteldofviewatvisualdisplayworkplaces.Toavoidincommodingreec-
tionsatvisualdisplayworkplacesthisdevicemustnotbeplacedinthedirecteldofview.

vi
Important Information
Health precautions to users viewing 3D images
Beforeviewing,besuretoreadhealthcareprecautionsthatmaybefoundintheuser’smanualincludedwithyour3D
eyeglassesoryour3DcompatiblecontentsuchasBlu-rayDiscs,videogames,computer’svideolesandthelike.
Toavoidanyadversesymptoms,heedthefollowing:
• Donotuse3Deyeglassesforviewinganymaterialotherthan3Dimages.
• Allowadistanceof2m/7feetorgreaterbetweenthescreenandauser.Viewing3Dimagesfromtooclosea
distancecanstrainyoureyes.
• Avoidviewing3Dimagesforaprolongedperiodoftime.Takeabreakof15minutesorlongeraftereveryhour
ofviewing.
• Ifyouoranymemberofyourfamilyhasahistoryoflight-sensitiveseizures,consultadoctorbeforeviewing3D
images.
• Whileviewing3Dimages,ifyougetsicksuchasnausea,dizziness,queasiness,headache,eyestrain,blurry
vision,convulsions,andnumbness,stopviewingthem.Ifsymptomsstillpersist,consultadoctor.
• View3Dimagesfromthefrontofthescreen.Viewingfromananglemaycausefatigueoreyestrain.
Replacing the light source
• Thelaserlightsourceofthisdeviceisratedfor20,000hours*ofuse.Theservicelifeoflightsourcecanbeaffected
bytheusageenvironment.ContacttheNECcustomerservicesupportcentertopurchaseareplacementlightsource.
* Itisthenominalhoursby50%brightnessreductionoftheindependentlaserlightsource,anditisnotguaranteed.
Power management function
Inordertokeeppowerconsumptionlow,thefollowingpowermanagementfunctions(1)and(2)havebeensetwhen
shippedfromthefactory.Pleasedisplaytheon-screenmenuandchangethesettings(1)and(2)accordingtothe
aimofusingtheprojector.
1. STANDBY MODE (Factory preset: NORMAL)
• When[NORMAL]isselectedfor[STANDBYMODE],thefollowingterminalsandfunctionswillnotwork:
HDMIOUTterminal,Ethernet/HDBaseTPort,USBPort,LANfunctions,MailAlertfunction
(→page114)
2. AUTO POWER OFF (Factory preset: 1 hour)
• When[1:00]isselectedfor[AUTOPOWEROFF],youcanenabletheprojectortoautomaticallyturnoffin1
hourifthereisnosignalreceivedbyanyinputorifnooperationisperformed.
(→page115)

vii
Important Information
Clearance for Installing the Projector
Allowampleclearancebetweentheprojectoranditssurroundingsasshownbelow.
Thehightemperatureexhaustcomingoutofthedevicemaybesuckedintothedeviceagain.
AvoidinstallingtheprojectorinaplacewhereairmovementfromtheHVACisdirectedattheprojector.
HeatedairfromtheHVACcanbetakeninbytheprojector'sintakevent.Ifthishappens,thetemperatureinsidethe
projectorwillrisetoohighcausingtheover-temperatureprotectortoautomaticallyturnofftheprojectorspower.
Example 1 – If there are walls on both sides of the projector.
30cm/11.8"orgreater 30cm/11.8"orgreater
IntakeventExhaustvent
NOTE:
The drawing shows the proper clearance required for the front, back and top of the projector.
Example 2 – In the case of portrait projection.
Intakevent
Safetycover
30cm/11.8"orgreater
NOTE:
• Thedrawingshowstheproperclearancerequiredforthefront,backandtopoftheprojector.
• Seepage135 for an installation example on portrait projection.

viii
Table of Contents
Important Information............................................................................................ i
1. Introduction...........................................................................................................1
❶What’sintheBox?..........................................................................................................1
❷IntroductiontotheProjector ...........................................................................................2
CongratulationsonYourPurchaseoftheProjector ..................................................2
General .....................................................................................................................2
Lightsource·Brightness ..........................................................................................2
Installation.................................................................................................................2
Videos.......................................................................................................................3
Network.....................................................................................................................3
Energy-saving ...........................................................................................................3
Aboutthisuser’smanual...........................................................................................4
❸PartNamesoftheProjector ...........................................................................................5
Front/Top...................................................................................................................5
Rear ..........................................................................................................................6
Controls/IndicatorPanel............................................................................................7
TerminalsFeatures ...................................................................................................8
❹PartNamesoftheRemoteControl ................................................................................9
BatteryInstallation ..................................................................................................10
RemoteControlPrecautions...................................................................................10
OperatingRangeforWirelessRemoteControl.......................................................11
UsingtheRemoteControlinWiredOperation........................................................11
2. Projecting an Image (Basic Operation) ...............................................12
❶FlowofProjectinganImage .........................................................................................12
❷ConnectingYourComputer/ConnectingthePowerCord..............................................13
❸TurningontheProjector ...............................................................................................14
NoteonStartupscreen(MenuLanguageSelectscreen).......................................15
❹SelectingaSource .......................................................................................................16
Selectingthecomputerorvideosource..................................................................16
❺AdjustingthePictureSizeandPosition ........................................................................18
Adjustingtheverticalpositionofaprojectedimage(Lensshift).............................19
Focus ......................................................................................................................21
Zoom.......................................................................................................................21
AdjustingtheTiltFoot .............................................................................................22
❻OptimizingComputerSignalAutomatically ..................................................................23
AdjustingtheImageUsingAutoAdjust...................................................................23
❼TurningofftheProjector ...............................................................................................24
❽AfterUse.......................................................................................................................25
3. Convenient Features......................................................................................26
❶Turnoffthelightoftheprojector(LENSSHUTTER) ....................................................26
❷TurningofftheImage....................................................................................................26
❸TurningOfftheOn-ScreenMenu(On-ScreenMute)....................................................26
❹FreezingaPicture ........................................................................................................27
❺MagnifyingaPicture.....................................................................................................28

ix
Table of Contents
❻ChangingLIGHTMODE/CheckingEnergy-SavingEffectUsingLIGHTMODE
[LIGHTMODE]........................................................................................................29
CheckingEnergy-SavingEffect[CARBONMETER] ..............................................31
❼CorrectingHorizontalandVerticalKeystoneDistortion[CORNERSTONE] .................32
❽PreventingtheUnauthorizedUseoftheProjector[SECURITY] ..................................35
❾Projecting3Dvideos.....................................................................................................38
Proceduretowatch3Dvideosusingthisprojector.................................................38
Whenvideoscannotbeviewedin3D.....................................................................41
❿ControllingtheProjectorbyUsinganHTTPBrowser ..................................................42
4. Multi-Screen Projection ...............................................................................48
❶Thingsthatcanbedoneusingmulti-screenprojection ................................................48
Case1.Usingasingleprojectortoprojecttwotypesofvideos[PIP/PICTURE
BYPICTURE] .........................................................................................................48
Case2.Usingfourprojectors(resolution:WUXGA)toprojectvideoswitha
resolutionof2560×1600pixels[TILING]...............................................................49
Thingstonotewheninstallingprojectors................................................................51
❷DisplayingTwoPicturesattheSameTime...................................................................52
Projectingtwoscreens............................................................................................53
Switchingthemaindisplaywiththesub-displayandviceversa .............................54
Restrictions .............................................................................................................55
❸DisplayingaPictureUsing[EDGEBLENDING] ...........................................................56
Settingtheoverlapofprojectionscreens................................................................57
BlackLevelAdjustment...........................................................................................60
5. Using On-Screen Menu.................................................................................62
❶UsingtheMenus...........................................................................................................62
❷MenuElements.............................................................................................................63
❸ListofMenuItems ........................................................................................................64
❹MenuDescriptions&Functions[INPUT]......................................................................70
HDMI.......................................................................................................................70
DisplayPort..............................................................................................................70
BNC ........................................................................................................................70
BNC(CV).................................................................................................................70
BNC(Y/C)................................................................................................................70
COMPUTER ...........................................................................................................70
HDBaseT ................................................................................................................70
SLOT.......................................................................................................................70
ENTRYLIST ...........................................................................................................70
TESTPATTERN......................................................................................................70
❺MenuDescriptions&Functions[ADJUST]...................................................................74
[PICTURE] ..............................................................................................................74
[IMAGEOPTIONS] .................................................................................................78
[VIDEO]...................................................................................................................82
[3DSETTINGS] ......................................................................................................84
❻MenuDescriptions&Functions[DISPLAY]..................................................................85
[PIP/PICTUREBYPICTURE].................................................................................85
[GEOMETRICCORRECTION]...............................................................................87
[EDGEBLENDING] ................................................................................................91

x
Table of Contents
[MULTISCREEN]....................................................................................................92
❼MenuDescriptions&Functions[SETUP].....................................................................94
[MENU] ...................................................................................................................94
[INSTALLATION] .....................................................................................................96
[CONTROL] ............................................................................................................99
[NETWORKSETTINGS].......................................................................................107
[SOURCEOPTIONS] ...........................................................................................112
[POWEROPTIONS] .............................................................................................114
ReturningtoFactoryDefault[RESET] ..................................................................116
❽MenuDescriptions&Functions[INFO.] .....................................................................117
[USAGETIME] ......................................................................................................117
[SOURCE(1)] ........................................................................................................117
[SOURCE(2)] ........................................................................................................118
[SOURCE(3)] ........................................................................................................118
[SOURCE(4)] ........................................................................................................118
[WIREDLAN]........................................................................................................119
[VERSION(1)] .......................................................................................................119
[OTHERS] .............................................................................................................119
[HDBaseT] ............................................................................................................120
6. Connecting to Other Equipment ...........................................................121
❶Mountingalens(soldseparately)...............................................................................121
PartNamesoftheLensMount .............................................................................121
Mountingthelens..................................................................................................122
Removingthelens ................................................................................................124
❷MakingConnections...................................................................................................125
AnalogRGBsignalconnection .............................................................................125
DigitalRGBsignalconnection ..............................................................................126
ConnectinganExternalMonitor ...........................................................................129
ConnectingYourBlu-rayPlayerorOtherAVEquipment.......................................130
ConnectingComponentInput ...............................................................................131
ConnectingHDMIInput.........................................................................................132
ConnectingtoaWiredLAN ..................................................................................133
ConnectingtoaHDBaseTtransmissiondevice(soldcommercially)....................134
Portraitprojection(verticalorientation) .................................................................135
Stackingprojectors ...............................................................................................138
7. Maintenance .....................................................................................................141
❶CleaningtheLens.......................................................................................................141
❷CleaningtheCabinet..................................................................................................141
8. User Supportware..........................................................................................142
❶OperatingEnvironmentforSoftwareIncludedonCD-ROM .......................................142
NamesandFeaturesofBundledSoftwarePrograms...........................................142
Downloadservice .................................................................................................142
OperatingEnvironment .........................................................................................142
❷InstallingSoftwareProgram .......................................................................................143
InstallationforWindowssoftware..........................................................................143
❸OperatingtheProjectorViatheLAN(VirtualRemoteTool)........................................146
ConnecttheprojectortoaLAN.............................................................................147

xi
Table of Contents
❹ControllingtheProjectoroveraLAN(PCControlUtilityPro4/Pro5) ........................149
9. Appendix..............................................................................................................153
❶Throwdistanceandscreensize .................................................................................153
Lenstypesandthrowdistance .............................................................................153
Tablesofscreensizesanddimensions ................................................................155
Lensshiftingrange................................................................................................156
❷MountingtheOptionalBoard(soldseparately) ..........................................................157
❸CompatibleInputSignalList.......................................................................................159
❹Specications .............................................................................................................162
❺CabinetDimensions ...................................................................................................165
❻Pinassignmentsandsignalnamesofmainterminals ...............................................166
❼Troubleshooting ..........................................................................................................168
IndicatorMessages...............................................................................................168
CommonProblems&Solutions ............................................................................170
Ifthereisnopicture,orthepictureisnotdisplayedcorrectly................................172
❽PCControlCodesandCableConnection ..................................................................173
❾TroubleshootingCheckList.........................................................................................174

1
1. Introduction
❶What’s in the Box?
Makesureyourboxcontainseverythinglisted.Ifanypiecesaremissing,contactyourdealer.
Pleasesavetheoriginalboxandpackingmaterialsifyoueverneedtoshipyourprojector.
Projector
Dustcapforlens
* Theprojectorisshippedwithout
alens.Forthetypesoflensand
throwdistances,seepage153.
Remotecontrol
(7N901041)
AAalkalinebatteries(x2)
Powercord
(US:79TG0251)
(EU:79TG0261)
3Stackingholders(79TG0291)
Whenstackingprojectors(doublestacking),thetiltfootoftheupper
projectorwillbeplacedontothesestackingholders.(→page139)
For North America only
Limitedwarranty
For customers in Europe:
YouwillndourcurrentvalidGuar-
anteePolicyonourWebSite:
www.nec-display-solutions.com
• ImportantInfomation
(7N8N5111)
• QuickSetupGuide(7N8N5131)
• SecuritySticker
(Usethisstickerwhensecurity
passwordisseton.)
NECProjectorCD-ROM
User’smanual(PDF)andthe
utilitysoftware
(7N952061)

2
1. Introduction
❷Introduction to the Projector
Thissectionintroducesyoutoyournewprojectoranddescribesthefeaturesandcontrols.
Congratulations on Your Purchase of the Projector
Thisprojectorisoneoftheverybestprojectorsavailabletoday.Theprojectorenablesyoutoprojectpreciseimages
upto500inchesacross(measureddiagonally)fromyourPCorMaccomputer(desktopornotebook),VCR,Blu-ray
player,ordocumentcamera.
Youcanusetheprojectoronatabletoporcart,youcanusetheprojectortoprojectimagesfrombehindthescreen,
andtheprojectorcanbepermanentlymountedonaceiling*1.Theremotecontrolcanbeusedwirelessly.
*1 Donotattempttomounttheprojectoronaceilingyourself.
Theprojectormustbeinstalledbyqualiedtechniciansinordertoensureproperoperationandreducetherisk
ofbodilyinjury.
Inaddition,theceilingmustbestrongenoughtosupporttheprojectorandtheinstallationmustbeinaccordance
withanylocalbuildingcodes.Pleaseconsultyourdealerformoreinformation.
General
• Single-chipDLPprojectorwithhighresolutionandhighbrightness
Modelname DMDpanel Resolution Aspectratio
PX602UL-WH/PX602UL-BK 0.67type 1,920×1,200pixels 16:10
PX602WL-WH/PX602WL-BK 0.65type 1,280×800pixels 16:10
Light source · Brightness
• Along-lifelaserdiodeisequippedinthelightmodule
Theproductcanbeoperatedatlowcostbecausethelaserlightsource(ratedfor20,000hoursofuse*)canbe
usedforalongtimewithoutrequiringreplacementormaintenance.
* Itisthenominalhoursby50%brightnessreductionoftheindependentlaserlightsource,anditisnotguar-
anteed.
• Brightnesscanbeadjustedwithinawiderange
Unlikewithordinarylightsources,thebrightnesscanbeadjustedfrom20to100%in1%increments.
• [CONSTANTBRIGHTNESS]mode
Brightnessnormallydecreaseswithuse,butbyselecting[CONSTANTBRIGHTNESS]mode,sensorsinsidethe
projectordetectandautomaticallyadjusttheoutput,therebymaintainingconstantbrightnessthroughoutthelife
ofthelightmodule.
However,ifbrightnessoutputissetatthemaximum,brightnesswilldecreasewithuse.
Installation
• Widerangeofoptionallensesselectableaccordingtotheplaceofinstallation
Thisprojectorsupports4types,howeverPX602UL-WHandPX602UL-BKsupport3typesofoptionallenses,
providingaselectionoflensesadaptedtoavarietyofplacesofinstallationandprojectionmethods.
Inaddition,thelensescanbemountedandremovedinonetouch.
Notethatnolensismounteduponshipmentfromthefactory.Pleasepurchaseoptionallensesseparately.
• Tilt-free,portraitprojection
Thisprojectorcanbesettoanyanglewithinavertical360°range.
Itcanalsorotatethepicture90°intoportraitorientation.
Thisprojectorcannotbeinstalledwithrightorleftslantbesidestheportraitprojection.
• Doublestackableforhighlightoutputprojection
Bystacking2projectors,increasedbrightnessonalargescreenispossible.

3
1. Introduction
• Powerlenscontrolforquickandeasyadjustment
Byusingbuttonsontheprojectorortheremotecontrol,zoom,focus,andposition(lensshift)canbeadjusted.
Videos
• Widerangeofinput/outputterminals(HDMI,DisplayPort,BNC,HDBaseT,etc.)andbuilt-inmonauralspeaker
Theprojectorisequippedwithavarietyofinput/outputterminals:HDMI,DisplayPort,BNC(5-core),computer
(analog),HDBaseT,etc.
Theprojector’sHDMIinput/outputterminalsandDisplayPortinputterminalsupportHDCP.
HDBaseT,promotedandadvancedbytheHDBaseTAlliance,isaconsumerelectronic(CE)andcommercialcon-
nectivitytechnology.
• Slotforoptionalboard
Thisprojectorhasaslotforoptionalboards(soldseparately).
• Simultaneousdisplayof2images(PIP/PICTUREBYPICTURE)
Twoimagescanbeprojectedsimultaneouslywithasingleprojector.
Therearetwotypesoflayoutsforthetwoimages:“picture-in-picture”(PIP)inwhichasub-pictureisdisplayed
onthemainpicture,and“picture-by-picture”(PICTUREBYPICTURE)inwhichthemainandsubpicturesare
displayednexttoeachother.
• Multi-screenprojectionusingmultipleprojectors
ThisprojectorisequippedwithmultipleHDMIinput&outputterminalsthatcanconnectmultipleprojectorsina
daisychain.Ahighqualitypictureisachievedbydividingandprojectinghighresolutionvideosamongthevarious
projectors.
Furthermore,theboundariesofthescreensaresmoothedusinganedgeblendingfunction.
• SupportsHDMI3Dformat
Thisprojectorcanbeusedtowatchvideosin3Dusingcommercially-availableactiveshutter-type3Deyewear
and3DemittersthatsupportXpand3D.
Network
• Convenientutilitysoftware(UserSupportware)providedasstandard
ThethreeutilitysoftwarestoredintheenclosedNECProjectorCD-ROM(VirtualRemoteTool,PCControlUtility
Pro4(forWindows)andPCControlUtilityPro5(forMacOS))canbeused.
• CRESTRONROOMVIEWcompatible
ThisprojectorsupportsCRESTRONROOMVIEW,allowingmultipledevicesconnectedtothenetworktobeman-
agedfromacomputerorcontroller.
Energy-saving
• Energy-savingdesignwithastandbypowerconsumptionof0.5watts
Whentheon-screenmenu’sstandbymodeissetto“NORMAL”,thepowerconsumptioninthestandbymodeis
0.5watts.
• “LIGHTMODE”forlowpowerconsumptionand“CarbonMeter”display
Theprojectorisequippedwithan“LIGHTMODE”forreducingpowerconsumptionduringuse.Furthermore,the
power-savingeffectwhentheLIGHTMODEissetisconvertedintotheamountofreductionsofCO2emissions
andthisisindicatedontheconrmationmessagedisplayedwhenthepoweristurnedoffandat“Information”on
theon-screenmenu(CARBONMETER).

4
1. Introduction
About this user’s manual
Thefastestwaytogetstartedistotakeyourtimeanddoeverythingrightthersttime.Takeafewminutesnowto
reviewtheuser’smanual.Thismaysaveyoutimelateron.Atthebeginningofeachsectionofthemanualyou’llnd
anoverview.Ifthesectiondoesn’tapply,youcanskipit.

5
1. Introduction
❸Part Names of the Projector
Front/Top
Thelensissoldseparately.ThedescriptionbelowisforwhentheNP35ZLlensismounted.
Controls
(→page7)Lens
RemoteSensor
(→page11)
LensHood
Protectsthelens.
RemoteSensor(locatedonthe
frontandtherear)
(→page11)
AdjustableTiltFoot
(→page22)
IndicatorPanel
(→page7)
AdjustableTiltFoot
(→page22)
Exhaustvent
Heatedairisexhaustedfromhere.

6
1. Introduction
Rear
Stackingholderxingposition
(3positions)
Forstackinguptheprojectors,fas-
tenupthestackingholderssupplied
withthisprojector.
Safetycoverxinghole
(7positions)
Thexingholesforinstallingthe
safetycover(soldseparately)thatis
usedforportraitinstallation. RemoteSensor(locatedonthe
frontandtherear)
(→page11)
ACINterminal
Connectthesuppliedpowercord’s
three-pinplughere,andplugthe
otherendintoanactivewalloutlet.
(→page13)
Mainpowerswitch
WhileACpowerisbeingsupplied,
setthemainpowerswitchtoON
position(|),thenyourprojectorwill
enterastandbystate.
* ThissecurityslotsupportstheMicroSaver®SecuritySystem.
Built-inSecuritySlot( )*
SecurityBar
Attachananti-theftdevice.
Thesecuritybaracceptssecurity
wiresorchainsupto0.18inch/4.6
mmindiameter.
AdjustableTiltFoot
(→page22)
Intakevent
Takesinoutsideairtocooltheunit.
Thereareairintakeandventilation
holesonthebottom.
(→pagevii,141)
Terminals
(→page8)

7
1. Introduction
Controls/Indicator Panel
11 10
7
23458
1
6
13
14
15 16 17
12
9
1. (POWER)Button
(→page14,24)
2. POWERIndicator
(→page14,15,24,168)
3. STATUS Indicator
(→page168)
4. LIGHT Indicator
(→page29,169)
5. TEMP.Indicator
(→page169)
6. SOURCEButton
(→page16)
7. AUTOADJ.Button
(→page23)
8. 3DREFORMButton
(→page32)
9. MENUButton
(→page62)
10.▲▼◀▶Buttons
(→page62)
11.ENTERButton
(→page62)
12.EXITButton
(→page62)
13.SHUTTERButton
(→page26)
14.LIGHTButton
(→page29)
15.LENSSHIFT/HOMEPOSITIONButton
(→page19,26,124,156)
16.FOCUS+/−Button
(→page21)
17.ZOOM+/−Button
(→page21)
This manual suits for next models
7
Table of contents
Other NEC Projector manuals

NEC
NEC M403W User manual

NEC
NEC NP215 EDU Manual

NEC
NEC M282X User manual

NEC
NEC MultiSync LT 80 Installation and user guide

NEC
NEC VT770 Series User manual

NEC
NEC UM361XI User manual

NEC
NEC MultiSync MT1055 User manual

NEC
NEC NP901W User manual

NEC
NEC NO500W User manual

NEC
NEC MT Series Assembly instructions