Nemalux GS Series User manual

APPLICATION
The GS Series 12VDC, 24VDC and 24VDC High Output luminaires are designed for use indoors,
outdoors, wet location, and areas containing moisture, dirt, corrosion, vibration, and rough usage.
As dened by the National Electrical Code (NEC) and the Canadian Electrical Code (CEC), they are
suitable for use in the following areas:
Certied to: UL 1598A, UL 2108;
CSA C22.2 No. 250.0
Housing: Copper-free Aluminium with Polycarbonate lens
Mounting: (A) Adjustable: Four 1/4”-20 x 4”Screws or bolts (Not Provided)
(B) Carriage Bolt: Two 1/4“-20 x 1”Bolts (Integral to luminaire)
Flat washers, lock washers & 1/4”-20 nuts (Provided)
Input Voltage: 12: 11-16VDC | 24: 22-28VDC | 24H: 22-28VDC
Electrical Ratings: 12 Models (@ 12VDC): GS-1: 0.66A | GS-2: 1.30A | GS-3: 1.98A | GS-4: 2.64A
24 Models (@ 12VDC): GS-1: 0.33A | GS-2: 0.66A | GS-3: 0.99A | GS-4: 1.32A
24H Models (@ 12VDC): GS-1: 0.66A | GS-2: 1.32A | GS-3: 1.98A | GS-4: 2.65A
Connections: 3ft extra hard usage cord with ying leads
Black: Negative (-) | White: Positive (+) | Green: Ground
DC Class 2 Wiring Only
Temperature Range: -40°C to +60°C
Ingress Protection: IP 66/67 | Suitable for Wet Locations. Marine Outside type (Salt Water).
(Luminaire enclosure only)
E480811
TM
Nemalux
I N DUSTRIAL
GS-DC-GEN
rev. A-12
1-3
MADE IN CANADA
WARNING
To avoid electric shock:
• Be certain electrical power is OFF before and during
installation and maintenance.
• Luminaire must be connected to a wiring system with an
equipment-grounding conductor.
WARNING
To avoid the risk of re, explosion, or electric shock, this
product should be installed, inspected, and maintained
by a qualied electrician only, in accordance with all
applicable electrical codes.
INSTALLATION
STEP 1:
Inspect shipping package and contents to
ensure no damage has occurred during
shipping.
STEP 2a:
Loosen each M4 pinch bolt (2x) slightly using
a 3mm hex key to allow some free movement.
This will allow for easier installation on uneven
or other surfaces.
*Be sure not to loosen the end brackets too
much as the end brackets will disengage.
STEP 2b:
Mount luminaire to desired location with four
1/4”-20 (4x) screws or bolts (not provided).
STEP 2c:
Adjust luminaire to desired angle and tighten
M4 pinch bolts (2x) using a 3mm hex key.
NOTE:
If application requires periodic adjustment of
aiming do not rotate more than 180° in either
direction from installation point, doing so may
put excessive strain on the electrical connec-
tions.
Continue to Step 3.
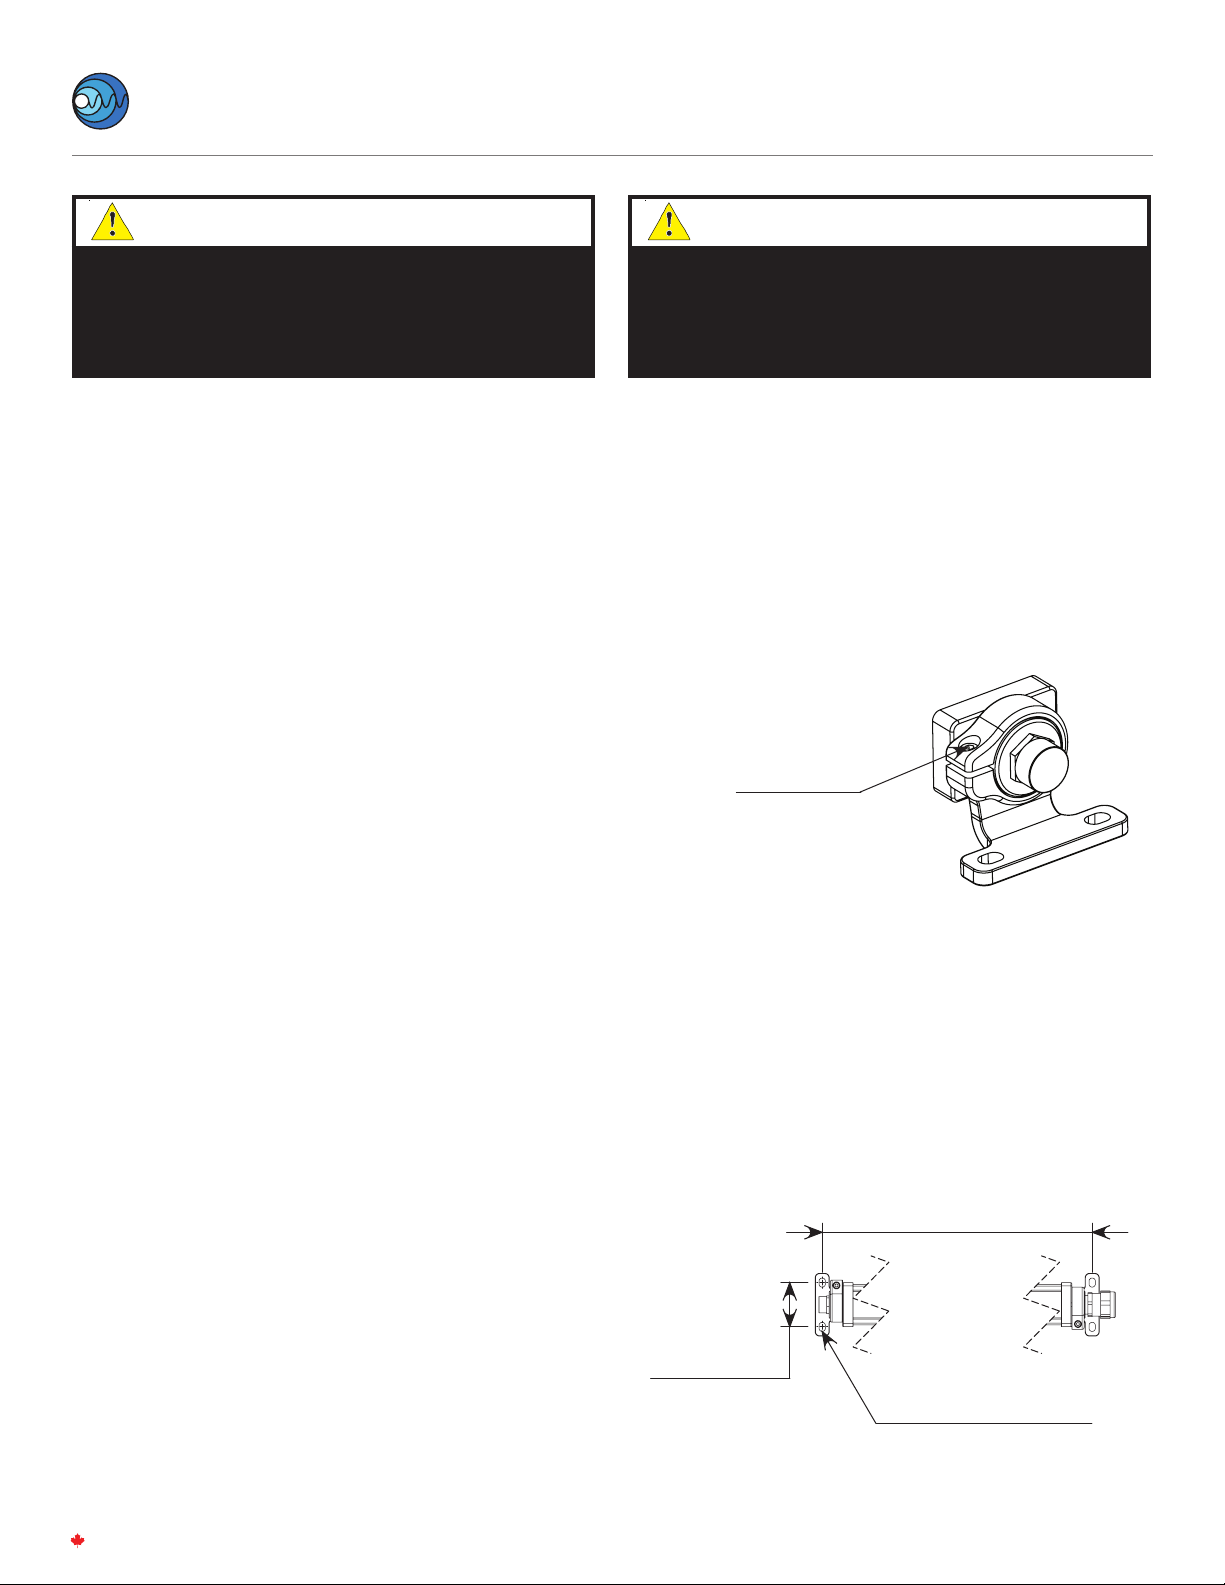
Mounting Dimensions:
M4 PINCH BOLT
Adjustable Bracket Mount
TM
Nemalux
I N DUSTRIAL
GS-DC-GEN
rev. A-12
2-3
MADE IN CANADA
GS-1:
368mm
± 2 [14.5in ± 0.1]
GS-2:
648mm
± 2 [25.5in ± 0.1]
GS-3:
927mm
± 2 [36.5in ± 0.1]
GS-4:
1206mm
± 2 [47.5in ± 0.1]
49mm
± 2
[1.9
in
± 0.1
]
1/4" - M6 CLEARANCE SLOT

INSTALLATION (CONT.)
STEP 2a:
Align both carriage bolts through holes in the desired
mounting surface. Place the provided at washer,
lock washer and 1/4”-20 nut on the bolt and tighten
luminaire to the surface.
STEP 3:
Supply side of the cord must be terminated with a
listed cord connector complying with the NEC / CEC
requirements of the installation. The cord connector
must be rated for use with suitable cable of types
SOW, STOOW, STOW, SEOW, SEOOW having a diame-
ter between 8.75mm/0.345”& 9.4mm/0.370”. The
listed cord connector must be installed in a listed box
complying with the NEC / CEC location requirements
of the installation. The cord connector and box must
be rated to the environment of the installation. The
installation environment must not exceed the Wet
Location IP66/67 rating of the luminaire.
STEP 4:
Black: Negative (-)
White: Positive (+)
Green: Ground
Connect the lead wires from the cord to the eld
supply wiring inside the outlet box. The eld wiring
terminations are to be made following acceptable
practices as outlined by the NEC / CEC for either the
specic ordinary or hazardous locations as dictated
by the installation location.
STEP 5:
Energize luminaire.
1/4”-20 NUT
LOCK WASHER
FLAT WASHER
Carriage Bolt Mount
1/4"-20 X 1” BOLT
TM
Nemalux
I N DUSTRIAL
GS-DC-GEN
rev. A-12
3-3
MADE IN CANADA
This manual suits for next models
10
Other Nemalux Lantern manuals


Popular Lantern manuals by other brands


Enlite
Enlite EN-PLEM instructions

LEGRAND
LEGRAND Kenall T8 Series installation instructions

Coopers of Stortford
Coopers of Stortford Welcome Globe Solar Light Instructions for use

Cosi
Cosi Cosiscoop Basket User instruction

MELINERA
MELINERA HG02115A Operation and safety notes

BEGA
BEGA 77 145 Instructions for use


