NeurOptics VIP-400 User manual
VIP®
-400
Pupillometer
Quick Start Guide
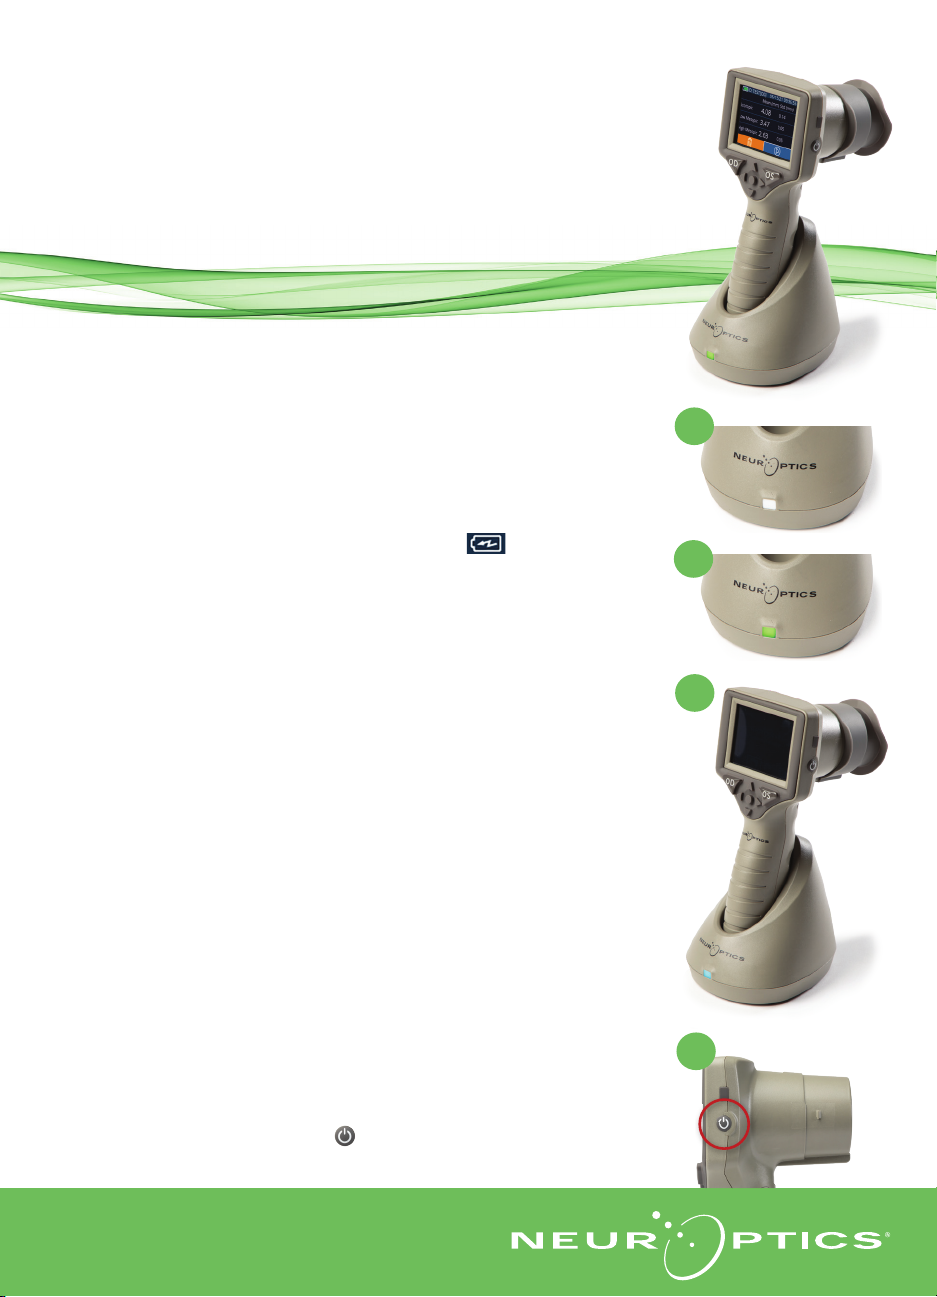
Power Up
Charging the VIP-400 Pupillometer
1. Connect the VIP-400 Power Adapter to the VIP-400 Charging Station and
plug into a power outlet. The indicator light at the base of the Charging
Station will display a white color to indicate power has been established to
the Charging Station.
2. Place the VIP-400 into the Charging Station. The Charging Station indicator
light will turn blue, and the LCD screen will display within the battery
icon, indicating the VIP-400 is charging. The indicator light will turn green
when fully charged.
NOTE: Prior to first-time use, ensure the VIP-400 is fully charged and
Date/Time are set accurately (refer to Setting Date and Time section).
1
2
3. The VIP-400 Pupillometer goes to sleep in the Charging Station to
eciently charge:
•The VIP-400 will initially turn ON (or remain on) upon being placed in the
Charging Station.
•After 2 minutes in the Charging Station, the VIP-400 will go to sleep to
eciently charge. The screen will go dark. If any button is pressed or the
screen is touched within this 2-minute window, the time period before the
VIP-400 goes to sleep is extended by an additional 2 minutes.
•To use the VIP-400 after it has gone to sleep in the Charging Station, simply
remove from the Charging Station, and it will wake up automatically.
4. If the VIP-400 Pupillometer is not in the Charging Station, to conserve
battery life it will:
•Go into sleep mode after 4 minutes. To turn ON, touch the screen or push
any button.
•Power down after an additional 6 minutes.
Turning On the VIP-400 Pupillometer
5. If the VIP-400 is out of the Charging Station and has powered down, press
(do not hold) the On/O button on the side of the device.
5
3

8
6
7
9-10
.Two components are required to initiate a pupil measurement:
•VIP-400 Pupillometer (Ex. 9)
•Eye Cup (Ex. 10)
The VIP-400 should not be used without the eye cup
positioned correctly (Ex. 10) It is very important that the eye
cup be correctly fitted. A snug fit helps reduce the possibility
of stray light entering the eye while the scan is taking place.
The eye cup has a tab in the rim which fits into the indentation
in the lens shield of the Pupillometer.
Setting Date and Time
6.
To modify the date and time, from the Home Screen, select the Settings icon
and then select Date or Time. Follow the prompts to input the current
date and time using 24-hour time configuration and select .
7. Customers in the United States have the option to enable Automatic Daylight
Savings Time (DST) in the Time settings. Automatic DST is disabled by default.
Automatic adjustments occur based only on US DST regulations and are not
updated according to geographic location.
Date and Time Maintenance:
•Regular quarterly maintenance is necessary to ensure date and time are
correct. The set date and time will aect the timestamp listed for subsequent
patient pupil measurements. Changing the date and time will not alter the
timestamps on previous measurements.
•Immediately adjust the time after any time change if Automatic DST is disabled.
Returning to the Main Menu
8. Press the OD or OS buttons (green circles) to return to the Main Menu.
Measuring Pupils Using the VIP-400 Pupillometer
Attaching the Eye Cup to the Pupillometer
Position the tab in the eye cup rim into the indentation
in the lens shield of the Pupillometer and press into
place. The tabs on either side of the lens shield should
also snap into the holes on either side of the eye cup.
9
10
Enter a New Patient ID
11
.There are two options for associating the Patient ID to the Pupillometer:
1) Scanning the patient’s wristband barcode using the VIP-400
Incorporated Barcode Scanner; or
2) Manually entering the Patient ID with entering alpha or numeric
characters.
11

Scan Barcode Using Incorporated Barcode
Scanner
12
.From the Main Menu,
select
, then
Scan Code.
The VIP-400 will emit a white light from the top of
the device. Center the light over the barcode until
you hear an audible beep.
13
.The Patient ID will now appear on the VIP-400
touchscreen. Confirm the patient information is correct and select Accept.
Manual Entry of the Patient ID
14
.From the Main Menu,
select
, then Manual ID. Using the
touchscreen or keypad, enter the alpha or numeric Patient ID and
select . Confirm the patient information on the screen is correct
and select Accept.
16. Position the VIP-400 at a right angle to the
patient’s axis of vision, minimizing any tilting of
the device.
17-18. Press and hold either the OD or OS button
until the pupil is centered on the touchscreen
and the display shows a green circle around the
pupil. A green frame around the screen indicates
the pupil is properly targeted (Ex. 17), while a red
frame indicates the pupil needs to be re-centered
on the screen before the measurement is
initiated (Ex. 18). Once the green frame appears,
release the button, holding the VIP-400 in place
for approximately three seconds until the results
screen is displayed.
19
.From the Results screen, select the Video icon
to view the playback of the reading.
14
15
19 20
2221
16
17 18
Set Measurement Protocol
15. From the Main Menu, select the Settings icon and then the top right
icon to toggle between Protocol Light O and Protocol Variable.
Then press OD or OS to return to the main measurement screen.
Browse Records
20
.From the Main Menu screen, select the
Records Icon .Browse records by patient ID
using the UP or DOWN keys. To search for a
specific ID, select , then type in the patient
ID and select .
Download Data
21-22
.From the Main Menu screen, select the
Settings Icon , then select Upload Data.
Connect the USB cable from the pupillometer
to the computer (Ex 21). The memory card of
the pupillometer will show as “Neuroptics” on
the computer. Open the folder and copy the
file. Press “Done” on the pupillometer screen
(Ex 22) once the files has been copied, as the
file will then be erased.
12 13
To turn the VIP-400 Pupillometer OFF, either:
•Navigate to the Main Menu and select the Power icon , then confirm Yes to power OFF.
•Press and hold the On/O button on the side of the VIP-400.
The VIP-400 may occasionally require a System Reboot. To reboot, simply press and hold the On/O
button on the side of the VIP-400 until it powers OFF.
Isopropyl alcohol (IPA)-based cleaning solutions, in formula concentrations up to 70% IPA, are
recommended for use in cleaning the VIP-400 Pupillometer and VIP-400 Charging Station. Please refer
to the Cleaning and Maintenance Instructions included in the Instructions For Use, which can be found
at https://neuroptics.com/resource-center-applied-research/
For additional information regarding our product, please refer to the Instructions For Use, which can be
found at https://neuroptics.com/resource-center-applied-research/
Power O
Cleaning and Maintenance
Ordering Information
24
9223 Research Drive | Irvine, CA 92618 | USA
p: +949.250.9792 | Toll Free North America: 866.99.PUPIL
QSG-0002-00 - VIP-400 Pupillometer System Quick Start Guide Rev A (HOMA-C2CRUA)
VIP-400-SYS VIP®-400 Pupillometer System
NEUR-2059-01 Eye Cup
CLB-006-00 Data Download Cable
NEUR-PRTS445 Wireless Printer Kit
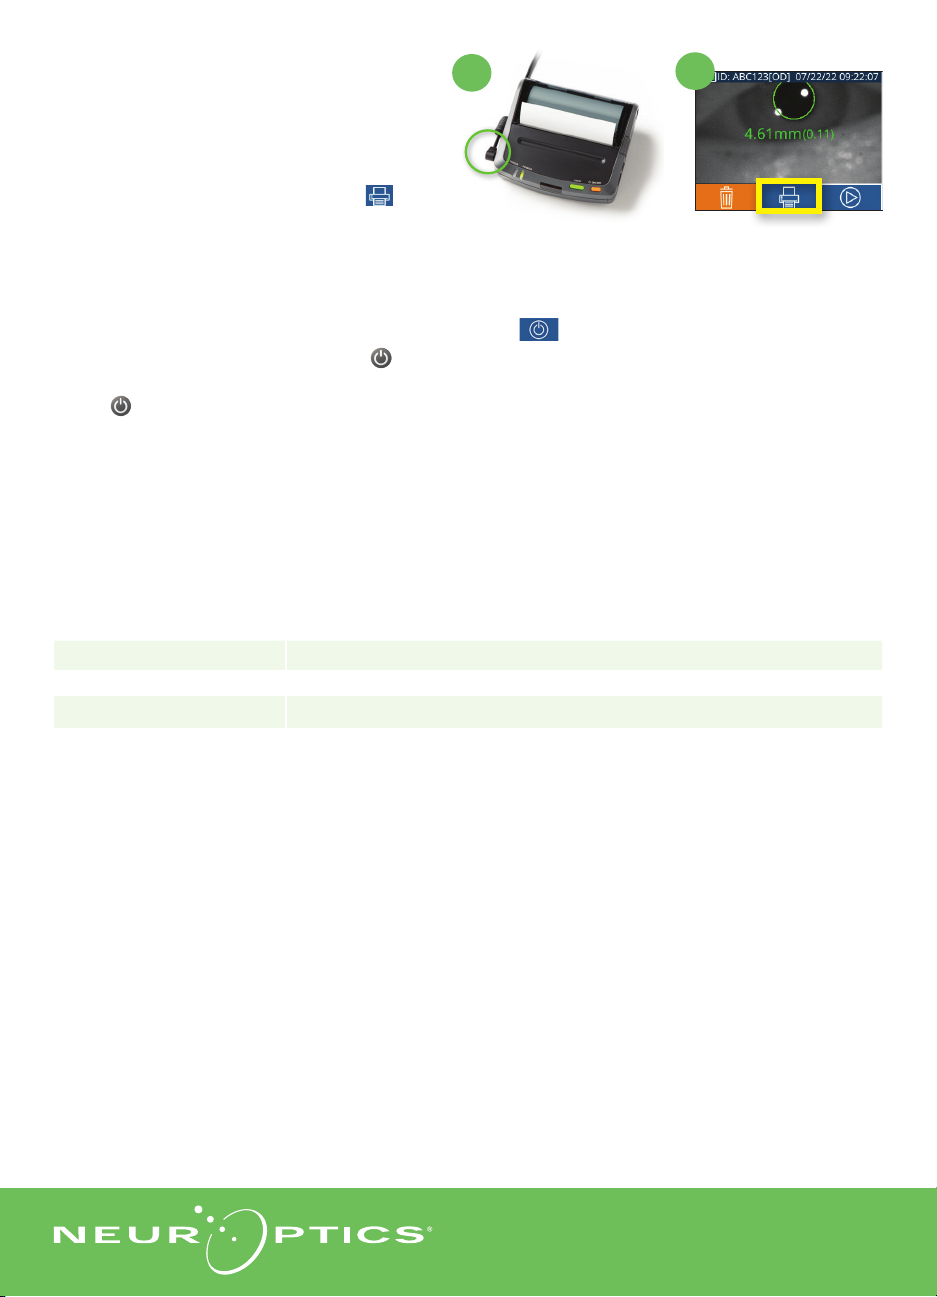
Print Data
23-24
.Attach the power supply to the printer
(Ex. 23). Turn the printer on and a green
light will illuminate. From a measurement
results screen (either last measurement
taken or “Browse Records” to find a dierent
measurement), select the Print icon on
the bottom of the screen (Ex. 24).
23
Other manuals for VIP-400
1
This manual suits for next models
1
Table of contents
Other NeurOptics Medical Equipment manuals


Popular Medical Equipment manuals by other brands


Getinge
Getinge Arjohuntleigh Nimbus 3 Professional Instructions for use

Mettler Electronics
Mettler Electronics Sonicator 730 Maintenance manual

Pressalit Care
Pressalit Care R1100 Mounting instruction

Denas MS
Denas MS DENAS-T operating manual

bort medical
bort medical ActiveColor quick guide

AccuVein
AccuVein AV400 user manual


