Newland NL-8300 User manual

NL-8300 POS
User’s Manual
8300 2007 20908
Copyright
2008.09
FuJian Newland Computer CO., Ltd
Add FuJian Newland Computer CO., Ltd
NEWLAND Science Park
1 Rujiang West Rd., Fuzhou, Fujian, China
Zip Code: 350015
Tel 0086 591 83979333
Fax
:
:--
:0086 591 83977666--
http://www.newlandcomputer.com
email:[email protected]

catalogue
1 Introduction....................................................................................................................................4
2 Getting start....................................................................................................................................4
2.1 Introduction.........................................................................................................................4
2.2 Familiar with NL-8300 .......................................................................................................4
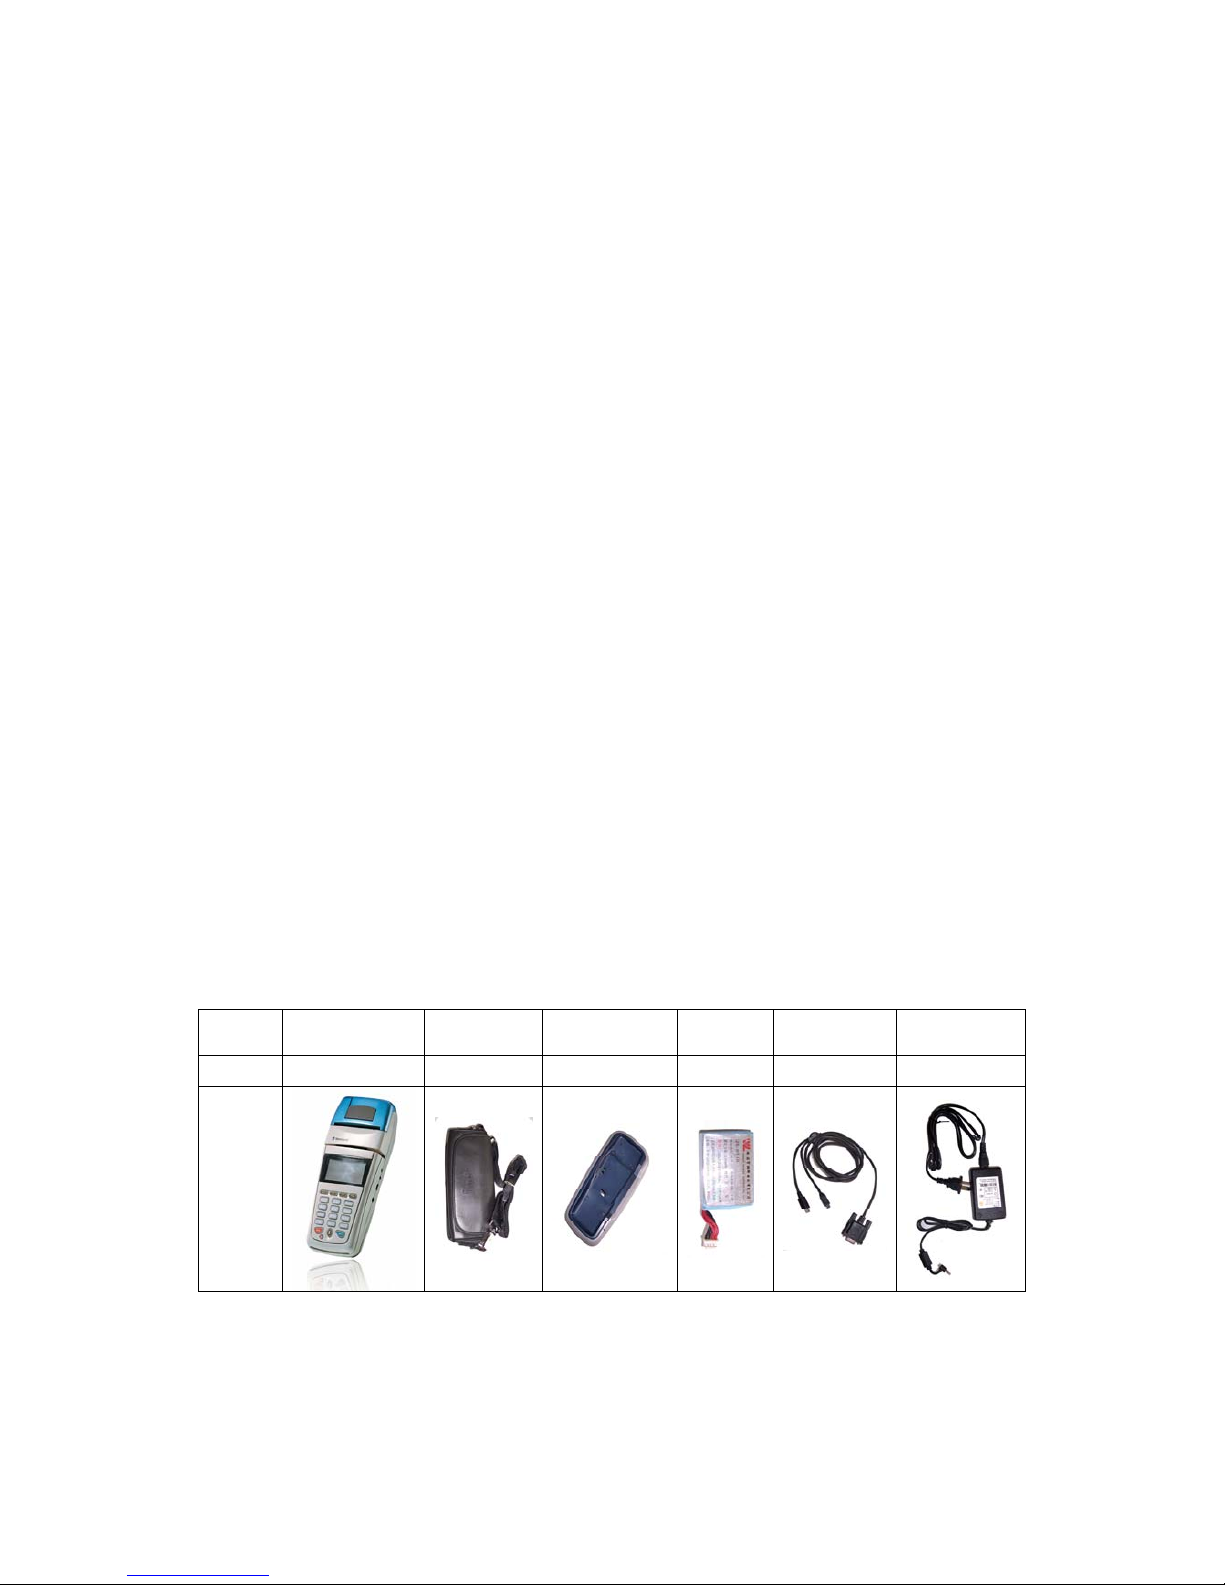
2.2.1 Unpacking ................................................................................................................4
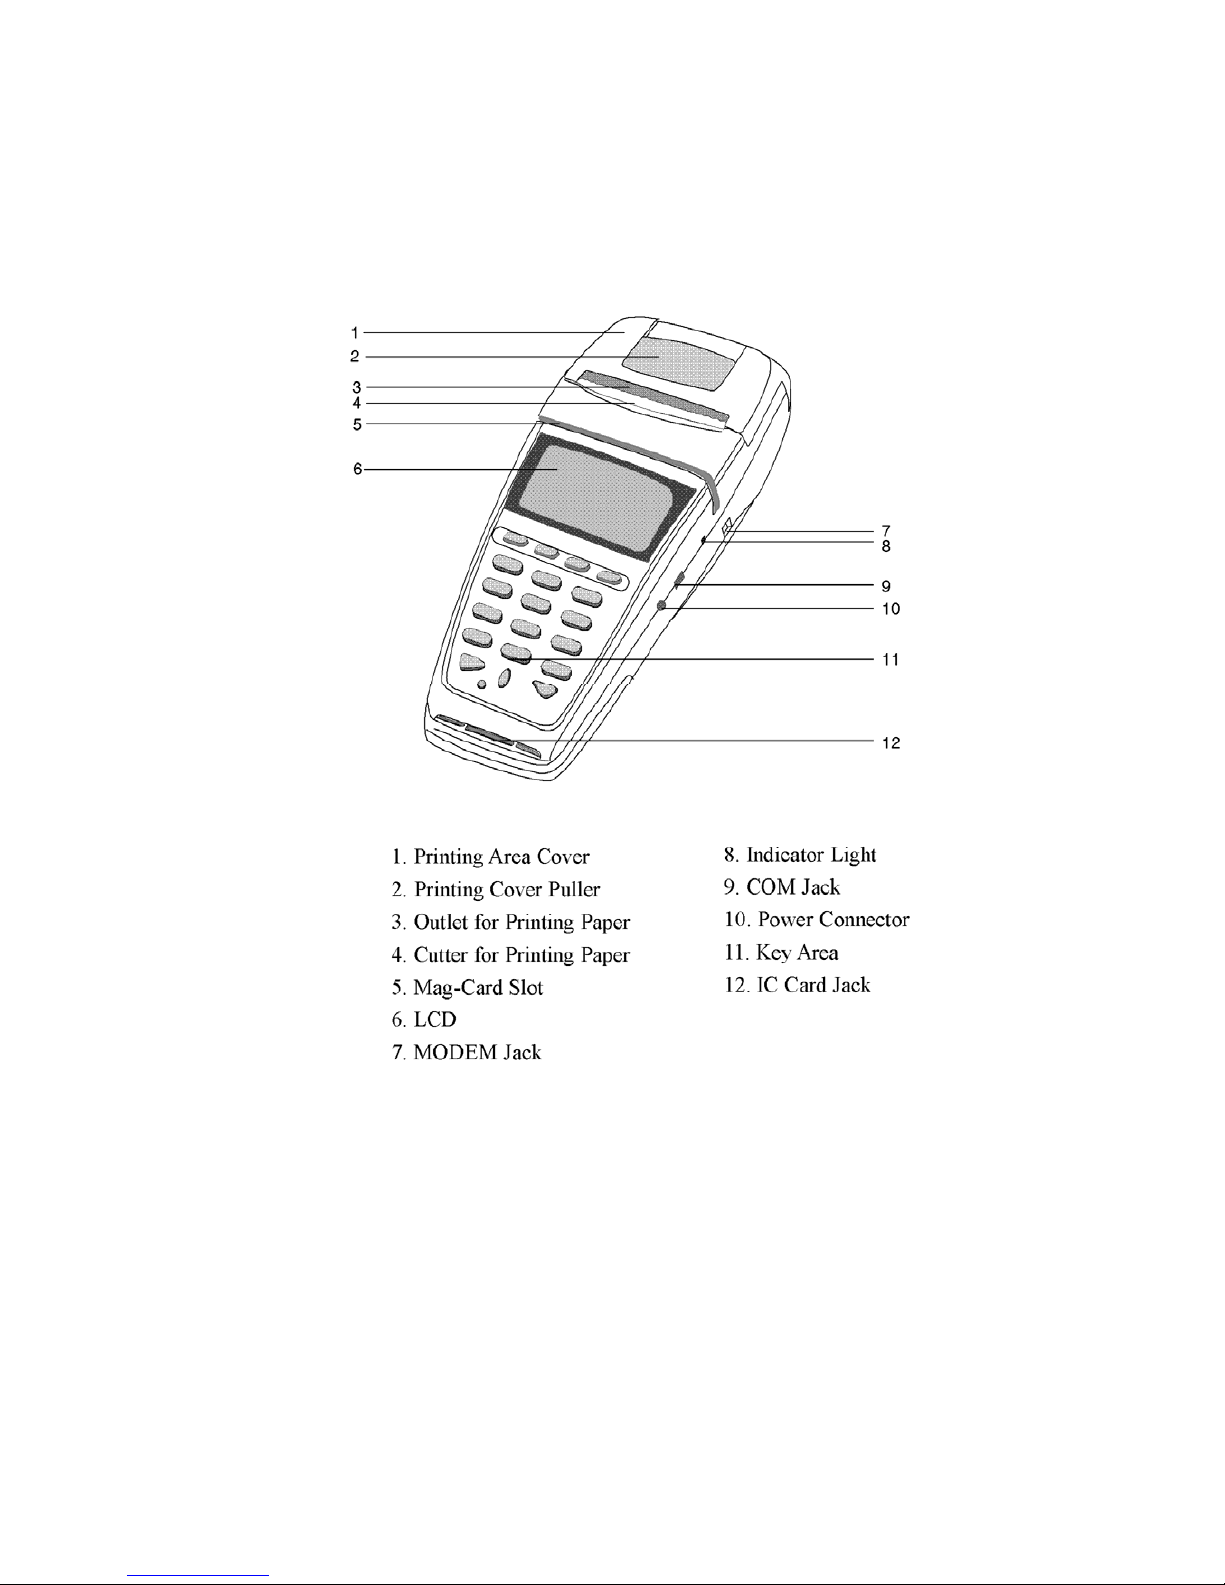
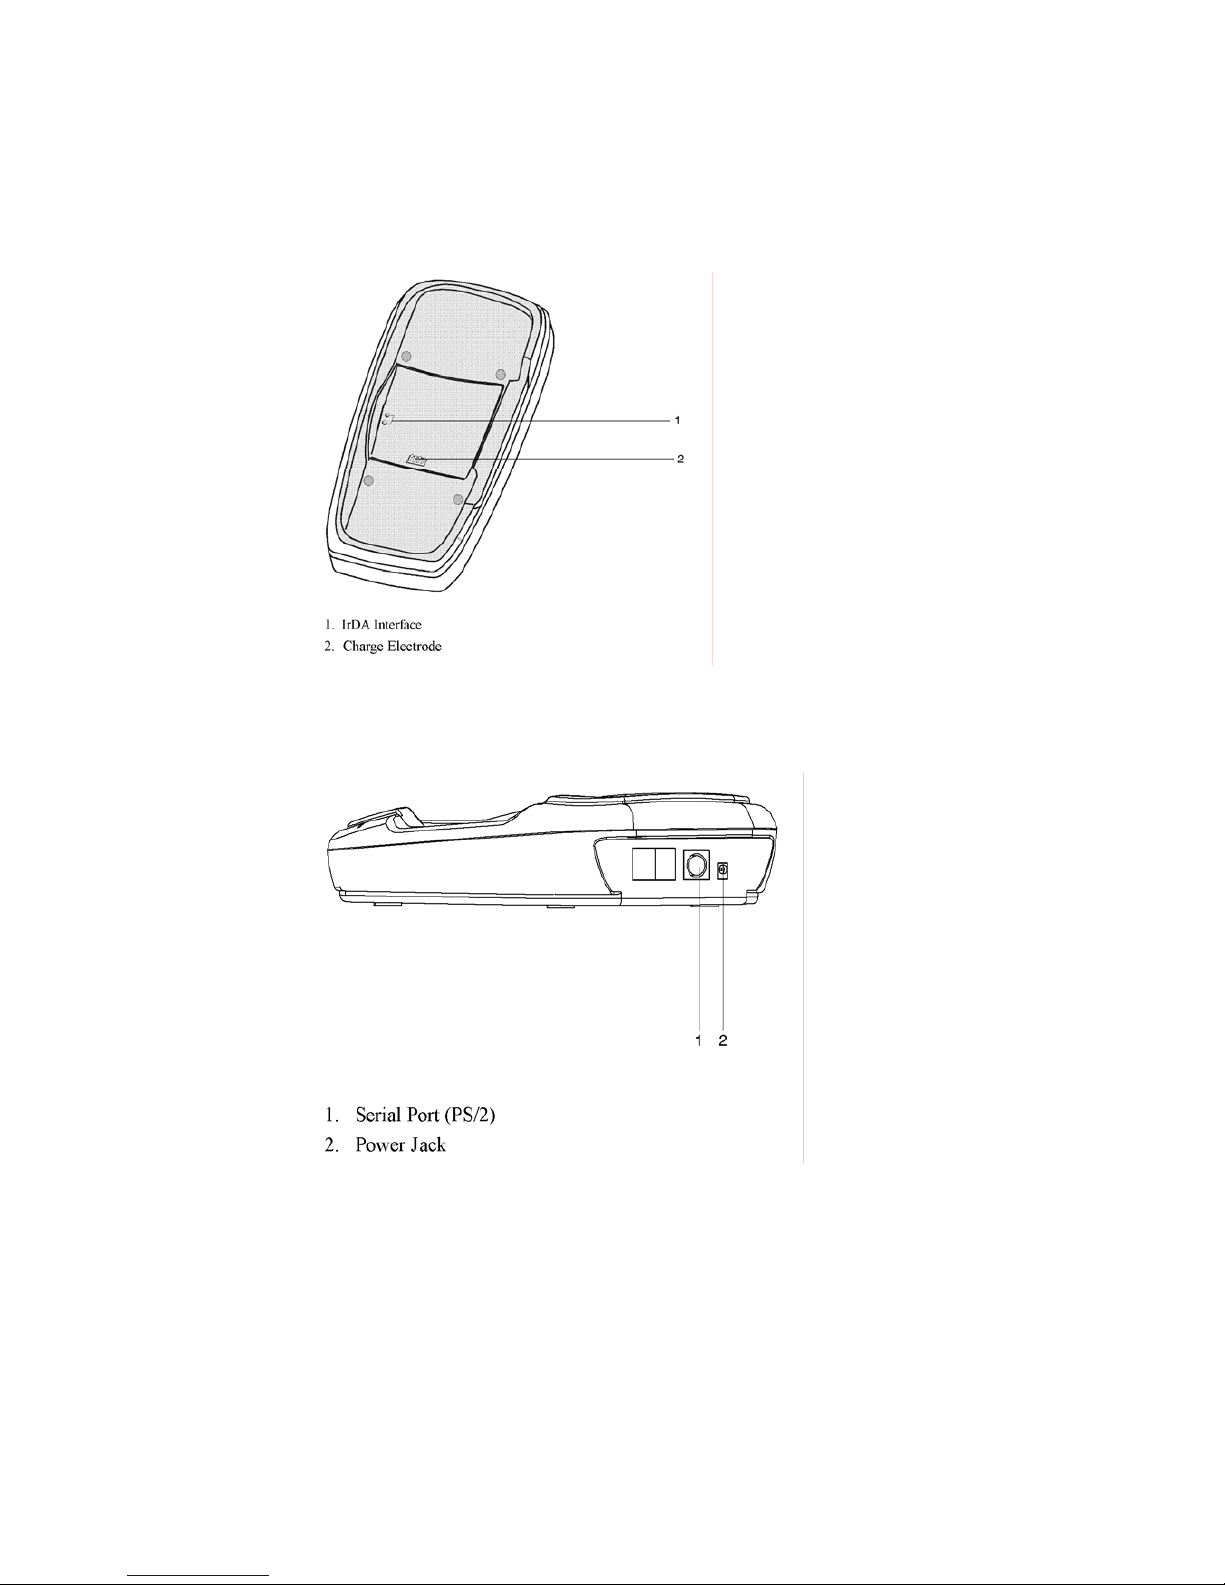
2.2.2 Housing ....................................................................................................................5
2.2.3 Detail function describe of POS........................................................................9
2.2.4 Every interface functions and pin definition .......................................................10
2.3 Startup/Operation/Shut down/reboot.................................................................................13
2.4 Start-up interface and its main function ............................................................................14
2.5 Program download ............................................................................................................15
3 The testing on functional modules ...............................................................................................18
3.1 Version ..............................................................................................................................19
3.2 Keyboard...........................................................................................................................20
3.3 Files...................................................................................................................................21
3.4 Magcard Test.....................................................................................................................22
3.5 IC/SAM.............................................................................................................................23
3.6 Printer................................................................................................................................24
3.7 Communication.................................................................................................................26
3.8 Battery...............................................................................................................................33
4 Operational parameter setting ......................................................................................................34
4.1 Display ..............................................................................................................................35
4.2 Keyboard...........................................................................................................................35
4.3 Clock .................................................................................................................................36
4.4 Password ...........................................................................................................................37
4.5 Auto-run ............................................................................................................................38
4.6 Printer................................................................................................................................38
4.7 APP Manage......................................................................................................................38
4.8 Hardware...........................................................................................................................39
4.9 Language...........................................................................................................................40
4.10 Wireless...........................................................................................................................41
4.11 Download ........................................................................................................................42
5 Attention ......................................................................................................................................43
5.1 Security attention ..............................................................................................................43
5.1.1 POS using security attention ..................................................................................43
5.1.2 Power .....................................................................................................................43
5.1.3 Battery Handle and Maintainance ..........................................................................44
5.1.4 The handling of waste products..............................................................................44

5.2 Battery use.........................................................................................................................45
5.3 Magnetic-card ...................................................................................................................46
5.4 IC card use ........................................................................................................................47
5.5 ATM IC card、SIM card and SAM card use ....................................................................48
5.6 Printer................................................................................................................................49
5.7 Battery Charge ..................................................................................................................50
5.8 Other points for attention ..................................................................................................51
5.9 How to Load Printer Paper................................................................................................52
5.10 Troubleshooting ..............................................................................................................55

1 Introduction
NL8300 is a hand-held wireless thermal POS. This manual introduces how to use the NL8300.
The content of this manual using the all function type POS to induce.
2 Getting start
2.1 Introduction
This chapter will introduce NL-8300 from unpacking to deeply. It will include housing,
principle, detail description of functions, every PIN definition, and every function of interface,
right setting and other relevant settings.
2.2 Familiar with NL-8300
2.2.1 Unpacking
Open the packing; get the NL-8300 and accessories. Observation of the appearance whether
broken down can not be used. If the losing happened during the transport, please contact your
supplier, and save the package. Make sure using the original package to return the
damaged product, to ensure that your after-sale rights.
Name Main Unit Bag Cradle Battery
(Built-in)
RS232 Data
Cable
Power
Adapter
Model NL-8300
Outline

2.2.2 Housing
① Obverse and profile

②The back

③Keyboard
④ Marker commentate of obverse and profile

⑤ Obverse and profile of the base.
Obverse
Profile

2.2.3 Detail function describe of POS
Clock Display the correct time
Magcard Can read the track I 2 3 of magcard which meet the standard of
ISO7816. Support 75 BPI and 210BPI and two-way slot card.
LCD
128*64 LCD, using EL uniform backlight, can adjust contrast,
display standard ASCII character, international
GB18030/GB2312 Chinese ideograph and graphics document.
Keyboard
12 number/alphabet button, 8 functional host-key.
There are so many buttons, such as up, down, menu, 10 numbers (0-9),
* and #, cancel, backspace and enter button. Some of them can be
multiplex, like * and., # and alphabet, menu and power. Also can
support combination key.
IC card
Support one IC card, can read and write CPU card and memory card
which meet the standard of ISO7816, support Chinese financial IC card
criterion, and meet the EMV standard.
SAM card Support two SAM card, can read and write CPU card which meet the
standard of ISO7816. Support Chinese financial IC card criterion.
Communication
RS232 serial port: serial transfer rate is 1200-115200bps; the parameter
of communication can set by the user.Base
transfer rate is 57600bps。
Wire Modem:can install in POS or base,synchronization is 1200BPS,
asynchronism is 1200/2400BPS。
Wireless modem (option): built-in wireless modem, support GPRS and
CDMA.
Infrared:Between POS and base,transfer rate 57600bps。
Printer
Support thermal print,can print the graphics and many kinds of
barcode. Using width 58MM thermal printer paper, Easy to reload the
paper。
Encryption and
security
Built-in ESIM security module, for encryption and decryption
operations and save the safety data
Power Input 5.0V,3.5A
battery
Non explosion-protection version: POS use high-capacity lithium cell
(3.7V 2.1AH),working time more than 8 hours,Ensure 100 times
volume of business in one day。explosion-protection version: POS use
high-capacity lithium cell(3.7V 1.8AH),working time more than 8
hours,Ensure 100 times volume of business in one day。

2.2.4 Every interface functions and pin definition
a.Rs232 interface
①Function: Main CPU using CPLD connected the electronic level conversion chip of
RS232.,canusetoconnecttheserialport.
②Every PIN of interface introduction:
PIN1: Grounding
PIN2: Empty
PIN3: Sending date
PIN4: Receiving date
PIN5: Empty
b.Infrared communication interface
①Function: Main CPU using CPLD connect to the infrared diode; achieve the
communication way of RS232 transfers rate 75600bps. Can connect the
infrared serial port communication equipment.
②Every PIN of interface introduction:
PIN1: Infrared sending
PIN2: Infrared receiving

c.MODEM and RS232 serial port
①Function:Build-in wire MODEM, support MODEM communication, and
synchronization rate is 1200BPS, asynchronism is 1200/2400BPS.
Main CPU using CPLD connected the electronic level conversion chip of
RS232., can use to connect the serial port.
②Interface and every PIN introduction
PIN1: Receiving date from RS232
PIN2: Grounding
PIN3, PIN4: Connect with the telephone, and can cross connection
PIN5: Output DC+5V
PIN6: Sending date from RS232
d.SAM card
①Function: Assistant CPU can connect SAM card directly, also can read and write the
dateintheSAMcard.
②Interface and every PIN introduction (Fig), please see the standard ISO7816
PIN1: SAM card power source: +5V
PIN2: SAM card reset signal
PIN3: SAM card clock signal
PIN4: Grounding
PIN5: SAM card power source: +5V
PIN6: SAM card date transfers.

e.IC card.
①Function: IC card use IC card interface chip connected with assistant CPU. Assistant
CPU can read and write the date of IC card.
②Every PIN induction of interface: please check standard ISO7816
PIN1:ICC Power +5V
PIN2:ICC Reset Signal
PIN3:ICC Clock Signal
PIN4:Null
PIN5:GND
PIN6:Null
PIN7:ICC Serial Data IO
PIN8:Null
PIN9:Check if the Card is inserted
PIN10:Power Output +5V for checking if the ICC is inserted.
f.SIM card
①Function: SIM card connected the wireless module, Main CPU using CPLD connect
the wireless module.
②Every PIN induction of interface: please check standard ISO7816
PIN1:SIM Card Power +5V
PIN2:SIM Card Reset Signal
PIN3:SIM Card Clock Signal
PIN4:GND
PIN5:SIM Card Power +5V
PIN6:SIM Card Data Communication

2.3 Startup/Operation/Shut down/reboot
2.3.1 Startup
Press “ ” button of keyboard for 3-5 sec
2.3.2 Operation
After starting, about 5 seconds the POS will entry the trade program. If the users don’t want to
wait for 5 seconds or after 5 second the program still not running, user can press ENTER to
entry the trade program by manual.
2.3.3 Shut down
Press “ ” button of keyboard for 3-5 sec will shut the POS down.
When POS is using alone can use the built-in power source, when power is use up, the LCD
will display the signal, but if the user put the POS into the Base or connect to the outboard
power source, it will become normal, also is not influence the charge.
The POS support auto saver function, and will display Enter Power saving state, press any
key to resume.
2.3.4 reboot
If there are some special reason to let the POS fail to use, can use startup and shut down to
reboot the POS.

2.4 Start-up interface and its main function
Picture below is the default main interface, Down, self-check and management are the
firmware program. Using operation can open the user-defined program, indicate the
current interface’s operation location.
NL8300 V3.58
08-04-20
10:08:08
Down
load
Self
Test
Optio
n
Run
After starting, press F1 and F4 can move the cursor to the corresponding icon location. If in
the corresponding icon press ENTER, then the system will run the corresponding program
●Download: Can download user-program, cipher code manage program, download document
to flash disk, remote download user-program, remote download document to
flash disk.
●Self-check: Can do the single test of every function module, if you want to test whether the
module can be a normal work, can use this function to do the test.
●Manage: Using this function must enter the password:”159951”. “Manage” menu is set
operating parameters. For example: the seventh option “language”, you can
choose Chinese or English according to the needs of individually. Save the setting,
all options’ language will display by your choice.
●Running: run the user-define program.
●Electric quantity Icon: In the right there is a icon to show the state of power.
●Wireless icon: If your POS have the wireless module, at the right side of the screen will
show the type of wireless modules and signal strength.

2.5 Program download
When running posdownload.exe for the first time, the following window may show up, just
click on the OK button to choose the default setting.
Then the main window will be shown.

Selecting the download type
This tool supports downloading of 3 different files: user program, key program and normal
file. They will be downloaded into different storage space respectively, i.e., User Program
will be downloaded into the user program space(up to 320 kB), Key Program will be
downloaded into the key management program space(up to 64 kB), while normal files will be
download into the flash file system space(up to 2MB).
Adding a file for downloading.
Click on the Append button, a file browse window will be shown for you to locate your
download target file.
Starting a download session
Click on the Get Ready(W) button to start a download session.
Batch downloading
This tool support batch downloading of multiple files of different download type, i.e., you
can select ,
Stopping/Cancelling a download session and closing the
COM port
Click on the Stop(S) button to stop/cancel a download session or close the COM port.
Selecting the COM port
Click on the pulldown list Port to select a suitable com port for download. Notice that you
cannot change the COM port setting after a download session has been started.
Downloading time to POS
When downloading the User Program or the Key Program, the current time of the host
download machine will be sent along to the POS. This function greatly facilitates the setting
of the machine’s real time clock. Be sure to check the Download Time item to enable this
function.
PinCode
PinCode is the password for download. Every maching is shipped with a default download
password: 159951. You can change the PinCode through the SETUP function of the POS. If
you change the POS’s PinCode, be sure to change PinCode setting of the POSDOWNLOAD
for a successful download.

Trouble shootings
Q: The download session doesn’t start after I click on the Get Ready(W) button.
A: Be sure to select the correct COM port for download. Make sure the download data line
has been connected to the POS’s RS232 port. Make sure the POS has been put into the
download mode by pressing Enter on the Download icon. Make sure the files you selected
really exist. Make sure the PinCode has not been changed, or you have provide the right
PinCode.
Q: There is no COM port on my PC, how can I do the download?
A: You can use a USB-TO-COM cable instead.

3 The testing on functional modules
In order to facilitate the technical maintenance staff on-site maintenance for this product, problem
positioning and hardware repair. We provide this self-check program in the BIOS. Using this
program you can do all the manual testing on each of the POS’sthe functional module .
self test
1.Version
2.Keyboard
4. Magnetic card
5. IC/SAM card
6. Printer
3.File system
7.Communication
8. battery
1.AUX Test
2.MC35 Test
3.TCP/IP Test
4.MODEM Test
5.Desktop Echo

3.1 Version
The first page will display software version: main CPU, assistant CPU, document system,
micro print device version, Detail please see Fig3-1 bellow
Main CPU:V3.58
Secondary CPU:V4.21
File System:V9.30
Printer Driver:V1.30
Fig 3-1
The second page displays the hardware version, FRAM size, Flasf1, flasf2. Detail please see
Fig3-2 bellow
Fig3-2
The third page displays the communication configuration, wireless module, also the type and
version. Detail please see Fig3-3 bellow
Hardware Version:V4.2
FRAM :8k
Flash1 :39VF1602
Flash2 :39VF1602
_____Connections _____
Modem:Ready
Wireless Module:
GPRS (Q2403)
Fig3-3

3.2 Keyboard
To test the keyboard, firstly testing whether every keys and its name, code is corresponding.
For example: presses “2”, detail please see Fig3-4 below.
keycode:0x32
(2 )
Press a key →
Fig3-4
Press “Cancel ” to quit, then test number input function, see Fig3-5
0123456789_
Digit-only input test:
Fig3-5
nput number date and press “enter” LCD will display the number date and its length, see
Fig3-6.
Next testing the input date, see Fig3-7: input date then press “enter” to see the context and
length that you inputted.
String length=10
Content is:
0123456789
Alpha & digit
NL8300_
Input test:
(To enter alpha input state,
press F4.)
Fig3-6 Fig3-7
Table of contents
Other Newland Touch Terminal manuals

Newland
Newland NQuire 200 User manual

Newland
Newland NLS-PT80 User manual

Newland
Newland NLS-MT37 User manual

Newland
Newland NLS-PT980 Series User manual

Newland
Newland N910 User manual

Newland
Newland NQuire 1000 Manta II User manual

Newland
Newland NLS-NQuire350 User manual

Newland
Newland NLS-NQuire300 User manual

Newland
Newland NQuire300 Series User manual

Newland
Newland NQ1000 MANTA User manual