NEXCAM AXIS RG 360 User manual

AXIS RG 360 CHAIR
INSTRUCTION MANUAL
THIS INSTRUCTION MANUAL MUST ALWAYS ACCOMPANY THIS PRODUCT AND BE TRANSFERRED WITH IT UPON
CHANGE OF OWNERSHIP, WHEN LOANED, OR PRESENTED TO ANOTHER PERSON.
Thank you for purchasing our NEXCAM Chair. This product is designed by hunters, for hunters. It is engineered for
safety, comfort and stealth, putting the odds in your favor when the moment of truth arrives. Constructed with only
the highest quality materials it’s built for years of satisfying hunts.
Read this instruction manual and all warnings in its entirety before using this product.
If you have any questions on assembly, use, safety warnings, or anything else, please contact us by email at
USING THIS PRODUCT!
DO NOT EXCEED Maximum Weight Limit - 300lbs. Exceeding this limit will damage
chair and may cause personal injury.
GROUND USE ONLY! NEVER USE AT HEIGHTS ABOVE GROUND LEVEL!
USE ONLY ON LEVEL SURFACE.
ALWAYS BE SURE ALL LEG SPRING PINS ARE ENGAGED THROUGH LEGS AND CHAIR IS
BEFORE USING CHAIR.
NEVER tip chair so feet lift off ground while seated in chair.
DO NOT use for any purpose other than intended use.
To avoid injuries to fingers and pinch hazards, use care when folding seat base and
adjusting spring stopper knob.
Do not modify, jump, bounce or stand on this product.
Always follow safe weapon/firearm handling practices.
FAILURE TO FOLLOW THESE INSTRUCTIONS CAN RESULT IN SERIOUS INJURY OR DEATH!
1
QUESTIONS? Email [email protected] for assistance.
NA70119 Nexcam AXIS RG 360
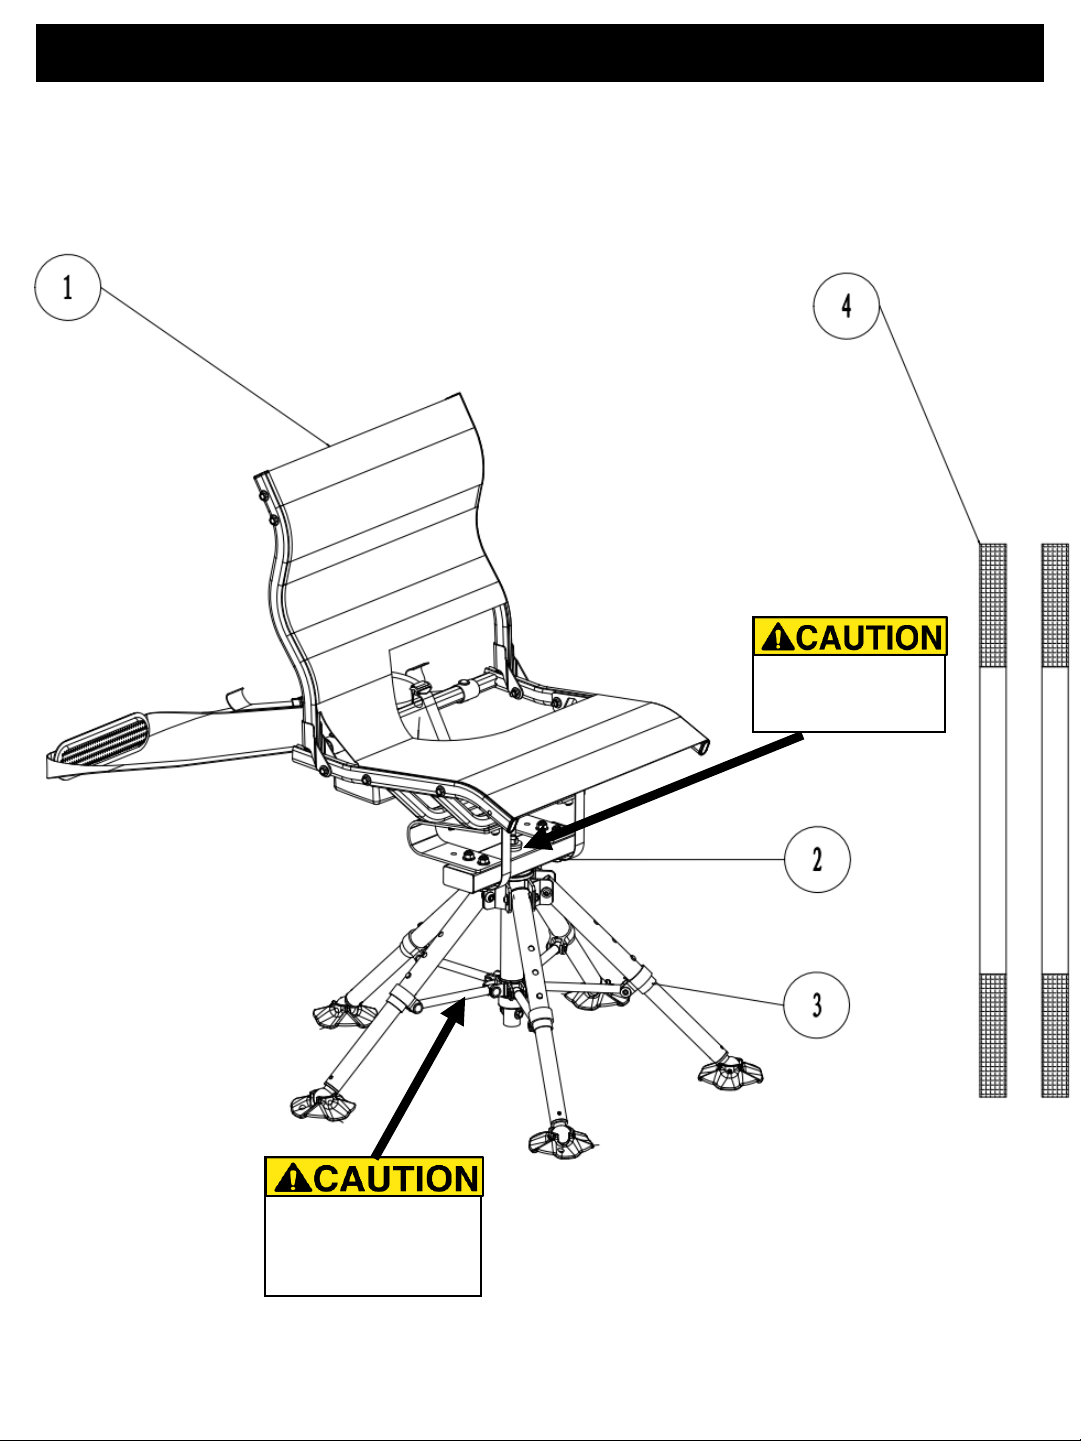
Chair Diagram
2
QUESTIONS? Email [email protected] for assistance.
Pinch Point Hazard.
Keep hands clear of
spring stopper knob
Pinch Point Hazard.
Keep hands clear of
center tube and all leg
supports.

Parts List
1
Seat with Carry
Strap & Storage
Bag
Qty
1
2
Seat Post
Qty
1
3
Seat Base
Qty
1
4
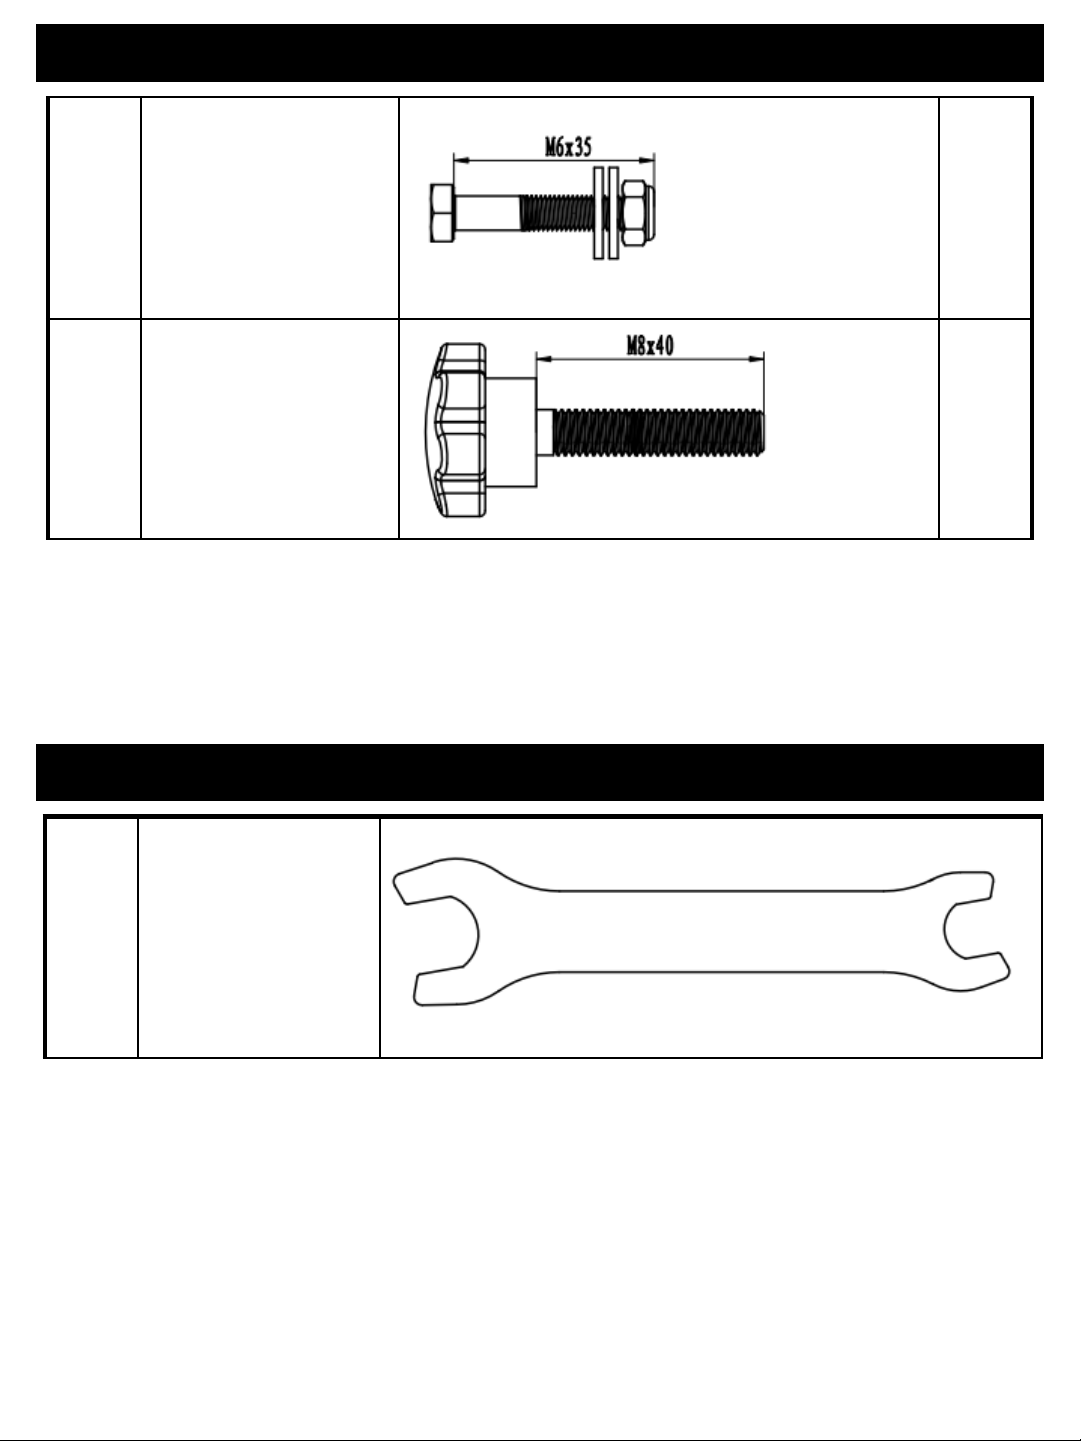
Hardware
Step
4
M6X35 (with steel
washer)
Qty
1
Step
6
M8X40 Knob
Qty
1
M8 Wrench
(2 pcs)
(Included)
Setup Instructions
5
QUESTIONS? Email [email protected] for assistance.
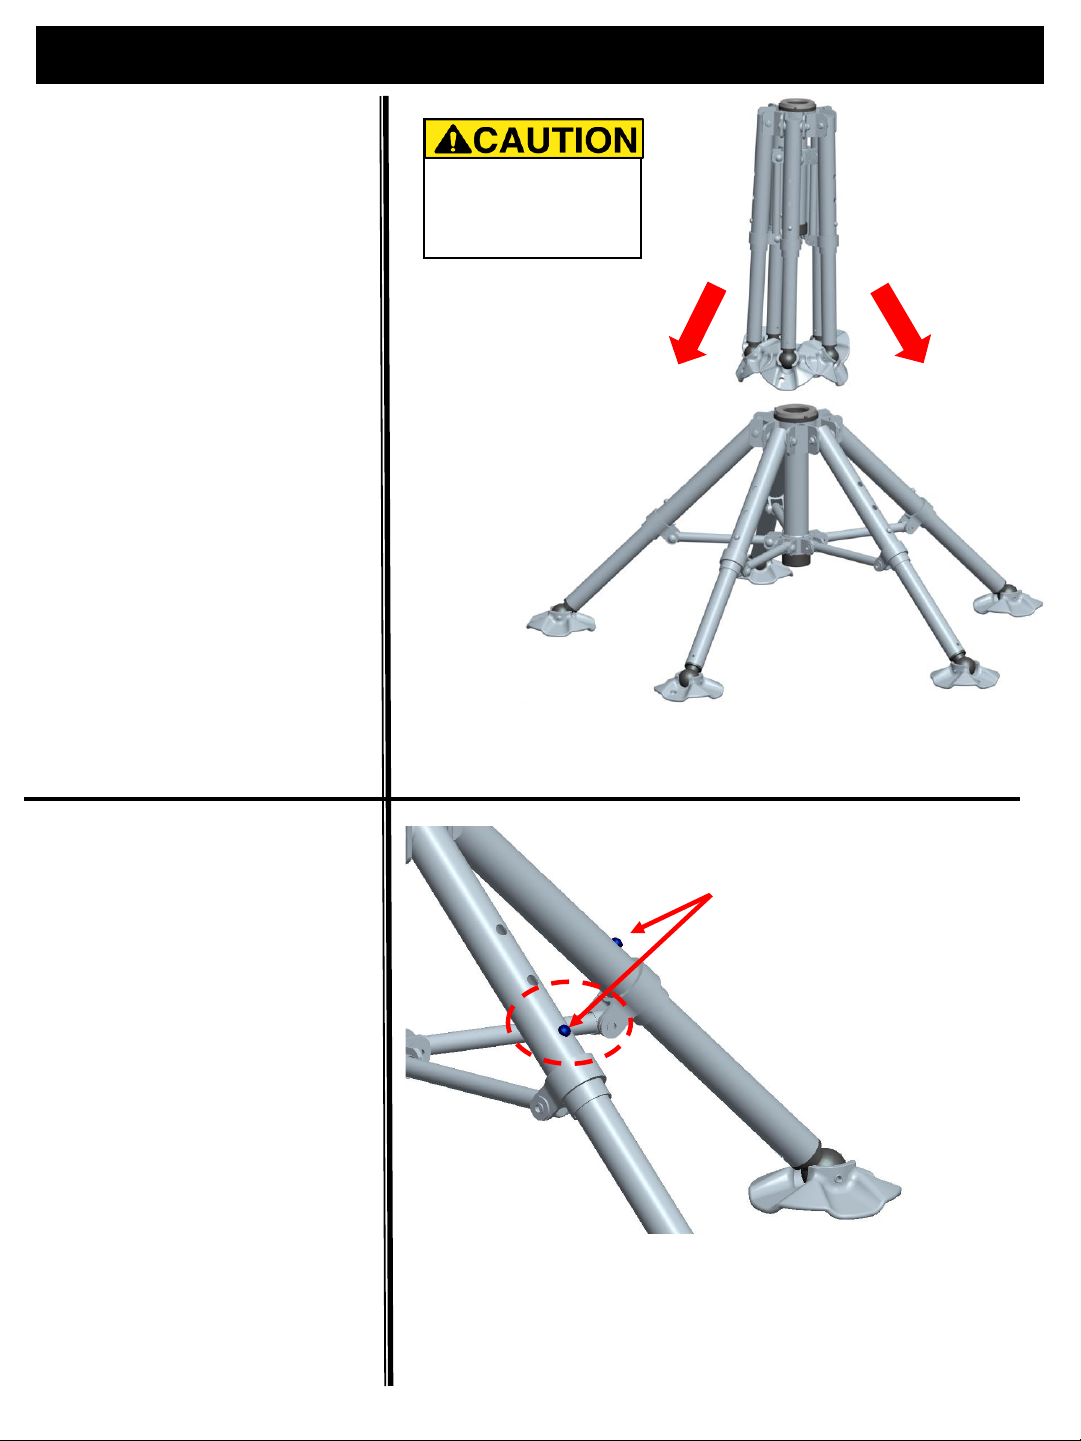
OPEN SEAT BASE
Open seat base by pulling
legs outward and sliding leg
supports down center tube
as shown in Figure 1.
Note –To fold Seat Base,
reverse above steps.
Step 1:
Figure 1
Open Seat Base
Pinch Point Hazard.
Keep hands clear of
center tube and leg
supports.
SEAT / LEG HEIGHT
ADJUSTMENT:
Adjust height by pressing
spring pin on leg and pull leg
out (higher seat height) or
push leg in (lower seat height)
until spring pin engages
through leg. See Figure 2.
Repeat for remaining legs.
WARNING! All leg feet
must sit flat on ground, so
chair is in level position. If
not reposition chair or
adjust leg height.
Step 2:
Figure 2
Seat Height Adjustment
WARNING!
ALWAYS CHECK ALL
LEG SPRING PINS ARE
ENGAGED THROUGH
LEGS AND CHAIR IS
LEVEL BEFORE USING
CHAIR.
Setup Instructions
6
QUESTIONS? Email [email protected] for assistance.
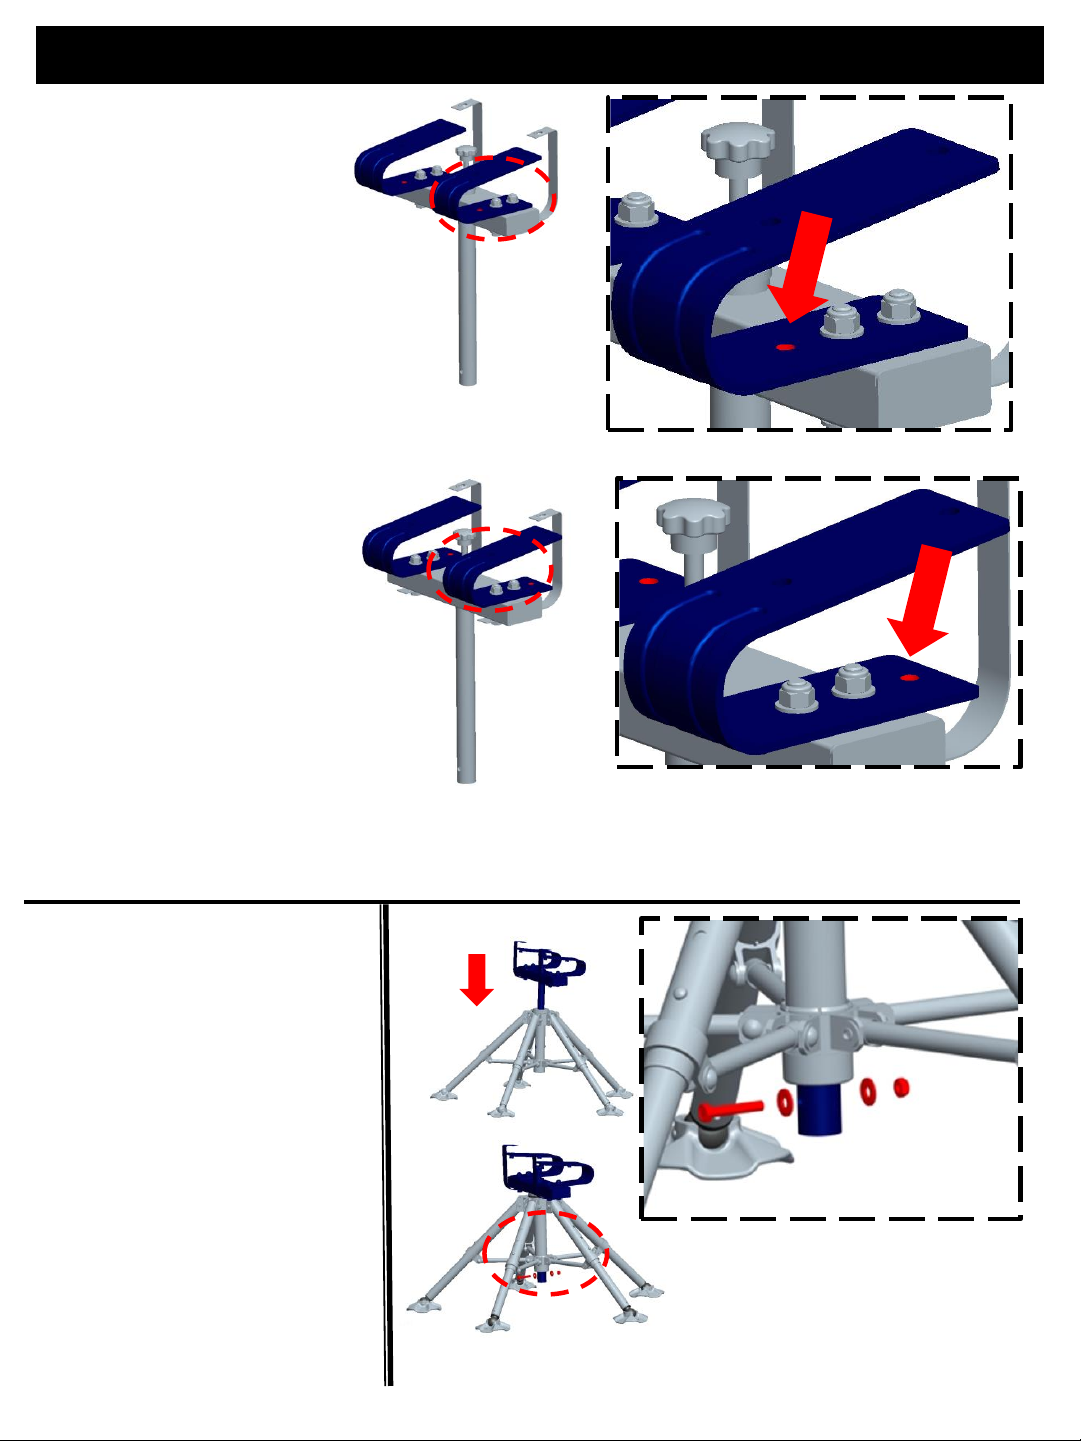
Step 3:
Figure 3
Select Spring Position
Before installing seat post,
select desired spring
positions by spring adjust
holes. See Figure 3.
Choose spring positions
based on your needs and
weight for the best rocking
feel.
Spring Position 1
Preassembled, if you select
this position, proceed to
Step 4.
Spring Position 2
If you select this position,
disassemble the bolts and
adjust sping position as
Figure 3. Reassemble
spring and webbing
stopper straps using bolts
and securely tighten bolts.
Spring Position 1
Increased rock/movement
Spring Position 2
Decreased rock/movement
Step 4:
Install Seat Post (#2)
through Seat Base (#3) Tube.
Secure using (1) M6x35 bolt
with steel washers and
locknut. See Figure 4.
Securely tighten bolt.
Figure 4
Install Seat Post into Seat Base
Setup Instructions
7
QUESTIONS? Email [email protected] for assistance.
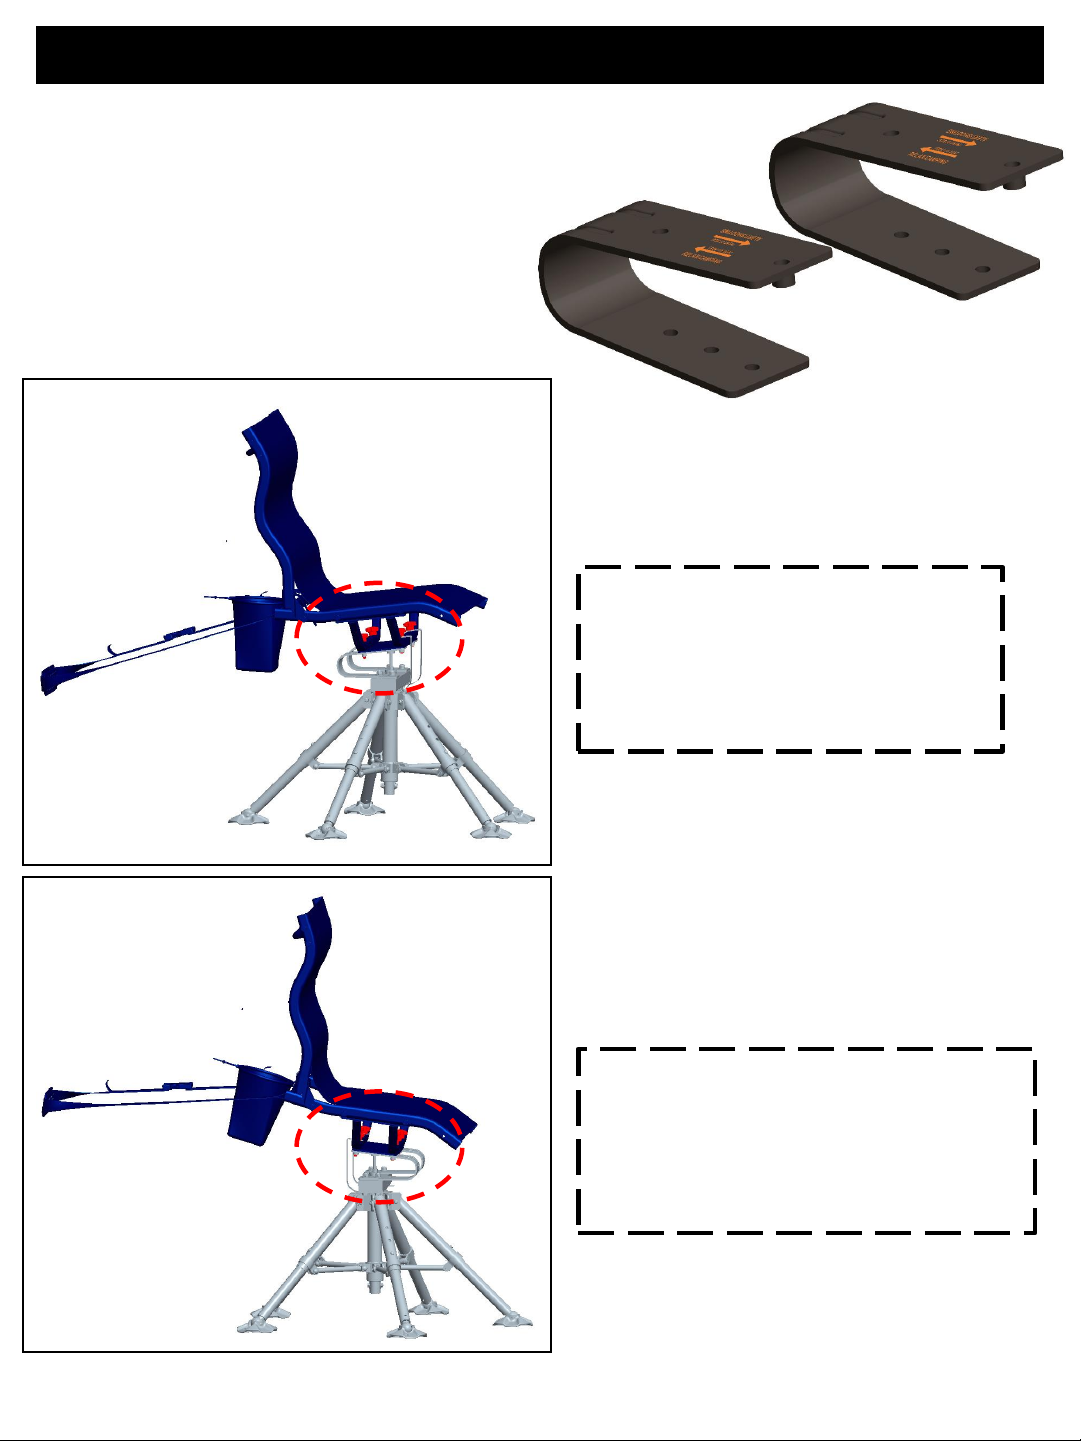
Before installing seat, select desired spring
positions by placing seat on springs for
Alert/Shooting or Relax/Camping position.
See Figure 5.
Step 5:
SPRING POSITION
FOR
ALERT / SHOOTING
SPRING POSITION
FOR
RELAX / CAMPING
Figure 5 Select Spring Position

Setup Instructions
8
QUESTIONS? Email [email protected] for assistance.
Step 6:
Figure 6
Install Seat
Step 7:
Adjust Spring Stopper Knob
height to adjust amount of
rocker travel as shown in
Figure 7.
This is used to steady chair
when leaning forward or
back depending on spring
position by providing a solid
stop point for rocker.
Figure 7
Spring Stopper Knob
Place Seat(#1) on top of
springs on seat post (#2)
and webbing stopper straps
on top of seat tubes.
Assemble seat, seat post
and webbing stopper straps
using four (4) M8x40 knob
as shown in Figure 6.
Securely tighten
USE:
USE ONLY ON LEVEL SURFACE. If chair is not stable or tips, do not use and select
another level surface.
ALWAYS BE SURE ALL LEG SPRING PINS ARE ENGAGED THROUGH LEGS AND
CHAIR IS LEVEL BEFORE USING CHAIR.
ALWAYS BE SURE ALL LEGS ARE CONTACTING GROUND AND SEAT IS LEVEL
BEFORE USING CHAIR.
NEVER tip chair so feet lift off ground while seated in chair.
To avoid injuries to fingers and pinch hazards, use care when folding seat base.
To avoid injuries to fingers and pinch hazards, only adjust spring stopper knob
when no one is seated in chair.
Prior to every use, inspect chair for damage. DO NOT USE IF ANY DAMAGE IS
VISIBLE OR SUSPECTED, including but not limited to cuts, frayed portions,
corrosion, or other damage to chair. If damage is visible or suspected, DO NOT
USE THE PRODUCT. If there are any questions, DO NOT use the product and
FAILURE TO FOLLOW THESE INSTRUCTIONS CAN RESULT IN SERIOUS INJURY OR
DEATH!
Place Chair on a level surface with seat base flat on surface. Adjust seat height as shown in setup
instructions so seat height is at comfortable height and all legs are contacting ground.
While next to chair, adjust Spring Stopper Knob as shown in setup instructions to adjust amount of Spring
Travel.
Chair is ready to be used.
MAINTENANCE AND STORAGE:
Do not modify this product in any way by making repairs, replacing parts, altering,
adding or attaching anything to it except if explicitly authorized in writing by
NEXCAM.
Use only NEXCAM authorized replacement parts. The use of unauthorized
replacement parts may result in serious injury or death.
Proper maintenance and inspection is required for this product.
This product is used to support your weight. Never use a chair that is damaged in
any way. Do not use if it is not wholly free of damage. If you have questions,
Failure to follow these instructions can lead to serious injury or death.
Should any damage occur or to purchase NEXCAM replacement parts, contact customer service by email at
Care and maintenance is required to assure trouble free performance of your chair.
Store this product indoors in a clean, dry environment free from direct sunlight, harmful chemicals, excessive
heat and dust. Exposure to sunlight, excessive heat and the elements can weaken material over time.
9
QUESTIONS? Email [email protected] for assistance.

LIMITED WARRANTY*.
LIMITED ONE YEAR WARRANTY. WE WARRANT THIS PRODUCT AGAINST ANY MANUFACTURER DEFECTS
IN MATERAILS AND WORKMANSHIP FOR PERIOD OF ONE YEAR FROM DATE OF PURCHASE FROM
AUTHORIZED RETAILER TO THE ORIGINAL OWNER. WE WILL REPAIR OR REPLACE ANY PART FOUND
DEFECTIVE IF THE UNIT CLAIMED TO BE DEFECTIVE IS RETURNED TO US POSTAGE PREPAID, WITHIN
CLAIMS.
This warranty is void if any product has been subjected to misuse, abuse, neglect (including but not
limited to improper maintenance or failure to follow instructions), storage, improper use, misapplication,
accident, normal wear, modification, adjustment, or repair.
NO OTHER WARRANTIES WHETHER EXPRESSED OR IMPLIED, INCLUDING WARRANTIES OF
MERCHANTABILITY AND FITNESS FOR A PARTICULAR PURPOSE, SHALL APPLY TO THE PRODUCT.
LIMITATION OF LIABILITY
It is expressly understood that our liability for this product, whether due to breach of warranty,
negligence, strict liability, or otherwise , is limited to repair of the product as stated above. We will not
be liable for any other injury, loss, damage, or expense, whether direct or consequential, including but
not limited to loss of use, income, profit, or damage to material from use of this product howsoever
caused.
SERVICING YOUR PRODUCT:
If you need repairs or have warranty issues, contact Customer Service at support@Nexcam.com
for assistance.
PLEASE NOTE:
We reserve the right to make substitutions on warranty coverage for any reason, including but not
limited to available parts.
*Limited Warranty to the Original Owner.
NEXCAM INC.
405 Annandale Blvd.,
Annandale, MN 55302
Email: [email protected]om
Website: https://nexcam.com
10
QUESTIONS? Email [email protected] for assistance.
This manual suits for next models
1
Table of contents
Other NEXCAM Indoor Furnishing manuals


Popular Indoor Furnishing manuals by other brands


Style selections
Style selections 8554-3890 Care and maintenance

EXPEDO
EXPEDO BRINICA NR 27 Assembly instruction

Home affaire
Home affaire Skini 3893 5457 Assembly instructions

Allen + Roth
Allen + Roth FTS81220 quick start guide

MYSTIQUE
MYSTIQUE B033 quick guide

StyleWell
StyleWell HWB-C-89-3136 Use and care guide