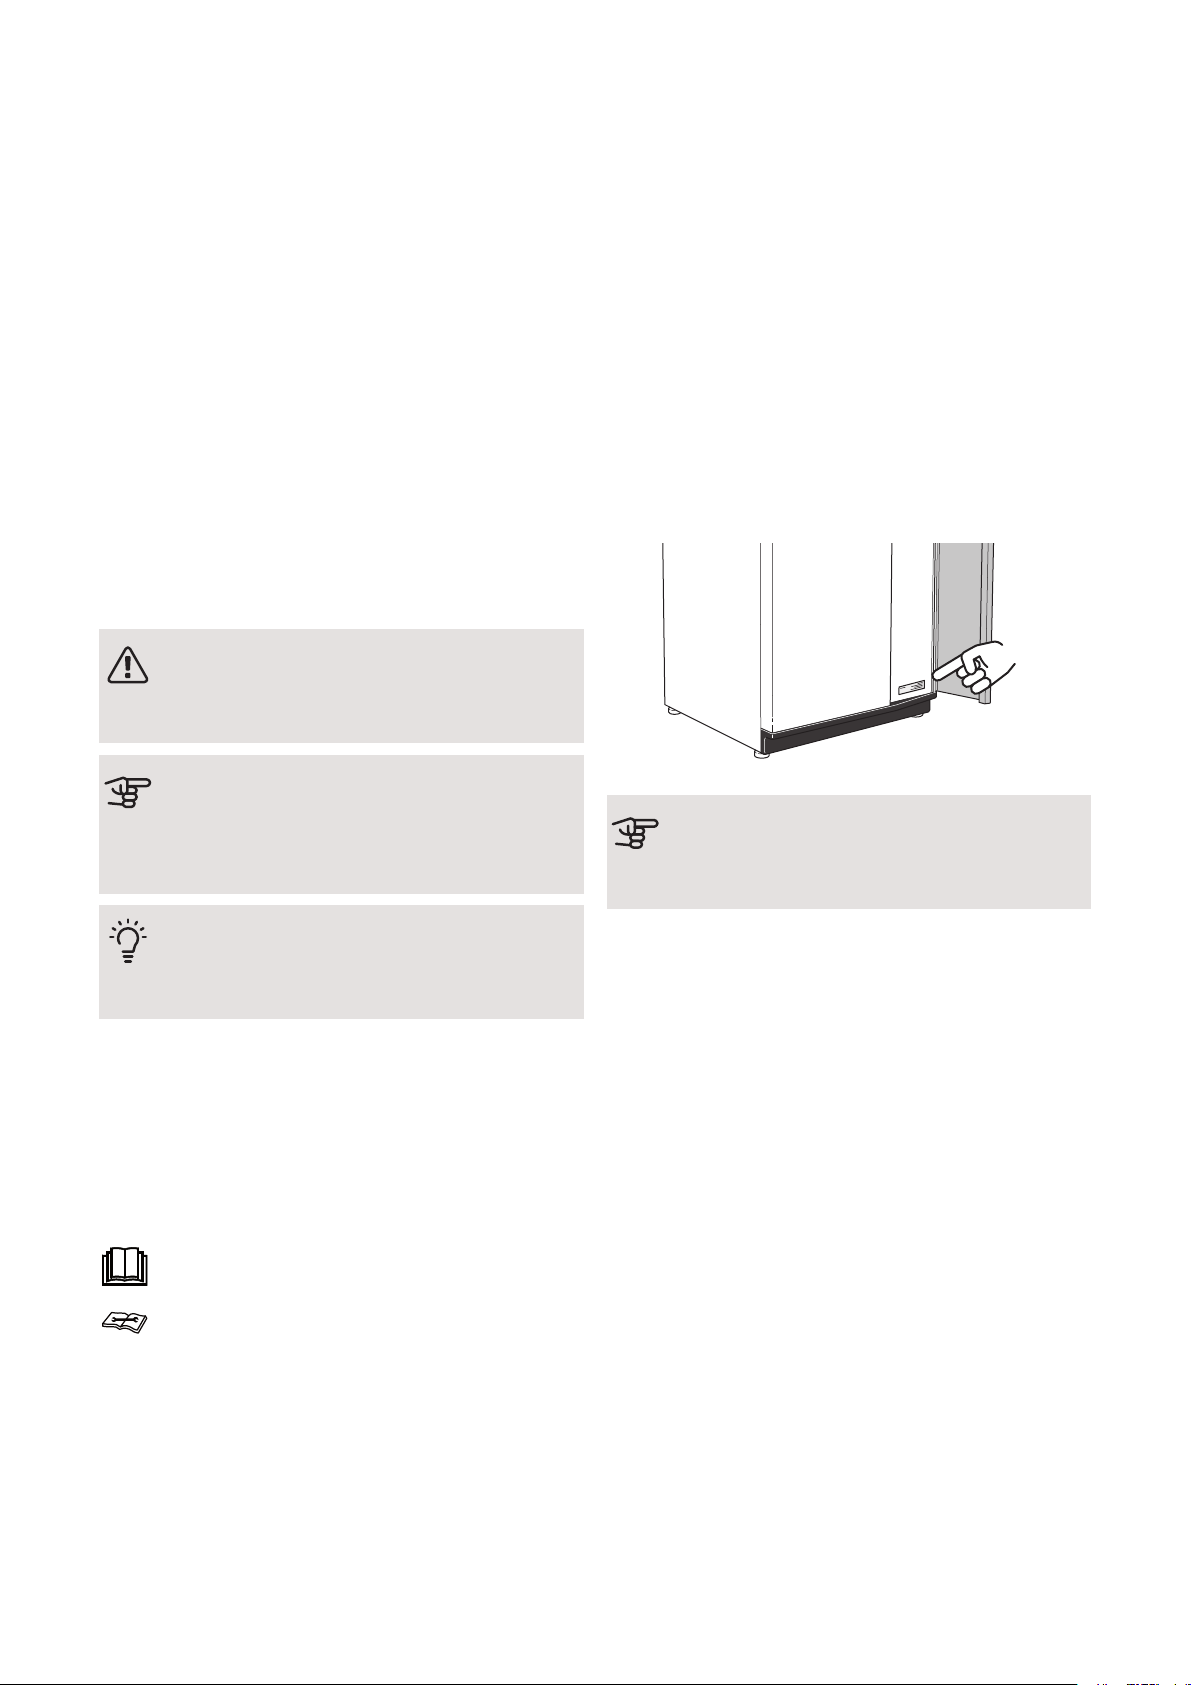
Nibe S1255PC User guide

IHB EN 2001-2
531093
INSTALLER MANUAL
Ground source heat pump
NIBE S1255PC

Quick guide
NAVIGATION
Browse
Scroll
Select The dots at the bot-
tom edge show
that there are more
pages.
If the menu has
several sub-menus,
you can see more
information by
dragging up or
down with your fin-
ger.
Most options and
functions are activ-
ated by lightly
pressing on the dis-
play with your fin-
ger.
Drag to the right or
left with your finger
to browse between
the pages.
Setting the indoor temperature.
Bottom floor
Temperature
HEAT
13.45 3 October
Smartguide
Yes please, take me to Smartguide.
Hi!
Your system is working properly. Do you want help making
changes?
13.45 3 October
You can set the temperature for your installation's climate
system here.
Smartguide helps you both to view information about the
current status and to make the most common settings
easily. The information that you see depends on the
product you have and the accessories that are connected
to the product.
Product overview
PRODUCT OVERVIEW
Update
Product name
Serial number
Software
Service
13.45 3 October
Company AB
Telephone number
VVM S320
06919618030101
0.5.1
Increasing hot water temperature
HOT WATER
More hot water
13.45 3 October
Here, you can find information about product name, the
product's serial number, the version of the software and
service. When there is new software to download, you
can do it here (provided that S1255PC is connected to
myUplink).
Here, you can start or stop a temporary increase in the
hot water temperature.

41 Important information
4Safety information
4Symbols
4Marking
4Serial number
5Inspection of the installation
62 Delivery and handling
6Transport
6Assembly
7Supplied components
7Handling panels
9Removing insulation
103 The heat pump design
10General
11Distribution boxes
11Cooling sections
124 Pipe connections
12General
13Dimensions and pipe connections
14Brine side
14Heating medium side
15Cold and hot water
15Docking alternatives
175 Electrical connections
17General
19Connections
24Settings
266 Commissioning and adjusting
26Preparations
26Filling and venting
27Start-up and inspection
29Setting the cooling/heating curve
327 myUplink
32Specification
32Connection
32Range of services
32Mobile apps for myUplink
338 Control - Introduction
33Display unit
34Navigation
34Menu types
379 Control - Menus
37Menu 1 – Indoor climate
42Menu 2 – Hot water
43Menu 3 - Info
44Menu 4 - My system
48Menu 5 - Connection
49Menu 6 - Scheduling
50Menu 7 - Service
5810 Service
58Service actions
6411 Disturbances in comfort
64Info-menu
64Manage alarm
64
6612 Accessories
6813 Technical data
68Dimensions and setting-out coordinates
69Electrical data
70Technical specifications
73Energy labelling
77Item register
82Contact information
3Table of ContentsNIBE S1255PC
Table of Contents

Safety information
This manual describes installation and service proced-
ures for implementation by specialists.
The manual must be left with the customer.
Symbols
NOTE
This symbol indicates danger to person or ma-
chine .
Caution
This symbol indicates important information
about what you should consider when installing
or servicing the installation.
TIP
This symbol indicates tips on how to facilitate
using the product.
Marking
The CE mark is obligatory for most products sold
in the EU, regardless of where they are made.
CE
Classification of enclosure of electro-technical
equipment.
IPx1B
Read the User Manual.
Read the Installer Manual.
Serial number
The serial number can be found at the bottom right on
S1255PC, in the display on the home screen "Product
overview" and on the type plate (PZ1).
Caution
You need the product's ((14 digit) serial number
for servicing and support.
NIBE S1255PCChapter 1 | Important information4
1 Important information

Inspection of the installation
Current regulations require the heating installation to be inspected before it is commissioned. The inspection must
be carried out by a suitably qualified person. In addition, fill in the page for the installation data in the User Manual.
DateSignatureNotesDescription
✔
Brine side
System flushed
System vented
Antifreeze
Level/Expansion vessel
Filterball (particle filter)
Safety valve
Shut off valves
Circulation pump setting
Heating medium side
System flushed
System vented
Expansion vessel
Filterball (particle filter)
Safety valve
Shut off valves
Circulation pump setting
Electricity
Connections
Main voltage
Phase voltage
Fuses heat pump
Fuses property
Outside sensor
Room sensor
Current sensor
Safety breaker
Earth circuit-breaker
Set emergency mode in menu 7.1.8.2
5Chapter 1 | Important informationNIBE S1255PC

Transport
S1255PC should be transported and stored vertically in
a dry place. When being moved into a building, S1255PC
may be leant back 45 °.
Ensure that S1255PC has not been damaged during
transport.
Caution
The product can be tail heavy.
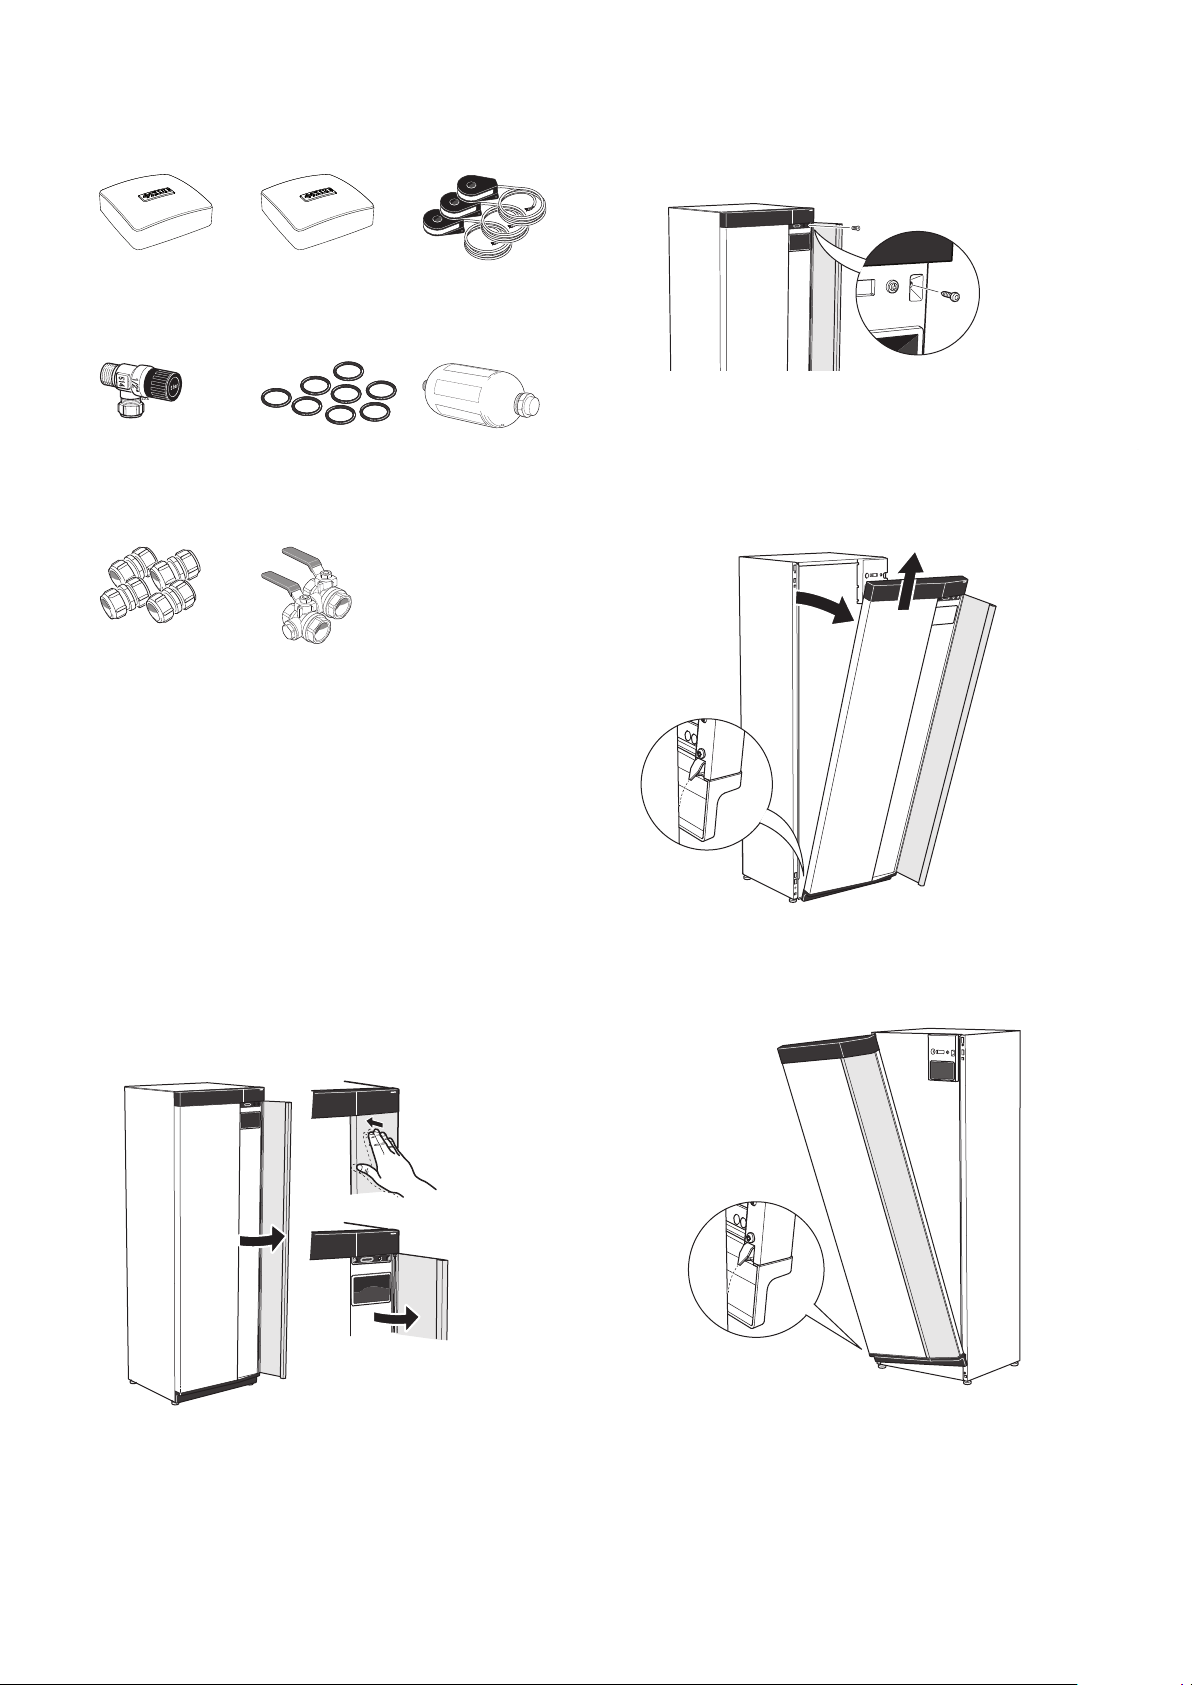
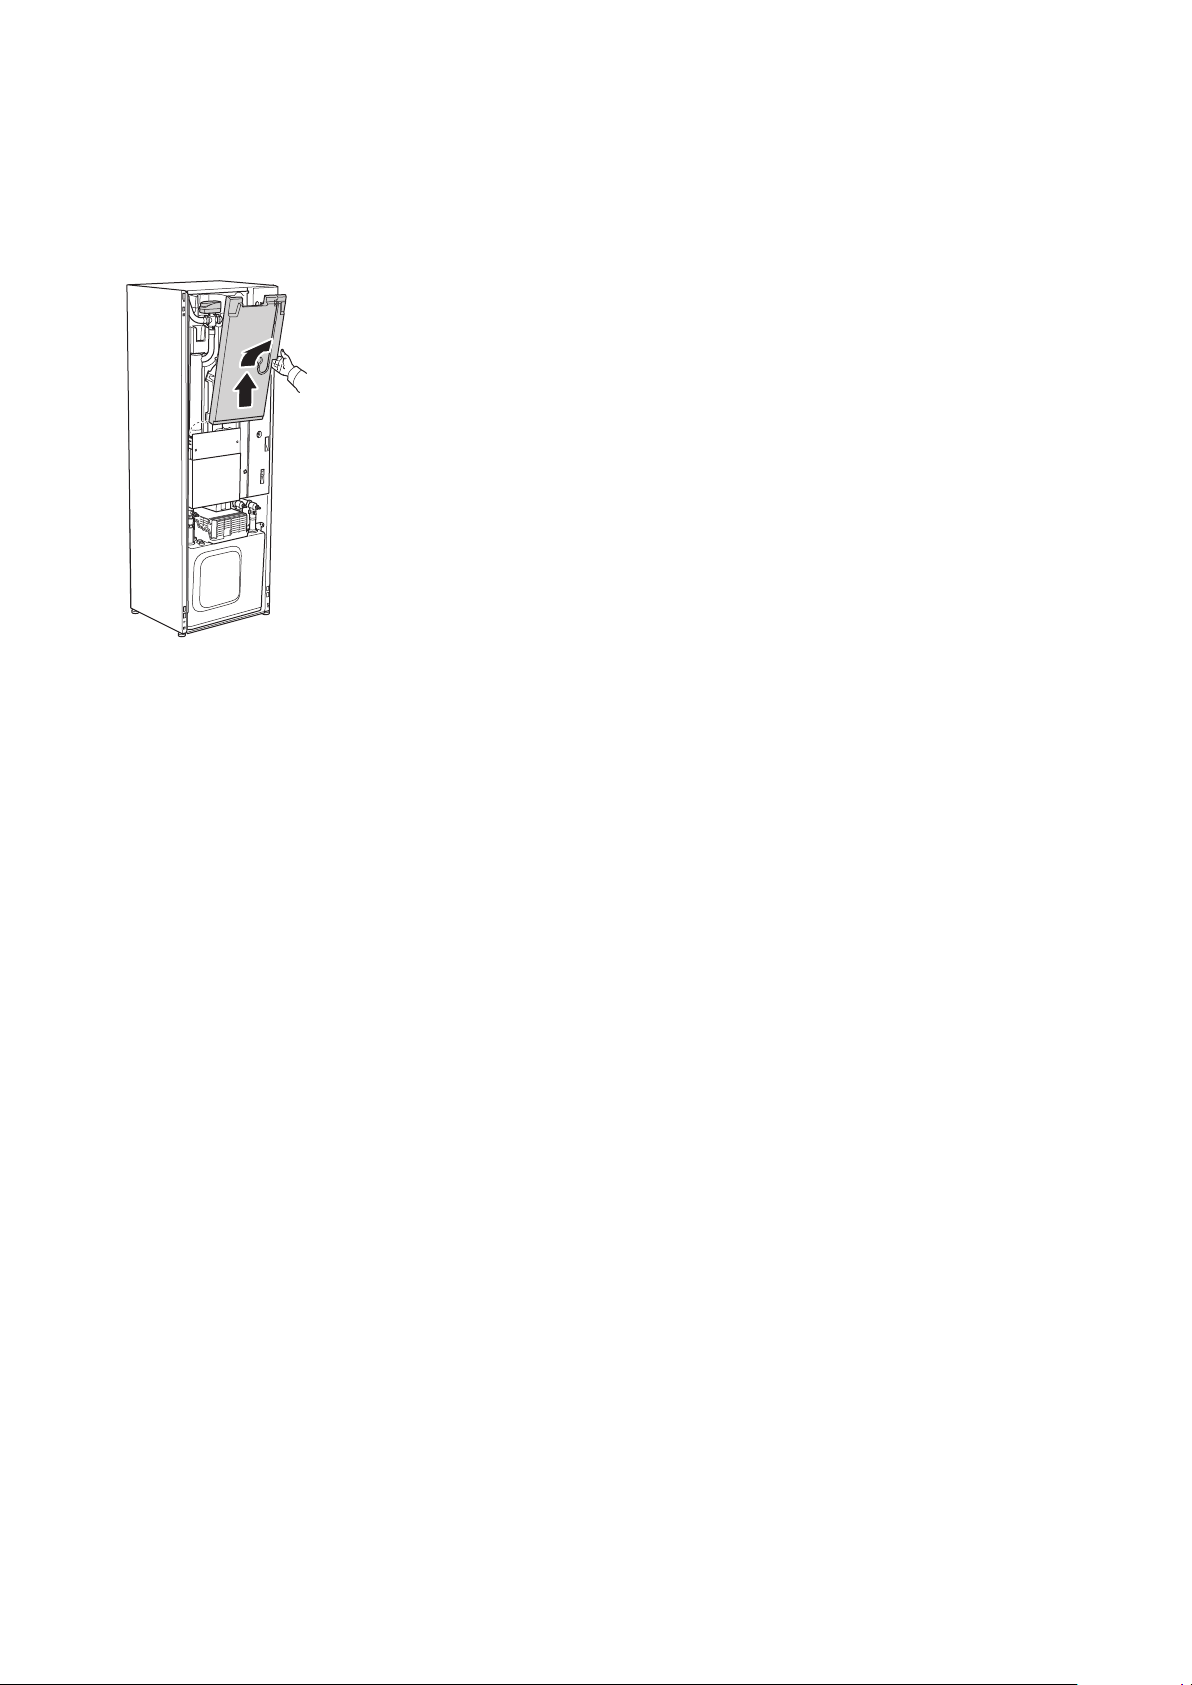
Remove the outer panels in order to protect them when
moving in confined spaces inside buildings.
R
0
R
0
EXTRACTING THE COOLING MODULE
To simplify transport and service, the heat pump can be
separated by pulling the cooling module out from the
cabinet.
See page 60 for instructions about the separation.
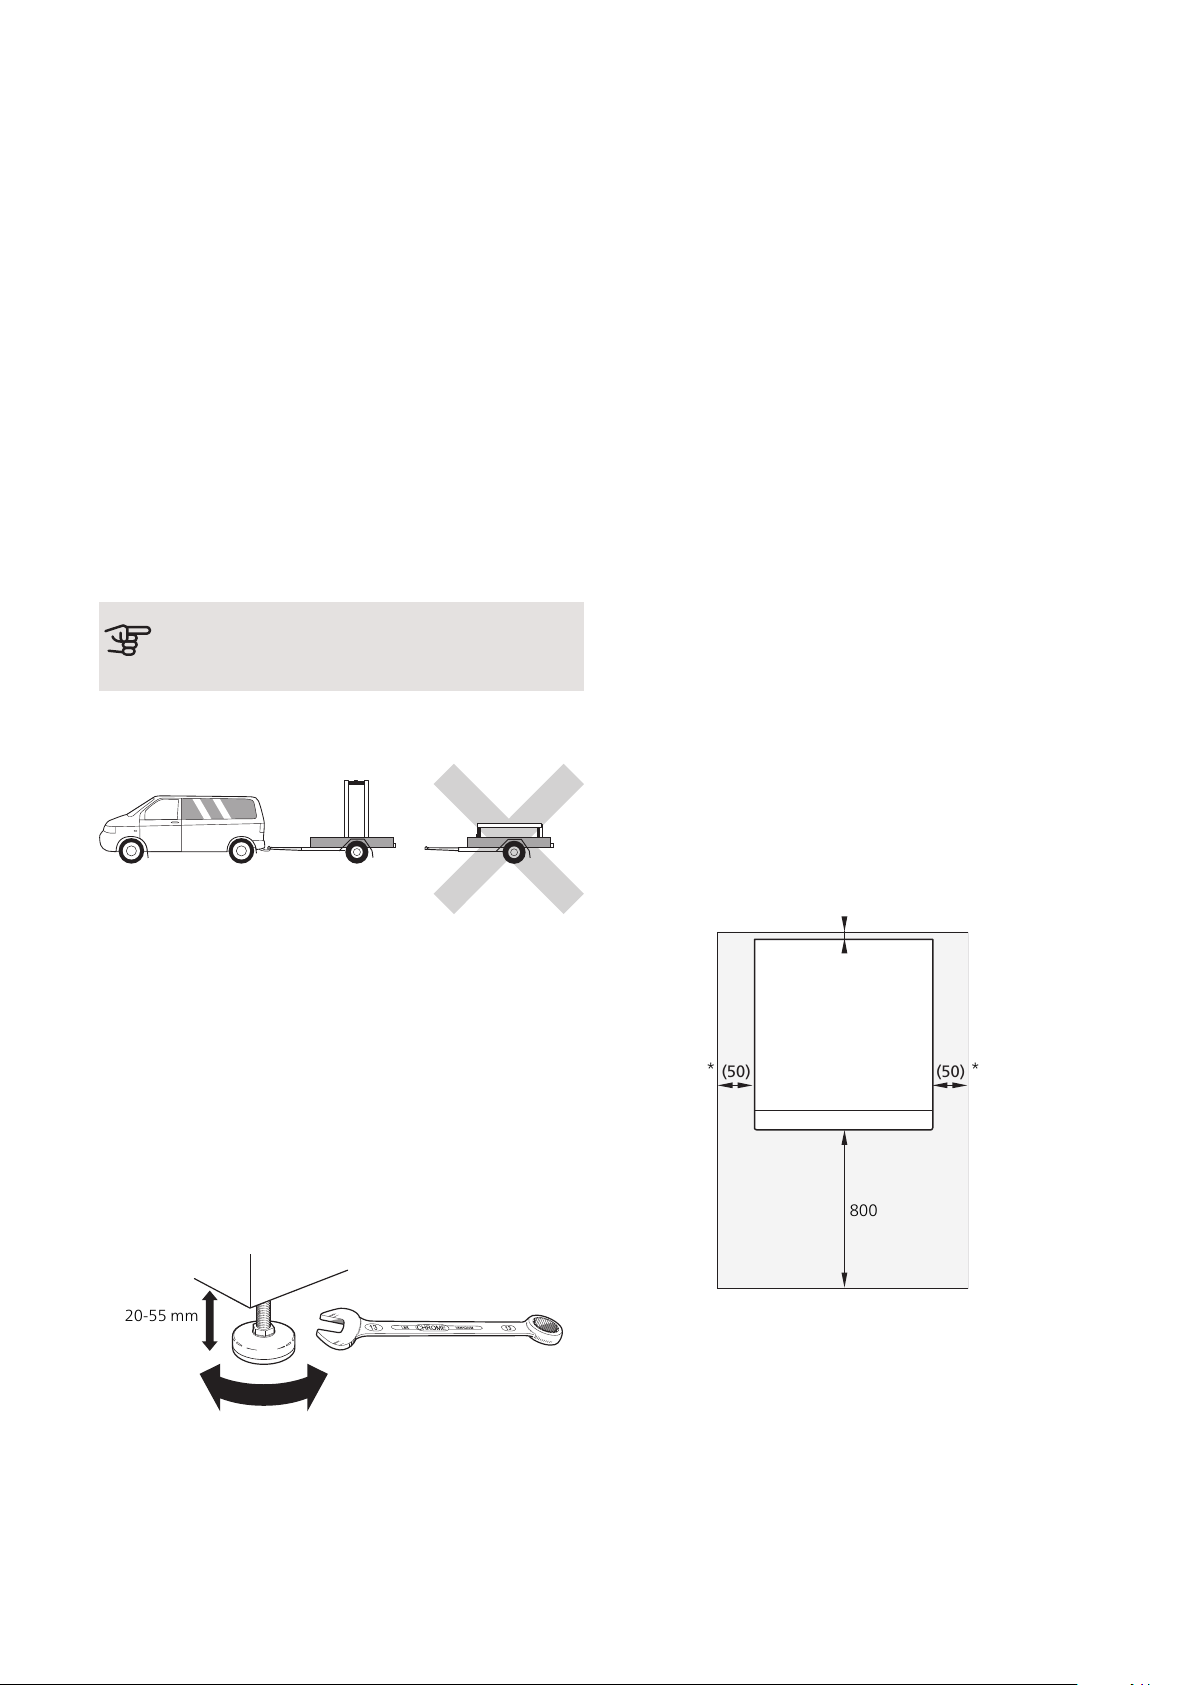
Assembly
• Place S1255PC on a solid foundation indoors that can
take the heat pump's weight. Use the product's ad-
justable feet to obtain a horizontal and stable set-up.
30 - 50 mm
30 - 50 mm
15 - 40 mm
20-55 mm
•Because water comes from S1255PC, the area where
the heating pump is located must be equipped with
floor drainage.
•Install with its back to an outside wall, ideally in a room
where noise does not matter, in order to eliminate
noise problems. If this is not possible, avoid placing
it against a wall behind a bedroom or other room
where noise may be a problem.
• Wherever the unit is located, walls to sound sensitive
rooms should be fitted with sound insulation.
• Route pipes so they are not fixed to an internal wall
that backs on to a bedroom or living room.
INSTALLATION AREA
Leave a free space of 800 mm in front of the product.
Approx. 50 mm free space is required on each side, to
remove the side panels (see image). The panels do not
need to be removed during service. All service on
S1255PC can be carried out from the front. Leave space
between the heat pump and the wall behind (and any
routing of supply cables and pipes) to reduce the risk of
any vibration being propagated.
(50) (50)
800
*
*
* A normal installation needs 300 – 400 mm (any side) for connection
equipment, i.e. level vessel, valves and electrical equipment.
NIBE S1255PCChapter 2 | Delivery and handling6
2 Delivery and handling

Supplied components
LEK
LEK
LEK
Current sensor1
3 x
Room sensor
1 x
Outside sensor
1 x
LEK
Level vessel1
1 x
O-rings
8 x
LEK
Safety valve
0.3 MPa (3 bar)1
1 x
Filterball
1 x G1
1 x G3/4
Compression ring
couplings
2 x (ø28 x G25)
2 x (ø22 x G20)
1Not Italy and the DACH countries.
LOCATION
The kit of supplied items is placed in packaging on top
of the heat pump.
Handling panels
OPEN FRONT HATCH
Press the hatch's top left corner to open it.
REMOVE THE FRONT
1. Remove the screw in the hole next to the on/off
button (SF1).
2. Pull the panel's top edge towards you and lift diag-
onally upwards to remove it from the frame.
UN
ASSEMBLE THE FRONT
1. Hook one bottom corner of the front onto the frame.
7Chapter 2 | Delivery and handlingNIBE S1255PC

2. Hook the other corner in place.
3. Check the display is straight. Adjust if necessary.
4. Press the top of the front section against the frame
and screw it into place.
REMOVE SIDE PANEL
The side panels can be removed to facilitate the install-
ation.
1. Remove the screws from the upper and lower
edges.
UN
2. Twist the panel slightly outwards.
UN
3. Move the panel outwards and backwards.
UN
NIBE S1255PCChapter 2 | Delivery and handling8

Assembly takes place in the reverse order.
Removing insulation
The insulation can be removed to make installation
easier.
UN
9Chapter 2 | Delivery and handlingNIBE S1255PC

General
UN
QN10
BT2
EB1
PZ1
QM34
QM31
BT6
QM32
QM33
PZ2
QM22 UB1
AA4
SF1
AA4-XF3
XL1
XL6
XL4 XL3
XL7
XL2
BF1
UB2
FC1
XL5
XF8
BT7
FR1
PIPE CONNECTIONS
Connection, heating medium flowXL1
Connection, heating medium returnXL2
Connection, cold waterXL3
Connection, hot waterXL4
Connection, HWCXL5
Connection, brine inXL6
Connection, brine outXL7
HVAC COMPONENTS
Venting, coilQM22
Shut-off valve, heating medium flowQM31
Shut off valve, heating medium returnQM32
Shut off valve, brine outQM33
Shut-off valve, brine inQM34
Shuttle valve, climate system/water heaterQN10
SENSORS ETC.
Flow meterBF1
Temperature sensors, heating medium flowBT2
Temperature sensor, hot water chargingBT6
Temperature sensor, hot water topBT7
ELECTRICAL COMPONENTS
Display unitAA4
AA4-XF3 USB port
Immersion heaterEB1
Miniature circuit breaker1
FC1
Electrical anode2
FR1
On/off buttonSF1
Network connection for myUplinkXF8
1S1255PC-6 3x400 V is not equipped with miniature circuit breakers
(FC1).
2Only heat pump with enamelled vessel.
MISCELLANEOUS
Rating platePZ1
Identification plate, cooling modulePZ2
Cable glandUB1
Cable glandUB2
Designations according to standard EN 81346-2.
NIBE S1255PCChapter 3 | The heat pump design10
3 The heat pump design

Distribution boxes
UN
-X29
-X28
1 0-5V
2 +5V
3 AUX1
4 AUX2
5 AUX3
6 AUX4
7 AUX5
8 AUX6
9 AUX7
10 AUX8
11AUX9
12 BT25
1
1
2
3
2
3
4
5
6
7
8
9
10
11
12
GND
+12V
B
A
OT+
OT−
0-5V
PWM0
PWM1
CPU
EXT COM
INT COM
ERROR
POWER
+5V
GND
BE1
BE2
BE3
K10
-X27
NO
O
NC
AUX-RELAY
13 BT50
14 BT1
-X30
FQ10-S2
FQ10
AA2
AA8
ELECTRICAL COMPONENTS
Base cardAA2
Electrical anode board1
AA8
Temperature limiterFQ10
FQ10-S2 Reset button for temperature limiter
1Only heat pump with enamelled vessel.
Cooling sections
QN18
BT12
AA3
BT11
GP2
GP1
QM2
QM1
BT10
EP6
BT3
RF2
EP2
RA1
BT15
XL21
QA40
BT17
BP1
BT14
HS1
XL20
EB10
EP1
GQ10
QN1
BP2
CA1
EP6
PIPE CONNECTIONS
Service connection, high pressureXL20
Service connection, low pressureXL21
HVAC COMPONENTS
Circulation pumpGP1
Brine pumpGP2
Drainage, climate systemQM1
Draining, brine sideQM2
Mixing valve, coolingQN18
SENSORS ETC.
High pressure pressostatBP1
Low pressure pressostatBP2
Temperature sensors, heating medium returnBT3
Temperature sensor, brine inBT10
Temperature sensor, brine outBT11
Temperature sensor, condenser supply lineBT12
Temperature sensor, hot gasBT14
Temperature sensor, fluid pipeBT15
Temperature sensor, suction gasBT17
ELECTRICAL COMPONENTS
Input circuit boardAA3
Compressor heaterEB10
InverterQA40
EMC-filterRF2
COOLING COMPONENTS
EvaporatorEP1
CondenserEP2
Heat exchanger, coolingEP6
CompressorGQ10
Drying filterHS1
Expansion valveQN1
11Chapter 3 | The heat pump designNIBE S1255PC

General
Pipe installation must be carried out in accordance with
current norms and directives. S1255PC can operate with
a return temperature of up to 58 °C and an outgoing
temperature from the heat pump of 70 (65 °C with only
the compressor).
S1255PC is not equipped with external shut off valves;
these must be installed to facilitate any future servicing.
Caution
Ensure that incoming water is clean. When
using a private well, it may be necessary to
supplement with an extra water filter.
Caution
Any high points in the climate system, must
be equipped with air vents.
NOTE
The pipe systems need to be flushed out be-
fore the heat pump is connected so debris
cannot damage component parts.
NOTE
Water may drip from the safety valve’s over-
flow pipe. The entire length of the overflow
water pipe must be routed to a suitable drain
and be inclined to prevent water pockets, and
must also be frost-proof. The overflow pipe
must be at least the same size as the safety
valve. The overflow pipe must be visible and
its mouth must be open and not located close
to electrical components.
NOTE
The climate system must be adjusted for both
heating and cooling operation.
SYMBOL KEY
MeaningSymbol
Unit box
Shut-off valve
Non-return valve
Circulation pump
Expansion vessel
Filterball
Fan
Pressure gauge
Level vessel
Particle filter
Safety valve
Temperature sensor
Reversing valve/shunt
Manual reversing valve/shunt
Heat exchanger
Overflow valve
Bore hole
Ground collector
Under floor heating systems
Heat pump
Pool
Radiator system
Domestic hot water
NIBE S1255PCChapter 4 | Pipe connections12
4 Pipe connections

SYSTEM DIAGRAM
S1255PC consists of a heat pump, water heater, elec-
trical module, circulation pumps and a control system.
S1255PC is connected to the brine and heating medium
circuits.
In the heat pump evaporator, the brine (water mixed
with anti-freeze, glycol or ethanol) releases its energy
to the refrigerant, which is vaporised in order to be
compressed in the compressor. The refrigerant, of which
the temperature has now been raised, is passed to the
condenser where it gives off its energy to the heating
medium circuit and, if necessary, to the water heater.
If there is a greater need for heating/hot water than the
compressor can provide there is an integrated immersion
heater.
The brine can also be circulated via a mixing valve to a
heat exchanger. There the brine cools the heating sys-
tem's water so that comfort cooling can be maintained
during the hotter periods of the year.
XL 1 6 3 7
42
Connection, heating medium flowXL1
Connection, heating medium returnXL2
Connection, cold waterXL3
Connection, hot waterXL4
Connection, brine inXL6
Connection, brine outXL7
Dimensions and pipe
connections
560 440
70
1800
650*
20-50
650*
600
60
135
210
390
465
540
25
622
622
600
560 440
70
1800
650*
20-50
25
60
135
210
390
465
540
650*
XL1 XL6 XL7XL4 XL3 XL2
PIPE DIMENSIONS
6
kW
Connection
22(mm)(XL1)/(XL2) Heating medium supply/return
ext. Ø
22(mm)(XL3)/(XL4) Cold/hot water Ø
28(mm)(XL6)/(XL7) Brine in/out ext. Ø
* Can be angled for side connection.
13Chapter 4 | Pipe connectionsNIBE S1255PC

Brine side
COLLECTOR
Caution
The length of the collector hose varies depend-
ing on the rock/soil conditions, climate zone
and on the climate system (radiators or under-
floor heating) and the heating requirement of
the building Each installation must be sized in-
dividually.
Max. length per coil for the collector should not exceed
400 m.
In those cases where it is necessary to have several
collectors, these should be connected in parallel with
the possibility for adjusting the flow of the relevant coil.
For surface soil heat, the hose should be buried at a
depth determined by local conditions and the distance
between the hoses should be at least 1 metre.
For several bore holes, the distance between the holes
must be determined according to local conditions.
Ensure the collector hose rises constantly towards the
heat pump to avoid air pockets. If this is not possible,
airvents should be used.
Because the temperature of the brine system can fall
below 0 °C, it must be protected against freezing down
to -15 °C. When making the volume calculation, use 1
litres of ready mixed brine per metre of collector hose
(applies when using PEM-hose 40x2.4 PN 6.3) as a guide
value.
SIDE CONNECTION
It is possible to angle the brine connections, for connec-
tion to the side instead of top connection.
To angle out a connection:
1. Disconnect the pipe at the top connection.
2. Angle the pipe in the desired direction.
3. If necessary, cut the pipe to the desired length.
CONNECTING THE BRINE SIDE
• Insulate all indoor brine pipes against condensation.
•The level vessel must be installed as the highest point
in the brine system on the incoming pipe before the
brine pump (Alt. 1).
If the level vessel cannot be placed at the highest
point, an expansion vessel must be used (Alt. 2).
NOTE
Note that condensation may drip from the level
vessel. Position the vessel so that this does
not harm other equipment.
• Details of the antifreeze used must be shown on the
level vessel.
•Install the enclosed safety valve below the level vessel
as illustrated.
• Install a shut off valve for outgoing brine as close to
the heat pump as possible.
• Fit the enclosed filterball on the incoming brine.
TIP
If filling connection KB25/KB32 is used, the
enclosed filterball does not need to be fitted.
In the case of connection to an open groundwater sys-
tem, an intermediate frost-protected circuit must be
provided, because of the risk of dirt and freezing in the
evaporator. This requires an extra heat exchanger.
P
-QZ20
Alt. 1 Alt. 2
XL6
XL7
Heating medium side
CONNECTING THE CLIMATE SYSTEM
A climate system is a system that regulates indoor
comfort with the help of the control system in S1255PC
and for example radiators, underfloor heating/cooling,
fan convectors etc.
•Install all necessary safety devices, shut-off valves (as
close to the heat pump as possible) and the enclosed
filterball.
NIBE S1255PCChapter 4 | Pipe connections14

• Fit safety valve on heating medium return as illus-
trated. Recommended opening pressure is 0.25 MPa
(2.5 bar). For information about max opening pressure,
see technical specifications.
• When connecting to a system with thermostats on all
radiators (or underfloor heating coils), either a bypass
valve must be fitted or some of the thermostats must
be removed to ensure there is sufficient flow.
P
XL1
XL2
Cold and hot water
CONNECTING COLD AND HOT WATER
• Fit shut-off valve, non-return valve and safety valve as
illustrated.
• A mixer valve must also be installed, if the factory
setting for hot water is changed. National regulations
must be observed.
•The safety valve must have a maximum 1.0 MPa (10.0
bar) opening pressure and be installed on the incoming
domestic water line as shown.
• The settings for hot water are made in menu 7.1.1.
XL3
XL4
Docking alternatives
S1255PC can be connected in several different ways,
some of which are shown below.
Further option information is available at nibe.eu/ODM
and in the respective assembly instructions for the ac-
cessories used. See page 66 for a list of the accessories
that can be used with S1255PC.
EXTRA HOT WATER HEATERS
The heat pump should be supplemented with an extra
water heater, if a large bath tub or other significant
consumer of hot water is installed.
Water heater with immersion heater
If it is possible to use a water heater with an immersion
heater, connect it as illustrated below.
XL3
XL4
GROUND WATER SYSTEM
An intermediate heat exchanger is used to protect the
heat pump's exchanger from dirt. The water is released
into a buried filtration unit or a drilled well. See page 23
for more information about connecting a ground water
pump.
If this docking alternative is used, "min. brine out" in
menu 7.1.2.8 "br pmp al set." must be changed to a
suitable value to prevent freezing of the heat exchanger.
-EP12-GP3
-EP12-HQ40
-EP12-EP4
-EP12-AA25
-EP12
15Chapter 4 | Pipe connectionsNIBE S1255PC

VENTILATION RECOVERY
The installation can be supplemented with the exhaust
air module NIBE FLM S45 to provide ventilation recov-
ery.
• Pipes and other cold surfaces must be insulated with
diffusion-proof material to prevent condensation.
• The brine system must be supplied with a pressure
expansion vessel. If there is a level vessel this should
be replaced.
P
TWO OR MORE CLIMATE SYSTEMS
In buildings with several climate systems that require
different supply temperatures, the accessory
ECS 40/ECS 41 can be connected. A shunt valve then
lowers the temperature to the underfloor heating sys-
tem, for example.
-EP21-GP20-EP21-BT2
-EP21-AA25
-EP21-BT3
-EP21-QN25
-EP21
POOL
With the POOL 40 accessory, you can heat the pool
with your heat pump.
During pool heating, the heating medium circulates
between the S1255PC and the pool exchanger using
the heat pump’s internal circulation pump.
-CL11-HQ4-CL11-BT51-CL11-GP9
-CL11-EP5-CL11-QN19
-CL11-AA25
-CL11
NIBE S1255PCChapter 4 | Pipe connections16

General
All electrical equipment, except the outdoor sensors,
room sensors and the current sensors are ready connec-
ted at the factory.
• Electrical installation and wiring must be carried out
in accordance with the stipulations in force.
• Disconnect S1255PC before insulation testing the
house wiring.
• If the building is equipped with an earth-fault breaker,
S1255PC should be equipped with a separate one.
• S1255PC must be installed via an isolator switch. The
cable area has to be dimensioned based on the fuse
rating used.
• If a miniature circuit breaker is used, this must have
motor characteristic "C" as a minimum. See section
"Technical specifications" for fuse size.
• To prevent interference, sensor cables to external
connections must not be laid close to high voltage
cables.
• The minimum area of communication and sensor
cables to external connections must be 0.5 mm² up
to 50 m, for example EKKX, LiYY or equivalent.
• Electrical wiring diagram for the heat pump, see sep-
arate Installer Manual.
• When cable routing in S1255PC, the cable grommets
(UB1 and UB2) must be used.
UB1
UB2
FC1
NOTE
Electrical installation and any servicing must
be carried out under the supervision of a quali-
fied electrician. Disconnect the current using
the circuit breaker before carrying out any ser-
vicing.
NOTE
If the supply cable is damaged, only NIBE, its
service representative or similar authorised
person may replace it to prevent any danger
and damage.
NOTE
Check the connections, main voltage and phase
voltage before the machine is started, to pre-
vent damage to the heat pump electronics.
NOTE
Do not start the system before filling up with
water. Components in the system could be
damaged.
MINIATURE CIRCUIT-BREAKER
The operating circuit in S1255PC and some of its internal
components are fused internally by a miniature circuit
breaker (FC1).
S1255PC-6 3x400 V is not equipped with miniature cir-
cuit breakers (FC1).
17Chapter 5 | Electrical connectionsNIBE S1255PC
5 Electrical connections

ACCESSIBILITY, ELECTRICAL CONNECTION
Removing the cover
The cover is opened using a screwdriver.
Removing the covers
The cover is opened using a screwdriver.
CABLE LOCK
Use a suitable tool to release/lock cables in the heat
pump terminal blocks.
Terminal block
1.
2.
TEMPERATURE LIMITER
-X29
-X28
1 0-5V
2 +5V
3 AUX1
4 AUX2
5 AUX3
6 AUX4
7 AUX5
8 AUX6
9 AUX7
10AUX8
11AUX9
12 BT25
1
1
2
3
2
3
4
5
6
7
8
9
10
11
12
GND
+12V
B
A
OT+
OT−
0-5V
PWM0
PWM1
CPU
EXT COM
INT COM
ERROR
POWER
+5V
GND
BE1
BE2
BE3
K10
-X27
NO
O
NC
AUX-RELAY
13 BT50
14 BT1
-X30
FQ10-S2
The temperature limiter (FQ10) cuts the power supply
to the electrical additional heat if the temperature rises
above 89 °C and it is reset manually.
Resetting
The temperature limiter (FQ10) can be accessed behind
the front cover. Reset the temperature limiter by
pressing its button (FQ10-S2).
NIBE S1255PCChapter 5 | Electrical connections18

Connections
POWER CONNECTION
Supply voltage
Enclosed cable for incoming supply electricity is connec-
ted to terminal block X1 and X6-1 on the PCB AA2.
-X29
-X28
1 0-5V
2 +5V
3 AUX1
4 AUX2
5 AUX3
6 AUX4
7 AUX5
8 AUX6
9 AUX7
10 AUX8
11AUX9
12 BT25
1
1
2
3
2
3
4
5
6
7
8
9
10
11
12
GND
+12V
B
A
OT+
OT−
0-5V
PWM0
PWM1
CPU
EXT COM
INT COM
ERROR
POWER
+5V
GND
BE1
BE2
BE3
K10
-X27
NO
O
NC
AUX-RELAY
13 BT50
14 BT1
-X30
X29
X28 X27
AA2
X9
X7-2
X6-1 X6-2 X5
X1
X30
Connection 3x400V
AA2-X1
AA2-X6-1
PE N L1 L2 L3
1 2 3 4
Connection 1x230V
AA2-X1
PE N L (L) (L)
1 2 3 4
AA2-X6-1
If separate supply to the compressor and electric heater
is required, see section "External blocking of functions".
External control voltage for the control system
NOTE
Only applies to power connection 3x400 V.
NOTE
Mark up any junction boxes with warnings for
external voltage.
Control voltage (230 V ~ 50Hz) connects to AA2:X5:N,
X5:L and X6-2 (PE).
When connecting external control voltage, remove the
bridges from terminal block X5.
L
N
1. 2.
3. 4.
AA5
19Chapter 5 | Electrical connectionsNIBE S1255PC

EXTERNAL CONNECTIONS
External connections are connected on terminal blocks
X28, X29 and X30 on the PCB (AA2).
-X29
-X28
1 0-5V
2 +5V
3 AUX1
4 AUX2
5 AUX3
6 AUX4
7 AUX5
8 AUX6
9 AUX7
10 AUX8
11 AUX9
12 BT25
1
1
2
3
2
3
4
5
6
7
8
9
10
11
12
GND
+12V
B
A
OT+
OT−
0-5V
PWM0
PWM1
CPU
EXT COM
INT COM
ERROR
POWER
+5V
GND
BE1
BE2
BE3
K10
-X27
NO
O
NC
AUX-RELAY
13 BT50
14 BT1
-X30
X28
X29
X30
AA2
X27
Sensors
Outside sensor
The outdoor sensor (BT1) is placed in the shade on a
wall facing north or north-west, so it is unaffected e.g.
by the morning sun.
The outdoor sensor is connected to terminal block AA2-
X28:14 and to any input on terminal block AA2-X29.
If a conduit is used it must be sealed to prevent condens-
ation in the sensor capsule.
13
1211
109 14
BT1
BT1
BT50
GND
BT25
AUX9
AUX8
AUX7
AA2-X28
AA2-X29
Temperature sensor, external flow line
Connect temperature sensor, external supply line (BT25)
to terminal block AA2-X28:12 and to any input on termin-
al block AA2-X29.
1211109
BT25
GND
BT25
AUX9
AUX8
AUX7
AA2-X28
AA2-X29
Room sensor
S1255PC is supplied with an enclosed room sensor
(BT50) that makes it possible to display and control the
room temperature in the display on S1255PC.
Fit the room sensor in a neutral position where a set
temperature is required. A suitable location might be,
for example, on a free inner wall in a hall approx. 1.5 m
above the floor. It is important that the room sensor is
not obstructed from measuring the correct room tem-
perature, for example by being located in a recess,
between shelves, behind a curtain, above or close to a
heat source, in a draught from an external door or in
direct sunlight. Closed radiator thermostats can also
cause problems.
S1255PC operates without room sensor, but if you want
to read the home’s indoor temperature from the display
on S1255PC, the room sensor must be fitted. The room
sensor is connected on terminal block X28:13 and to
any input on terminal block AA2-X29.
If a room sensor is to be used to change the room
temperature in °C and/or to fine-tune the room temper-
ature, the sensor must be activated in menu 1.3 "Room
sensor settings".
If a room sensor is used in a room with underfloor
heating, it should only have an indicatory function, not
control of the room temperature.
13121110
BT50
GND
BT50
BT25
AUX9
AUX8
AA2-X28
AA2-X29
Caution
Changes of temperature in accommodation
take time. For example, short time periods in
combination with underfloor heating will not
give a noticeable difference in room temperat-
ure.
External energy meter
One or two energy meters (BE6, BE7) are connected to
AA2-X28:1-2 or AA2-X30:7-8.
NIBE S1255PCChapter 5 | Electrical connections20
Table of contents
Other Nibe Heat Pump manuals