Instrument Error · · · · · ·
INC
INC
INC
INC
INC
INC INC
Read the manual and follow the directions.
・Use of product other than as described in
this manual may cause accident.
Use only for measuring.
・Use for any purpose other than measuring
may damage or wear the instrument.
Improper use may also cause accident.
Handle with Care.
・
Do not drop or subject instrument to excessive
force. Do not place under heavy objects. Improper
handling may cause damage or poor accuracy.
・Do not scratch or mark instrument.
Avoid using in high electric fields, such as near
fluorescent lights or switching power supplies.
・Incorrect value may be displayed on LCD
and may result in accident or injury.
Use and store only in environment meeting
the following conditions:
●Dry location protected from rain, water,
and oils.
●Location that is not excessively hot.
●Location protected from use by children
and unauthorized people.
・Use in places contrary to the above may
cause damage to the product resulting in
accident or injury.
・Disassembly may damage product or
cause accident. For repair, please
contact distributor or place of purchase.
Do not write on instrument with electric engraver.
・Do not engrave instrument Base or
Main Beam, such as for an ID number
with engraver or electric pen.
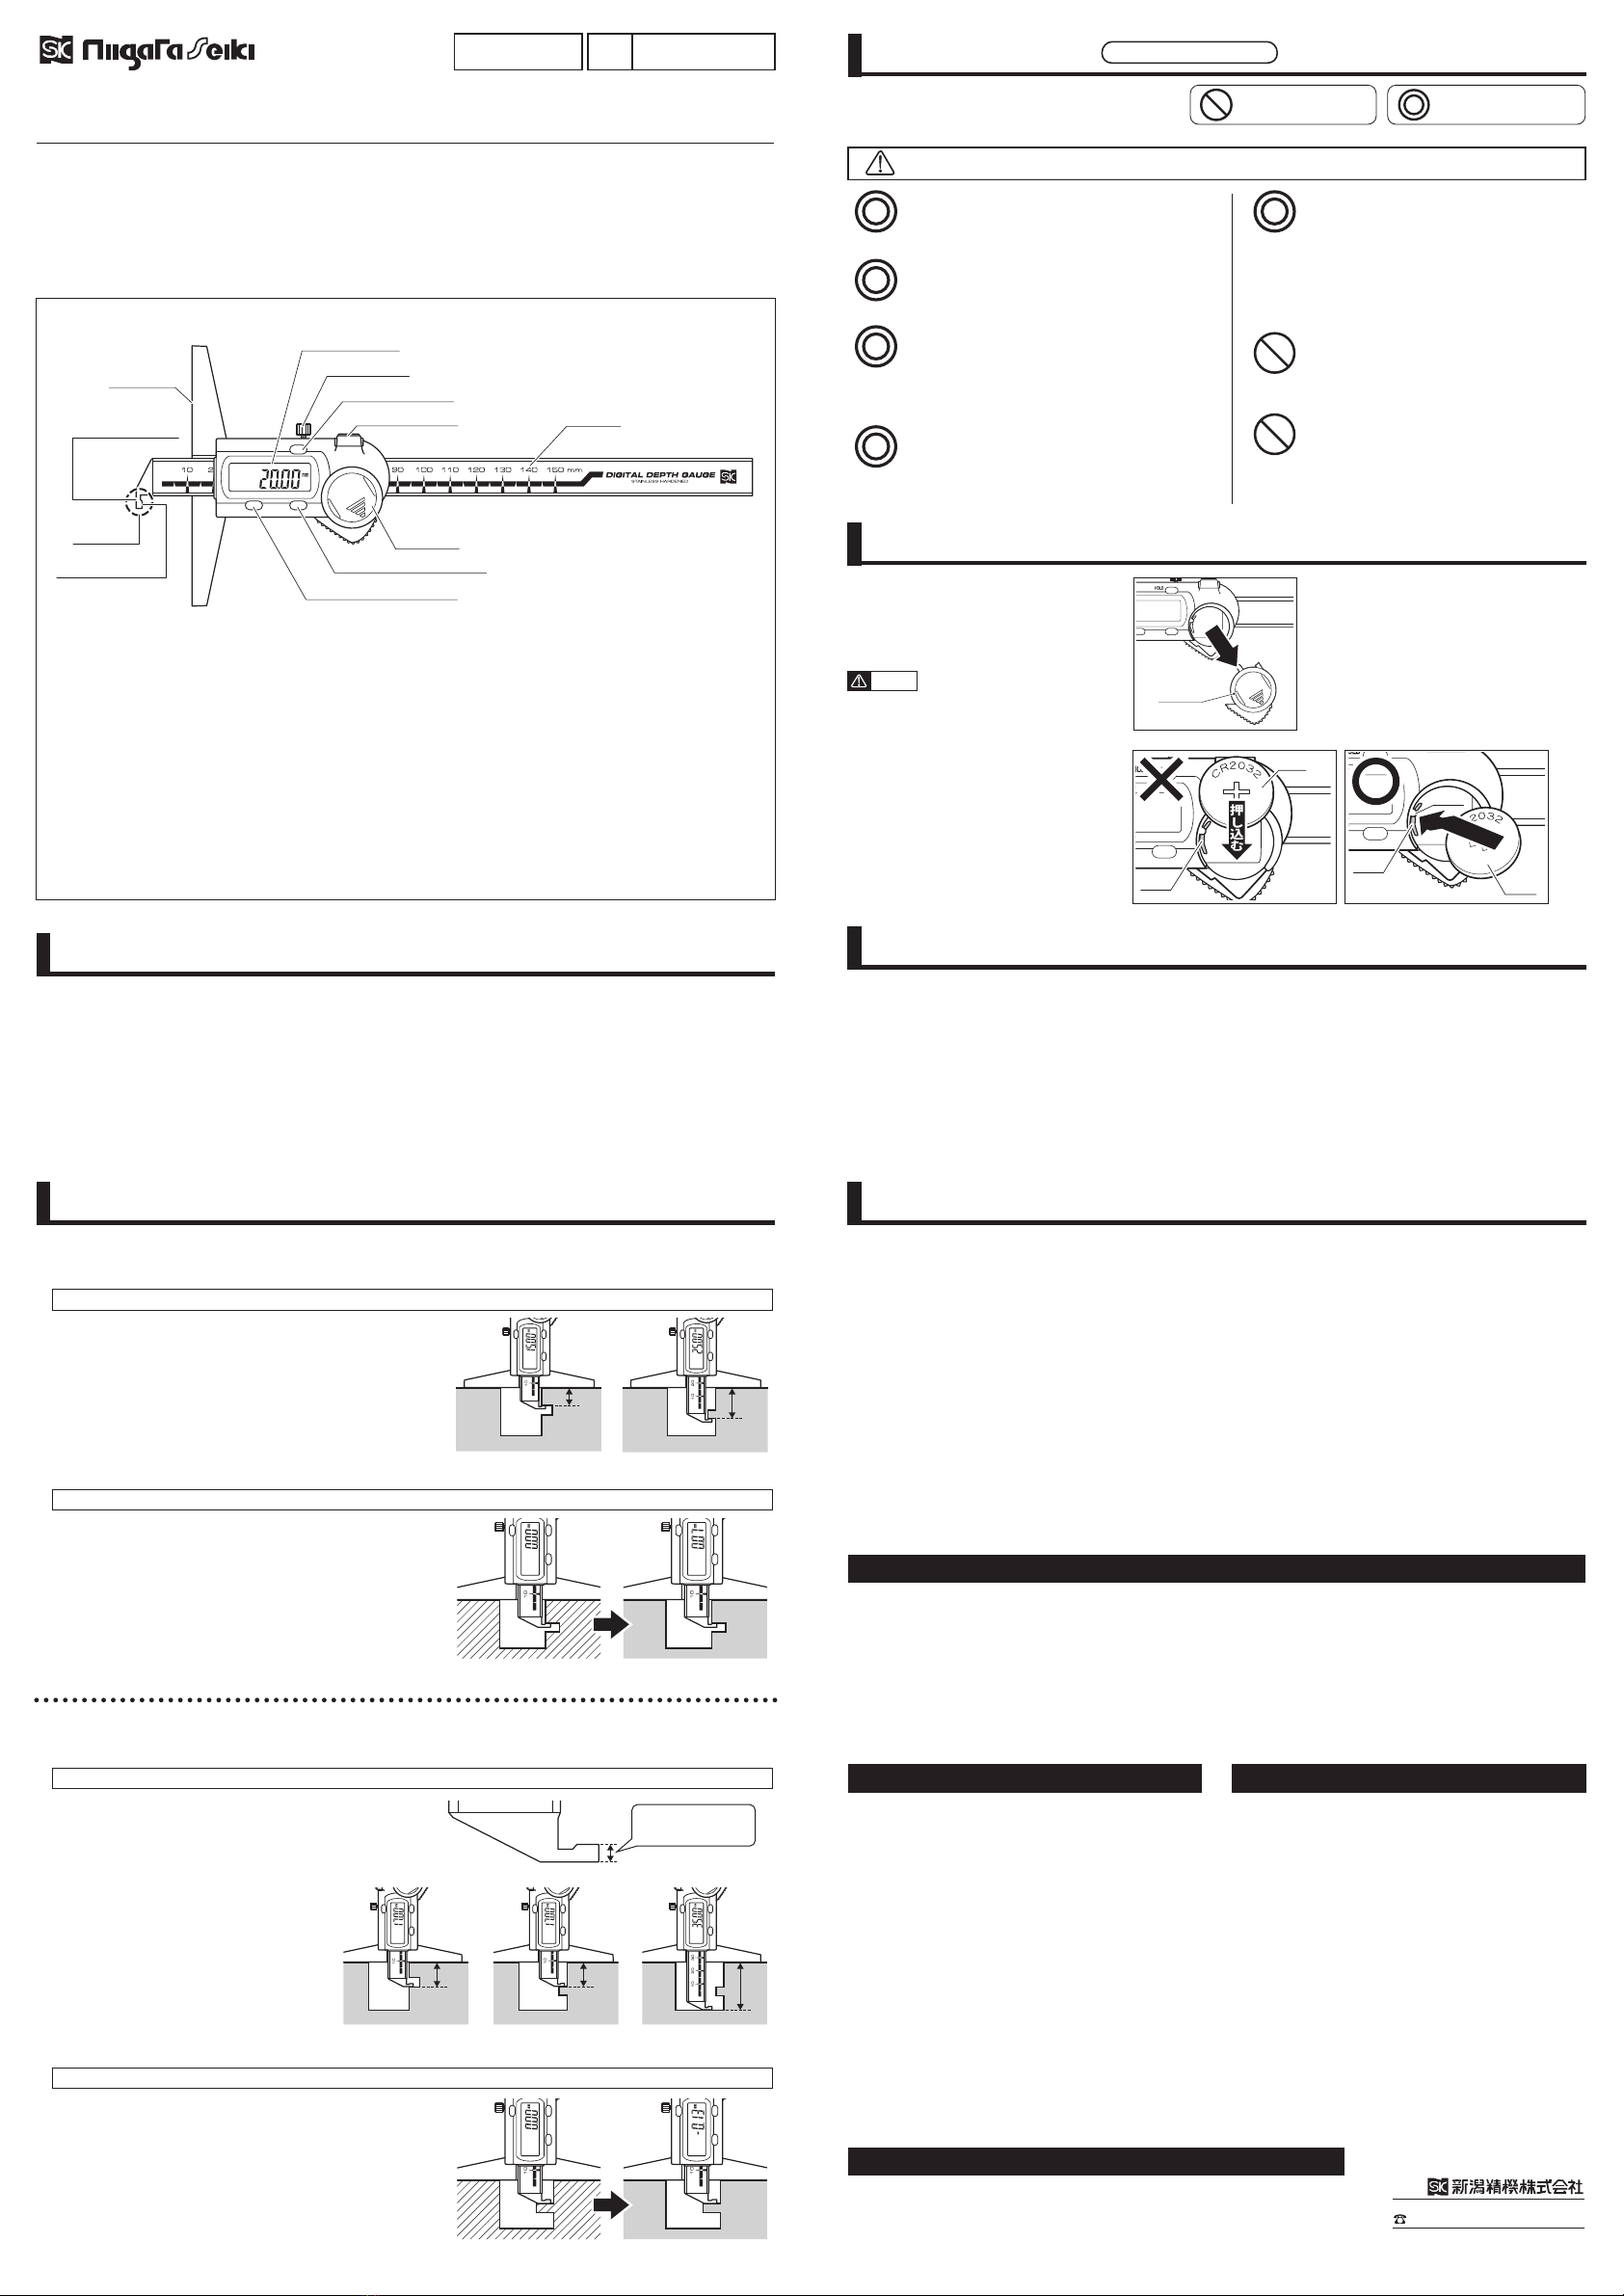
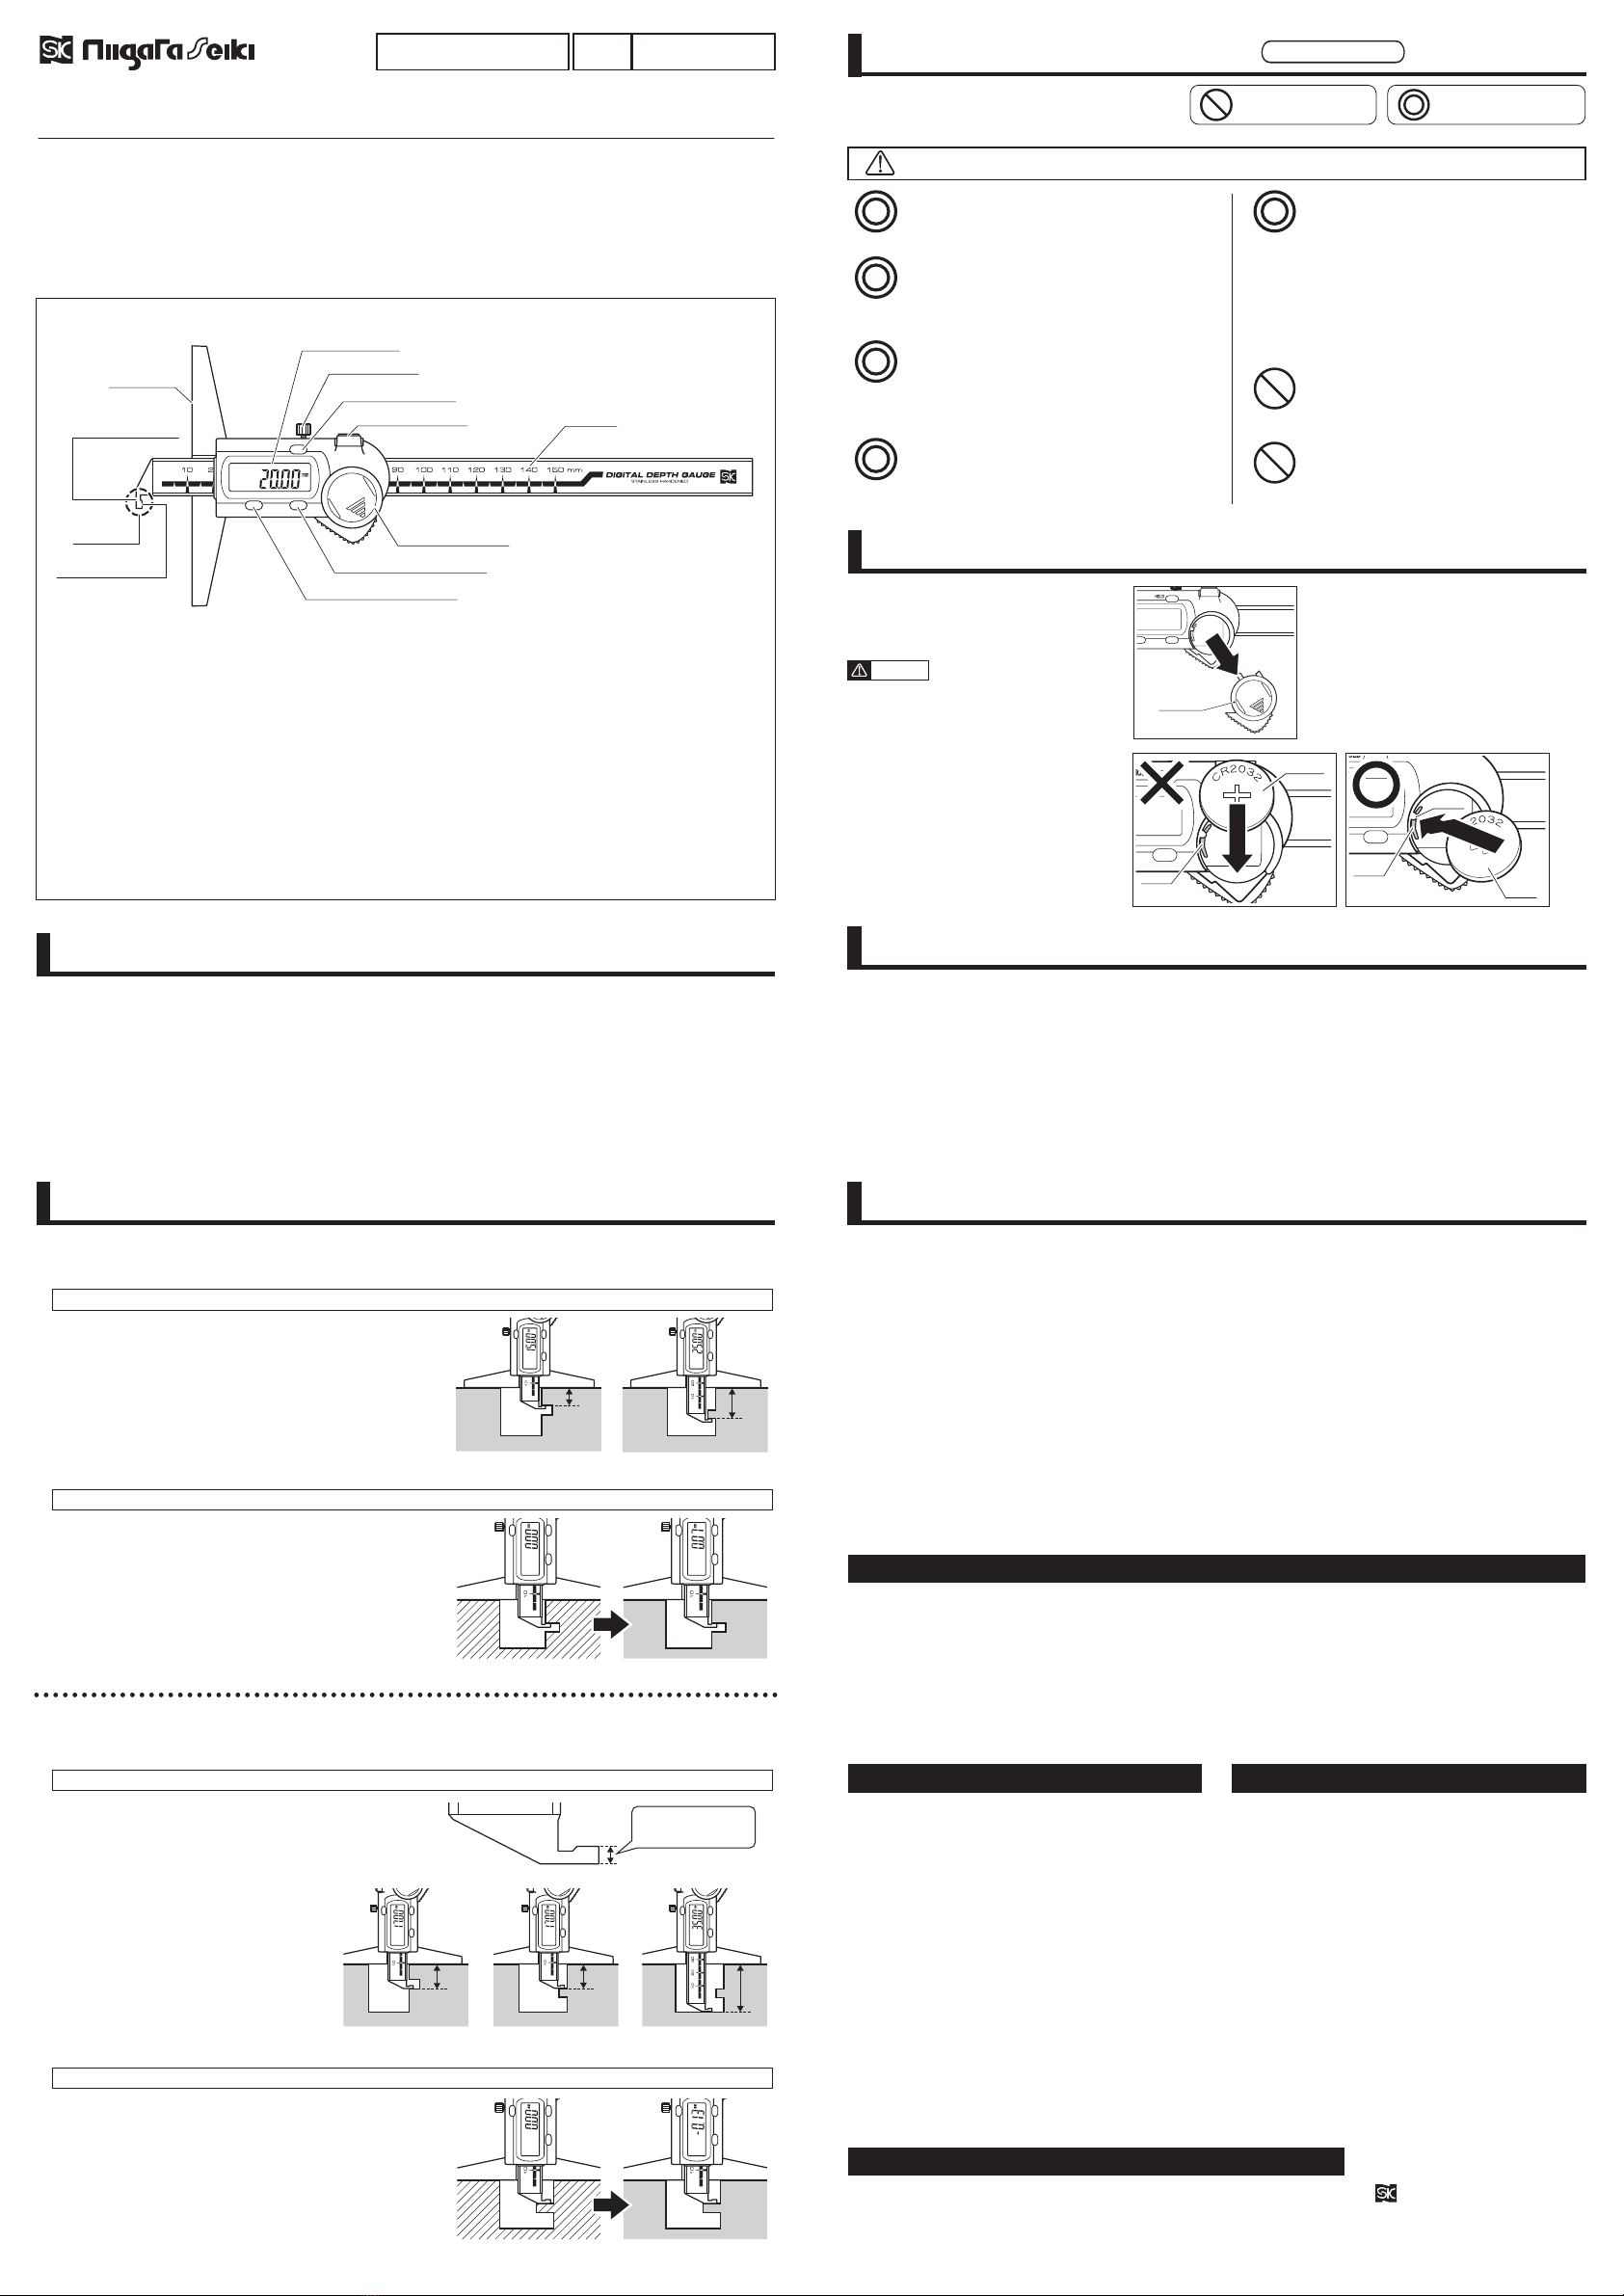
⑪ [ON/OFF/P] Button
③ Hook Meas.
Surface
④ Hook
⑤LCD Display
⑥ Lock Screw
⑦[HOLD]Button
⑧ Output Conn.
① Base · · · · · · · · · · · · · · · · · · · Reference surface positioned on workpiece.
② Depth Meas. Surface · · · · Depth is measured as distance to this surface.
③ Hook Meas. Surface · · · · · Depth in Hook Mode is distance to this surface.
④ Hook · · · · · · · · · · · · · · · · · · · Can be used to measure depth on offset features of workpiece.
⑤ LCD Display · · · · · · · · · · · · Displays digital measurement.
⑥ Lock Screw · · · · · · · · · · · · · Tighten to prevent the slide and display from moving.
⑦ [HOLD] Button · · · · · · · · · · When pressed, "HOLD" Icon appears on Display and measurement
will be fixed.
⑧ Output Connector · · · · · · Connect to optional Bluetooth Box to send measurements to PC.
⑨ Battery Cover · · · · · · · · · · · Open for access to Battery.
⑩ [ZERO/INC] Button · · · · · · When pressed, Display will read "0.00"
⑪ [ON/OFF/P] Button · · · · · · For turning power ON / OFF, and setting Preset value.
⑫ Main Beam · · · · · · · · · · · · · Supports LCD Display and Slide.
⑨ Battery Cover
⑩[ZERO/INC] Button
DIGITAL DEPTH GAUGE
(HOOK END)
Thank you for purchasing Niigata Seiki Digital Depth Gauge.
This is a precision measuring tool for measuring depth. In addition to standard depth measurements, this
gauge has a hooked probe for measuring depth of offset surfaces on features such as grooves and ledges, as
well as standard depth measurements.
●For safe and proper use, please read this instruction manual before use and follow the procedures described.
●Please keep manual where it is accessible to user for future reference.
Keep this manual with the instrument if transferred or leased to a third party.
●For inquiries about this product, please contact distributor or place of purchase.
■PART IDENTIFICATION
& FUNCTION
①Base
GDCP-150DF
Model
No.
INSTRUCTION MANUAL
SAFETY PRECAUTIONS Please Observe
To prevent harm to yourself or others, and to
prevent damage to property, always follow the
procedures marked by the following symbols.
WARNING:
Indicates risk of personal injury or property damage if not followed.
Denotes a prohibition
‒ You MUST NOT do
Denotes a requirement
‒ You MUST do
INSERTING ・ REPLACING BATTERY
HOW TO USE
AFTER USE CARE ・ STORAGE
TROUBLESHOOTING SPECIFICATIONS
After use, wipe off any dirt or oil from measuring surfaces, sliding surfaces, and exterior using a dry cloth and
perform rust prevention treatment.
For rust prevention, lightly apply anti-rust oil, or place in rust preventive bag.
Store with Lock Screws loosened.
If stored with Lock Screw tight, expansion due to temperature changes may cause excessive force which will
cause inaccuracy.
Store in a cool, dry, and dark location in the provided case.
Keep out of direct sunlight and moisture, and please keep secure from unauthorized personnel.
Remove battery if Gauge will not be used for a long period of time.
●
●
If Instrument is not working properly, or if you have any questions, please
contact distributor or place of purchase.
Please note, manufacturer is unable to respond to inquires or provide
service directly. Please contact distributor or place of purchase.
Q. Nothing is displayed on LCD.
A. The battery may be running low, please replace
battery with a new one.
Q. With power on, the number on the LCD does
not change as Display Unit is moved.
A. Please reset by removing battery for about
30sec., and then replacing.
Q. Nothing happens when buttons are pressed.
A. Make sure battery is properly inserted.
Q. The characters “MIN”, “MAX”, or “△” are
displayed on LCD.
A. Cycle power, or apply several long presses to
[HOLD] Button. Use as normal once character
is off.
Q. The correct value is not displayed.
A. High humidity may cause dampness. Please
dry off the instrument and use only in dry
location.
■Hook Measurements
Distance to surfaces inside a groove or hole can be measured using this method.
① Loosen the Lock Screw and turn power ON.
②Position the Hook against the Base of the Gauge so
that there is no gap and press the [ZERO/INC] Button.
③ The LCD will displays "0.00mm" and "INC", the gauge
is ready for measurements.
④ The display reading will be the distance from the top
surface of the Hook to the instrument Base.
SERVICE
Measurement Range
· · · · Hook Meas. …0-150mm
Depth Meas.
…2.1-150mm
Resolution · · · · · · · · · · · · 0.01mm
±0.03mm
※ Not including ±1 count quantization error
Display · · · · · · · · · · · · · · · 6 Digit LCD
Auto Off · · · · · · · · · · · · · · approx. 20 min.
Max. Response · · · · · · · · Slide in pos. dir. … 1.5m/s
Slide in neg. dir. … 0.75m/s
Operating Temp. · · · · · · 0℃
~
40℃
Storage Temp. · · · · · · · ·
-
10℃
~
60℃
Power · · · · · · · · · · · · · · · ·
(1x) CR2032 Lithium Battery
Battery Life · · · · · · · · · · ·
approx. 2.5 years in normal use.
Weight · · · · · · · · · · · · · · · 190g
Accessory · · · · · · · · · · · ·
CR2032 Lithium Battery (for test)
① Slide cover in direction of arrow.
② Insert battery with (+) side outward.
③ Replace battery cover.
●
●
●
Use care to avoid damaging
terminals when inserting battery.
Terminals may be broken if battery is
pressed straight down.
Insert battery at angle, underneath
the small hook, as shown.
Use only CR2032 type
battery.
NOTICE
Battery
Cover
Remove
Batt.
Hook
Slide In
Battery
Pressed Down
Terminal Terminal
PREPARATION FOR USE
MEASUREMENTS PRESET FUNCTION
■Power ON/OFF
① To turn ON, press the [ON/OFF/P] Button.
② To turn OFF, press and hold the [ON/OFF/P] Button for about 2 sec.
※If power does not turn OFF, gauge is expecting Preset Value to be set. (Refer to "Preset Function" section
for instructions on clearing.)
③HOLD Function
With power ON, pressing the [HOLD] Button will freeze the value on the Display. Press a second time to
release.
Before using the Gauge, please follow the steps below:
●
Wipe off rust proofing and dirt from measuring surfaces and slide.
Contamination of surfaces may cause measurement error.
●Allow the Gauge and object to be measured time to reach the same temperature.
A temperature difference between the object to be measured and the instrument may cause measurement
error. Allow enough time for the temperatures to equilibrate.
Absolute Mode
① Loosen the Lock Screw and turn power ON.
②Position the Hook against the Reference Surface and
press the [ZERO/INC] Button.
The LCD will displays "0.00mm" and "INC", the
Reference Measurement is now set.
③When measuring a workpiece, the display reading will
be difference between the Reference Surface and the
workpiece surface.
Comparative Mode
■Depth Measurement
By measuring the thickness of the Hook and setting it as a Preset Value, the Gauge can be used as a Depth Gauge
for standard and for offset depth measurements.
By entering a Preset Value, that value can be set as reference point for future measurements.
【Setting the Preset Value】
① Loosen the Lock Screw and turn power ON.
② Press the [ON/OFF/P] Button and the letter "P" will start to blink on the Display.
③ Press and hold the [ON/OFF/P] Button and the blinking character will move to one of the display digits.
④ A short press of the [ON/OFF/P] Button will change the value of the blinking character.
⑤ Repeat steps ③ and ④ to set the desired value on the display.
⑥ When the desired value is displayed, move the blinking character back to the letter "P" and a short press of
the [ON/OFF/P] Button will set that value as the Preset.
【Recalling the Preset Value】
Press the [ON/OFF/P] Button 2 times to recall the Preset Value to the Display.
【Preset Measurement Mode】
The Preset Value is stored and will be retained even after switching modes using the [ZERO/INC] Button.
①
②
Loosen the Lock Screw and measure the Hook thickness
using a micrometer or similar precision instrument.
Preset the value measured in step ① using the "Preset
Function".
③Position the Hook against the Base of
the Gauge so that there is no gap and
press the [ON/OFF/P] Button 2 times
to set the display reading to the
Preset Value.
④When measuring a workpiece, the
display reading will be the distance
from the base to the bottom surface.
※Refer to "Preset Function" for
directions on setting Presets.
Absolute Mode
※Preset Function not needed for this mode.
①
②
Loosen the Lock Screw and turn power ON.
Position the Probe against the Reference Surface and
press the [ZERO/INC] Button.
The LCD will displays "0.00mm" and "INC", the Reference
Point is now set.
③When measuring a workpiece, the display reading will
be difference between the Reference Surface and the
measured surface.
Comparative Mode
Groove Measurement
Set to 0 on Ref. Surface Comparative Meas.
Ledge Measurement
Ledge Meas. Bottom SurfaceGroove Meas.
Hook dimension
set as Preset Value
Set to 0 on Ref. Surface Comparative Meas.
Niigata Seiki Co., Ltd.
5-3-14, Tsukanome, Sanjo, Niigata, Japan, 955-0055
Tel. : +81-256-33-5522 Fax. : +81-256-33-5518
URL http://www.niigataseiki.co.jp
Precision Depth
Measurement
② Depth
Meas. Surface
⑫ Main
Beam
Do not disassemble or modify.
●
●
●
●
●
●
●
●
●
●
●
●
●
●
●
●