Nikkei Extreme X6 User manual

© Elmarc, 16/05
Extreme X6 Aconcam
USER MANUAL EN

2
Table of contents
1 Intended use 3
2 Safety 4
2.1 Labels in this manual 4
2.2 Generalsafetyinstrucons 4
3 Preparaons for use 6
3.1 Unpacking 6
3.2 Packagecontents 6
3.3 Chargethebaery 7
4 Funcons 8
4.1 Extreme X6 8
5 Use 9
5.1 MemoryCard:Placementandaccess 9
5.2 Usingtheon/obuon 9
5.3 FactorySengs 10
5.4 Startlming 10
5.5 Makeaphoto 11
5.6 Startslowlming 11
5.7 Play 12
5.8 Sengs 12
5.9 Removethebaery 15
5.10 ConnecngaUSBtoacomputer 15
5.11 MakeanHDMIconneconwiththetelevision 16
6 Managing your camera using your smartphone 17
6.1 Viewyourcameraimageonyourmobile 17
6.2 Placethecamerainthewaterproofcase 17
6.3 Mountthecameraonthehelmet 18
6.4 Mountthecameraonyourbike 19
6.5 Aachthecamerawiththeclip 20
7 Cleaning and maintenance 21
8 Technical data 22
9 Disposal of used electric and electronic equipment 23

3
1 Intended use
TheExtremeX6isanaconcamtomakepicturesandmovies.Usethe
deliveredaccesoiresbyexampletoaachtheExtremeX6onyourbike,
helmetandbelt.UsetheXDVApponyoursmartphonetooperatethe
ExtremeX6.Theaconcammaynotbeexposedtosplashingordripping
waterwithoutthewaterproofcase.
Thedeviceisintendedforconsumeruse,notforprofessionaluse.
5DuethewidevarietyofproductswithUSBports,mobiledevicesand
theirmanufacturer-specicfunconswecannotguaranteethatall
deviceswillberecognizedoralloperangoponscanfuncon.

4
2 Safety
2.1 Labels in this manual
6 WARNINGAwarningmeansthatinjuryordeathispossibleifthe
instruconsarenotobeyed.
1 CAUTIONAcauonmeansthatdamagetotheequipmentispossible.
5Anotegivesaddionalinformaon,e.g.foraprocedure.
2.2 General safety instrucons
6 Warning!Itisnotpermiedtoopentheproductyourselfortohave
itopened,neitherisitpermiedtorepairtheproductyourself
ortohaveitrepaired.Thiswillvoidthewarranes.Pleaseletany
maintenancebecarriedoutbyceredmaintenancepersonnel.
1 Warning!Onlyuseoriginalaccessoriesfromthemanufacturer.
1 Alwayssecurethecamerainitshousingwhenusingthecamerainor
aroundwater.Donotgetthecameraorthebaerywet.Thecamera
isnotwaterproof.
1 Therubbersealthatlinesthecamerahousingformsawaterproof
barrierthatprotectstheapplianceinwetandunderwatercondions.
Keeptheappliancehousing'srubbersealclean.Asinglehairorgrain
ofsandcancausealeakanddamageyourcamera.
1 Aereveryuseinsaltwater,rinsetheoutsideofthecamerahousing
withnon-saltwateranddry.Notdoingthiscaneventuallycause
corrosionofthehingepinandsaltbuildupintheseal,whichcan
damagethecamerahousing.
1 Thecameracontainssensivecomponents,includingthebaery.
1 Avoidexposingyourcameraandbaerytoverycoldorveryhot
temperatures.Loworhightemperaturecondionsmaytemporarily
shortenthebaerylifeorcausethecameratotemporarilystop

5
workingproperly.Avoiddramacchangesintemperatureor
humiditywhenusingthecamera,ascondensaonmayformonor
withinthecamera.
1 Donotdrythecameraorbaerywithanexternalheatsourcesuch
asamicrowaveovenorhairdryer.
6
3 Preparaons for use
3.1 Unpacking
• Unpack the appliance carefully.
• Checkthepackagecontentsasdescribedbelow.Ifanyitemismissing,
pleasecontactyourreseller.
• Werecommendthatyouretaintheoriginalcartonandpacking
materialsincaseiteverbecomesnecessarytoreturnyourproduct
forservice.Thisistheonlywaytosafelyprotecttheproduct
againstdamageintransit.Ifyoudodisposeofthecartonandthe
packingmaterials,pleaseremembertorecyclewithduecaretothe
environment.
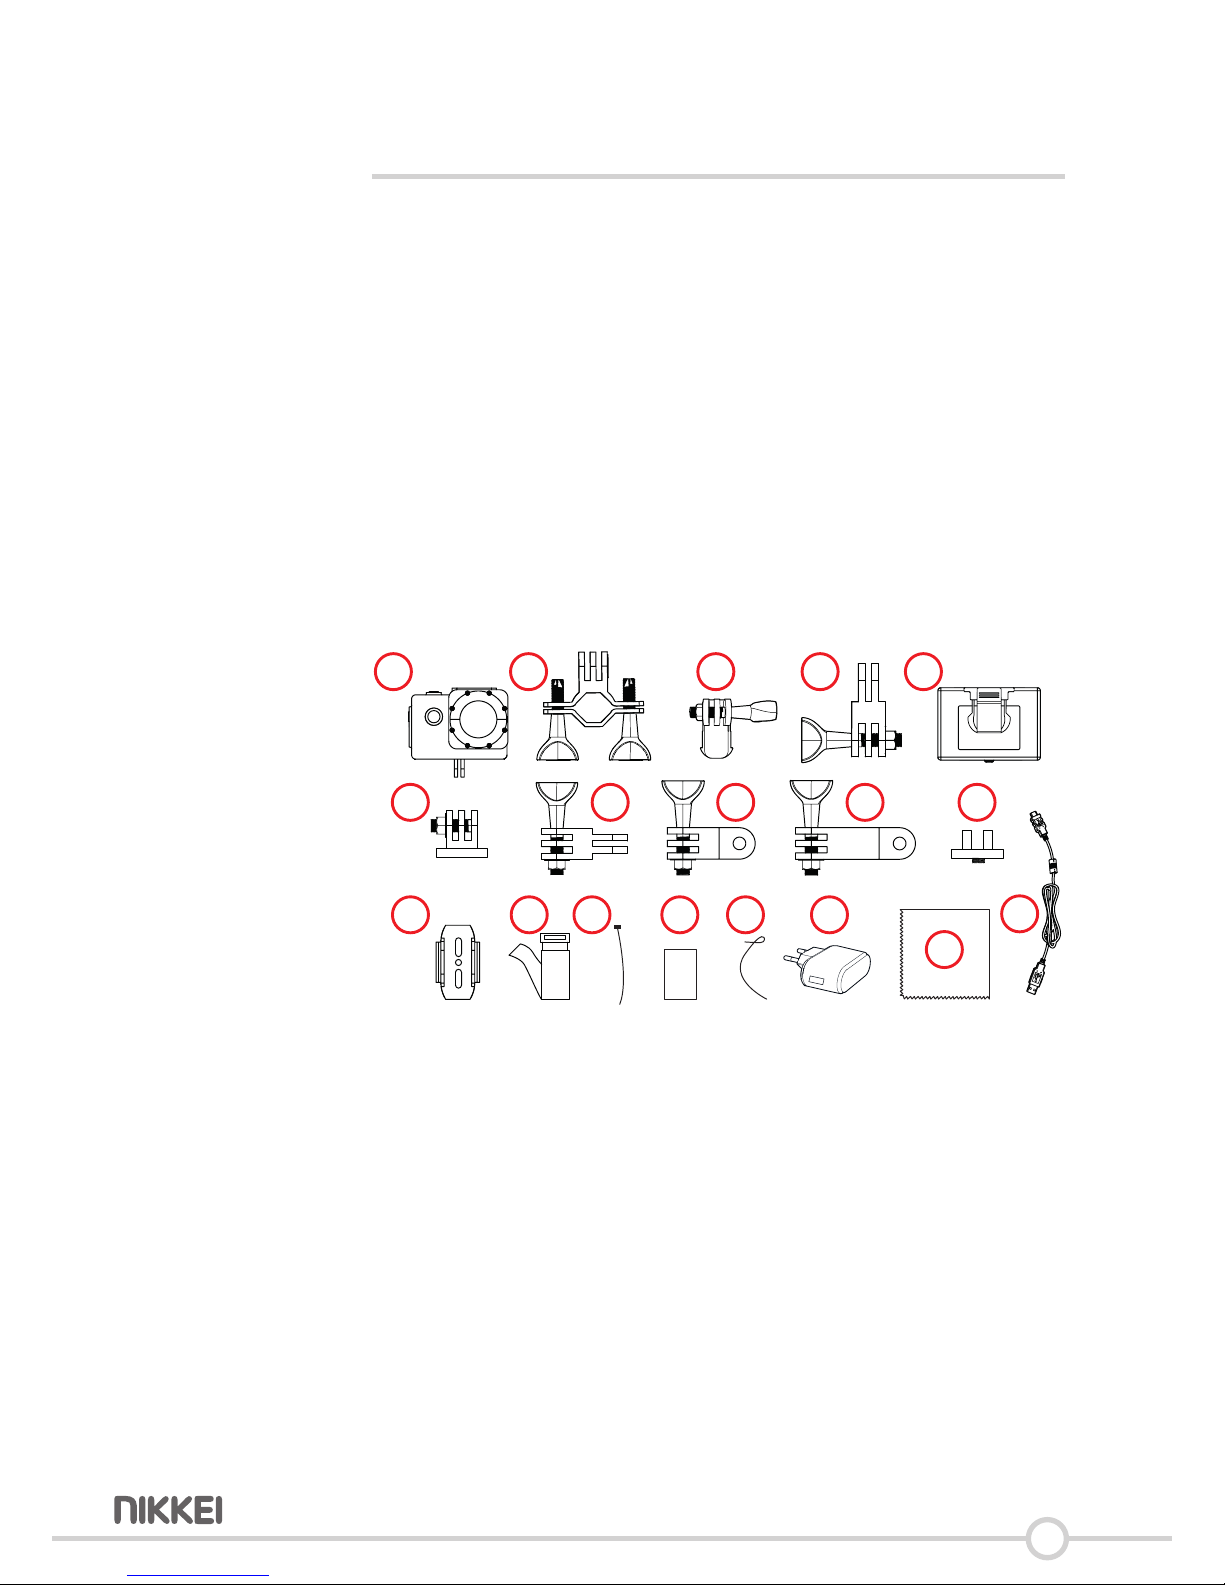
3.2 Package contents
4 x 2 x2 x
3M
3M
2 x
1 2 3 4 5
6 7 8 9 10
11 12 13 14 15 16
17
18
Thefollowingitemsareincludedinthereceivedpackage:
5Ifanyitemismissing,pleasecontactyourreseller.
1. 1xWaterproofcasewithinthe
camera
2. 1xBicyclebracket
3. 1xPedestal1
4. 1xPedestal2
5. 1xBackclip
6. 1xxedbase
7. 1xswitchsupport1
8. 1xswitchsupport2
9. 1xswitchsupport3
10.1xcommunicator
11. 2xhelmetpedestalforexample
12. 1xbandage
13. 4xe-wrap
14. 2x3Mscker
15. 2xwirecable
16. 1xAdapter
17.1xMicroUSBcable
18. 1xcleaningcloth
• 1xQuickstartguide
7
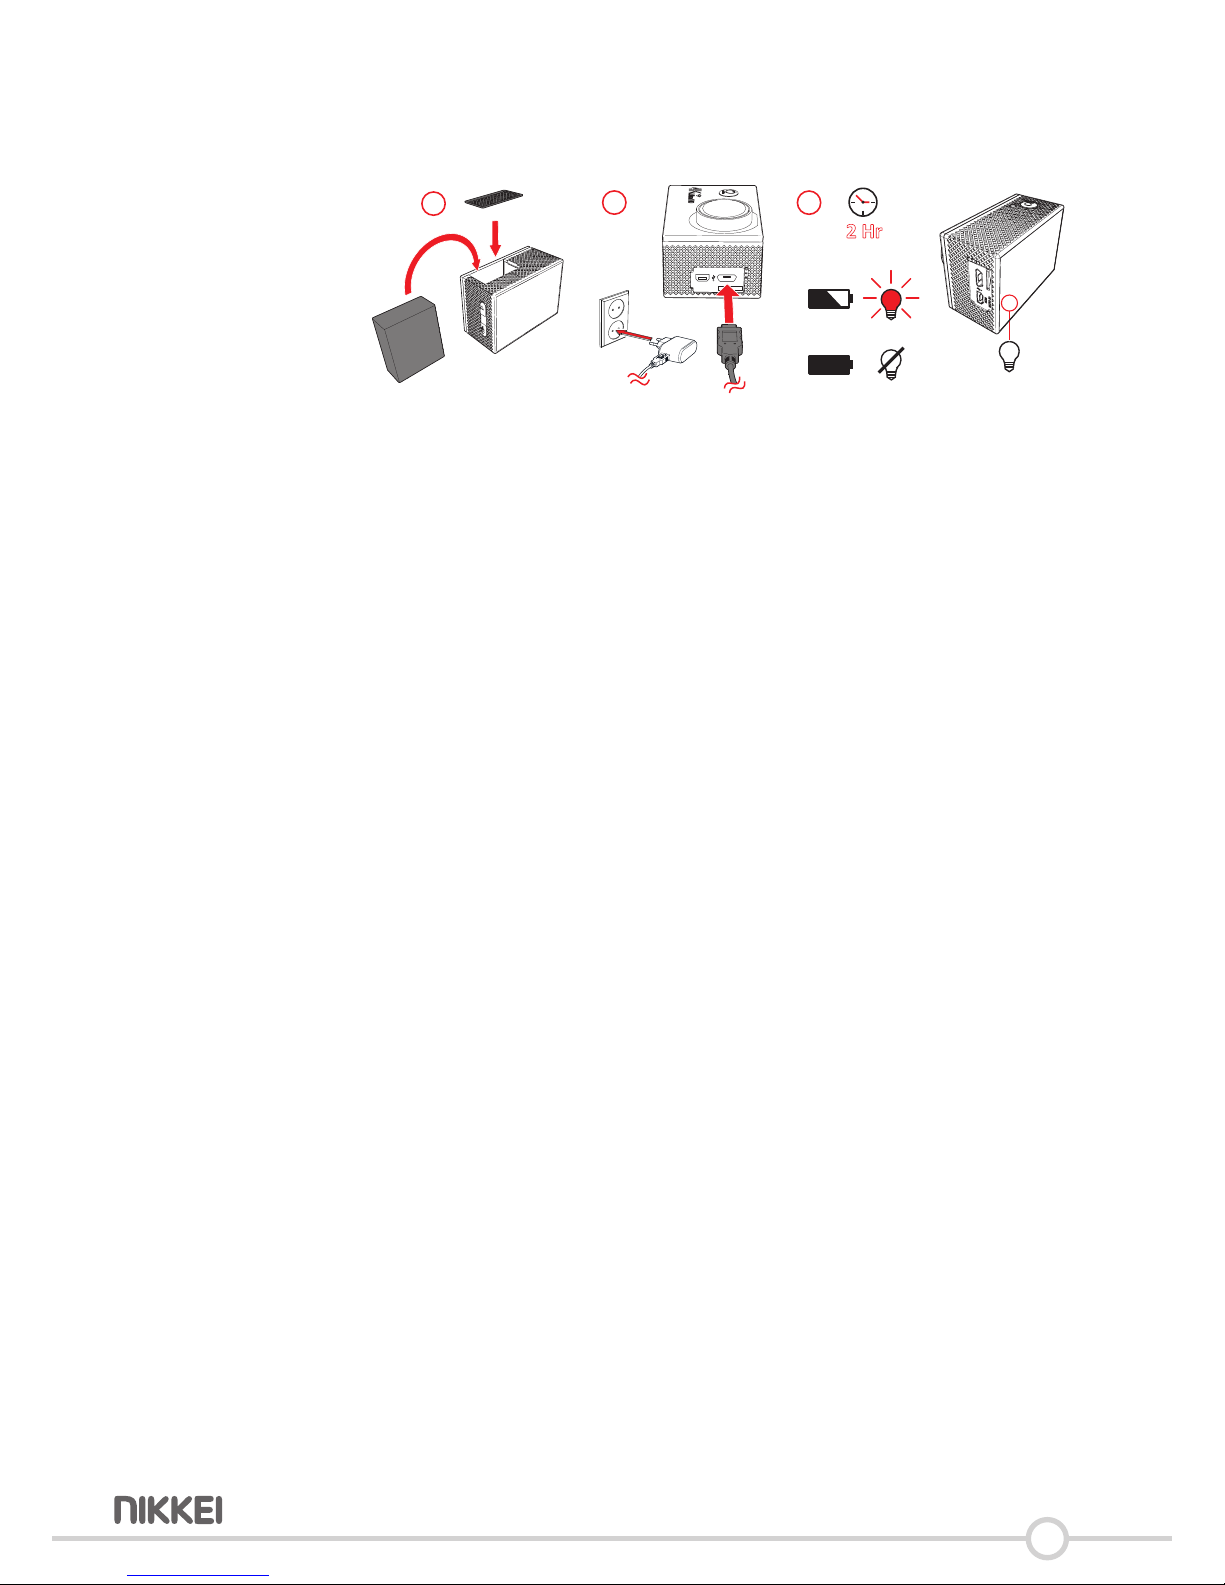
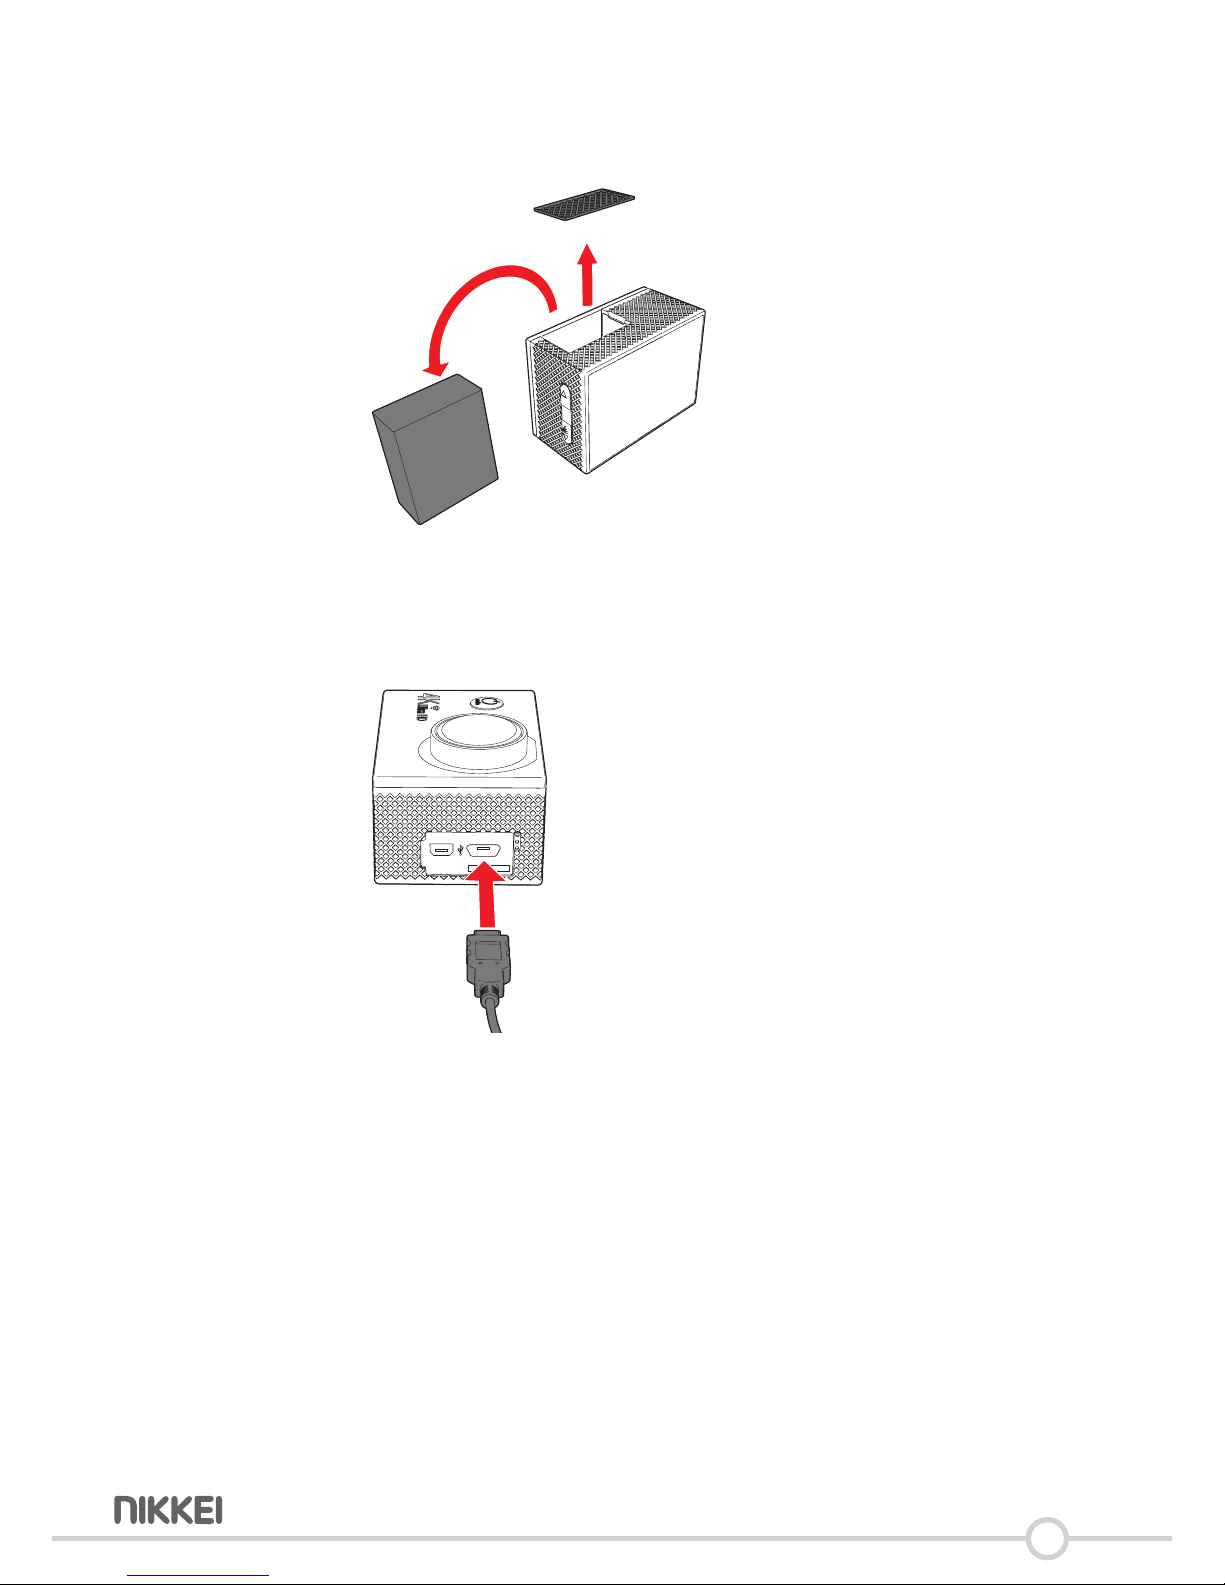
3.3 Charge the baery
123
HDMI
MICRO SD
2 Hr
• Openthebaerydoor.
• Placethebaeryandclosethebaerydoor.
Thebaeryisfullychargedwithin2hours.TheLEDindicatorisredduring
charging.WhenthebaeryisfulltheLEDindicatoriso.
8
4 Funcons
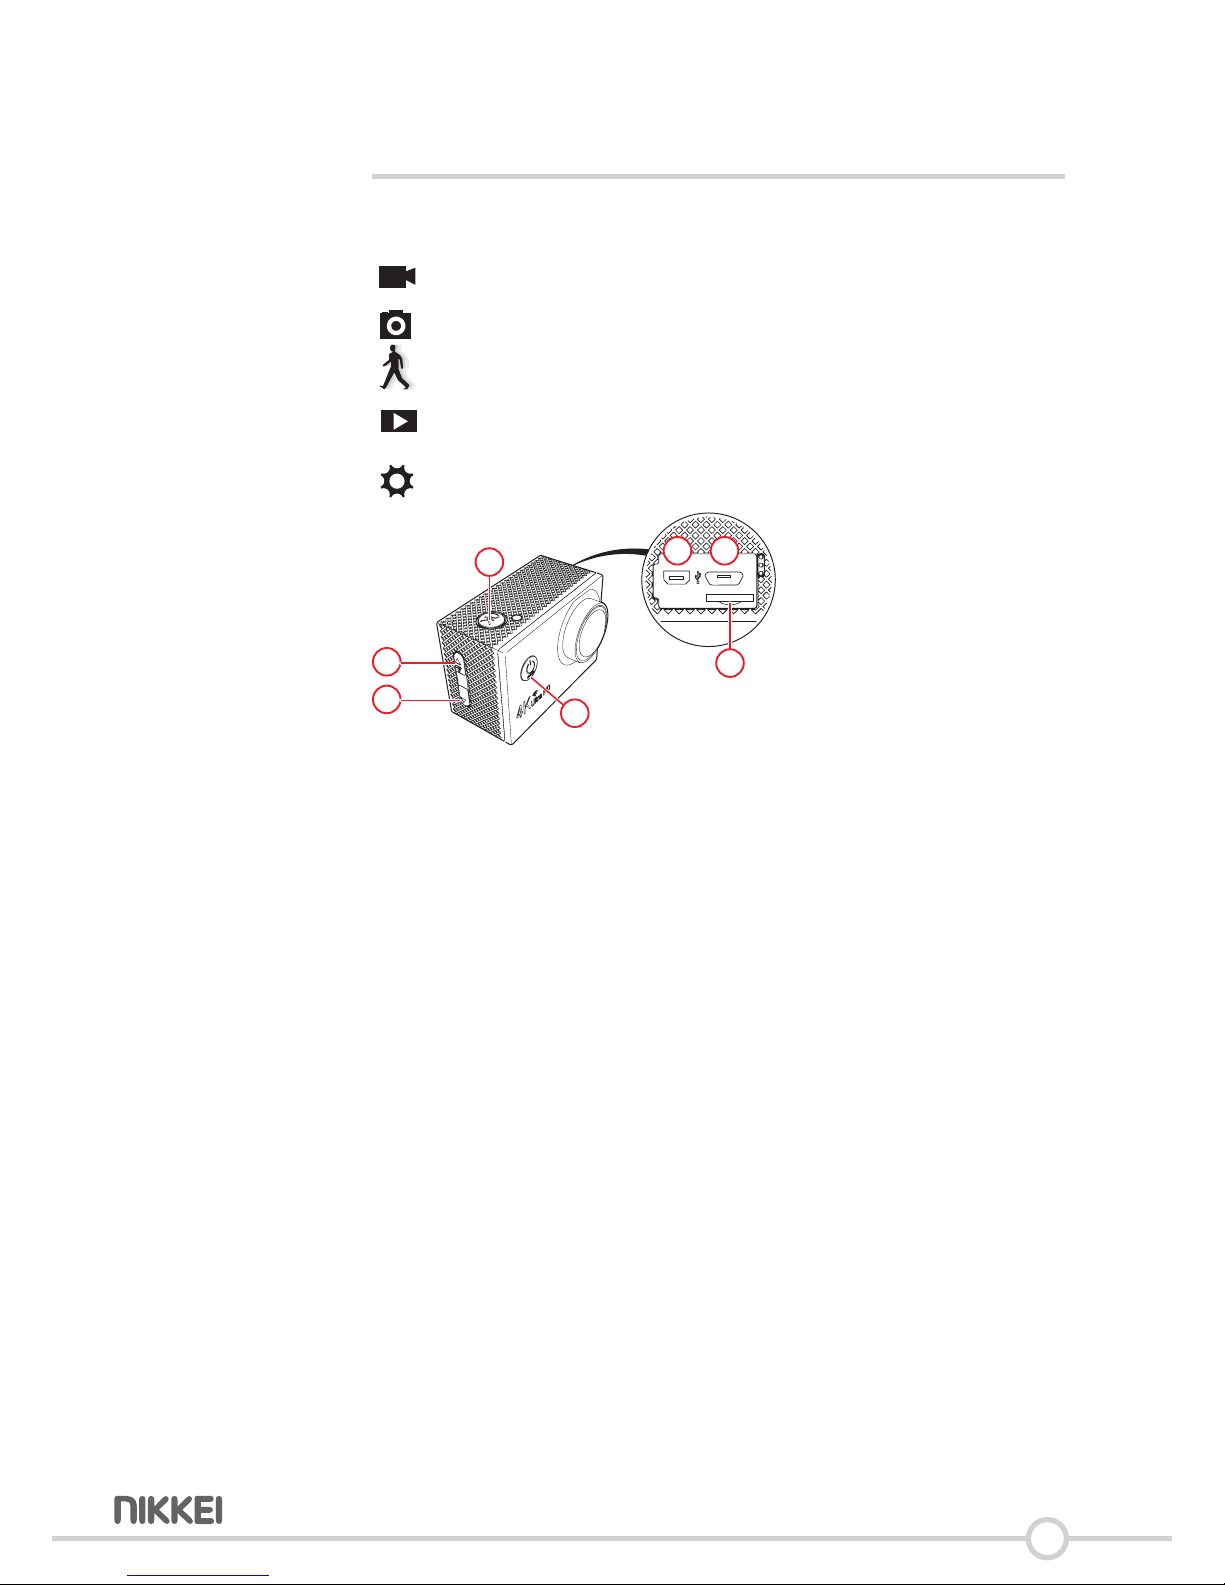
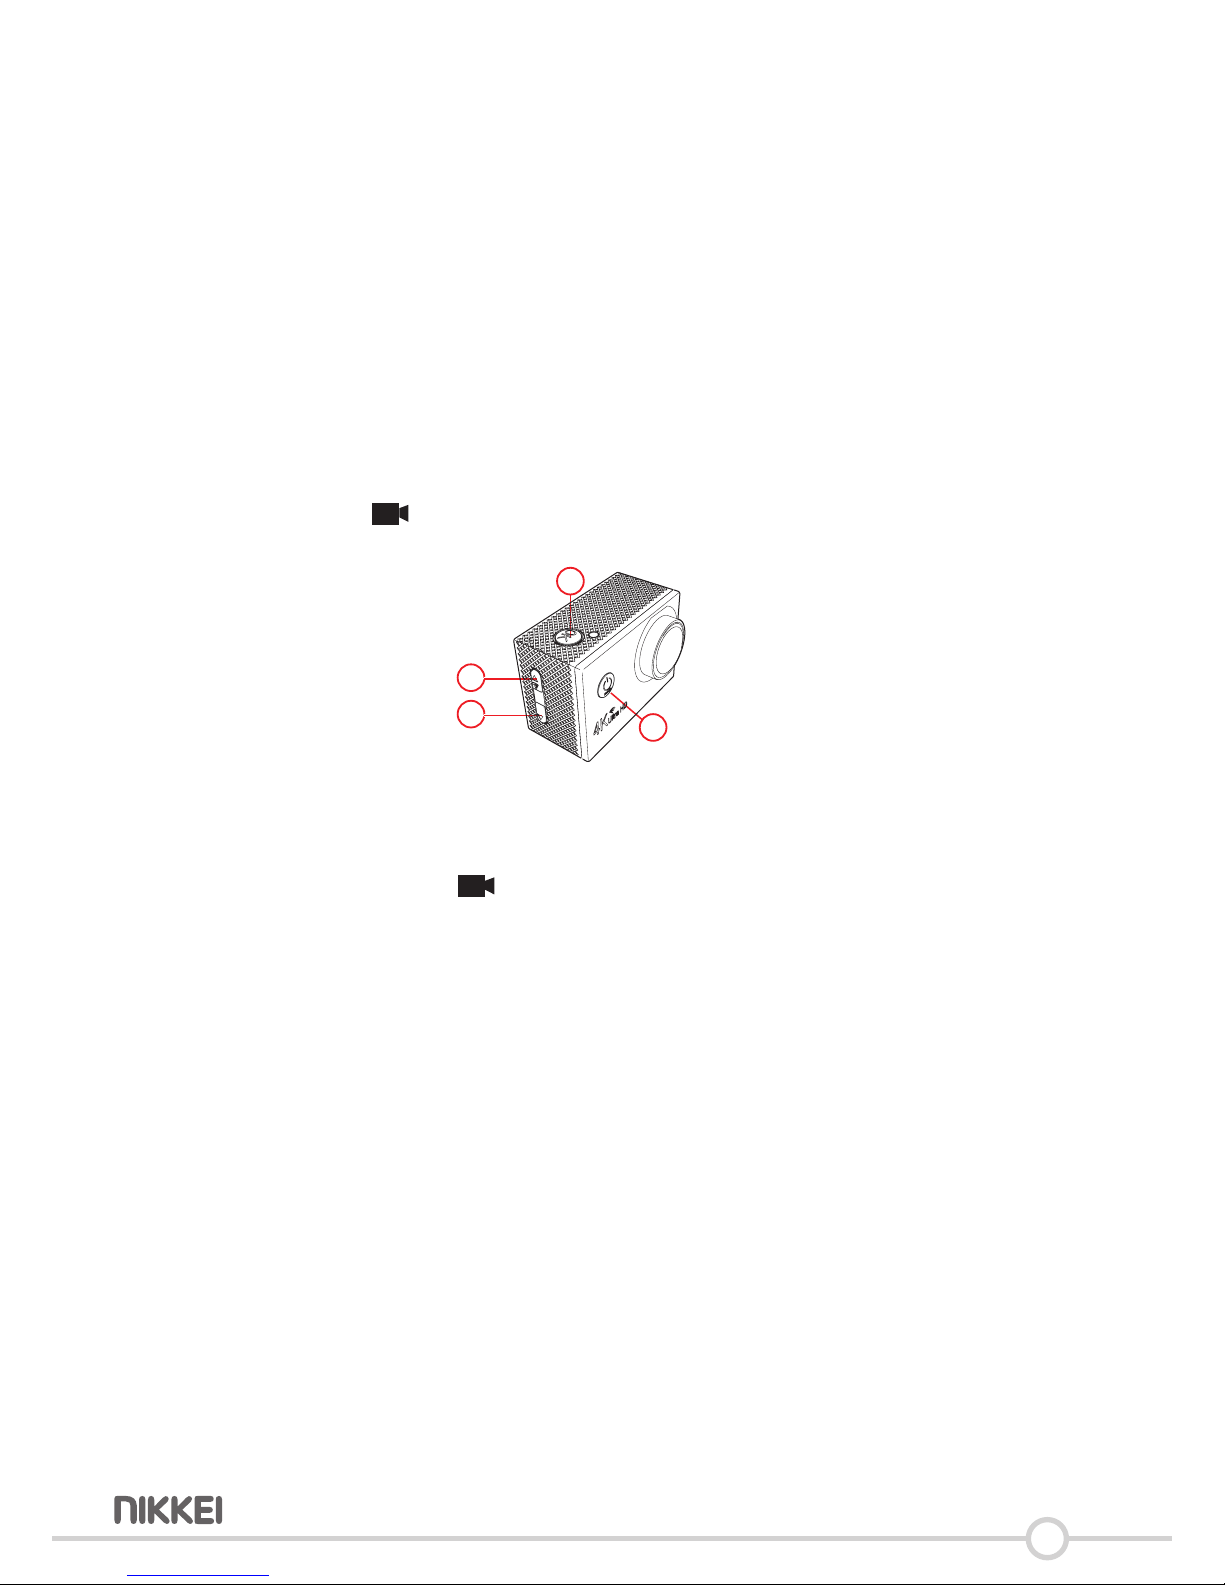
4.1 Extreme X6
Filming
Make a photo
Slow lming
Play
Sengs
HDMI
MICRO SD
1
2
3
5 6
7
4
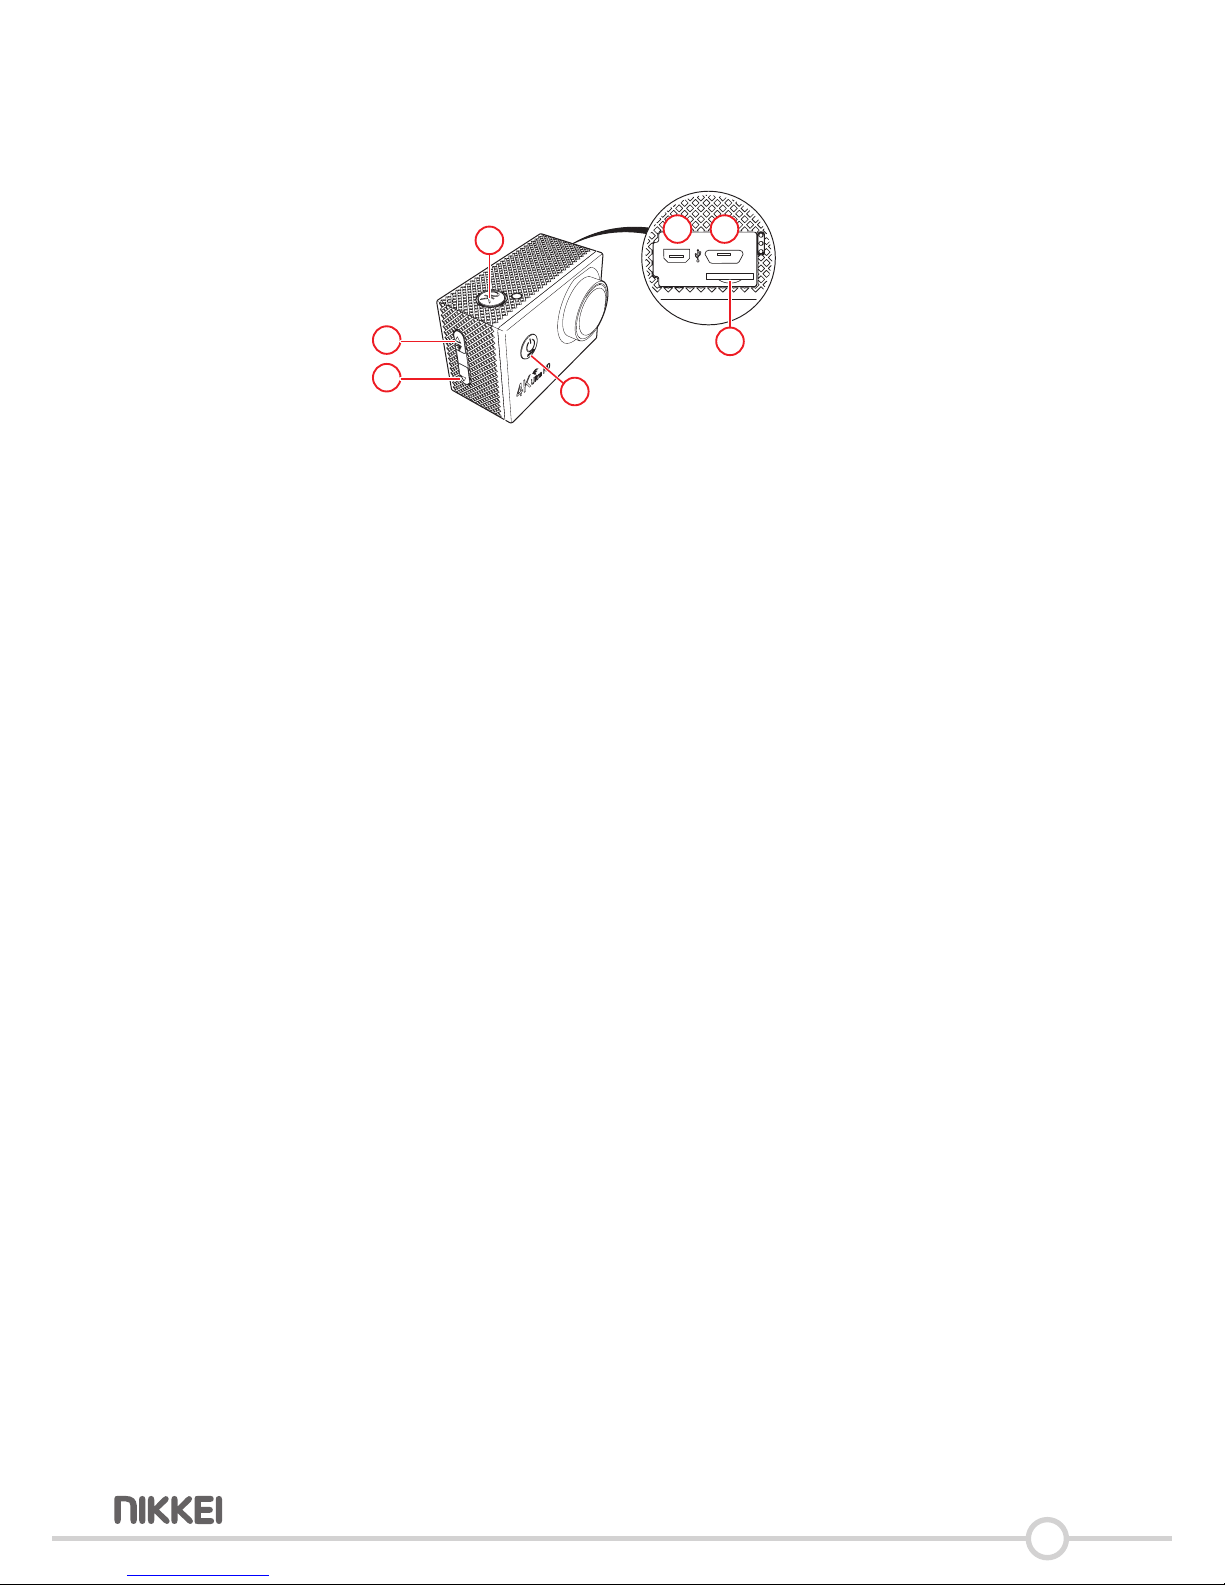
1. OKbuon
2. PREVIOUS/wi/ZOOMOUTbuon
3. FORWARD/ZOOMINbuon
4. ON/OFF/MODEbuon
5. HDMI-output
6. MicroUSBconnecon
7. Slot-informicroSDcard
9
5 Use
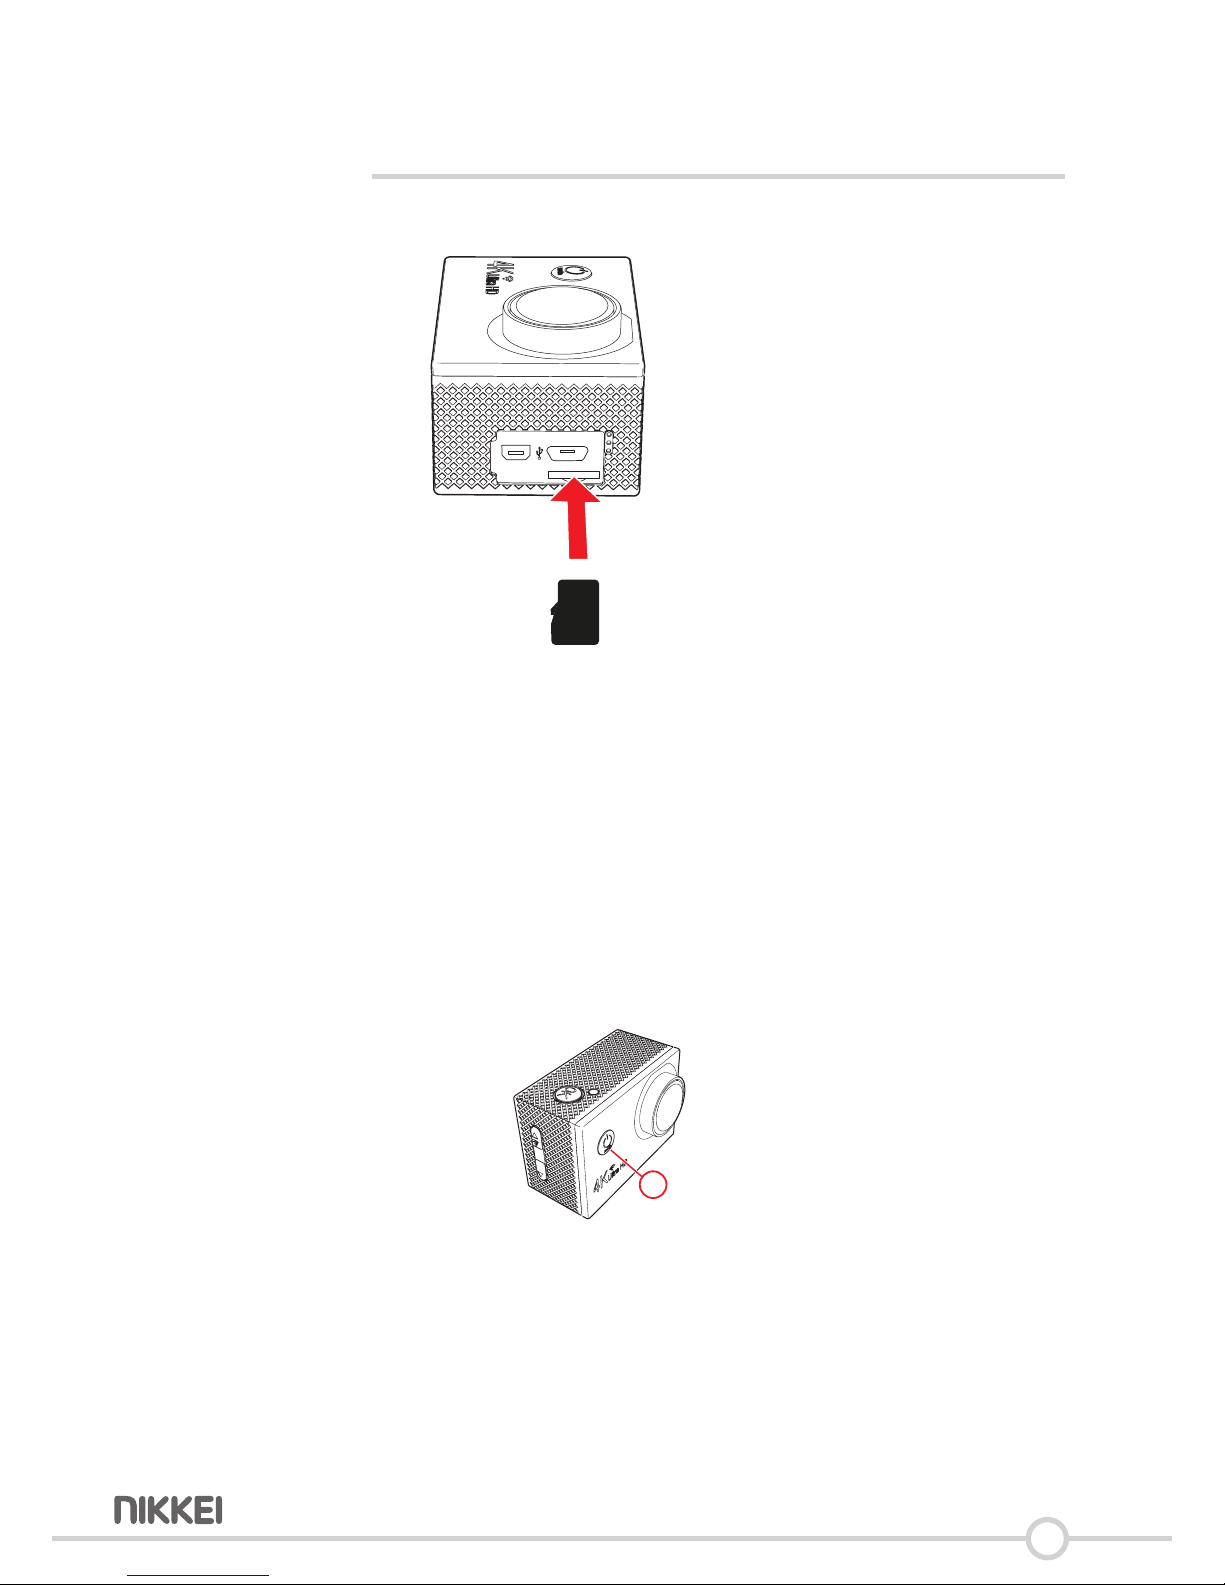
5.1 Memory Card: Placement and access
HDMI
MICRO SD
5Duetothegreatvarietyofproductswithexternalmemory
connecon(USB,SD/MMC,etc.)andtheirsomemesquite
manufacturer-specicfunconswecanneitherguaranteethatall
deviceswillberecognised,northatalloperangoponsthatare
possibleintheorywillactuallywork.
(7) Memorycardslotmax.32Gb
5.2 Using the on/o buon
4
•KeepkeyMODE(4)pressedfor2seconds
•Thedevicehasnowbeenturnedon.
IIIIIII
10
5.3 Factory Sengs
Thefactorysengsare:
Exposure:0
Whitebalance:AUTO
G-sensor:LOW
LightSourceFrequency:AUTO
LEDIndicatorLight:enabled.
AutoShutdown:5minutes.
TimeWatermark:set
5.4 Start lming
1
2
3
4
5Whenyouturntheapplianceon,youarealreadyinthelmmode.
• PressrepeatedlyontheModebuon(4)unllyoureachthelm
mode .
• PressonthebuonOK((1))tostartlming.
• UsethebuonsZOOM(2)(3)tozoominandzoomout.
• PressagainonthebuonOK(1)tostoplming.Themovieissaved.

11
5.5 Make a photo
1
2
3
4
5Whenyouturntheapplianceon,youarealreadyinthelmmode.
• PressrepeatedlyontheModebuon(4)unllyoureachthephoto
mode .
• UsethebuonsZOOM(2)(3)tozoominandzoomout.
• PressonthebuonOK(1)tomakeaphoto.
5.6 Start slow lming
1
2
3
4
• PressrepeatedlyontheModebuon(4)unllyoureachtheslowlm
mode .
• PressonthebuonOK(1)tostartlming.
• UsethebuonsZOOM(2)(3)tozoominandzoomout.
• PressagainonthebuonOK((1))tostoplming.Themovieissaved.

12
5.7 Play
1
2
3
4
5Whenyouturntheapplianceon,youarealreadyinthelmmode.
• PressrepeatedlyontheModebuon(4)unllyoureachtheplay
mode .Youcandisplaythephoto`sandwatchtherecordedvideos.
• Usethebuons(2)(3)tosearchforaphotoorvideo.
• PressonthebuonOK(1)toviewaphotosandvideos.
5.8 Sengs
1
2
3
4
• PressrepeatedlyontheModebuon(4)unllyoureachthesengs
mode .
• PressOK(1)toconrmyourselecon.
• Thesengsmenuconsistsovesubmenu`s:1)video,2)photo,3)
generalsengs4)camerasengs5)exit.PressonthebuonMode
(4)tochooseonofthesemenu`s.
• PressOK(1)toconrmyourselecon.
• Usethe(2)and(3)keystonavigatewithinthemenu.
• PressOK(1)toconrmyourselecon.

13
Sengs for video recording
Videoresoluon:youcanchangeheretheresoluonofthevideos.
Recordingsound:youcansetheretherecordingsoundonando.
TimeLapse(NotSlowMoon):Shortenthevideofromevery1minute
into1second,2seconds,5secondsetc..whentakingthevideo.
Youcouldchooseeither1or2or5secondsetc...Whenyoucheckthe
videoitlookslikefastforward.
Looprecordingistheprocessofrecordingvideofeeds.Thisprocessis
anever-endingone:attheendoftheinternaldiskdrive,therecording
processconnuestorecordatthebeginning,erasingthepreviously
recordedmaterialandreplacingitwiththenewcontent.Withinthis
funconyoucansettheduraonof1video.Youcanchoosethefollowing
sengs:none,2,3en5minutes.
Slowmoon:Takingthevideoat720P120fpsor720P60fps,andreplay
thevideowillbein720P30fps,iftakingthevideoat
1080P60fps,thevideoreplaywillbein1080P30fps.Thevideolookslike
slowerthannormal.
Sengs for videos
Photoresoluon:youcansetheretheresoluonofthephoto.Youcan
choosefrom:16M,12M,8Mand5M.
Timed:Hereyoucansetthenumberofsecondsforthecameratowaitto
takeapicture.Youcanchoosefrom5,7or10seconds.
Auto:Hereyoucansettheintervalinsecondsforthecameratowaitto
takeapicture.Youcanchoosefrom5,7or10seconds.
Dramashot:Usethisfuncontomakeaconphoto1s.Youcansethere
howmanyphoto`saretakingpersecond.Youcanchoosebetween:3p/s,
5p/s,10p/s,and20p/s.

14
General sengs
White balance
Exposure:youcansettheexposurehere.Youcanchoosefrom:1,2,3.
Imagerotaon:Ifyouneedtomountyourcameraupsidedown,youcan
setthecameratosave
thephotoorvideoupsidedownsothatitappearsrightsideupwhenyou
review
itonyourcomputerorTV.Thiseliminatestheneedto"?ip"thephotoor
video
lateronyourcomputer.
WIFI:displaytheWIFISSDandtheWIFIpassword.
G-sensor:hereyoucansetthesensivityofthesensor.Youcanchoose
from:low,mediumorhigh.Devideowillbelockedautomacallyby
seriousshockslikeacaraccident.Thevideowillremain.
LightSourceFrequency:forEurope50Hz
LEDIndicatorLight:ontheleofthecamera`sscreenaretwoLEDlights.
Youcansetthoselightso.Formoreinformaonabouttheselights,see
thechapterTechnicalspecicaons.
AutoScreensaver:hereyoucansetaerhowmanysecondsthescreen
turnso.Youcanchoosefrom10,20and30seconden.
AutoShutdown:youcansethereaerhowmanyminutesthecamerawill
shutdown.Youcanchoosefrom1,3and5minuten.
TimeWatermark:thedateandmewillappearonvideosandphotos.
System sengs
Language:English,SimpliedChinese,TradionalChinese,Korean,
Russian,French,German,Dutch,Italian,Spanish,Polish,Japanese.
DateandTimeSengs:
Hereyoucansetthedateandme.
Format:hereyoucanformatthememorycard.Alldatawillbelost.
Resettofactorysengs:thecamerasengswillberesettothefactory
sengs.
Firmwareversion
Hereyoucanseethesysteminformaon,
15
5.9 Remove the baery
• Openthebaerydoor.
• Takethetabonthebaerijenmovethebaerijoutofthecamera.
5.10 Connecng a USB to a computer
HDMI
MICRO SD
InserttheUSBcableintothecameraandthecomputer.
Youcanchoosethefollowingopons:
USB Mode
Viewandexportvideosandphotos.
Charging mode
Youcanmakephotosandvideoswiththecomputer.
USB Mode
ChargingviaUSBtocomputersystem
16
5.11 Make an HDMI connecon with the television
HDMI
MICRO SD
1
2
3
5 6
7
4
• KeepkeyMODE(4)pressedfor2seconds
• Thedevicehasnowbeenturnedo.
• InserttheminiHDMIcable(5)(notincluded)intheaconcamand
connecttheaconcamwiththetelevision.
• Turnthedeviceandtelevisionon.
• Selectthetelevisiononthedesiredsourceinput(seethemanualof
thetelevision).
• Performthestepsasdescribedonthetelevisionscreen.
17
6 Managing your camera using your
smartphone
6.1 View your camera image on your mobile
#13#
5TousethecamerawithyourmobilePhone,youneedtodownload
theXDVappfromtheplaystore.
PressthebuonWIFIfor2seconds.
• OpentheXDVapponyourmobilephone.
• SelecttheWIFI:X20V_040dandinsertthepassword.Select
connecon.DeaconcamisnowconnectedwithyourmobilePhone.
Youcanoperatetheaconcamwiththeapp.
5Thedefaultpasswordis(1234567890).
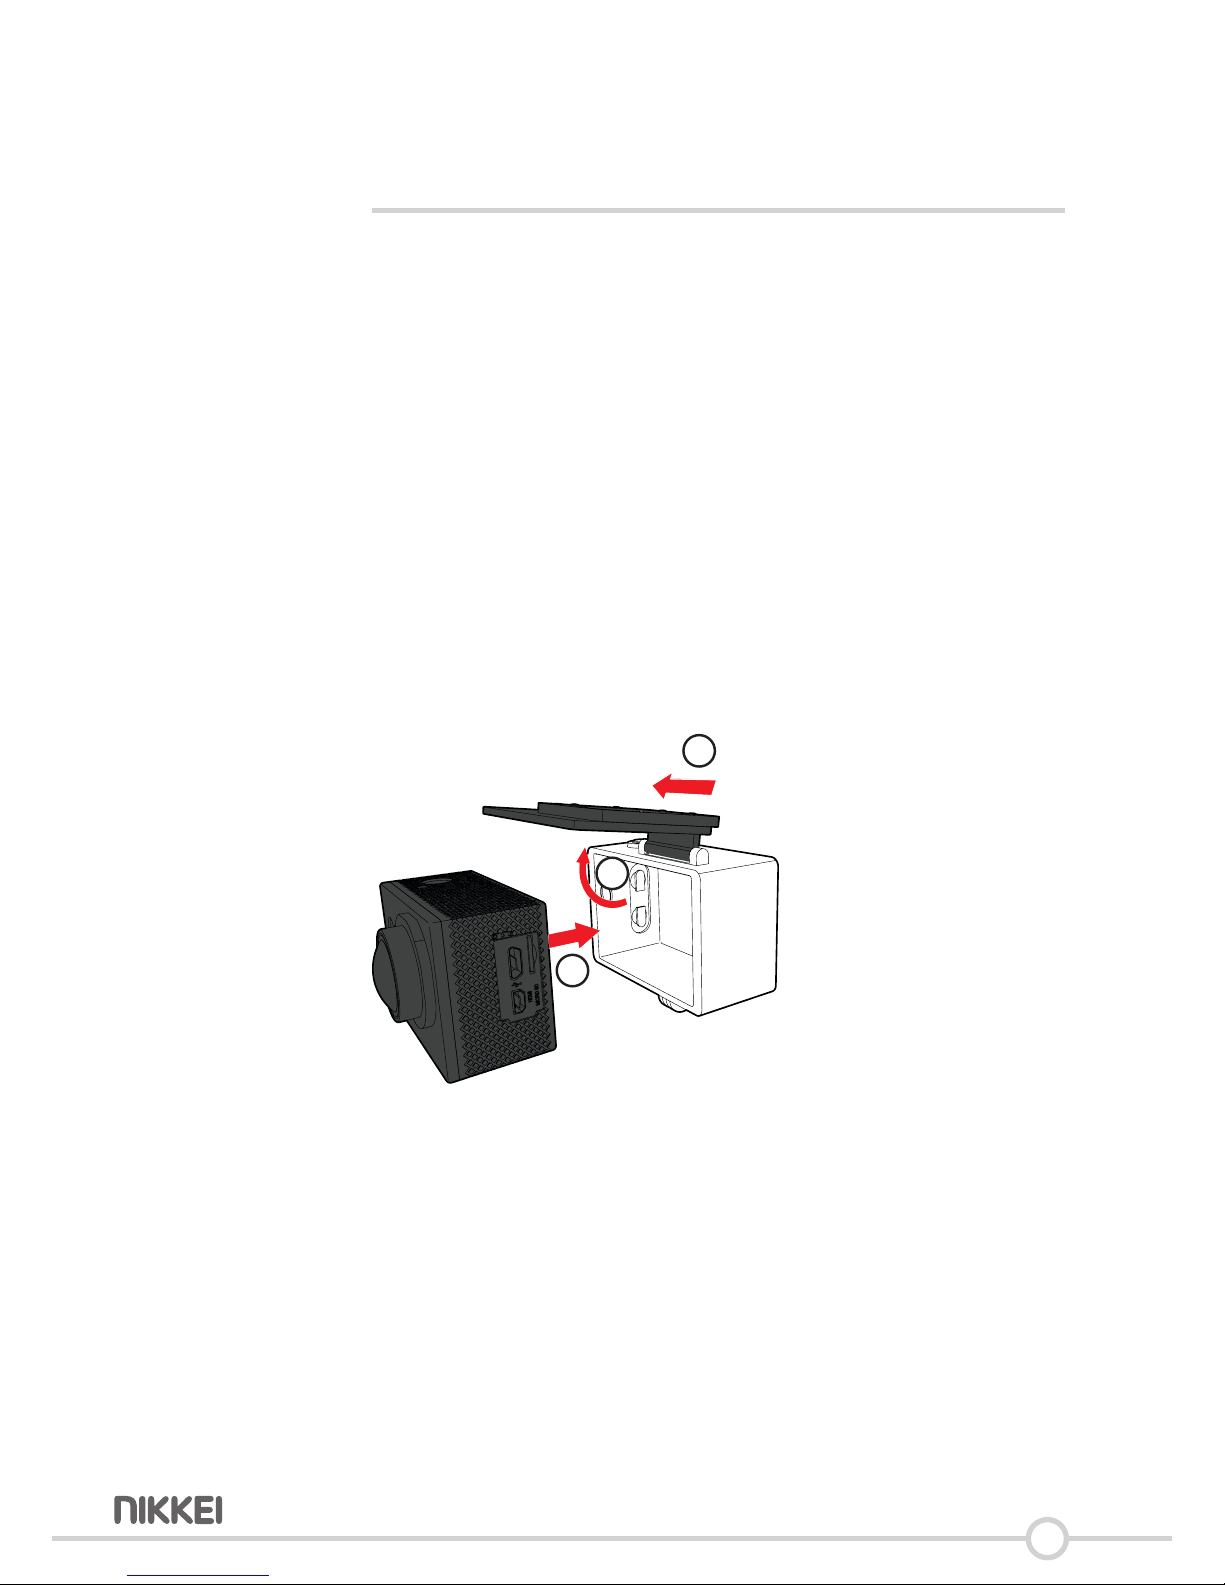
6.2 Place the camera in the waterproof case
1
2
3
18
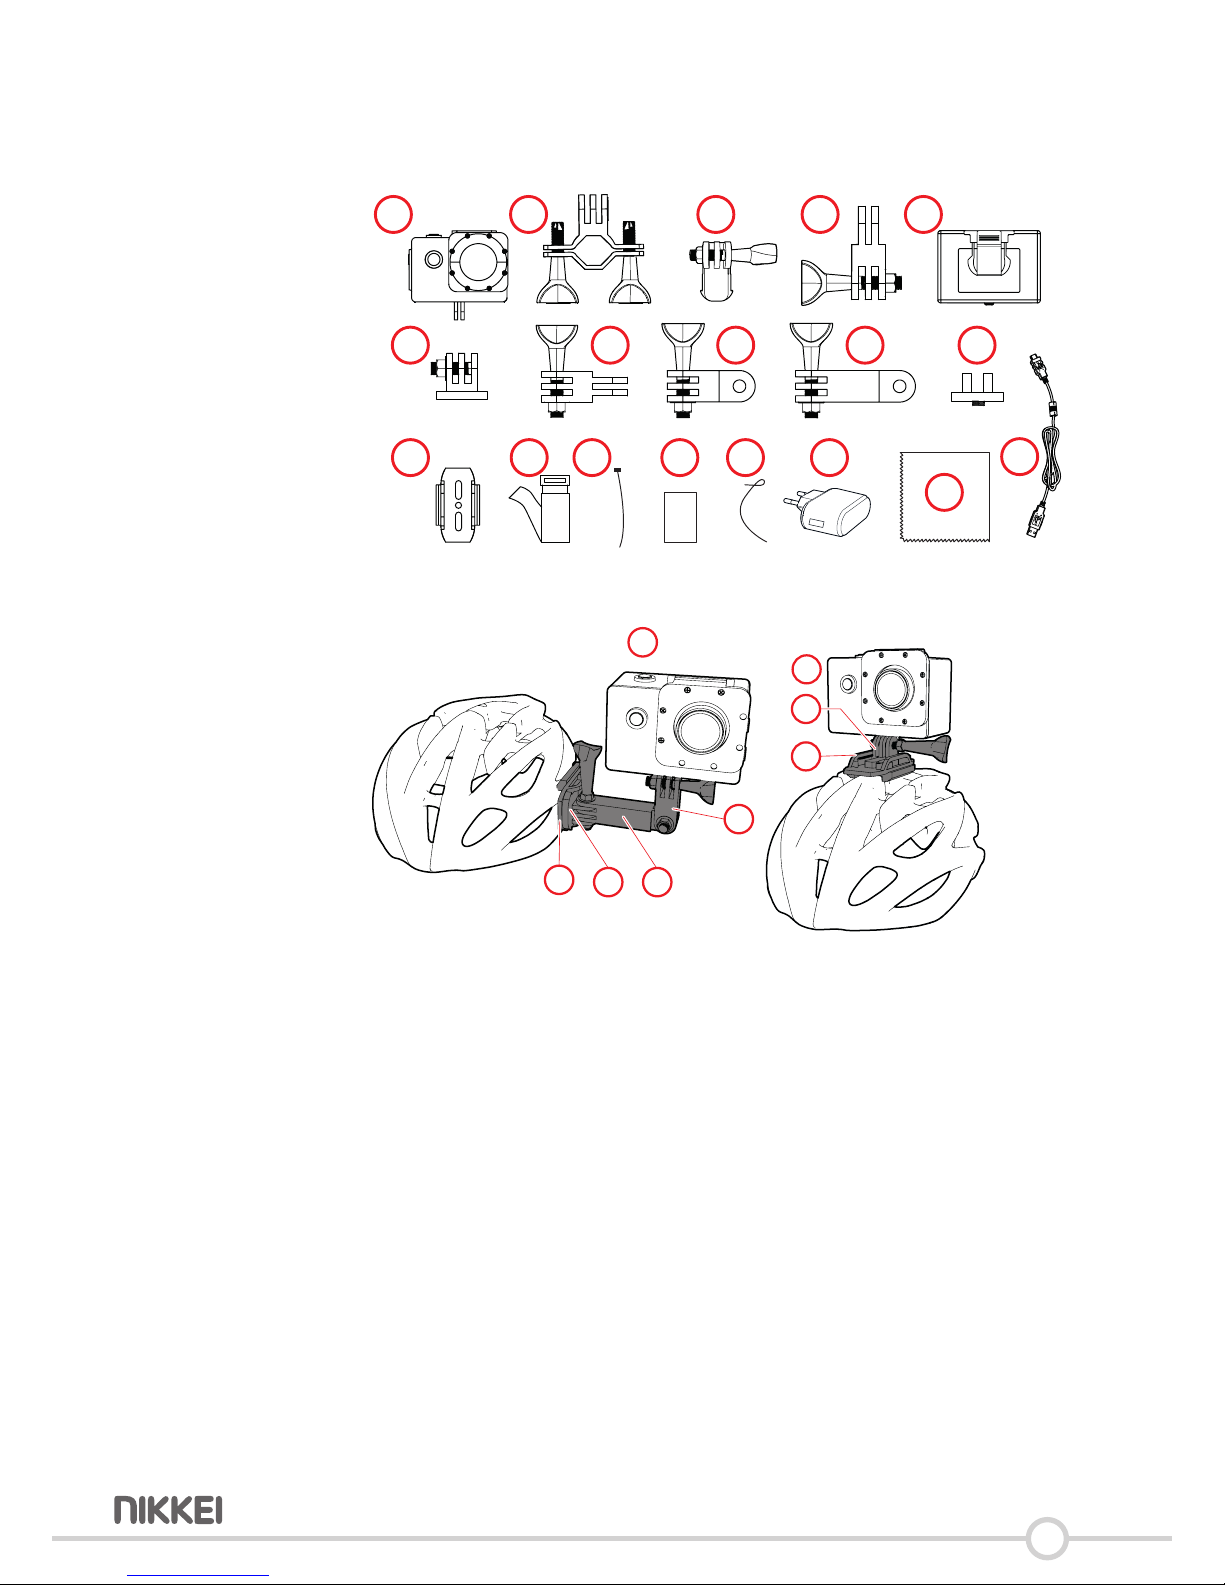
6.3 Mount the camera on the helmet
4 x 2 x2 x
3M
3M
2 x
1 2 3 4 5
6 7 8 9 10
11 12 13 14 15 16
17
18
Youcanmounttheaconcamtwowaysonthehelmet.Onlyusethe
suppliedaccessory.
1
3 9
8
11
1
11
6
19
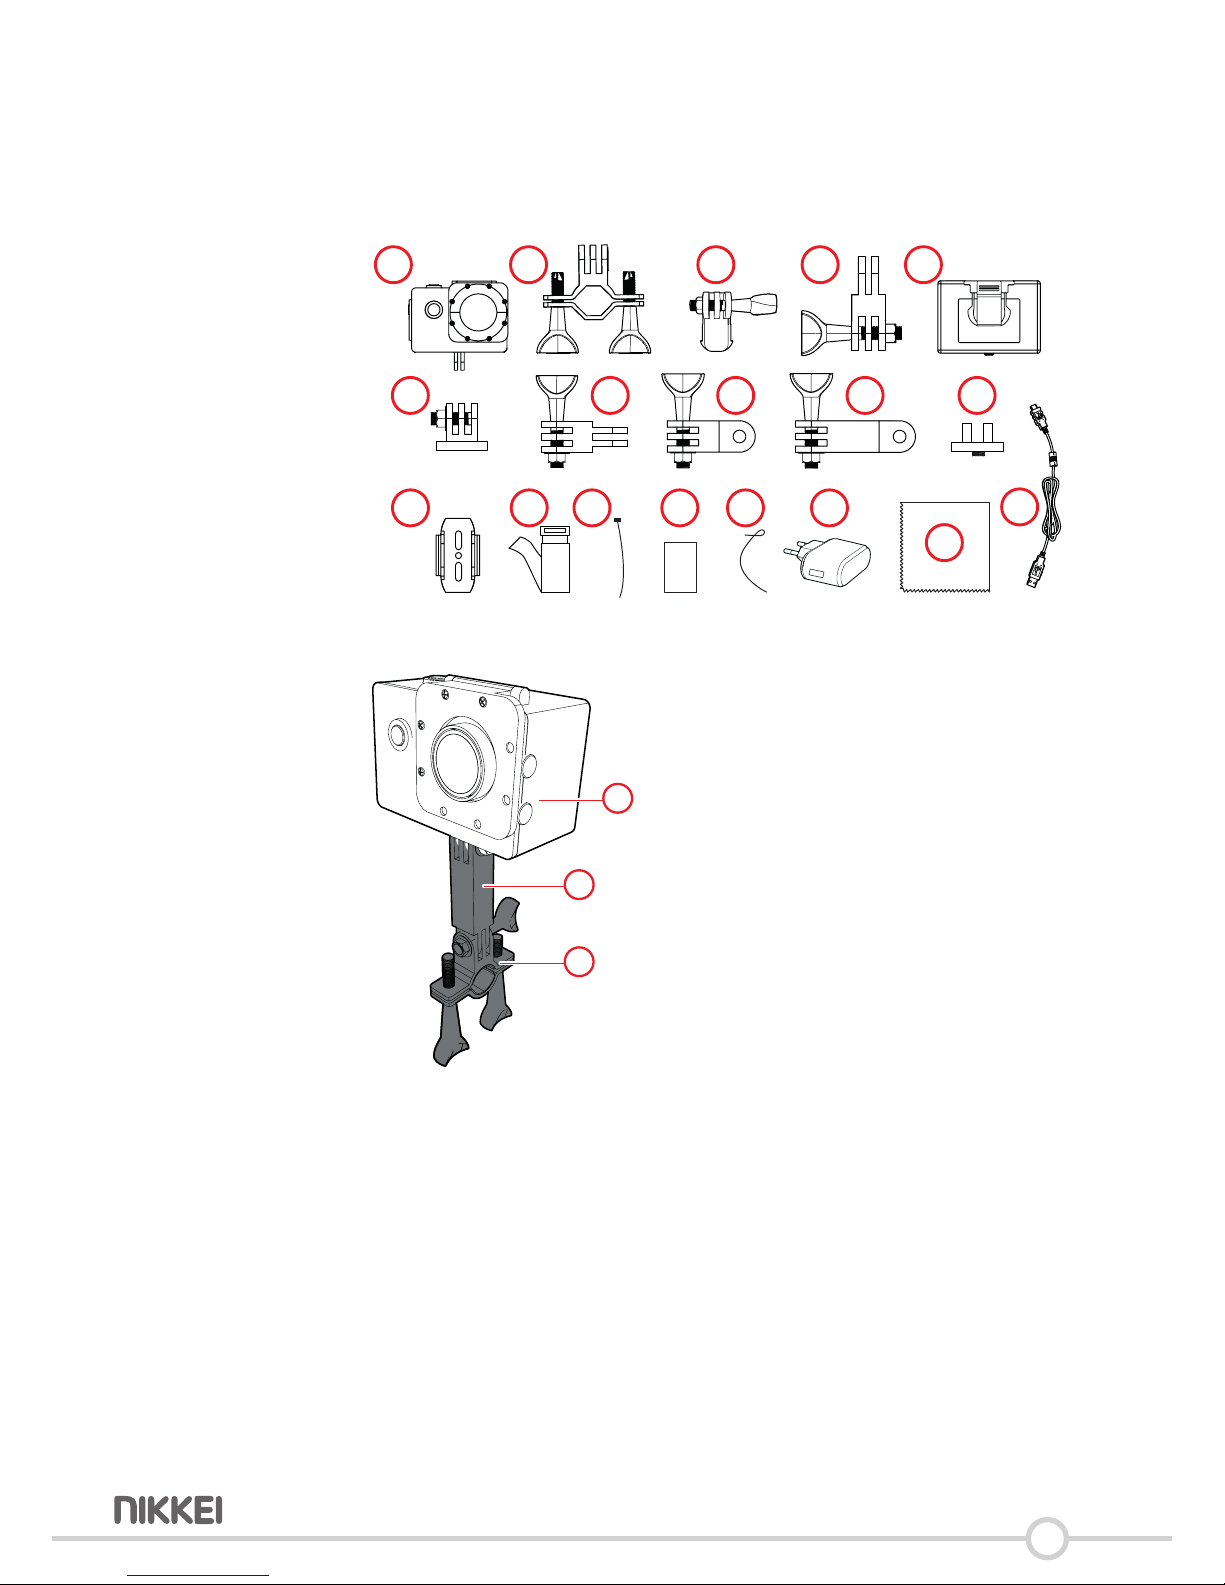
6.4 Mount the camera on your bike
Youcanmounttheaconcamonyourbike.Onlyusethesupplied
accessories.
4 x 2 x2 x
3M
3M
2 x
1 2 3 4 5
6 7 8 9 10
11 12 13 14 15 16
17
18
2
9
1

20
6.5 Aach the camera with the clip
Youcanmountthecameraonyourbelt(forexample).Onlyusethe
suppliedaccessories.
4 x 2 x2 x
3M
3M
2 x
1 2 3 4 5
6 7 8 9 10
11 12 13 14 15 16
17
18
5
Table of contents
Other Nikkei Action Camera manuals


