Niko 410-10000 User manual

nv Niko sa Industriepark West 40, BE-9100 Sint-Niklaas, Belgium, tel. +32 3 778 90 00, fax +32 3 777 71 20, support@niko.be, www.niko.euPM410-10000R16362 1
LEES DE VOLLEDIGE HANDLEIDING VÓÓR INSTALLATIE EN
INGEBRUIKNAME. BEWAAR DE HANDLEIDING ZORGVULDIG VOOR
LATER GEBRUIK.
1 BESCHRIJVING
Dit startpakket bevat een gateway en een draadloze schakelaar met twee toetsen in de
kleur Niko Intense white.
De gateway zorgt ervoor dat alle draadloze schakelaars van een installatie bediend kunnen
worden met een app voor de smartphone, tablet en smart watch of via een webpagina. Zo
kan de klant zijn installatie op een veilige manier bedienen via een mobiel netwerk zoals 4G,
3G, GPRS of een wihotspot.
Het startpakket kan naar wens uitgebreid worden met andere draadloze Niko-schakelaars
en ontvangers die werken volgens het Easywave-protocol. Dankzij de ontvangers is het
mogelijk lichten te schakelen of te dimmen, rolluiken en zonweringen te sturen of toestellen
verbonden met een stopcontact te schakelen.
2 INSTALLATIE IN SLECHTS VIER STAPPEN
2.1 Programmeer op de ontvangers de draadloze schakelaars in
2-knopsmode (mode 1)
Bij deze manier van bedienen steekt de bovenste toets van de schakelaar het licht aan en gaat
het licht weer uit bij een druk op de onderste toets. Alle schakelaars moeten op deze manier
geprogrammeerd worden om de juiste feedback (bv. is het licht aan of uit) te garanderen in
de app.
Je kan een uitgebreide omschrijving van de programmering terugvinden in de handleiding van
elke ontvanger. Kort samengevat, verloopt de programmering doorgaans als volgt:
1. Druk eenmaal kort op de
programmeerknop van de
ontvanger. De ontvanger knippert
of biept regelmatig.
2. Druk kort op de knop die het licht
moet aanschakelen of het rolluik
moet openen. De led brandt 4
seconden of je hoort een lange
biep.
3. Druk (enkele malen) kort op
de programmeerknop van
de ontvanger tot deze uit
programmeermodus is en niet
meer knippert of biept.
De schakelaars, ontvangers en gateway
mogen onderling maximaal 30m van
elkaar verwijderd zijn. Geef de gateway
een centrale plaats in de installatie om
een optimaal bereik te garanderen. Het
zendbereik is afhankelijk van de in de
woning gebruikte materialen.
Houten of gipsen
wanden: verlies
van 5 à 20%
Baksteen en beton:
verlies van 20 à
40%
Gewapend beton:
verlies van 40 à
90%
Gesloten metalen
ruimte: verlies van
90 à 100%
2.2 Sluit de gateway aan op het netwerk
1. Verbind de gateway via de
bijgeleverde ethernet kabel
met de internetmodem- of
router
2. Sluit het netsnoer aan op
de gateway en steek de
stekker in het stopcontact
3. De led op de gateway begint groen te knipperen. De gateway is aan het opstarten.
Zodra de led stopt met knipperen en groen blijft branden, is de gateway verbonden
met het internet. De eerste keer dat deze verbinding tot stand komt, zal de gateway de
nodige updates binnenhalen. Na maximum 5 minuten zal de led opnieuw doven en zal
de gateway herstarten. Wacht daarom totdat de led opnieuw groen brandt.
Indien de led van de gateway geel knippert, werd er geen verbinding met het internet
gedetecteerd. Controleer in dat geval de instellingen van de internetrouter.
2.3 Maak een account aan en leer de geïnstalleerde knoppen aan
1. Surf naar de webpagina myconnectedswitch.niko.eu
2. Maak een account aan op naam van de
eindgebruiker. Houd hiervoor ook het MAC-
adres en serienummer, die je op de achterzijde
van de gateway vindt, bij de hand.
3. De gebruiker krijgt een bevestigingsmail. In deze e-mail staat ook alle informatie om na de
conguratie de login en het paswoord te wijzigen.
4. Druk in de menubalk op Conguratie en wacht tot de verbinding met de gateway tot stand
gekomen is.
5. Volg nu de stappen die de conguratiewizard aangeeft:
- Eerst moeten de ‘bedieningen’ aangeleerd worden. Hiervoor druk je op elke
bediening één toets in en geef je de bediening een naam (max. 16 karakters) en duid
je aan om welk type bediening het gaat (draadloze schakelaar met 2, 4 of 8 toetsen,
handzender …)
- Daarna geef je aan welke ‘functies’ deze bedieningen moeten uitvoeren. Kies het
type functie door het juiste icoon te kiezen (geschakeld licht, gedimd licht, rolluik of
zonwering, geschakeld stopcontact) en geef het een zinvolle naam (max. 16 karakters).
Kies uit de lijst welke aangeleerde bedieningen deze functie bedienen.
2.4 Download de app “Niko connected switch”
Je downloadt de Niko connected switch app in de App Store of Google Play. Open de
app en link deze aan je account van de klant door dezelfde login- en paswoordgegevens te
gebruiken.
De app vereist minimaal iOS 9 of Android 4.1 (Jelly Bean).
410-10000
Connected switch startpakket
met gateway en draadloze schakelaar
max. 30 m

nv Niko sa Industriepark West 40, BE-9100 Sint-Niklaas, Belgium, tel. +32 3 778 90 00, fax +32 3 777 71 20, support@niko.be, www.niko.euPM410-10000R16362 2
3 STORINGEN VERHELPEN
Gateway led Probleem Oplossing
Knippert rood Er is een probleem met de
conguratie
Trek de stekker uit het stopcontact, wacht
enkele minuten en probeer opnieuw.
Contacteer Niko customer support indien
het nog niet lukt.
De gateway is defect Contacteer Niko customer support
Knippert geel De gateway heeft geen
verbinding met het internet
Controleer of de gateway goed is
aangesloten op de modem of router.
Controleer de internetverbinding
Continu geel De gateway heeft geen
verbinding met de server
Contacteer Niko customer support
Brandt niet Er is geen netspanning. Controleer de netspanning.
De voeding van de gateway
is defect.
Vervang de voeding. Neem contact op
met Niko customer support indien de
garantie nog van toepassing is.
De gateway is defect. Contacteer Niko customer support
4 TECHNISCHE GEGEVENS
4.1 Installatie
Communicatieprotocol Niko Easywave – 868,3 MHz
Zendbereik Max. 30 m binnenshuis
Niet compatibel met 05-311: minihandzender met 1 bedieningsknop
05-363: draadloos raam- of deurcontact
4.2 Gateway
Montage Horizontale plaatsing of verticaal gemonteerd op de muur
Afmetingen 173 x 173 x 35 mm (HxBxD)
Gewicht 540 g
Maximaal verbruik 2.5 W
Maximaal radiofrequent
vermogen
5.85dBm
Ingangsspanning 5 V via bijgeleverde stroomadapter
Poorten RJ45 poort, 100 Mbit WAN port
Omgevingstemperatuur 0 – 45 °C
Beschermingsgraad IP20
Markering CE
4.3. Bijgeleverde draadloze schakelaar
De bijgeleverde draadloze schakelaar is samengesteld uit de volgende artikels:
• 410-00001
• 101-00001
• 120-76100
• batterij (type CR2430)
5 WAARSCHUWINGEN VOOR INSTALLATIE
• De installatie moet worden uitgevoerd door een erkend installateur en volgens de
geldende voorschriften.
• Deze handleiding moet aan de gebruiker worden overhandigd. Het moet bij het
dossier van de elektrische installatie worden gevoegd en worden overgedragen aan
eventuele nieuwe eigenaars. Bijkomende exemplaren zijn verkrijgbaar via de website of
supportdienst van Niko. Op de Niko website is altijd de meest recente handleiding van het
product terug te vinden.
• Tijdens de installatie moet rekening gehouden worden met (niet-limitatieve lijst):
- de geldende wetten, normen en reglementen.
- de stand van de techniek op het moment van de installatie.
- deze handleiding die alleen algemene bepalingen vermeldt en moet worden gelezen in
het kader van elke specieke installatie.
- de regels van goed vakmanschap.
Dit product voldoet aan alle toepasselijke Europese richtlijnen en verordeningen.
Indien van toepassing, vind je de EU-verklaring van overeenstemming met
betrekking tot dit product op www.niko.eu.
6 NIKO SUPPORT
Heb je twijfel? Of wil je het product omruilen in geval van een eventueel defect?
Neem dan contact op met je groothandel of de Niko supportdienst:
• België: +32 3 778 90 80
• Nederland: +31 880 15 96 10
Contactgegevens en meer informatie vind je op www.niko.eu onder de rubriek “Hulp en
advies”.
7 GARANTIEBEPALINGEN
• De garantietermijn bedraagt vier jaar vanaf leveringsdatum. Als leveringsdatum geldt
de factuurdatum van aankoop van het product door de consument. Als er geen factuur
voorhanden is, geldt de productiedatum.
• De consument is verplicht Niko schriftelijk te informeren over het gebrek aan
overeenstemming, en dit uiterlijk binnen de twee maanden na vaststelling.
• In geval van een gebrek aan overeenstemming heeft de consument enkel recht op een
kosteloze herstelling of vervanging van het product, wat door Niko bepaald wordt.
• Niko is niet verantwoordelijk voor een defect of schade als gevolg van een foutieve
installatie, oneigenlijk of onachtzaam gebruik, een verkeerde bediening, transformatie van
het product, onderhoud in strijd met de onderhoudsvoorschriften of een externe oorzaak
zoals vochtschade of schade door overspanning.
• De dwingende bepalingen in de nationale wetgeving over de verkoop van
consumptiegoederen en de bescherming van consumenten in landen waar Niko
rechtstreeks of via zuster- of dochtervennootschappen, lialen, distributeurs, agenten of
vaste vertegenwoordigers verkoopt, hebben voorrang op bovenstaande bepalingen.
Hierbij verklaar ik, Niko nv, dat het type radioapparatuur 410-10000 conform is met Richtlijn
1999/5/EC en Richtlijn 2014/53/EU. De volledige tekst van de EU-conformiteitsverklaring kan
worden geraadpleegd op www.niko.eu.
Dit product mag u niet bij het ongesorteerd afval gooien. Breng uw afgedankt
product naar een containerpark of een erkend verzamelpunt. Net als producenten
en importeurs speelt ook u een belangrijke rol in de bevordering van sortering,
recycling en hergebruik van afgedankte elektrische en elektronische apparatuur.
Om de ophaling en verwerking te kunnen nancieren, heft de overheid in bepaalde
gevallen een recyclingbijdrage (inbegrepen in de aankoopprijs van dit product).

nv Niko sa Industriepark West 40, BE-9100 Sint-Niklaas, Belgium, tel. +32 3 778 90 00, fax +32 3 777 71 20, support@niko.be, www.niko.euPM410-10000R16362 3
VEUILLEZ LIRE LE MANUEL ENTIÈREMENT AVANT L'INSTALLATION ET
LA MISE EN SERVICE. VEUILLEZ CONSERVER CE MODE D’EMPLOI AFIN
DE POUVOIR LE CONSULTER ULTÉRIEUREMENT.
1 DESCRIPTION
Ce pack initial contient un module de contrôle à distance et un interrupteur sans l avec
deux touches de la couleur Niko Intense white.
Le module de contrôle à distance permet de commander tous les interrupteurs sans l d'une
installation à partir d'une appli pour smartphone, tablette et smartwatch ou d'une page
Internet. Le client peut ainsi commander son installation en toute sécurité au moyen d'un
réseau mobile de type 4G, 3G, GPRS ou à partir d'une borne WiFi.
Le pack initial peut être élargi avec d'autres interrupteurs sans l et récepteurs Niko
fonctionnant selon le protocole Easywave. Grâce aux récepteurs, il est possible d'éteindre
ou de tamiser l'éclairage, de commander les volets et les stores ou de mettre en marche des
appareils reliés à une prise de courant.
2 INSTALLATION EN QUATRE ÉTAPES SEULEMENT
2.1 Programmez sur les récepteurs les interrupteurs sans l en mode à deux
boutons (mode 1)
Avec ce mode de commande, la touche supérieure de l'interrupteur allume la lumière et
la lumière s'éteint d'une pression sur la touche inférieure. Tous les interrupteurs doivent
être programmés de cette manière an de garantir le feedback correct (p. ex. la lumière est
allumée ou éteinte) dans l'appli.
Vous trouverez une description détaillée de la programmation dans le manuel de chaque
récepteur. En résumé, la programmation se déroule généralement comme suit :
1. Appuyez brièvement une fois sur
le bouton de programmation du
récepteur. Le récepteur clignote
régulièrement ou émet un beep
régulier.
2. Appuyez brièvement sur le bouton
qui doit allumer la lumière ou
ouvrir le volet. La LED s'allume
pendant 4 secondes ou vous
entendez un long beep.
3. Appuyez (plusieurs fois) sur le
bouton de programmation du
récepteur jusqu'à ce qu'il sorte
du mode de programmation et
ne clignote plus ou n'émette plus
de beep.
Les interrupteurs, les récepteurs et le
module de contrôle à distance peuvent
être distants de 30 m au maximum.
Mettez le module de contrôle à distance
au centre de l'installation, pour garantir
une portée optimale. La portée
d’émission dépend des matériaux mis en
œuvre dans l'habitation.
Cloisons de bois
ou de plâtre :
perte de 5 à 20 %
Briques et béton :
perte de 20 à
40 %
Béton armé :
perte de 40 à
90 %
Espace métallique
fermé : perte de
90 à 100 %
2.2 Raccordez le module de contrôle à distance sur le réseau
1. Reliez le module de contrôle
à distance au modem ou
routeur Internet à l'aide du
câble ethernet fourni.
2. Reliez le cordon réseau au
module de contrôle à distance
et enfoncez la che dans la
prise de courant.
3. La LED sur le module de contrôle à distance se met à clignoter en vert. Le module de
contrôle à distance est en train de démarrer. Une fois que la LED cesse de clignoter et
qu'elle reste allumée en vert, le module de contrôle à distance est raccordé à l'Internet.
La première fois que cette liaison est réalisée, le module de contrôle à distance
va chercher les mises à jour nécessaires. Après 5 minutes maximum, la LED va de
nouveau s'éteindre et le module de contrôle à distance va redémarrer. Attendez par
conséquent jusqu'à ce que la LED s'allume de nouveau en vert.
Si la LED du module de contrôle à distance clignote en jaune, aucune liaison avec Internet
n'a été détectée. Le cas échéant, contrôlez les réglages du routeur Internet.
2.3 Créez un compte et enregistrez les boutons installés
1. Surfez sur la page web myconnectedswitch.niko.eu
2. Créez un compte au nom de l'utilisateur nal.
À cet effet, gardez aussi sous la main l'adresse
MAC et le numéro de série, que vous trouverez
à l'arrière du module de contrôle à distance.
3. L'utilisateur reçoit un e-mail de conrmation. Cet e-mail contient aussi toutes les
informations pour modier le nom d'utilisateur et le mot de passe à l'issue de la
conguration.
4. Dans la barre de menu, appuyez sur Conguration et attendez jusqu'à ce que la liaison
avec le module de contrôle soit réalisée.
5. Suivez maintenant les étapes indiquées par l'assistant de conguration :
- Il faut d'abord enregistrer les ‘commandes’. À cet effet, vous appuyez sur une seule
touche sur chaque commande, vous donnez un nom à la commande (16 caractères
max.) et vous indiquez de quel type de commande il s'agit (interrupteur sans l avec 2, 4
ou 8 touches, émetteur portable, …).
- Vous indiquez ensuite quelles ‘fonctions’ ces commandes doivent exécuter.
Sélectionnez le type de fonction en choisissant la bonne icône (éclairage commuté,
éclairage tamisé, volets ou stores, prise de courant commutée) et donnez-lui un
nom adéquat (max. 16 caractères). Sélectionnez dans la liste quelles commandes
enregistrées commandent cette fonction.
2.4 Téléchargez l'appli « Niko connected switch »
Vous téléchargez l'appli Niko connected switch dans l'App Store ou Google Play. Ouvrez
l'appli et liez-la à votre compte du client en utilisant les mêmes identiant et mot de passe.
L'appli requiert au minimum iOS 9 ou Android 4.1 (Jelly Bean).
410-10000
Pack initial connected switch avec
module de contrôle à distance et interrupteur sans l
30 m au maximum

nv Niko sa Industriepark West 40, BE-9100 Sint-Niklaas, Belgium, tel. +32 3 778 90 00, fax +32 3 777 71 20, support@niko.be, www.niko.euPM410-10000R16362 4
1 REMÉDIER AUX PANNES
LED du module
de contrôle à
distance
Problème Solution
Clignote en
rouge
Il y a un problème de
conguration
Retirez la che de la prise de courant,
attendez quelques minutes et réessayez.
Contactez Niko customer support si ça
ne marche toujours pas.
Le module de contrôle à
distance est défectueux
Contactez Niko customer support
Clignote en
jaune
Le module de contrôle à
distance n'a pas de liaison
avec Internet
Contrôlez si le module de contrôle à
distance est bien connecté au modem ou
au routeur.
Contrôlez la connexion Internet
Allumé en
continu en jaune
Le module de contrôle à
distance n'a pas de liaison
avec le serveur
Contactez Niko customer support
Ne s'allume pas Il n'y a pas de tension
réseau.
Contrôlez la tension réseau.
L'alimentation du module
de contrôle à distance est
défectueuse.
Remplacez l'alimentation. Contactez Niko
customer support si la garantie est encore
d'application.
Le module de contrôle à
distance est défectueux.
Contactez Niko customer support
2 DONNÉES TECHNIQUES
4.1 Installation
Protocole de communication Niko Easywave – 868,3 MHz
Portée d’émission 30 m au maximum à l'intérieur
Pas compatible avec 05-311 : émetteur portable miniature avec 1 touche de
commande
05-363 : contact de porte ou de fenêtre sans l
4.2 Module de contrôle à distance
Montage Pose horizontale ou montage vertical sur le mur
Dimensions 173 x 173 x 35 mm (HxLxP)
Poids 540 g
Consommation maximale 2.5 W
Puissance maximale de
radiofréquence
5.85 dBm
Tension d’entrée 5 V via adaptateur de courant fourni
Ports Port RJ45, port WAN 100 Mbits
Température ambiante 0 – 45 °C
Degré de protection IP20
Marquage CE
4.3. Interrupteur sans l fourni
L'interrupteur sans l fourni est composé des articles suivants :
• 410-00001
• 101-00001
• 120-76100
• batterie (type CR2430)
3 MISES EN GARDE RELATIVES À L'INSTALLATION
• L’installation doit être effectuée par un installateur agréé et dans le respect des
prescriptions en vigueur.
• Ce mode d'emploi doit être remis à l’utilisateur. Il doit être joint au dossier de l’installation
électrique et être remis aux nouveaux propriétaires éventuels. Des exemplaires
supplémentaires peuvent être obtenus sur le site internet ou auprès du service support
de Niko. Sur le site internet de Niko, vous trouverez le mode d’emploi le plus récent du
produit.
• Pendant l'installation, il y a lieu de tenir compte de ce qui suit (liste non limitative) :
- les lois, normes et règlements en vigueur.
- l'état de la technique au moment de l'installation.
- le présent mode d'emploi, qui ne stipule que des dispositions générales et qui doit être
lu dans le cadre de toute installation spécique.
- les règles de l'art.
Ce produit est conforme à l’ensemble des directives et règlements européens
applicables. Le cas échéant, vous trouverez la déclaration UE de conformité relative
à ce produit sur le site www.niko.eu.
4 SUPPORT NIKO
Vous avez un doute ? Ou vous souhaitez échanger un produit défectueux ? Veuillez, dans ce
cas, contacter votre grossiste ou le service support de Niko :
• Belgique : +32 3 778 90 80
• Pays-Bas : +31 880 15 96 10
Vous trouverez les coordonnées et de plus amples informations sur le site www.niko.eu, sous
la rubrique « Aide et conseils ».
5 CONDITIONS DE GARANTIE
• Le délai de garantie est de quatre ans à compter de la date de livraison. La date de la
facture d’achat du produit par le consommateur fait ofce de date de livraison. En l’absence
de facture, la date de fabrication fait foi.
• Le consommateur est tenu de prévenir Niko par écrit de tout défaut de conformité, dans
un délai maximal de deux mois après constatation.
• Au cas où un tel défaut de conformité serait constaté, le consommateur peut uniquement
prétendre à la réparation gratuite ou au remplacement gratuit du produit, selon l’avis de
Niko.
• Niko ne peut être tenu pour responsable d’un défaut ou de dommages résultant d’une
installation fautive, d’une utilisation inappropriée ou imprudente, d’une commande
erronée, d’une transformation du produit, d’un entretien contraire aux consignes
d’entretien ou d’une cause externe telle que de l’humidité ou une surtension.
• Les dispositions contraignantes de la législation nationale ayant trait à la vente de biens de
consommation et à la protection des consommateurs des différents pays où Niko procède
à la vente directe ou par l’intermédiaire d’entreprises sœurs, de liales, de succursales,
de distributeurs, d’agents ou de représentants xes, prévalent sur les dispositions
susmentionnées.
Par la présente nous, Niko SA, déclarons que l'appareillage radio de type 410-10000 est
conforme à la Directive 1999/5/CE et à la Directive 2014/53/EU. Le texte complet de la
déclaration de conformité EU est consultable sur www.niko.eu.
Ce produit ne peut pas être mis au rebut en tant que déchet non trié. Déposez
votre produit usagé dans un parc à conteneurs ou un point de collecte agréé.
Tout comme les fabricants et importateurs, vous jouez un rôle important dans
l'amélioration du tri, du recyclage et de la réutilisation d'appareils électriques et
électroniques mis au rebut. Pour nancer la collecte et le traitement, les pouvoirs
publics ont prévu, dans certains cas, une cotisation de recyclage (comprise dans le
prix d'achat de ce produit).

nv Niko sa Industriepark West 40, BE-9100 Sint-Niklaas, Belgium, tel. +32 3 778 90 00, fax +32 3 777 71 20, support@niko.be, www.niko.euPM410-10000R16362 5
READ THE COMPLETE MANUAL BEFORE CARRYING OUT THE
INSTALLATION AND ACTIVATING THE SYSTEM. KEEP THE MANUAL
FOR FUTURE REFERENCE.
1 DESCRIPTION
This starter kit contains one gateway and one wireless switch with 2 buttons in the colour
Niko Intense White.
The gateway ensures that all the wireless switches in an installation can be controlled with
an app for smartphone, tablet or smartwatch, or via a web page. In this way, the customer
can securely control the installation via a mobile network such as 4G, 3G, GPRS or a WiFi
hotspot.
The starter kit can be extended, according to your needs, with other Niko wireless switches
and receivers that function according to the Easywave protocol. Thanks to these receivers, it
is possible to switch lights on/off and dim lights, control shutters and sun blinds, or switch on
devices connected with a socket outlet.
2 INSTALLATION IN JUST FOUR STEPS
2.1. Programme the wireless switches on the receiver in dual-button mode
(Mode 1)
In this control mode, the switch's top button switches on the light, and pressing the bottom
button turns it off again. All switches need to be programmed in the same way to guarantee
the right feedback (e.g. is the light on or off) in the app.
An extensive description of the programming can be found in the manual of each receiver. In
short, the programming usually goes as follows:
1. Briefly press the receiver's
programming button one time.
The receiver will blink or start
beeping regularly.
2. Briefly press the button meant
to turn on the light or open the
roll-down shutter. The led will
burn for 4 seconds or you will hear
a long beep.
3. Briefly press the receiver's
programming button several
times until the receiver leaves
programming mode and has
stopped blinking or beeping.
The switches, receivers and gateway can
be up to 30 m away from each other.
Put the gateway in a central location of
the installation for optimal range. The
transmission range depends on the
materials used in the residence.
Gypsum or wood
walls: loss of 5 to
20%
Brick and concrete:
loss of 20 to 40%
Reinforced
concrete:
loss of 40 to 90%
Conned metal
space: loss of 90 to
100%
2.2 Connect the gateway to the network
1. Use the included ethernet
cable to connect the
gateway to the internet
modem or router
2. Connect the mains lead to
the gateway and insert the
plug into the socket outlet
3. The green LED on the gateway will start flashing. The gateway is starting up. As soon
as the LED stops flashing and stays on continuously, the gateway is connected to
the internet. The rst time this connection is made, the gateway will download the
necessary updates. After up to 5 minutes the LED will switch off and the gateway will
restart. Wait until the LED turns green again.
If the yellow LED flashes on the gateway, no connection to the internet has been detected.
Check in this case the settings of the Internet router.
2.3 Create an account and programme the installed buttons
1. Browse to web page myconnectedswitch.niko.eu
2. Create an account in name of the end user. Make
sure you also have the MAC address and serial
number on hand. You can nd these on the back
of the gateway.
3. The user will get a conrmation e-mail. This e-mail also includes all information on
modifying the Log-in and Password after conguration.
4 Press Conguration in the menu bar and wait until the connection to the gateway has
been made.
5. Follow the steps of the conguration wizard:
- First programme the controls. In order to do this, press one button on each control
and assign a name to it (up to 16 characters) and indicate what kind of control it is
(wireless switch with 2, 4 or 8 buttons, hand-held transmitter ...)
- Then, indicate which 'functions' these controls need to execute. Pick the type of
function by selecting the right icon (switched light, dimmed light, roll-down shutter
or sun blinds, switched socket outlet) and assign a meaningful name to it (up to 16
characters). Choose the programmed controls that these functions need to control.
2.4 Download the "Niko connected switch" app
Download the Niko connected switch app in the App Store or on Google Play. Open the
app and link it to your customer's account by using the same log-in and password.
The app requires iOS 9 or Android 4.1 (Jelly Bean) or later.
410-10000
Connected switch starter kit
with gateway and wireless switch
max. 30 m

nv Niko sa Industriepark West 40, BE-9100 Sint-Niklaas, Belgium, tel. +32 3 778 90 00, fax +32 3 777 71 20, support@niko.be, www.niko.euPM410-10000R16362 6
1 TROUBLESHOOTING
Gateway LED Problem Solution
Flashes red There is a problem with the
conguration
Unplug the power cord, wait several
minutes and try again. Contact Niko
Customer Support if conguration still
fails.
The gateway is defect Contact Niko Customer Support
Flashes yellow The gateway has no
connection to the internet.
Check the cable connection between the
gateway and the modem or router.
Check your internet connection
Continuously
yellow
The gateway has no
connection to the server.
Contact Niko Customer Support
Is off There is no mains voltage. Check the mains voltage.
The gateway's power
supply is defect.
Replace the power supply. Contact Niko
Customer Support if the gateway is still
under warranty.
The gateway is defect. Contact Niko Customer Support
2 TECHNICAL DATA
4.1 Installation
Communication protocol Niko Easywave – 868,3 MHz
Transmission range Max. 30 m indoors
Not compatible with 05-311: mini hand-held transmitter with 1 control button
05-363: wireless window or door contact
4.2 Gateway
Mounting Horizontal or vertical mounting against a wall
Dimensions 173 x 173 x 35 mm (HxWxD)
Weight 540 g
Maximum consumption 2.5 W
Maximum radio frequency
power
5.85 dBm
Input voltage 5 V via included power adapter
Ports RJ45 port, 100 Mbit WAN port
Ambient temperature 0 – 45 °C
Protection degree IP 20
Marking CE
4.3. Included wireless switch
The included wireless switch is composed of the following articles:
• 410-00001
• 101-00001
• 120-76100
• battery (type CR2430)
3 WARNINGS REGARDING INSTALLATION
• The installation should be carried out by a registered installer and in compliance with the
applicable regulations.
• This user manual should be presented to the user. It should be included in the electrical
installation le, and it should be passed on to any new owners. Additional copies are
available on the Niko website or via the Niko support service. The latest manual for this
product is available on the Niko website at any time.
• During installation, the following should be taken into account (non-exhaustive list):
- the applicable laws, standards and regulations.
-the technology available at the time of installation.
- this user manual, which only states general regulations and should therefore be read
within the scope of each specic installation.
- the rules of proper workmanship.
This product complies with all of the relevant European guidelines and regulations.
If applicable, you can nd the EU declaration of conformity regarding this product
at www.niko.eu.
4 NIKO SUPPORT
In case of doubt or if you want to exchange the product in case of a defect, contact your
wholesaler or the Niko support service:
• Belgium: +32 3 778 90 80
• The Netherlands: +31 880 15 96 10
Contact details and more information can be found at www.niko.eu under the “Help and
advice” section.
5 GUARANTEE PROVISIONS
• The warranty period is four years from the date of delivery. The delivery date is the
invoice date of purchase of the product by the consumer. If there is no invoice, the date of
production applies.
• The consumer is obliged to inform Niko in writing about the non-conformity, within two
months of noticing the defect.
• In case of a non-conformity, the consumer only has the right to a product repair or
replacement free of charge, which shall be decided by Niko.
• Niko shall not be held liable for a defect or damage resulting from incorrect installation,
improper or careless use, incorrect operation, transformation of the product, maintenance
that does not adhere to the maintenance instructions or an external cause, such as damage
due to moisture or overvoltage.
• The compulsory regulations of the national legislation concerning the sale of consumer
goods and the protection of the consumer in the countries where Niko sells, directly or
via sister companies, subsidiaries, chain stores, distributors, agents or permanent sales
representatives, take priority over the above-mentioned rules and regulations.
Niko nv hereby declares that the type of radio equipment 410-100000 complies with
Directive 1999/5/EC and Directive 2014/53/EU. The full text of the EU Declaration of
Conformity can be found on www.niko.eu.
This product cannot be deposited in the unsorted waste. Take your discarded
product to a recycling centre or a recognised collection point. Just like producers
and importers, you too play an important role in the promotion of sorting, recycling
and reuse of waste electrical and electronic equipment. To nance the rubbish
collection and waste treatment, the government levies recycling charges in certain
cases (included in the price of this product).

nv Niko sa Industriepark West 40, BE-9100 Sint-Niklaas, Belgium, tel. +32 3 778 90 00, fax +32 3 777 71 20, support@niko.be, www.niko.euPM410-10000R16362 7
HANDBUCH VOR MONTAGE UND INBETRIEBNAHME VOLLSTÄNDIG
DURCHLESEN. BEWAHREN SIE DIESES HANDBUCH SORGFÄLTIG FÜR
EINEN SPÄTEREN GEBRAUCH AUF.
1 BESCHREIBUNG
Dieses Starterpaket enthält ein Gateway und einen drahtlosen Schalter mit 2 Drucktastern
in der Farbe Niko Intense White.
Das Gateway sorgt dafür, dass alle drahtlosen Schalter einer Installationsanlage mit einer App
für Smartphone, Tablet-PC oder Smartwatch oder über eine Website bedient werden
können. So kann der Kunde seine Installationsanlage auf eine sichere Art und Weise über ein
mobiles Netzwerk wie 4G, 3G, GPRS oder WLAN bedienen.
Das Starterpaket kann nach Wunsch um andere drahtlose Niko-Schalter und -Empfänger
erweitert werden, die nach dem Easywave-Protokoll funktionieren. Dank des Empfängers
ist es möglich, Beleuchtung zu schalten oder zu dimmen, Rollläden und Markisen anzusteuern
oder Geräte, die an eine Steckdose angeschlossen sind, zu schalten.
2 INSTALLATION IN NUR VIER SCHRITTEN
2.1 Programmieren Sie am Empfänger den drahtlosen Schalter im
Zweitastermodus (Modus 1)
Bei dieser Art der Bedienung schaltet der obere Taster des Schalters das Licht ein, und bei
einem Druck auf den unteren Taster geht das Licht wieder aus. Alle Schalter müssen auf diese
Weise programmiert werden, um das richtige Feedback (z. B. das Licht ist an oder aus) in der
App zu gewährleisten.
Eine ausführliche Beschreibung der Programmierung nden Sie im Handbuch jedes
Empfängers. Kurz zusammengefasst verläuft die Programmierung meist wie folgt:
1. Drücken Sie einmal kurz auf die
Programmiertaste der Empfängers.
Der Empfänger blinkt oder piepst
regelmäßig.
2. Drücken Sie kurz auf den Taster,
der das Licht anschalten oder den
Rollladen öffnen soll. Die LED
brennt 4 Sekunden lang oder es
ertönt ein langer Piepton.
3. Drücken Sie (mehrmals) kurz
auf die Programmiertaste der
Empfängers, bis dieser sich nicht
mehr im Programmiermodus
bendet und nicht mehr blinkt
oder piepst.
Die Schalter, Empfänger und das Gateway
dürfen max. 30 m voneinander entfernt
sein. Wählen Sie für das Gateway einen
zentralen Ort in der Installationsanlage,
um eine optimale Reichweite zu
gewährleisten. Der Sendebereich hängt
von den in der Wohnung verbauten
Baumaterialien ab.
Holz- oder
Rigipswände:
Verlust von 5 bis
20%
Backstein und
Beton:
Verlust von 20 bis
40 %
Stahlbeton:
Verlust von 40 bis
90 %
Metallumschlossene
Räume: Verlust von
90 bis 100 %
2.2 Schließen Sie das Gateway an das Netzwerk an
1. Verbinden Sie das Gateway
mit dem mitgelieferten
Ethernetkabel mit dem
Internetmodem oder
Router
2. Schließen Sie das Netzkabel
an das Gateway an und
stecken Sie den Stecker in
die Steckdose ein
3. Die LED am Gateway beginnt, grün zu blinken. Das Gateway ist dabei, hochzufahren.
Sobald die LED aufhört zu blinken und dauerhaft grün aufleuchtet, ist das Gateway mit
dem Internet verbunden. Wenn diese Verbindung erstmals zustande kommt, wird das
Gateway die erforderlichen Updates herunterladen. Nach maximal 5 Minuten wird die
LED wieder ausgehen und das Gateway startet sich neu. Warten Sie daher, bis die LED
erneut grün aufleuchtet.
Falls die LED des Gateways gelb blinkt, wurde keine Internetverbindung gefunden.
Überprüfen Sie in diesem Fall die Einstellungen des Routers.
2.3 Erstellen Sie ein Konto und kongurieren Sie die installierten Taster
1. Begeben Sie sich zur Website myconnectedswitch.niko.eu
2. Erstellen Sie ein Konto im Namen des
Endbenutzers. Halten Sie zu diesem Zweck die
MAC-Adresse und Seriennummer bereit, die
sich auf der Rückseite des Gateways bendet.
3. Der Benutzer erhält eine Bestätigungs-E-Mail. Diese enthält ebenfalls alle erforderlichen
Informationen, um nach der Konguration den Log-in und das Passwort zu ändern.
4. Drücken Sie im Menübalken auf „Konguration“ und warten Sie, bis die Verbindung mit
dem Gateway zustande gekommen ist.
5. Befolgen Sie nun die Schritte, die der Kongurationsassistent beschreibt:
- Zunächst müssen die „Bedienungen“ konguriert werden. Zu diesem Zweck drücken
Sie auf jeder Bedienung einen Taster und geben Sie der Bedienung einen Namen (max.
16 Zeichen). Außerdem geben Sie an, um welche Art von Bedienung es sich handelt
(drahtloser Schalter mit 2, 4 oder 8 Tastern, Handsender, ...)
- Anschließend geben Sie an, welche „Funktionen“ diese Bedienungen ausführen
müssen. Wählen Sie die Art der Funktion, indem Sie das richtige Symbol wählen
(geschaltetes Licht, gedimmtes Licht, Rollladen oder Markise, geschaltete Steckdose)
und geben Sie diesem einen sinnvollen Namen (max. 16 Zeichen). Wählen Sie aus der
Liste, welche kongurierten Bedienungen diese Funktion bedienen.
2.4 Laden Sie die „Niko Connected Switch“-App herunter
Laden Sie die Niko Connected Switch-App im App Store oder bei Google Play herunter.
Öffnen Sie die App und verlinken Sie diese mit dem Konto des Kunden, indem Sie denselben
Log-in und dasselbe Passwort verwenden.
Die Mindestvoraussetzung der App ist iOS 9 bzw. Android 4.1 (Jelly Bean).
410-10000
Connected Switch Starterpaket
mit Gateway und drahtlosem Schalter
max. 30 m

nv Niko sa Industriepark West 40, BE-9100 Sint-Niklaas, Belgium, tel. +32 3 778 90 00, fax +32 3 777 71 20, support@niko.be, www.niko.euPM410-10000R16362 8
1 STÖRUNGSBESEITIGUNG
Gateway-LED Problem Lösung
Blinkt rot Es besteht ein Problem mit
der Konguration
Ziehen Sie den Stecker aus der Steckdose
und versuchen Sie es nach einigen
Minuten erneut. Kontaktieren Sie den
Niko-Kundendienst, falls es danach noch
immer nicht klappt.
Das Gateway ist defekt Kontaktieren Sie den Niko-Kundendienst
Blinkt gelb Das Gateway hat keine
Internetverbindung
Überprüfen Sie, ob das Gateway
korrekt an das Modem oder den Router
angeschlossen ist.
Überprüfen Sie die Internetverbindung
Dauerhaft gelb Das Gateway hat keine
Verbindung mit dem Server
Kontaktieren Sie den Niko-Kundendienst
Leuchtet nicht Es ist keine Netzspannung
vorhanden.
Überprüfen Sie die Netzspannung.
Das Netzteil des Gateways
ist defekt.
Tauschen Sie das Netzteil aus. Nehmen
Sie mit dem Niko-Kundendienst Kontakt
auf, falls Sie noch Garantie auf das Gerät
haben.
Das Gateway ist defekt. Kontaktieren Sie den Niko-Kundendienst
2 TECHNISCHE DATEN
4.1. Installation
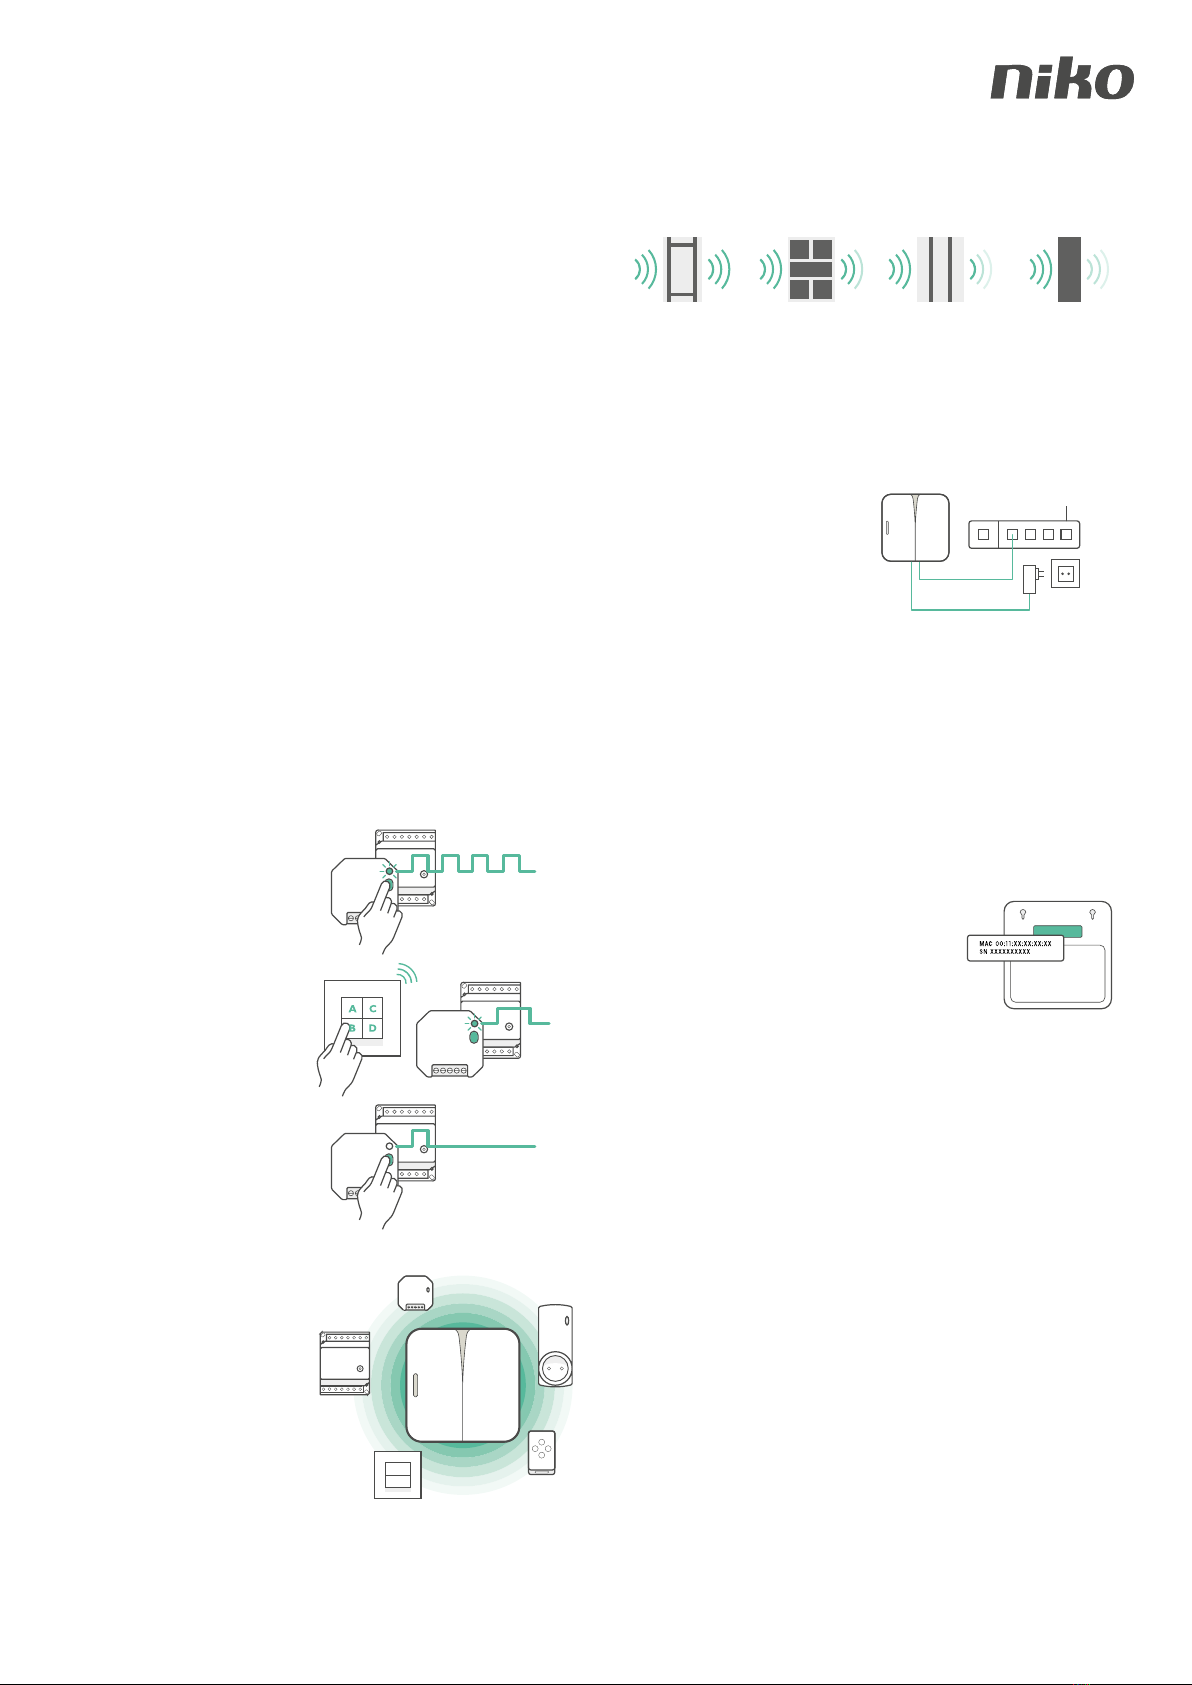
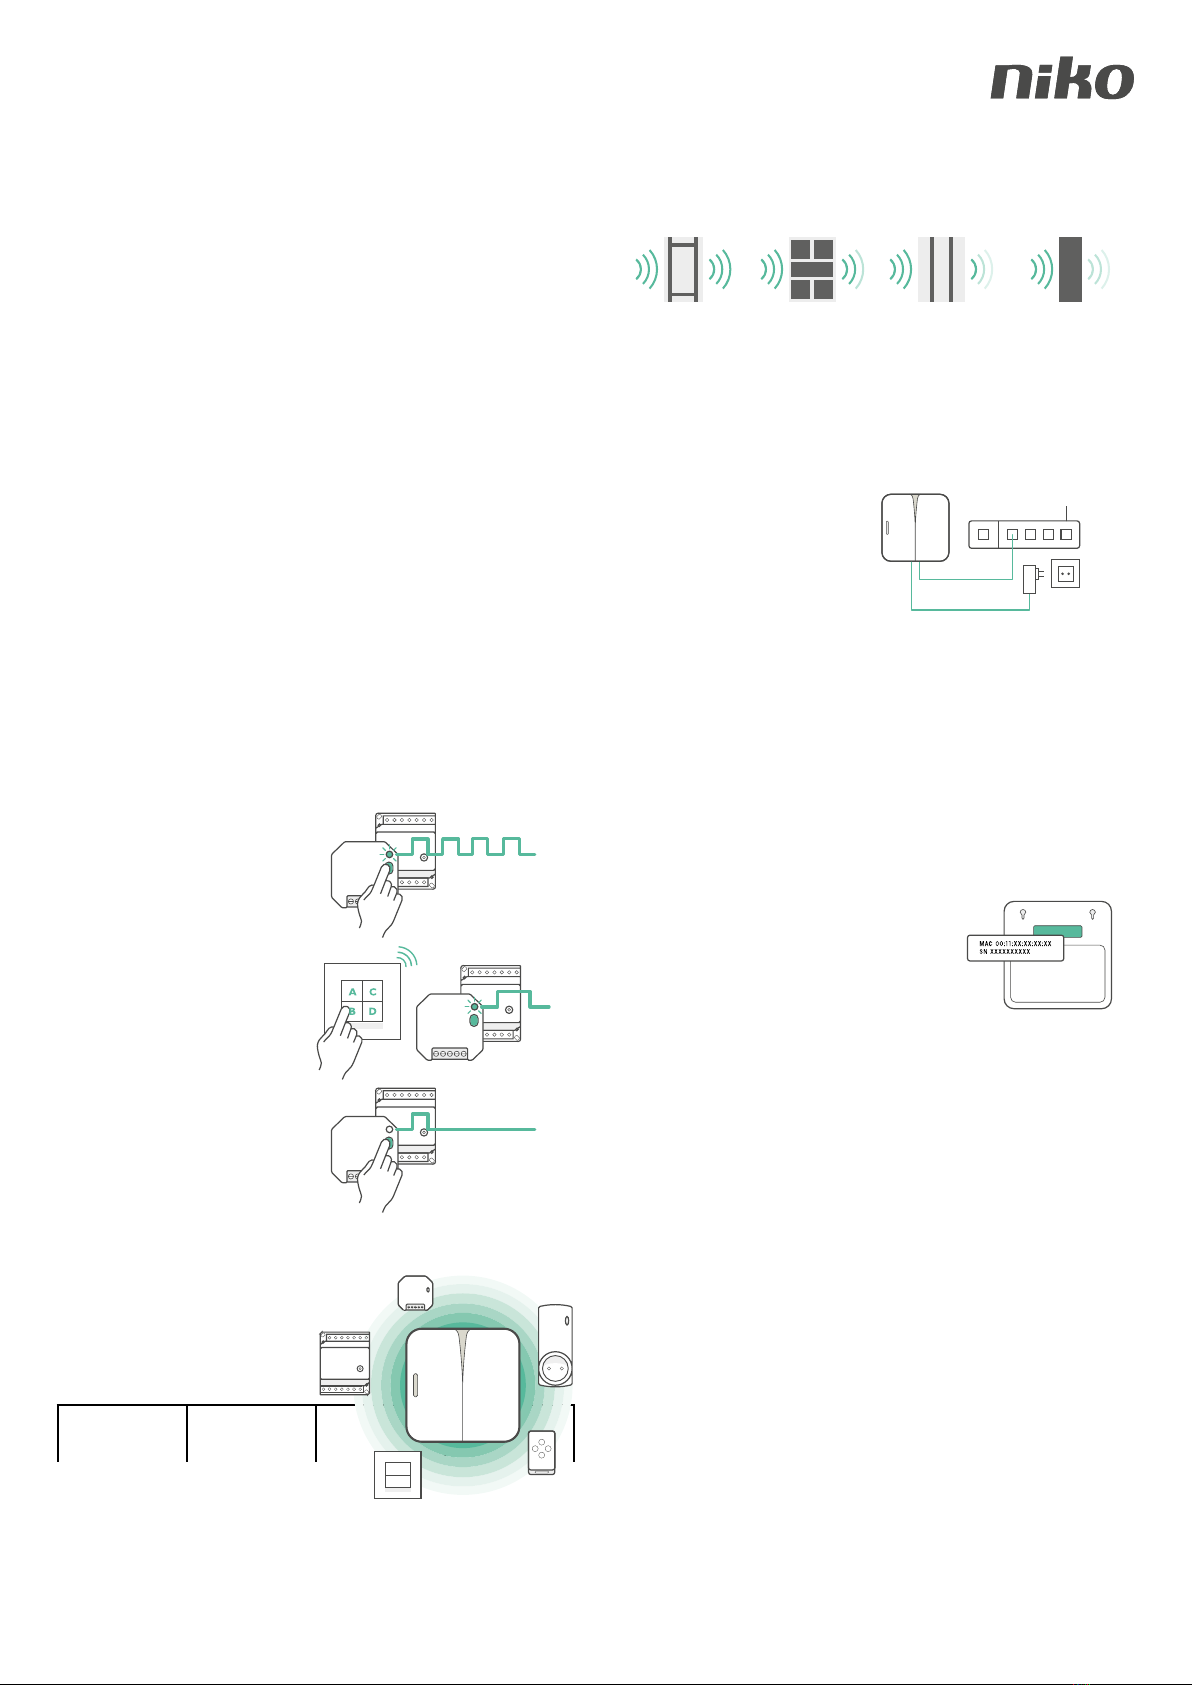
Kommunikationsprotokoll Niko Easywave – 868,3 MHz
Sendebereich Max. 30 m im Innenbereich
Nicht kompatibel mit 05-311: Minihandsender mit 1 Bedientaster
05-363: drahtloser Fenster- oder Türkontakt
4.2 Gateway
Montage Horizontal oder vertikal an der Wand anbringen
Abmessungen 173 x 173 x 35 mm (HxBxT)
Gewicht 540 g
Maximaler Verbrauch 2,5 W
Maximale
Radiofrequenzleistung
5.85dBm
Eingangsspannung 5 V über mitgeliefertes Netzteil
Anschlüsse RJ45-Anschluss, 100 Mbit WAN-Anschluss
Umgebungstemperatur 0 – 45 °C
Schutzart IP20
Kennzeichnung CE
4.3. Mitgelieferter drahtloser Schalter
Der mitgelieferte drahtlose Schalter ist aus den folgenden Artikeln zusammengestellt:
• 410-00001
• 101-00001
• 120-76100
• Batterie (Typ CR2430)
3 VOR INSTALLATION ZU BEACHTENDE WARNHINWEISE
• Die Installation darf ausschließlich von einem anerkannten Installateur unter
Berücksichtigung der geltenden Vorschriften ausgeführt werden.
• Diese Gebrauchsanleitung muss dem Benutzer ausgehändigt werden. Die
Gebrauchsanleitung ist den Unterlagen der elektrischen Anlage beizufügen und muss auch
eventuellen neuen Besitzern ausgehändigt werden. Zusätzliche Exemplare erhalten Sie
über die Website von Niko oder über den Kundendienst von Niko. Die neueste Version
der Gebrauchsanleitung erhalten Sie immer auf der Niko-Website.
• Beachten und berücksichtigen Sie bei der Installation unter anderem folgende Punkte:
- die geltenden Gesetze, Normen und Vorschriften.
- den Stand der Technik zum Zeitpunkt der Installation,
- die in dieser Gebrauchsanleitung aufgeführten Anweisungen, wobei diese
Gebrauchsanleitung nur allgemein gültige Bestimmungen enthält, die für jede Anlage
spezisch angewendet werden müssen.
- die allgemein anerkannten Regeln fachmännischer Arbeit.
Dieses Produkt erfüllt alle anwendbaren europäischen Richtlinien und
Verordnungen. Die auf dieses Produkt zutreffende EU-Konformitätserklärung
können Sie unter der Internetadresse www.niko.eu abrufen.
4 NIKO-KUNDENDIENST
Bei Zweifel Oder möchten Sie bei einem eventuellen Defekt das Produkt umtauschen? dann
nehmen Sie bitte Kontakt auf mit dem Kundendienst von Niko:
• Belgien: +32 3 778 90 80
• Niederlande: +31 880 15 96 10
Kontaktdaten und weitere Informationen erhalten Sie im Internet unter www.niko.eu in der
Rubrik „Unterstützung und Beratung”.
5 GARANTIEBESTIMMUNGEN
• Der Garantiezeitraum beträgt vier Jahre ab Lieferdatum. Als Lieferdatum gilt das
Rechnungsdatum zum Zeitpunkt des Kaufs durch den Endverbraucher. Falls keine
Rechnung mehr vorhanden ist, gilt das Produktionsdatum.
• Der Endverbraucher ist verpflichtet, Niko schriftlich über einen Produktmangel innerhalb
von zwei Monaten nach dessen Feststellung zu informieren.
• Im Falle eines Mangels hat der Endverbraucher nur Recht auf kostenlose Reparatur oder
Ersatz des Produkts. Eine Entscheidung darüber obliegt allein Niko.
• Niko ist nicht für Mängel oder Schäden verantwortlich, die durch fehlerhafte Installation,
nicht bestimmungsgemäßen oder unsachgemäßen Gebrauch, durch falsche Bedienung,
Anpassen/Ändern des Produktes, infolge von unsachgemäßer Wartung entgegen den
Wartungsvorschriften oder die sich aus äußeren Umständen, wie beispielsweise infolge
Feuchtigkeit oder Überspannung, ergeben.
• Zwingende Vorschriften der nationalen Gesetzgebung bezüglich des Verkaufs von
Konsumgütern und zum Verbraucherschutz haben vor den obigen Bestimmungen Vorrang
in den Ländern, in denen Niko direkt oder über seine Neben- oder Tochtergesellschaften,
Filialen, Vertriebsstellen, Agenten oder über feste Vertreter verkauft.
Hiermit erkläre ich, Niko nv, dass die Funkanlage 410-10000 der Richtlinie 1999/5/EG und
der Richtlinie 2014/53/EU entspricht. Den vollständigen Text der EU-Konformitätserklärung
nden Sie unter www.niko.eu.
Sie dürfen dieses Produkt nicht über den normalen Hausmüll entsorgen. Bringen Sie
Ihr ausgedientes Produkt zum Recyclinghof oder einer anerkannten Sammelstelle.
Genau wie Hersteller und Importeure spielen auch Sie eine wichtige Rolle bei
Sortierung, Recycling und Wiederverwendung von ausgedienten elektrischen und
elektronischen Geräten. Um die Abholung und Verarbeitung wiederverwertbarer
Abfälle nanzieren zu können, ist im Verkaufspreis oftmals bereits eine obligatorische
Recyclingabgabe enthalten.

nv Niko sa Industriepark West 40, BE-9100 Sint-Niklaas, Belgium, tel. +32 3 778 90 00, fax +32 3 777 71 20, support@niko.be, www.niko.euPM410-10000R16362 9
PRED VYKONANÍM INŠTALÁCIE A AKTIVÁCIE SYSTÉMU SI PREČÍTAJTE
CELÝ NÁVOD. NÁVOD USCHOVAJTE PRE BUDÚCE POUŽITIE.
1 OPIS
Tento štartovací balíček obsahuje jednu bránu a jeden bezdrôtový spínač s dvomi tlačidlami
vo farbe Niko Intense White (biela).
Brána zabezpečuje, že všetky bezdrôtové spínače v inštalácii môžete ovládať pomocou
aplikácie pre smartfóny, tablety alebo inteligentné hodinky, alebo prostredníctvom
internetovej stránky. Týmto spôsobom môže používateľ bezpečne ovládať inštaláciu
prostredníctvom mobilnej siete (ako napr. 4G, 3G, GPRS alebo WiFi hotspotu).
Podľa Vašich potrieb môžete štartovací balíček rozšíriť pomocou iných bezdrôtových spínačov
a vysielačov od spoločnosti Niko, ktoré sú založené na protokole Easywave. Vďaka týmto
prijímačom je možné ovládať osvetlenie (zapínanie/vypínanie), stmievať osvetlenie, ovládať
rolety a žalúzie, alebo zapínať zariadenia zapojené do zásuviek.
2 INŠTALÁCIA LEN V ŠTYROCH KROKOCH
2.1. Naprogramujte bezdrôtové spínače na prijímač v dvojtlačidlovom režime
(Režim 1)
V tomto ovládacom režime horným tlačidlom spínača zapnete osvetlenie, zatiaľčo spodným
ho znovu vypnete. Pre zaručenie správnej spätnej väzby v aplikácii (napr. či je svetlo zapnuté
alebo vypnuté) je potrebné naprogramovať všetky spínače rovnakým spôsobom.
Podrobný opis programovanie nájdete v návode pre každý prijímač. V skratke, programovanie
väčšinou prebieha nasledujúcim spôsobom:
1. Krátko raz stlačte programovacie
tlačidlo na prijímači. Prijímač začne
pravidelne blikať alebo pípať.
2. Krátko stlačte tlačidlo určené
na zapínanie osvetlenia alebo
vyťahovanie elektrických roliet.
LED kontrolka bude 4 sekundy
svietiť alebo už nebude počuť
pípanie.
3. Krátko a viackrát stlačte
programovacie tlačidlo prijímača,
až kým prijímač neopustí
programovací režim a neprestane
blikať alebo pípať.
Spínače, prijímače a brána môžu byť
od seba vzdialené max. 30 metrov. Pre
optimálny dosah umiestnite bránu do
centrálnej pozície v rámci inštalácie.
Dosah vysielača závisí od materiálov
použitých v stavbe/budove.
Sadrokartónové
alebo drevené
steny: strata 5 až
20 %
Tehly a betón:
strata 20 až 40 %
Železobetón:
strata 40 až 90%
Stiesnené kovové
priestory: strata 90
až 100%
2.2 Pripojenie brány na domácu sieť.
1. Na pripojenie brány k
internetovému modemu
alebo routru použite
pribalený ethernetový kábel
2. Pripojte sieťový kábel k
bráne a vložte zástrčku do
zásuvky
3. Zelená LED kontrolka na bráne začne blikať. Brána sa spúšťa. V momente, keď LED
kontrolka prestane blikať a bude už len svietiť, je brána pripojená k internetu. Pri prvom
pripojení brána stiahne potrebné aktualizácie. Po max. 5 minútach sa LED kontrolka
vypne a brána sa reštartuje. Počkajte kým nezačne LED kontrolka znovu svietiť
nazeleno.
Ak začne blikať žltá LED kontrolka na bráne, nebolo objavené žiadne pripojenie na internet.
V takom prípade skontrolujte nastavenia internetového routru.
2.3 Vytvorte účet a naprogramujte nainštalované tlačidlá
1. Prejdite na stránku myconnectedswitch.niko.eu
2. V mene koncového používateľa vytvorte účet.
Uistite sa, že poruke máte takisto aj MAC adresu
a sériové číslo . Tieto nájdete na zadnej strane
brány.
3. Používateľovi príde potvrdzovací e-mail. Tento e-mail takisto obsahuje všetky informácie
týkajúce sa upravovania prihlasovacieho mena a hesla po kongurácii.
4 V lište ponuky stlačte Konguráciu a počkajte, kým nebude vytvorené pripojenie na bránu.
5. Postupujte podľa pokynov sprievodcu inštaláciou:
- Najprv naprogramujte ovládače. Na to musíte stlačiť jedno tlačidlo na každom
ovládači a priradiť mu názov (max. 16 znakov) a takisto musíte zadať o aký ovládač ide
(bezdrôtový spínač s 2, 4 alebo 8 tlačidlami, diaľkový ovládač ...)
- Potom zadajte, ktoré „funkcie“ majú tieto ovládače spustiť. Vyberte si typ funkcie.
To spravíte tak, že si vyberiete správnu ikonu (spínanie svetla, stmievanie osvetlenia,
elektrické rolety alebo žalúzie, spínaná zásuvka) a priradíte jej vhodný názov (max. 16
znakov). Vyberte si naprogramované ovládače, ktoré tieto funkcie majú ovládať.
2.4 Stiahnite si aplikáciu „Niko connected switch“
Stiahnite si aplikáciu Niko connected switch cez App Store alebo Google Play. Otvorte
aplikáciu a prepojte ju s Vaším používateľským účtom s použitím rovnakého prihlasovacieho
mena a hesla.
Aplikácia potrebuje iOS 9 alebo Android 4.1 (Jelly Bean) alebo novšiu verziu.
410-10000
Štartovací balíček pripojeného spínača
a bránou a bezdrôtovým spínačom
max. 30 m

nv Niko sa Industriepark West 40, BE-9100 Sint-Niklaas, Belgium, tel. +32 3 778 90 00, fax +32 3 777 71 20, support@niko.be, www.niko.euPM410-10000R16362 10
1 ODSTRAŇOVANIE PROBLÉMOV
LED kontrolka
brány
Problém Riešenie
Bliká načerveno Je problém s konguráciou Odpojte napájací kábel, počkajte niekoľko
minút a skúste to znova. Kontaktujte
zákaznícku podporu spoločnosti Niko ak
kongurácia stále nefunguje.
Brána je pokazená Kontaktujte zákaznícku podporu
spoločnosti Niko
Bliká nažlto Brána nemá žiadne
pripojenie na internet.
Skontrolujte káblové pripojenie medzi
bránou a modemom alebo routerom.
Skontrolujte Vaše internetové pripojenie
Svieti nažlto Brána nemá žiadne
pripojenie na server.
Kontaktujte zákaznícku podporu
spoločnosti Niko
Je vyp. Žiadne sieťové napájanie. Skontrolujte sieťové napájanie.
Napájací zdroj brány je
chybný.
Vymeňte napájací zdroj. Kontaktujte
zákaznícku podporu spoločnosti Niko ak
brána je stále v záruke.
Brána je pokazená. Kontaktujte zákaznícku podporu
spoločnosti Niko
2 TECHNICKÉ ÚDAJE
4.1 Inštalácia
Komunikačný protokol Niko Easywave – 868,3 MHz
Rozsah prenosu Max. 30 m v interiéri
Nie je kompatibilné s 05-311: mini diaľkový vysielač s 1 tlačidlom
05-363: bezdrôtový dverový alebo okenný kontakt
4.2 Brána
Montáž Horizontálna alebo verikálna montáž na stenu
Rozmery 173 x 173 x 35 mm (V x Š x H)
Hmotnosť: 540 g
Max. spotreba 2,5 W
Max. výkon rádiovej
frekvencie
5,85 dBm
Vstupné napätie 5 V cez pribalený napájací adaptér
Porty RJ45 port, 100 Mbit WAN port
Okolitá teplota 0 – 45 °C
Stupeň ochrany IP 20
Označenie CE
4.3. Pribalený bezdrôtový spínač
Pribalený bezdrôtový spínač sa skladá z nasledujúcich výrobkov:
• 410-00001
• 101-00001
• 120-76100
• batéria (typ CR2430)
3 UPOZORNENIA TÝKAJÚCE SA INŠTALÁCIE
• Inštaláciu musí vykonať kvalikovaný elektroinštalatér v súlade s platnými predpismi.
• Tento návod musí byť odovzdaný užívateľovi. Musí byť súčasťou dokumentácie o
elektrickej inštalácii a musí byť odovzdaný každému novému užívateľovi. Ďalšie kópie sú
k dispozícii na webovej stránke Niko alebo prostredníctvom služby podpory. Najnovší
manuál pre tento produkt je vždy k dispozícii na webovej stránke Niko.
• Počas inštalácie je potrebné brať do úvahy nasledovné (neobmedzuje sa iba na nasledovný
zoznam):
- platné zákonné predpisy, normy a nariadenia;
-aktuálny stav dostupnej technológie v čase inštalácie.
- túto užívateľskú príručku, ktorá uvádza iba všeobecné predpisy, a preto musí byť
naštudovaná v rozsahu potrebnom k danej inštalácii.
- pravidlá správneho vypracovania.
Tento výrobok spĺňa všetky relevantné Európske predpisy a nariadenia. V prípade
potreby nájdete príslušné EÚvyhlásenie o zhode na www.niko.eu.
4 NIKO PODPORA
V prípade pochybností alebo ak si prajete vymeniť chybný produkt, obráťte sa na svojho
predajcu alebo na podporu spoločnosti Niko:
• Belgicko: +32 3 778 90 80
• Holandsko: +31 880 15 96 10
Ďalšie informácie a kontakty nájdete na stránke www.niko.eu v sekcii „Pomoc a podpora“.
5 ZÁRUČNÉ PODMIENKY
• Záručná doba je štyri roky od dátumu dodávky. Dátum dodania je dátum nákupu výrobku
zákazníkom uvedený na faktúre. V prípade, že faktúra nebola vystavená, platí dátum
výroby.
• Zákazník je povinný písomnou formou informovať spoločnosť Niko o poruche do dvoch
mesiacov od jej objavenia.
• V prípade poruchy výrobku má zákazník nárok na bezplatnú opravu alebo výmenu (na
základe posúdenia rmy Niko).
• Spoločnosť Niko nenesie zodpovednosť za poruchu alebo poškodenie spôsobené
nesprávnou inštaláciou, nesprávnym alebo nedbalým použitím, prepravou výrobku,
nesprávnou údržbou, alebo vonkajšími vplyvmi ako sú zvýšená vlhkosť či prepätie.
• Záväzné zákony národnej legislatívy, týkajúce sa predaja tovaru a ochrany zákazníka
platné v krajinách, kde sa predávajú výrobky Niko, priamo alebo cez sesterské či dcérske
spoločnosti, reťazce, distribútorov, agentov alebo stálych predajných zástupcov, sú
nadriadené vyššie uvedeným pravidlám a nariadeniam.
Niko nv týmto prehlasuje, že typy rádiových zariadení 410-100000 sú v súlade so smernicou
1999/5/ES a smernicou 2014/53/EÚ. Plné znenie európskeho vyhlásenia o zhode nájdete na
stránke www.niko.eu.
Tento produkt nemôže byť odstraňovaný spolu s netriedeným odpadom. Váš starý
produkt zoberte do zberného dvora alebo na určené zberné miesto odpadu alebo
do recyklačného strediska Takisto, ako aj výrobcovia a dovozcovia, aj vy zohrávate
veľmi dôležitú úlohu pri podpore triedenia, recyklovania a opätovného používania
odpadu vzniknutého z elektrických a elektronických zariadení. Aby bolo možné
nancovať zber, triedenie a spracovanie odpadu, vláda v určitých prípadoch odvádza
poplatky za recykláciu (tie sú zahrnuté v cene tohto výrobku).

nv Niko sa Industriepark West 40, BE-9100 Sint-Niklaas, Belgium, tel. +32 3 778 90 00, fax +32 3 777 71 20, support@niko.be, www.niko.euPM410-10000R16362 11

nv Niko sa Industriepark West 40, BE-9100 Sint-Niklaas, Belgium, tel. +32 3 778 90 00, fax +32 3 777 71 20, support@niko.be, www.niko.euPM410-10000R16362 12
Table of contents
Languages:
Other Niko Switch manuals