!0
Focus limit switch
Choose the focus distance limits for autofocus
according to your goals.
• FULL: Choose for subjects at distances any-
where in the lens’s full autofocus range
(0.16 m/0.53ft to infinity).
• 0.3 m –0.16 m: Limit autofocus to distances
of 0.16 m (0.53ft) to 0.3 m (0.98 ft). Choose
this option for faster focusing when shooting
close-ups or at any other time you anticipate
that your subject will be no more than 0.3 m
away.
—
!1
Lens cap (front cap)
——
!2
Lens cap (rear cap)
——
1 Attaching the SB-R200 requires an SX-1 attachment ring in addition to the
SY-1-62 adapter ring. For information on using the SB-R200, see the documenta-
tion provided with the ash unit.
2 For information on using the ES-2 lm digitizing adapter, see the documentation
provided with the ES-2.
A
Attachment and Removal
Attaching the Lens
z
Turn the camera o, remove the body cap, and detach the rear lens cap.
xPosition the lens on the camera body, keeping the mounting mark
on the lens aligned with the mounting mark on the camera body,
and then rotate the lens counterclockwise until it clicks into place.
cTurn the camera on.
• The lens will extend automatically.
DExtending the Lens
• Do not place the camera on a surface with the lens pointing
down. Be particularly careful not to turn the camera on while
it is resting on the lens, as the lens may malfunction if it fails
to extend.
• Do not hold the telescoping section or attempt to forcibly ex-
tend or retract the lens. Failure to observe these precautions
could result in product malfunction.
• If the lens does not extend or freezes in place once extended, press the shutter-release button.
Removing the Lens
zTurn the camera o.
• The lens will retract automatically. Proceed to Step 2 after conrming
that the lens is fully retracted.
x
Press and hold the lens release button while turning the lens clockwise.
DRemoving the Lens While It Is Extended
The lens will not retract if removed while the camera is on. To retract the lens, turn the camera o, reat-
tach the lens, turn the camera on, and then turn the camera o and remove the lens in the correct order.
B
Attaching and Removing the Lens Hood
Attaching and Removing the Lens Hood
The lens hood screws directly onto the attach-
ment point for 46mm filters.
• Before attaching or removing the lens hood,
turn the camera off and confirm that the lens is
retracted. In addition, be careful not to touch or
apply excessive force to the glass part of the lens.
• To remove the hood, unscrew it from the lens.
Shooting Close-Ups
This lens can be used for close-ups, letting you get closer to your subject so that it fills
more of the frame. When shooting close-ups, note the following:
• Close-ups are prone to blur caused by camera shake.We recommend that you mount
the camera on a tripod and release the shutter using an optional remote cord or wire-
less remote controller.
• Shooting at short focus distances noticeably reduces depth of field. To increase depth
of field and so increase the apparent depth of focus in front of and behind the focus
point, stop aperture down and increase exposure times.
• Be careful not to strike your subject when using the lens hood.
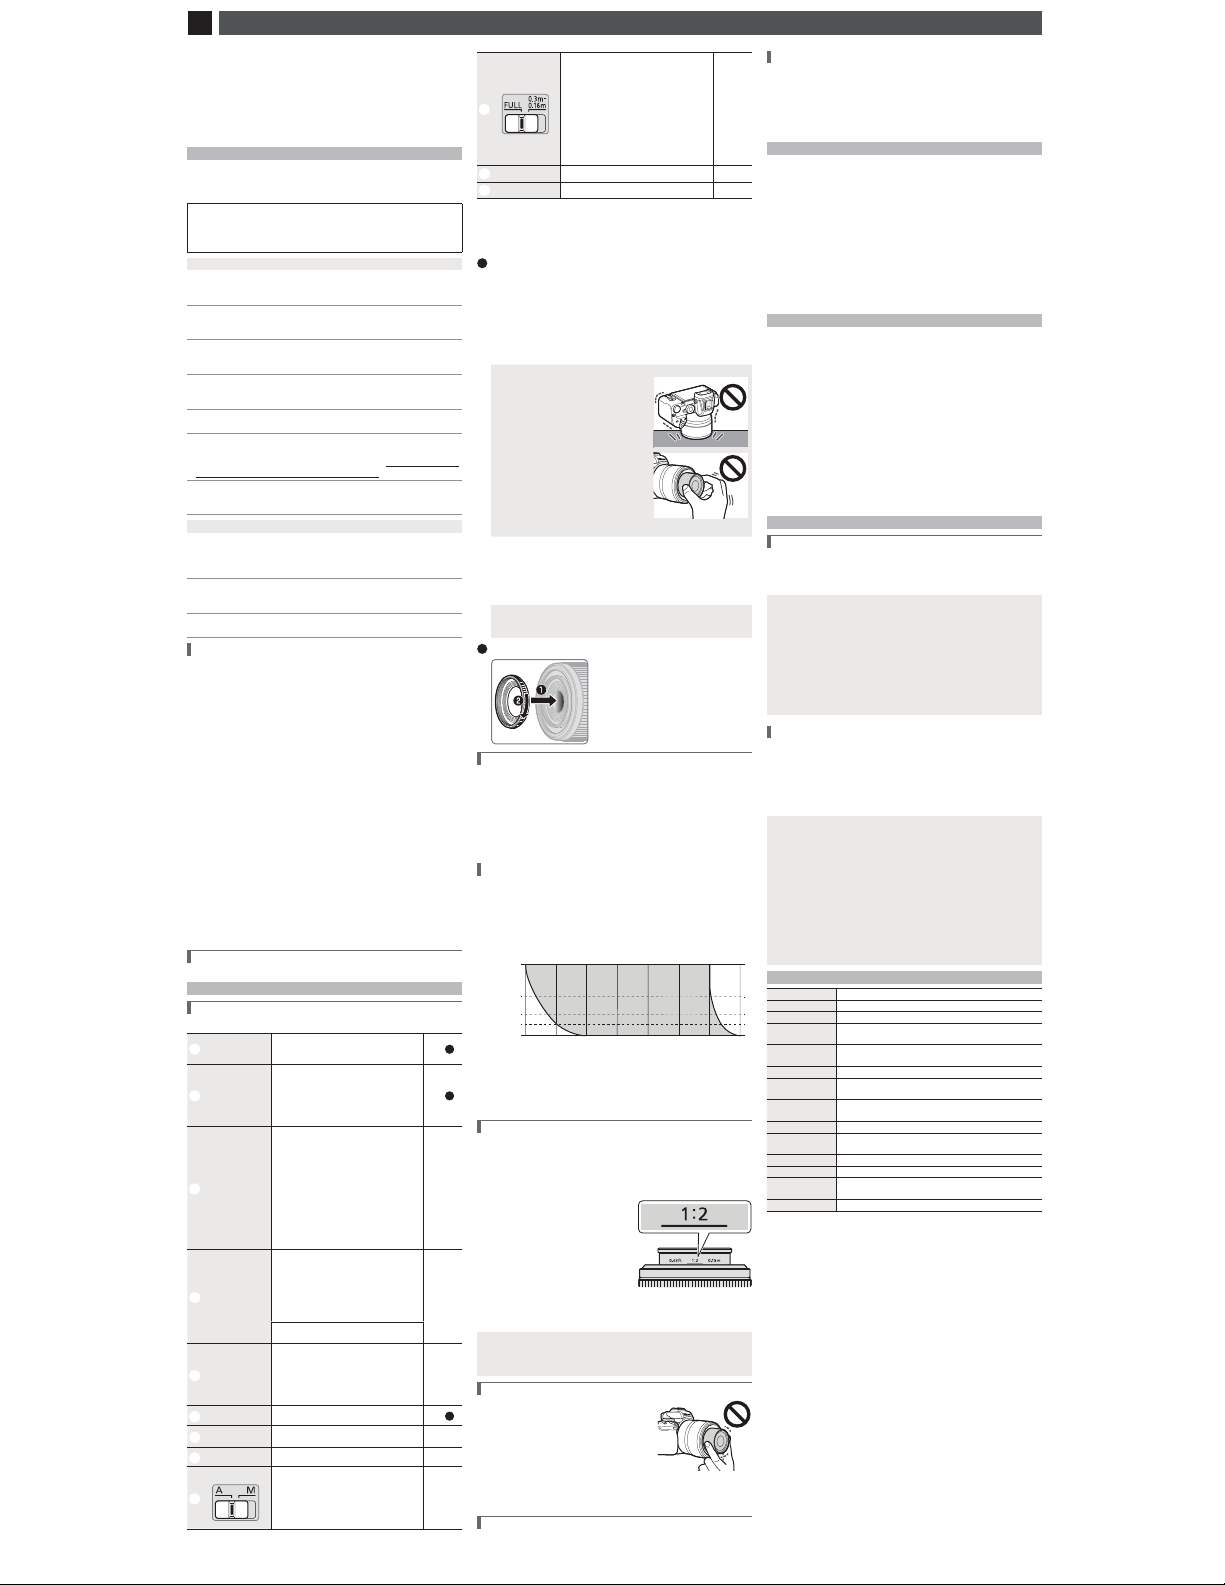
Adjusting Aperture
The aperture of the lens varies in a range that changes with focus distance. At a focus
distance of infinity, aperture ranges from f/2.8 to f/22, while the range at a focus dis-
tance of 0.16 m (0.53 ft) is f/5.6 to f/32. At apertures matching or close to the maximum
and minimum for the lens in modes Aand M, effective aperture1is automatically ad-
justed for changes in focus distance as shown.2For example, if an aperture of f/2.8 is
selected at a focus distance of infinity, the effective aperture when the focus distance is
reduced to 0.16 m (0.53 ft) will be f/5.6.
∞
0.36m(1.19 ft)
0.27m(0.89 ft)
0.16m(0.53 ft)
0.79m(2.60 ft)
f/4 f/5.6
(f/5.6)
f/8f/2.8 f/11 f/16 f/22
(f/32)
Aperture range
1 Due to the way the lens is constructed, the brightness of the image it projects on the
image sensor varies with focus distance. The image darkens as the focus distance
drops and the reproduction ratio increases. The camera consequently shows an “ef-
fective aperture” that reects this variation in brightness.
2 Assuming an aperture step size of / EV.
Choosing a Reproduction Ratio
Choosing a Reproduction Ratio
To take pictures at a selected reproduction ratio—for example, 1:1 (life size) or 1:2 (half
life-size):
zSlide the focus-mode switch to M.
xRotate the control ring until the desired reproduction ratio is selected on the
reproduction ratio indicator.
• For example, to select a reproduction ratio
of 1:2, rotate the control ring until the in-
dex points to “1:2”. Do not rotate the con-
trol ring after choosing the reproduction
ratio.
cPosition the camera so that the subject is in focus.
• Move the camera forward or back until the image in the shooting display is in
focus.
A Reproduction Ratio
The“reproduction ratio”is the ratio of the apparent size of an object on the image sensor to its true size. If the length
of the subject on the image sensor is 1 cm when the actual subject is 2 cm long, for example, the reproduction ratio
is 1:2 (half life-size).
Taking Photographs
• Touching the extended portion of the lens while au-
tofocus is in progress may interrupt the focus opera-
tion. Normal function can be restored by pressing the
shutter-release button.
• The focus position may change if you turn the camera off and then on again after
focusing. If you have focused on a pre-selected location while waiting for your sub-
ject to appear, we recommend that you do not turn the camera off until the picture
is taken.
Cameras with AF-Assist Illuminators
Cameras with AF-Assist Illuminators
The lens or lens hood may block the light from the camera AF-assist illuminator.
• For the information on using the lens with cameras that have built-in AF-assist illumi-
nators, visit the site below.
https://downloadcenter.nikonimglib.com/
Before using this product, please read these instructions carefully. You will also need to
consult the camera manual.
• This lens is intended exclusively for use with mirrorless cameras featuring a Nikon Z
mount.
• Update the camera firmware to the latest version. With earlier versions, the camera
may fail to detect the lens correctly and some features may not be available. The latest
version of the camera firmware can be downloaded from the Nikon Download Center
at the URL below.
https://downloadcenter.nikonimglib.com/
For Your Safety
To prevent damage to property or injury to yourself or to others, read “For Your Safety”
in its entirety before using this product.
Keep these safety instructions where all those who use this product will read them.
AWARNING: Failure to observe the precautions marked with this icon could
result in death or severe injury.
ACAUTION: Failure to observe the precautions marked with this icon could
result in injury or property damage.
A
WARNING
•
Do not disassemble or modify this product.
Do not disassemble or modify this product.
Do not touch internal parts that become exposed as the result of a fall or other accident.
Do not touch internal parts that become exposed as the result of a fall or other accident.
Failure to observe these precautions could result in electric shock or other injury.
•
Should you notice any abnormalities such as the product producing smoke,
Should you notice any abnormalities such as the product producing smoke,
heat, or unusual odors, immediately disconnect the camera power source.
heat, or unusual odors, immediately disconnect the camera power source.
Continued operation could result in fire, burns or other injury.
•
Keep dry.
Do not handle with wet hands.
Do not handle with wet hands.
Failure to observe these precautions could result in fire or electric shock.
•
Do not use this product in the presence of flammable dust or gas such as
Do not use this product in the presence of flammable dust or gas such as
propane, gasoline or aerosols.
propane, gasoline or aerosols.
Failure to observe this precaution could result in explosion or fire.
•
Do not directly view the sun or other bright light source through the lens.
Do not directly view the sun or other bright light source through the lens.
Failure to observe this precaution could result in visual impairment.
•
Keep this product out of reach of children.
Keep this product out of reach of children.
Failure to observe this precaution could result in injury or product malfunction. In
addition, note that small parts constitute a choking hazard. Should a child swallow
any part of this product, seek immediate medical attention.
•
Do not handle with bare hands in locations exposed to extremely high or
Do not handle with bare hands in locations exposed to extremely high or
low temperatures.
Failure to observe this precaution could result in burns or frostbite.
A
CAUTION
•
Do not leave the lens pointed at the sun or other strong light sources.
Do not leave the lens pointed at the sun or other strong light sources.
Light focused by the lens could cause fire or damage to product’s internal parts. When
shooting backlit subjects, keep the sun well out of the frame. Sunlight focused into
the camera when the sun is close to the frame could cause fire.
•
Donot leavethe product where it willbeexposedtoextremelyhightemperatures,
Donot leavethe product where it willbeexposedtoextremelyhightemperatures,
for an extended period such as in an enclosed automobile or in direct sunlight.
for an extended period such as in an enclosed automobile or in direct sunlight.
Failure to observe this precaution could result in fire or product malfunction.
•
Do not transport cameras or lenses with tripods or similar accessories attached.
Do not transport cameras or lenses with tripods or similar accessories attached.
Failure to observe this precaution could result in injury or product malfunction.
Notices for Customers in the U.S.A.
Notices for Customers in the U.S.A.
This device complies with part 15 of the FCC Rules. Operation is subject to the following two
conditions: (1) this device may not cause harmful interference, and (2) this device must ac-
cept any interference received, including interference that may cause undesired operation.
Federal Communications Commission (FCC) Radio Frequency Interference Statement
Federal Communications Commission (FCC) Radio Frequency Interference Statement
This equipment has been tested and found to comply with the limits for a Class B digital
device, pursuant to Part 15 of the FCC rules.These limits are designed to provide reason-
able protection against harmful interference in a residential installation. This equipment
generates, uses, and can radiate radio frequency energy and, if not installed and used in
accordance with the instructions, may cause harmful interference to radio communica-
tions. However, there is no guarantee that interference will not occur in a particular instal-
lation. If this equipment does cause harmful interference to radio or television reception,
which can be determined by turning the equipment off and on, the user is encouraged to
try to correct the interference by one or more of the following measures:
• Reorient or relocate the receiving antenna.
• Increase the separation between the equipment and receiver.
• Connect the equipment into an outlet on a circuit different from that to which the
receiver is connected.
• Consult the dealer or an experienced radio/television technician for help.
CAUTIONS
Modifications
The FCC requires the user to be notified that any changes or modifications made to
this device that are not expressly approved by Nikon Corporation may void the user’s
authority to operate the equipment.
Nikon Inc., 1300 Walt Whitman Road,
Melville, New York 11747-3064, U.S.A.
Tel.: 631-547-4200
Notice for Customers in Canada
Notice for Customers in Canada
CAN ICES-3 B / NMB-3 B
Using the Lens
Parts of the Lens: Names and Functions
Parts of the Lens: Names and Functions
Refer to the diagram on the left edge of this sheet.
q
Lens hood
Lens hoods block stray light that would other-
wise cause flare or ghosting. They also serve to
protect the lens.
See B
w
Attachment point for
46mm filters
An attachment point for the lens cap, lens
hood, and 46mm filters.
• This attachment point is for use exclusively
with the lens cap, lens hood, and 46mm fil-
ters, and should not be used with other ac-
cessories.
See B
e
Accessory attach-
ment point
An attachment point for SY-1-621
adapter
rings for use with optional SB-R200 flash units
and 62mm B adapters2 for use with optional
ES-2 film digitizing adapters.
• The accessory attachment point is for use
exclusively with SY-1-62 adapter rings and
62 mm B adapters and should not be used
with other accessories. Attaching filters, lens
caps, or other accessories that could inter-
fere with the lens as it extends could result in
product malfunction or damage to the lens
caused by contact with the accessory.
—
r
Control ring
Autofocus mode selected:
In autofocus mode, rotate the ring to adjust
a setting such as [Focus (M/A)] or [Aperture]
assigned using the camera. For more informa-
tion, see the description of [Custom control
assignment], [Custom controls], or [Custom
controls (shooting)] in the camera manual.
—
Manual focus mode selected:
Rotate the ring to focus.
t
Reproduction ratio
indicator
View the reproduction ratio and focus distance
for close-up photography.
• The reproduction ratio and focus distance
shown by the reproduction ratio indicator are
approximations only and their accuracy is not
guaranteed.
—
y
Lens mounting mark
Use when mounting the lens on the camera. See A
u
Rubber lens-mount
gasket
——
i
CPU contacts
Used to transfer data to and from the camera. —
o
Focus-mode switch
Choose a focus mode.
• A: Autofocus
• M: Manual focus
Note that regardless of the setting chosen, fo-
cus must be adjusted manually when manual
focus mode is selected using camera controls.
—
Using the Lens on Cameras with a Built-in Flash
Using the Lens on Cameras with a Built-in Flash
Shadows will be visible in photos where light from the built-in flash is obscured by the
lens or lens hood. Remove the lens hood before shooting. Note, however, that depend-
ing on the distance to the subject, and in the case of zoom lenses also on the lens focal
length, shadows may appear even when the lens hood is removed.
• For the information on focal lengths and subject distances at which shadows will not
appear in photos taken with a built-in flash, visit the site below.
https://downloadcenter.nikonimglib.com/
Precautions for Use
• Do not pick up or hold the lens or camera using only the lens caps or lens hood.
• Keep the CPU contacts clean.
• Should the rubber lens-mount gasket be damaged, cease use immediately and take
the lens to a Nikon-authorized service center for repair.
• Replace the lens caps when the lens is not in use.
• Do not leave the lens in humid locations or in locations in which it may be exposed to
moisture. Rusting of the internal mechanism can cause irreparable damage.
• Do not leave the lens next to open flames or in other extremely hot locations. Ex-
treme heat could damage or warp the reinforced plastic exterior.
• Taking the lens from a warm to a cold environment or vice versa may cause damaging
condensation inside and outside the lens. Place the lens in a sealed bag or plastic case
before taking it across a temperature boundary.The lens can be taken from the bag or
case once it has had time to adjust to the new temperature.
• We recommend that you place the lens in its case to protect it from scratches during
transport.
Lens Care
• Removing dust is normally sufficient to clean the glass surfaces of the lens.
• When cleaning the fluorine-coated front lens element:
-Remove fingerprints and other oily stains with a soft, clean cotton cloth or third-
party lens cleaning tissue; clean from the center outwards using a circular motion.
-To remove stubborn stains, wipe gently using a soft cloth lightly dampened with a
small amount of distilled water, ethanol, or third-party lens cleaner.
-Drop-shaped marks may form on fluorine-coated surfaces, which are highly water-
and oil-repellent. Such marks can be removed with a dry cloth.
• When cleaning the rear lens element, which is not fluorine-coated:
-Remove fingerprints and other oily stains with a soft, clean cloth or third-party lens
cleaning tissue lightly dampened with a small amount of ethanol or third-party lens
cleaner; clean from the center outwards using a circular motion. Be sure to clean
evenly and thoroughly without leaving smears.
• Never use organic solvents such as paint thinner or benzene to clean the lens.
• Neutral Color (NC) filters (available separately) and the like can be used to protect the
front lens element.
• Do not store with naphtha or camphor moth balls or in direct sunlight. If the lens will not
be used for an extended period, store it in a cool, dry location to prevent mold and rust.
Accessories
Supplied Accessories
• LC-46B Lens Cap (front cap)
• LF-N1 Lens Cap (rear cap)
• HN-41 Lens Hood
• CL-C1 Lens Case
DUsing the Lens Case
• The case is intended to protect the lens from scratches, not from falls or other physical shocks.
• The case is not water resistant.
• The material used in the case may fade, bleed, stretch, shrink, or change color when rubbed or wet.
• Remove dust with a soft brush.
• Water and stains can be removed from the surface with a soft, dry cloth. Do not use alcohol, benzene, thinner,
or other volatile chemicals.
• Do not store in locations exposed to direct sunlight or high temperatures or humidity.
• Do not use the case to clean the monitor or lens elements.
• Be careful that the lens does not fall from the case during transport.
Material: Polyester
Compatible Accessories
The lens supports the following optional accessories.
• Accessories for use with the attachment point for 46mm filters:
-46mm filters
• Accessories for use with the accessory attachment point:
-SB-R200 wireless remote flash units*
-ES-2 film digitizing adapters
* The lens can be used with up to four SB-R200 flash units.
DFilters
• Use only one lter at a time.
• Before attaching or removing lters, turn the camera o and conrm that the lens is retracted.
• Remove the lens hood before attaching lters.
DIncompatible Accessories
Use only supplied or compatible accessories. Using other accessories could cause product malfunction or dam-
age the accessory or lens. Examples of accessories that cannot be used with each attachment point follow.
• Accessories that cannot be used with the attachment point for 46 mm lters:
-Third-party step-up or step-down rings
• Accessories that cannot be used with the accessory attachment point:
-Lens caps
-Filters
-AF-3 and AF-4 gel lter holders
-Third-party step-up or step-down rings
Specications
Mount Nikon Z mount
Focal length 50 mm
Maximum aperture f/2.8
Lens construction 10 elements in 7 groups (including 1 ED element, 1 aspherical element,
and a uorine-coated front lens element)
Angle of view • FX format: 47°
• DX format: 31° 30’
Focusing system Front focusing system
Minimum focus
distance 0.16 m (0.53 ft) from focal plane
Maximum reproduc-
tion ratio 1×
Diaphragm blades 9 (rounded diaphragm opening)
Aperture range • At a focus distance of infinity: f/2.8 –22
• At a focus distance of 0.16 m (0.53 ft): f/5.6 – 32
Focus limit switch Two positions: FULL (∞ – 0.16 m) and 0.3 m –0.16 m
Filter-attachment size 46 mm (P = 0.75 mm)
Dimensions Approx. 74.5 mm/3 in. maximum diameter × 66 mm/2.6 in.
(distance to end of lens from camera lens mount ange)
Weight Approx. 260 g (9.2 oz )
Nikon reserves the right to change the appearance, specifications, and performance of this
product at any time and without prior notice.
En User’s Manual
Pour votre sécurité
AAVERTISSEMENT
• Ne démontez pas ou ne modifiez pas ce produit.
Ne touchez pas les composants internes qui sont exposés suite à une chute
ou à un autre accident.
• Si vous observez des anomalies provenant du produit comme de la fumée,
de la chaleur ou des odeurs inhabituelles, débranchez immédiatement la
source d’alimentation de l’appareil photo.
• Gardez votre matériel au sec.
Ne le manipulez pas avec les mains mouillées.
• N’utilisez pas ce produit en présence de poussières ou de gaz inflammables
comme du propane, de l’essence ou des aérosols.
• N’observez pas directement le soleil ou toute autre source lumineuse
puissante à travers l’objectif.
• Conservez ce produit hors de portée des enfants.
• Ne manipulez pas le matériel à mains nues dans des lieux exposés à des
températures extrêmement basses ou élevées.
AATTENTION
• Ne pointez pas l’objectif en direction du soleil ou d’autres sources très
lumineuses.
• Ne laissez pas le produit exposé à des températures excessivement chaudes
pendant une période prolongée, comme dans une voiture fermée ou en
plein soleil.
• Ne transportez pas les appareils photo ou les objectifs si des trépieds ou
accessoires similaires sont fixés.
Avis pour les clients au Canada
Utilisation de l’objectif
Descriptif de l’objectif: noms et fonctions
Fixation et retrait
Fixation et retrait du parasoleil
Prises de vues en gros plan
Réglage de l’ouverture
Sélection d’un rapport de reproduction
Prise de vue
Appareils photo dotés d’illuminateurs d’assistance AF
Utilisation de l’objectif avec des appareils photo équipés d’un flash intégré
Précautions d’utilisation
Entretien de l’objectif
Accessoires
Accessoires fournis
Accessoires compatibles
Caractéristiques
Monture
Focale
Ouverture maximale
Construction optique
Angle de champ
Système de mise au point
Distance minimale de mise
au point
Rapport de reproduction
maximal
Lamelles de diaphragme
Plage des ouvertures
Commutateur de la limite de
mise au point
Diamètre de xation pour ltre
Dimensions
Poids


