Nikon E800 User manual

!"#$%&#'&())*(
( (
( +(
Nikon E800 Operating Instructions
Note: These instructions were written for the microscope, equipped with a Diagnostic
Instruments SPOT camera, located in the Life Science Microscopy Facility at Purdue
University.
1. The Nikon E800 Microscope.
The Nikon E800 is a fixed-stage upright microscope configured to image in
transmitted light, DIC, and epifluorescence modes. The Nikon is equipped with the
following objectives:
2X/0.1 NA Plan Apo ------- ∞/- WD = 8.5mm
10x.0.45 NA Plan Apo DIC L ∞/0.17 WD = 4.0mm
20x/0.75 NA Plan Apo DIC M ∞/0.17 WD = 1.0mm
40x/0.9 NA Plan Apo DIC M ∞/0.17 WD = 0.11-0.23mm
100x/1.40 NA Plan Apo DIC H ∞/0.17 WD = 0.13mm Oil
The last objective (shaded) is an Oil immersion objective.
The condenser is: C-CU with 0.9 N.A. dry lens (swing-out) And contains the
following inserts: A(bright field) /DICL/ DICM/ DICH
DIC lens prisms are inserted above each individual objective lens.
The Nikon also has a filter cube slider with the following filter cubes (right to left):
1. empty (VIS)
2. Red (Rhodamine): 560±20/585/620 longpass
3. 11001 Blue (GFP longpass) 470±20/500/515 longpass
3. 41017 Green (GFP) 470±20/495/525±25 narrow band
4. 11000 Ultraviolet ( DAPI) 360±20/400/420 longpass
Camera: the microscope is equipped with a SPOT RT slider CCD camera from
Diagnostic Imaging. It can be used as a B/W camera with the color filter sets
removed or as a color camera with the filters inserted.
,(
Turning on the Microscope:
1) Sign in on the log sheet.
2) Turn on the main power and the camera power.
3) Turn the microscope power to “on”.
4) Turn on the Fluorescence power only if you plan to use fluorescence imaging.
Please note: fluorescence bulb needs `30MIN to warm up to full illumination. It also
needs 30 MIN to cool after to has been turned off before it can be turned on again.
PLEASE OBSERVE THESE TIME REQUIREMENTS TO PRESERVE THE
BULB!!
5) The computer is normally left ON. Just wake up the monitor and open the SPOT
ADVANCED software.
Turning off the microscope
1) Power off all switches (except computer)
NOTE: make sure the next user does not plan to use it before turning of fluorescence
Burner. All users should put an “F” on the sign-up sheet if they need fluorescence so the
previous user knows to leave the burner on. You must be on time for your session, as the
previous user MUST turn off the microscope completely before they leave and they will
not wait for you. Once the burner if off, you must wait 30min before turning it on again.
2) Move objective turret to 2x or 10X position.
3) Leave condenser in position “A”.
4) Leave DIC upper filter in the OUT position.
5) Clean off immersion oil from objectives using lens paper if necessary.
6) Log off computer.
7) Make sure all your supplies
are removed and area is left clean.
8) Turn off all room lights.
(
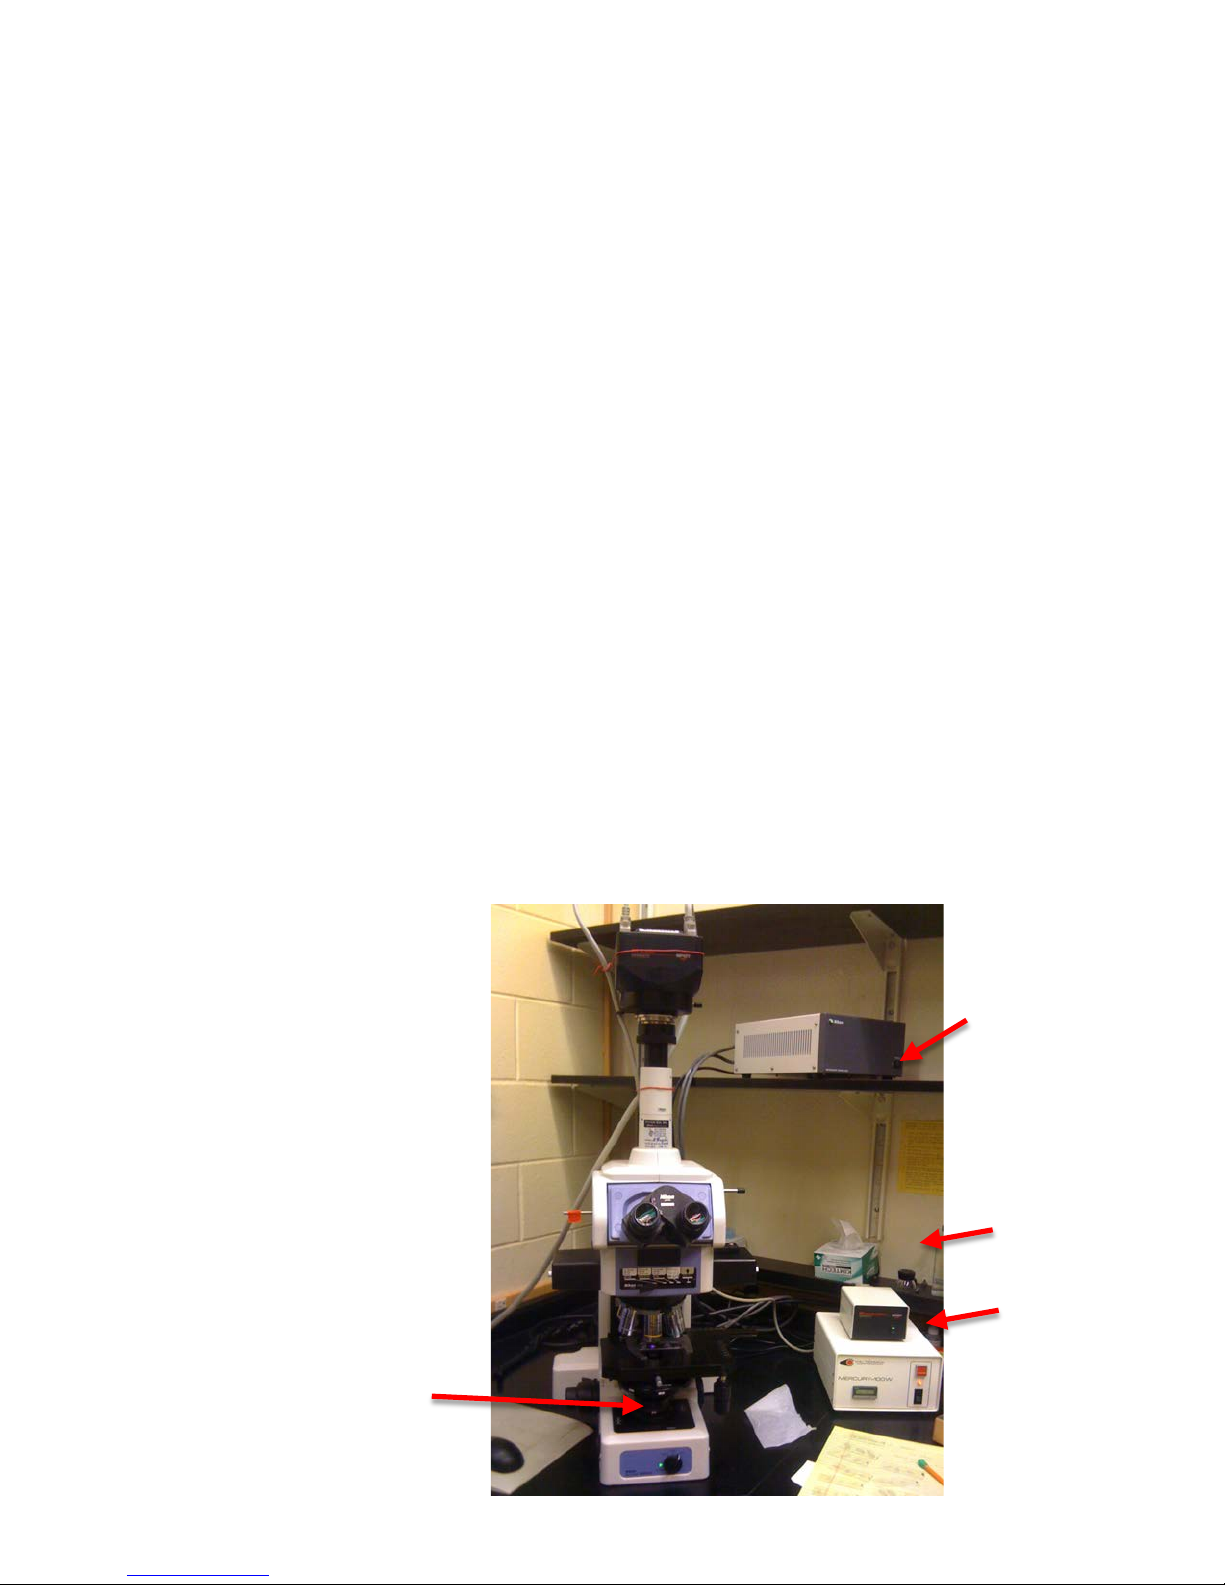
-%#'(./012(
*%$12%(./012(
345/21671'71(
852'12(
-#72/67/91(
./012(

:(
Parts of the microscope:
Neutral density filters to adjust illumination
if required. They can be used in any
combination to adjust the illumination so
that it is comfortable for your eyes..
Push lever down to engage filter. Filters are
marked ND2, ND8, & ND32. They can be
used in any combination.
Illumination intensity can be adjusted with
power dial on left side of microscope. Please
note that turning the dial changes the voltage
to the lamp. This also changes the wavelength
of the emitted light. Since wavelength
determines color, this should not be used for
any color samples. Instead adjust to “SET”
position (extreme counter-clockwise) and then
use the neutral density filters to adjust the
illumination intensity.
The condenser system consists of the
condenser turret and also the DIC lower filter.
Positions on the turret are marked “A” for
brightfield and DICL, DICM, and DICH for
Nomarski DIC contrast.
The microscope power selector is on the front
bottom and the condenser field aperture is on
the lower right.
(
(
(
3#14;(
<912=521(
-#72/67/91(
9/012(61417=/2(
1
*/';1'612(>5221=(
2
"1=(9/6#=#/'(
?15=2%4(!1'6#=@(
3#4=126(

A(
Adjusting the microscope for Koehler illumination.
1) Insert a sample and focus it using an objective that you typically use for imaging.
Tip: Focus on the edge of the coverslip to set the
course focus. Then focus up and down using fine
focus to locate sample.
2) Stop down (close) field aperture by rotating
dial on left side of microscope base. You may see a
round circle of light through the eyepieces that has
a blurry edge.
3) Adjust the condenser height (#1: black knob on left of condenser) until the circle of
light is smaller and the edges are sharp. This will appear as the octagon (8-sided) shape
of the aperture.
4) Open up the field aperture to fill ~half the area
with light.
5) Adjust the aperture centering with the two
silver knobs (#2 below the condenser turret). When
centered, open the field aperture until the entire field
is full of light.
Note: You may have to adjust the light for other
objectives. Lower magnification objectives have a
wider opening so will require opening the field
aperture more.
6) Close the condenser aperture by moving the
slider to the right. This is the position of maximum
diffraction. This will give additional contrast to the
sample but reduces resolution.
Open the condenser aperture until the light level does
not change. This is the position of maximum
resolution and minimum diffraction. Use this position
for all higher magnification objectives.
<Open……Close>
O | | | | | | | | | o
10 0
You have now aligned the microscope for routine brightfield imaging.
(
3#14;(
<912=521(
(
Condenser(Aperture(

B(
Taking an Image in Brightfield Mode:
1) Complete the Koehler alignment. Find an appropriate area of your sample and focus.
2) Open the SPOT Advanced program.
3) Select Brightfield-grayscale or brightfield-RGB in the lower right of the SPOT screen.
4) You need to do a color balance to show the camera what is white if you are doing color
imaging. The camera program will then assign the other color values.
a. Move to a clear area of your slide.
b. Click on the color balance icon on the menu bar (on the right).
c. Proceed to follow instructions to do the color balance. The values will be saved
in the Brightfield-Color dialogue box.
5) Move back to your sample, focus using the live window, and then capture an image using the
camera icon on the upper right.
6) Select “SETUP > Image Setup” and a dialog box will appear. Click on “Modify”. This will
open the main dialogue menu for brightfield
imaging.
a. Select Exposure dialogue box and make
sure “auto” is selected. It should also
be set to:
8-bit for grayscale
24-bit for color
no binning
b. Select “auto”. This brings up another
dialogue box.
Adjustment: use this to adjust image brightness: lower # is darker image.
Gain: This is usually set at “0” for BF or DIC imaging.
7) Modify adjustment setting to darken or lighten your image.
8) Go to Post-Processing. Modify “Gamma” setting to adjust contrast
in your image. Lower # gives more contrast.
9) Take another test exposure and repeat above until you have the desired image.
(
<;C56=$1'=((
3%7=/2(
(
?%$1(
1
8#=6(912(.#D14(
2
*/4/2(8%4%'71(61==#'&6E(
F%61;(/'(@/52(0G#=1(
F%4%'71(7%4#F2%=#/'H(
I%#'E(J417=2/'#7(
1'G%'71$1'=(KK'/#61(
(

L(
Adjusting the microscope for Nomarski DIC imaging
1) Select DIC grayscale or DIC color on the lower left of the SPOT camera program window.
2) Make sure the camera filter selector is pushed in for grayscale or pulled out for color.
3) Insert and, using the LIVE mode on the camera, focus on a sample using the objective you
intend to use for your imaging.
4) Adjust the lower DIC filter to the extreme right position.
5) Move the condenser to the correct position to match the objective you plan to use.
DICL = 10x or 20x
DICM = 40x
DICH = 100x (oil immersion)
6) Insert the upper DIC filter. Adjust the microscope light using the neutral density filters.
7) Adjust the position of the lower DIC filter until you have the amount of DIC contrast you
want.
8) Remove your slide and select “camera > Get flatfield” from the camera menu. Make a
flatfield and save it as “ff”. Overwrite the previous flatfield. This procedure takes an image
of your light path through the microscope and will subtract it from your image. This will
remove any uneven light from the final image. A new flatfield must be made if you change
anything in your setup such as objective or position of lower
DIC filter.
9) Insert your slide and proceed with locating and focusing
your sample.
(
(
(
<;C56=(*/';1'612(=/(
;16#21;(!M*(61==#'&(
N9912(!M*(O#4=12(#6(
/5=(O/2(83(%';(
345/2H(M$%&#'&(%';(
#'(O/2(!M*(#$%&#'&H(
)/012(!M*(O#4=12(#6(61=(O/2(
;16#21;(%$/5'=(/O(
7/'=2%6=H((
>52'(O2/$(41O=(=/(2#&G=(
1

P(
10) From the Setup menu, use “Setup > Image setup” to get into the dialogue boxes to adjust
image.
a. Select “modify” in Setups dialogue box.
b. Select Exposure dialogue box and make sure “auto” is selected. It should also
be set to:
8-bit for
grayscale
24-bit for color
no binning
c. Select “auto”. This brings up
another dialogue box.
Adjustment: use this to adjust image
brightness: lower # is darker image.
Gain: This is usually set at “1” for BF or DIC imaging.
11) Select Post-Processing dialogue box. Adjust gamma (lower # adds contrast to image).
You should see the flatfield box checked.
12) Proceed to take your image. Modify Adjustment and Gamma if necessary to get a
satisfactory image.
(
1
(
2
34%=(O#14;(
I%$$%((
<;C56=(
Q7/'=2%6=R(

S(
Fluorescent Imaging
1. Align the microscope for Koehler Illumination as described above.
2. Locate your sample using either brightfield or Nomarski DIC imaging.
3. In most cases, the fluorescence signal is not bright enough to use camera live imaging to
focus. Thus it is important that what you see through the eyepieces is the same as is seen by
the camera. Do this as follows:
a. Focus on the line pattern in the right eyepiece with your right eye. Adjust the
eyepiece so that this looks like 4 double lines.
b. Then pick a feature on your slide and bring the image into focus with the right eye.
c. Now adjust the left eyepiece so that the feature is still in focus with the left eye.
d. You should now have both eyepieces adjusted so that the focus through the eyepieces
is the same as that of the image taken with the camera.
(
Other manuals for E800
2
Table of contents
Other Nikon Microscope manuals

Nikon
Nikon SMZ1500 User manual

Nikon
Nikon SMZ25 User manual

Nikon
Nikon eclipse E200 User manual

Nikon
Nikon SMZ-10 Operating instructions

Nikon
Nikon A1+ User manual

Nikon
Nikon ECLIPSE E200 MV Series User manual

Nikon
Nikon LABOPHC-POL User manual

Nikon
Nikon SMZ-2 User manual

Nikon
Nikon Eclipse TE300 User manual

Nikon
Nikon SMZ-U Manual

Nikon
Nikon ECLIPSE Ni-E User manual

Nikon
Nikon Alphapot2 Manual

Nikon
Nikon SMZ1500 User manual

Nikon
Nikon ECLIPSE Ni-E User manual

Nikon
Nikon eclipse lv150 User manual

Nikon
Nikon Alphaphot User manual

Nikon
Nikon ECLIPSE E200 POL User manual

Nikon
Nikon Epiphot 300 User manual

Nikon
Nikon Multizoom AZ100 User manual

Nikon
Nikon Eclipse Ci-E User manual


