Nixie Glass Tube Clock 3 User manual
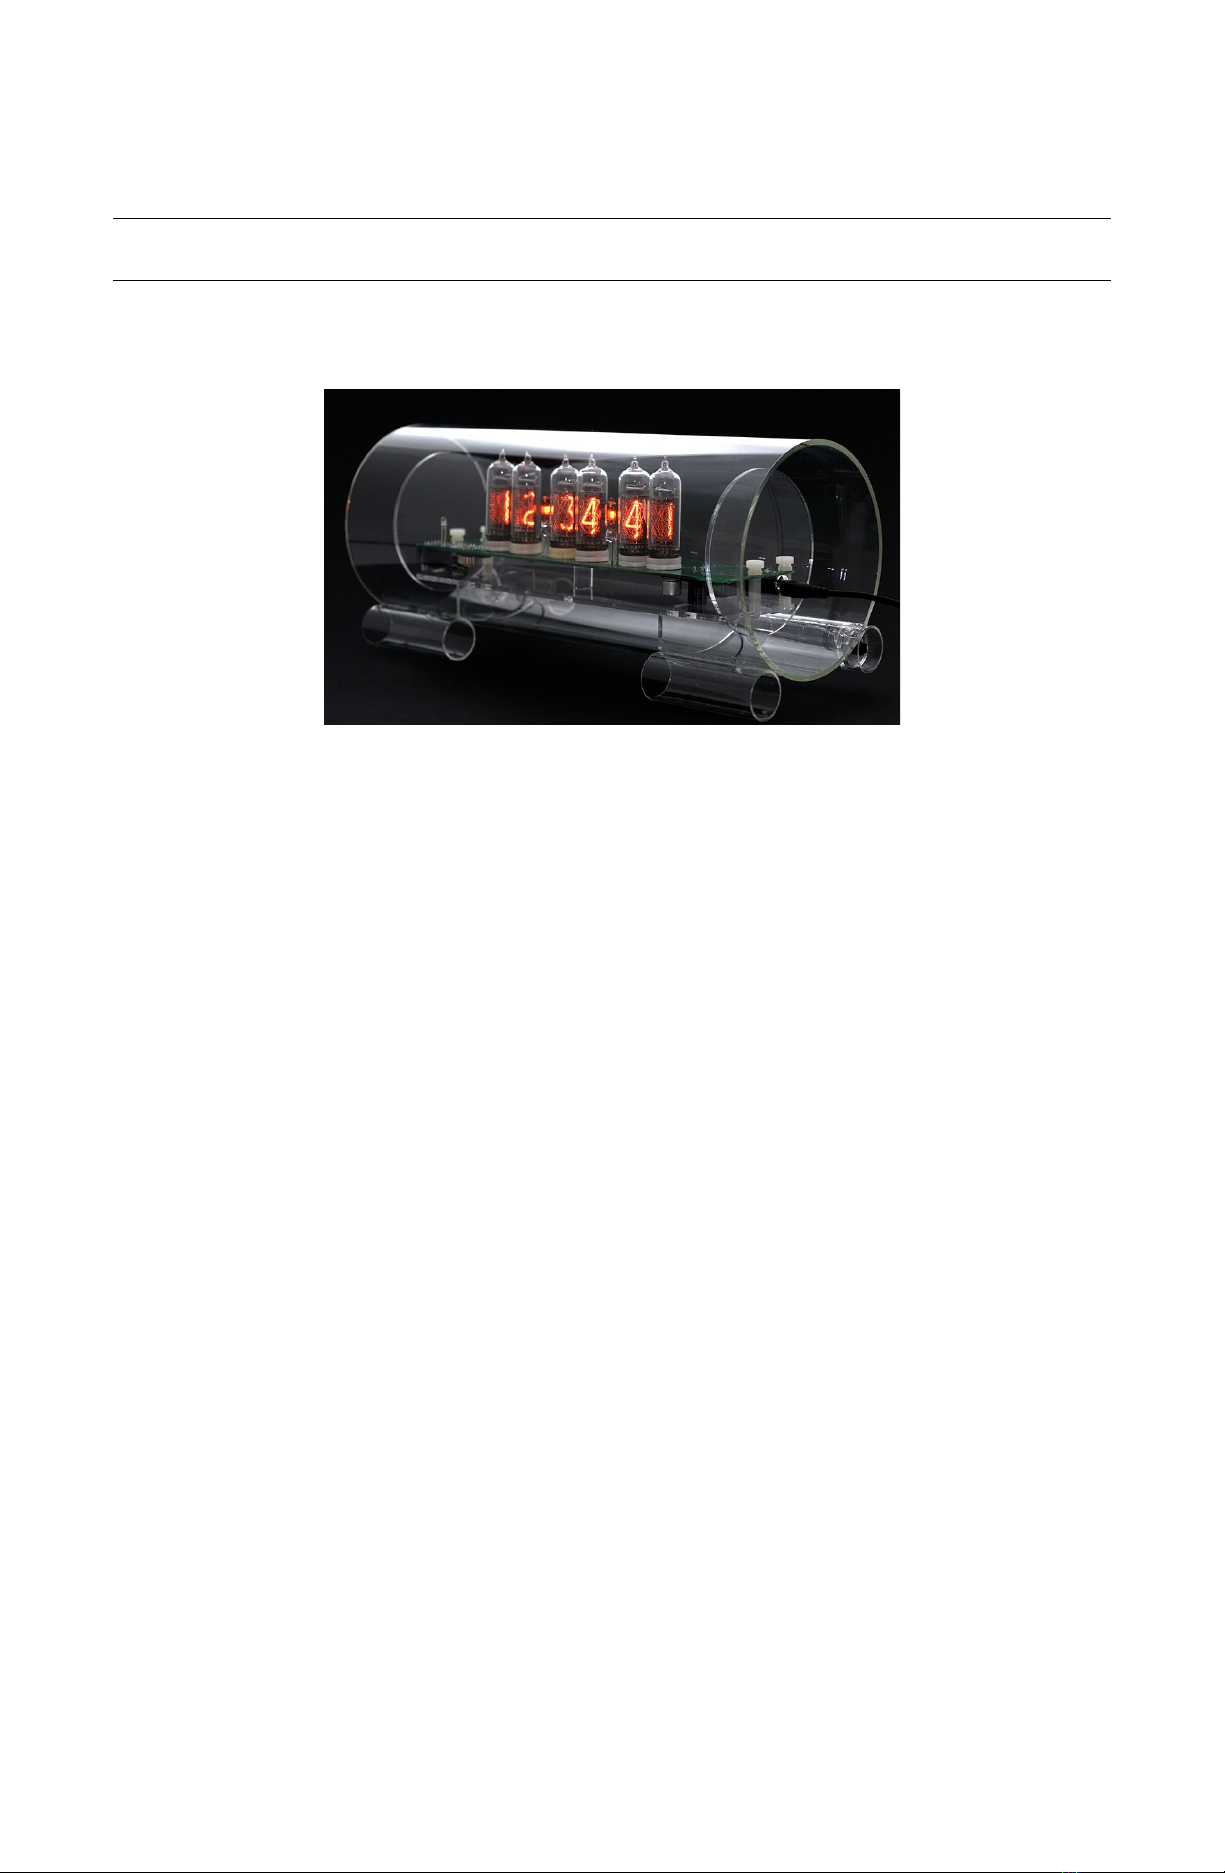
Glass Nixie Tube Clock #3
User's manual
© Cold War Creations, 2010

User manual – Glass Clock Design #3 rev 1.2
Page 1 of 2

User manual – Glass Clock Design #3 rev 1.2
Table of Contents
1 Glass Clock Design #3...........................................................................................................................4
2 Introduction to Nixie Tubes...................................................................................................................5
3 Clock Features........................................................................................................................................
4 Unpacking and setting up the Clock......................................................................................................8
5 Setting the Clock....................................................................................................................................9
5.1 Clock diagram................................................................................................................................9
5.2 Setting the time and date..............................................................................................................10
5.3 Set time mode...............................................................................................................................10
5.3.1 Setting the time - hours.........................................................................................................10
5.3.2 Setting the time – minutes....................................................................................................11
5.4 Set date mode...............................................................................................................................11
5.4.1 Setting the date – month.......................................................................................................12
5.4.2 Setting the date – day............................................................................................................12
5.4.3 Setting the date - year...........................................................................................................12
5.5 Setting the Alarm Time.................................................................................................................13
5.5.1 Enabling the Alarm...............................................................................................................13
5.5.2 Set Alarm time mode............................................................................................................13
5.5.3 Setting the time - hours.........................................................................................................14
5.5.4 Setting the time – minutes....................................................................................................14
5.6 Changing clock options................................................................................................................15
5.6.1 Option 1 – 12/24 hour mode.................................................................................................15
5.6.2 Option 2 – Date format display option.................................................................................16
5.6.3 Option 3 – Display option, time/date/temperature, crossfade..............................................1
5.6.4 Option 4 – Temperature units, F or C...................................................................................18
5.6.5 Option 5 – Brightness level..................................................................................................19
5.6.6 Option 6 – Anti-cathode poisoning function........................................................................20
5. Setting the display ON/OFF times...............................................................................................21
5. .1 Entering the OFF/ON set time enable..................................................................................21
5. .2 Setting the OFF time.............................................................................................................22
5. .3 Setting the ON time..............................................................................................................23
5. .4 Disabling OFF/ON time.......................................................................................................24
6 Maintenance and Care..........................................................................................................................25
6.1 Cleaning........................................................................................................................................25
6.2 Use................................................................................................................................................25
Warranty...............................................................................................................................................26
8 Specifications.......................................................................................................................................2
Page 2 of 2

User manual – Glass Clock Design #3 rev 1.2
1 Glass Clock Design #3
Congratulations on your purchase of this unique timepiece! This clock uses Cold
War era Nixie display tubes. The old is mixed with the new, using a RISC
processor based single chip computer – which has more processing power than the
old computers that originally used these Nixie tubes.
The case is all optically clear Simax glass and clear acrylic support pieces to
complement the glass vacuum tube construction of the Nixies.
“Стекло часы Дизайн номер 3”, or “Glass Clock Design #3” is the third design
for my Nixie tube based clock. It uses a microprocessor that multiplexes 3 tubes
by 2 (meaning 2 tubes are on at a time, with 3 sets of 2). SMD (surface mount)
construction is used throughout. A high efficiency high voltage power supply is
used to generate the 180v required for the Soviet Nixie tubes.
Page 3 of 2

User manual – Glass Clock Design #3 rev 1.2
2 Introduction to Nixie Tubes
Nixie tubes (gas indicator tubes) were invented during the Cold War in the early
50's by a small vacuum tube manufacturer called Haydu Brothers Laboratories.
These tubes were sold by the Burroughs Corporation, who came up with the trade
name “Nixie”. This name refers to "NIX I", an abbreviation that stood for,
"Numeric Indicator eXperimental No. 1”, which was a label for one of the
drawings for the tube. This was shortened to “NIXIE” and the name stuck.
Early computers and test instruments didn't have any means to display digits
easily until the Nixie tube appeared. Nixies found their way into numerical
computer displays, volt/ohm meters, frequency counters, radiation counters and
even calculators. By the mid 19 0's, they were obsolete (replaced by LED's and
LCD displays) and were discontinued.
A Nixie tube display, which should really be called a gas indicator tube, works
like a neon bulb. A neon bulb works by a high voltage ionizing neon gas, causing
the gas to glow with an orange color. The Nixie tube takes this a step further, by
shaping the cathodes like a numeral (0 – 9). When the cathode is energized, the
numeral glows orange. There are individual cathodes for each digit, 0 – 9. Some
tubes have decimal points, and others may contain special characters, such as “F”
or “Hz”.
Nixie tubes require high voltage with special drivers for each digit, provided by a
special high voltage converter on the circuit board. There are many failure modes
for Nixie tubes. Breakage of the glass tube, loss of seal between the metal pins
and the glass, and cathode poisoning. Cathode poisoning is when unused or
seldom used digits acquire a coating of material “sputtered” off of the active
digits. This coating insulates the metal, making it difficult for the digit to glow.
Page 4 of 2
Illustration 1: Explo e view of a
Nixie tube

User manual – Glass Clock Design #3 rev 1.2
The tubes used in this clock are Russian (Soviet) military tubes. The Soviets,
seeing the Western Nixie, came up with their own versions with similar sizes and
shapes. Unlike the U.S. Tubes they were manufactured well into the 1980's. Since
the collapse of the Soviet Union, these tubes became available on the surplus
market, possibly from old warehouses of obsolete electronic equipment. This
clock contains the IN-14 series of tubes. One interesting feature is the '5' digit. It
is actually the '2' digit upside down and reversed, making for a very unique
looking '5'.
Page 5 of 2

User manual – Glass Clock Design #3 rev 1.2
3 Clock Features
The glass clock has many features. They are listed below:
Unique look of individually formed digits.
Optically pure Simax brand glass tubes for the case.
Laser cut clear acrylic used for the case’s internal support pieces.
Time can be displayed in either 12 or 24-hour format.
Date can optionally be displayed in either “mm dd yy” or “dd mm yy”
format.
Temperature can optionally be displayed in either Degrees F, or Degrees C.
Power loss time backup, will not lose the time if power fails, and no battery
to replace.
Nixie tube anti-cathode protection software, helps prevent tube failure.
Programmable display Off period – blanks display, while still keeping time.
Temperature compensated Quartz Crystal controlled timebase for accuracy.
Automatic Leap Year correction.
Auto display brightness settings.
Option for cross fading digits.
Page 6 of 2
User manual – Glass Clock Design #3 rev 1.2
4 Un acking and setting u the Clock
Carefully unpack the clock from the box. The box should contain a wall plug-in
power supply, two clear acrylic end plates and the clock itself.
The power supply plugs into the wall outlet. The other end plugs into the clocks
power input jack.
When powered up for the first time, the clock will go through the self test
checkout. This checkout will set all the digits to '9', and each digit (starting with
the leftmost digit) will count down from '9' to '0'. When this is complete the
display will read “00 00 00”. Then each digit will go blank one at a time starting
with the leftmost digit. This completes the self test.
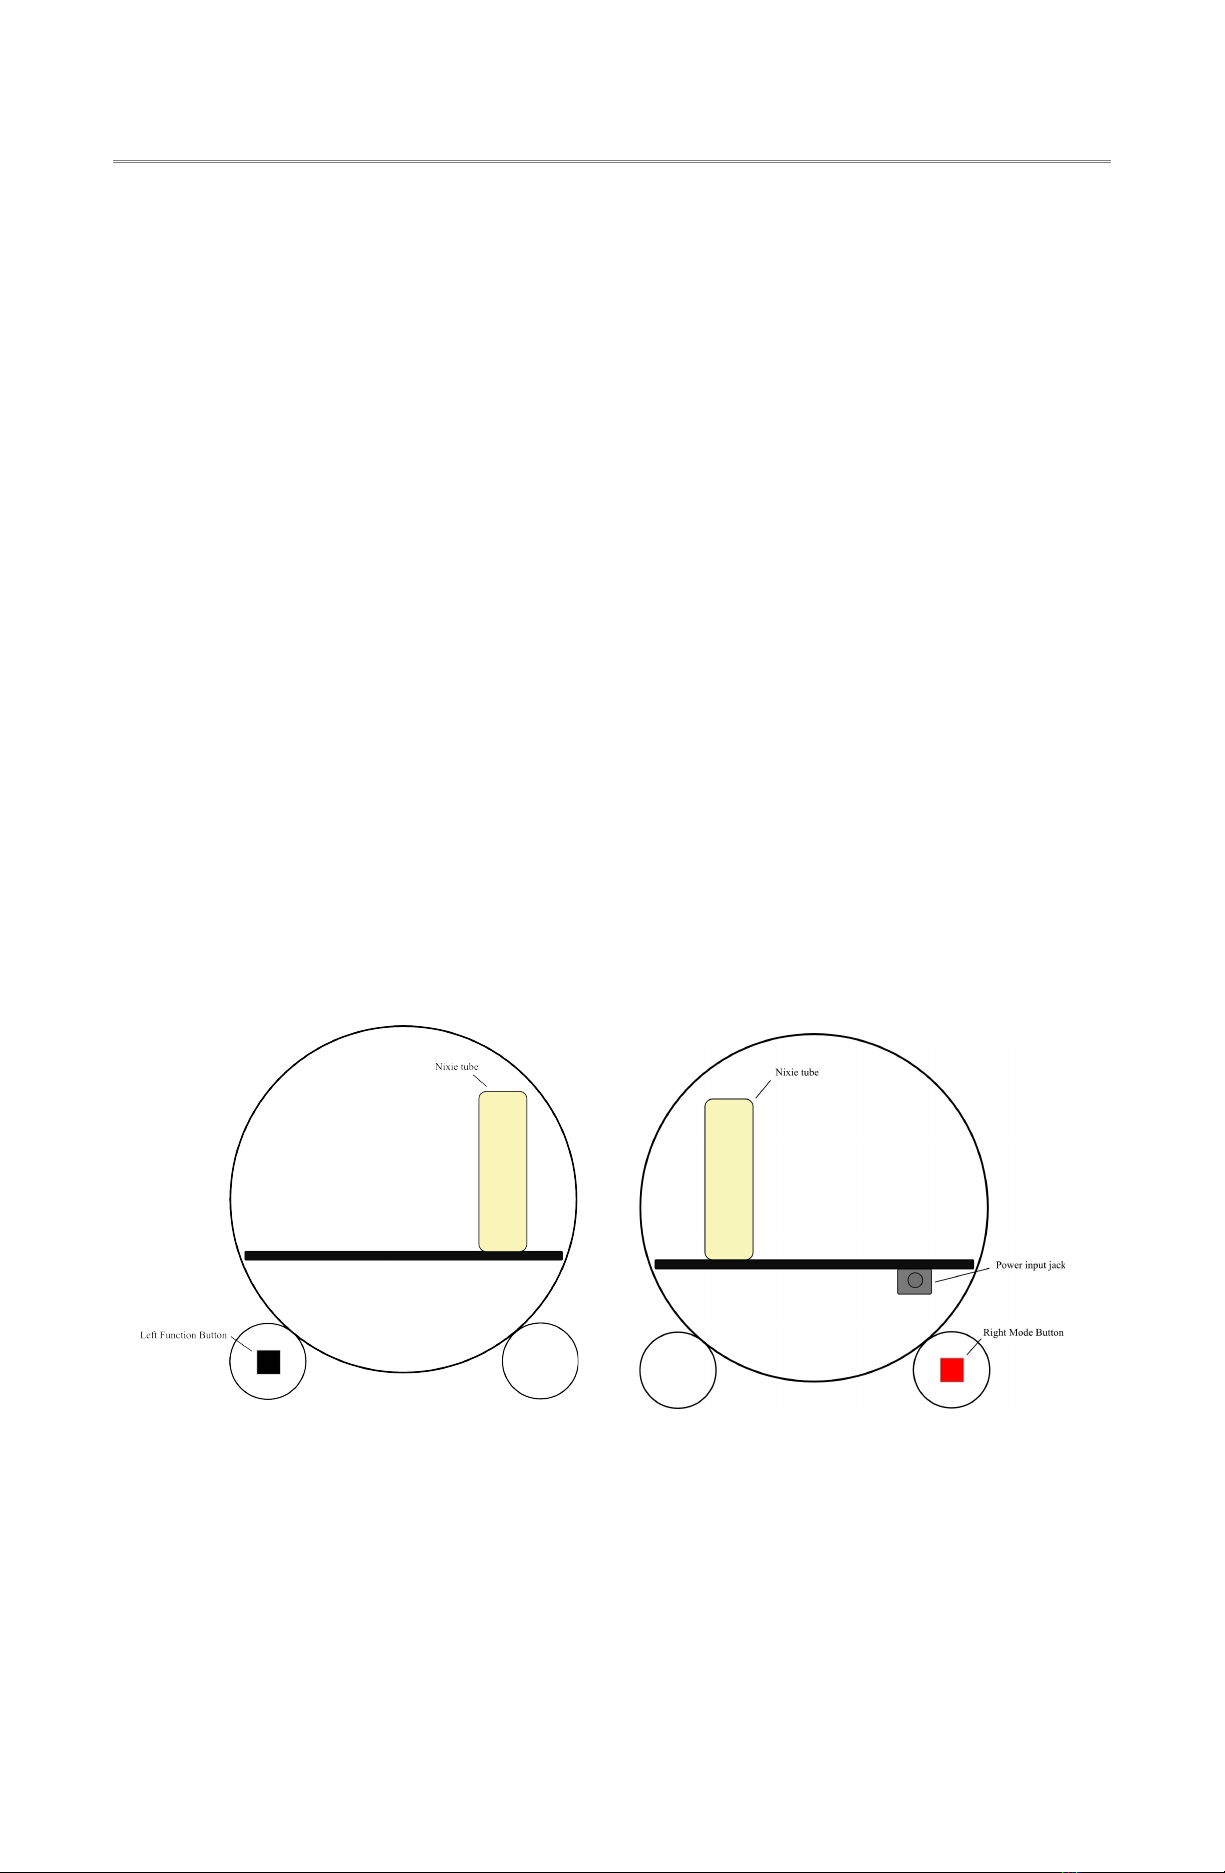
The clock has to buttons. On the left is a black function button, and on the right is
a red mode button.
At this point, the clock should show “0 00 00” with the leftmost digits (hours)
blinking. It is now in the time/date set mode. There is no need to press the right
mode button to enter the time set mode. Go to the next section, “Setting the
clock”. Note: Due to the time save function of the clock, if it was disconnected
from power less than an hour ago, it will not enter the time set mode – it will
show the current time.
Page of 2
Illustration 3: Si e View, Right
Illustration 2: Si e View, Left
User manual – Glass Clock Design #3 rev 1.2
5 Setting the Clock
This section describes how to set the clock. This includes setting the time and
date, plus all the display options. Setting the Nixie clock features is accomplished
by using the red mode button and the black function button.
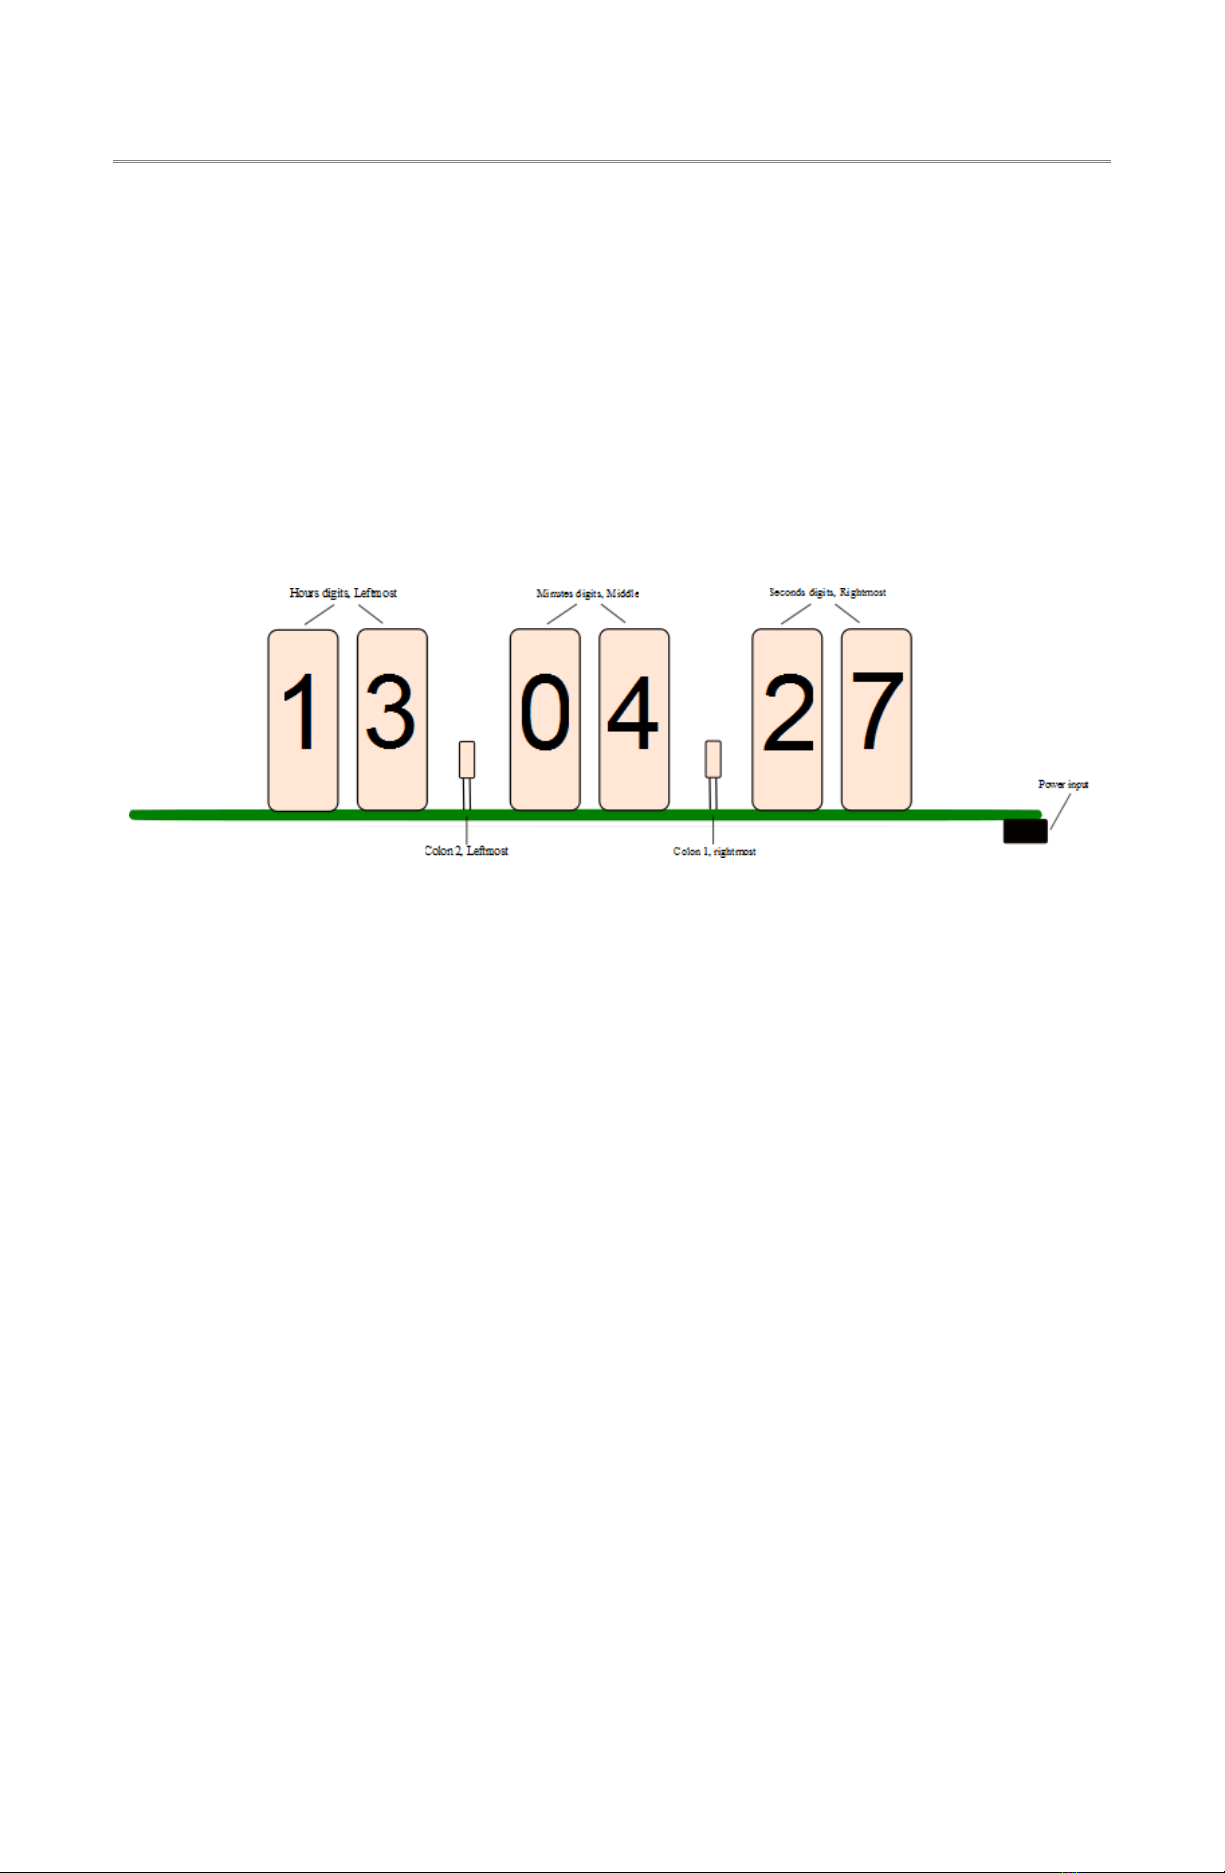
5.1 Clock diagram
Page 8 of 2
Illustration 4: Si e view

User manual – Glass Clock Design #3 rev 1.2
5.2 Setting the time and date
When setting the time/date, the time is entered first followed by the date.
Set the time by pressing the red mode button on the right side momentarily
(Note: when powered up the clock will already be in set time mode, no need
to push the mode button). When pressed, the hours digits will flash on and
off once a second.
5.3 Set time mode
When the clock is in the set time mode, the current time will be
displayed with the hours (2 leftmost digits) blinking. The colons will
both be on steady (no blinking) and the seconds will be off.
If the colons are blinking, the clock is still in the normal display
mode, and the red mode button on the right side should be
momentarily pressed to enter the set time mode.
Note: If the clock loses time (first setup, or without power for an
extended period of time) the time displayed will be all zeroes: 0:00.
To cancel setting the time value at any point, press and hold the red
mode button until the display goes blank. This will cancel setting the
time/date. When the mode button is released, the clock will go back
to the normal display. The old time value will be used.
5.3.1 Setting the time - hours
When the hours (leftmost) digits are blinking, the hour value can be
changed.
The black function button on the left side will change the hour value
when pressed. Holding the function button on will quickly cycle
through the hours (0-23). Note: When setting the hours, 24 hour
mode is used, regardless of the hour format setting (12/24 hour
display mode). This means '00' is 12 AM (midnight), and '13' is 1 PM
(afternoon).
Once the hours are set to the proper value, press the red mode button
(right side) momentarily. The clock will then go to the minutes set
mode.
Page 9 of 2

User manual – Glass Clock Design #3 rev 1.2
5.3.2 Setting the time – minutes
When the minutes (middle) digits are blinking, the minutes value can
be changed.
The black function button (left side) will change the minute value
when pressed. Holding the function button on will quickly cycle
through the minutes (0-59).
After the hours are set correctly, momentarily press the red mode
button (right side). At this point, all the digits
(Hours:Minutes:Seconds) will flash once a second. Pressing the mode
button again will update the time to the new settings. Note: The
seconds value will be reset to '00' when the time is set.
Now that the time is set, the clock will go to the set date mode.
5.4 Set date mode
When the clock is in the set date mode, the current date will be
displayed with the days (2 leftmost digits) blinking. The colons will
both be off.
If not in the date set mode, see the “Setting the time and date”
section. Before the date can be set, the time must be set. Note: If only
the date needs to be set, enter time set mode, and press the red mode
button to go through the hours, minutes until the date mode appears.
The time will not change.
To cancel setting the date value at any point, press and hold the red
mode button until the display goes blank. This will cancel setting the
date. When the mode button is released, the clock will go back to the
normal display. The old date value will be used.
Page 10 of 2

User manual – Glass Clock Design #3 rev 1.2
5.4.1 Setting the date – month
At this point, the month number (2 leftmost digits) will be blinking.
Use the function button to change the month value ('01' = January,
'12' = December, etc).
Once the month value is set to the proper value, press the red mode
button momentarily. The clock will then go to the day set mode.
Note: If using the alternate date format (dd mm yy), the day will be
shown, followed by the month value).
5.4.2 Setting the date – day
At this point, the day number (2 middle digits) will be blinking. Use
the black function button (left side) to change the day value (01 – 31).
Once the day value is set to the proper value, press the red mode
button momentarily. The clock will then go to the year set mode.
Note: If using the alternate date format (dd mm yy), the day will be
shown, followed by the month value).
5.4.3 Setting the date - year
At this point, the year number (2 rightmost digits) will be blinking.
Use the function button to change the year value ('10' = 2010, '99' =
2099, etc).
Once the year value is set to the proper value, press the red mode
button (right side) momentarily. At this point the date is set and the
clock will go back to the normal display mode.
Page 11 of 2

User manual – Glass Clock Design #3 rev 1.2
5.5 Setting the Alarm Time
Set the alarm time by pressing the black function button on the left side
momentarily. When pressed, the right most colon will be flashing, and the
hours digits will flash on and off once a second.
5.5.1 Enabling the Alarm
The alarm function is enabled by putting the Alarm Enable Switch (SW3) in
the ON position.
When this switch is OFF, the alarm time will be ignored. Also, if an alarm is
present, turning the switch OFF will cancel the alarm.
When the time equals the alarm time, the alarm output will go on for 30
seconds, unless canceled by the Alarm Enable Switch.
5.5.2 Set Alarm time mode
When the clock is in the set time mode, the current alarm time will be
displayed with the hours (2 leftmost digits) blinking and the right
most colon will be flashing.
To cancel setting the alarm time value at any point, press and hold the
red mode button until the display goes blank. This will cancel setting
the alarm time. When the mode button is released, the clock will go
back to the normal display. The old alarm time value will be used.
Page 12 of 2

User manual – Glass Clock Design #3 rev 1.2
5.5.3 Setting the time - hours
When the hours (leftmost) digits are blinking, the hour value can be
changed.
The black function button on the left side will change the hour value
when pressed. Holding the function button on will quickly cycle
through the hours (0-23). Note: When setting the hours, 24 hour
mode is used, regardless of the hour format setting (12/24 hour
display mode). This means '00' is 12 AM (midnight), and '13' is 1 PM
(afternoon).
Once the hours are set to the proper value, press the red mode button
(right side) momentarily. The clock will then go to the minutes set
mode.
5.5.4 Setting the time – minutes
When the minutes (middle) digits are blinking, the minutes value can
be changed.
The black function button (left side) will change the minute value
when pressed. Holding the function button on will quickly cycle
through the minutes (0-59).
After the hours are set correctly, momentarily press the red mode
button (right side). At this point, all the digits
(Hours:Minutes:Seconds) will flash once a second. Pressing the mode
button again will update the alarm time to the new settings.
Page 13 of 2

User manual – Glass Clock Design #3 rev 1.2
5.6 Changing clock options
There are several clock and display options available that can be changed
by the user. When changed, these options will be saved to permanent
memory. They will be saved even if the power is off for an extended period
of time.
Enter the options mode by pressing and holding the black function button
(left side) until the display goes blank. After releasing the function button,
the 2 leftmost digits will flash with '12' or '24' value, (starts with option 1).
Each option is displayed one after another (by pressing the red mode
button), starting with option 1 and ending with option 6.
Table of clock options
Option 1 12/24 hour mode
Option 2 Date format option: mm-dd-yy or dd-mm-
yy
Option 3 Display option, time/date/temperature, digit
cross fade
Option 4 Temperature units, F or C
Option 5 Brightness level, auto or fixed brightness
Option 6 Anti-cathode poisoning mode start time
5.6.1 O tion 1 – 12/24 hour mode
This option selects the hour style displayed. 12 hour style is 1:00 →
12:00 AM/PM. 24 hour style is 0:00 → 23:00.
A blinking '12' or '24' will be displayed in the 2 leftmost digits,
indicating the hour style. To change the style, press the black function
button (left side). Press the red mode button (right side) when the
desired hour style is displayed. Then the next option will be
displayed.
To cancel the option mode, press and hold the red mode button until
the display goes blank. Release the mode button and the clock will go
back to normal operation, aborting setting option 1.
Page 14 of 2

User manual – Glass Clock Design #3 rev 1.2
5.6.2 O tion 2 – Date format dis lay o tion
This option selects the date format displayed. There are 2 different
date display formats available:
‘01’ = display date format: mm dd yy (default)
‘02’ = display date format: dd mm yy
A blinking '01' → '02' will be displayed in the 2 middle digits,
indicating the selected date display format. To change the format,
press the black function button (left side). Press the red mode button
(right side) when the desired display format is shown. Then the next
option will be displayed.
To cancel the option mode, press and hold the red mode button until
the display goes blank. Release the mode button and the clock will go
back to normal operation. Option 1 will still be saved, but option 2
will not be saved.
Page 15 of 2

User manual – Glass Clock Design #3 rev 1.2
5.6.3 O tion 3 – Dis lay o tion, time/date/tem erature, crossfade
There are 3 different display styles available:
'01' = display time and date.
'02' = display time and temperature.
'03' = display time, date and temperature.
'11' = display time and date with digit crossfade.
'12' = display time and temperature with digit crossfade.
'13' = display time, date and temperature with digit crossfade.
Time is displayed HH:MM:SS (HH = hours, MM = minutes, SS =
seconds) with blinking colons between the digits.
Date is displayed MM:DD:YY (MM = Month, DD = day, YY =
year), or DD:MM:YY.
Temperature is displayed TT (TT = temperature, Deg C or Deg F, see
option 4).
The Crossfade style option is when a digit changes value (seconds
counting up, etc) the old digit fades out while at the same time the
new digit fades in. This is a user preference, and other than changing
the look of the digits as they change, has no other effect.
A blinking '01' → '03', '11' → '13' will be displayed in the 2 rightmost
digits, indicating the selected display style. To change the style, press
the black function button (left side). Press the red mode button (right
side) when the desired display style is shown. The next option will be
displayed.
To cancel the option mode, press and hold the red mode button until
the display goes blank. Release the mode button and the clock will go
back to normal operation. Option 1 & 2 will still be saved, but option
3 will not be saved.
Page 16 of 2

User manual – Glass Clock Design #3 rev 1.2
5.6.4 O tion 4 – Tem erature units, F or C
This option selects the temperature units displayed. '01' format is
Degrees Centigrade. '02' format is Degrees Fahrenheit.
A blinking '01' or '02' will be displayed in the 2 leftmost digits, with
the colon on. To change the temperature display format, press the
black function button (left side). Press the red mode button (right
side) when the desired hour format is displayed. The next option will
be displayed.
To cancel the option mode, press and hold the red mode button until
the display goes blank. Release the mode button and the clock will go
back to normal operation. Option 1, 2 & 3 will still be saved, but
option 4 will not be saved.
Page 1 of 2

User manual – Glass Clock Design #3 rev 1.2
5.6.5 O tion 5 – Brightness level
This option selects the brightness level for the display. There are 5
brightness levels to select. '01' → '04' select a fixed brightness level
as follows:
'01' = dim, no colons
'02' = low-medium
'03' = medium
'04' = brightest level
'00' = Auto brightness level. When this level is selected, a light
sensor on the clock will automatically set the display
brightness level.
Note: When the clock is in the dim level, either manually
selected or selected by the auto level, the blinking colons will
not be displayed on the time display.
A blinking '00' → '04' will be displayed in the 2 middle digits, with
the colon on. To change the brightness level, press the black function
button (left side). Press the red mode button (right side) when the
desired brightness level is displayed. The next option will be
displayed.
To cancel the option mode, press and hold the red mode button until
the display goes blank. Release the mode button and the clock will go
back to normal operation. Option 1 - 3 will still be saved, but option 5
will not be saved.
Page 18 of 2

User manual – Glass Clock Design #3 rev 1.2
5.6.6 O tion 6 – Anti-cathode oisoning function
This option selects the anti-cathode poisoning function. This option
will enable/disable anti-cathode poisoning function for the display.
'00' = disable anti-cathode poisoning function.
'01' → '23' = selects which hour anti-cathode poisoning starts.
Anti-cathode poisoning mode helps prevent a condition in Nixie
tubes where the cathodes (the individual digits) that aren't used often
will be 'poisoned'. This is where deposits build up on the digits. When
these deposits are thick enough, parts of the digit will not light up.
This mode will cycle all the tubes through all the digits at full
brightness 4 times, exercising the digits, preventing cathode
poisoning.
A blinking '00' → '23' will be displayed in the 2 rightmost digits, with
the colon on. To change the enable time, press the black function
button (left side). Holding the function button on will quickly cycle
through the hours (0-23). Press the red mode button when the desired
anti-cathode poisoning enable time is displayed. The next option will
be displayed.
To cancel the option function, press and hold the red mode button
until the display goes blank. Release the mode button and the clock
will go back to normal operation. Option 1 - 4 will still be saved, but
option 6 will not be saved.
Page 19 of 2
Table of contents
Other Nixie Clock manuals


