Nokia 32 User manual

Nokia 3.2
User Guide
Issue 2019-02-26 en-US

About this user guide
Important: For important information on the safe use of your device and battery, read
“For your safety” and “Product Safety” info in the printed user guide, or at
www.nokia.com/support before you take the device into use. To find out how to get
started with your new device, read the printed user guide.
Nokia 3.2 User Guide
© 2019 HMD Global Oy. All rights reserved. 2

Table of Contents
About this user guide 2
Get started 6
Keep your phone up to date 6
Keys and parts 6
Insert the SIM and memory cards 7
Charge your phone 8
Switch on and set up your phone 9
Dual SIM settings 10
Use the touch screen 11
Basics 15
Open and close an app 15
Personalize your phone 15
Notifications 16
Control volume 17
Google Assistant 18
Battery life 19
Write text 20
Date and time 22
Clock and alarm 23
Accessibility 24
FM Radio 24
Connect with your friends and family 26
Calls 26
Contacts 26
Send and receive messages 27
Mail 28
Get social 29
Camera 31
Camera basics 31
Videos 32
Use your camera like a pro 32
Nokia 3.2 User Guide
© 2019 HMD Global Oy. All rights reserved. 3

Your photos and videos 33
Internet and connections 34
Activate Wi-Fi 34
Use a mobile data connection 34
Browse the web 35
Bluetooth® 36
VPN 38
Organize your day 40
Calendar 40
Maps 41
Find places and get directions 41
Download and update maps 41
Use location services 42
Apps and services 44
Google Play 44
Software updates and backups 46
Update your phone software 46
Back up your data 46
Restore original settings and remove private content from your phone 47
Storage 47
Protect your phone 50
Protect your phone with a screen lock 50
Setting up fingerprint ID 50
Change your SIM PIN code 50
Access codes 51
Product and safety information 54
For your safety 54
Network services and costs 57
Emergency calls 58
Take care of your device 58
Recycle 59
Crossed-out wheelie bin symbol 59
Battery and charger information 60
Small children 61
Medical devices 62
Nokia 3.2 User Guide
© 2019 HMD Global Oy. All rights reserved. 4

Get started
Keep your phone up to date
YOUR PHONE SOFTWARE
Keep your phone up to date and accept available software updates to get new and
enhanced features for your phone. Updating the software may also improve your
phone’s performance.
Keys and parts
Explore the keys and parts of your new phone.
YOUR PHONE
Nokia 3.2 User Guide
© 2019 HMD Global Oy. All rights reserved. 6

This user guide applies to the following models: TA-1156, TA-1159, TA-1164,
TA-1154, and TA-1161.
Fingerprint sensor (only in Nokia 3.2 1.
32 GB)
Flash2.
Camera3.
Headset connector4.
SIM and memory card slot5.
Google Assistant/Google search key*6.
Front camera7.
Earpiece8.
Volume keys9.
Power/Lock key10.
USB connector11.
Microphone12.
Loudspeaker13.
Some of the accessories mentioned in this user guide, such as charger, headset, or
data cable, may be sold separately.
*Google Assistant is available in selected markets and languages. Where not
available Google Assistant is replaced by Google Search.
PARTS AND CONNECTORS, MAGNETISM
Do not connect to products that create an output signal, as this may damage the
device. Do not connect any voltage source to the audio connector. If you connect an
external device or headset, other than those approved for use with this device, to
the audio connector, pay special attention to volume levels.
Parts of the device are magnetic. Metallic materials may be attracted to the device.
Do not place credit cards or other magnetic stripe cards near the device for
extended periods of time, since the cards may be damaged.
Nokia 3.2 User Guide
© 2019 HMD Global Oy. All rights reserved. 7

Insert the SIM and memory cards
INSERT THE CARDS
Open the SIM and memory card tray: push the tray opener pin in the tray hole 1.
and slide the tray out.
Put the nano-SIM in slot 1 on the tray with the contact area face down. If you 2.
have a second SIM, put it in slot 2.
Put the memory card in the memory card slot.3.
Slide the tray back in.4.
Use only original nano-SIM cards. Use of incompatible SIM cards may damage the
card or the device, and may corrupt data stored on the card.
Use only compatible memory cards approved for use with this device. Incompatible
cards may damage the card and the device and corrupt data stored on the card.
Important: Do not remove the memory card when an app is using it. Doing so may damage
the memory card and the device and corrupt data stored on the card.
Nokia 3.2 User Guide
© 2019 HMD Global Oy. All rights reserved. 8

Charge your phone
CHARGE THE BATTERY
Plug a compatible charger into a wall outlet.1.
Connect the cable to your phone.2.
Your phone supports the USB micro-B cable. You can also charge your phone from a
computer with a USB cable, but it may take a longer time.
If the battery is completely discharged, it may take several minutes before the
charging indicator is displayed.
Switch on and set up your phone
When you switch your phone on for the first time, your phone guides you to set up
your network connections and phone settings.
SWITCH ON YOUR PHONE
To switch on your phone, press and hold the power key until the phone vibrates. 1.
When the phone is switched on, choose your language and region.2.
Follow the instructions shown on your phone.3.
TRANSFER DATA FROM YOUR PREVIOUS PHONE
You can transfer data from an old phone to your new phone using your Google
account.
To back up data on your old phone to your Google account, refer to your old
Nokia 3.2 User Guide
© 2019 HMD Global Oy. All rights reserved. 9

phone’s user guide.
Tap Settings > Accounts > Add account > Google.1.
Select which data you want to restore on your new phone. The sync starts 2.
automatically once your phone is connected to the internet.
RESTORE APP SETTINGS FROM YOUR PREVIOUS ANDROID PHONE
If your previous phone was an Android, and back up to Google account is enabled on
it, you can restore your app settings and Wi-Fi passwords.
Tap Settings > System > Advanced > Backup.1.
Switch Backup to Google Drive to On.2.
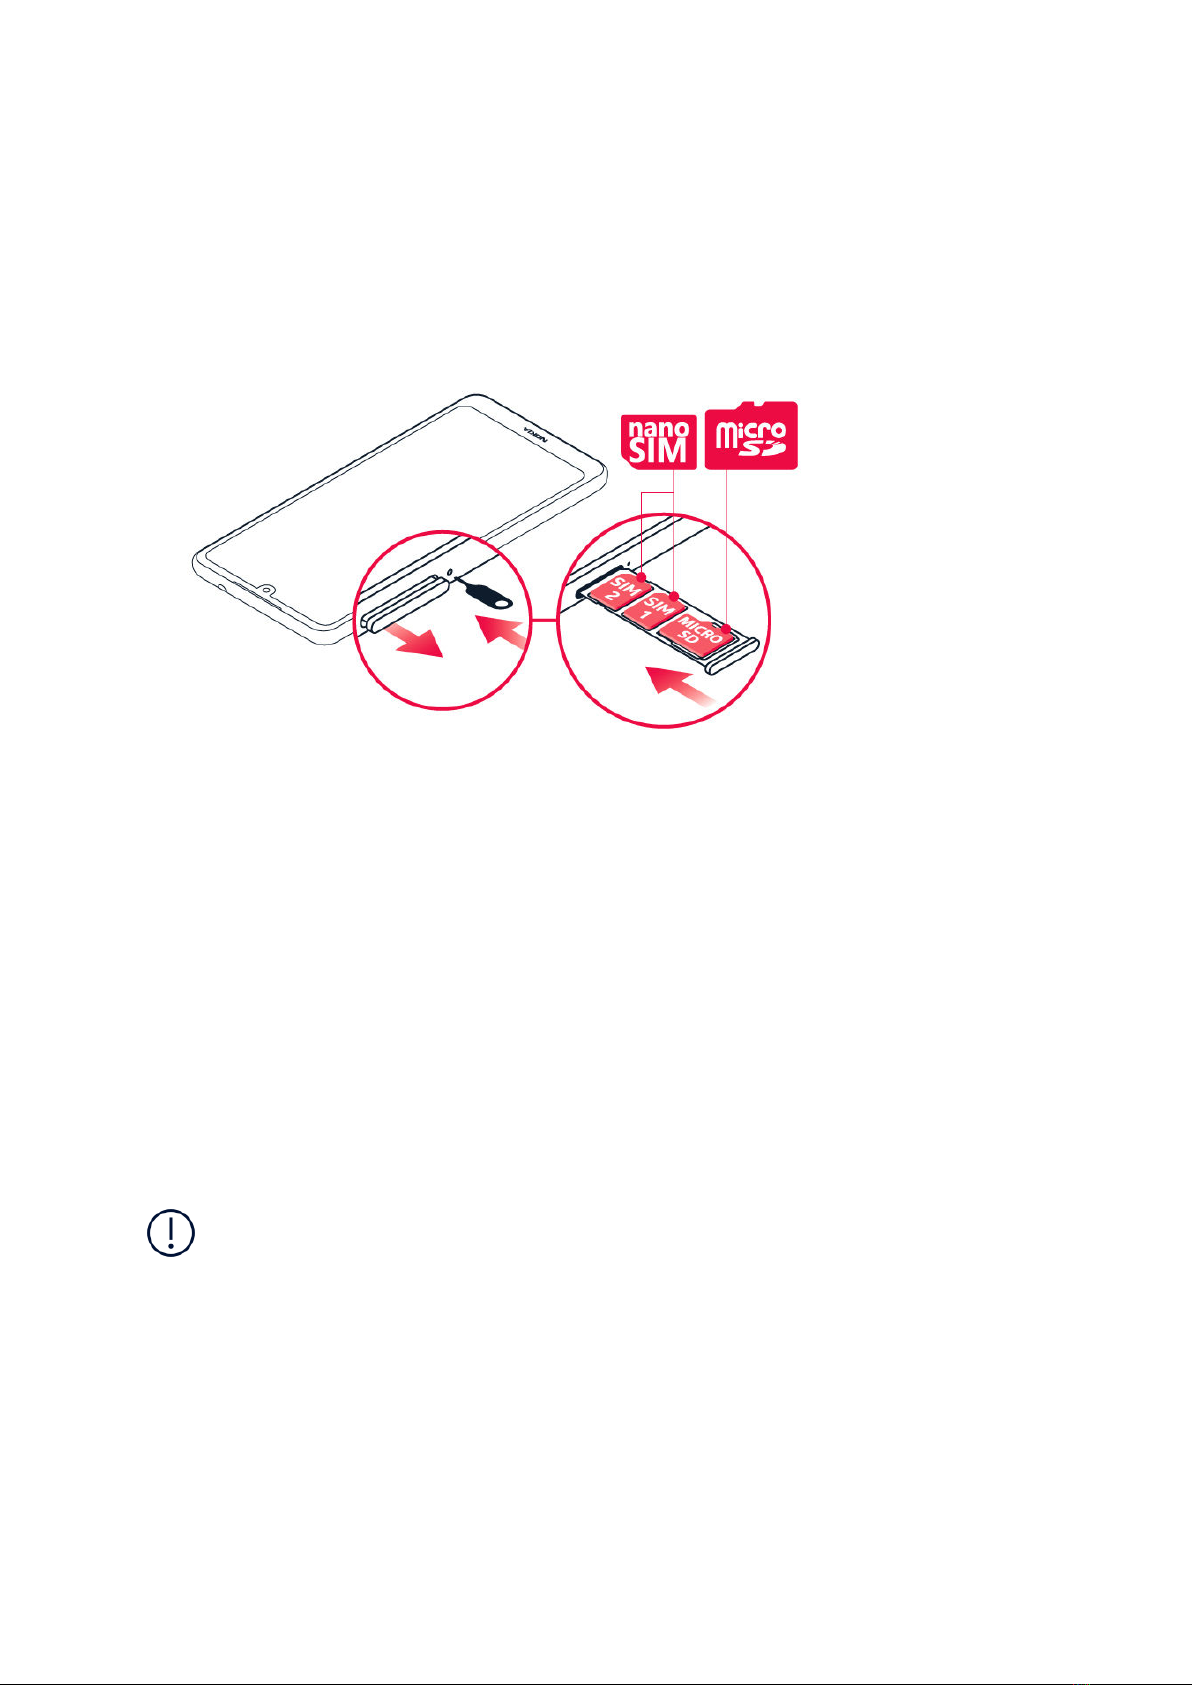
Dual SIM settings
If you have a dual SIM variant, you can have 2 SIMs in your phone, for example, one
for your work and one for your personal use.
Note: On dual SIM capable devices, both SIM1 and SIM2 slots support 4G networks.
However, if your SIM1 and SIM2 are both LTE SIM cards, the primary SIM supports
4G/3G/2G networks, while the secondary SIM can only support 3G/2G. For more
information on your SIM cards, contact your service provider.
CHOOSE WHICH SIM TO USE
When, for example, making a call, you can choose which SIM to use by tapping the
corresponding SIM 1 or SIM 2 button after you dial the number.
Your phone shows the network status for both SIMs separately. Both SIM cards are
available at the same time when the device is not being used, but while one SIM card
is active, when, for example, making a call, the other may be unavailable.
MANAGE YOUR SIMS
Don't want work to interfere with your free time? Or do you have a cheaper data
connection on one SIM? You can decide which SIM you want to use.
Nokia 3.2 User Guide
© 2019 HMD Global Oy. All rights reserved. 10

Tap Settings > Network & Internet > SIM Cards.
RENAME A SIM CARD
Tap the SIM you want to rename, and type in the name you want.
SELECT WHICH SIM TO USE FOR CALLS OR DATA CONNECTION
Under Preferred SIM for, tap the setting you want to change and select the SIM.
Use the touch screen
Important: Avoid scratching the touch screen. Never use an actual pen, pencil, or
other sharp object on the touch screen.
TAP AND HOLD TO DRAG AN ITEM
Place your finger on the item for a couple of seconds, and slide your finger across
the screen.
Nokia 3.2 User Guide
© 2019 HMD Global Oy. All rights reserved. 11

SWIPE
Place your finger on the screen, and slide your finger in the direction you want.
SCROLL THROUGH A LONG LIST OR MENU
Slide your finger quickly in a flicking motion up or down the screen, and lift your
finger. To stop the scrolling, tap the screen.
Nokia 3.2 User Guide
© 2019 HMD Global Oy. All rights reserved. 12

ZOOM IN OR OUT
Place 2 fingers on an item, such as a map, photo, or web page, and slide your fingers
apart or together.
LOCK THE SCREEN ORIENTATION
The screen rotates automatically when you turn the phone 90 degrees.
To lock the screen in portrait mode, swipe down from the top of the screen, and tap
Auto-rotate.
Nokia 3.2 User Guide
© 2019 HMD Global Oy. All rights reserved. 13

USE THE NAVIGATION KEYS
To see which apps you have open, swipe up the home key .
To switch to another app, swipe right.
To close an app, swipe it up.
To go back to the previous screen you were in, tap the back key . Your phone
remembers all the apps and websites you've visited since the last time your screen
was locked.
To go to the home screen, tap the home key . The app you were in stays open in
the background.
OPEN TWO APPS AT ONCE
To navigate easier between apps, swipe up the home key .1.
Tap the app icon on top of the app and tap the icon. 2.
Tap another app in the app list to divide the screen between two apps. 3.
To go back to the normal view, tap an app and swipe up.
Nokia 3.2 User Guide
© 2019 HMD Global Oy. All rights reserved. 14

Basics
Open and close an app
OPEN AN APP
On the home screen, tap an app icon to open it. To open one of the apps running in
the background, swipe up the home key then swipe right and select the app.
CLOSE AN APP
Swipe up the home key and swipe up the app you want to close.
FIND YOUR APPS
Swipe up the home key and swipe up again to see all your apps.
CLOSE ALL RUNNING APPS
Swipe up the home key , swipe right through all apps, and tap CLEAR ALL.
Personalize your phone
Learn how to personalize the home screen and how to change ringtones.
Nokia 3.2 User Guide
© 2019 HMD Global Oy. All rights reserved. 15

CHANGE YOUR WALLPAPER
Tap Settings > Display > Wallpaper.
CHANGE YOUR PHONE RINGTONE
Tap Settings > Sound > SIM1 Phone ringtone or SIM2 Phone ringtone.
CHANGE YOUR MESSAGE NOTIFICATION SOUND
Tap Settings > Sound > Advanced > Default notification sound.
Notifications
Stay in touch with what's happening on your phone with notifications.
USE THE NOTIFICATION PANEL
When you receive new notifications, such as messages or missed calls, indicator
icons appear on the status bar at the top of the screen. To see more information
about the notifications, drag the status bar down. To close the view, swipe up on
the screen.
To open the notification panel, drag the status bar down. To close the notification
panel, swipe up on the screen.
To change the notification settings of an app, tap Settings > Apps & notifications
and tap the app name to open the app settings. Tap Notifications. You can turn off
or on the notifications per each app individually.
Nokia 3.2 User Guide
© 2019 HMD Global Oy. All rights reserved. 16

USE THE QUICK SETTING ICONS
To activate features, tap the quick settings icons on the notification panel. To see
more icons, drag the menu down.
To rearrange the icons, tap , tap and hold an icon, and then drag it to another
location.
Control volume
CHANGE THE VOLUME
If you have trouble hearing your phone ringing in noisy environments, or calls are
too loud, you can change the volume to your liking by using the volume keys on the
side of your phone.
Do not connect to products that create an output signal, as this may damage the
device. Do not connect any voltage source to the audio connector. If you connect an
external device or headset, other than those approved for use with this device, to
the audio connector, pay special attention to volume levels.
Nokia 3.2 User Guide
© 2019 HMD Global Oy. All rights reserved. 17

CHANGE THE VOLUME SETTINGS
Press a volume key on the side of your phone to see the volume status bar, tap ,
and drag the sliders on the volume bars left or right.
SET THE PHONE TO SILENT
To set the phone to silent, press a volume key, tap to set your phone to vibrate
only and tap to set it to silent.
Google Assistant
Google Assistant is available in selected markets and languages only. Where not
available, Google Assistant is replaced by Google Search.
Google Assistant can help you search information online, translate words and
sentences, make notes and calendar appointments, for example.
USE THE GOOGLE ASSISTANT KEY
To access the Google Assistant services, use the Google Assistant key on the side of
your phone:
- Press the key once to start Google Assistant. When you press the key for the first
time, you are asked to sign in with your Google account or create a new account.
- Press the key twice to see a visual overview of your day, get suggestions and
personalized information
- Press and hold the key to speak with Google Assistant. Ask your question and
release the key. You see Google Assistant’s answer on your phone’s display.
If your country or region does not support Google Assistant, you can still use the
Google Assistant key:
- Press the key once to open Google search
- Press the key twice to start Google visual snapshot that shows your agenda for
today
- Press and hold the key to use Google voice search. Ask your question and release
the key. You see Google’s answer on your phone’s display.
Nokia 3.2 User Guide
© 2019 HMD Global Oy. All rights reserved. 18

SWITCH OFF THE GOOGLE ASSISTANT KEY
To switch off the Google Assistant key, tap Settings > System > Gestures >
Assist gesture, and switch Assist gesture off.
Battery life
Get the most out of your phone while getting the battery life you need. There are
steps you can take to save power on your phone.
EXTEND BATTERY LIFE
To save power:
Always charge the battery fully.
Mute unnecessary sounds, such as
touch sounds. Tap Settings > Sound
> Advanced, and under Other
sounds and vibrations, select which
sounds to keep.
Use wired headphones, rather than
the loudspeaker.
Set the phone screen to switch off
after a short time. Tap Settings >
Display > Advanced > Sleep and
select the time.
Tap Settings > Display >
Brightness level. To adjust the
brightness, drag the brightness level
slider. Make sure that Adaptive
brightness is disabled.
Stop apps from running in the
background: swipe up the home key
and swipe up the app you want to
close.
Enable adaptive battery. Limit battery
for apps that you don't use often.
The notifications may be delayed for
these apps. Tap Settings > Battery
> Adaptive Battery.
Switch on the power saver: tap
Settings > Battery > Battery saver,
and switch to On.
Use location services selectively:
switch location services off when you
don’t need them. Tap Settings >
Security & location > Location, and
disable Use location.
Use network connections selectively:
switch Bluetooth on only when
needed. Use a Wi-Fi connection to
connect to the internet, rather than a
mobile data connection.
Stop your phone scanning for
available wireless networks. Tap
Settings > Network & internet > Wi-
Fi, and disable Use Wi-Fi.
If you're listening to music or
otherwise using your phone, but
Nokia 3.2 User Guide
© 2019 HMD Global Oy. All rights reserved. 19

don't want to make or receive calls,
switch the airplane mode on. Tap
Settings > Network & internet >
Advanced > Airplane mode. Airplane
mode closes connections to the
mobile network and switches your
device’s wireless features off.
Write text
Learn how to write text quickly and efficiently using your phone’s keyboard.
USE THE ON-SCREEN KEYBOARD
Writing with the on-screen keyboard is easy. You can use the keyboard when holding
your phone in portrait or landscape mode. The keyboard layout can vary in different
apps and languages.
To open the on-screen keyboard, tap a text box.
SWITCH BETWEEN UPPER AND LOWER CASE CHARACTERS
Tap the shift key. To switch caps lock mode on, double-tap the key. To return to
normal mode, tap the shift key again.
TYPE IN A NUMBER OR SPECIAL CHARACTER
Tap the numbers and symbols key. Some special character keys bring up more
symbols. To see more symbols, tap and hold a symbol or special character.
INSERT EMOJIS
Tap the emoji key, and select the emoji.
Nokia 3.2 User Guide
© 2019 HMD Global Oy. All rights reserved. 20
Other manuals for 32
5
This manual suits for next models
5
Table of contents
Other Nokia Cell Phone manuals

Nokia
Nokia N97 User manual

Nokia
Nokia 1200 - Cell Phone 4 MB User manual

Nokia
Nokia 6560 User manual

Nokia
Nokia Asha 200 User manual

Nokia
Nokia 6708 - Cell Phone 18 MB User manual

Nokia
Nokia Mural User manual

Nokia
Nokia 8270 User manual

Nokia
Nokia 6086 - Cell Phone 5 MB User manual

Nokia
Nokia 3310 User manual

Nokia
Nokia 130 User manual

Nokia
Nokia Mode User manual

Nokia
Nokia 6225 User manual

Nokia
Nokia Nokia User manual

Nokia
Nokia 6212 classic User manual

Nokia
Nokia 3128 User manual

Nokia
Nokia 5230 User manual

Nokia
Nokia 220 Dual SIM User manual

Nokia
Nokia 6 User manual

Nokia
Nokia G22 User manual

Nokia
Nokia C5-03 GSM Phone C5-03 User manual