Nokia 6190 User manual

OWNER’S
MANUAL
All manuals and user guides at all-guides.com
all-guides.com

Keys
0HQX 1DPHV
ó
Dials the number
on the display.
Volume button
Adjusts volume of
earpiece or
speaker.
Softkeys
Their current
function is
displayed
above the key
(for example,
here their
functions are
Menu and
Names).
ô
Press this key to
end a phone
call, or to return
to the start
screen when no
t
in a call.
Scroll
button
Scroll through
menus,
submenus, and
phone book.
Press and hold
for continuous
scrolling.
Power key
Press and hold to
turn your phone on
or off.
Fixed
antenna
Do not
attempt to
extend or
remove!
All manuals and user guides at all-guides.com

Quick guide to functions
Note: If you have trouble accessing a feature, try starting from
the start screen. To get to the start screen, press ôat any
time except during a call (unless you want to hang up).
Accessing your phone book - Press Wor V(to
skip ahead in the list, press the number key that
corresponds to the first letter of the name)
Answering a call - Press any key except ôor
Answering a call with call waiting - Press ó
(press óto swap calls; press ôto end each call)
Clearing a digit from the display - Press &OHDU
Emergency 9 call - Press and hold 9 for three sec-
onds (Emergency Key 9 feature must be set to on!)
Ending a call - Press ô
Keyguard activation - Press and hold ôuntil
.H\V ORFNHG appears, or press 0HQX
Keyguard deactivation - Press 8QORFN
Last number redial - Press ótwice
Listening to voice messages - With 1HZ YRLFH PHV0
VDJH on display, press /LVWHQ or press ó(requires
voice mail subscription)
Making a call - Enter phone number, then press ó
One-touch dialing - Press and hold one key, 2
through 8, for two seconds
Profiles - To change profiles, press , scroll to the
desired profile, and press 2.
Storing a name and number (Quick Save) -
Enter the phone number and press 6DYH.Enter a name
if you wish (optional), then press 2.
Switching on/off - Press and hold
Volume adjust - Press top or bottom volume button
(on the left side of the phone)
All manuals and user guides at all-guides.com

Quick guide to the menu
Back one level - Press %DFN
Entering the menu - From start screen, press 0HQX
Exiting the menu - Press ([LW or %DFN repeatedly, or
press ô
Scrolling the menu - Press Wor V
Selecting a submenu or option - Press 6HOHFW or
2.
Using shortcuts - Press 0HQX, then menu number
Menu summary:
1 Messages
1Text messages1
2Message settings1
3Voice messages1
4News & info service1
5Service command
editor
2 Call log
1Missed calls1
2Received calls1
3Dialed calls
4Clear call lists
5Call timers
6Show call costs1,4
7Show costs in1
3 Profiles
1Normal
2Silent
3Meeting
4Outdoor
5Pager
6Car2
7Headset3
4Settings
1Call settings
2Security settings
3Phone settings
4Analog module
settings5
5Forwarding
1
1Forward all voice
calls1
2Forward when not
able to take calls1
3Forward all fax calls1
4Forward all data calls1
5Cancel all call
forwarding1
6Games
7 Calculator
8Calendar
9 Keyguard
1Appears only if supported by your operator and/or SIM card
2Appears once used with car kit
3Appears once used with headset
4Not available in analog systems
5Appears only with the optional analog module attached
All manuals and user guides at all-guides.com

1
Indicators and Icons
You have an active call.
The phone is waiting for you to enter a response.
Ringing option is set to 6LOHQW and keypad tones,
warning tones, and message alert tone are turned off.
Keyguard has been activated. Your phone will not
accept any keypresses. To deactivate, press 8QORFN,
then .
Your phone has been set to forward all incoming
voice calls to another number.
You have one or more voice messages waiting.
You have one or more text messages waiting.
Analog mode is active. See Optional Analog Module
on page 82.
Your phone is roaming outside of its home system.
Any characters you enter will be upper-case letters.
Press the # key to switch letter case.
Any characters you enter will be lower-case letters.
Press the # key to switch letter case.
Any characters you enter will be numbers.
You are in special character mode; select a special
character and press ,QVHUW. (When entering letters,
switch to this mode by pressing the key.)
The alarm clock is set.
All manuals and user guides at all-guides.com

2
Contents
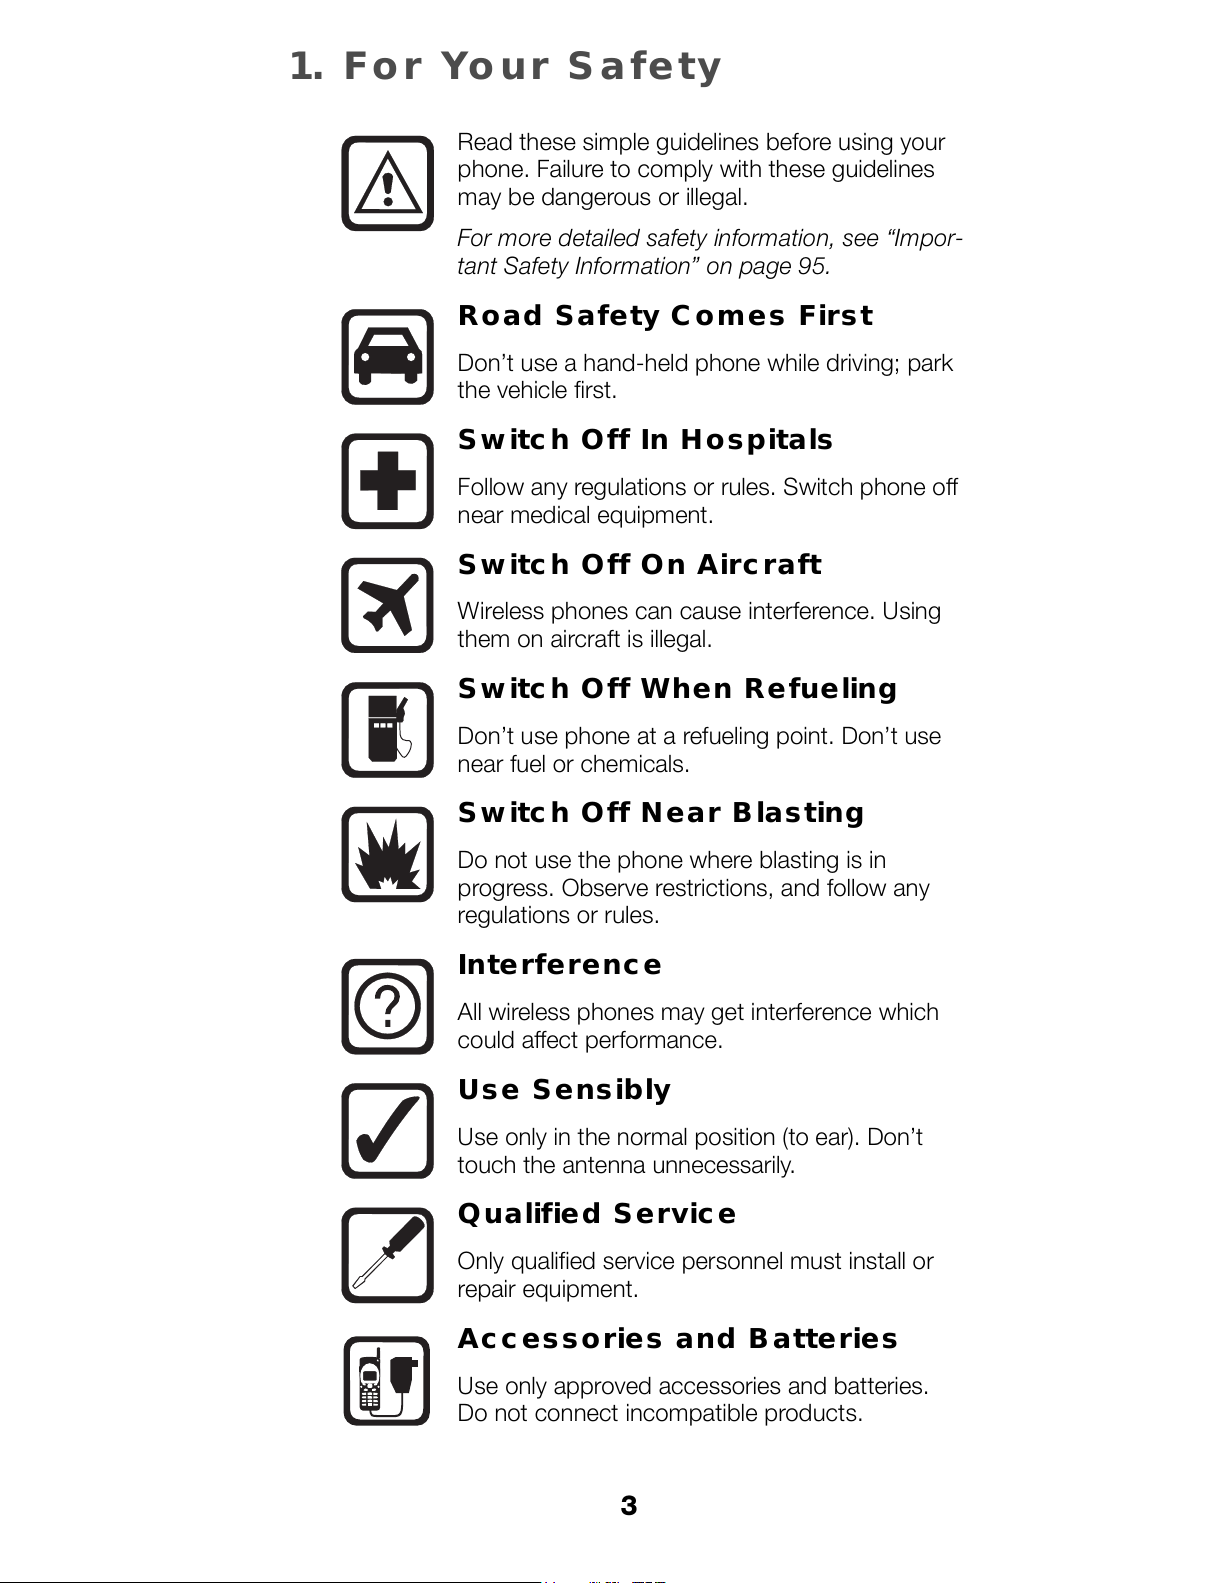
1. For Your Safety . . . . . . . . . . . . . . 3
FCC/Industry Canada Notice . . . . . . . . . . . . . . . . . . . . .4
Using this Guide. . . . . . . . . . . . . . . . . . . . . . . . . . . . . . .4
2. Getting Connected . . . . . . . . . . . 5
Installing the SIM card . . . . . . . . . . . . . . . . . . . . . . . . . .5
Battery information . . . . . . . . . . . . . . . . . . . . . . . . . . . . .6
When is a good time to charge? . . . . . . . . . . . . . . .8
3. The Very Basics . . . . . . . . . . . . 10
Switching on the phone . . . . . . . . . . . . . . . . . . . . . . . .10
Checking signal strength . . . . . . . . . . . . . . . . . . . . . . .10
Making a call . . . . . . . . . . . . . . . . . . . . . . . . . . . . . . . .11
Ending a call. . . . . . . . . . . . . . . . . . . . . . . . . . . . . . . . .11
Answering a call . . . . . . . . . . . . . . . . . . . . . . . . . . . . . .12
Switching off the phone . . . . . . . . . . . . . . . . . . . . . . . .12
Keyguard . . . . . . . . . . . . . . . . . . . . . . . . . . . . . . . . . . .12
4. Working The Menu . . . . . . . . . . 13
Navigating tools . . . . . . . . . . . . . . . . . . . . . . . . . . . . . .13
What is the start screen? . . . . . . . . . . . . . . . . . . . . . .14
The main menu . . . . . . . . . . . . . . . . . . . . . . . . . . . . . .14
Help text. . . . . . . . . . . . . . . . . . . . . . . . . . . . . . . . . . . .15
Summary of Menu Items . . . . . . . . . . . . . . . . . . . . . . .16
5. Features A-Z . . . . . . . . . . . . . . . 18
6. Optional Analog Module . . . . . . 82
Analog features . . . . . . . . . . . . . . . . . . . . . . . . . . . . . .83
Analog system selection. . . . . . . . . . . . . . . . . . . . . . . .83
Digital/analog selection. . . . . . . . . . . . . . . . . . . . . . . . .85
Module security . . . . . . . . . . . . . . . . . . . . . . . . . . . . . .86
7. Call Forwarding Codes . . . . . . . 87
8. Accessories . . . . . . . . . . . . . . . 89
Batteries. . . . . . . . . . . . . . . . . . . . . . . . . . . . . . . . . . . .89
Charging Times . . . . . . . . . . . . . . . . . . . . . . . . . . .90
Talk and Standby Times. . . . . . . . . . . . . . . . . . . . .90
Chargers and other accessories . . . . . . . . . . . . . . . . . .91
9. Reference Information . . . . . . . 95
10. Technical Information . . . . . . .101
All manuals and user guides at all-guides.com
all-guides.com

3
1. For Your Safety
Read these simple guidelines before using your
phone. Failure to comply with these guidelines
may be dangerous or illegal.
For more detailed safety information, see Impor-
tant Safety Information on page 95.
Road Safety Comes First
Dont use a hand-held phone while driving; park
the vehicle first.
Switch Off In Hospitals
Follow any regulations or rules. Switch phone off
near medical equipment.
Switch Off On Aircraft
Wireless phones can cause interference. Using
them on aircraft is illegal.
Switch Off When Refueling
Dont use phone at a refueling point. Dont use
near fuel or chemicals.
Switch Off Near Blasting
Do not use the phone where blasting is in
progress. Observe restrictions, and follow any
regulations or rules.
Interference
All wireless phones may get interference which
could affect performance.
Use Sensibly
Use only in the normal position (to ear). Dont
touch the antenna unnecessarily.
Qualified Service
Only qualified service personnel must install or
repair equipment.
Accessories and Batteries
Use only approved accessories and batteries.
Do not connect incompatible products.
All manuals and user guides at all-guides.com

4
FCC/Industry Canada Notice
Your phone may cause TV or radio interference (e.g. when
using a telephone in close proximity to receiving equipment).
The FCC/Industry Canada can require you to stop using your
telephone if such interference cannot be eliminated. If you
require assistance, contact your local service facility.
This device complies with part 15 of the FCC rules. Operation
is subject to the condition that this device does not cause
harmful interference.
Using this Guide
The wireless phone described in this guide is
approved for use in GSM 1900 and AMPS networks.
Network services
A number of features included in this guide are called
network services. They are special services provided
by wireless service providers. Before you can take
advantage of any of these network services, you must
subscribe to the service(s) from your home service
provider and obtain instructions for their use.
Updates
The latest version of this Owners Manual may be
found on Nokias World Wide Web site at
www.nokia.com.
All manuals and user guides at all-guides.com

5
2. Getting Connected
So youve just bought your new phone, taken it out of
the box, and youre wondering what to do next. To get
started, just follow a few easy steps.
1) Install the SIM card
2) Attach and charge the battery
3) If you purchased an optional analog module,
attach it to the phone
See Optional Analog Module on page 82.
Note: The analog module is a separate accessory that may be
purchased from your service provider. It allows you to make
and receive calls in analog networks.
Installing the SIM card
Before you can use your phone, you need to put a
valid miniature SIM card in the phone. The card comes
from your network operator or service provider.
Before installing the SIM card, switch off the phone and wait
for a few seconds before removing the battery.
The SIM card and its contacts can be easily damaged by
scratches or bending, so be careful when you handle, insert or
remove the card.
Note: Keep all miniature SIM cards out of small childrens
reach.
1) If the battery is already attached, remove it. See
Removing the battery on page 9.
2) Open the SIM card
holder: slide the latch
toward the top of the
phone, then lift it up
All manuals and user guides at all-guides.com

6
3) Place the SIM card in its
slot. Make sure that the bev-
elled corner is top right and
the gold contacts of the card
face into the phone.
4) Close the holder
5) Slide the SIM card
holder toward the bottom
of the phone until it locks
into place
6) Attach the battery (see below)
Battery information
Attaching the battery
To attach the battery, place
it on the back of the phone
as shown and slide it
toward the top of the
phone until it clicks into
place.
All manuals and user guides at all-guides.com

7
Attaching the battery when using optional
analog module
1) Place the analog
module on the back of
the phone
2) Slide the module
toward the top of the
phone until it clicks into
place
3) Place the battery
on top of the analog
module
4) Slide the battery toward the top of the phone until
it clicks into place
Charging your new battery
Your phone is powered by a rechargeable Li-Ion or
NiMH battery, which should be charged for 24 hours
without interruption. Note that a new NiMH batterys
full performance is achieved only after two or three
complete charge and discharge cycles.
Note: Use only batteries approved by the phone manufacturer
and recharge your battery only with the chargers approved by
the manufacturer.
Also, see Important Battery Information on page 98 for
important battery usage information and Talk and Standby
Times on page 90 for approximate battery operation times.
With your phone on or off, simply connect the lead
from the charger to the bottom of your phone or place
it on a charging stand. Then connect the charger to a
standard 120V AC outlet.
Note: If you have purchased an optional analog module, be
sure to remove it and replace the battery before placing the
phone in a charging stand. Although the phone will fit in the
stand with the analog module attached, charging will not take
place.
When the battery begins charging, the battery
strength indicator on the right side of the display will
scroll and your phone will beep once. When you
All manuals and user guides at all-guides.com
all-guides.com

8
charge the battery for the first time, the battery
strength indicator bars will not scroll the entire time. If
your phone is off, the scroll bars will disappear shortly
after charging begins; if your phone is on, the scroll
bars will stop scrolling after a while. This is normal. Be
sure to charge the battery for the entire 24-hour period
without interruption.
If your phone displays 1RW FKDUJLQJ, charging is sus-
pended. Check that the battery is not connected to a
non-approved charging device. If the battery is very
hot or cold, wait for a while; charging will automatically
resume after the battery is restored to its normal oper-
ating state. If charging still fails, contact your dealer.
When is a good time to charge?
Actually, you can charge anytime. If you have a NiMH
battery, you should allow it to discharge once in a while
(see Discharging NiMH batteries on page 9).
Whenever your phone beeps once and displays %DW0
WHU\ ORZ, you only have a couple of minutes of talk time
remaining. The repetition rate of these battery-low
warnings depend on the remaining battery capacity
and the battery condition. These warnings are more
frequent when youre in a call.
Note: The phone will not give you the warning tone under
certain conditions. See Warning tones on page 79.
Once all the power has drained from your battery,
youll hear three beeps with the message 5HFKDUJH
EDWWHU\ on your display. At this point, your phone will
switch itself off and youll need to recharge your
battery.
When is charging complete?
When the charge indicators stop scrolling,
your phone is considered fully charged.
However, a slight increase in charge may
occur if your phone is left connected to the
charger. This is called trickle charge.
All manuals and user guides at all-guides.com

9
Charging times depend on the type of battery and
charger used. For approximate charging and oper-
ating times, see Batteries on page 89.
If the battery is too hot or cold, charging may be inter-
rupted until the battery reaches its normal operating
temperature.
Can I make calls while charging?
Yes, you can. But your battery may not charge while a
call is in progress. Charging should resume once you
end the call.
Discharging NiMH batteries
An NiMH battery lasts longer and performs better if you
fully discharge it from time to time. To discharge the bat-
tery, leave your phone switched on until the battery is
drained. The phone will display several messages that
the battery is low and that you need to recharge it; just
ignore them. After the phone turns itself off, connect the
charger and fully recharge the battery.
Note: Do not attempt to discharge the battery by any other
means.
When do I need to buy a new battery?
The battery can be charged and discharged hundreds
of times, but it will eventually wear out. When the oper-
ating time (talk-time and standby time) is noticeably
shorter than normal, its time to buy a new battery.
Removing the battery
Note: Switch off the phone before removing the battery!
1) Press and hold
the button at the
top of the battery
2) Slide the battery
toward the bottom
of the phone
3) Lift the battery off the phone
All manuals and user guides at all-guides.com

10
3. The Very Basics
Your phone is designed with many powerful features
that you can learn to use as needed. This chapter cov-
ers the basic information you need to use your phone.
Everything else is covered in Features A-Z starting
on page 18.
Switching on the phone
Press and hold the key for one second to switch on
the phone.
If the phone asks for a PIN code, see PIN and PIN2
codes on page 63. If the phone asks for a Security
code, see Security code on page 71.
NORMAL POSITION: Hold the phone as you would any other
telephone with the antenna pointed up and over your
shoulder.
TIPS ON EFFICIENT OPERATION: As with any other radio
transmitting device, do not touch the antenna unnecessarily
when the phone is switched on. Contact with the antenna af-
fects call quality and may cause the phone to operate at a
higher power level than otherwise needed.
WARNING! Do not switch on the phone when wireless phone
use is prohibited or when it may cause interference or danger.
Checking signal strength
Your phone operates on radio waves, and the quality
of radio reception depends entirely on the strength of
the radio signal in your area.
This radio coverage is maintained by a wireless net-
work and the quality of calls on a wireless phone
depends on the strength of the wireless radio signal.
Get a strong signal
When you are at the start screen (see page
14) or in a call, the strength of the radio signal
is indicated by the signal indicators on the left
side of your phones display. These indicators
scroll as the strength of the signal increases
and decreases.
All manuals and user guides at all-guides.com

11
Improving your phones reception may be easy.
Try moving your phone slightly, or move towards a
window if youre calling from inside a building.
Making a call
Enter the area code and phone
number and press ó
Making an international call
Enter the + character (press
twice), country code, area code and phone number.
Editing a number on display
Press Vto move the cursor to the left and Wto move
it to the right. Press &OHDU to delete the character to the
left of the cursor.
Dialing a phone number stored in the phone
book
View entries by pressing Wor Vfrom the start screen,
then press ó
Emergency calls
See Emergency calls on page 39.
IMPORTANT! The phone can make and receive calls only
when:
It is switched on,
It has a valid SIM card installed, and
It is located in the service area of a GSM 1900 or analog
network (if using the optional analog module) where your
SIM card can be used and the radio signal strength is
adequate.
Ending a call
Press ô
All manuals and user guides at all-guides.com

12
Answering a call
The phone rings according to the settings in the
currently selected profile (see page 63).
To answer, press any key except ôor
Note: If Keyguard is on (see page 49), only óanswers
calls.
To reject a call, press ô.
Note: If you are using the optional analog module, pressing
ôstops the ringing but does not answer or reject the call.
Switching off the phone
Press and hold the key for one second OR
Briefly press the key (6ZLWFK RII$will appear, high-
lighted) then press 2.. (This does not work if the
phone is connected to a headset or handsfree car kit.)
Keyguard
You can lock your phones key-
pad with this convenient feature.
Keyguard makes sure that keys
dont get pressed by accident
when the phone is in your pocket
or purse.
Note: Keyguard is not a security feature and will not prevent
unauthorized use of your phone.
To l o c k t h e k e y s
Press and hold ôuntil .H\V ORFNHG appears, OR
Press 0HQX OR
Press 0HQX 9
To unlock the keys
Press 8QORFN 25
Press and hold ôuntil 8QORFN NH\V" appears, then
press 2.
See page 49 for more information about Keyguard.
All manuals and user guides at all-guides.com
all-guides.com

13
4. Working The Menu
Your phone contains several menus and submenus,
giving you access to certain options and allowing you
to customize your phone to suit your individual
preferences.
Navigating tools
Softkeys
Your phone has two softkeys that
appear below the display. Their
current function is indicated by the
words appearing above them.
Simply press the corresponding
key under the choice you wish to
select.
This illustration shows the phone at the start screen
(see What is the start screen? on page 14). The
start screen always displays 0HQX on the left and
1DPHV on the right. 0HQX allows you to access your
phones menus and submenus. 1DPHV allows you to
access your phone book (see Phone book on
page 59).
Scroll button
Your phone has a scroll button located just below the
display screen. The scroll button has two arrows on it
that look like Vand W. You will press these arrows to
navigate through your phones menus and submenus,
as well as through your phone book (See Phone
book on page 59).
Scroll bar
When you access your phones menu and sub-
menus, you will notice a scroll bar at the far right
of the screen. This bar indicates where you are
in the menu structure; each tab on the bar rep-
resents a different menu item.
All manuals and user guides at all-guides.com

14
For example, press 0HQX once. The scroll bar appears
with the first (top) tab displayed. A different tab
appears each time you press the Wor Vkey to move
up and down through the menu structure. The scroll
bar works the same way with submenus.
Menu & submenu numbering
When you scroll to a menu or submenu, the menu
number and/or submenu number appears on the dis-
play above the scroll bar. If you become familiar with
these numbers, you can use them as shortcuts for
accessing different menus.
For example, when you enter menu 2 (&DOO ORJ) the
number 5appears in the top right-hand corner of the
display. If you enter menu 4 (6HWWLQJV), submenu 2
(6HFXULW\ VHWWLQJV), your phone will display 705 in the top
right-hand corner.
See "Using shortcuts" on page 15.
What is the ‘start screen’?
The start screen appears when you first turn your
phone on, in its idle state (see illustration on page 13).
Your phone must be at the start screen in order to use
most of its features.
When you want to get to the start screen
Press ôat any time except during a call (unless you
want to hang up).
The main menu
From the start screen, press 0HQX to access the main
menu. When in a call, press 2SWLRQV, scroll to 0HQX,
then press 6HOHFW.
To view main menu items one by one, press Wor V.
6HOHFW allows you to select and enter menus and
submenus.
All manuals and user guides at all-guides.com

15
%DFN allows you to exit the present menu or submenu
and go back a level. Press repeatedly to return to the
main menu, then press ([LW to return to the start screen.
ôreturns your phone to the start screen. If you
press ôwhen the phone is requesting input (for
example, a setting, phone number, name, etc.), the
phone displays the start screen and the input is not
saved.
Remember: If you press ôduring a call, the phone will hang
up!
Scrolling through the main menu
1) Press 0HQX
2) Press Wor Vto reach the desired menu item
3) Press 6HOHFW,2SWLRQV or 2. (whichever appears) to
enter submenus and to choose options
4) Press ([LW to exit the present menu or %DFN to go
back one level
Using shortcuts
This is a quick and easy way to access a menu without
having to scroll through other menus.
Press 0HQX, then menu number, then submenu
number.
Press the menu and submenu numbers within a cou-
ple of seconds of each other when using this method.
For a summary of your phones menu structure, see
"Summary of Menu Items" on page 16.
Help text
Many of the menu functions have brief help text. To
view the help text, scroll to the menu item and wait for
about 15 seconds. Press 0RUH to see the next page of
the text or %DFN to exit.
All manuals and user guides at all-guides.com

16
Summary of Menu Items
1 Messages
1 1 Text Messages1
1 1 1 Inbox
1 1 2 Outbox
1 1 3 Write messages
1 2 Message settings1
1 2 1 Set 1
1 2 2 Set 2
1 2 3 Set 3
1 2 4 Set 4
1 2 5 Set 5
1 2 6 Common
1 3 Voice messages1
1 3 1 Listen to voice messages
1 3 2 Voice mailbox number
1 4 News & info service1
1 5 Service command editor
2Calllog
2 1 Missed calls1
2 2 Received calls1
2 3 Dialed calls
2 4 Clear call lists
2 5 Call timers
2 6 Show call costs1,4
2 7 Show costs in1
3Profiles
3 1 Normal
3 2 Silent
3 3 Meeting
3 4 Outdoor
3 5 Pager
3 6 Car2
3 7 Headset3
All manuals and user guides at all-guides.com
Table of contents
Other Nokia Cell Phone manuals

Nokia
Nokia 6700 classic User manual

Nokia
Nokia TA-1579 User manual

Nokia
Nokia Lumia 1020 RM-875 User manual

Nokia
Nokia C1-00 User manual

Nokia
Nokia TA-1068 User manual

Nokia
Nokia 220 4G User manual

Nokia
Nokia N75 User manual

Nokia
Nokia 3711 User manual

Nokia
Nokia 2600 classic User manual

Nokia
Nokia RH-59 Guide