Nokia 7 User manual

Nokia 7
User Guide
Issue 2019-10-10 en-IN

Nokia 7 User Guide
1 About this user guide
Important: For important information on the safe use of your device and battery,
read “For your safety” and “Product Safety” info in the printed user guide, or at
www.nokia.com/support before you take the device into use. To find out how to get started
with your new device, read the printed user guide.
© 2019 HMD Global Oy. All rights reserved. 2

Nokia 7 User Guide
Table of Contents
1 About this user guide 2
2 Get started 4
Keysandparts.......................................... 4
Insert or remove SIM and memory card . . . . . . . . . . . . . . . . . . . . . . . . . . . . 5
Chargeyourphone ....................................... 6
Switchonandsetupyourphone................................ 6
DualSIMsettings ........................................ 6
SettingupfingerprintID .................................... 7
Lockorunlockyourphone ................................... 7
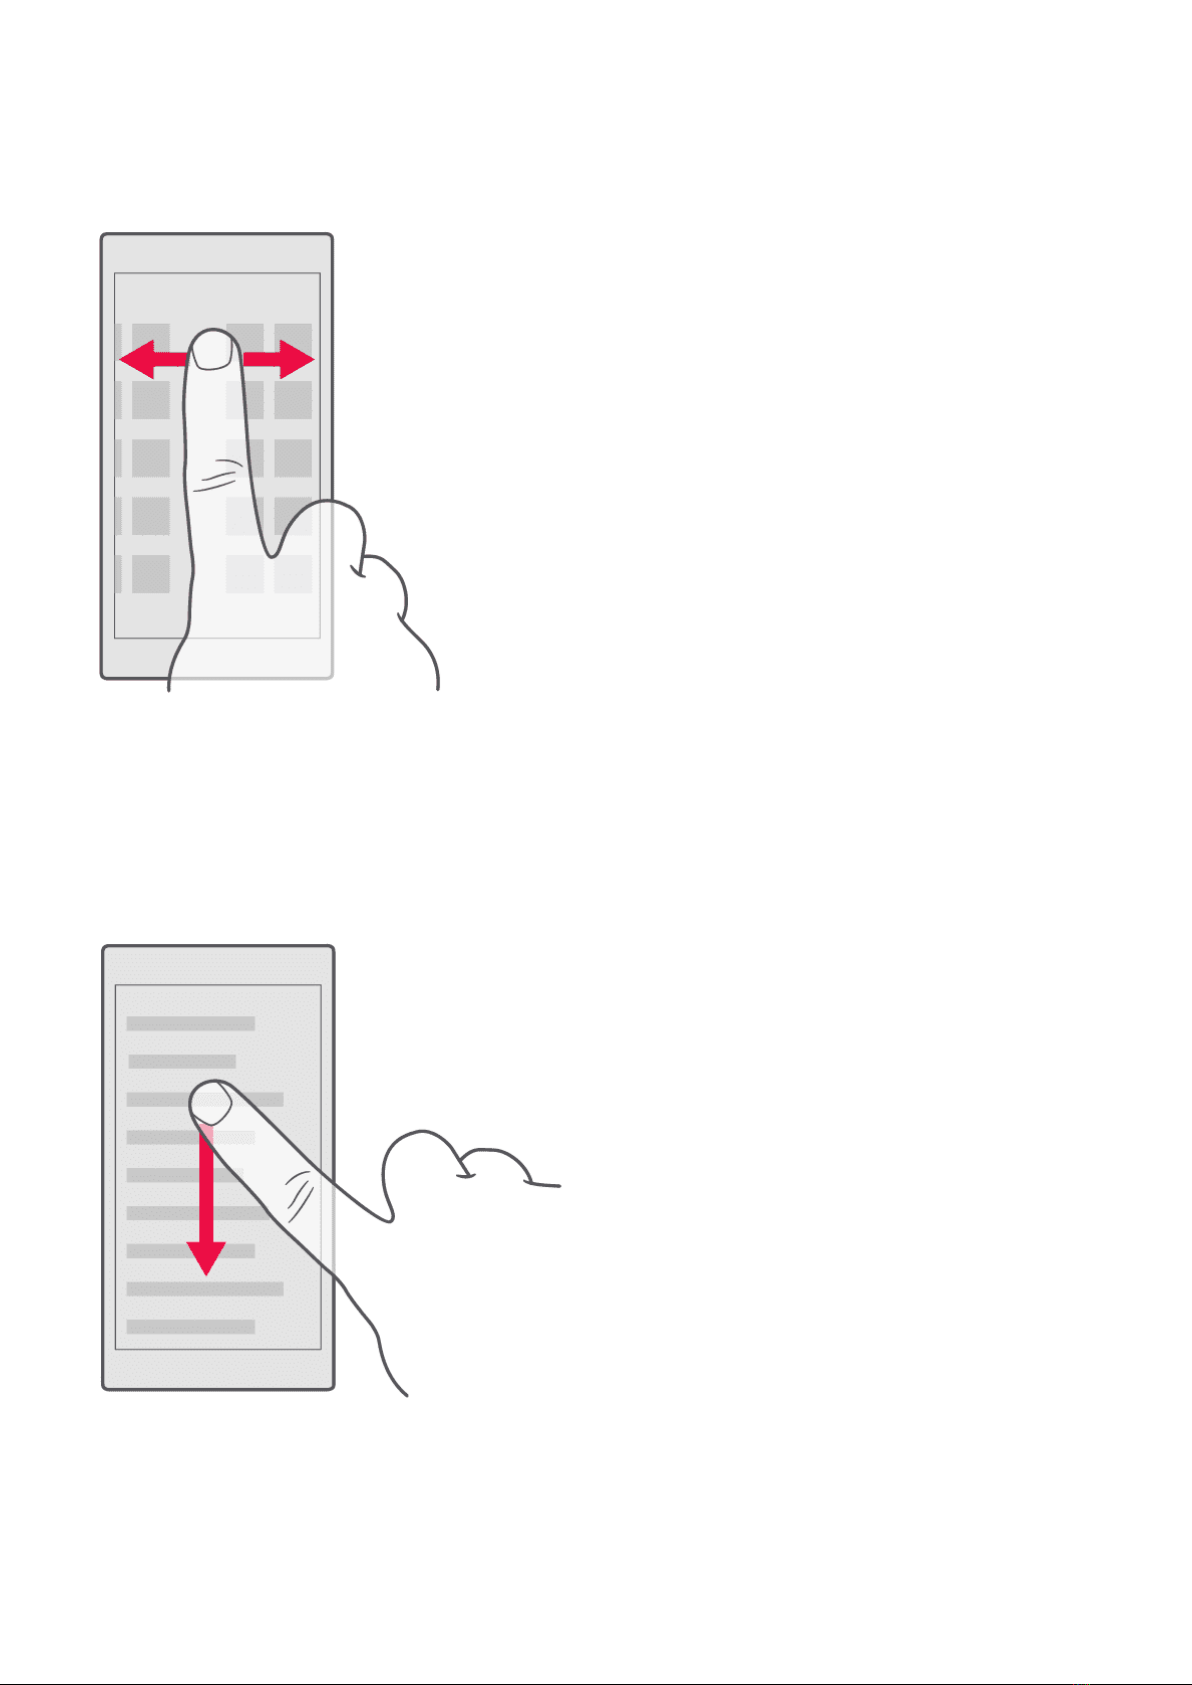
Usethetouchscreen ...................................... 8
3 Basics 11
Personaliseyourphone..................................... 11
Openandcloseanapp ..................................... 11
Notifications ........................................... 12
Controlvolume.......................................... 12
Screenshots ........................................... 13
Batterylife ............................................ 13
Saveondataroamingcosts .................................. 14
Writetext............................................. 15
Dateandtime .......................................... 16
Clockandalarm ......................................... 17
Calculator............................................. 18
Accessibility ........................................... 18
Notes ............................................... 19
4 Connect with your friends and family 20
Calls................................................ 20
Contacts ............................................. 20
Sendandreceivemessages .................................. 21
Getsocial............................................. 22
© 2019 HMD Global Oy. All rights reserved. 3

Nokia 7 User Guide
5 Camera 23
Camerabasics .......................................... 23
Useyourcameralikeapro ................................... 24
Save your photos and videos to a memory card . . . . . . . . . . . . . . . . . . . . . . . 25
Yourphotosandvideos..................................... 25
6 Internet and connections 27
ActivateWi-Fi........................................... 27
Useamobiledataconnection ................................. 27
Browsetheweb ......................................... 28
Closeaconnection........................................ 29
Bluetooth............................................. 30
NFC ................................................ 32
VPN ................................................ 33
7 Apps and services 35
AppStoreandpreloadedapps ................................. 35
8 Software updates and backups 37
Updateyourphonesoftware.................................. 37
Storage.............................................. 37
9 Protect your phone 39
Protect your phone with your fingerprint . . . . . . . . . . . . . . . . . . . . . . . . . . . 39
ChangeyourSIMPIN....................................... 39
Accesscodes........................................... 40
10 Product and safety information 41
Copyrightsandnotices ..................................... 41
© 2019 HMD Global Oy. All rights reserved. 4

Nokia 7 User Guide
2 Get started
KEYS AND PARTS
Explore the keys and parts of your new phone.
Your phone
1. Fingerprint sensor
2. Main camera
3. Audio connector
4. SIM card/MicroSD card
5. Front camera
6. Earpiece
7. Proximity sensor
8. Volume keys
9. Power/Lock key
10. Charger connector
11. Loudspeaker
12. Microphone
Parts and connectors, magnetism
Do not connect to products that create an output signal, as this may damage the device. Do
not connect any voltage source to the audio connector. If you connect an external device
or headset, other than those approved for use with this device, to the audio connector, pay
special attention to the volume levels.
© 2019 HMD Global Oy. All rights reserved. 5

Nokia 7 User Guide
Parts of the device are magnetic. Metallic materials may be attracted to the device. Do not
place credit cards or other magnetic stripe cards near the device for extended periods of time,
since the cards may be damaged.
INSERT OR REMOVE SIM AND MEMORY CARD
Insert SIM and memory card
1. Open the SIM tray and memory card tray by putting the provided tray opener into the hole
next to the tray.
2. Put the nano-SIM into the slot 1 located on the tray with the contact area face down. If you
have a second SIM, put it into the slot 2, or, if you have a memory card, put the card into the
memory card slot located in the SIM slot.
3. Slide the SIM and memory card trays back into the slot.1
Note: If you have a dual SIM variant with only one SIM tray, you cannot use two SIM cards and
a memory card at the same time.
Remove SIM and memory card
Open the SIM and memory card trays, remove the cards, and slide trays back into their
respective slots.
1Use only original nano-SIM cards. Use of incompatible SIM cards may damage the card or the
device, and may corrupt data stored on the card.
© 2019 HMD Global Oy. All rights reserved. 6

Nokia 7 User Guide
CHARGE YOUR PHONE
Charge the battery
1. Plug a compatible charger into a wall outlet.
2. Connect the cable to your phone.
Your phone supports the USB-C cable. You can also charge your phone from a computer with a
USB cable, but it may take a longer time.
If the battery is completely discharged, it may take several minutes before the charging
indicator is displayed.
SWITCH ON AND SET UP YOUR PHONE
When you switch your phone on for the first time, your phone guides you to set up your
network connections and phone settings.
Switch on your phone
1. To switch on your phone, press and hold the power key until the phone vibrates.
2. When the phone is switched on, choose your language and region.
3. Follow the instructions shown on your phone.
DUAL SIM SETTINGS
You can have 2 SIMs in your phone, for example, one for your work and one for your personal
use.
Note: On dual SIM capable devices, both SIM1 and SIM2 slots support 4G networks. However,
if your SIM1 and SIM2 are both LTE SIM cards, the primary SIM supports 4G/3G/2G networks,
while the secondary SIM can only support 3G/2G. For more information on your SIM cards,
contact your service provider.
© 2019 HMD Global Oy. All rights reserved. 7

Nokia 7 User Guide
Choose which SIM to use
When, for example, making a call, you can choose which SIM to use by tapping the
corresponding SIM 1 or SIM 2 button after you dial the number.
Your phone shows the network status for both SIMs separately. Both SIM cards are available
at the same time when the device is not being used, but while one SIM card is active, when, for
example, making a call, the other may be unavailable.
Manage your SIMs
Don’t want work to interfere with your free time? Or do you have a cheaper data connection on
one SIM? You can decide which SIM you want to use.
Tap Settings > SIM Cards .
Rename a SIM card
Tap the SIM you want to rename, and type in the name you want.
Select which SIM to use for calls or data connection
Under Preferred SIM for , tap the setting you want to change and select the SIM.
SETTING UP FINGERPRINT ID
You can unlock your phone with just a touch of your finger. Set up your fingerprint ID for extra
security.
Add a fingerprint
1. Tap Settings > Security > Fingerprint . If you don’t have screen lock set up on your
phone, tap SET UP SCREEN LOCK .
2. Select which backup unlocking method you want to use for the lock screen and follow the
instructions shown on your phone.
LOCK OR UNLOCK YOUR PHONE
Lock your phone
If you want to avoid accidentally making a call when your phone is in your pocket or bag, you
can lock your keys and screen.
To lock your keys and screen, press the power key.
© 2019 HMD Global Oy. All rights reserved. 8

Nokia 7 User Guide
Unlock the keys and screen
Press the power key and swipe up across the screen. If asked, provide additional credentials.
USE THE TOUCH SCREEN
Important: Avoid scratching the touch screen. Never use an actual pen, pencil, or other sharp
object on the touch screen.
Tap and hold to drag an item
Place your finger on the item for a couple of seconds and slide your finger across the screen.
© 2019 HMD Global Oy. All rights reserved. 9

Nokia 7 User Guide
Swipe
Place your finger on the screen and slide your finger in the direction you want.
Scroll through a long list or menu
Slide your finger quickly in a flicking motion up or down the screen and lift your finger. To stop
the scrolling, tap the screen.
© 2019 HMD Global Oy. All rights reserved. 10

Nokia 7 User Guide
Zoom in or out
Place 2 fingers on an item, such as a map, photo, or web page, and slide your fingers apart or
together.
Lock the screen orientation
The screen rotates automatically when you turn the phone 90°.
To lock the screen in portrait mode, swipe down from the top of the screen and tap
Auto-rotate to switch to Portrait .
Use the navigation keys
To see which apps you have open, tap the Overview key .
To switch to another app, tap the app you want. To close an app, tap the icon next to it.
To go back to the previous screen, tap the Back key . Your phone remembers all the apps and
websites you‘ve visited since the last time your screen was locked.
To go to the home screen, tap the Home key . The app you were in stays open in the
background.
Open two apps at once
For easier navigation between apps, press and hold the overview key to divide the screen
between two apps. To go back to normal view, press and hold the overview key again.
© 2019 HMD Global Oy. All rights reserved. 11

Nokia 7 User Guide
3 Basics
PERSONALISE YOUR PHONE
Learn how to personalise the Home screen and how to change ringtones.
Change your wallpaper
Tap Settings > Display > Wallpaper .
Change your phone ringtone
1. Tap Settings > Sound .
2. Tap SIM1 Phone ringtone or SIM2 Phone ringtone to select the ringtone for respective
SIMs.
Change your message notification ringtone
Tap Settings > Sound > Default notification ringtone .
OPEN AND CLOSE AN APP
Open an app
On the home screen, tap an app icon to open it. To open one of the apps running in the
background, tap , and select the app.
Close an app
Tap , and then tap on the app you want to close.
Find your apps
On the home screen, swipe up from the bottom of the screen to see all your apps.
Close all running apps
Press , swipe up through all apps, and tap CLEAR ALL .
© 2019 HMD Global Oy. All rights reserved. 12

Nokia 7 User Guide
NOTIFICATIONS
Stay in touch with what‘s happening on your phone with notifications.
Use the notification panel
When you receive new notifications, such as messages or missed calls, indicator icons appear
on the status bar at the top of the screen. To see more information about the notifications,
drag the status bar down. To close the view, swipe up on the screen.
To open the notification panel, drag the status bar down. To close the notification panel, swipe
up on the screen.
To change the notification settings of an app, tap Settings > Notifications and tap the app
name to open the app settings.
Use the quick setting icons
To activate certain features, tap the quick settings icons on the notification panel. To see more
icons, drag the menu down.
To rearrange the icons, tap , tap and hold an icon, and then drag it to another location.
CONTROL VOLUME
Change the volume
If you have trouble hearing your phone ringing in noisy environments or calls are too loud, you
can change the volume to your liking by using the volume keys on the side of your phone.
© 2019 HMD Global Oy. All rights reserved. 13

Nokia 7 User Guide
Do not connect to products that create an output signal, as this may damage the device. Do
not connect any voltage source to the audio connector. If you connect an external device
or headset, other than those approved for use with this device, to the audio connector, pay
special attention to the volume levels.
Change the volume for media and apps
Press a volume key on the side of your phone to see the volume status bar, tap , and drag
the slider on the volume bar for media and apps left or right.
Set the phone to silent
Press a volume key on the side of your phone, and tap to switch to silent.
Tip: Don’t want to keep your phone in silent mode, but can’t answer right now? To silence an
incoming call, press the volume down key. You can also set your phone to mute the ringing
when you pick the phone up: tap Settings > Motion > Mute on pickup .
If you want to be able to quickly reject a call, tap Settings > Motion >
Turn over to reject call . When there is an incoming call, turn the phone over to reject the
call.
SCREENSHOTS
Take a screenshot
To take a screenshot, open the notification panel, and drag the status bar down. Tap
Screen capture . You can view the captured images in Gallery.
It is not possible to capture a screenshot while using some apps and features.
BATTERY LIFE
Extend battery life
To save power:
1. Charge wisely: Always charge the battery
fully.
2. Select only the sounds that you need:
Mute unnecessary sounds, such as key
press sounds. Tap Settings > Sound , and
under Other sounds , select which sounds
to keep.
3. Use wired headphones, rather than the
loudspeaker.
4. Change the phone screen settings: Set the
phone screen to switch off after a short
time. Tap Settings > Display > Sleep
and select the time.
© 2019 HMD Global Oy. All rights reserved. 14

Nokia 7 User Guide
5. Lower the screen brightness: Tap
Settings > Display > Brightness level .
Make sure that Adaptive brightness is
unabled. To adjust the brightness, drag
the Brightness level slider.
6. Stop apps from running in the background:
Press , and close the apps you don’t
need.
7. Enable the Background activity manager.
The notifications of some apps or emails
may not be able to be retrieved instantly.
You can manage the battery life by adding
or removing the apps to or from the
whitelist. Tap Settings > Battery >
Background activity manager .
8. Enable Battery saver . Tap Settings >
Battery > Battery saver , and switch to
On .
9. Use location services selectively: Switch
location services off when you don’t need
them. Tap Settings > Location , and
switch to Off .
10. Use network connections selectively:
Switch Bluetooth on only when needed.
Use a Wi-Fi connection to connect to
the internet, rather than a cellular data
connection. Stop your phone scanning for
available wireless networks. Tap Settings
> Wi-Fi , and switch to Off . If you’re
listening to music or otherwise using
your phone, but don’t want to make or
receive calls, switch Airplane mode on. Tap
Settings > More > Airplane mode .
Airplane mode closes connections to the cellular network and switches your device’s wireless
features off.
SAVE ON DATA ROAMING COSTS
You can cut data roaming costs and save on your phone bills by changing cellular data settings.
To use the optimal connection method, change the Wi-Fi and cellular networks settings. Data
roaming means using your phone to receive data over networks that your network service
provider doesn’t own or operate. Connecting to the internet when roaming, especially when
abroad, can increase data costs substantially. Using a Wi-Fi connection is generally faster and
less expensive than using a cellular data connection. If both Wi-Fi and cellular data connections
are available, your phone uses the Wi-Fi connection.
Connect to a Wi-Fi network
1. Tap Settings > Wi-Fi .
2. Make sure Wi-Fi networking is switched to On .
3. Select the connection you want to use.
Close the cellular data connection
Swipe down from the top of the screen, tap and switch Cellular data to Off .
To follow your data usage, tap Settings > Data usage .
© 2019 HMD Global Oy. All rights reserved. 15

Nokia 7 User Guide
Stop data roaming
Tap Settings > More > Cellular networks , and switch Data roaming off.
WRITE TEXT
Learn how to write text quickly and efficiently using your phone’s keyboard.
Use the on-screen keyboard
Writing with the on-screen keyboard is easy. You can use the keyboard when holding your
phone in portrait or landscape mode. The keyboard layout can vary in different apps and
languages.
To open the on-screen keyboard, tap a text box.
Switch between upper and lower case characters
Tap the shift key. To switch caps lock mode on, double-tap the key. To return to normal mode,
tap the shift key again.
Enter a number or special character
Tap the numbers and symbols key. Some special character keys bring up more symbols. To see
more symbols, tap and hold a symbol or special character.
Insert emojis
Tap the emoji key and select the emoji.
Copy or paste text
Tap and hold a word, drag the markers before and after the word to highlight the section you
want to copy and tap COPY . To paste the text, tap where you want to paste the text and select
PASTE .
Add an accent to a character
Tap and hold the character, then tap the accent or the accented character, if supported by your
keyboard.
© 2019 HMD Global Oy. All rights reserved. 16

Nokia 7 User Guide
Delete a character
Tap the backspace key.
Move the cursor
To edit a word you just wrote, tap the word and drag the cursor to the place you want.
Use keyboard word suggestions
Your phone suggests words as you write, to help you write quickly and more accurately. Word
suggestions may not be available in all languages.
When you start writing a word, your phone suggests possible words. When the word you want
is shown in the suggestion bar, select the word. To see more suggestions, tap and hold the
suggestion.
Tip: If the suggested word is marked in bold, your phone automatically uses it to replace the
word you wrote. If the word is wrong, tap and hold it to see a few other suggestions.
If you do not want the keyboard to suggest words while typing, turn off the text corrections.
Tap Settings > Languages & input > Virtual keyboard . Select the keyboard you normally
use. Tap Text correction and switch off the text correction methods you do not want to use.
Correct a word
If you notice that you have misspelled a word, tap it to see suggestions for correcting the word.
Switch spell checker off
Tap Settings > Languages & input > Spell checker , and switch Spell checker to Off .
DATE AND TIME
Keep track of time – learn how to use your phone as a clock, as well as an alarm clock, and how
to keep your appointments, tasks, and schedules up to date.
Set date and time
Tap Settings > Date & time .
© 2019 HMD Global Oy. All rights reserved. 17

Nokia 7 User Guide
Update the time and date automatically
You can set your phone to update the time, date, and time zone automatically. Automatic
update is a network service and may not be available depending on your region or network
service provider.
1. Tap Settings > Date & time .
2. Tap Automatic date & time > Use network-provided time .
3. Switch Automatic time zone on .
Change the clock to the 24-hour format
Tap Settings > Date & time , and switch Use 24-hour format on.
CLOCK AND ALARM
Your clock is not just for alarms – learn what else you can do.
Use the countdown timer
No more overcooking – use the countdown timer to measure your cooking times.
1. Tap Clock > TIMER .
2. Set the duration of the timer.
Use the stopwatch
Use the stopwatch to see how you improve on the running track.
Tap Clock > STOPWATCH .
Set an alarm
You can use your phone as an alarm clock.
1. Tap Clock > ALARM .
2. To add an alarm, tap .
3. To modify an alarm, tap it. To set the alarm to repeat on specific dates, select Repeat and
highlight the days of the week.
© 2019 HMD Global Oy. All rights reserved. 18

Nokia 7 User Guide
Set an alarm to Snooze
If you don’t want to get up just yet, when the alarm sounds, swipe the alarm left. To adjust the
snooze length, tap Clock > > Settings > Snooze length and select the desired length.
Switch an alarm off
When the alarm sounds, swipe the alarm right.
Delete an alarm
Tap Clock > ALARM . Select the alarm and tap Delete .
CALCULATOR
Forget your pocket calculator – there’s a calculator on your phone.
Use the calculator
Tap Calculator .
To use the advanced calculator, swipe the bar from the right edge of the screen to the left.
ACCESSIBILITY
You can change various settings to make using your phone easier.
Increase or decrease the font size
Do you want to have larger fonts on your phone?
1. Tap Settings > Accessibility .
2. Tap Font size . To increase or decrease the font size, drag the Font size slider.
Increase or decrease the display size
Do you want to make the items on your screen smaller or larger?
1. Tap Settings > Accessibility .
2. Tap Display size and adjust the display size by dragging the display size level slider.
© 2019 HMD Global Oy. All rights reserved. 19

Nokia 7 User Guide
NOTES
Make a note
Notes on paper are easy to lose. Instead, jot them down with the Note app. This way, you
always have your notes with you.
1. To take a note, tap Note > .
2. Write a note.
Your notes are automatically saved.
© 2019 HMD Global Oy. All rights reserved. 20
Table of contents
Other Nokia Cell Phone manuals

Nokia
Nokia 6700 slode User manual

Nokia
Nokia N81 User manual

Nokia
Nokia 6350 User manual

Nokia
Nokia Lumia 1020 User manual

Nokia
Nokia Communicator 9210 User manual

Nokia
Nokia 8110 4G User manual

Nokia
Nokia N76-1 User manual

Nokia
Nokia C5-03 GSM Phone C5-03 User manual

Nokia
Nokia TA-1270 Specification sheet

Nokia
Nokia TA-1288 Specification sheet