Numatic NX300 User manual

Original Instructions
numatic.com
CAUTION, Read instructions before using the machine
Keep for future reference
GBGB
TTB1840 36V
BATTERY
SCRUBBER DRYER
GBGB

2
In the event of a breakdown contact
your Numatic dealer or the
Numatic Technical
help line +44 (0)1460 269268
Machine Overview ................................. Pages 2-3
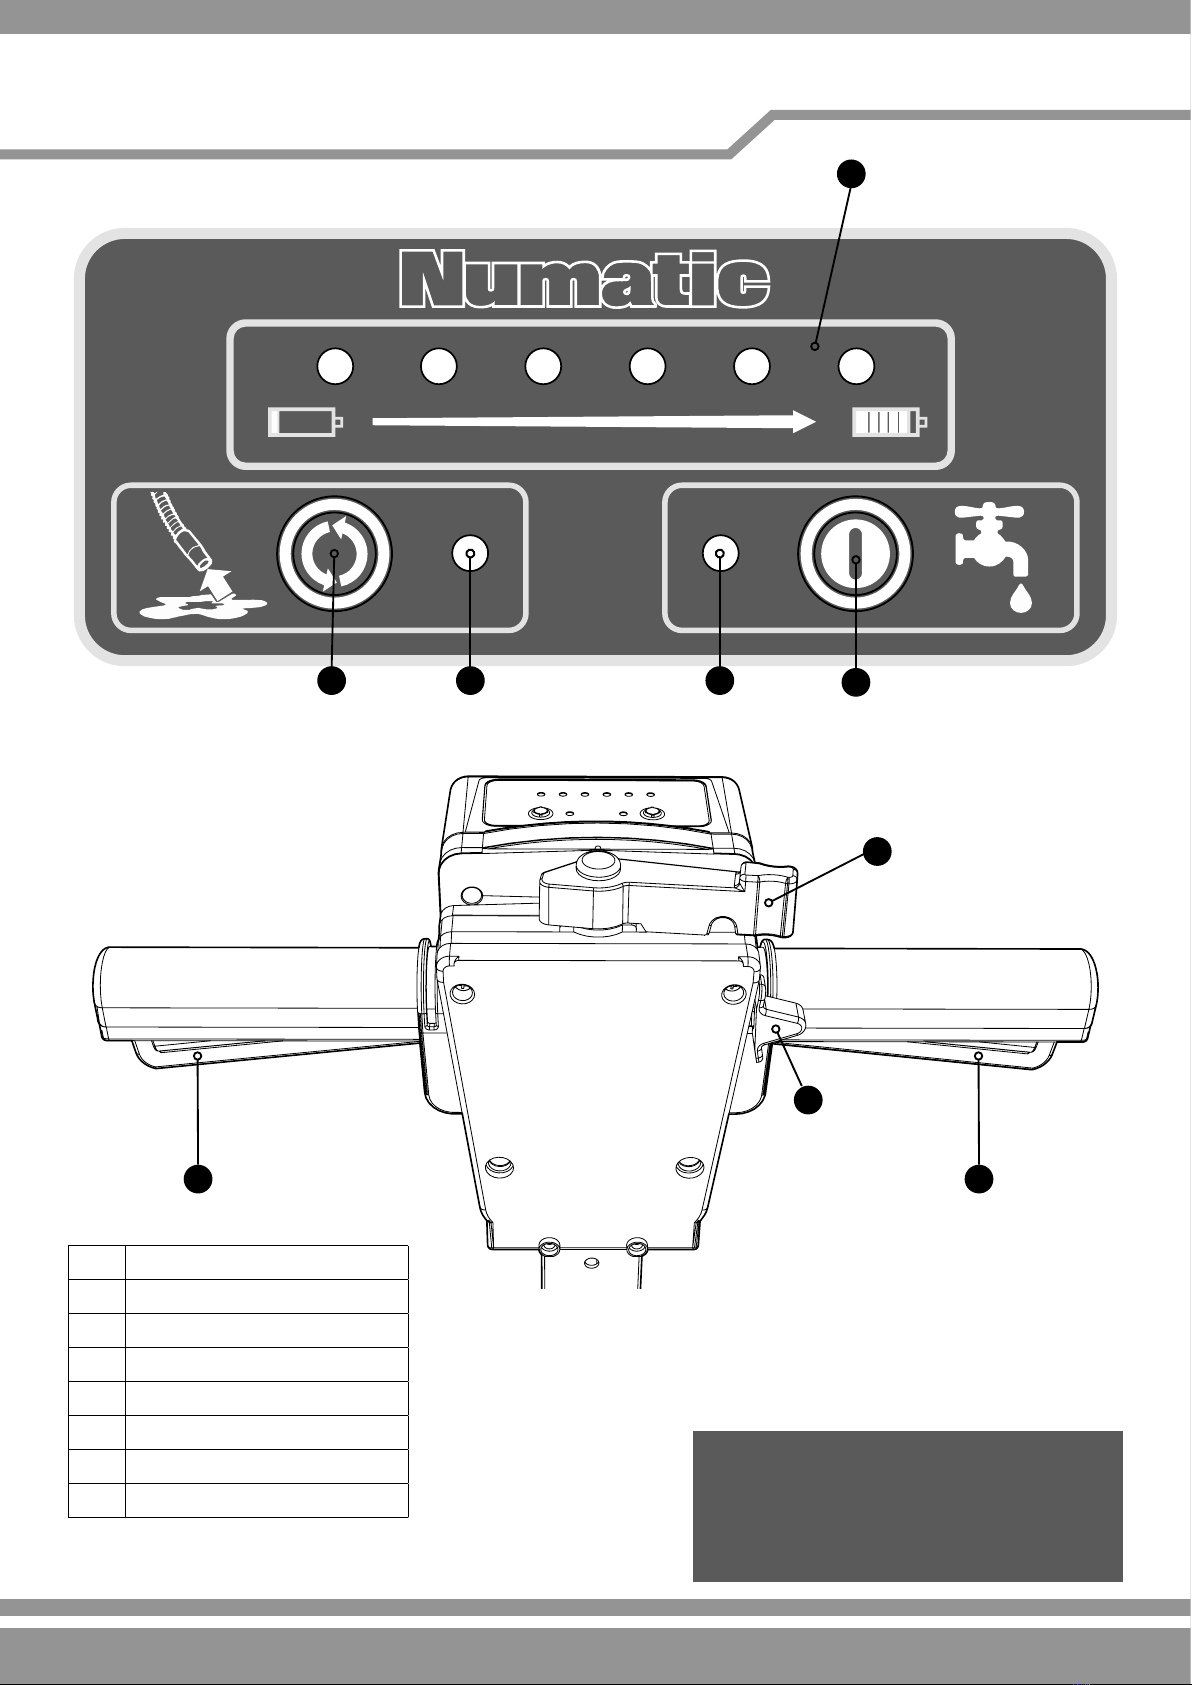
Control Panel Overview ................................. Page 4
Quick Set up Guide ................................. Page 5
Machine Set up Guide ................................. Page 6-7
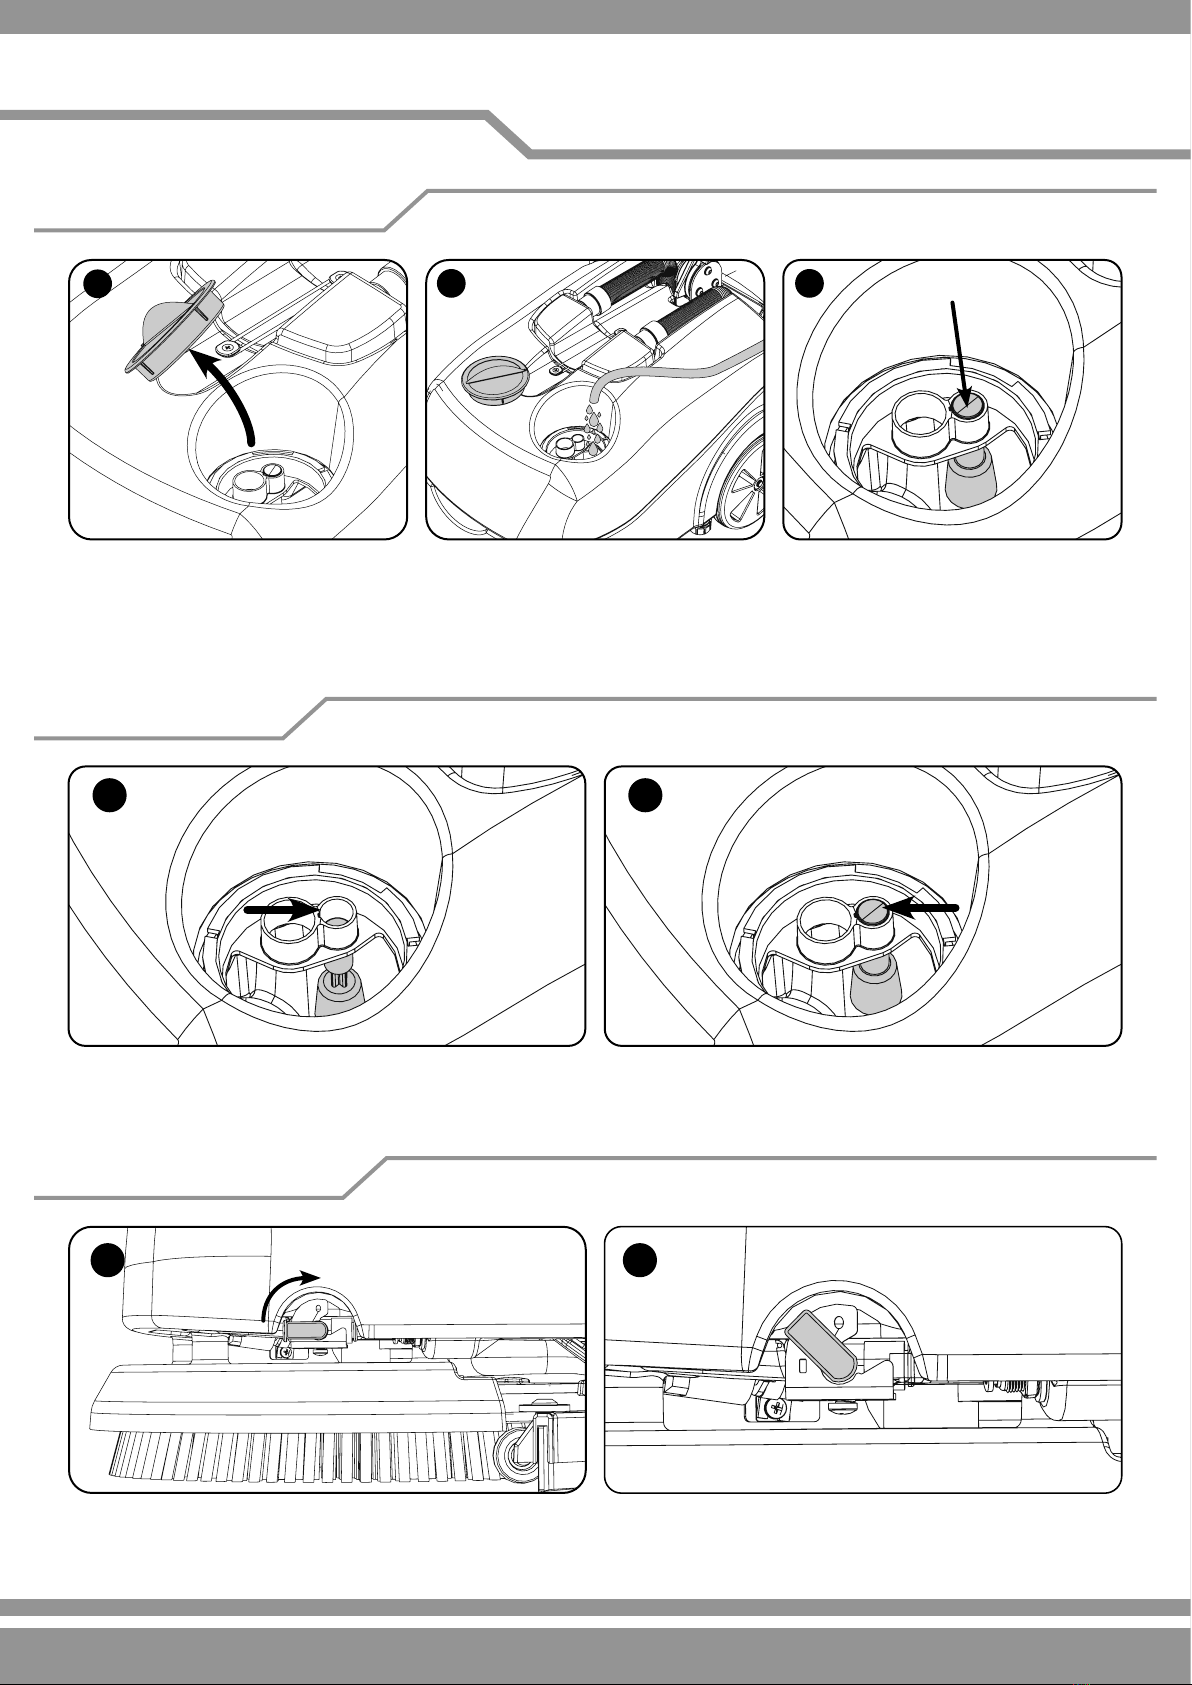
Fitting the Brush / Pad ................................. Page 6
Fitting the Floor-tool ................................. Page 6
Filling the Clean Water Tank ........................... Page 7
Fill Level Indicator ............................... Page 7
Water Flow Adjustment ................................. Page 7
Machine Operation ................................. Pages 8-9
Setting the Cleaning Controls ......................... Page 8
System Error Indicators ................................. Page 8
Raising/Lowering Floor-tool.............................. Page 9
Machine in Use ................................. Page 9
Regular Maintenance ................................. Page 10
Emptying Top/Bottom Tank............................... Page 10
Separator ................................. Page 10
Changing Floor-tool Blades ............................. Page 11
......................... Page 11
Lifting the Machine ................................. Page 12
Specications ................................. Page 13
Trouble Shooting ................................. Page 13
About the Machine ................................. Page 14
Rating Label / PPE / Recycling ....................... Page 14
Twintec Maintenance ................................. Page 14
Information for Scrubber Dryer .................... Page 15
Battery Information ................................. Pages 16-19
Recommended Spare Parts ............................. Page 19
Schematic Diagram ................................. Page 20
Warranty ................................. Page 21
EU Declaration Document ........................... Page 22
Company Address ................................. Page 24
Index
After the removal of all the packaging,
carefully open and check the contents
●Owner Manual
• Battery & Charger Manual
●Battery Charger & Lead
●Battery●Scrub Brush
●Squeegee Assembly
PLEASE READ
BEFORE COMMENCING
OPERATION.
KEEP FOR FUTURE REFERENCE
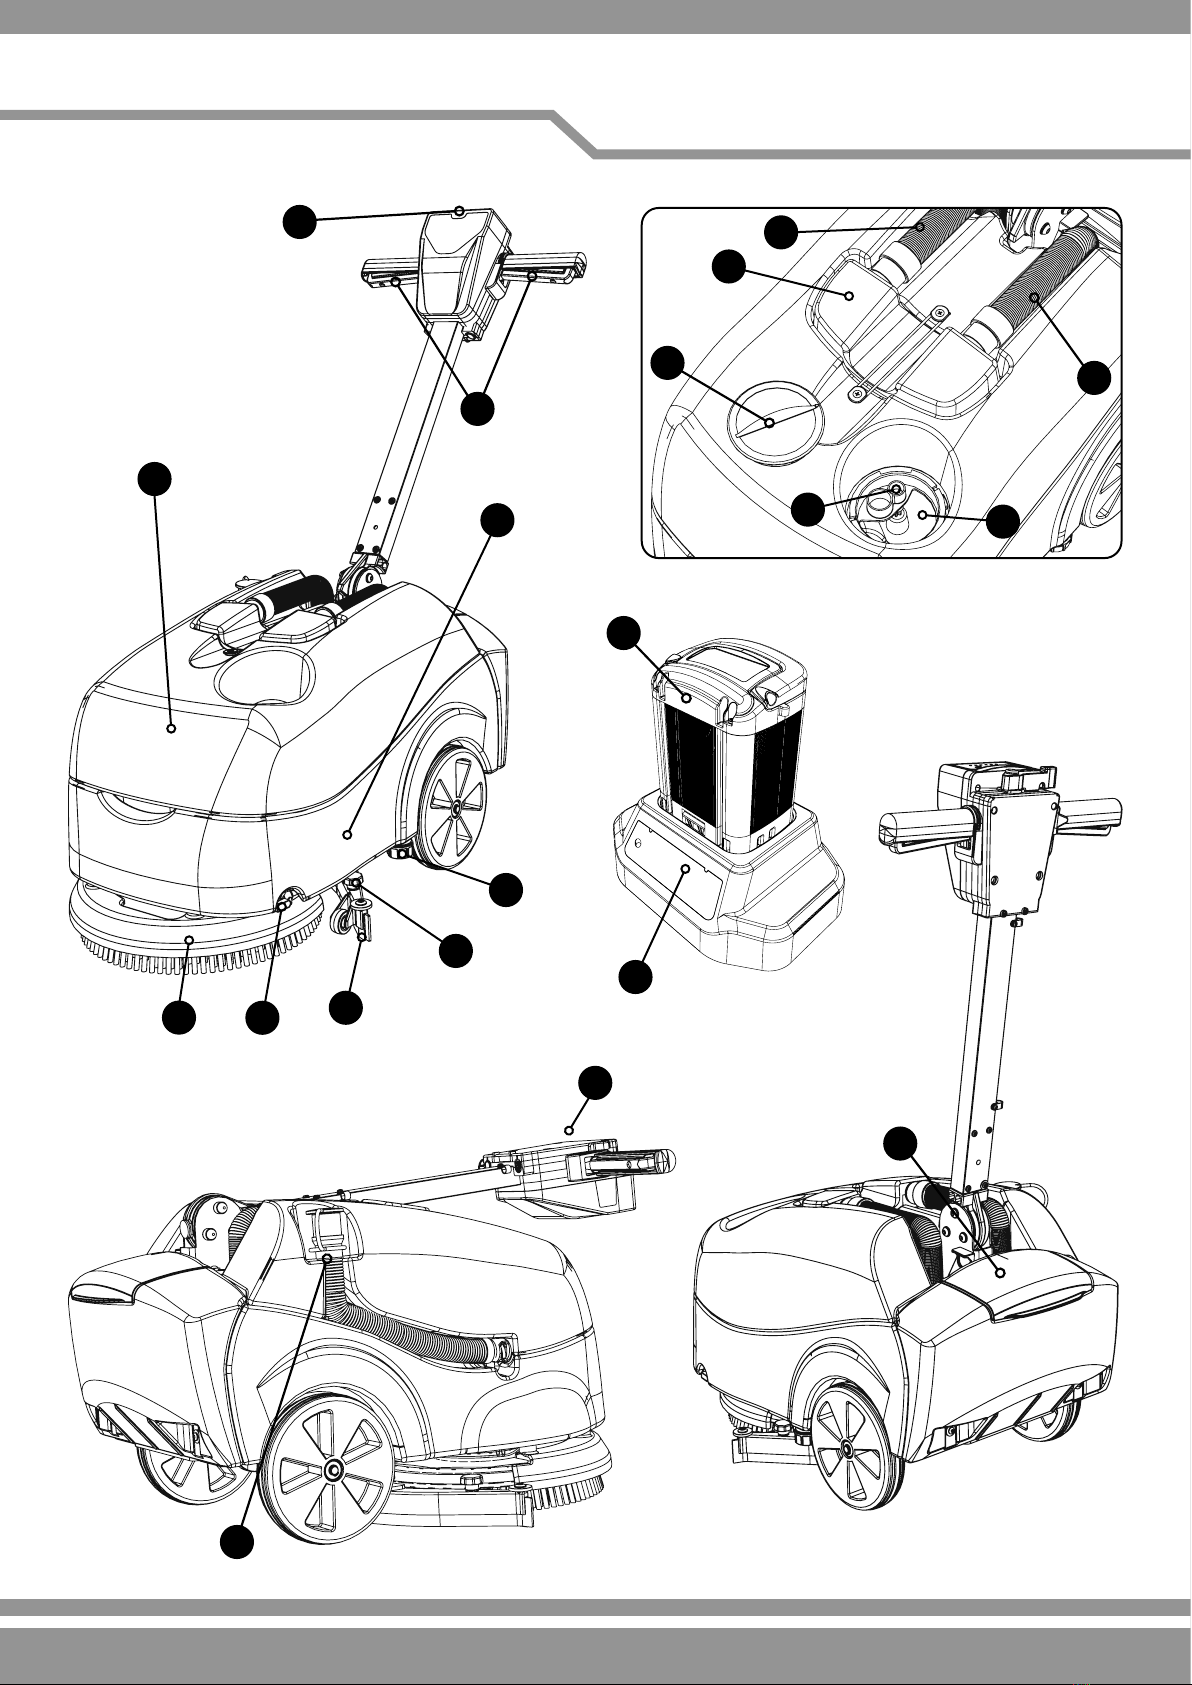
Machine Overview
1Operator control panel ( see page 4 )
2Triggers
3Waste-water tank
4Clean-water tank
5Brush deck
6Squeegee blades
7Floor-tool retaining knobs
8
9Clean-water emptying cap
10 Floor-tool vacuum hose
11 Vacuum hose
12 Separator
13
14 Clean-water level indicator
15
16 Start Switch
17 Top tank (waste water) drainage hose
18 Battery compartment
19 Battery
20 Battery charger

3
4
3
9
5
13
16
12
18
17
11
10
19
20
15
2
1
8
6
7
14
Machine Overview

4
In the event of a breakdown contact
your Numatic dealer or the
Numatic Technical
Help line +44 (0)1460 269268
Control Panel Overview
1Battery Charge Level Display
2
3Water Flow Indicatorv
4
5
6Handle Position Lever
7Start Switch
8Triggers
1
4
3
5
8
8
6
7
2

5
!
Using the handle position lever, (Fig.1)
Move the handle into the upright position,
(Fig.2)
Fill the clean-water tank to Max of 18 litresSlide the battery into the
battery compartment (Fig.6)
sealed correctly. (Fig.7)
7
8
6
Slide the brush / pad under the brush deck
(Fig.3).
Fit the brush / pad onto the Nulock drive
chuck, twist to lock the brush / pad in
place (Fig.4).
3
4
5
1
2
ALWAYS ENSURE THAT THE FLOOR IS PRE-SWEPT
AND RELEVANT SAFETY SIGNS ARE DISPLAYED.
TTB 1840 36V CONTENTS
●OwnerManual
●Battery&ChargerManual
●BatteryCharger&Lead
●Battery
●ScrubBrush
●SqueegeeAssembly
Quick Set-up Guide
PLEASE READ BEFORE COMMENCING ANY OPERATION. AFTER THE REMOVAL OF ALL
THE PACKAGING, CAREFULLY OPEN AND CHECK THE CONTENTS.
!
!
!
!

6
3
NOTE:Itiseasiertottheoor-tooliftheweightofthemachineisrestingonthebrush.Ensurethebrushisttedrst.
Fitting the Brush / Pad / Turn on water
Fitting the Floor-Tool
Machine Set-up Guide
400mm Brush / 360mm Pad.
Featuring the Nulock brush system.
Slide the brush / pad under the brush deck.
Fit the brush / pad onto the Nulock drive chuck, twist to lock the brush / pad in place.
Safety gloves are recommended for the changing of used brushes.
Turn on the clean water tap.
1
2
ALWAYS ENSURE THAT THE MACHINE IS SWITCHED OFF
BEFORE MAKING ANY ADJUSTMENTS
!
!
the machine. (Fig.1).
Secure to the carrier using the two knobs
(Fig.2) - (Fig.3).
Do not over tighten the retaining knobs.
Ensure inspection cap is in place on the
(See Page 11).
4
5

7
Machine Set-up Guide
Fill Level Indicator
A
B
Showing the clean-water tank full
(Fig.B)
Showing the clean-water tank empty
(Fig.A)
Water Flow Adjustment
1
2
Set the tap to enable the cleaning solution .(Fig.2).
2
3
Filling the Clean Water Tank
NOTE: Great care must be taken to ensure that contaminants (leaves, hair, dirt, etc.) are not allowed to enter the clean
watertankduringthellingprocess.Ifusingasuitablecontainer,ensureitisalwayscleanandfreefromdebris.
The TTB1840 is equipped with a large 18 litre clean-water tank allowing large
Fill Indicator
1

8
To check the battery level pull
one of the Triggers or press
button (A).
F
System Error Indicators
*Releasing the handle triggers will allow the machine to reset.
Machine Operation
pull either trigger and press the Start switch (A).
Note: that the start switch (A) must be pressed after the
trigger is pulled.
The running state of the vacuum and water can be adjusted
with or without the brush running. First pull one of the triggers
then press the vacuum and water buttons to set the desired
operation .These states will be stored for use when the machine
is restarted.
When the Triggers are released the brush motor and the
continue for 10 seconds.
To Enable /Disable Vacuum press button (D).
Note: that the vacuum can only be stopped by pressing the
B
Setting the Cleaning Controls
A
Trigger Trigger
On /
C
D
Number
of
Flashes
Priority Description Solution
1 Low Low Battery
Replace, Charge
Batteries
2 High Battery over temp *Reset Machine
3 High Battery
communications fail
*Reset Machine
4 High Control board over
temperature
*Reset Machine
5 High System power
exceeded
*Reset Machine
6 High Vacuum overload *Reset Machine
7 High Brush overload *Reset Machine
8 High Control board failed Renew (contact
service dept)
The errors are split into two groups, low and high priority.
Low priority errors are to be expected in normal operation
and are represented by the left-hand battery light ashing.
High priority errors indicate something more serious has
happened and are represented by all six battery lights
ashing
.
! !
IMPORTANT
If the brush motor keeps overloading consider using a dierent type of brush.
Heavy brush load decreases the available battery run time.

9
Machine Operation
Lift the lever near the base of the handle and lock into position.
Raising/Lowering the Floor-tool
switches, pull trigger(s).
Overlap each scrubbing path by 10cm to ensure an even clean.
Do not operate the machine on slopes that exceed (2%),when full.
NOTE: Care must be taken to reduce speed when cornering or when
manoeuvring around obstacles
Machine In Use
! !
WHEN HANDLING CHEMICALS
Only use chemicals recommended for use in auto scrubber-dryers.
!IMPORTANT
Do not operate machine unless the
Operator Manual has been read
and fully understood.
!

10
Regular Maintenance
1
2
3
! !
ALWAYS ENSURE THAT THE BATTERY IS REMOVED
PRIOR TO ANY MAINTENANCE OPERATION
Remove the two hoses to disconnect the separator from the
machine (1 & 2).
should be examined at every clean-down (4).
Rinse using clean water.
A
4
B
6
5
Seperator
After use, empty waste-water tank using
Emptying Top Tank
The clean-water tank can be drained via
of the machine. There is a sealing bung
beneath the red cap (ensure the sealing
bung is clean) The cap should only be
Emptying Bottom Tank

11
Rettingtheoor-toolblades
Floor-tool Overview
1. Retaining knobs x 4
2. Front blade (slotted)
3. Blade carrier
4. Rear blade
!!
5
4
3
2
1
(Fig.B).
Note: The blades are designed to be reversible, thus extending their useful working life.
A
1
2
3
B
Replace the Squeegee blades using
replacement blade set (Fig.3),
location lugs.
Remove the blade holder (Fig.2).Unscrew the four knobs securing the
blade holder (Fig.1).
Changing the Floor-Tool Blades
! !
ALWAYS ENSURE THAT THE BATTERY IS REMOVED
PRIOR TO ANY MAINTENANCE OPERATION

12
Fold handle and
lock in to position
Lifting the Machine
Lift Points
Front Back
Machine
Dry Weight
34 kg
2 Person

13
Failure to rectify the problem or in the event of a breakdown contact your Numatic dealer or
Numatic Technical helpline +44 (0)1460 269268
Trouble Shooting
Specications
Model - TTB1840 36V
Brush
Motor
Vac
Motor
Brush
Sizes
Pad
sizes
Net
Weight
Gross
Weight (Full)
100 W 400 mm 360 mm 34 kg
Protection
Class *Run Time Water
Capacity
Fluid
Flow
Sound Pressure (LpA)
Uncertainty (KpA) Cleaning speed
IPX4 *60 Min 18 L 0 - 0.7L/Min dB(A)
0 - 4.2 KPH
Brush
Speed
Brush
Pressure
Pad
Pressure Dimensions Hand Arm
Vibration *Charge Time
24.61g/cm22
Height = 1132 mm
1.7 m/s2*80%=60 Min
*100%=120 Min
*Run and Recharge times may vary dependent on ambient temperature.
PROBLEM CAUSE SOLUTION
Machine will not operate Battery not inserted correctly
Low battery charge
Faulty battery
Recharge battery (See battery & charger instructions)
Vacuum not operating Vacuum not turned on
If vacuum light on but no vacuum
operation
Turn on vacuum (page 8)
Contact service agent
Poor water pick-up Waste-water tank full
Clogged / blocked vacuum hose
Loose hose connections
Poor separator seal
Damaged separator seal
Damaged / split vacuum hose
Empty waste-water tank (page 10)
Remove and clean (page 10)
Push tight connections (page 10)
Remove and clean (page 10)
Renew (contact service dept)
No brush / scrub function
Brush overloaded
Reset machine (page 8)
Clean-water tank empty
Fill clean-water tank (page 7)
Adjust tap as desired (page 6/7)
Remove and clean
operating
Too much load on the brush system If cut out engages then the surface is to rough & an
alternative machine may be required

14
About the Machine
Rating Label
1Company Name & Address
2Model
3Voltage / Direct Current
Rated Input Power
WEEE Logo
6Ingress Protection
7Max Gradient
8Approval Mark
9Weight (ready to use)
10 Machine yr/wk Serial Number
11 Model
12 Noise Rating
13 Hand Arm Vibration
7
9
8
10
11
12
13
1
2
3
4
WEEE (Waste, Electrical and Electronic Equipment)
Scrubber dryer Accessories and packaging should be sorted for environmentally-friendly recycling.
Only for UK / EU countries.
Do not dispose of scrubber-dryer into household waste.
According to the European Directive 2012/19/EU on waste electrical electronic equipment and its incorporation into national law.
Scrubber-dryers that are no longer suitable for use must be separated, collected and sent for
recovery in an environmentally-friendly manner.
Ear Protection Safety Footwear Head Protection Safety Gloves
Dust / Allergens
Protection
Eye Protection Protective Clothing Hi-Vis Jacket Caution
Wet Floor Sign
PPE (Personal protective equipment) that may be required for certain operations.
Note: A risk assessment should be conducted to determine which PPE should be worn.
Daily
Keep the machine clean.
Check for any worn or damaged parts and replace immediately.
Drain and rinse dirty water tank after every use.
Store machine with brush deck secured in tilted position.
Weekly – as daily and –
Check brush or pad and skirt and rinse.
Batteries
Always re-charge the batteries after use.
TwinTec
Maintenance
6
In the event of a breakdown contact your Numatic dealer or
Numatic Technical helpline +44 (0)1460 269268

15
Information for Scrubber Dryer
WARNING
Read the instruction manual before using the appliance.
As with all electrical equipment care and attention must be exercised at all times during its use, in addition to ensuring that
routine and preventative maintenance is carried out periodically in order to ensure its safe operation.
Failure to carry out maintenance as necessary, including the replacement of parts to the correct standard
could render this equipment unsafe and the manufacturer can accept no responsibility or liability in this respect.
Warning do not use on slopes exceeding 2%.
This appliance is not intended for use by persons (including children) with reduced physical, sensory or mental capabilities,
or lack of experience and knowledge.
Children should be supervised to ensure that they do not play with the appliance.
The use of other brushes may impair safety.
A full range of brushes and accessories are available for this product.
It is essential that this equipment is correctly assembled and operated in accordance with current safety regulations.
When using the equipment always ensure that all necessary precautions are taken to guarantee the safety of the operator
Wear non slip footwear when scrubbing. Use a respiratory mask in dusty environments.
When cleaning, servicing or maintaining the machine, replacing parts or converting to another function the power source
shall be removed.
Battery operated machines shall be disconnected by removing the battery.
Machines left unattended shall be secured against unintentional movement.
Operators shall be adequately instructed as to the correct use of the machine.
For battery and charger details please refer to your battery and charger original instructions.
CAUTION
This machine is not suitable for picking-up hazardous dust. This machine is not to be stored outdoors in wet conditions.
This machine is for indoor use only.
NOTES: This machine is also suitable for commercial use, for example in hotels, schools, hospitals, factories, shops
DO
• Ensure only competent persons unpack/assemble the machine.
• Keep your machine clean.
• Keep your brushes in good condition.
• Replace any worn or damaged parts immediately.
• Regularly examine the power cord for damage, such as cracking or ageing. If damage is found, replace
the cord before further use.
• Only replace the power cord with the correct Numatic approved replacement parts.
• Ensure that the work area is clear of obstructions and / or people.
• Ensure that the working area is well illuminated.
• Pre-sweep the area to be cleaned.
DON’T
• Use steam cleaners or pressure washers to clean the machine or use in the rain.
• Allow any inexperienced repairs. Call the experts.
• Leave the brush pad on the machine when not in use.
• Allow the machine to be used by inexperienced or unauthorised operators or without appropriate
training.
• Use the machine without the solution tanks properly positioned on the machine, as shown in the
instructions.
Expect the machine to provide trouble-free, reliable operation unless maintained correctly.
Lift or pull the machine by any of the operating triggers, use the main handle.
Remove the handle from the machine except for service and repair.
Attempt machine maintenance or lifting unless the battery has been removed.
COMPONENT INTERVAL INSPECT FOR
Mains Lead DAILY
Brushes DAILY Bristle damage, wear, drive collar wear
Squeegee Blade BEFORE EACH USE Wear, cracks, splits
Filters BEFORE EACH USE Clogging and debris retention
Tanks AFTER EACH USE Rinse dirty water tank after use
READ MANUAL BEFORE USE

16
It is important that you observe the following information and warnings!
1. DEFECTIVE BATTERIES
1. If a customer wishes to return a battery to a supplier, then collection of the battery must be arranged by the supplier; however,
Faulty batteries must not be returned through the postal system or by courier.
2. If on return to a supplier, OR at a customer base, a suspected defective battery shows any signs of impact damage, distortion,
considered defective and the procedures described from item 9 below should be followed.
3. If, on return to a supplier, OR at a customer base, a suspected defective battery, that shows No signs of impact damage,
condition checking device operated by a competent person.
4. If battery is subjected to any liquid ingress users should put the pack
upright immediately, with the terminal face downwards.
6. If on checking the battery is found to be operational then a single recharge cycle under observation can be attempted with the
appropriate Numatic charger.
7. If the battery recharges correctly on this single recharge cycle then it can be deemed a good battery.
8. If the battery fails to recharge correctly on this single recharge cycle then it must be deemed a defective battery and the
procedures described from item 9 below should be followed. On no account must any further attempt to recharge be
made. A defective battery should not be stored inside buildings on any account.
9. The defective battery should be discharged by placing it in a container of salt water located in a well- ventilated area. This
should have a closed locked lid but should not be sealed. The battery should be left fully immersed in the water to a depth of at
least 100mm for at least 2 weeks. The water should be disposed of as hazardous waste when the discharge is complete.
10. The defective discharged battery can then be stored in a locked battery waste container which should be plastic or plastic
lined and placed away from buildings and clearly signed as a defective battery container with appropriate warnings.
Emergency Contact Informa� on
Address: CBAK BATTERY HEADQUARTERS
Shenzhen BAK ENERGY Co. LTD,
2603A BAK Tech Bldg,
9th Keyan Rd, Hi-tech Park,
Nanshan Dist,
Shenzhen City, China
NUMATIC INTERNATIONAL LTD
Millfi eld Road,
Chard,
Somerset,
TA20 2GB, UK
Tel:
Fax
0086-755-83283710
0086-755-8328649
0044-146-068600
0044-146-068458
www.numa� c.co.uk | www.numa� c.de | www.numa� c.ch | www.numa� c.fr
www.numa� c.nl | www.numa� c.co.za | www.numa� c.pt | www.numa� c.es
An example of a waste battery
storage bin well away from
buildings.

17
2
DANGER!
Store batteries out of reach of children.
• Insert the battery in the appliance only when it is in use.
• Always remove the battery from the appliance for transport and when it is not in use.
•
•
•
•
WARNING:
• Do not open the battery, disassemble it or allow it to fall from a substantial height.
•
•
source.
•
•
• Do not use defective or deformed batteries.
• Use only original NUMATIC chargers to charge the battery.
STORAGE:
• Good batteries should be stored in a protected area away from sources of direct heat and sunlight and should be kept dry.
•
• Storage area should be of low humidity, non dusty and a non corrosive atmosphere.
• An example of a well protected area with a cage to protect against accidental impact damage and with the batteries stored in a
protective container to protect from heat, impact and accidental spillage of liquids.
• Care when handling / moving with forklift trucks or pallet trucks is needed at all times to avoid any physical damage to the
batteries.
• If a good battery at any time is mishandled or subjected to any conditions that may damage it, as described in the battery
Instruction manual supplied, it must then be considered as defective and procedures followed from Item 1 of this document
overleaf.
3. HAZARDS IDENTIFICATION
• Electrolyte may escape from damaged batteries. Avoid contact.
• Contact can cause skin irritation, burns and chemical burns.
• If liquid comes into contact with eyes, seek medical attention.
• Avoid inhaling any vapours formed or released – caustic.
4. FIRST AID MEASURES
In the event of contact with released electrolyte or electrolyte vapours:
•
•
• Inhalation – provide fresh air or administer oxygen immediately and seek medical attention.
• Ingestion – if electrolyte has been ingested, seek medical attention immediately.
Information for physicians:
• Contains caustic alkaline electrolytes in cells with lithium oxide, nickel oxide and cobalt/lithium manganese oxide cathodes – NO
LITHIUM METAL OR LITHIUM ALLOYS.

18
6. EXPOSURE CONTROLS, PERSONAL PROTECTION
Respiratory Protection:
•
• Respiratory Protection is not necessary under conditions of normal use.
Ventilation:
• Not necessary under conditions of normal use.
• Protective Gloves:
• Not necessary under conditions of normal use.
Other Protective Clothing or Equipment:
• Not necessary under conditions of normal use.
• Personal Protection is recommended for venting batteries: Respiratory Protection, Protective Gloves, Protective Clothing and
safety glass with side shields.
Temperature Range Table
CHARGING
DISCHARGING
STORAGE OPTIMUM
STORAGE LIMIT
8. DO
• Use NUMATIC batteries only with NUMATIC appliances and charge them only using NUMATIC chargers.
• Charge battery before use.
• Store the battery out of the reach of children.
• Secure the appliance against unintentional start up – remove the battery from the appliance before transporting or storing the
appliance.
• Protect from rain and liquid ingress
•
• Keep a battery that is not in use away from metal objects, (e.g. nails, coins, jewellery).
• Follow the disposal advice of the manufacturer and any internal waste management guidance.
• Use and store the battery with-in temperature range (as shown in Temperature Range Table).
Warning: The battery included in this product must only be charged by the Numatic Charger and docking system supplied with the
result.
Note* “If batteries are subjected to temperatures beyond normal operating limits automatic shutdown will occur. Under these conditions
allow the batteries to acclimatise at room temperature (180C – 220C) for several hours to allow the battery to wake up”.
9. DO NOT
•
• Charge or use a defective, damaged or deformed battery including batteries subjected to liquid ingress.
• Open, damage or drop the battery.
• Expose the battery to microwaves or high pressure.
•
•
• Bridge (short circuit) the battery terminals with metallic objects since this may damage the battery.
• Use metal containers for transporting batteries.
• Expose the batteries to high temperatures including direct sunlight.
• Crush, break open or physically abuse the batteries or the equipment that contains them.
7. ACCIDENTAL RELEASE
Disposal – Wear protective gear, wipe up with absorbent textile and dispose of as hazardous waste at collection points for hazardous
waste according to national regulations.
5. FIRE FIGHTING MEASURES
•
•
are especially suitable).
•
•

19
10. DISTRIBUTOR TAKE-BACK / DISPOSAL
•
of batteries used in devices. To this end, batteries must be handed over for disposal to the collection systems
established for this under national law. Disposal of batteries together with household waste is prohibited; batteries must
be collected separately according to type.
• Return the battery free of charge to your NUMATIC servicing dealer for disposal or hand it over to an appropriate public
collection point.
11. CHARGING BATTERIES
•
the charger is damaged or does not charge anymore, please return to service centre.
Charging Procedure:
• Ensure the battery is fully inserted into the charger.
• Fit the mains power cord to charger and suitable power supply.
Please Note: If the battery is above its optimum charging temperature (due to ambient temperature or it if was recently discharged)
charging to begin.
• The LED should show RED to indicate charging.
• Once fully charged the LED will show GREEN.
•
CAUTION!
• Check the mains cord regularly for any sign of damage.
• Do not use damaged devices.
• If the mains cord of the charger is damaged, it must be replaced by an original NUMATIC INTERNATIONAL cord available from
the manufacturer or service agent.
12. WARRANTY
Lithium-Ion Battery Warranty
Warranty: Commercial Use
a. Batteries are warranted (3 Year) providing all battery care rules are followed
b. To claim warranty the following details must be supplied
i. Serial number of the machine
ii. Battery date code
iii. Date purchased
iv. Proof of Purchase
v. Maintenance history and charging regime
Failure to use the correct Numatic charger will void your warranty.
Spare Parts
Part No. SPARES & ACCESSORIES Part No. SPARES & ACCESSORIES
911334 LITHIUM BATTERY CHARGER 912363 CHARGER CABLE (SOUTH AFRICAN)
CHARGER CABLE (UK) 912360 CHARGER CABLE (AUSTRALIAN)
912361 CHARGER CABLE (EURO) 912362 CHARGER CABLE (NORTH AMERICAN)
912364 CHARGER CABLE (SWISS)

20
Schematic Diagram
Notes
Other manuals for NX300
6
This manual suits for next models
1
Table of contents
Other Numatic Dryer manuals

Numatic
Numatic ttb 6652 100T Guide

Numatic
Numatic TTV 678-300 Assembly instructions

Numatic
Numatic TBL6055/100 User manual

Numatic
Numatic TTV-5565/200T User manual

Numatic
Numatic TTB 1840G User manual

Numatic
Numatic TTV - 4555/100T User manual

Numatic
Numatic HT 1840 User manual

Numatic
Numatic CRL8055/100T User manual

Numatic
Numatic HBG 3045 User manual

Numatic
Numatic CRG 8055/100T User manual