Nutricia Flocare Infinity III User manual

Instructions For Use - Infinity III - Rev 0-18 –23 August 2017
Instructions for Use
Nutricia Flocare® Infinity™ III

1
1Introduction ..................................................................................................................................... 3
2Intended use ..................................................................................................................................... 3
3Safety information ........................................................................................................................... 3
3.1 General safety ..................................................................................................................................................................... 3
3.2 Warnings, precautions and contra indications.............................................................................................................. 3
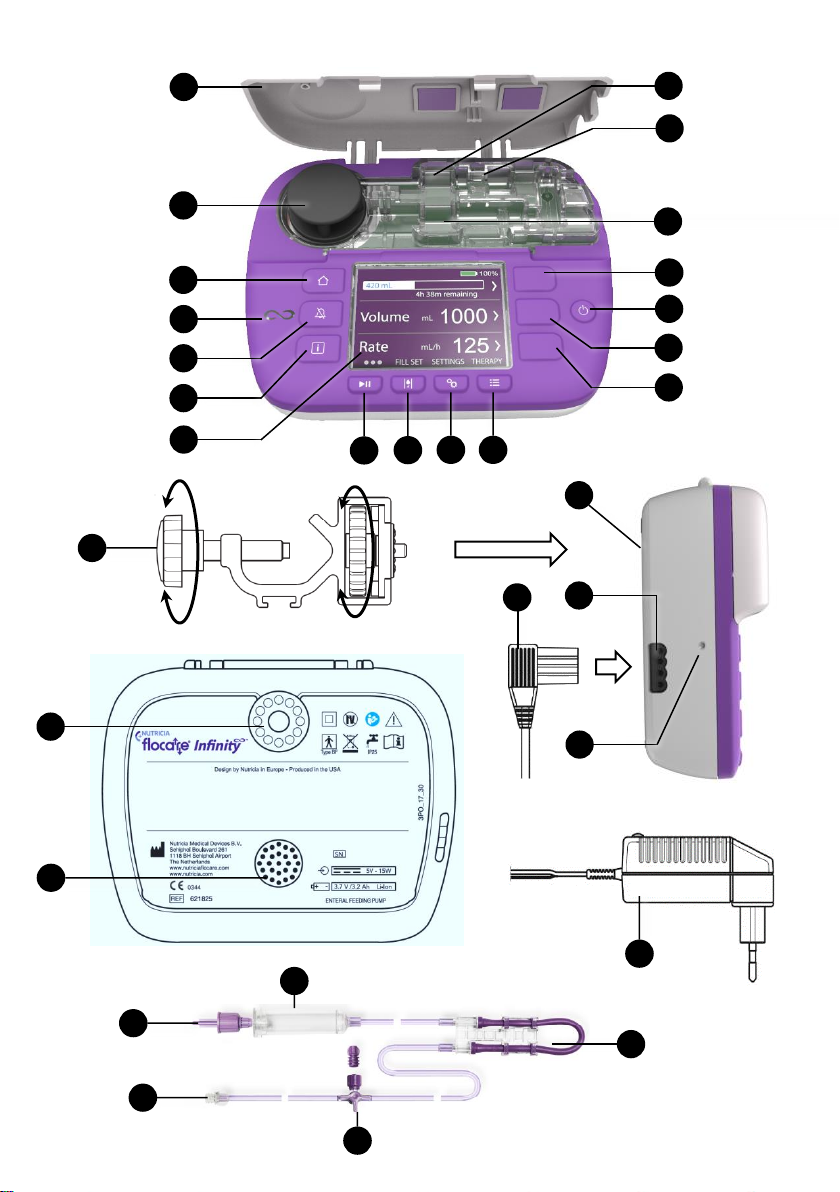
4Quick reference overview ............................................................................................................... 7
5User interface................................................................................................................................... 8
5.1 Buttons.................................................................................................................................................................................. 8
5.1.1
Home button..................................................................................................................................................... 8
5.1.2
Snooze button.................................................................................................................................................... 8
5.1.3
Information button ........................................................................................................................................... 8
5.1.4
Start/pause button........................................................................................................................................... 9
5.1.5
Fill set button....................................................................................................................................................... 9
5.1.6
Settings button .................................................................................................................................................. 9
5.1.7
Therapy button ................................................................................................................................................. 9
5.1.8
On/Off button .................................................................................................................................................... 9
5.1.9
Soft buttons ............................................................................................................................................................ 9
5.2 Pump status indicator ........................................................................................................................................................ 9
5.3 Display................................................................................................................................................................................... 9
5.4 Home screen......................................................................................................................................................................10
5.4.1
Status bar...............................................................................................................................................................10
5.4.2
Icons .......................................................................................................................................................................10
5.4.3
Progress bar ..........................................................................................................................................................11
5.4.4
Running indicator.................................................................................................................................................11
6Pump setup ..................................................................................................................................... 11
6.1 Attaching to the pole clamp (optional) .........................................................................................................................11
6.2 Connect to the AC power plug ......................................................................................................................................11
6.3 Switch the pump on .........................................................................................................................................................11
6.4 Set the language................................................................................................................................................................12
6.5 Set the time and date.......................................................................................................................................................12
6.6 Switch the pump off.........................................................................................................................................................12
7Operating Instructions................................................................................................................... 12
7.1 Load the Flocare Infinity giving set ...............................................................................................................................12
7.2 Pause / running mode......................................................................................................................................................12
7.3 Fill the Flocare Infinity giving set...................................................................................................................................12
7.4 Settings menu ....................................................................................................................................................................13
7.4.1
Define therapy list ...............................................................................................................................................13
7.4.2
Personalised therapies........................................................................................................................................13
7.4.3
Therapy lock .........................................................................................................................................................13
7.4.4
Reset patient data................................................................................................................................................13
7.4.5
Sound .....................................................................................................................................................................13
7.4.6
Display ...................................................................................................................................................................13
7.4.7
Time and date.......................................................................................................................................................14
7.4.8
Language ...............................................................................................................................................................14
7.4.9
Airplane mode ......................................................................................................................................................14
7.4.10
About this pump ..................................................................................................................................................14
7.5 Programming the pump ...................................................................................................................................................14
7.5.1
Program a VOLUME - RATE therapy ..............................................................................................................14
7.5.2
Program a RATE therapy (not recommended for volume sensitive patients) .........................................15
7.5.3
Program an INTERMITTENT therapy..............................................................................................................15
7.5.4
Change the parameters of an active therapy.................................................................................................15
7.5.5
Program a PERSONALISED THERAPY ...........................................................................................................15
7.5.6
Editing of a PERSONALISED THERAPY .........................................................................................................16
7.6 Last feeding incomplete ..................................................................................................................................................16

2
7.7 Information & memory functions ..................................................................................................................................16
7.7.1
Therapy information ...........................................................................................................................................16
7.7.2
Portions information ...........................................................................................................................................16
7.7.3
30-day history graph...........................................................................................................................................16
7.7.4
Reset progress bar ...............................................................................................................................................16
7.8 Keypad lock........................................................................................................................................................................16
7.9 Connect to a Nurse call or PDMS system....................................................................................................................17
7.10 Battery..........................................................................................................................................................................17
8Advanced settings .......................................................................................................................... 17
8.1 Communications mode ....................................................................................................................................................17
8.2 Change PIN code ..............................................................................................................................................................17
8.3 Factory reset......................................................................................................................................................................18
9Alarms, warning messages and trouble shooting ......................................................................... 18
9.1 Problem solver chart ........................................................................................................................................................18
10 Cleaning, inspection & servicing guidelines ................................................................................. 20
10.1 Switching between patients.....................................................................................................................................20
10.2 Cleaning & disinfection .............................................................................................................................................20
10.3 Inspection ....................................................................................................................................................................21
10.3.1
Housing..................................................................................................................................................................21
10.3.2
Keypad ...................................................................................................................................................................21
10.3.3
Rotor.......................................................................................................................................................................21
10.3.4
AC power plug......................................................................................................................................................21
10.3.5
Electrical ................................................................................................................................................................21
10.4 Servicing.......................................................................................................................................................................22
10.5 Repair............................................................................................................................................................................22
10.6 Spare parts...................................................................................................................................................................22
10.7 Accessories ..................................................................................................................................................................23
10.8 Recycling & disposal ..................................................................................................................................................23
11 Specifications ................................................................................................................................. 23
11.1 Performance................................................................................................................................................................23
11.2 Electrical / Mechanical..............................................................................................................................................23
11.3 Operating .....................................................................................................................................................................24
11.4 Storage .........................................................................................................................................................................24
11.5 EMC ..............................................................................................................................................................................24
11.6 Volumetric accuracy ..................................................................................................................................................24
11.7 occlusion response times..........................................................................................................................................24
12 Glossary of terms ........................................................................................................................... 25
13 Symbols .......................................................................................................................................... 25
14 Warranty ........................................................................................................................................ 25

3
1INTRODUCTION
The Flocare® Infinity™III pump is a rotary peristaltic enteral feeding pump. The pump provides a variety of options
that allow for customisation for each patient and a flexible approach to enteral feeding therapy.
The Flocare Infinity III pump provides better care while maintaining the accurate and safe performance you would
expect. The Flocare Infinity III pump can provide individual tailored therapies for nutrition delivery.
2INTENDED USE
The Flocare Infinity III is intended to be used to administer enteral nutrition or hydration fluids in a safe, controlled
and intuitive manner into the gastrointestinal tract of a patient.
The pump will operate in a clinical environment or home care setting and can be used by trained care givers and
patients for bedside as well as for mobile use.
3SAFETY INFORMATION
3.1 GENERAL SAFETY
▪Read the entire instructions for use before using the Flocare Infinity III enteral feeding pump.
▪The user should be trained in the operation of the Flocare Infinity III and its accessories.
It is recommended to follow the on-line training tool or get trained by an experienced and qualified trainer
▪The Flocare Infinity III enteral feeding pump should only be used in combination with the appropriate Flocare®
Infinity™ giving sets. The use of non-Flocare® Infinity™ giving sets will generate unforeseen hazards and will
not provide the same functionality and safety. Consult your local Nutricia sales representative for information
on available Flocare® Infinity™ giving sets.
▪Replace the Flocare Infinity giving set every 24 hours to maintain delivery accuracy, functionality, allow proper
system performance and prevent potential retrograde growth of bacteria. Do not program volume and rate
combinations which exceed a 24-hour feed regimen.
▪Enteral pump fed patients should be regularly monitored and supervised. Specific patient groups require
consistent and controlled administration of enteral nutrition as well as simultaneous application of medication
(e.g. insulin administration). In these cases, regular and frequent checks, as determined by the attending
healthcare professional, should be carried out to ensure correct administration of nutrition throughout the
therapy period.
▪Strangulation hazard: avoid leaving AC power plug cord and Flocare Infinity giving set tubing where infants or
young children can become caught around the neck.
▪Choking hazard: caution should be taken as the Flocare Infinity giving sets contains loose parts which may be
dangerous for young children.
▪Using the Flocare Infinity III pump’s VOLUME function is recommended to program as good practice.
▪The Flocare Infinity III can be used for adult and paediatric patients, it is the responsibility of the healthcare
giver to verify that the patient can tolerate the programmed volume and flow rate.
▪Do not use the pump in strong magnetic fields. e.g. MRI (Magnetic Resonance Imaging) environments.
3.2 WARNINGS, PRECAUTIONS AND CONTRA INDICATIONS
General warnings / getting started
▪Only use the Flocare Infinity III enteral feeding pump for delivery of enteral feeding solutions or hydration fluids.
Do not use for intravenous administration.
▪A leaking enteral feeding system might compromise the pumps ability to detect an occlusion. Ensure the enteral
feeding system is installed and connected properly. During a feeding therapy, ensure there is no leakage
observed within the system.
In case of any leakage, tighten the connectors and closure caps and verify whether leakage stopped. In case the
leakage still occurs, the Flocare Infinity giving set should be replaced.
•If the pump has been stored for any period of time, it should be plugged into the mains to recharge the battery
before commencing enteral feeding. The battery will be completely charged after approximately 6 hours.
•Use only approved cleaning agents, using non-approved cleaning agents might harm the pump.
•To avoid electrical shock, switch the pump off and remove the plug from the mains before cleaning the pump.
•Make sure the Infinity AC power adapter is completely dry before plugging into the mains.

4
Before using or setting a feeding regimen, check the integrity of the pump for the items below.
▪There are no cracks anywhere on the pump housing.
▪The power pins of the AC adaptor socket of the pump are of equal length, not bent and not corroded.
▪The keypad is not cut or damaged and the text is legible.
▪Scratches on the display that affects display legibility.
▪Inspect the rotor; verify that the rollers are not damaged, perpendicularly in relation to the rotor and turn freely
by hand.
▪Verify the AC power socket pins are not bent or corroded.
▪Verify that the AC power adapter incl. housing and cord is clean and not damaged.
Caution: Do not use the pump if it is damaged.
Use of home brew tube feed / Powder based tube feed
▪Any nutrition added into the enteral feeding line must be of a homogeneous nature and should remain
homogeneous during the feeding regimen.
▪Use only feeding solutions prescribed by the responsible clinician, registered dietician, registered nurse or other
licensed practitioner.
▪Nutricia recommend using ready to feed tube nutrition as this is developed for the intended delivery
specifications of the pump.
▪Non-liquid food ingredients and mixed or reconstituted foods may tend to occlude the flow within the feeding
tube and Flocare Infinity giving set. Clinicians and caregivers should carefully monitor the pump during use with
these types of feeds.
▪Users must ensure that any substrate used for any mixed or reconstituted powdered nutrition is indicated as
suitable for enteral tube feeding delivery (refer to instructions for use on nutrition / substrate added).
▪Mixed or reconstituted nutrition may have foam. If using this type of nutrition, allow it to sit for some time until
the foam has been dissolved before pouring it into a feeding reservoir. This will reduce the chance of an ‘AIR in
giving set’ alarm.
▪In using any mixed, reconstituted powdered nutrition or breast milk, we advise users to ensure the nutrition is
prepared and dissolved properly as to avoid particles, foam accumulation or films in the Flocare Infinity giving
set potentially hampering pump performance and a normal feeding regimen.
Technical & EMC
▪The manufacturer recommends an inspection of the pump every 2 years by an authorised service centre or a
trained and qualified technician.
▪If a technical failure occurs or if the pump is dropped, the pump should be checked by an authorised service
centre or a trained and qualified technician.
▪Do not modify this equipment. Modification of this device or its accessories can result in physical hazards
including delayed therapy, over delivery, under delivery, electrocution and fire. These hazards could result in
patient injury or death.
▪The use of other accessories, adaptors and cables than listed within this manual may result in increased
emissions or decreased immunity of the equipment of the Flocare® Infinity™ pump.
▪Medical electrical equipment needs special precautions regarding EMC and needs to be installed and put into
service according to the EMC information provided in the accompanying documents.
▪Portable and mobile RF communications equipment (cellular telephones) can affect medical electrical
equipment.
▪If the Flocare® Infinity™ pump is used adjacent to or stacked with other equipment, the pump should be
observed to verify normal operation.

5
Alarm usage
▪Do not use the Infinity alarm systems to trigger actions related to secondary (electrical) medical devices (e.g. a
volumetric or syringe pump).
▪Do not use pump functions for any other purpose than described in this manual.
E.g. FILL SET function to overcome an occlusion or the AIR in giving set alarm to indicate end of therapy.

6
This page has been intentionally left blank

7
4QUICK REFERENCE OVERVIEW
M
8
A
3
10
2
4
5
6
7
9
11
C
B
D
E
F
G
H
I
K
L
N
O
P
Q
R
J
M
1
S

8
Pump status indicator Air sensor Pole clamp interface
Colour display Occlusion OUT sensor Pole clamp
Door AC power plug ENPlus® connector
Pump rotor AC power socket ENFit® connector
Charger plug AC charging light Medication port
Occlusion IN sensor Speaker Cassette
Drip chamber
5USER INTERFACE
5.1 BUTTONS
Home button Fill set button SOFT button 2
Snooze button Settings button SOFT button 3
Information button Therapy button ON/OFF button
Start/pause button SOFT button 1
5.1.1 Home button
The HOME [ ] button navigates back to the home screen or dashboard, in 1 touch from whichever screen you
are in.
Additionally, the HOME [ ] button acknowledges an alarm or warning.
Note: the HOME [ ] button does not act as a back button to move one level up in a menu.
5.1.2 Snooze button
The alarm SNOOZE [ ] button silences the audio alarm signal for 2 minutes when the pump is in an alarm state.
This gives you the opportunity to investigate and addresses the indicated alarm without being distracted by the
audio alarm signal.
Note: the alarm remains visible. The symbol on the display indicates that the alarm sound is snoozed.
5.1.3 Information button
The INFORMATION [ ] button (i-button) provides help and additional information about the actual pump state
at any given time.
Examples:
-In a running mode, the information button provides information about the status of the therapy.
A
B
C
D
E
G
M
H
I
J
K
N
O
P
F
L
Q
R
1
2
3
4
5
6
7
8
9
10
11
S

9
-In pause mode, the information button will give recommendations how to program a therapy depending
on your selected therapy.
-In an alarm state, the information button [ ]provides recommendations on how to solve the indicated
alarm by providing potential solutions.
5.1.4 Start/pause button
The START/PAUSE [ ]button starts or pauses a programmed therapy.
5.1.5 Fill set button
The FILL SET button primes the Flocare Infinity giving set to ensure that air within the system has been purged.
5.1.6 Settings button
The SETTINGS button provides access to the pump settings.
See chapter 7.4 ‘Settings menu’for full button functionality
5.1.7 Therapy button
With the THERAPY [ ] button, you can select your desired therapy.
See also chapter 7.5 ‘Programming the pump’, 7.4.1 ‘Define therapy list’and 7.5.5 ‘Program a PERSONALISED
THERAPY’.
5.1.8 On/Off button
The ON/OFF button switches the pump ON and OFF.
Note: to avoid unintended button presses, the ON/OFF button needs to be pressed for 2 seconds for both
switching the pump ON or OFF.
5.1.9 Soft buttons
The soft buttons relate to the function on the screen which has an action indicated by the “<, >, ,,,,+,-”
symbol.
Note: the SOFT buttons are only active when accompanied with the above-mentioned symbols, if no symbol
appears, the button is inactive.
5.2 PUMP STATUS INDICATOR
The pump status indicator provides a visual indication of the actual pump status.
-A green light indicates that the pump is in delivery mode and working normally.
-An orange light indicates that the pump is in pause mode and waits for user input.
-A red light indicates an alarm state; immediate action from the user is required.
5.3 DISPLAY
The Flocare Infinity III will perform a display test during each pump start. Carefully check for any sections or pixels
that do not appear during the display test.
Caution: In case of any missing sections or pixels, the pump should not be used and to be send to an authorised
service centre for inspection.

10
5.4 HOME SCREEN
The home screen lay-out corresponds with your selected therapy VOLUME / RATE, RATE or INTERMITTENT
The grey lines separate the panels in PAUSE mode, and are a visual indicator that the navigation and selection buttons
are active.
5.4.1 Status bar
The status bar shows the system status by presenting icons at the top of the screen.
Note: icons are shown in home screen view only and can change status bar location.
5.4.2 Icons
•The Nurse call icon indicates that the pump is set to Nurse Call mode
•The PDMS icon indicates that the pump is set to PDMS mode
•The Therapy lock icon indicates that the current active therapy has been locked and cannot be modified
unless unlocked.
•The Airplane mode icon indicates that the pump has been set to flight mode and is safe to use in a
commercial aircraft. (not available in first release)
•The Plug icon indicates whether the pump is connected to the mains.
•The Battery icon indicates the charged capacity in percentage.
Status bar
Progress bar
Volume panel
Rate panel
Running indicator
Nurse call
PDMS
Therapy lock
Battery
Mains connected
Airplane mode
Remaining therapy time

11
5.4.3 Progress bar
The progress bar provides a quick overview about the amount of delivered tube feed since the last time the
progress bar was cleared.
Note: refer to chapter
7.7.4 ‘Reset progress bar’
for a manual reset of the progress bar.
VOLUME - RATE
When a volume - rate therapy has been programmed, the progress bar is fully outlined and gives real-time
information of the administered volume on the left side.
RATE
When a rate therapy has been programmed, the progress bar fades out at the end of the graph indicating
that no volume has been programmed. The graph is static and shows only the administered volume since the
last time it was cleared.
INTERMITTENT
When an intermittent therapy has been programmed, the progress bar is separated into the number of
programmed portions. The progress bar is capable to show up to 3 portions, if more portions are
programmed, they will appear automatically after the previous administered portions has been delivered.
Progress of each individual portion is indicated by filling in real-time the programmed portion comparable to
volume/rate.
5.4.4 Running indicator
The running indicator symbol becomes active after pressing the START/PAUSE [ ]button. The indicator shows 6
dots moving from the left to right and represents an active programmed therapy.
In PAUSE mode, only 3 static dots are visible.
6PUMP SETUP
6.1 ATTACHING TO THE POLE CLAMP (OPTIONAL)
1. Connect the Flocare Infinity III pole clamp (N) to a pole stand by rotating the black star shaped bolt clockwise.
2. Connect the Flocare Infinity III to the pole clamp interface (M) by rotating the grey wheel shaped disk clockwise
until the pole clamp is fully connected to the pump without any clearance.
6.2 CONNECT TO THE AC POWER PLUG
Connect the AC power adapter by gently pressing the charger plug (E) into the pump (J).
The charger plug is designed to fit in only one way. When the pump is connected to the mains, the blue AC charging
light (K) should be on and the plug icon to be appeared next to the battery icon.
Note
:
The Flocare Infinity III is equipped with Lithium/Ion battery technology and needs to be fully charged for a
period of 6 hours prior to first use.
6.3 SWITCH THE PUMP ON
Turn the pump ON by pressing and holding the ON/OFF button for approximately 2 seconds until the start-up sound
can be heard.
The pump will perform a self-test and inform the user when the device is ready to use, the home screen will be shown
after the self-test.
Note: When a previous therapy has not been administered completely before the pump was turned OFF, the pump
will show the warning message ‘Last feeding incomplete’. Refer to chapter
7.6 ‘Last feeding incomplete’
for more
information.

12
6.4 SET THE LANGUAGE
Set the language by pressing the SETTINGS button, navigate to LANGUAGE and select your preferred language.
Note: at first pump start up or after a factory reset, the pump will guide you automatically through the language
selection.
6.5 SET THE TIME AND DATE
Set the date and time by pressing the SETTINGS button, navigate to TIME AND DATE and set these to your local
time zone. The pump will not change to daylights savings automatically nor will it change to other time zones during
travelling.
Note: at first pump start up or after a factory reset, the pump will guide you automatically through the date and time
setting.
6.6 SWITCH THE PUMP OFF
Turn the pump OFF by pressing and holding the ON/OFF button for approximately 2 seconds until you hear the turn-
off sound.
7OPERATING INSTRUCTIONS
7.1 LOAD THE FLOCARE INFINITY GIVING SET
Follow the instructions for use on the packaging of the Flocare Infinity giving set, for setting up the enteral system.
1. Open the door
2. Position the purple looped section of the cassette (R) around the pump rotor (D)
3. Gently stretch (do not over stretch) and seat the cassette into the pump
The cassette is designed to fit into the pump one way
4. Close the pump door
5. Pump is now ready to be programmed
7.2 PAUSE / RUNNING MODE
The Flocare Infinity III is either in pause mode waiting for user instructions or it is in running mode delivering a
therapy to a patient. The pause or running modes are controlled by the START/PAUSE [ ]button button.
Note: when the pump has been untouched for 3 minutes or more in PAUSE mode, the pump will display the ‘Pump
needs attention’ alarm message.
7.3 FILL THE FLOCARE INFINITY GIVING SET
The FILL SET function is used to prime a (new) Flocare Infinity giving set with nutrition or water and needs to be
commenced before starting a feeding therapy.
Ensure the Flocare Infinity giving set is disconnected from the patient feeding tube. Prime the set by press and hold
the FILL SET button for 2 seconds to activate the FILL SET function and release the FILL SET button as soon as the
pump generates a beep and automatically starts.
The FILL SET can be manually stopped by pressing STOP in case the giving set is over filled.
Note: when the FILL SET function is activated, all alarms are temporary deactivated helping avoid alarms being
inadvertently triggered (e.g. air alarm).

13
7.4 SETTINGS MENU
7.4.1 Define therapy list
Define Therapy list controls the list of available therapies that are visible when the THERAPY [ ] button is
pressed. Therapies that are currently enabled are marked with a green switch symbol.
Personalised therapies are shown in the list of available Therapies once they have been enabled and
programmed. 2 examples are shown below.
Define therapy list Therapy list result Define therapy list Therapy list result
7.4.2 Personalised therapies
Personalise therapies provided the functionality to pre-program therapies that are often used.
Once programmed, it automatically appears in the list when the THERAPY [ ] button is pressed.
A personalised therapy can be created, edited or erased.
Note: Personalised therapies can be hidden using Define Therapy
list.
7.4.3 Therapy lock
The THERAPY LOCK will lock an active therapy to avoid therapy tampering. It is not possible to select a new
therapy or reprogram the active therapy when the therapy lock is activated however it is possible to restart a
locked therapy. Clearing the progress bar is still possible.
A therapy lock can be activated in PAUSE mode only by pressing SETTINGS THERAPY LOCK and a valid PIN
code must be entered. When a therapy is locked, a lock symbol appears in the status bar.
Unlocking a therapy is done via the same procedure.
Note: In case the therapy parameters need modification, consult your care giver.
7.4.4 Reset patient data
Reset patient data is designed to erase all collected patient data (non-personal)
The following data will reset:
Therapy parameters, Progress bar, Patient history data, Personalised therapies,
Define therapy list, Sound settings and Display settings.
Note: The internal LOG file will not be erased, data can be recovered upon request by Nutricia or an authorised
repair centre.
7.4.5 Sound
The Flocare Infinity III supports 3 AUDIO VOLUMES, ‘
Low, Medium and High’
and can be set by the user.
For safety reasons the alarm volume will be automatically escalated to
High
in both settings ‘
Low’
and ‘
Medium’
after 3 min. This safety feature cannot be turned off.
The VOLUME DELIVERED ALARM is activated by default and the pump will generate an audio and visual
warning. If it is not desired to be disturbed by the audio warning, the VOLUME DELIVERED ALARM can be
switched OFF.
Caution: Disable the VOLUME DELIVED alarm is not recommended so please consult your healthcare giver
before doing so.
7.4.6 Display
The DISPLAY BRIGHTNESS can be set to a convenient level depending on the ambient conditions. Nutricia
recommends to set the DISPLAY BRIGHTNESS to maximal when used in bright sunlight as to ensure full visibility.

14
This display illumination can be set to AUTO DIMMING mode when connected to the mains.
When AUTO DIMMING is set to ON, the display will be dimmed after 2 min.
When AUTO DIMMING is set to OFF, the display will always be illuminated.
Note: When the pump is running on battery power only, the display will always be dimmed after 2 min. in order
to extend battery life.
7.4.7 Time and date
The Flocare Infinity III uses real time and dates in reporting the administered volumes in 30-day HISTORY as well
as in the THERAPY DETAILS screens. To ensure accuracy of data, the actual time and date according to your
local time zone must be set.
Set the time and date by pressing the SETTINGS button, navigate to TIME AND DATE and set these to your
local time zone.
Note: Daylight savings are not automatically performed.
7.4.8 Language
Set the language by pressing the SETTINGS button, navigate to LANGUAGE and select your preferred
language.
Note: at first pump start up or after a factory reset, the Infinity will guide you automatically through the language
selection.
7.4.9 Airplane mode
Not in first release
7.4.10 About this pump
Information concerning the pump is gathered in the ABOUT THIS PUMP screen where you can check:
Serial
number, Manufacturing date, last maintenance check date, PCB hardware revision, Software version, current
Time and date settings and data communication mode
.
Note: a Nutricia help desk employee might ask for this information for support reasons.
7.5 PROGRAMMING THE PUMP
Caution: Before programming the pump, always be convinced that your selected therapy and its parameters are
correct. In case of any doubts, consult your care giver.
Therapies are programmed via the THERAPY [ ] button.
The Flocare Infinity III supports the following therapies:
Volume –Rate
Administering of a programmed VOLUME (mL) with a programmed RATE (mL/h).
Rate
Administering with a programmed RATE (mL/h) but without a programmed VOLUME (mL)
Intermittent
Administering of a programmed VOLUME (mL) divided over different portions with a
programmed RATE (mL/h) with programmed PAUSE (interval) times.
7.5.1 Program a VOLUME - RATE therapy
•From the home screen press the THERAPY [ ] button
•Select VOLUME –RATE by pressing the associated soft button.
IMPORTANT:
Therapies RATE and INTERMITTENT are disabled by default, if a desired therapy does not appear when the
THERAPY button is pressed, you can enable them by selecting: SETTINGS DEFINE THERAPY LIST.
See chapter
7.4.1 ‘Define therapy list’
for more information.

15
•Press the VOLUME soft button
•Change the Volume using the '+' and '-' buttons, and press the '>' button to accept the value.
•Press the RATE soft button
•Change the Rate using the '+' and '-' buttons, and press the '>' button to accept the value.
•Check your total therapy time underneath the VOLUME or RATE panel for additional safety.
•Press the START/PAUSE [ ]button to start your VOLUME-RATE therapy.
7.5.2 Program a RATE therapy (not recommended for volume sensitive patients)
•From the home screen press the THERAPY [ ] button
•Enter the RATE soft button
•Change the Rate using the '+' and '-' buttons, and press the '>' button to accept the value.
•Press the START/PAUSE [ ]button to start your RATE therapy.
7.5.3 Program an INTERMITTENT therapy
The INTERMITTENT therapy has a step- by step approach where all parameters need to be entered and validated
prior to return to the home screen.
The Flocare Infinity III shows resulting parameters based on the user input for safety and convenience reasons.
Note: after each step, the Flocare Infinity III guides you to the next programming step.
•From the home screen press the THERAPY [ ] button
•Select INTERMITTENT by pressing the associated soft button.
•Press the TOTAL VOLUME soft button
•Change the Volume using the '+' and '-' buttons, and press the '>' button to accept the value.
•Press the PORTIONS soft button
•Change the required Portions using the '+' and '-' buttons, and press the '>' button to accept the value.
•Press the RATE soft button
•Change the Rate using the '+' and '-' buttons, and press the '>' button to accept the value.
•Press the PAUSE soft button
•Change the required Pause time using the '+' and '-' buttons, and press the '>' button to accept the value.
•Scroll up and down with soft button 1 and 3 through all programmed settings and verify the input
•Scroll to CONFIRM and validate the input by pressing soft button 2.
•Press the START/PAUSE [ ]button to start your INTERMITTENT therapy.
Note: When the pump is in the NEXT PORTION mode, the home screen will differ, indicating and counting down
the time until the next portion. The running indicator will remain active during the count down.
7.5.4 Change the parameters of an active therapy
Changes to an active therapy are possible regardless whether a manual programmed or a personalised therapy is
active. To change an active therapy, make sure the pump is in PAUSE mode.
Volume –Rate VOLUME and RATE parameters can be modified
Rate RATE parameters can be modified.
Intermittent RATE parameter can be modified.
TOTAL VOLUME cannot be modified.
PAUSE time can be modified only when the pump is in NEXT DELIVERY mode.
7.5.5 Program a PERSONALISED THERAPY
The Flocare Infinity III provides the functionality to pre-program up to 3 personalised therapies and store them
into the pump memory for later use. Programming a personalised therapy is considered as a pump setting rather

16
than a THERAPY itself. To program a personalised therapy, navigate from the HOME screen to SETTINGS
PERSONALISE THERAPIES.
▪Select the therapy type by pressing the associated soft button 1, 2 or 3.
▪Follow the step- by step instructions to program a PERSONALISED THERAPY.
▪After programming, press YES with soft button 2 to confirm the PERSONALISED THERAPY and to return
to the PERSONALISED THERAPY overview screen.
Note: pressing NO will restart the procedure.
Note: pressing YES will make the programmed PERSONALISED THERAPY available in the THERAPY menu.
▪When finished programming a PERSONALISED THERAPY, press HOME [ ] button to return to the home
screen.
7.5.6 Editing of a PERSONALISED THERAPY
To EDIT or to DELETE a PERSONALISED THERAPY navigate from the HOME screen to SETTINGS
PERSONALISE THERAPIES and select the therapy that needs editing or deletion.
Note: deleting a therapy will erase all stored previous programmed therapy settings and make the personalised
therapy available for re-programming a new personalised therapy.
7.6 LAST FEEDING INCOMPLETE
When a therapy has not been administered completely whilst the pump has been turned OFF, the pump will
show the warning message: ‘
Last feeding incomplete’
. You either have the option to RESTART the active therapy
where the progress bar will be reset or you can RESUME the delivery of the active therapy.
7.7 INFORMATION & MEMORY FUNCTIONS
7.7.1 Therapy information
When a ‘VOLUME – RATE’ or ‘RATE’ therapy has been programmed, the Flocare Infinity III provides useful
information concerning your active therapy when the THERAPY INFORMATION button is pressed.
This function can be accessed from the HOME SCREEN SOFT BUTTON 1 THERAPY INFORMATION
In general, the left side of the screen are past events, in the middle the actual events and on the right-hand side
the estimated events for the future. The display will show [---] in case an event cannot be calculated.
Note: The Therapy information screen is also visible when the information button is pressed during running
mode.
7.7.2 Portions information
When an INTERMITTENT therapy has been programmed, the Flocare Infinity III provides useful information
concerning your individual portion when the PORTIONS INFORMATION button is pressed.
This function can be access from the HOME SCREEN SOFT BUTTON 1 PORTIONS INFORMATION
7.7.3 30-day history graph
The Flocare Infinity III stores all administered therapies for a maximum period of 30 days.
The daily administered volume can be accessed by pressing SOFT BUTTON 1 from the home screen and pressing
HISTORY. With the arrow buttons, you can navigate to earlier or later days. By pressing the + magnifying symbol
you can zoom in on your selected day by showing a table of individual therapies.
7.7.4 Reset progress bar
The Progress bar is automatically cleared after completion of each therapy where a VOLUME was programmed.
When there is a need to manually clear the Progress bar, navigate from the HOME screen to SOFT BUTTON 1
RESET PROGRESS BAR.
7.8 KEYPAD LOCK
The keypad can be locked to avoid unintentional changes. The keypad lock can be activated by pressing the
INFORMATION button and SOFT BUTTON 3 simultaneously when the pump is in running mode. Follow the same
procedure to unlock the keypad. Icons will guide the user on how to unlock the keypad to support untrained users.

17
Note: the pump can still be turned OFF even when the keypad is locked.
7.9 CONNECT TO A NURSE CALL OR PDMS SYSTEM
The power connector at the left-hand side of the pump offers the option of connecting the pump to an external alarm
system (Nurse call) or Patient Data Monitoring System (PDMS). For these functions, we offer the following
accessories:
▪The Flocare® Infinity™ Nurse Call (corporate code 35752) enables connection to an external alarm
system. Follow the instructions for use of the Flocare® Infinity™ Nurse Call to connect the pump.
▪The Flocare® Infinity™ PDMS Cable (corporate code 35776) enables connection to an external PDMS
system. Follow the instructions for use of the Flocare® Infinity™ PDMS Cable to connect the pump to an
external PDMS system
7.10 BATTERY
The Flocare Infinity III is equipped with Lithium/Ion battery technology and needs to be fully charged for a period of 6
hours prior to first use, this will maximise the battery life time.
The battery microprocessor continuously monitors the battery state of health and the pump will warn the user when
the battery is depleted for 70% or more and needs replacement.
Battery age
125 mL/h
1 year
24 hrs
2 year
24 hrs
3 year
20 hrs
4 year
16 hrs
5 year
12 hrs
70% depleted
7.2 hrs
Note: The battery capacity is an estimate. If you are unsure that enough battery capacity remains for your intended
therapy, connect to the AC power adapter until recharged.
8ADVANCED SETTINGS
The Advanced settings menu can be accessed by following the below procedure:
▪Make sure the pump is OFF.
▪Press and hold SOFT BUTTON 1 and the ON/OFF button simultaneously until the advanced settings menu
appears.
Caution: These settings are only intended to be set by qualified caregivers or qualified technicians.
8.1 COMMUNICATIONS MODE
▪Off No communication (standard mode)
▪PDMS To communicate with an external computer via the Flocare® Infinity™ PDMS Cable.
▪Nurse call To trigger an external nurse call system via the Flocare® Infinity™ Nurse Call Cable.
In Flight mode both PDMS and Nurse Call are disabled.
Note: See chapter
7.9 ‘Connect to a Nurse call or PDMS system’
for more information.
8.2 CHANGE PIN CODE
Edit PIN Set and store a secret PIN code
Default PIN Change the PIN code to the default public PIN CODE 3584.

18
Note: See chapter
7.4.3 ‘Therapy lock’
for more information.
8.3 FACTORY RESET
This will reset all user settings and brings the Flocare Infinity III to its original state.
Note: after a factory reset, the Flocare Infinity III shall ask to set the language and time and date.
9ALARMS, WARNING MESSAGES AND TROUBLE SHOOTING
The Flocare Infinity III is equipped with several sensors and safety features linked to clear visual and audio alarms and
warning messages on the display.
If an alarm or warning message appears on the display:
▪The HOME [ ] button acknowledges an alarm or warning state and dismisses the alarm or warning message.
▪The SNOOZE [ ] button snoozes the alarm or warning audio signal for 2 minutes whilst the alarm or warning
message remains on the display. A suppressed audio icon will appear on the display indicating that the audio
signal has been snoozed.
•The INFORMATION button [ ] can provide suggestions on the display to solve an alarm or warning condition.
Note: during an alarm or warning, all other buttons are disabled. The HOME [ ] button is the only button that
acknowledge and dismiss an alarm or warning message.
9.1 PROBLEM SOLVER CHART
In case any of the alarms listed on the problem solver chart occur, the pump will generate an audible and visual alarm
and stops administering. The back light of the display automatically switches on. Exception to this is the low battery
alarm, in this situation the pump continues working.
In the event of any alarm: Acknowledge or SNOOZE the alarm and check the type of alarm and solution displayed.
Feeding regimen can be restarted by pressing START/PAUSE [ ]button again once the cause of the alarm is solved.

19
PROBLEM SOLVER CHART
Alarm description
Cause
Solution
Air in giving set
The pump has detected air in
the giving set.
The air sensor area is dirty
If your feeding reservoir is intended to be empty:
Disconnect and discard feeding reservoir and Flocare
Infinity giving set or replace as per training.
If your feed reservoir is NOT intended to be empty:
Disconnect from feeding tube and use FILL SET
function to clear air.
Reattach the feeding tube and recommence feed.
Make sure there is no excessive foam in the feeding
reservoir.
Make sure the air sensor is clean.
Battery empty
The battery charge is critically
low
Connect the pump to the AC power adapter and
mains to recharge the battery immediately for 6
hours.
During charging the pump can be used.
Charging please wait
The battery is charging.
Wait until the battery is charged.
Door is open
The door is not properly closed
Close the door
Keypad is locked
The keypad is locked to
prevent unintended button
presses
Unlock the keypad by pressing i-Button [ ] and
SOFT BUTTON 3 simultaneously.
Last feeding incomplete
The pump was turned off
before the therapy was
completed.
Press START/PAUSE [ ]button to start the same
therapy all over.
Press RESUME to continue your active therapy.
Low battery
The battery charge is low
Connect the pump to the AC power adapter and
mains to recharge the battery for 6 hours.
During charging the pump can be used.
No plug symbol visible,
while the pump is
connected to the mains.
The mains outlet does not
work.
The AC power adapter is
damaged
Connect the pump to another mains outlet.
Contact your pump provider for replacement.
Occlusion in
The pump has detected an
occlusion between the pump
and the feeding reservoir.
The sensor area is dirty
Recurring alarm
Check the Flocare Infinity giving set between the
pump and the reservoir for kinks or other
obstructions and correct if found. Restart the pump.
Clean the sensor area
If alarm persists, replace the Flocare Infinity giving
set.
Other manuals for Infinity III
3
Table of contents
Other Nutricia Flocare Medical Equipment manuals
Popular Medical Equipment manuals by other brands

ASP
ASP motioncare LIANA user manual

GLAXOSMITHKLINE
GLAXOSMITHKLINE BabyHALER Consumer information

Blatchford
Blatchford Multiflex Standard Instructions for use

Covidien
Covidien Nellcor Series Operator's manual

Handicare
Handicare LinidoSolutions LI2403.150 Series manual

Medisana
Medisana IN 165 instruction manual