manuals.online logo
Brands
  1. Home
  2. •
  3. Brands
  4. •
  5. OCULUS
  6. •
  7. Virtual Reality Headset
  8. •
  9. OCULUS Quest 2 User manual

OCULUS Quest 2 User manual

Other manuals for Quest 2

2

This manual suits for next models

1

Other OCULUS Virtual Reality Headset manuals

OCULUS Rift S User manual

OCULUS

OCULUS Rift S User manual

OCULUS Rigt User manual

OCULUS

OCULUS Rigt User manual

OCULUS Quest User manual

OCULUS

OCULUS Quest User manual

OCULUS Quest 2 User manual

OCULUS

OCULUS Quest 2 User manual

OCULUS Rift User manual

OCULUS

OCULUS Rift User manual

OCULUS Rift S User manual

OCULUS

OCULUS Rift S User manual

OCULUS Go User manual

OCULUS

OCULUS Go User manual

OCULUS Quest 2 Guide

OCULUS

OCULUS Quest 2 Guide

OCULUS Rift User manual

OCULUS

OCULUS Rift User manual

OCULUS Rift User manual

OCULUS

OCULUS Rift User manual

OCULUS HM-A User manual

OCULUS

OCULUS HM-A User manual

OCULUS Go Service manual

OCULUS

OCULUS Go Service manual

OCULUS Go User manual

OCULUS

OCULUS Go User manual

OCULUS Go User manual

OCULUS

OCULUS Go User manual

OCULUS Go User manual

OCULUS

OCULUS Go User manual

OCULUS Go User manual

OCULUS

OCULUS Go User manual

OCULUS Rift S User manual

OCULUS

OCULUS Rift S User manual

Popular Virtual Reality Headset manuals by other brands

iLive IVR77-1762-01 user guide

iLive

iLive IVR77-1762-01 user guide

NuEyes e2+ quick start

NuEyes

NuEyes e2+ quick start

WalkOVR WalkOVR user guide

WalkOVR

WalkOVR WalkOVR user guide

D-Parts Fantastic user manual

D-Parts

D-Parts Fantastic user manual

HP Reverb G2 Setup guide

HP

HP Reverb G2 Setup guide

Varjo Aero user guide

Varjo

Varjo Aero user guide

Sony PlayStation VR CUH-ZVR2 quick start guide

Sony

Sony PlayStation VR CUH-ZVR2 quick start guide

Samsung Gear VR user manual

Samsung

Samsung Gear VR user manual

Emdoor A839 user manual

Emdoor

Emdoor A839 user manual

Samsung SM-R323 Gear VR user manual

Samsung

Samsung SM-R323 Gear VR user manual

HP REVERB G2 OMNICEPT EDITION Faq

HP

HP REVERB G2 OMNICEPT EDITION Faq

Sony PLAYSTATION VR quick start guide

Sony

Sony PLAYSTATION VR quick start guide

HTC VIVE Tracker (3.0) user guide

HTC

HTC VIVE Tracker (3.0) user guide

Champion CHVR210 user manual

Champion

Champion CHVR210 user manual

Eachine EV300O user manual

Eachine

Eachine EV300O user manual

META Oculus Quest user manual

META

META Oculus Quest user manual

Veer Fabric user manual

Veer

Veer Fabric user manual

ANTVR ALL-IN-ONE UNIVERSAL VIRTUAL REALITY KIT instruction manual

ANTVR

ANTVR ALL-IN-ONE UNIVERSAL VIRTUAL REALITY KIT instruction manual

manuals.online logo
manuals.online logoBrands
  • About & Mission
  • Contact us
  • Privacy Policy
  • Terms and Conditions

Copyright 2025 Manuals.Online. All Rights Reserved.

Oculus Quest 2
VR Headset
Kit contents
1. Oculus Quest 2 VR he dset
2. One (1) p ir of lens covers
3. Two (2) touch controllers
4. Two (2) rech rge ble AA b tteries
for controllers ( lre dy inst lled)
5. Oculus power c ble (USB-C plug
nd USB-C to USB-C cord) for
ch rging nd le tr nsferring
6. Microbre cle ning cloth
Please ensure these contents are included when you return the device.
Kits with missing items will not be accepted.
Version 1.10 (2022-08-30)
1
Table of contents
Before using the device 2
Instructions 4
1. Adjusting and wearing the headset 4
2. Using the controllers 5
3. Setup using your Facebook/Meta account 6
4. Setting up a play area (Guardian) 8
5. Adjusting the lenses and the volume 9
6. Exploring and opening apps in the headset 10
7. Navigating the settings 11
8. Re-calibrating the Oculus display 11
9. Turning off the Oculus 12
Helpful tips and usage notes 13
Attributions 14
2
Before using the device
1. If you wear eyeglasses, make s re that yo r frames are less than 142 mm
(5.59 in) wide and less than 50 mm (1.97 in) tall.
2. Decide whether you want to use the MCL’s Facebook/Meta account or
your account.
2.a. If yo want to se the MCL’s content library, a staff member needs to
set p the headset. Note that yo won’t be able to (screen)cast to a
comp ter or mobile device witho t the MCL’s Facebook/Meta acco nt
credentials.
2.b. If yo want to se/generate yo r content library, staff can help yo set
p the headset with yo r Facebook/Meta acco nt
Note: For set p, yo ’ll need a mobile device and the Oc l s app, which
is a free download from the Apple App Store or Google Play Store.
3. Ensure that the play area is clear of objects within and around it:
3.1. Remove all hazards and obstacles that might limit yo r movement
within the play area.
3.2. Allow extra space (2-3 ft) between the bo ndaries of yo r play area
and any hard s rfaces like f rnit re and walls.
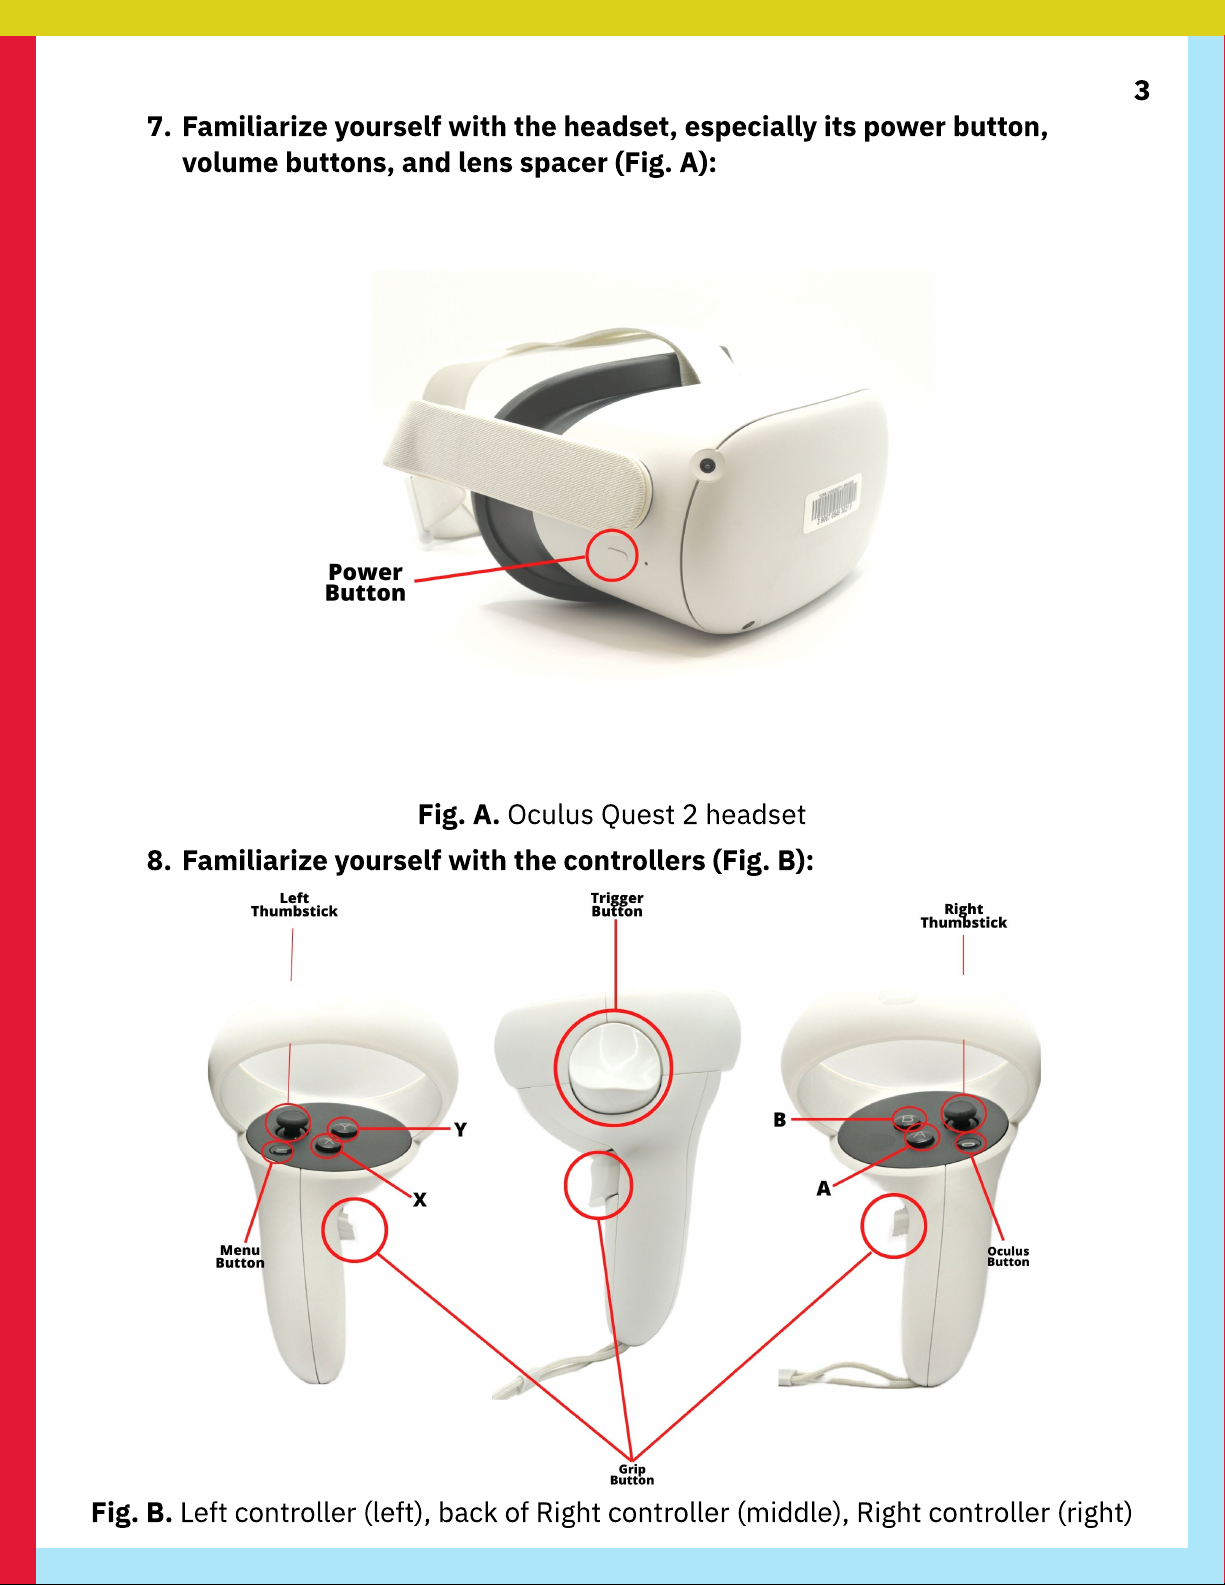
4. Don’t use che
icals
(
including alcohol
-
based wipes
)
to clean the
Q
uest
lenses.
U
se the soft, lint-free cloth provided to clean the lenses by r bbing
in a circ lar motion from the center of the lens to its edges.
5
.
K
eep the headset away fro
direct sunlight.
E
ns re that the lenses are
facing away from windows, as well as direct s nlight, to avoid damaging the
headset.
6
. Be prepared to stop: don’t force yourself through
VR
e
x
periences.
T
ake
breaks and stop if yo ’re feeling dizzy or na seo s.
3
7. amiliarize yourself with the headset, especially its power button,
volume buttons, and lens spacer ( ig. A):
ig. A. Oculus Quest 2 headset
8. amiliarize yourself with the controllers ( ig. B):
ig. B. Left controller (left), back of Right controller (middle), Right controller (right)
4
Instructions
1. Adjusting and wearing the headset
1. Swing the headband upward.
2. Adjust the Velcro straps on the headband as needed. Loosen the top
strap to start and then fasten the side straps (Fig. 1a).
Fig. 1a. Adjusting top strap (left and middle), adjusting side straps (right)
3. Press the headset visor rmly against/into your face, and then swing
the headband downward (Fig. 1b):
3.1. Align the lower part of the visor padding with your cheekbones.
3.2. Bring the headband down and over the back of your skull (Fig. 1b).
4. To remove the headset, swing the headband upward and then pull the
visor away from your face.
Fig. 1b. Headband being lowered/lifted
5
2. Using the controllers
1. Use the controllers’ lanyards to secure them to your wrists. Secure the
Right controller to your right limb and the Left controller on your left limb
(Fig. 2a).
Fig. 2a. Holding controllers with lanyards attached
2. For each controller, align your primary (index) nger with the trigger on
the back. Your middle nger should rest on the button located on the side
of the controller handle, and your thumbs on the A and B buttons and
analog stick (Fig. 2b).
Fig. 2b. Holding controllers with index ngers near triggers and thumbs resting on
face buttons (A and B for Right controller, X and Y for Left controller)
6
3. Setup using your Facebook/Meta account
Note: If you’re using the MCL’s Face ook/Meta account, skip to section 4,
Setting up the play area.
1. Turn on the headset by pressing and holding the power button on the
side of the headset.
2. Download and install the Oculus app on your mobile device. It’s free on
the Apple App Store and Google Play Store.
3. Use the Oculus app to pair the headset with your mobile device:
3.1. Log in with your Face ook or Meta account.
3.2. Select Menu in the tool ar at the ottom of the screen (Fig. 3a).
Fig. 3a. Location of Menu option
3.3. On su sequent screens (Fig. 3 ), select Devices, then select the +
icon, and then select Quest 2.
Fig. 3b. Menu screen (left), Devices screen (middle), Select
H
ea
d
set screen (right)
7
4. Enter the code diplayed in the headset (Fig. 3c).
Fig. 3c. The pairing screen
Note: In certain instances, the Oculus app will automatically detect the
pairing code from the Quest 2 Headset. However, if automatic pairing doesn’t
occur, then follow the steps as they are listed.
4.3. Follow the rest of the instruction inside the headset to select the
desired language, callibrate the view, connect to wi and set a
guardian.
Note: To check if the headset is connected you can also go back to the Menu/
Setting screen, select the desired headset from the dropdown menu. The
headset will appear as connected or not connected
Fig. 3d. The status of the Oculus conectivity
8
4. Setting up the play area (Guardian)
1. Decide whether you want a Stationary (xed spot) or a Roomscale (free
movement) experience.
1.a. For a Stationary experience, clear a space of at least 3.5ft x 3.5 ft.
1.b. For a Roomscale experience, clear a space of at least 6.5ft x 6.5 ft.
2. Turn on and wear the headset.
3. Follow the on screen prompts to set your experience type and
corresponding Guardian boundaries.
3.1. Hold down/up the toggle stick to adjust and set the floor level (Fig. 4a).
Fig. 4a. Controller analog sticks have 360-degree rotation
3.2. (Roomscale experience) Hold a trigger, point to the ground, and draw
an outline to dene the play area (Fig. 4b).
Fig. 4b. Creating
G
uardian boundaries
N
ote
:
Y
ou need to (re)set your experience-type and
G
uardian for each session
9
5. Adjusting the lenses and the volume
1. Adjust the distance between the lenses by moving the slider on the left
underside of the visor (Fig. 5a). Increase/decrease this spacing until the
headset image is clear.
Fig. 5a. Lens-spacing slider inside visor
2. Use the (+) and ( ) button on the right underside of the headset to adjust
the volume. You can also adjust this volume in the Settings menu within
the headset (Fig. 5b).
3. (Optional) Insert wired headphones into the port on the visor’s left side:
3.1. Locate the 3.5 mm port on the left side of the visor.
3.2. Insert the headphones plug into the port. Ideal headphones have
plugs shaped at 90 degrees.
Fig. 5b. Volume buttons on underside of visor