Odyssey STARFALL X ODY-2222 User manual

Size:148*210mm
RACING DRONE
INSTRUCTION & REFERENCE MANUAL
Model no. ODY-2222

Thank you for buying the Odyssey Toys Starfall X Racing Drone.
Please be sure to review all of the information contained
within to ensure safe and fun operation of your Drone. Should
you have any issues, please contact Customer Service
immediately. You can contact us online at
www.OdysseyToys.com. You can also contact Customer
Service on our Facebook page.
You can also follow us on Twitter and Instagram for all of the
latest innovations from Odyssey Toys.
Follow us at
2

Disclaimer
Intellectual Property
Cautions for Product Use
Battery & Charging Precautions
What's Included in the Box
Identifying the Parts of your Starfall X Drone
Identifying the Parts of your Remote Transmitter
Basic usage for the Drone and Remote Transmitter
Modes of Operation
Installation and Preparation for Flight •Part 1
Installation and Preparation for Flight •Part 2
Flight Test
Flight Safety Instruction
Low Voltage Alarm
Aircraft Parameters
Table of Contents
4
5
5
6
7
8
9
10
11
12
13
13-14
3

Any potential users, please read this statement carefully before using the Starfall X Racing Drone.
This drone is not suitable nor intended for anyone under 14 years of age.
Although the Starfall X Racing Drone has been equipped with smart control systems which enable it to be a
safe when powered on, we stronglyadvise you to take off the propellers when adjusting any settings and
parameters. Keep the drone aircraft away from people as well as property to avoid any damage. Odyssey
Toys shall not assume compensation nor liability:
1. Damages caused when operator is under the influence of drugs or alcohol
2. Damages caused byoperator error
3. Assembly or Operation not done under the guidance of this manual
5. Damages caused by arbitrarily refitting or changing spare parts or accessories not manufactured by
Odyssey Toys.
6. Damages caused by using items not manufactured by Odyssey Toys
7. Damages caused by operator’s inappropriate operation
8. Natural wear and tear (flight time is up to 100 hours)
9. Causing the drone aircraft to crash if it’s kept in the air after the sounding alarm for low voltage.
10. Keeping it flying even when exposed (such as water, oil, soil and other unnamed substances coming in,
not fully assembled, breakdown of major parts)
11. Damages caused when the aircraft flies under radio interference, unknown areas, no-fly zone or when
operator can not see the unit clearly.
12. Flying in bad or inclement weather like rain, snow, hail or extreme wind.
13. When aircraft is exposed to events or natural disaster, such as fire, explosion, lightning, storm,
tornado, rainstorm, flood, tsunami, earthquake, etc.
14. Damages caused due to infringement happened when operator use aircraft to acquire data, audio or
video material that is the property of the pilot.
15. Damages caused by a malfunctioning protecting circuit, batteries due to mismatch of RC models
and charger.
4
Disclaimer

The intellectual property of this product and manuals belobg to Odyssey Toys, without the
expressed written consent or permission of Odyssey Marketing or Odyssey Toys, they
may not be reproduced in any form, copy and distribute.
If you are unable to resolve any problems encountered during installation, please
contact Odyssey Toys immediately for assistance.
Be sure to check the following items one by one before each flight:
1. Before using this product, please be sure to have enough practice and experience to fly the
Odyssey Toys Starfall X Racing Drone.
2. Be sure to check all parts are in good condition; if any part is worn or damaged, do not fly.
3. Always remove the propellers when setting up your radio or receivers to avoid serious injury!
Check the receiver and cables after every flight. Damaged or wet electronic components, even if
re-dried, should no longer be used.
4. Please check whether the propeller and motor are installed correctly and securely, and confirm
positive spin and counter-spin propeller installement. Do not touch when the drone is powered to
avoid serious injury.
5. Always perform a range and function test on the ground . Repeat the test with the motor running
and with short bursts of throttle to ensure proper operation.
6. Keep the remote transmitter from any items that may cause radio interference;
7. Make sure all components are accurately connected to their power supply.
8.Make sure all connections are secure. Do not pull on the cables when you unplug the connector.
9. Remember to turn on the remote control, and then start your flight. (After landing, the first step is
to lock the aircraft, next take out the battery and then turn off the remote control.)
10. The propellers spin at a very high rate of speed. Keep the drone vehicle at least 3 meters distance
away when the aircraft is in operation. Please keep away from obstacles, people, power lines. Keep
a clear flight path.
11. All items and accessories should be kept away from children. If a child accidentally swallows any
part, please seek immediate medical assistance.
13. Please use the original Odyssey motors and 6-inch propeller. Do not use aftermarket parts on the
drone.
14. Protect the model and receiver from dust, dirt, and moisture . Do not expose the equipment to
vibrations and excessive heat or cold.
15. For safety and (CE) certification, unauthorized conversions and / or modifications of the Starfall
X Racing Drone are not permitted or authorized by Odyssey Toys.
16. Before you fly, please check any relevant laws and regulations for your area and region. Always
5
Intellectual Property
Caution & Notices for Product Use

1. The battery cannot be exposed to water. Put the battery in a cool and dry place if they are not used for
a long time.
2. Do not mix battery type or capacities as this may lead to damage of the drone.
3. Keep batteries out the reach of children. If the batteries are swallowed by children, seek immediate
medical care.
4. Do not use or store the battery near a heat source, such as fire or heater.
5. Any charging opertions must meet the specifications of the charger when it is charging.
6. Check the polarity of the battery to make sure whether they are correctly connected and installed.
7. Do not connect the battery directly to a wall outlet or car cigarette lighter socket.
8. Donot place the battery in fire or heat the battery.
9. Do not makethe battery short-circuit with a wire or other metal objects on the positive and negative
terminal.
10. Do not put the battery with necklaces, hairpins, or other metal objects together during transport or
storage.
11. Do not strike, throw batteries, or make the battery be subjected to shock.
12. Do not directlysolder the battery terminals.
13. Do not pierce the battery case with any sharp objects. Do not hammer the battery or strike with a
blunt object.
14. Do not disassemblethe battery in any way.
15. Do not use or store the battery under direct sunlight or inside a car on a hot day. Otherwise, the
battery may overheat, then catch fire (spontaneous combustion), which will affect the performance of
battery and
shorten batter y life.
16. Do not use the batter y under strong, electrostatic conditions, otherwise the electronic protection
device may be damaged causing or leading to a dangerous accident.
17. If the battery electrolyte leaks into the eye, do not rub! Rinse with water and immediately seek
medical attention.
18. If the battery has a strange odor, heat, deformation, discoloration, or any other anomalies, do not
use it! If the battery is being used or charged, the battery should be removed immediately and stop
using the charger.
19. If the battery terminals are dirty, wipe with a dry cloth before using. Otherwise the battery is bad, it
will cause energy loss or cannot be charged.
20. Improperly discarded batteries could cause a fire. Please dispose of all rechargeable batteries
properly.
6
Battery and Charging Precautions

Photo Name
Starfall X
Drone x 1
Remote
Transmitter
Propeller
Rotors x 8
1300 mAh
Battery x 2
Battery
Charger x 1
Adjustment Kit x 1
Photo Name
Before using the product, check the packaging to make sure all of the components are included:
Product Introduction
The Starfall X Racing Drone is racing drone designed for those who love speed and
want to fly fast! Please review the instructions and parameters in the following
pages o fully enjoy your Odyssey drone.
Low voltage protection
Lose signal protection
Crash protection
CC3D fly control system
USB port (In battery compartment)
Support open pilot software
FunctionsBUILT-In Technology
7
What's Included in the Box!

1
2
3
4
Battery
8
Identifying the Parts of the Starfall X Racing Drone
6
5
7
8
9
10
11
12
Upper Fuselage
USB adjusting-
parameter port
SD card port
Motor
Propeller
HD Camera
Front LED
indicator light
Middle
Fuselage
LED status light
Rear LED
indicator light
Bottom Fuselage
Power Button
13

Working Frequency: 2.4GHz ISM
Remote control channel: 6
Communication distance (outdoor, non stop):300m
Receiver Sensitivity: (1%PER):>-93dBm
Transmitting power: <20dBm
Working current / Voltage: 52 mA@6V
AA battery (five): 4pcs
Flight mode switch
Rocker bar
Hook
Electronic indicator
light
Power switch
Frequency socket
Handle
1
2
3
4
5
6
7
Video start/stop
Shooting button
8
10
6
95.8G FPV channel
switch
Mode 1 - Beginner Mode
Mode 2 - Advanced Mode
Mode 3 - Rolling Mode
9
Identifying the Parts of the Remote Transmitter

Remote control Aircraft
( For the helicopter)Function instruction
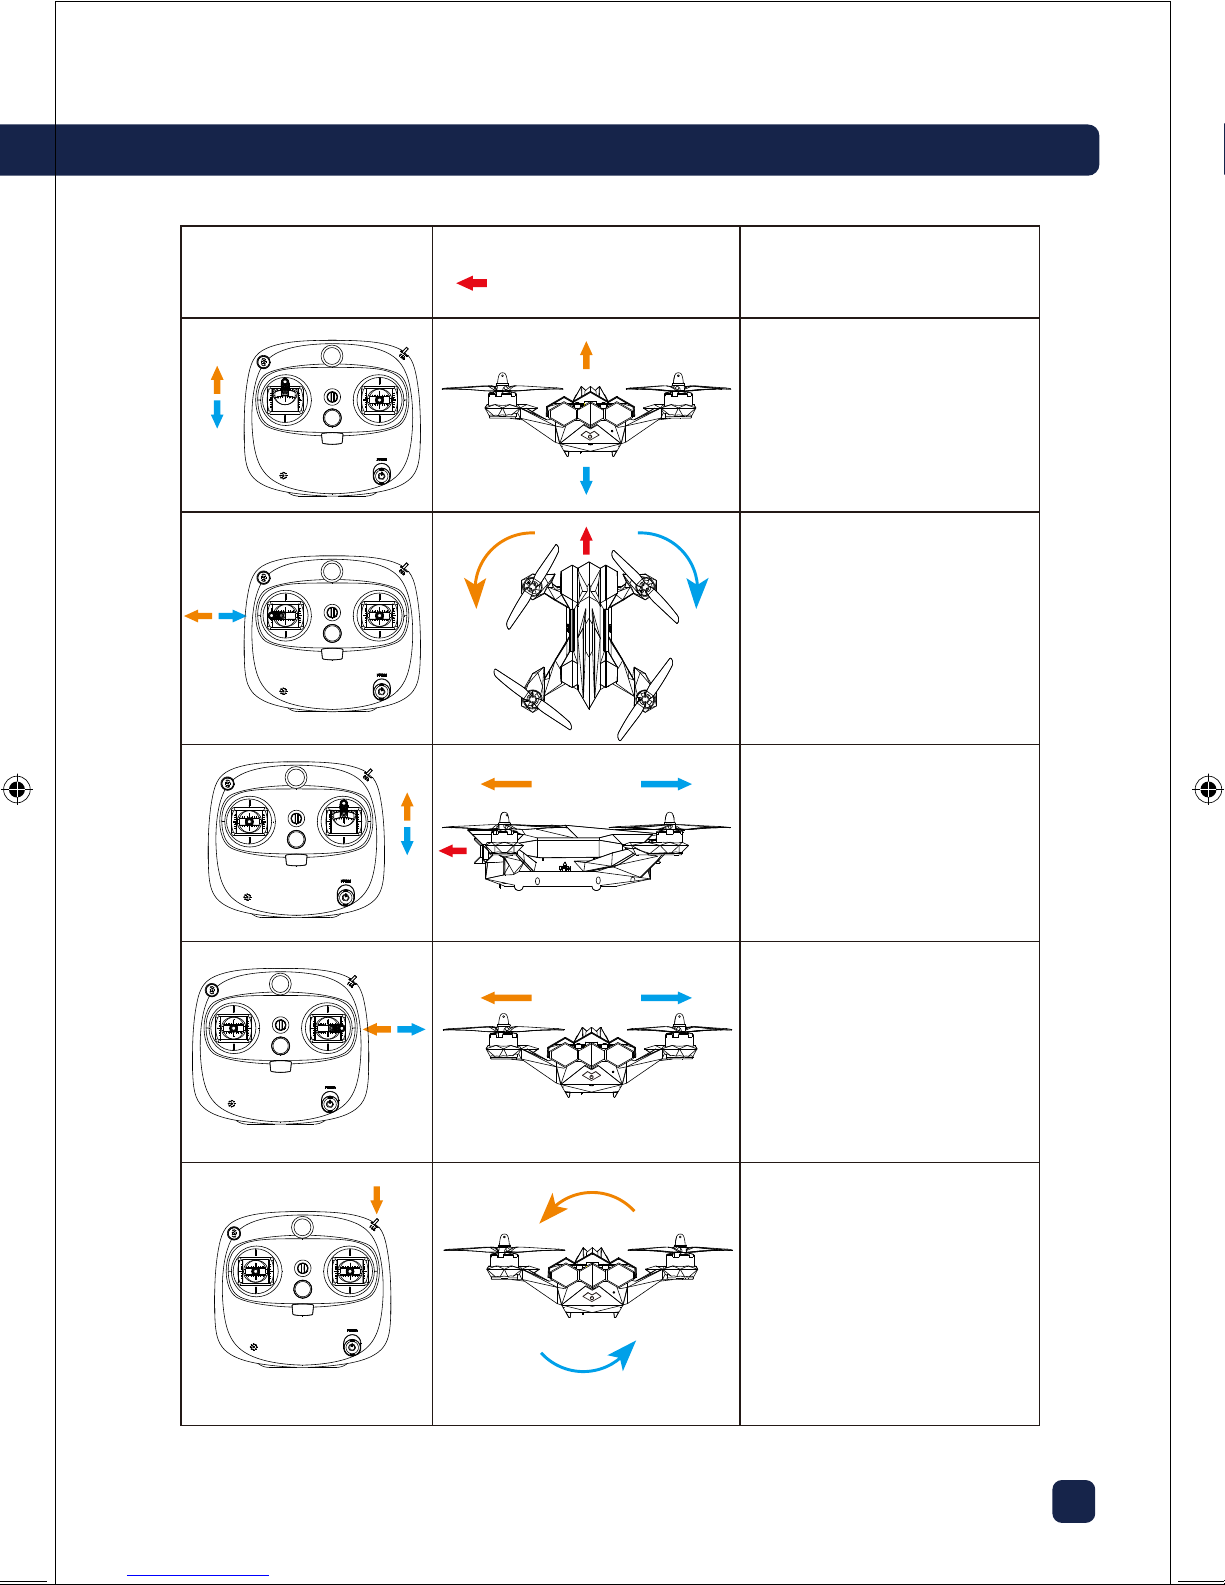
The throttle stick is used to control the
aircraft.
Up the putter, aircraft increased.
Down the lever, lower aircraft.
(Please push the stick slowly to
prevent a sudden flight).
The yaw lever is used to control the
aircraft heading.Left the pole, the
aircraft will turn counterclockwise.
Stick to the right, the aircraft will rotate
in clockwise direction.
The rotational angular velocity is in
neutral position, aircraft does not rotate.
The moving range of the rocket decides
the rotational angular velocity, the larger
the amount of the lever, the greater the
rotational angular velocity.
Tilt lever is used to control the aircraft
flying around.Up the putt, the aircraft
tilted forward, and fly forward.Down the
rocket, aircraft tilted backward, and fly
backward.The front and rear direction
of the aircraft maintain the level in neutral.
The moving range of the rocket decides
the angle of the inclination, the larger
the amount of the lever, the greater the
angle of inclination, the faster it flies.
The horizontal side stick is used for
controlling aircraft flying around.
Stick to the left, the aircraft tilted to the left
and fly to the left.Stick to the right, the
aircraft tilted to the right and fly to the right.
When it stays in the middle, the left and
right direction of the aircraft keeps
balanced in the air.The moving range of
the vehicle decides the tilt angle, the larger
volume the stick moves, the greater the
angle tilted, the faster it flies.
1
2
3
4
Mode 3 - Rolling mode
5
10
Basic usage for Aircraft &Transmitter

8
Mode 1: Beginner Mode, rolling joystick control the rolling range of the drone; pitching joystick controls
the pitching range of the drone; directional joystick controls the direction of the drone. When the rolling
joystick and pitching joystick lie in the middle, the aircraft will self-stabilize.
Mode 2: Advanced Mode (Faster speeds and reactions than Mode 1) .
Mode 3: Rolling Mode, In this mode, it is stabilize mode when pitching and rolling rocker are nearby
middle, when at bottom is rolling mode. We suggest you fly the drone at least 10 meters high from the
ground, pushing the throttle slightly, then put the pitching and rolling switch to the bottom, when the
rolling is almost finished, the pitching and rolling sticks return to middle point.
( The three modes are accessed by using the switch on the top right of the remote control )
1. BEGINNER MODE
2. ADVANCED MODE
3. ROLLING MODE
12 3
12 3
12 3
11
Modes of Operation

1. Remote Controller Batteries Installation
•Take off the battery cover from the back of remote controller.
•Insert 4 x AA batteries into the battery compartment according to the correct polarity.
•Close the battery cover.
• The remote controller (receiver) of the Starfall X can’t be used together with a
third-party remote control device
•Please use the correct type of batteries to prevent damage to the drone
• Please dispose of the used batteries according to the battery instructions.
• Please remove the discharged batteries after usage.
• Please replace a new battery when the voltage is lower than 4.2V and the remote
controller warm with an audible alarm sound.
2. Aircraft Battery Charging
Please use a fully-charged LiPo battery.
(Proposed Parameter: 1300mAh - 25º C - 11.1V).
The built-in Electronic Speed Control (ESC) of v only support 3S
(11.1V) battery,it can not use higher voltage battery.
3. Propeller Installation
•Firstly, prepare the aircraft and the 6-inch propellers.
•Put the side of the propellers with the spin marks up. Make sure that the marks on
them corresponding to the marks on the engine arms of the motors. ( the
arrows on sketchesindicated the spin directions of the motors.)
•Finally, tighten the propeller nuts.
Note:
•Using the diagram above, you can also note the slope of the propellers to properly
determine which propeller goes on which motor. If the propellers are installed in the
incorrect order, the drone will not fly properly and may become damaged.
Installation and Preparation for Flight •1
12

Installation and Preparation for Flight •2
Flight Test
1. Place the Starfall X drone horizontally on the ground 3 meters away from people, especially children,
to avoid accidents, injury or damage to property
2. Unlock motor procedure
•Push the Throttle stick down to the bottom right corner and hold for 3 seconds to start the motors.
5.Installation of the Drone Battery
•Put the drone on a flat surface taking care not to let it fall
•Open the batter y cover.
•Put the battery into the compartment, press it down and turn on the switch,
ensuring the ESC sounds normal.
•Don't touch the sticks of the remote and don't move the drone, until the status
LED turn from rapid flashing to slowly flashing and the system initialization and
self-check are completely finished. This ensures the gyrometer is calibrated correctly.
•Close the battery cover and armed the motors, then start to fly.
Powering On: double press and hold 3 sec.
Powering Off : press and hold 3 sec.
Push the battery down
Installation of the Drone Battery
4.Powering on the Remote Transmitter
•First, push the Throttle Stick of the Remote to the lowest point.
•Push the power button up to turn on the Remote.
13

Flight Test (continued)
Movement of
throttle stick Transmitter Status Position/Status of LED
lights on aircraft
Aircraft status indicator lamp changes
from slow flashing of 0.8 seconds to
rapid flashing of 0.5 seconds, it
indicates that the aircraft is armed
successfully
Push the throttle
stick to right bottom
and pause for 3
seconds, it will be
powered on
Status of LED lights when the
Drone is Powered On
Aircraft status indicator lamp from
rapid flashing of 0.5 seconds to
slow flashing of 0.8 seconds, it
indicates that the aircraft is powered
down successfully
Aircraft motors stop working
Push the throttle
stick to left bottom
and pause for 3
seconds, it will be
powered off
When battery voltage is lower than
10.5 V, LED lights flash every 0.5
seconds before and after aircraft’s
flying
The drone can not work accurately
1
2
3
3. When the green LED light turns from slow flashing of 0.8 seconds to rapid flashing of 0.5 seconds,
it indicates that the aircraft is powered on and initialized successfully and you can push the Throttle
stick up. When the drone is going to take off, push the Throttle up quickly so it gains altitude (Take
care to not push up to fast to avoid losing control of the drone).
4. Please pay close attention to the movement of the drone after taking off, and adjust the throttle
as necessary.
3. After finishing the test flight, lock the aircraft first, next take out the battery and
turn off the remote control,then the test is complete.
Pull the throttle stick upwards, aircraft
motors start work and propellers
begin rotating, aircraft can work
Flight Safety & Warnings
If the voltage of the battery gets too low while in-flight, the aircraft will begin to sound the low voltage
alarm,The power of front and back indicator light will flash. Please land the drone quickly to avoid a
serious crash and damage to the unit or injury to others.
•Please use Beginner Mode to take off the aircraft every time when you fly.
•After it lands, pull the throttle stick to the bottom left for 3 seconds to lock the aircraft, next take off
the battery and then turn down the remote control.
Landing off: Please control the decent speed when the aircraft land off, it is better to slow down to
avoid crash damage of the aircraft. After hearing the low voltage alarm of the remote control, please
land off the aircraft quickly to avoid losing control of the aircraft or having it crash.
14

Safety Features
Drone Technical and Mechanical Parameters
Parameters
Operating Temperature
Battery type
Flight weight
Yaw Angle Velocity
Tiltable Angle
Ascension/Descension Speed
Max. Flight Speed
Wheelbase
Range
-10°C ~ 50°C
3S 1300 mAh LiPo 11.1 V
<580g
200°/s
80°
±6m/s
72 km/h
250mm
Flight time
Max. Transmission Range
Camera resolution
500~600 m (1,640 - 1,970 ft.)
Approx. 8~10minutes
720p
Radio Signal Loss/Control Protection
When the device lose control signal, the device will automatic turn to low-speed rotation.
Low Voltage Alarm
The Low Voltage Alarm is used to remind you when the current voltage of the battery is too low.
It may not be able to provide enough power for the drone to fly properly, so you need to land the
drone quickly and carefully, to avoid a crash, serious injury and property damage.
When the voltage is less than 10.5 V, the front and rear lights will begin to flash and the alarm
will sound.
2

2
Extra Parts Available!
Visit Odyssey online to order:
• Extra Batteries
• New rotor blades
•Micro SD Memory Card
www.OdysseyToys.com
Follow us at
• Do not submerge the unit in any liquids.
• Keep the unit dry.
• Disconnect the unit and monitor from USB power
sources when not in use.
• Do not place the unit near powerful, un-shielded
magnets.
• Do not expose the unit to extreme hot or cold
temperatures.
• Do not hit, drop, or smash the unit with extreme force.
• Do not disassemble the unit for any reason.
NOT FOLLOWING THESE PRECAUTIONS WILL VOID
YOUR WARRANTY.
CAUTIONS, WARNINGS & NOTICES
GENERAL CARE & MAINTENANCE
Before operating your Starfall X Racing Drone for the first time, please read
through the following notices to be aware of proper drone and battery care.
Suitable for ages 12 and older. Adult supervision is always recommended.
This product contains small parts that are a choking hazard. Keep away from small children.
Keep the drone (the flying element) at least 10 feet away from yourself, other people, and objects during use.
Correctly assemble all parts of the Starfall X and fly it only under the guidelines of this instruction manual. Small parts
should be assembled by an adult.
Keep hands, hair, and loose clothing away from the propellers when powered on to prevent injury to yourself or damage
to the product.
The Starfall X should not be flown in windy conditions (winds of 5 MPH or stronger) or near any body of water.
Never leave a charging battery unattended. The battery may become damaged from overcharging.
Manufacturers and dealers disclaim all responsibility for damage caused by misuse.
Please retain this manual for future reference.
This device complies with part 15 of the FCC Rules. Operation is subject to the following two conditions: (1) This device may
not cause harmful interference, and (2) this device must accept any interference received, including interference that may
cause undesired operation.
•
•
•
•
•
•
•
•
Table of contents
Other Odyssey Drone manuals

Odyssey
Odyssey XV-7 Microlite II User manual

Odyssey
Odyssey Build-A-Drone ODY-1228 User manual

Odyssey
Odyssey ODY-2016BF1 User manual

Odyssey
Odyssey ODY-1717NX User manual

Odyssey
Odyssey Stellar NX User manual

Odyssey
Odyssey T.E.D. ODY-1719 User manual

Odyssey
Odyssey STEALTH NX-2 ODY-1765 User manual

Odyssey
Odyssey Galaxy Seeker II User manual

Odyssey
Odyssey GALACTIC II User manual

Odyssey
Odyssey Spartan User manual