manuals.online logo
Brands
  1. Home
  2. •
  3. Brands
  4. •
  5. Odyssey
  6. •
  7. Toy
  8. •
  9. Odyssey B.Y.O.T. ODY-8600 User manual

Odyssey B.Y.O.T. ODY-8600 User manual

CARE & MAINTENANCE
CAUTIONS & WARNINGS
INSTRUCTION MANUAL: BUILD YOUR OWN TRUCK 3+
•Suitable for ages 3 and up. Adult supervision is always recommended.
•This product contains small parts which are a choking hazard. Keep away from small
children.
•Manufacturers and dealers disclaim all responsibility for damage caused by misuse.
•Keep hair and loose clothing away from the toy when powered on.
•If the toy will be stored and unused for an extended period of time, please remove the
batteries.
•Check the batteries regularly for potential leakage or corrosion that may occur.
• When installing the batteries carefully follow the polarity marking +/-.
•Do not mix dierent battery types.
•Remove exhausted or drained batteries.
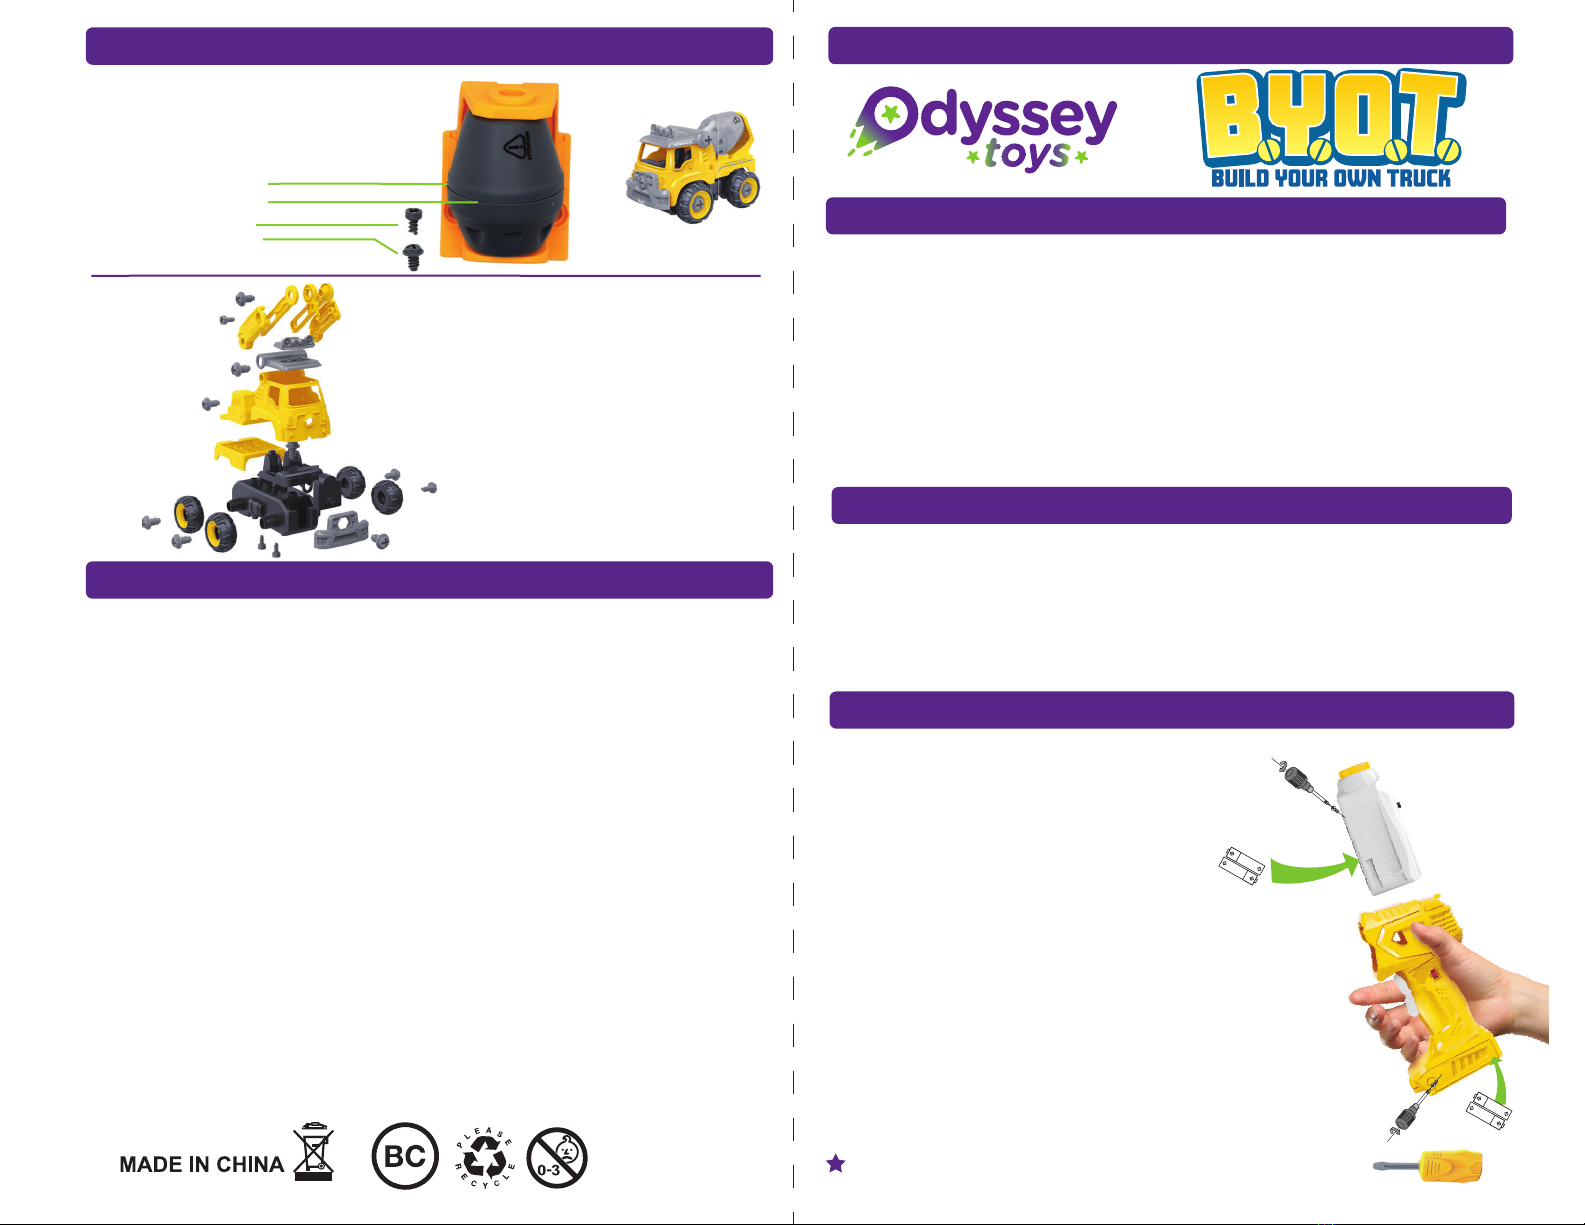
Setting up the screwdriver / truck motor.
Step 1 - Locate the white motor assembly and
remove the screw holding the battery
cover.
Step 2 - Insert 2xAA batteries taking care to
match the correct polarity.
Step 3 - Replace the cover and re-tighten the
screw.
Setting up the remote control.
Step 1 - Locate the remote control and remove
the screw holding the battery cover on
the base.
Step 2 - Insert 2xAA batteries taking care to
match the correct polarity.
Step 3 - Replace the cover and re-tighten the
screw.
Tip: You can also use the included manual screwdriver to
setup the truck instead of the electric screwdriver.
To build one of the three trucks you need to setup the multifunction electric
screwdriver/truck motor & the remote control.
• Do not submerge the unit in any liquids.
• Keep the unit dry.
•Do not place the unit near powerful, un-shielded magnets.
•Do not expose the unit to extreme hot or cold temperatures.
•Do not hit, drop, or smash the unit with extreme force.
•Do not disassemble the unit for any reason.
NOT FOLLOWING THESE PRECAUTIONS WILL VOID YOUR WARRANTY.
Please do not return product to store. For Customer Service please email:
Care@OdysseyToys.com
Please note the units model number and name in your email:
Model no. ODY-8600 • Build Your Own Truck
SETTING UP THE BUILD YOUR OWN TRUCK
FCC STATEMENT: This product complies with Part 15 of the FCC Rules. Operation is subject to the following two
conditions: (1) This device may not cause harmful interference and (2) this device must accept any interference
receiver, including interference that may cause undesirable operation.
For questions or assistance on installation, parts or
operation contact: Odyssey Toys at 1-(305)-933-4480.
Hours of operation: 10:00am - 5:00pm EST
Email: Care@OdysseyToys.com
or visit us online at: www.odysseytoys.com/support
20855 NE 16 AVE C-4, Miami FL, 33179
c
t
60 DAY LIMITED WARRANTY
Odyssey Marketing/ Odyssey Toys warrants to the original purchaser when used in the United States only, that this
product shall be free of defects in material and workmanship. This warranty applies within 60 days of the original purchase
date with normal home use. This warranty does not apply for commercial use of this product. Use outside of United States
is not covered by this warranty. During the warranty period, we will at our discretion, repair or replace this product without
charge, as long as the product has not been abused or mishandled as by our determination. Our determination shall be
final and be the consumer's sole remedy. ALL RETURNS must be accompanied by a Return Authorization Number which
is issued by Odyssey Marketing's Customer Service Department.
Please contact Customer Service BEFORE returning any products or parts thereof. Once you have obtained a Return
Authorization Number you will be provided a return address within the Customer Service email.
This warranty does not cover installation, adjustments in the home, nor damage due to accidents, misuse, abuse, fire, or
any acts of God, incorrect line voltage, damage to other equipment caused by improper installation, unauthorized or
improper modifications. This warranty gives you specific legal rights and you may also have other rights that vary from
state to state.
** THIS WARRANTY IS EXPRESSLY IN LIEU OF ALL OTHER WARRANTIES. EXPRESSED OR IMPLIED INCLUDING THE
WARRANTIES OF MERCHANTABILITY AND FITNESS.** ©2022 Odyssey Marketing Corp.
Note: Diagram shows the complete
assembly for the Crane Truck.
The “Build Your Own Truck” is
supplied partially assembled right
out of the box for your convenience.
1
4
CEMENT TRUCK ASSEMBLY
CUSTOMER SERVICE
Follow Steps 1 thru 3 of “Crane Truck
Assembly” Instructions to build the
Truck Base.
Step 4 - Install Dump Truck Body
Parts Required:
1x Cement Truck Body
1x Cement Truck Drum
2x Flat Head Screws
1x Round Hex Screws
FOR
AGES
AA
AA
AA
AA
Step 1 - Remove the screwdriver / truck motor
unit from the remote control, and remove
the grey driver bit from the motor,
Step 2 - Turn your newly assembled truck over to
locate the motor compartment in the
black wheel assembly.
Step 3 - Slide the motor unit into the motor
compartment making sure the switch still
is accessible, and the motor shaft is
correctly aligned with the drive gear
inside of the motor compartment.
Step 4 - Set the switch on the motor unit to “RC”
mode.
Step 5 - Turn the remote control on and use the
Forward / Back trigger buttons on the
remote control to move the truck
forwards or backwards.
Note: If you hear the motor run but the truck
does not move, check the motor for
corect alignment inside the motor
compartment.
Once you have assembled your chosen truck design, you can use the truck
motor with the remote to take it for a spin!
USING THE SCREWDRIVER CRANE TRUCK ASSEMBLY
DUMP TRUCK ASSEMBLY
USING THE REMOTE CONTROL WITH THE TRUCK
Step 1 - Insert a grey driver bit into the screwdriver /
truck motor unit. Then slide the whole unit
into the slot on the top of the remote control.
Step 2 - Set the switch on the top of the screwdriver /
motor unit to “RC” mode.
Step 3 - Turn the red switch on the remote control to
“On”.
Step 4 - Use the Forward / Back trigger buttons to
activate the screwdriver in forward or
backward mode.
Step 5 - Use the included parts to assemble one of
the 3 trucks.
Step 6 - When finished with the screwdriver turn the
red switch on the remote control to “O” and
set the switch on the screwdriver / truck
motor to the o position.
Tip.
To set the truck continuously moving forward or backwards
you can set the motor switch to either or .
Setting the motor to turns it o.
Step 1 - Assemble the Motor Base
Parts Required:
4x Round Hex Screws
4x Wheels
1x Black Motor Base
2x Flat Head Screws
Follow Steps 1 thru 3 of “Crane Truck
Assembly” Instructions to build the
Truck Base.
Step 2 - Assemble Cab, Seats, Bed & Fender
Parts Required:
1x Truck Cab
1x Truck Bed
1x Truck Seats
1x Gearbox
1x Fender
2x Round Hex Screws
Step 3 - Assemble Cab Top
Parts Required:
2x Round Hex Screws
1x Cab Top
1x Truck Horns
Step 4 - Install Crane Body
Parts Required:
1x Crane Body Base
1x Crane Arm
2x Round Hex Screws
Step 4 - Install Dump Truck Body
Parts Required:
1x Dump Truck Body
1x Dump Truck Bucket
2x Flat Head Screws
2x Round Hex Screws
2 3

Other Odyssey Toy manuals

Odyssey BLAZIN’ MOTO User manual

Odyssey

Odyssey BLAZIN’ MOTO User manual

Odyssey Hovering Soccer Ball Set User manual

Odyssey

Odyssey Hovering Soccer Ball Set User manual

Odyssey ODY-1050 User manual

Odyssey

Odyssey ODY-1050 User manual

Odyssey THE RIPPER User manual

Odyssey

Odyssey THE RIPPER User manual

Odyssey Land + Sea Truck User manual

Odyssey

Odyssey Land + Sea Truck User manual

Odyssey Shooting Star ODY-1020 User manual

Odyssey

Odyssey Shooting Star ODY-1020 User manual

Odyssey Rampaging Rex User manual

Odyssey

Odyssey Rampaging Rex User manual

Popular Toy manuals by other brands

Fisher-Price Brilliant Basics 74123 instruction sheet

Fisher-Price

Fisher-Price Brilliant Basics 74123 instruction sheet

Top RC Model P-51D Mustang 89 inch instruction manual

Top RC Model

Top RC Model P-51D Mustang 89 inch instruction manual

Estes Control Wild Sky 4553 instructions

Estes

Estes Control Wild Sky 4553 instructions

PIKO BR 93 Instructions for use

PIKO

PIKO BR 93 Instructions for use

PLANEPRINT AERON Assembling manual

PLANEPRINT

PLANEPRINT AERON Assembling manual

Mattel Mojang GNM44 quick start guide

Mattel

Mattel Mojang GNM44 quick start guide

goliath DINO MEAL quick start guide

goliath

goliath DINO MEAL quick start guide

myToys 5527867 Assembly instructions

myToys

myToys 5527867 Assembly instructions

Fisher-Price Geo Trax M4142 quick start guide

Fisher-Price

Fisher-Price Geo Trax M4142 quick start guide

Hasbro TOYBOX Tools Playskool Friends My Little Pony Musical Celebration... manual

Hasbro

Hasbro TOYBOX Tools Playskool Friends My Little Pony Musical Celebration... manual

Fisher-Price THOMAS & FRIENDS TRACK MASTER instructions

Fisher-Price

Fisher-Price THOMAS & FRIENDS TRACK MASTER instructions

ROBBE Bucker Jungmeister 3041 Assembly and operating instructions

ROBBE

ROBBE Bucker Jungmeister 3041 Assembly and operating instructions

Heli-Professional SOXOS 550 KIT Assembly instruction and manual

Heli-Professional

Heli-Professional SOXOS 550 KIT Assembly instruction and manual

Jamara Sporty Instruction

Jamara

Jamara Sporty Instruction

Hobbico Flyzone Sensei FS instruction manual

Hobbico

Hobbico Flyzone Sensei FS instruction manual

Sci-High viper mark II Assembly manual

Sci-High

Sci-High viper mark II Assembly manual

Eduard P-38L Lightning quick start guide

Eduard

Eduard P-38L Lightning quick start guide

Opitec Rattle Snake manual

Opitec

Opitec Rattle Snake manual

manuals.online logo
manuals.online logoBrands
  • About & Mission
  • Contact us
  • Privacy Policy
  • Terms and Conditions

Copyright 2025 Manuals.Online. All Rights Reserved.