manuals.online logo
Brands
  1. Home
  2. •
  3. Brands
  4. •
  5. OfficeSource
  6. •
  7. Indoor Furnishing
  8. •
  9. OfficeSource PBTR48 User manual

OfficeSource PBTR48 User manual

®
®www.ocesourcefurniture.com
PBTR48
ASSEMBLY INSTRUCTIONS
BORDERS
Assembly Instructions
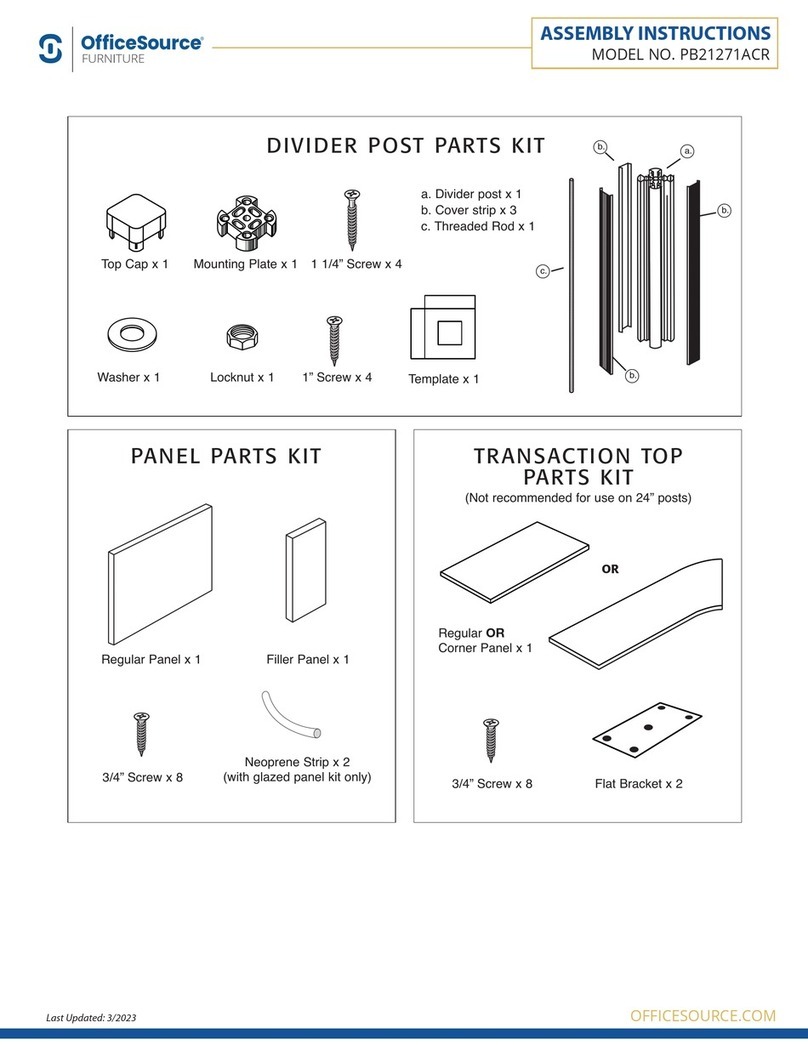
Thank you for purchasing Borders desk mounted partition system. Before you begin assembly, please check that
you have all the parts listed below for the appropriate kit purchased. If you do not, please contact the dealer that
sold you this product.
a.
b.
c.
b.
b.
Regular OR
Corner Panel x 1
PANEL PARTS KIT TRANSACTION TOP
PARTS KIT
(Not recommended for use on 24” posts)
DIVIDER POST PARTS KIT
Top Cap x 1 Mounting Plate x 1 1 1/4” Screw x 4
Template x 1
Washer x 1 Locknut x 1 1” Screw x 4
a. Divider post x 1
b. Cover strip x 3
c. Threaded Rod x 1
Regular Panel x 1
3/4” Screw x 8 3/4” Screw x 8
Filler Panel x 1
Neoprene Strip x 2
(with glazed panel kit only) Flat Bracket x 2
OR
MODEL NO. PBTR48
OFFICESOURCE.COM
ASSEMBLY INSTRUCTIONS
Last Updated: 3/2023
®
®www.ocesourcefurniture.com
PBTR48
ASSEMBLY INSTRUCTIONS
1.4 Install the mounting plate that is to
be fixed at the other end of the work
surface by following steps 1.1 to 1.3
above.
1.5 Temporarily position a panel between
the two mounting plates. Adjust
mounting plates so that a gap of
approximately 1/16” or 2mm is
between the panel and the plate.
1/16”
or 2.0 mm gap
1.4
1.5
1.7 After all the mounting plates have been properly aligned, including having the panels temporarily
positioned as per instruction 1.5, then install the remaining 3 - 1” screws in each mounting plate as
shown, followed by the 4 - 1 1/4” in the four outside corners of the plate.
1.6 1.7
1.6 Install all the remaining mounting
plates that will be on your work surfaces
following the above instructions. Remember
when aligning the mounting plates use only
the one short screw and do not tighten.
Filler Panel
Regular Panel
STEP 1. ATTACH MOUNTING PLATE
1.1 Fold sides of template downward and
position template tight against work
surface corner.
1.2 Expose double sided tape and
position mounting plate inside the
template opening.
1.3 Remove the template and install the
short 1” screw into one of the
inside holes. Do not tighten.
DO NOT INSTALL ANY OTHER SCREWS
1.1
1.2
1.3
MODEL NO. PBTR48
OFFICESOURCE.COM
ASSEMBLY INSTRUCTIONS
Last Updated: 3/2023
®
®www.ocesourcefurniture.com
PBTR48
ASSEMBLY INSTRUCTIONS
STEP 3. SLIDE PANELS INTO PLACE
STEP 4. ATTACHING TRANSACTION TOPS
3.1 Insert a 3/4” screw into threaded hole in each
corner of the panel. Once all the way in,
back out each screw 2 turns.
3.2 Slide panels into place, making sure that
exposed screw head slides down appropiate
channel on post.
3.3 If using glazed panel, in addition to the four
screws, (not required on fabric panels) secure
panel by inserting Neoprene strips between
panel and post (Neoprene strips are provided
with the panel).
3.4 Ensure cover strips on the post are propery
placed. Note. If using transaction tops,
proceed to Step 4
3.5 Tighten locking nut. Place caps on top of divider post.
3/4” Screw
3.1
3.2
Note: All transaction tops come with necessary connecting hardware
4.1 Remove nut and washer. Slide connecting bracket onto threaded rod and divider post.
4.2 Fasten connecting bracket to divider post by tightening locking nut.
4.3 Align connecting brackets
with recessed cut outs on
underside of transaction tops.
4.4 Attach flat brackets to under
side of adjoining transaction
tops with 4 wood screws
provided. 4.1
4.2
4.3
4.4
Underside of
transaction top
STEP 2. MOUNT DIVIDER POST
2.1 Place divider post over mounting plate.
2.2 Screw threaded rod through divider
post and into mounting plate.
2.3 Place washer then nut on rod and
finger tighten only.
2.3
2.1 2.2
MODEL NO. PBTR48
OFFICESOURCE.COM
ASSEMBLY INSTRUCTIONS
Last Updated: 3/2023
®
®www.ocesourcefurniture.com
PBTR48
ASSEMBLY INSTRUCTIONS
STEP 5. STACKING ON PANELS
Note: When using 2 stacked 12” panels, 24” high posts must be used.
5.1 Attach first level of panels as described in Step 3. Insert 2nd level of panels between 24” high posts in
same fashion.
5.2 Tighten locking nut on the threaded rod and place caps on top of divider post.
USER
SIDE
5.1
5.2
5.1
STACKED
INCORRECTLY
STACKED
PROPERLY
3/4” Screw
TOP CAP
Please ensure panels are stacked properly - rails should fit in channels .
MODEL NO. PBTR48
OFFICESOURCE.COM
ASSEMBLY INSTRUCTIONS
Last Updated: 3/2023

Other OfficeSource Indoor Furnishing manuals

OfficeSource EVH100BGG User manual

OfficeSource

OfficeSource EVH100BGG User manual

OfficeSource PB21248 User manual

OfficeSource

OfficeSource PB21248 User manual

OfficeSource Orion OSTW8001 Quick reference guide

OfficeSource

OfficeSource Orion OSTW8001 Quick reference guide

OfficeSource PL250LD User manual

OfficeSource

OfficeSource PL250LD User manual

OfficeSource PL105 User manual

OfficeSource

OfficeSource PL105 User manual

OfficeSource RCN3222STG User manual

OfficeSource

OfficeSource RCN3222STG User manual

OfficeSource PL9997 User manual

OfficeSource

OfficeSource PL9997 User manual

OfficeSource 83846H User manual

OfficeSource

OfficeSource 83846H User manual

OfficeSource 300HL Quick reference guide

OfficeSource

OfficeSource 300HL Quick reference guide

OfficeSource PL1066 User manual

OfficeSource

OfficeSource PL1066 User manual

OfficeSource PLTCRKB36WF24 User manual

OfficeSource

OfficeSource PLTCRKB36WF24 User manual

OfficeSource RCN3222WB User manual

OfficeSource

OfficeSource RCN3222WB User manual

OfficeSource PL169DELTT User manual

OfficeSource

OfficeSource PL169DELTT User manual

OfficeSource PL9998 User manual

OfficeSource

OfficeSource PL9998 User manual

OfficeSource 1101HMF User manual

OfficeSource

OfficeSource 1101HMF User manual

OfficeSource PL133 User manual

OfficeSource

OfficeSource PL133 User manual

OfficeSource PL9997 User manual

OfficeSource

OfficeSource PL9997 User manual

OfficeSource PL102 User manual

OfficeSource

OfficeSource PL102 User manual
OfficeSource RCN6331 User manual

OfficeSource

OfficeSource RCN6331 User manual
OfficeSource PL155 User manual

OfficeSource

OfficeSource PL155 User manual

OfficeSource PL103 User manual

OfficeSource

OfficeSource PL103 User manual

OfficeSource 200HMFBK Quick reference guide

OfficeSource

OfficeSource 200HMFBK Quick reference guide

OfficeSource PL163 User manual

OfficeSource

OfficeSource PL163 User manual
OfficeSource EVS700GG User manual

OfficeSource

OfficeSource EVS700GG User manual

Popular Indoor Furnishing manuals by other brands

Forte MGAT221 Assembling Instruction

Forte

Forte MGAT221 Assembling Instruction

FITUEYES F05S3113L manual

FITUEYES

FITUEYES F05S3113L manual

Knight Cubit Credenza Assembly instructions

Knight

Knight Cubit Credenza Assembly instructions

KENAY BONNET KMK-0020BL Assembly instructions

KENAY

KENAY BONNET KMK-0020BL Assembly instructions

Manhattan Comfort BR 51 Assembly instructions

Manhattan Comfort

Manhattan Comfort BR 51 Assembly instructions

Hillsdale Furniture NORWOOD 4935-826S quick start guide

Hillsdale Furniture

Hillsdale Furniture NORWOOD 4935-826S quick start guide

Woltra SILKEBORG SI-43 Assembly instructions

Woltra

Woltra SILKEBORG SI-43 Assembly instructions

overstock WF289498 Assembly instructions

overstock

overstock WF289498 Assembly instructions

Sauder Hammond 431249 manual

Sauder

Sauder Hammond 431249 manual

Habitat Macadam 904536 manual

Habitat

Habitat Macadam 904536 manual

Henn&Hart CT0065 Assembly instructions

Henn&Hart

Henn&Hart CT0065 Assembly instructions

SMITH SYSTEM 58020 Assembly instructions

SMITH SYSTEM

SMITH SYSTEM 58020 Assembly instructions

modway MOD-5244 Assembly instructions

modway

modway MOD-5244 Assembly instructions

MAVAULAR moveis Premium RM3940 manual

MAVAULAR moveis

MAVAULAR moveis Premium RM3940 manual

Next EZRA A59344 Assembly instructions

Next

Next EZRA A59344 Assembly instructions

INTER LINK SAS WESTERLAND 5.2 20 90 14 62 Assembling Instruction

INTER LINK SAS

INTER LINK SAS WESTERLAND 5.2 20 90 14 62 Assembling Instruction

Livarno Living 114815 Assembly instruction

Livarno Living

Livarno Living 114815 Assembly instruction

BEBE CONFORT DA1746-5 instruction manual

BEBE CONFORT

BEBE CONFORT DA1746-5 instruction manual

manuals.online logo
manuals.online logoBrands
  • About & Mission
  • Contact us
  • Privacy Policy
  • Terms and Conditions

Copyright 2025 Manuals.Online. All Rights Reserved.