manuals.online logo
Brands
  1. Home
  2. •
  3. Brands
  4. •
  5. OfficeSource
  6. •
  7. Indoor Furnishing
  8. •
  9. OfficeSource PBP24 User manual

OfficeSource PBP24 User manual

®
®www.ocesourcefurniture.com
PBP24
ASSEMBLY INSTRUCTIONS
BORDERS
Assembly Instructions
Thank you for purchasing Borders desk mounted partition system. Before you begin assembly, please check that
you have all the parts listed below for the appropriate kit purchased. If you do not, please contact the dealer that
sold you this product.
a.
b.
c.
b.
b.
Regular OR
Corner Panel x 1
PANEL PARTS KIT TRANSACTION TOP
PARTS KIT
(Not recommended for use on 24” posts)
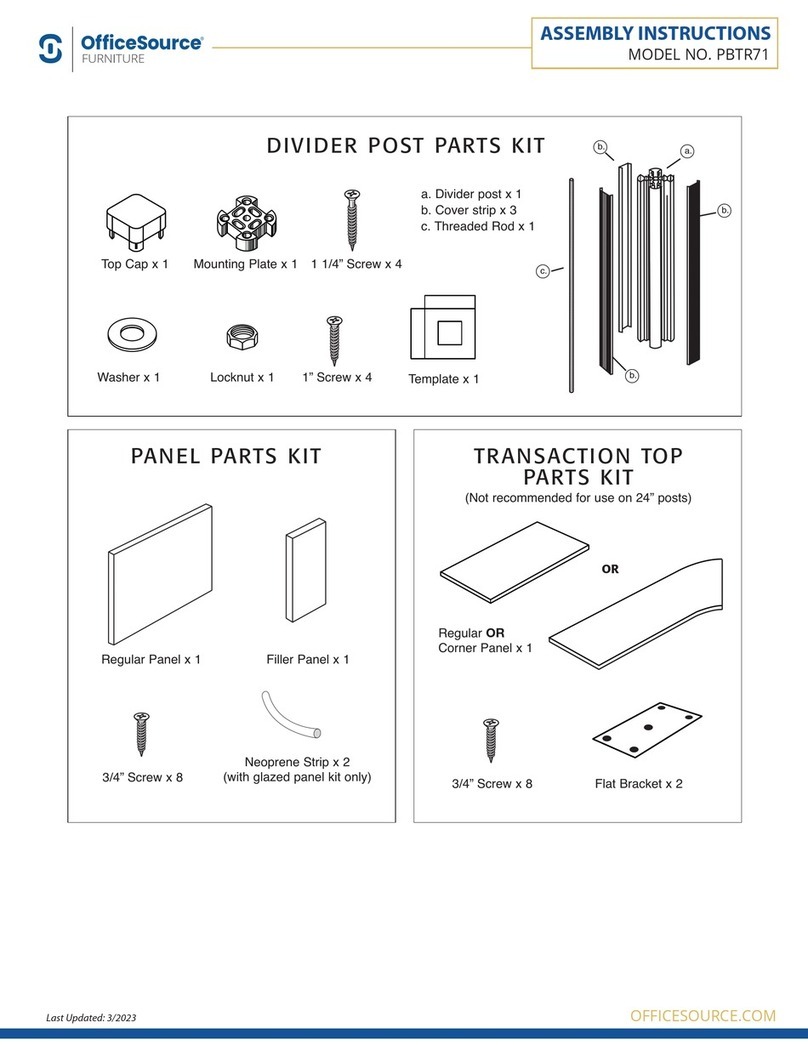
DIVIDER POST PARTS KIT
Top Cap x 1 Mounting Plate x 1 1 1/4” Screw x 4
Template x 1
Washer x 1 Locknut x 1 1” Screw x 4
a. Divider post x 1
b. Cover strip x 3
c. Threaded Rod x 1
Regular Panel x 1
3/4” Screw x 8 3/4” Screw x 8
Filler Panel x 1
Neoprene Strip x 2
(with glazed panel kit only) Flat Bracket x 2
OR
MODEL NO. PBP24
OFFICESOURCE.COM
ASSEMBLY INSTRUCTIONS
Last Updated: 3/2023
®
®www.ocesourcefurniture.com
PBP24
ASSEMBLY INSTRUCTIONS
1.4 Install the mounting plate that is to
be fixed at the other end of the work
surface by following steps 1.1 to 1.3
above.
1.5 Temporarily position a panel between
the two mounting plates. Adjust
mounting plates so that a gap of
approximately 1/16” or 2mm is
between the panel and the plate.
1/16”
or 2.0 mm gap
1.4
1.5
1.7 After all the mounting plates have been properly aligned, including having the panels temporarily
positioned as per instruction 1.5, then install the remaining 3 - 1” screws in each mounting plate as
shown, followed by the 4 - 1 1/4” in the four outside corners of the plate.
1.6 1.7
1.6 Install all the remaining mounting
plates that will be on your work surfaces
following the above instructions. Remember
when aligning the mounting plates use only
the one short screw and do not tighten.
Filler Panel
Regular Panel
STEP 1. ATTACH MOUNTING PLATE
1.1 Fold sides of template downward and
position template tight against work
surface corner.
1.2 Expose double sided tape and
position mounting plate inside the
template opening.
1.3 Remove the template and install the
short 1” screw into one of the
inside holes. Do not tighten.
DO NOT INSTALL ANY OTHER SCREWS
1.1
1.2
1.3
MODEL NO. PBP24
OFFICESOURCE.COM
ASSEMBLY INSTRUCTIONS
Last Updated: 3/2023
MODEL NO. PBP24
OFFICESOURCE.COM
ASSEMBLY INSTRUCTIONS
Last Updated: 3/2023
®
®www.ocesourcefurniture.com
PBP24
ASSEMBLY INSTRUCTIONS
STEP 3. SLIDE PANELS INTO PLACE
STEP 4. ATTACHING TRANSACTION TOPS
3.1 Insert a 3/4” screw into threaded hole in each
corner of the panel. Once all the way in,
back out each screw 2 turns.
3.2 Slide panels into place, making sure that
exposed screw head slides down appropiate
channel on post.
3.3 If using glazed panel, in addition to the four
screws, (not required on fabric panels) secure
panel by inserting Neoprene strips between
panel and post (Neoprene strips are provided
with the panel).
3.4 Ensure cover strips on the post are propery
placed. Note. If using transaction tops,
proceed to Step 4
3.5 Tighten locking nut. Place caps on top of divider post.
3/4” Screw
3.1
3.2
Note: All transaction tops come with necessary connecting hardware
4.1 Remove nut and washer. Slide connecting bracket onto threaded rod and divider post.
4.2 Fasten connecting bracket to divider post by tightening locking nut.
4.3 Align connecting brackets
with recessed cut outs on
underside of transaction tops.
4.4 Attach flat brackets to under
side of adjoining transaction
tops with 4 wood screws
provided. 4.1
4.2
4.3
4.4
Underside of
transaction top
STEP 2. MOUNT DIVIDER POST
2.1 Place divider post over mounting plate.
2.2 Screw threaded rod through divider
post and into mounting plate.
2.3 Place washer then nut on rod and
finger tighten only.
2.3
2.1 2.2
MODEL NO. PBP24
OFFICESOURCE.COM
ASSEMBLY INSTRUCTIONS
Last Updated: 3/2023
®
®www.ocesourcefurniture.com
PBP24
ASSEMBLY INSTRUCTIONS
STEP 5. STACKING ON PANELS
Note: When using 2 stacked 12” panels, 24” high posts must be used.
5.1 Attach first level of panels as described in Step 3. Insert 2nd level of panels between 24” high posts in
same fashion.
5.2 Tighten locking nut on the threaded rod and place caps on top of divider post.
USER
SIDE
5.1
5.2
5.1
STACKED
INCORRECTLY
STACKED
PROPERLY
3/4” Screw
TOP CAP
Please ensure panels are stacked properly - rails should fit in channels .

Other OfficeSource Indoor Furnishing manuals
OfficeSource PB21236 User manual

OfficeSource

OfficeSource PB21236 User manual

OfficeSource PB21271ACR User manual

OfficeSource

OfficeSource PB21271ACR User manual

OfficeSource PL231T User manual

OfficeSource

OfficeSource PL231T User manual

OfficeSource EVS600GG User manual

OfficeSource

OfficeSource EVS600GG User manual

OfficeSource PL102 User manual

OfficeSource

OfficeSource PL102 User manual

OfficeSource OX9130 User manual

OfficeSource

OfficeSource OX9130 User manual

OfficeSource Wellness Series User manual

OfficeSource

OfficeSource Wellness Series User manual

OfficeSource PBTR48 User manual

OfficeSource

OfficeSource PBTR48 User manual

OfficeSource RCN3131C User manual

OfficeSource

OfficeSource RCN3131C User manual

OfficeSource PL150 User manual

OfficeSource

OfficeSource PL150 User manual

OfficeSource PL163 User manual

OfficeSource

OfficeSource PL163 User manual

OfficeSource PL2013 User manual

OfficeSource

OfficeSource PL2013 User manual

OfficeSource PL102 User manual

OfficeSource

OfficeSource PL102 User manual

OfficeSource PLTEAB4872ECONF User manual
OfficeSource

OfficeSource PLTEAB4872ECONF User manual

OfficeSource EVH200DGG/EBK User manual
OfficeSource

OfficeSource EVH200DGG/EBK User manual

OfficeSource PB21266 User manual

OfficeSource

OfficeSource PB21266 User manual

OfficeSource PB21271 User manual

OfficeSource

OfficeSource PB21271 User manual

OfficeSource PL103 User manual

OfficeSource

OfficeSource PL103 User manual

OfficeSource PLTEAB4872ECONF User manual

OfficeSource

OfficeSource PLTEAB4872ECONF User manual

OfficeSource OX9245 User manual

OfficeSource

OfficeSource OX9245 User manual

OfficeSource RCN4731 User manual

OfficeSource

OfficeSource RCN4731 User manual

OfficeSource EVH200DGG User manual

OfficeSource

OfficeSource EVH200DGG User manual

OfficeSource PLTCRKB36WF30 User manual

OfficeSource

OfficeSource PLTCRKB36WF30 User manual

OfficeSource EVT8AGG User manual

OfficeSource

OfficeSource EVT8AGG User manual

Popular Indoor Furnishing manuals by other brands

nbf SIGNATURE Series CARBON COLLECTION Assembly instructions

nbf

nbf SIGNATURE Series CARBON COLLECTION Assembly instructions

Happy Babies ANIMALS SZ02 BL Assembly instruction

Happy Babies

Happy Babies ANIMALS SZ02 BL Assembly instruction

Sanus Systems WFA37 Assembly instructions

Sanus Systems

Sanus Systems WFA37 Assembly instructions

BCP SKY2253 instruction manual

BCP

BCP SKY2253 instruction manual

HOMCOM 838-264V03 Assembly instructions

HOMCOM

HOMCOM 838-264V03 Assembly instructions

Coaster 204192 Assembly instructions

Coaster

Coaster 204192 Assembly instructions

Nordic Home 1653283 Assembly instructions

Nordic Home

Nordic Home 1653283 Assembly instructions

Costway JV10215CF user manual

Costway

Costway JV10215CF user manual

BOCK belluno Assembly and operation manual

BOCK

BOCK belluno Assembly and operation manual

Safavieh Javan FOX4255A quick start guide

Safavieh

Safavieh Javan FOX4255A quick start guide

Southern Enterprises CK927000TX Assembly instructions

Southern Enterprises

Southern Enterprises CK927000TX Assembly instructions

Indiana Furniture Square One 17-1 Assembly instructions

Indiana Furniture

Indiana Furniture Square One 17-1 Assembly instructions

EAST COAST Urban Assembly and care instructions

EAST COAST

EAST COAST Urban Assembly and care instructions

DITALIA CD-639 Assembly manual

DITALIA

DITALIA CD-639 Assembly manual

Next STOCKHOLM TL SHELF Assembly instructions

Next

Next STOCKHOLM TL SHELF Assembly instructions

Flexispot Comhar Pro Q8 installation guide

Flexispot

Flexispot Comhar Pro Q8 installation guide

Vamol Classic Monel Bancada Princess 010062150 Assembly instructions

Vamol

Vamol Classic Monel Bancada Princess 010062150 Assembly instructions

TOPSKY TS500018 manual

TOPSKY

TOPSKY TS500018 manual

manuals.online logo
manuals.online logoBrands
  • About & Mission
  • Contact us
  • Privacy Policy
  • Terms and Conditions

Copyright 2025 Manuals.Online. All Rights Reserved.