OLT RB812GHO User manual

8x12 Garden in a Box with
Greenhouse Cover
Assembly Manual
Version #1.3
Jan 26, 2022
1-888-658-1658 www.outdoorlivingtoday.com sales@outdoorlivingtoday.com
Page 1
In the event of a missing or broken piece, call the Outdoor Living Today Customer Support Line @ 1-888-658-1658 with-
in 30 days of the delivery of your purchase. It is our commitment to you to courier replacement parts, free of charge,
within 10 business days of this notification. Replacement parts will not be provided free of charge after the 30 day
grace period.
All structures purchased from Outdoor Living Today are covered for a period of one year for defects in manufacturing
and workmanship. Costs incurred for customer installations are not included.
Failure to use supplied parts included in this kit could result in poor product performance and may void your warranty.
Please contact Outdoor Living Today’s Customer Toll Free Line if you plan to deviate from our written instructions.
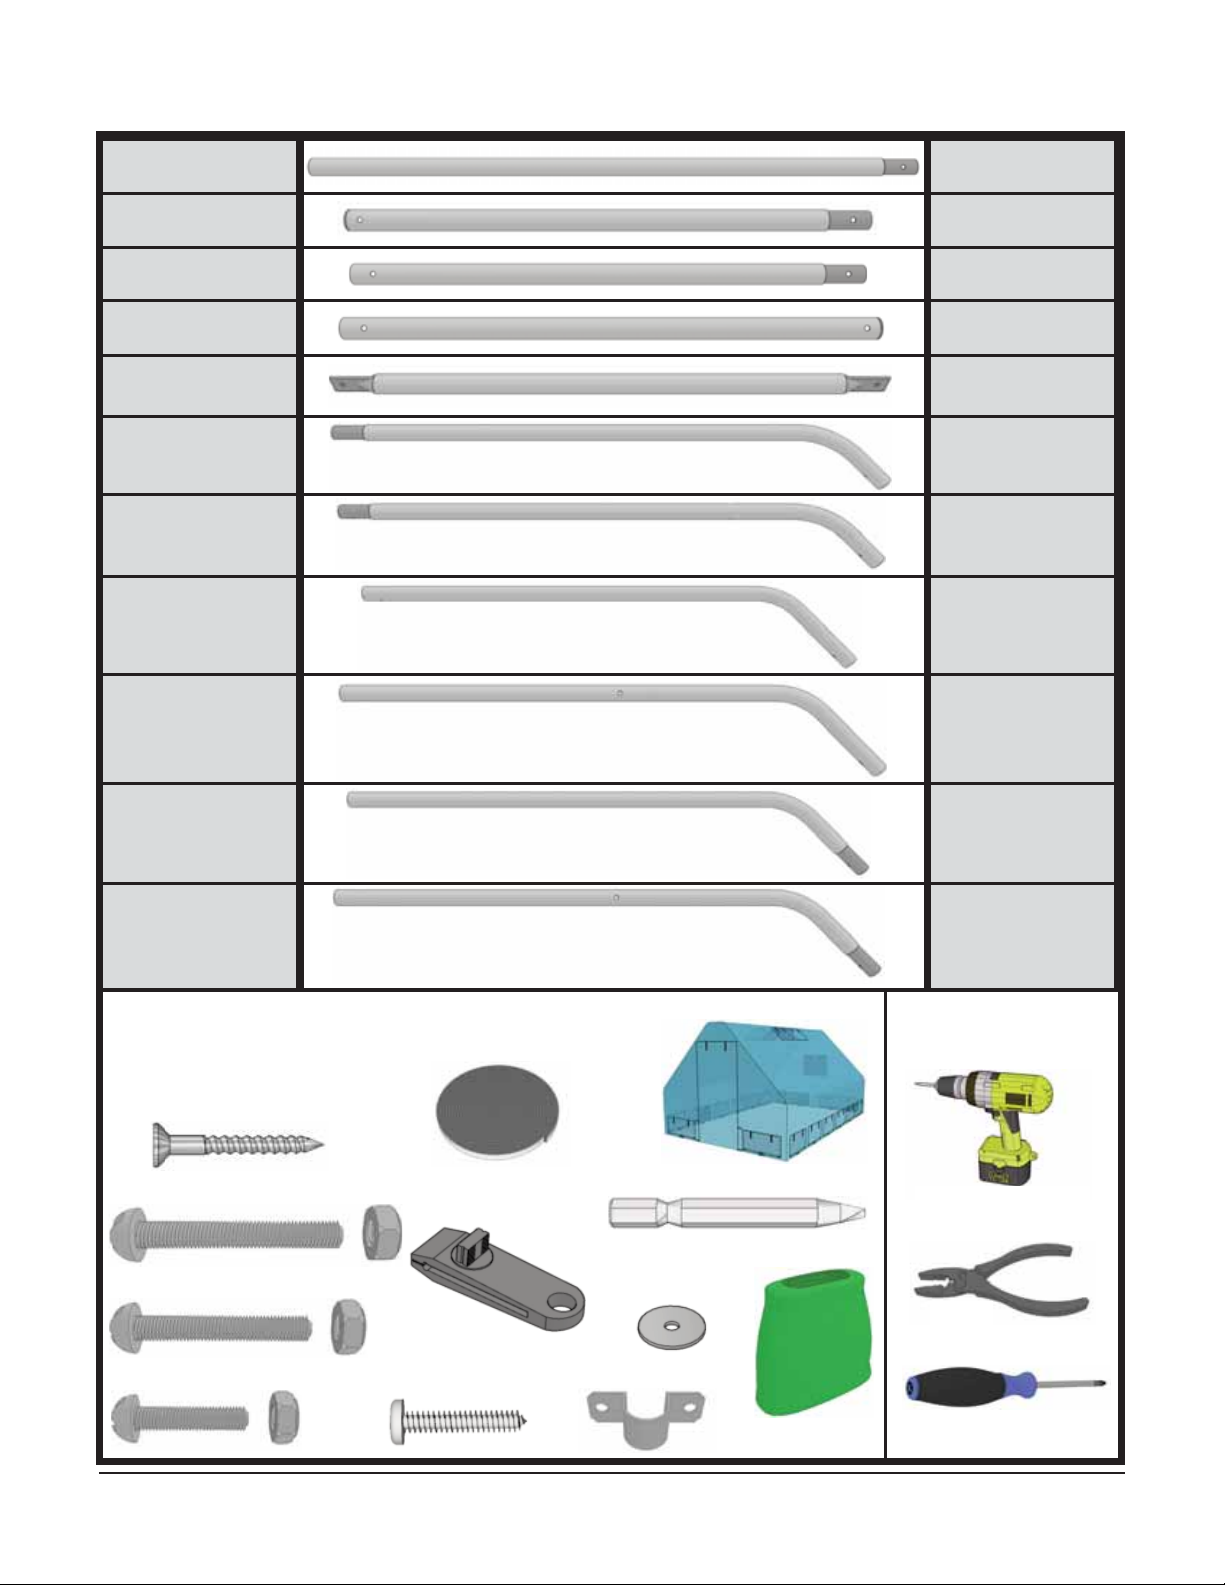
Thank you for purchasing a
8x12 Garden in a Box with Greenhouse
Cover. Please take the time to identify
all the parts prior to assembly.
In colder climates, please remove your Garden in a Box
Plastic Cover during the winter months and store in
included bag in a dry warm location.
Do not leave cover on during any large snow storms or
extreme weather phenomenon such as hurricanes,
tornadoes or heavy wind storms.
Cover can easily be taken off in minutes if such weather
patterns are forecast in your area.
We recommend once a year in the early spring to check
that all fasterners are snug and to tighten if loose.
Plastic cover can be cleaned with a mild soap and a cloth.
Customer agrees to hold Outdoor Living Today
and any Authorized Dealers free of any liability
for improper installation, maintenance and
repair.

Toll Free 1-888-658-1658 www.outdoorlivingtoday.com sales@outdoorlivingtoday.com
Page 2
Thank you for purchasing our 8x12 Garden in a Box with Greenhouse Cover.
Please take the time to identify all the parts prior to assembly.
Part 1 x 14
Part 2 x 5
Part 3 x 20
Part 4 x 5
Part 5 x 6
Part 6 x 12
Part 7 x 2
Part 8 x 3
Part 9 x 4
Part 10 x 3
Part 11 x 4
Pliers
Phillips Screwdriver
Tools Required
(Not Provided)
Hardware
& Miscellaneous
Screw Gun/Drill
10 x M6x35
33 x M6x55
2 x M6x60
Storage Bag
56 x S2 - 1 1/4” Screws
Greenhouse Cover
28 x Pipe Clamps
2 x Protective Stripping
Rolls (40ft each)
16 x Clips
16 x Washers
16 x 1 1/4” Pan
Head Screws
1 x BR1 - Square Drive Bit

Toll Free 1-888-658-1658 www.outdoorlivingtoday.com sales@outdoorlivingtoday.com
Page 3
Exploded View
1
1
6
2
7 5
5
2
2
8 10
3
5
2
11
3
3
6
6
6
6
6
4
4
4
9 11
6
4
6
6
6
6
7
6
11
10
11
8
8
9
9
9
3
3
3
3
3
3
3
5
5
5
Front
4
3
3
3
2
3
3
3
3
3
3
1
1
1
1
1
1
1
1
1
1
1
1
3
10

1 x M6x55
1 x Part 9
1 x Part 111 x Part 4
Parts & Hardware
Step
1
Toll Free 1-888-658-1658 www.outdoorlivingtoday.com sales@outdoorlivingtoday.com
Page 4
Tighten
until snug.
Part 9
Start with top
rear connection.
M6x55
Part 4
Part 11
Rear
Rear

2 x M6x35
1 x Part 5
Parts & Hardware
Step
2
Toll Free 1-888-658-1658 www.outdoorlivingtoday.com sales@outdoorlivingtoday.com
Page 5
M6x35
M6x35
Part 5
Tighten
until snug.
Rear
Rear

1 x M6x55
1 x Part 8
1 x Part 101 x Part 3
Parts & Hardware
Step
3
Toll Free 1-888-658-1658 www.outdoorlivingtoday.com sales@outdoorlivingtoday.com
Page 6
Part 10
M6x55
Part 3
Part 8
Rear
Rear

5 x M6x55
2 x Part 8 2 x Part 10
3 x Part 3
Parts & Hardware
Step
4
Toll Free 1-888-658-1658 www.outdoorlivingtoday.com sales@outdoorlivingtoday.com
Page 7
1 x Part 2
3 x Part 9 3 x Part 11
3 x Part 5
6 x M6x35
Front
Rear
M6x55
Part 9
Part 3
Part 5
Part 8
M6x35
M6x35
M6x55
Part 3
Part 11
Part 10
Part 9
Part 5
Part 3
M6x55 M6x55
M6x55
Part 8
Part 9
Part 3 Part 2
Part 5
Part 11
Part 10
Part 11
Completed top section

6 x Part 6
1 x Part 4
Parts & Hardware
Step
5
Toll Free 1-888-658-1658 www.outdoorlivingtoday.com sales@outdoorlivingtoday.com
Page 8
Rear
1 x Part 7
4 x Part 3
1 x Part 2 1 x Part 5
1 x M6x35 6 x M6x55 1 x M6x60
Start with rear
connection and
work towards front.
Part 5
Part 6
Part 6
Part 6
Part 6
Part 6
Part 6
Part 7
Part 2 Part 3
Part 3
Part 3
Part 3
Part 4
M6x55 M6x55 M6x55 M6x55
M6x55 M6x55
M6x35
M6x60
Part 5

1 x M6x35
6 x Part 6
1 x Part 4
Parts & Hardware
Step
6
Toll Free 1-888-658-1658 www.outdoorlivingtoday.com sales@outdoorlivingtoday.com
Page 9
1 x Part 7
4 x Part 3
1 x Part 2 1 x Part 5
6 x M6x55 1 x M6x60
Front
Front
Step 6 - Complete opposite
side as per Step 5.
M6x55
Part 6
Part 5
Part 7
Part 6
Part 6
Part 6
Part 6
Part 6
Part 2
Part 3
Part 3
Part 3
Part 3
Part 4
M6x55 M6x55 M6x55 M6x55 M6x55 M6x60
M6x35
Rear

Parts & Hardware
Step
7
Toll Free 1-888-658-1658 www.outdoorlivingtoday.com sales@outdoorlivingtoday.com
Page 10
Front
14 x Part 1
Front
Part 1
Part 1
Part 1
Part 1
Part 1 Part 1 Part 1 Part 1 Part 1
Part 1
Part 1
Part 1
Part 1
Part 1
Insert remaining Part 1’s to stand up
Greenhouse frame
Note: You may find it easier to complete
Step 11 before beginning Step 7 since
the top of the frame will be difficult to
reach after installing Part 1’s.

14 x M6x55
Parts & Hardware
Step
8
Toll Free 1-888-658-1658 www.outdoorlivingtoday.com sales@outdoorlivingtoday.com
Page 11
8 x Part 3
Part 3
M6x55
Front
Part 2
M6x55
2 x Part 4
2 x Part 2
Complete step 8 for both
sides.
M6x55
M6x55
M6x55
M6x55
M6x55
Part 4
Part 3
Part 3
Part 3
Rear

Step
9
Toll Free 1-888-658-1658 www.outdoorlivingtoday.com sales@outdoorlivingtoday.com
Page 12
Rear

Parts & Hardware
Step
10
Toll Free 1-888-658-1658 www.outdoorlivingtoday.com sales@outdoorlivingtoday.com
Page 13
28 x Y34 - Pipe Clamps
Attach clamps on
left and right side
of garden bed.
56 x S2 - 1 1/4” Screws
Note: Pre-drill
pilot holes to
prevent splitting.

Step
11
Parts & Hardware
Toll Free 1-888-658-1658 www.outdoorlivingtoday.com sales@outdoorlivingtoday.com
Page 14
Peel off film to reveal adhesive side of protective
stripping. Cover top of Greenhouse Frame with
protective stripping as shown below. Start at the
bottom of Part 6 as shown. Protective stripping
will prevent your frame from damaging the cover.
2x Protective Stripping Rolls

Toll Free 1-888-658-1658 www.outdoorlivingtoday.com sales@outdoorlivingtoday.com
Page 15
Step
12
Note: To fit the Greenhouse Cover
on the frame, you will need to
open the doorway of the cover.
*Greenhouse Cover is
not actually rigid.
Unzip inner flap
and reach through
to roll up roof vent.
You may need a
step ladder to reach
the roof vents.

Toll Free 1-888-658-1658 www.outdoorlivingtoday.com sales@outdoorlivingtoday.com
Page 16
Parts & Hardware
Step
13
2 x Clips
2 x Washers
2 x 1 1/4” Pan Head Screws
Front of Unit
Note: Do not pull the Greenhouse Cover
down too tight when attaching the clips.

Toll Free 1-888-658-1658 www.outdoorlivingtoday.com sales@outdoorlivingtoday.com
Page 17
Parts & Hardware
Step
14
14 x Clips
14 x Washers
14 x 1 1/4” Pan Head Screws
Right Side of Unit
Left Side of Unit
Rear of Unit

Congratulations on assembling your
8x12 Garden in a Box with Greenhouse Cover!
We value your feedback and
would like to hear back from you
on how well we are doing in the
following areas:
1. Customer Service
2. On Time Shipping
3. Motor Freight Delivery
4. Quality of Materials
5. Assembly Manual
6. Overall Satisfaction.
Toll Line: 1.888.658.1658 | Fax: 1.604.462.5333 | sales@outdoorlivingtoday.com
The materials contained in this
Assembly Manual may be downloaded
or copied provided that ALL copies
retain the copyright and any other
proprietary notices contained on the
materials. No material may be
modified, edited or taken out of context
such that its use creates a false or
misleading statement or impression as
to the positions, statements or actions.
Canadian Address
9393 287th Street
Maple Ridge, British Columbia
Canada V2W 1L1
United States Address
P.O. Box 96
Sumas, Washington
USA 98295
Outdoor Living Today
Please call, write or email us at:
We hope your experience
assembling your 8x12
Garden in a Box with
Greenhouse Cover has been
both positive and rewarding.
Page 18
This manual suits for next models
1
Table of contents
Other OLT Greenhouse Kit manuals
Popular Greenhouse Kit manuals by other brands

Mercia Garden Products
Mercia Garden Products 04GREEN0606SDPB-V1 General instructions

Floria garden products
Floria garden products Popular W605 Assembly instructions

HOKLARTHERM
HOKLARTHERM Riga III Series Assembly instructions

Otto
Otto VM9057-PSC 5000 Assembly instructions

Palram
Palram CANOPIA HARMONY How to assemble

Dancover
Dancover GH140055 manual