manuals.online logo
Brands
  1. Home
  2. •
  3. Brands
  4. •
  5. Olympia
  6. •
  7. Bathroom Fixture
  8. •
  9. Olympia FANTOM 69201 Instruction Manual

Olympia FANTOM 69201 Instruction Manual

Other Olympia Bathroom Fixture manuals

Olympia TUTTO EVO 17TE Instruction Manual

Olympia

Olympia TUTTO EVO 17TE Instruction Manual

Olympia P-4430 User manual

Olympia

Olympia P-4430 User manual

Popular Bathroom Fixture manuals by other brands

Kohler Mira Sport Max J03G Installation and user guide

Kohler

Kohler Mira Sport Max J03G Installation and user guide

Moen 186117 Series installation guide

Moen

Moen 186117 Series installation guide

Hans Grohe Raindance Showerpipe 27235000 Instructions for use/assembly instructions

Hans Grohe

Hans Grohe Raindance Showerpipe 27235000 Instructions for use/assembly instructions

Signature Hardware ROUND SWIVEL BODY SPRAY 948942 Install

Signature Hardware

Signature Hardware ROUND SWIVEL BODY SPRAY 948942 Install

fine fixtures AC3TH installation manual

fine fixtures

fine fixtures AC3TH installation manual

LIXIL HP50 Series quick start guide

LIXIL

LIXIL HP50 Series quick start guide

KOLO ATOL PLUS installation manual

KOLO

KOLO ATOL PLUS installation manual

Hans Grohe PuraVida 15073000 Instructions for use/assembly instructions

Hans Grohe

Hans Grohe PuraVida 15073000 Instructions for use/assembly instructions

Toto TS111B8 Installation and owner's manual

Toto

Toto TS111B8 Installation and owner's manual

Kohler K-1158-H2 Homeowner's guide

Kohler

Kohler K-1158-H2 Homeowner's guide

Coram Showers OFFSET QUADRANT manual

Coram Showers

Coram Showers OFFSET QUADRANT manual

baliv DU-2010 manual

baliv

baliv DU-2010 manual

odass OD-1710 instruction manual

odass

odass OD-1710 instruction manual

Oxygenics Evolution Easy installation instructions

Oxygenics

Oxygenics Evolution Easy installation instructions

Bradley Express SS Series installation instructions

Bradley

Bradley Express SS Series installation instructions

Helvex TH-974 installation guide

Helvex

Helvex TH-974 installation guide

DURAVIT C.1 C15240 0090 Instructions for mounting and use

DURAVIT

DURAVIT C.1 C15240 0090 Instructions for mounting and use

Sunshower PURE SOLO manual

Sunshower

Sunshower PURE SOLO manual

manuals.online logo
manuals.online logoBrands
  • About & Mission
  • Contact us
  • Privacy Policy
  • Terms and Conditions

Copyright 2025 Manuals.Online. All Rights Reserved.

Installazione e garanzia
Installation and maintenance
4www .olympiaceramica.it
Bidet a terra
Back to wall bidet
art. 69201
Olympia Ceramica s.r.l.
Loc. Pantalone, 35 - 01030 Corchiano (VT), Italy
tel. +39 0761.573392 r.a. fax. +39 0761.573393
[email protected] www.olympiaceramica.it
FANTOM
IMPORTANTE - PLEASE READ
SERUSAEM-ERUSIM COM PONENTI - COMP STNENO
2
art. FBVF
Fixing kit
120
190
120
mm
mm
mm
mm
265 mm
1
2
3
ART. 05FOFORMOSA
INSTALLAZIONE- INSTALLATION
3
80/100
- Leggere attentamente queste istruzioni prima di iniziare l’istallazione.
- Controllare il pr re che non ci siano pezzi mancanti o danneggiati.
- Se ci dovessero essere proble darsi alla garanzia.
- Si raccomanda l’installazione da parte di personale qu .
- Nelle nuove abitazioni riempire con acqua il sifone di vasi, lavabi e bidet per evitare il rilascio di gas
corrosivi che possono rovinare la rubinetteria ed il copriwater.
- Fissare i tubi di entrata e scarico acqua prima dell’istallazione.
- Grazie ad un lavaggio periodico si può evitare la formazione di calcare.
- R esidui di prodotti acidi per il lavaggio possono danneggiare i pezzi metallici dei sanitari e i relativi rubinetti.
• Please read these instructions carefully before starting installation.
• Check the product for missing parts and damages.
• In the unlikely event of product failure, please refer to supplier concerning product guarantee.
• We strongly recommend the use of a quali
• In new buildings it is recommended to ll the traps with water to ensure toxic gases do not corrode the surface
of .
• Fix all the outlet and inlet valves before installation.
• Periodic cleaning and maintenance should be used to avoid formation of damaging lime scale deposits.
• Astringent cleaning agents may damage some materials, such as seat hinges and plastic components.
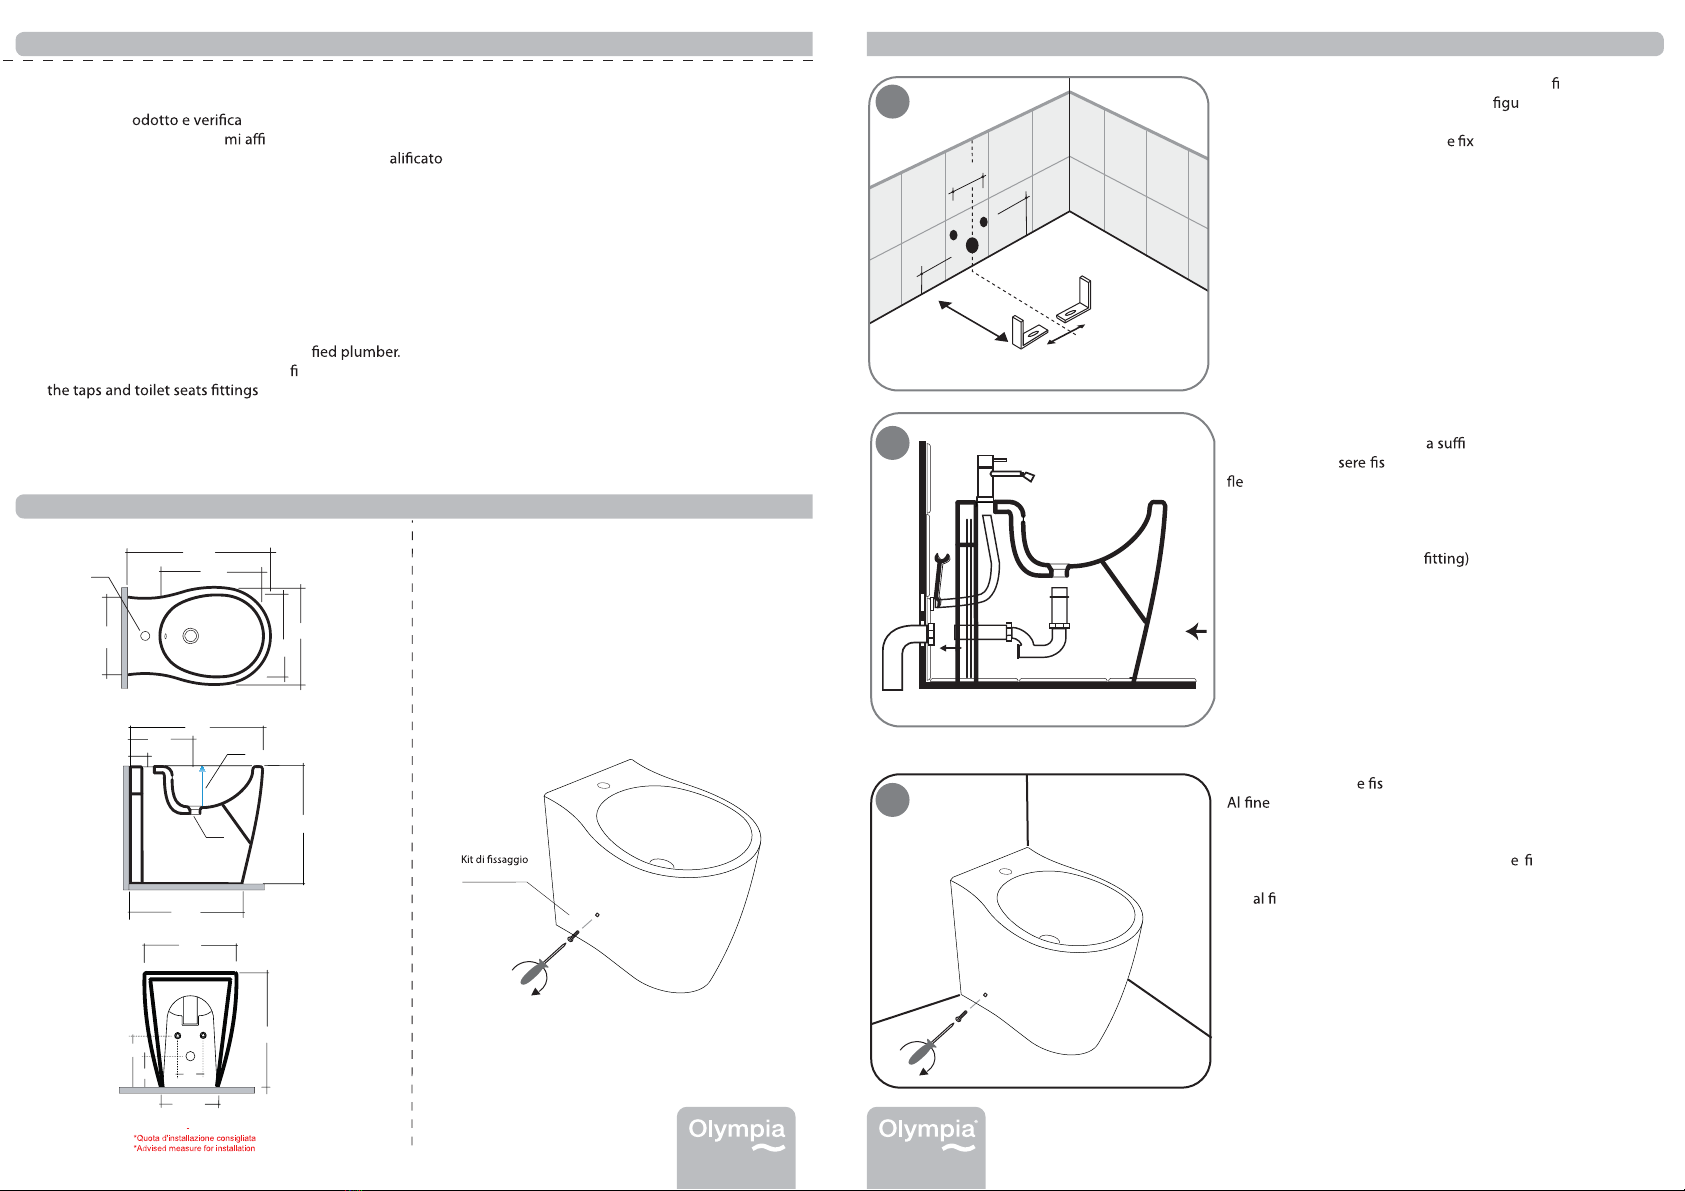
1- Predisporre gli scarichi e posizionare le viti di ssaggio
mantenendo la distanza mostrata nella ra 1.
1- Prepare the Waste pipe and th ing brackets according
to the distance in the picture.
2- Installare la rubinetteria ed il sifone lasciando che il
tubo di scarico esca dal bidet cenza per permettere
allo scarico di es sato a muro. Collegare i due tubi
ssibili dell’acqua e lo scarico alle prese del muro.
2- Assemble the taps, waste and trap. (ATTENTION: the
waste pipe must be cut to the correct length in order to make
good connection with waste . Connect the two waste
pipes for water and the discharg to the wall.
3- Livellare il bidet sarlo utilizzando le apposite viti.
di ottenere una installazione corretta alla parete, si
consiglia di alternare l’avvitamento.
3- Align the bidet and secure it with th xing nuts. It is
recommended to tighten the nuts alternately to secure an
equ t of the bidet against the wall.
100
190
120
420
420
60
225
540
370
370
540
300
Ø35
Ø46
290
360
180
470
210