OMAS CX MATIC Maintenance and service guide

4/4
DEFINITIONS
Motors
electrical
data
1~ S1 33
W V Hz Phase N° Service A IP
Degree of
Protection
240 50
120 60 7
REMARK: Stop the carriage at the
end of the stroke nearest the
oprator and pour the lubricant into
the special oiler
Carriage bar oiler
Slice thickness control knob
Product holder fixing knob
Carriage release handle
Product holder stroke
adjustement
Start Product holder Stop Product holder
Stop Balde
Start Balde
NB: For the manual funtioning of the carriage
rotate the handle clockwise by 180°
Power Supply (led)
Start Balde (led)
Start Product holder (led)
550
B
D
620
580
430
TECHNICAL DATA
C
A
CX Matic
Slicing Capacity mm
Ø 300 Ø 330 Ø 350 Ø 370
A150 165 185 190
B260 260 260 260
C250 270 290 305
D210 235 240 260
MANUAL OPERATION
RotatetheAUTO/MANUALselectorcarriage release handleby1800,clockwise
Pushtheonswitch/bladestartpushbutton
Adjustthethicknessyouwantbyturningtheslicethicknesscontrol knob
Actuatethecarriagebyyour hand
Pushtheoffswitch/bladestoppushbutton
AUTOMATIC OPERATION
RotatetheAUTO/MANUALselectorcarriage release handle by1800,counterclockwise
Pushtheonswitch/bladestartpushbutton
Adjustthethicknessyouwantbyturningtheslicethicknesscontrol knob
Pushtheproductholderstartpushbutton
Adjustthelengthofthestrokebyturningtheproductholderstrokeadjustment
Pushtheproductholderstoppushbutton to end carriage movement
PushtheoffswitchbIadestoppushbutton
LUBRICATION
Therodon which the product holder slides, whichisunderneath the slicer,shouldbelubricated
weeklywithseveraldropsofoil.Stopthecarriage at the endofthestroke nearest the operatorposition
andpourtheIubricantintothespecialoiler.DONOTusevegetableoil.Occasionally,theslicethickness
platesliderodshouldbecoatedIightlywithlubricant.Turntheslicethicknesscontrolfullycounterclockwise
whenIubricatingthissliderodandthenturnitfullyclockwisewhenfinished.DONOTlubricatetherodon
which the last slice device slides. It must be kept clean but not lubricated. The motor has sealed
bearingsandrequiresnoIubrication maintenance.
WEAR ADJUSTMENT
Afterseveral,yearsofoperationandmanysharpeningsof the blade it may becomenecessarytohave
the slice thickness plate 14 adjusted closer to the blade.

1/4 Filename:Man_CX_Matic_300.PMD07/02/06
INSTALLATION
MAINTENANCE
SLICER CX MATIC
INSTALLATION
UNPACKING
Immediatelyondeliveryunloading,please chek whether machinepackagingiseventuallydeteriorated
and in this case make necessary reservetions on signing the delivery note. You will than check the
machineinsidepackaging and eventuallycontact immediately thecarrierwhen it isdamaged.
Priortoinstallation,testtheelettricalservicetoassurethatitisincompliance with the specifications on
the machine data plate 1 .
ELECTRICAL
Warning: THIS MACHINE IS PROVIDED WITH THIS PLUG MUST BE CONNECTED
TO PROPERLY GROUNDING PLUG, GROUNDED OUTLET. IF THE RECEPTACLE IS NOT THE
PROPERGROUNDINGTYPE,CONTACTANELECTRICIAN.
CLEANING
This machine musi be thoroughly cleaned and sanitized after installation and before being put into
service.
SAFETY
SAFETYDEVICESINCORPORATEDINTHISSLICERMUSTBE INTHEIR
CORRECTOPERATINGPOSITIONEVERYTIMETHESLICERISINUSE.
The blade cover 6must be in position over the knife and secured by tightening
the hand knob 7.
TheIast slice device 4 mustbe used whenslicing, itkeeps your handsaway fromthe knife.
RETURN

2/4
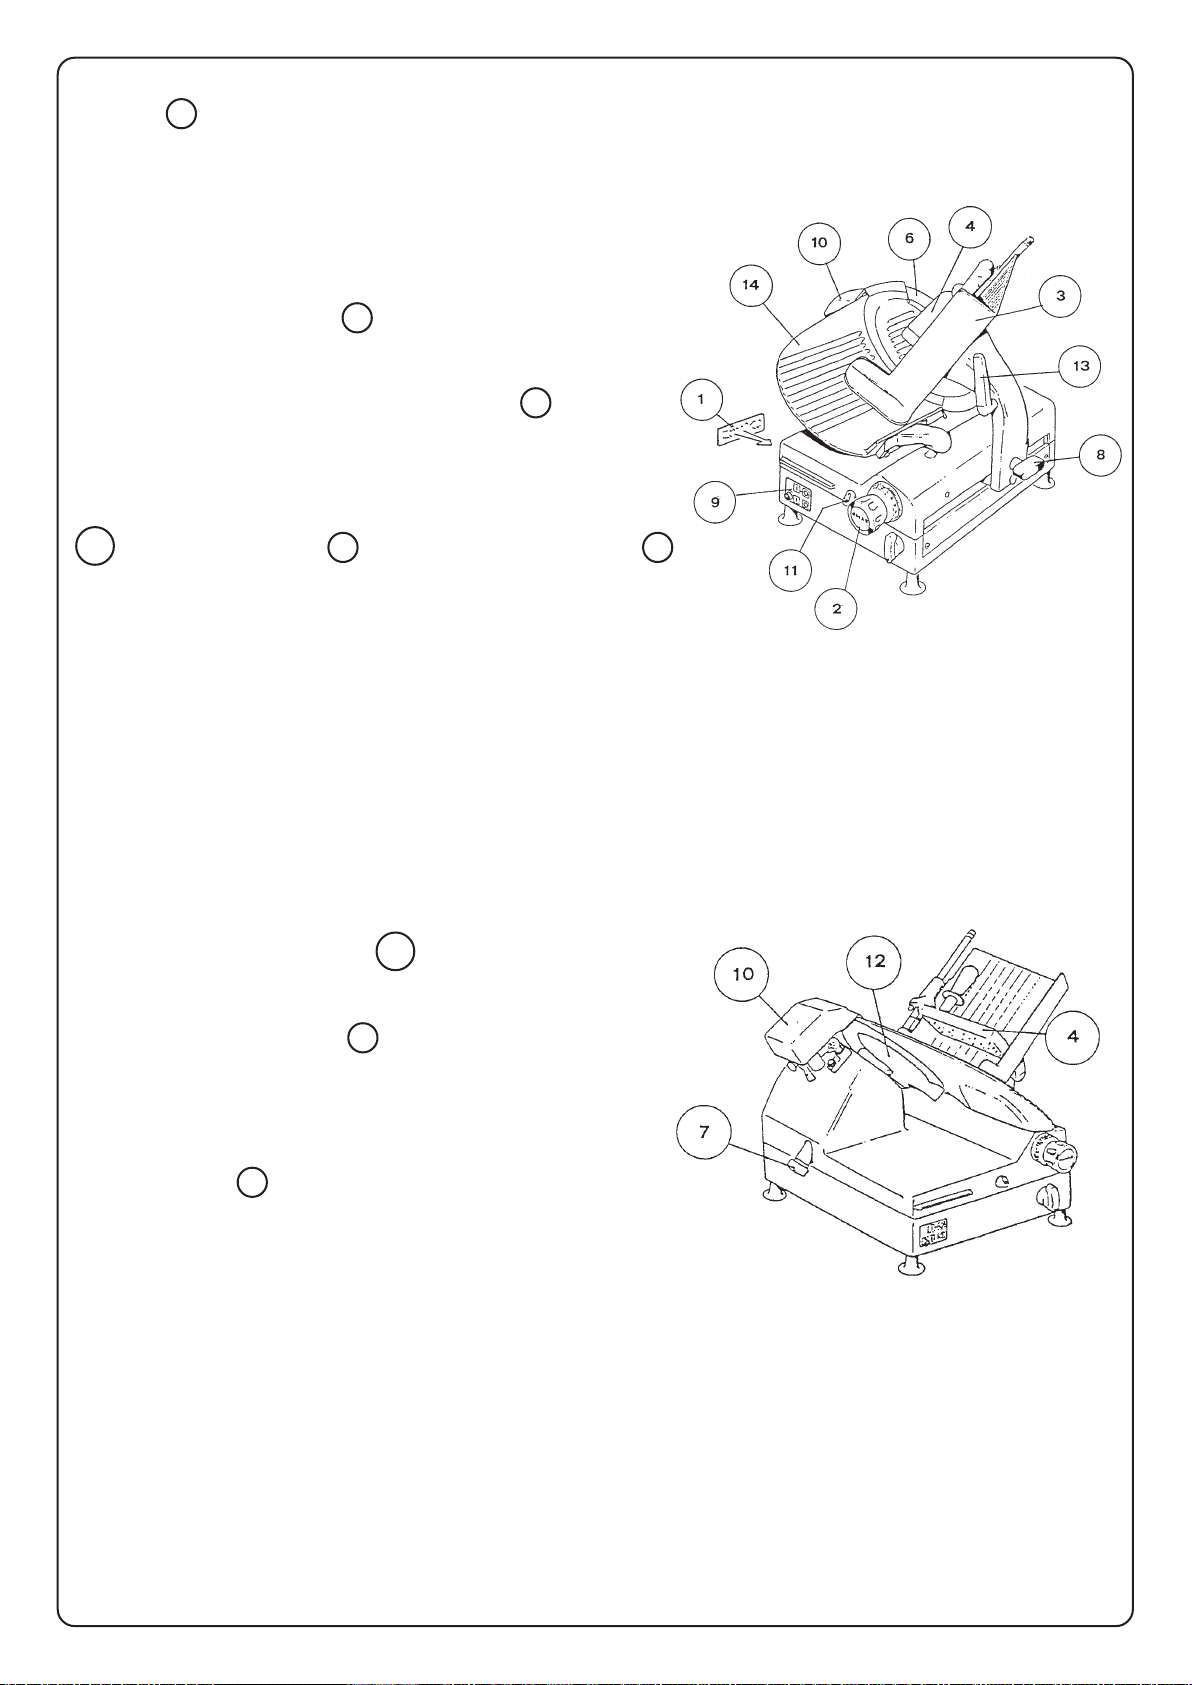
When the siicer is not working, the slicer thickness
control 2 mustbesetonzero(fuIlyclockwise)toprevent
the blade edge from being exposed.
AlwaysUNPLUGthepowercordbeforecleaningormoving
theslicer.
SLICING
PuII the product holder 3 towards you until it stops
andplacetheproduct to be slicedonthe product holder
tray. Place the last slice device against the product and
startthe slicer by pressingtheon-offswtich 9 .Adjustthe
slicethicknessbyturningtheslicethicknesscontrol.The
numbers on the slice thickness control do not indicate
precise measurement, but may be used for reference to
duplicateslicethickness.Usingeitherthecarriagehandle
13 orIast slice device 4 pushtheproduct holder 3
back and forth to slice. Always swtich-off the slicer and
turnthe slice thickness control clockwise tozero when
notslicing.
WARNING: Slicershouldnotbeoperatedbyuntrained
personnelor persons under18yearsofage.
CLEANING
Thismachinemustbethoroughlycleanedaftereachday’s
operationorevery time it willnotbe used foranextended
period.
WARNING: UNPLUGMACHINE POWERCORD
AND TURN THE INDEX KNOB FULLY CLOCKWISE
BEFORECLEANINGTHE SLICER.
Removethe slice deflector 12 byremovingitsthumb
screw.
Theproductholdercanberemovedforaneasy cleaning
byunfastening its handle 8 .
Usingamildsoapandhotwatersolutionandacleancloth,
wipeallsurfaces of theslicer.
Thoroughlyrinseitwithanothercleanclothandfreshwater.
Remove the blade cover byremoving
the hand knob 7 . With the hand knob removed, grasp
theedgeof the blade cover andcarefullyliftitstraight off
theknife.
WARNING:THE SLICER BLADE IS VERYSHARPUSE
EXTREME CAUTION WHEN WORKING NEAR THE
BLADE.
CAREFULLYwash bothsides of theblade withthe slice
thicknesscontrol turnedfullyclockwise. Washtheblade
by wiping outward from the center. ALWAYS rinse the
bladethoruogthlyusingfreshwaterandacleancloth.Never
use steel pads it clean the blade. Wash and thoroughly
rinsetheremovedcamponentspriortoreassemblingthem.
DONOTwash anyslicercomponents in a dishwasher.

3/4
MAINTENANCE
ATTENTION
Use protection gloves
ELECTRICAL SAFETY
Whentheslicer is runningthe eventual removal ofthe blade cover 6,orthe default ofelectric power,
causesthestop of the machine.
To restartthe slicer press theon-offswitch 9.
SHARPENING OPERATION
Your slicerblade will provide longservice in normaldeli, food store,or commercial kitchenuse.
However,in highvolumeapplications where itis a practicetosharpen the blade frequently or even
daily,the blade willbe expended in a shortertime.
Beforeusingsharpener,besurethe front and back
side of the knife edge is clean and free of grease.
Thesharpenknife:
a)be sure thatthe slicer hasbeen switched off
b) rotate the slice thickness control (item 4 ) into
"O" position, sothat the thickness plate ( item 5 )
protectsthe knife fig.2
Lift up the sharpener cover ( item 1 ) fig. 2
Disengage the pin (item 7 ) and rotate the
sharpener ( item 3 ) fig. 3
Sothatthe sharpener goesinto its sharpening
position (fig. 4 )
To sharpen,firstturning the switch inonposition,so
thattheknifeturns, the slowlyrotatetheleverwhich
letsbothstones go in contactwiththe knife; shar-
pening and trimming are made in same time fig. 5
Replacethesharpenertonormal horizontal position,
by lifting the pin (item 7 ) and close the cover fig. 6
The grinding stone (item 6 ) , fitted on its pin, can be
easilyremoved, by justdrawing it fig. 7
To geta nice sharpening,thegrinding stone mustbe
cleanand free ofgrease.
Thesharpeningtime depends onthewear of the
knife. To get a good result the time needed is 10 to
15seconds. Alonger sharpening reducethe duration
oftheknife and givesno advantage.
Wipethe slicer witha cleandamp cloth toremove
anygrindingparticles.
2
4
5
7
1
3
5
14
7
1
6
7
6
Other OMAS Kitchen Appliance manuals