Omron BP100XSG User manual

1
BP100XSG/BP150XSG Instruction Manual
Perform replacement on a stable and at place.
lHandle the battery carefully so that you do not drop it.
lNot doing so could cause injury or burns due to liquid (acid) leakage.
Use a specied battery for replacement.
lNot doing so may cause a re.
lProduct model:
BP100XSG: One required (Replacement battery pack for BU1002SWG)
BP150XSG: Two required (Replacement battery pack for BU3002SWG)
Do not replace the battery in a place where there is ammable gas.
lSpark may occur when connecting the battery, which may cause an explosion or re.
Replacement battery pack
BP100XSG/BP150XSG Manual
This product is a replacement battery pack for uninterruptible power supply (UPS);
For BU1002SWG: Model BP100XSG
For BU3002SWG: Model BP150XSG
Safety precautions Important information for safe operation is described.
Be sure to read it before installation and start of use.
: Indicates prohibition. For example, indicates that disassembly is prohibited.
: Indicates obligation. For example, indicates that grounding is necessary.
Misuse may cause death or serious injury.
Warning
Caution
● The safety symbols and their meaning used in this manual are as follows:
* Property damage means damage to houses/household effects, livestock, and pets.
Note that events categorized as a caution required matter also may cause more
serious results under certain conditions.
Misuse may cause injury or property damage.
Caution (for battery replacement)
Table of Contents
Safety precautions .................................................................1
Checking the contents ...........................................................3
Replacing the battery .............................................................3

2 BP100XSG/BP150XSG Instruction Manual
Pb
Caution (for battery replacement)
If uid (dilute sulfuric acid) leaks from the battery, do not touch the uid.
lDoing so may cause blindness or burns.
lIf it contacts your eyes or skin, wash it out with lots of clean water and consult your
doctor.
Do not disassemble or modify the battery.
lDoing so could cause dilute sulfuric acid leak, which could cause blindness and burns.
Do not drop the battery and do not expose it to strong impact.
lDilute sulfuric acid may leak.
Do not short the battery with metal objects.
lDoing so could cause an electric shock, re or burn.
lSome electrical energy still remains inside the spent battery.
Do not put the battery into re and do not break it.
lThe battery may explode or leak dilute sulfuric acid.
Do not use a new battery and an old battery at the same time.
lDilute sulfuric acid may leak.
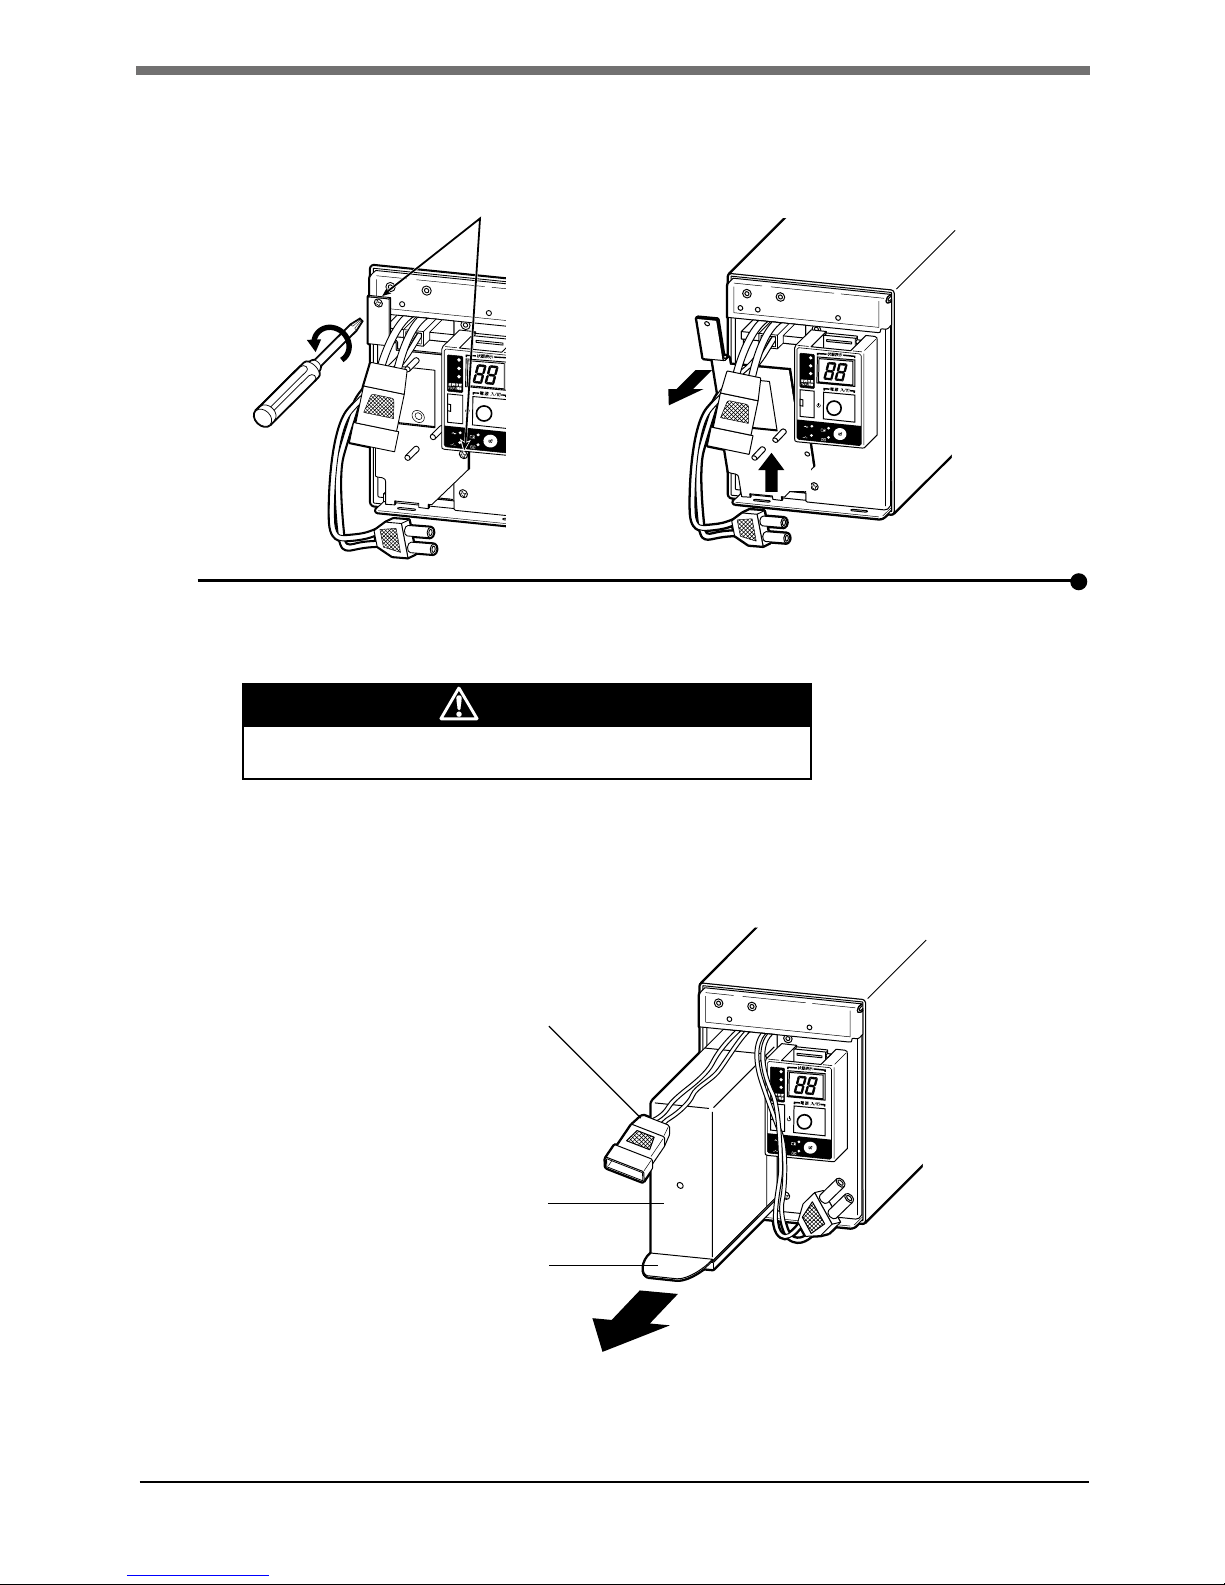
When replacing batteries, do not put hands in the battery compartment.
lDoing so may cause an electric shock or a short circuit.
lDo not insert metal objects.
Do not insert metal objects into the battery connectors.
lDoing so may result in electric shock.
Keep plastic package bags and lms out of reach of children.
lChildren may suffocate if they place their heads into plastic bags and lms.
uNOTEu
Battery recycling
lThe unit uses lead acid batteries, which are a valuable recyclable resource.
Please recycle.
Storage possible period of the battery (in unused state) is about 6 months from the full
charge state. (Storage temperature is 25°C or less, or every 2 months when the storage
temperature is 40°C or less.
lThe battery self-discharges even when it not being used, and it goes into over-discharge
state if it is left for a long period. The backup time may become shorter or the battery may
become unusable.
lDegradation progresses while the battery is being stored, and it shorten the life of the
battery. Start using it as soon as possible.
lStart using the battery within 6 months after purchase.
lWhen storing the battery installed on the UPS, recharge the battery for at least 8 hours
before storing and turn OFF the unit’s power switch when storing it.
lIf the storage period exceeds 6 months, connect the UPS to a commercial outlet for at least
8 hours and recharge it before the storage period exceeds 6 months.
lIf storage is to be continued, recharge every 6 months when the storage temperature is
25°C or less and every 2 months when it is below 40°C.

3 BP100XSG/BP150XSG Instruction Manual
2. Remove the battery connector from the plate cover. 1
Hold the connector and pull it out. 2
90%
50%
30%
-
バッテリ
交換
バッテリ
増設
ブザー停止/テスト
電源出力
バイパス
運転
1
90%
50%
30%
-
バッテリ
交換
バッテリ
増設
ブザー停止/テスト
電源出力
バイパス
運転
Loosen the 2 screws
2
Hold here
to disconnect
90%
50%
30%
-
バッテリ
交換
バッテリ
増設
ブザー停止/テスト
電源出力
バイパス
運転
1
Battery connector
Plate cover
1. Checking the contents
Check whether all the package contents are included and there is no damage found on their ap-
pearance. If you should notice defects or anything wrong, contact the shop of purchase.
lCompliance Information Sheet ......................1
lBattery pack xing screw (spare)...................2
2. Replacing the battery
2-1. Procedure for replacing the battery of UPS
1. Use a screwdriver to loosen (turn counter-clockwise) the 2 screws at the top of the front
panel of the unit, until they turn freely. (The screws cannot be removed from the front
panel.) Pull the top of the front panel open and remove it. 1
BU1002SWG

4 BP100XSG/BP150XSG Instruction Manual
90%
50%
30%
-
バッテリ
交換
バッテリ
増設
ブザー停止/テスト
電源出力
バイパス
運転
Remove the 2 screws
1
90%
50%
30%
-
バッテリ
交換
バッテリ
増設
ブザー停止/テスト
電源出力
バイパス
運転
90%
50%
30%
-
バッテリ
交換
バッテリ
増設
ブザー停止/テスト
電源出力
バイパス
運転
2
3
Battery connector
Battery pack
Pullout label
(Pull this to
remove.)
Use the red tape on the top of the battery pack, which is 10 cm from the inner edge of
the battery, to gauge how much further you need to pull the battery to remove it.
Hold the battery securely with both hands so as not to drop it.
Caution
Do not hold the connector or cable of the battery pack.
3. Turn the 2 screws that x the plate cover counter-clockwise to remove them. 2
Pull the plate cover towards you ➁2 and lift it up to remove it. 3
4. Hold the pullout label at the bottom of the battery pack and remove the battery pack.

5 BP100XSG/BP150XSG Instruction Manual
Tighten the 2 screws.
90%
50%
30%
-
バッテリ
交換
バッテリ
増設
ブザー停止/テスト
電源出力
バイパス
運転
1
90%
50%
30%
-
バッテリ
交換
バッテリ
増設
ブザー停止/テスト
電源出力
バイパス
運転
2
3
90%
50%
30%
-
バッテリ
交換
バッテリ
増設
ブザー停止/テスト
電源出力
バイパス
運転
2
Fasten the connector
to the 3 supports of
the plate cover and
x it.
1
You may hear a “pop” sound when you connect the battery if it is replaced
after the unit’s operation is stopped, but this sound is not abnormal.
5. Insert a new battery into the UPS as far as it will go and store it. 1
lReplacement battery pack
For BU1002SWG: Model BP100XSG
Attach the plate cover.
Insert the hook on the bottom side of the plate cover into the hole of the main body 2,
and push the plate cover toward the main body. 3
Use a screwdriver to securely tighten (clockwise) the 2 screws you removed.
Do not pinch the cable with the plate cover.
6. Insert the connector until it is locked. 1
Fix the connector to the plate cover. 2
If the connector is not xed to the plate cover, the connector is not completely
inserted. Insert the connector again.

6 BP100XSG/BP150XSG Instruction Manual
90%
50%
30%
-
バッテリ
交換
バッテリ
増設
ブザー停止/テスト
電源出力
バイパス
運転
1
2
90%
50%
30%
-
バッテリ
交換
バッテリ
増設
ブザー停止/テスト
電源出力
バイパス
運転
Battery replacement is now complete.
1
1. Remove the battery connector from the plate cover. 1
Hold the connector and pull it out. 2
2
Hold here to
disconnect.
Battery
connector
Plate cover
1
1
Loosen the 4 screws.
7.Attach the front panel.
Insert the hook on the bottom side of the front panel into the hole of the main body 1,
and push the front panel toward the main body. 2
Use a screwdriver to securely tighten (clockwise) the 2 screws at the top of the front
panel.
1. Use a screwdriver to loosen (turn counter-clockwise) the 4 screws at the top of the front
panel of the unit, until they turn freely. (The screws cannot be removed from the front
panel.) Pull the top of the front panel open and remove it. 1
BU3002SWG

7 BP100XSG/BP150XSG Instruction Manual
2
1
Remove the 2 screws.
Battery pack (Upper)
Pullout label
(Pull this to remove.)
Battery connector
Battery pack (Bottom)
Red tape
3. Turn the 2 screws that x the plate cover counter-clockwise to remove them. 1
Pull the plate cover towards you 2and lift it up and remove the bottom battery
connector from the through hole.
4.Hold the pullout label at the bottom of the battery pack and remove the battery pack.
Remove the upper and bottom battery packs one by one.
Use the red tape on the top of the battery pack, which is 10 cm from the inner edge of
the battery, to gauge how much further you need to pull the battery to remove it.
Hold the battery securely with both hands so as not to drop it.
Caution
Do not hold the connector or cable of the battery pack.

8 BP100XSG/BP150XSG Instruction Manual
1
2
Fasten the connector to the
2 supports of the plate cover
and x it.
You may hear a “pop” sound when you connect the battery if it is replaced
after the unit’s operation is stopped, but this sound is not abnormal.
If the connector is not xed to the plate cover, the connector is not completely
inserted. Insert the connector again.
1
2
1
3
Tighten
the 2 screws.
5. Insert new batteries in both upper and bottom parts as far as it will go and store them. 1
lReplacement battery pack
For BU3002SWG: Model BP150XSG (2 required)
Pass the upper part of the bottom battery connector through the square hole of the plate
cover. 2
Insert the hook on the bottom side of the plate cover into the hole of the main body, and
push the plate cover toward the main body.
Use a screwdriver to securely tighten (clockwise) the 2 screws you removed. 3
Do not pinch the cable with the plate cover.
6. Insert the upper and bottom connectors until they are locked. 1
Fix the connector to the plate cover. 2

9 BP100XSG/BP150XSG Instruction Manual
1
2
Tighten the 4 screws.
Pb
Battery replacement is now complete.
7.Attach the front panel.
Push the front panel toward the main body. 1
Use a screwdriver to securely tighten (clockwise) the 4 screws at the top of the front
panel. 2
Write the date you started using the battery on the included battery replacement
date label, and attach it to the front panel.
Also, by using the included UPS monitoring software, possible to keep a record
of usage start date by the software.
<After replacing the battery when operation was stopped...>
Connect the AC input plug to a wall outlet (commercial power) and turn ON the
power switch of the UPS. When operation starts, the self-diagnostic test is automati-
cally performed. Normal operation resumes after the 10-second test.
<After replacing the battery during operation...>
If the battery replacement indicator is displayed and the beeper sounds before
replacement, press the beep stop/test switch once to stop the beeper, and hold it
for 5 sec. to perform a self-diagnostic test. The beeper stops and normal operation
resumes after the 10-second test is complete.
uNOTEu
Battery recycling
lThe unit uses lead acid batteries, which are a valuable recyclable resource.
Please recycle.

NUD-D-17035A
Omron representatives
OMRON EUROPE B.V.
+31 (0) 23 568 13 00
industrial.omron.eu
Austria
Tel: +43 (0) 2236 377 800
industrial.omron.at
Belgium
Tel: +32 (0) 2 466 24 80
industrial.omron.be
Czech Republic
Tel: +420 234 602 602
industrial.omron.cz
Denmark
Tel: +45 43 44 00 11
industrial.omron.dk
Finland
Tel: +358 (0) 207 464 200
industrial.omron.
France
Tel: +33 (0) 1 56 63 70 00
industrial.omron.fr
Germany
Tel: +49 (0) 2173 680 00
industrial.omron.de
Hungary
Tel: +36 1 399 30 50
industrial.omron.hu
Italy
Tel: +39 02 326 81
industrial.omron.it
Netherlands
Tel: +31 (0) 23 568 11 00
industrial.omron.nl
Norway
Tel: +47 (0) 22 65 75 00
industrial.omron.no
Poland
Tel: +48 22 458 66 66
industrial.omron.pl
Portugal
Tel: +351 21 942 94 00
industrial.omron.pt
Russia
Tel: +7 495 648 94 50
industrial.omron.ru
South Africa
Tel: +27 (0)11 579 2600
industrial.omron.co.za
Spain
Tel: +34 902 100 221
industrial.omron.es
Sweden
Tel: +46 (0) 8 632 35 00
industrial.omron.se
Switzerland
Tel: +41 (0) 41 748 13 13
industrial.omron.ch
Turkey
Tel: +90 212 467 30 00
industrial.omron.com.tr
United Kingdom
Tel: +44 (0) 1908 258 258
industrial.omron.co.uk
More Omron representatives
industrial.omron.eu
This manual suits for next models
1
Table of contents
Other Omron Batteries Pack manuals