Optika M-069 User manual

Ver. 7.2 2022
Model
M-069
Solar Battery Pack
INSTRUCTION MANUAL

Page 2
Table of contents
1. Warning 3
2. Safety Information 3
3. Package content 4
4. Unpacking 5
5. Intended use 5
6. Symbols and conventions 5
7. Instrument description 6
8. Connection guide 8
9. Recharging the battery 8
10. Use of the solar panel 9
10.1 Powering the microscope 9
10.2 Using the LED torch light 9
11. Troubleshooting 10
Equipment disposal 11

Page 3
1. Warning
This microscope is a scientic precision instrument designed to last for many years with a minimum of maintenance. It
is built to high optical and mechanical standards and to withstand daily use. We remind you that this manual contains
important information on safety and maintenance, and that it must therefore be made accessible to the instrument users.
We decline any responsibility deriving from incorrect instrument use uses that does not comply with this manual.
2. Safety Information
Avoiding Electrical Shock
Before plugging in the power supply, make sure that the supplying voltage of your region matches with the operation voltage
of the equipment and that the lamp switch is in o position. Users should observe all safety regulations of the region. The
equipment has acquired the CE safety label. However, users have full responsibility to use this equipment safely. Please
follow the guidelines below, and read this manual in its entirety to ensure safe operation of the unit.

Page 4
3. Package content
① Solarpanel
② USB-Jack2.1mmcable
③ USB-miniUSBcable
④ Powersupply
③
④
①②

Page 5
4. Unpacking
The microscope is housed in a moulded Styrofoam container. Remove the tape from the edge of the container and lift the
top half of the container. Take some care to avoid that the optical items (objectives and eyepieces) fall out and get dam-
aged. Using both hands (one around the arm and one around the base), lift the microscope from the container and put it
on a stable desk.
Do not touch with bare hands optical surfaces such as lenses, lters or glasses. Traces of grease or other
residuals may deteriorate the nal image quality and corrode the optics surface in a short time.
5. Intended use
Standard models
For research and teaching use only. Not intended for any animal or human therapeutic or diagnostic use.
IVD Models
Also for diagnostic use, aimed at obtaining information on the physiological or pathological situation of the subject.
6. Symbols and conventions
The following chart is an illustrated glossary of the symbols that are used in this manual.
CAUTION
This symbol indicates a potential risk and alerts you to proceed with caution.
ELECTRICAL SHOCK
This symbol indicates a risk of electrical shock.

Page 6
SOLAR CELLS
7. Instrument description
USB
OUTPUT PORT
MINI USB
INPUT PORT
OPERATING
LED
SWITCHING
BUTTON
USB
OUTPUT PORT
LED TORCH
LIGHT

Page 7
8. Connection guide
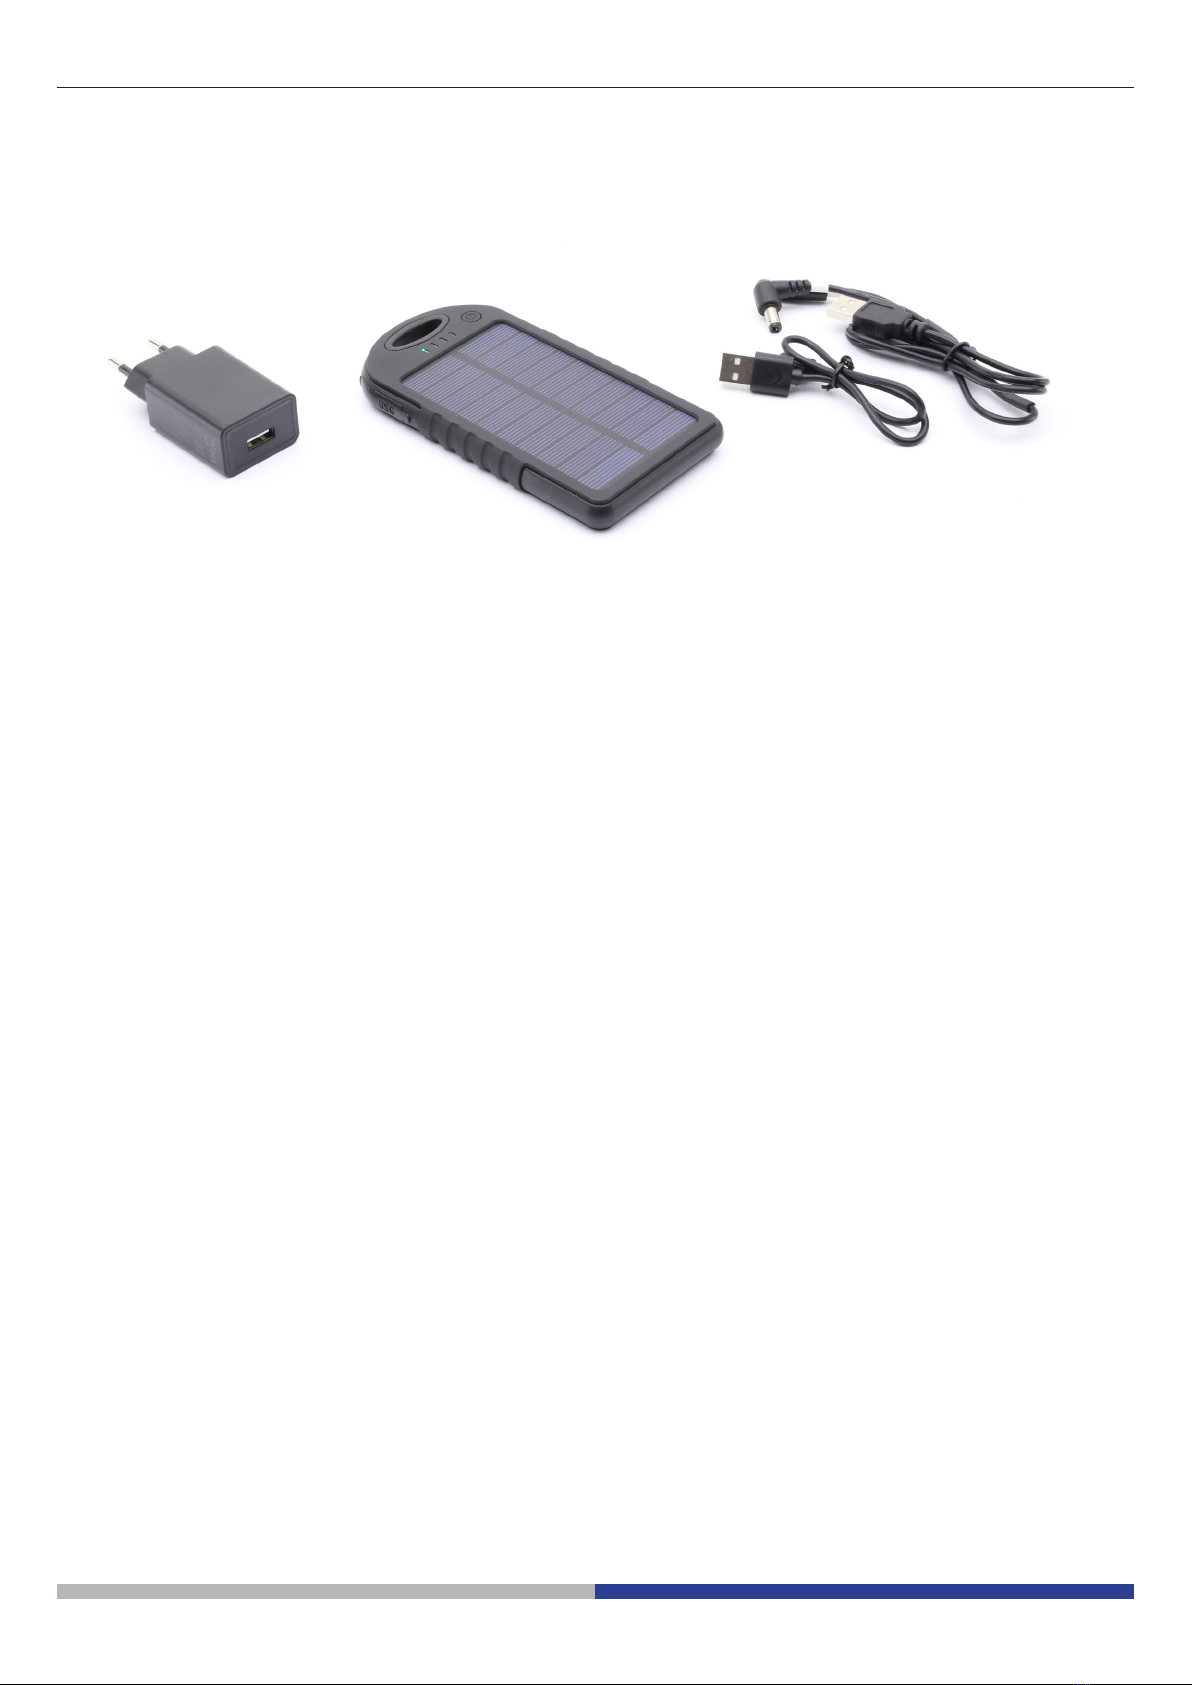
Plug your microscope to the solar panel using the provided USB/Jack cable:
FFig. 1ig. 1
FFig. 2ig. 2
TO SOLAR BATTERY
TO MICROSCOPE
• PLEASE NOTE: Although the solar panel has two USB outputs, you can only connect one microscope. Opti-
mum operation of the microscope is not guaranteed if two devices are connected to the solar panel at the same
time.
9. Recharging the battery
• Fully recharge the battery via USB cable and power sup-
ply when using it for the rst time.
Solar panel can be recharged in three ways:
1. Expose the front solar panel to direct light (sunlight or ambi-
ent light).
2. The green LED indicator will turn on. (Fig. 1)
3. Connect via USB/micro-USB cable to the external USB pow-
er supply.
4. Connect via USB/micro-USB cable to a PC USB port.
• The blue LED indicators will turn on (according to current the
battery charge status of the solar panel). (Fig. 2)
• If the battery is not fully charged one of the blue light will blink
indicating the recharging.
• When the battery is fully charged all the four blue LED will
be lit.

Page 8
FFig. 3ig. 3
FFig. 4ig. 4
FFig. 5ig. 5
10. Use of the solar panel
10.1 Powering the microscope
1. Connect the USB/micro-USB cable from the solar panel to
the microscope.
2. The blue LED will immediately turn on. (Fig. 3)
• This means that the solar battery is giving power to the mi-
croscope.
3. The battery charge level decreases when the microscope is
used. Blue LED will turn o as the charge level decreases.
①
②
10.2 Using the LED torch light
1. Press twice the switching button ①. (Fig. 4)
2. The LED torch light ② will turn on. (Fig. 5)
3. Press the button ① to turn o the torch light.

Page 9
11. Troubleshooting
Review the information in the table below to solve operating problems.
PROBLEM CAUSE SOLUTION
After charging for long time, indicators
don’t show full capacity Charging time is not enough Charge it 8 hours continuously
Power supply or battery pack is faulty Refer to technical assistance
Microscope light is not working No power left Recharge the battery
Something wrong with cables and con-
nections
Check that USB is well inserted into
the output connector of the battery.
Check that the jack connector is well
inserted into the input of the micro-
scope
Wrong settings of microscope switches Check that the main power switch of
the microscope is in ON position.
Check that the brightness adjustment
knob of the microscope is set to the
desired value

Page 10
Art.13 Dlsg 25 July 2005 N°151. “According to directives 2002/95/EC, 2002/96/EC and 2003/108/EC relating to the reduc-
tion in the use of hazardous substances in electrical and electronic equipment and waste disposal.”
The basket symbol on equipment or on its box indicates that the product at the end of its useful life should be collected sep-
arately from other waste. The separate collection of this equipment at the end of its lifetime is organized and managed by
the producer. The user will have to contact the manufacturer and follow the rules that he adopted for end-of-life equipment
collection. The collection of the equipment for recycling, treatment and environmentally compatible disposal, helps to pre-
vent possible adverse eects on the environment and health and promotes reuse and/or recycling of materials of the equip-
ment. Improper disposal of the product involves the application of administrative penalties as provided by the laws in force.
Equipment disposal

OPTIKA S.r.l.
Via Rigla, 30 - 24010 Ponteranica (BG) - ITALY Tel.: +39 035.571.392
OPTIKA
Spain
OPTIKA
USA
OPTIKA
China
OPTIKA
India
OPTIKA
Central America
®
®
®
®
®
®

Ver. 7.2 2022
Modello
M-069
Pannello Solare
MANUALE DI ISTRUZIONI

Pagina 13
Sommario
1. Avvertenza 14
2. Informazioni sulla sicurezza 14
3. Contenuto della confezione 15
4. Disimballaggio 16
5. Utilizzo previsto 16
6. Simboli 16
7. Descrizione dello strumento 17
8. Guida alla connessione 18
9. Ricaricare le batterie 18
10. Uso del pannello solare 19
10.1 Alimentare il microscopio 19
10.2 Uso della torcia a LED 19
11. Risoluzione dei problemi 20
Smaltimento 21

Pagina 14
1. Avvertenza
Questo microscopio è uno strumento scientico di alta precisione, progettato per durare a lungo con una minima
manutenzione; la realizzazione è secondo i migliori standard ottici e meccanici, per poter essere utilizzato quotidianamente.
Vi ricordiamo che questo manuale contiene informazioni importanti per la sicurezza e per la manutenzione dello strumento,
e deve quindi essere messo a disposizione di coloro che lo utilizzeranno.
Decliniamo ogni responsabilità derivante da un utilizzo dello strumento non indicato nel presente manuale.
2. Informazioni sulla sicurezza
Per evitare shock elettrici
Prima di collegare il cavo di alimentazione alla presa elettrica, assicurarsi che il voltaggio della rete locale coincida con il
voltaggio dello strumento e che l’interruttore dell’illuminazione sia nella posizione “OFF”.
Gli utenti dovranno seguire tutte le norme di sicurezza locali. Lo strumento è certicato CE. In ogni caso, gli utilizzatori sono
gli unici responsabili per un utilizzo sicuro dello strumento. Per l’utilizzo in sicurezza dello strumento è importante attenersi
alle seguenti istruzioni e leggere il manuale in tutte le sue parti.

Pagina 15
3. Contenuto della confezione
① Pannellosolare
② CavoUSB-Jack2.1mm
③ CavoUSB-miniUSB
④ Alimentatore
③
④
①②

Pagina 16
4. Disimballaggio
Il microscopio è riposto in un imballo di polistirolo espanso. Rimuovere il nastro adesivo dal collo ed aprire la parte superiore
dell’imballo. Fare attenzione a non far cadere le parti ottiche (obiettivi e oculari) nell’estrarre il microscopio dalla scatola per
evitare che vengano danneggiati. Utilizzare entrambe le mani (una intorno allo stativo e una alla base), slare il microscopio
dal contenitore e appoggiarlo su un piano stabile.
Evitare di toccare le superci ottiche come lenti, ltri o vetri. Tracce di grasso o altri residui possono ridurre la
qualità visiva dell’immagine nale e corrodere la supercie delle ottiche in breve tempo.
5. Utilizzo previsto
Modelli standard
Solo per applicazioni di ricerca ed usi didattici. Non indicato per utilizzo diagnostico e terapeutico umano e veterinario.
Modelli IVD
Anche per uso diagnostico, nalizzato ad ottenere informazioni sulla situazione siologica o patologica del soggetto.
6. Simboli
La seguente tabella riporta i simboli utilizzati in questo manuale.
PERICOLO
Questo simbolo indica un rischio potenziale ed avverte di procedere con cautela.
SHOCK ELETTRICO
Questo simbolo indica un rischio di shock elettrico.

Pagina 17
CELLE SOLARI
7. Descrizione dello strumento
PORTA USB
IN USCITA
PORTA
MINI USB
IN INGRESSO
LED
OPERATIVI
TASTO DI
ACCENSIONE
TORCIA LED
PORTA USB
IN USCITA

Pagina 18
8. Guida alla connessione
9. Ricaricare le batterie
AL PANNELLO SOLARE
AL MICROSCOPIO
• Ricaricare completamente la batteria tramite cavo USB e
alimentatore quando si utilizza per la prima volta.
Il pannello solare si può ricaricare in tre modi:
1. Esporre il pannello solare frontale alla luce diretta (luce sola-
re o luce ambientale).
2. L’indicatore LED verde si accende. (Fig. 1)
FFig. 1ig. 1
FFig. 2ig. 2
Collegare il microscopio al pannello solare con il cavo USB/Jack in dotazione:
• ATTENZIONE: anche se il pannello solare ha due uscite USB, è possibile collegare solo un microscopio. Il
funzionamento ottimale del microscopio non è garantito se al pannello solare sono collegati contemporanea-
mente due dispositivi.
3. Collegamento tramite cavo USB/micro-USB all’alimentatore
esterno USB.
4. Collegamento tramite cavo USB/micro-USB ad una porta
USB del PC.
• Gli indicatori LED blu si accendono (in base allo stato di cari-
ca della batteria del pannello solare). (Fig. 2)
• Se la batteria non è completamente carica, una delle luci blu
lampeggia indicando la ricarica.
• Quando la batteria è completamente carica, tutti e quattro i
quattro LED blu si accendono.

Pagina 19
10. Uso del pannello solare
10.1 Alimentare il microscopio
1. Collegare il cavo USB/micro-USB dal pannello solare al mi-
croscopio.
2. I LED blu si accendono immediatamente. (Fig. 3)
• Questo signica che la batteria solare sta fornendo energia
al microscopio.
3. Il livello di carica della batteria diminuisce quando si utilizza
il microscopio. I LED blu si spengono al diminuire del livello
di carica.
FFig. 3ig. 3
FFig. 4ig. 4
FFig. 5ig. 5
①
②
10.2 Uso della torcia a LED
1. Premere due volte il pulsante di accensione ①. (Fig. 4)
2. La luce della torcia a LED ② si accende. (Fig. 5)
3. Premere il pulsante ① per spegnere la luce della torcia.

Pagina 20
11. Risoluzione dei problemi
Consultare le informazioni della tabella sottostante per risolvere i problemi operativi.
PROBLEMA CAUSA SOLUZIONE
Dopo la ricarica per lungo tempo, gli
indicatori non mostrano la piena capa-
cità
Tempo di carica insuciente Caricare per 8 ore in continuo
Alimentatore o pannello solare difettosi Rivolgersi all’assistenza tecnica
La luce del microscopio non funziona Batteria scarica Ricaricare la batteria
Qualcosa non va con i cavi e i colle-
gamenti
Controllare che l’USB sia ben inserito
nel connettore di uscita della batteria.
Controllare che il connettore jack sia
ben inserito nell’ingresso del micro-
scopio
Impostazioni errate degli interruttori
del microscopio Controllare che l’interruttore principale
di alimentazione del microscopio sia in
posizione ON.
Controllare che la manopola di regola-
zione della luminosità del microscopio
sia impostata sul valore desiderato
Other manuals for M-069
1
Table of contents
Languages:
Other Optika Batteries Pack manuals