Oransi finn User manual

U S E R M A N U A L
finn
R E A D A N D S A V E T H E S E I N S T R U C T I O N S
A I R P U R I F I E R

welcome
W E A P P R E C I A T E Y O U C H O O S I N G O R A N S I
Y o u c a n e x p e c t t h e v e r y b e s t p e r f o r m a n c e
f r o m y o u r O r a n s i f o r r e m o v a l o f f i n e a i r
p a r t i c l e s w h e r e i t i s u s e d . I f y o u h a v e
q u e s t i o n s b e y o n d t h i s m a n u a l , f e e l f r e e t o
v i s i t o u r w e b s i t e O r a n s i . c o m o r c a l l o u r
t r a i n e d c u s t o m e r s e r v i c e s t a f f a t
8 8 8 . 2 8 1 . 3 9 4 8 . Y o u r a i r p u r i f i e r s e r i a l
n u m b e r c a n b e f o u n d o n t h e r a t i n g l a b e l .
S i n c e r e l y ,
T H E O R A N S I T E A M

I N D E X
05
07
10
13
14
safety precautions
air purifier overview
operating instructions
maintenance
filter/uv replacement
troubleshooting
how to use
warranty program

first,
be safe.

S A F E T Y P R E C A U T I O N S
Do not attempt to service the air purifier in any way other than to replace or
clean the air filter.
This product operates at 120V 60Hz only.
Always unplug the power cord from the electrical outlet when the air purifier
is not in use or when changing the filter.
Never run the air purifier unless it is fully assembled.
Do not alter the plug in any way.
Always tum off the air purifier before unplugging the air purifier from the
outlet.
Do not place the cord near a heated surface.
Never operate the air purifier if the plug or cord is damaged or appears
damaged. Only qualified service personnel should ever replace or attempt to
replace a damaged power cord or plug.
Never use the power cord to pick up, carry, drag, pull, or lift the air purifier.
Do not pull the cord against or around sharp corners and edges.
Always remove the plug from its power outlet by holding onto the plug itself
and pulling gently.
Use care when operating the air purifier by keeping all foreign objects,
fingers, body parts, hair, loose clothing, jewelry, etc., away from openings.
Do not drop items into the air purifier.
Never touch the air purifier or its plug when your hands are wet.
If moving the air purifier, lift by the carrying handle.
Do not use outside.
Do not operate without the filters installed.
Only use in an upright position. Do not place anything on top of the air
purifier.
Use only as described in this manual.
Use only Oransi replacement filters.
Place air purifier on a flat floor.
This appliance has a polarized plug (one blade is wider than the other). To
reduce the risk of electric shock, this plug is intended to fit in a polarized
outlet only one way. If the plug does not fit fully in the outlet, reverse the
plug. If it still does not fit, contact a qualified electrician. Do not attempt to
by-pass this safety feature.
READ ALL INSTRUCTIONS BEFORE USING THIS APPLIANCE TO REDUCE THE RISK
OF FIRE, ELECTRIC SHOCK, OR INJURY. PLEASE SAVE FOR REFERENCE.
W A R N I N G
T o R e d u c e T h e R i s k O f F i r e O r E l e c t r i c S h o c k , D o N o t U s e
T h i s F a n W i t h A n y S o l i d - S t a t e S p e e d C o n t r o l D e v i c e .
05

next, meet
your finn.
S K U : O V H T 9 9 0 8

A I R P U R I F I E R O V E R V I E W
07
U N I T T O P V I E W
Control Panel
UV View Window
Air Output
Base
Rear Handle
with lock & release
button for accessing
filter and UV lamp.
Rear Cover
Air Input
Unit Body
U N I T F R O N T V I E W
HEPA Reset Button
UV Light Button
Fan Speed Button
Power Indicator
LCD Display
Ionizer Button
On/Off
When pushed,
the ionizer will
automatically cut on.

Plug the air purifier into a 120V AC outlet.
Turn the air purifier on by pressing On/Off Button.
Upon turning the air purifier on, the power indicator will be lit, the unit will be at
the High fan speed, and the ionizer will start to work.
Pressing Fan Speed Button, at this point will set the air purifier into Medium fan
speed.
Pressing Fan Speed Button again will set the air purifier into Low fan speed.
Pressing Fan Speed Button once more will set the air purifier back to High fan
speed.
To turn the air purifier off, press the On/Off Button.
Operating Instructions
The air purifier is operated by the manual controls located on the top of the air
purifier (as shown in Unit Top View).
1.
2.
3.
4.
5.
6.
7.
Pre-Operating Instructions
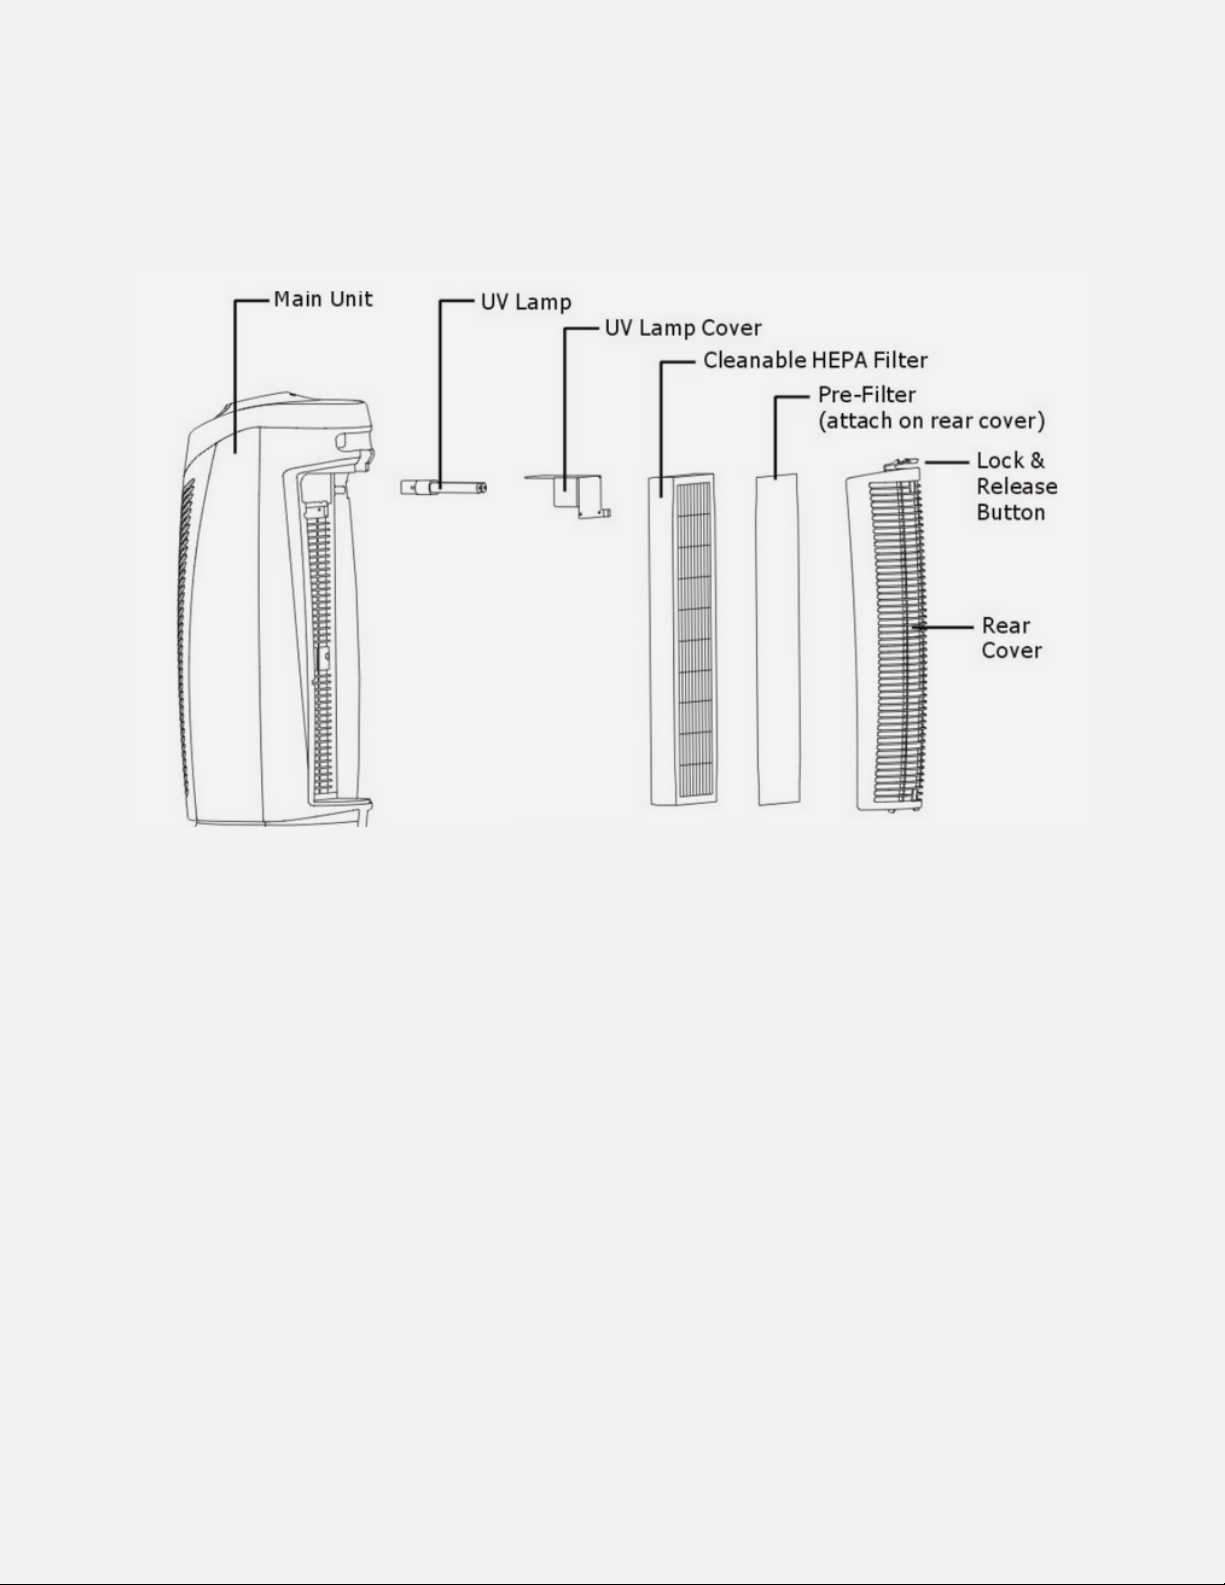
Carefully remove your air purifier from the gift box and the bag.
Remove the back cover and remove the filter from the bag.
Select a firm, level and flat location. For proper air flow, locate the unit at least 1
foot (0.3 M) from any wall or furniture. Ensure no grilles are blocked.
Plug the power cord into a 120V AC outlet.
Pre-Operating Instructions
1.
2.
3.
4.
5.
H O W T O U S E
08
INSTRUCTIONS ARE LISTED IN NUMERICAL ORDER. USE AIR PURIFIER
OVERVIEW PAGE FOR REFERENCE.
COUNTDOWN NEGATIVE ION/ION FUNCTION:
When pressing the Ionizer Button to start it, the Ion icon will light on the LCD display.
To turn the ionizer off, press Ionizer Button.
UV LAMP FUNCTION:
The UV-C germicidal lamp can kill harmful airborne bacteria and viruses. This function
will work in any mode. Press the UV Button to start the UV lamp and stop the UV lamp
by pressing the UV Button again.
UV LAMP RESET FUNCTION:
If the UV lamp needs to be replaced, the UV icon on the LCD will illuminate and flicker.
After replacing the UV lamp, reset the UV lamp by pressing the UV Button for a few
seconds, the UV icon will stop flickering and the new UV lamp will start to work. Check
from the UV View Window, if the UV lamp still lights, it should not be replaced.
HEPA RESET FUNCTION:
If the HEPA filter needs to be cleaned, the HEPA Reset icon on the LCD will illuminate
and flicker. After cleaning the HEPA filter, RESET the HEPA filter by using a pin or
paperclip to press the HEPA RESET Button, then the icon will stop flickering. For
instruction on how to clean the HEPA filter see page 10.

let's keep
each other
healthy.

M A I N T E N A N C E
10
The air filters should be checked every 2 to3 months. More frequent
cleaning may be required depending upon environmental conditions.
Clean the HEPA filter and pre-filter with the vacuum brush attachment of
your vacuum cleaner. This will remove lint and dirt. See CLEANING PRE-
FILTER and CLEANING HEPA FILTER on page 11.
Check the UV lamp from the UV view window (Unit Front View on page 7). If
the UV lamp needs to be replaced, see REMOVING/INSTALLING UV LAMP on
page 12.
Use a clean, dry, soft cloth to wipe the external surface of unit.
1.
2.
3.
4.
NOTE: Do not stick any foreign objects or your fingers inside the unit. Do not
use any chemical or harsh cleaners, etc., as they will damage the product.
NEVER USE ALCOHOL OR SOLVENTS.
General Upkeep Instructions

Turn off and unplug the unit
Press the Lock & Release Button and remove the Rear Cover from the unit
Remove the HEPA filter.
Use the brush attachment with your vacuum cleaner to clean the filter. CAUTION: Do not
use water or any household cleaner to clean the HEPA filter.
The HEPA Filter will only fit in one way. Install the rear cover back to the unit and securely
latch in place.
1.
2.
3.
4.
5.
NOTE: The HEPA filter can be used continuously for up to two years. When the HEPA filter
turns from white to dark grey, it should be replaced with a new one. If the HEPA filter is still
white, it does NOT need to be replaced. Both the filter and rear cover must be installed
otherwise the purifier will not power on.
Cleaning the HEPA Filter
M A I N T E N A N C E
11
Turn Off and unplug the unit.
Press the Lock & Release Button then remove the Rear Cover from the Unit.
Remove the pre-filter from the rear cover. Clean the pre-filter with the vacuum
brush attachment of your vacuum cleaner. This will remove lint and dirt from the
filter. Use a clean, damp, soft cloth to wipe the pre-filter again.
After cleaning, reattach the pre-filter to the rear cover, and install the rear cover
back onto the unit and securely latch in place.
1.
2.
3.
4.
Clean Pre-Filter Every 2-3 Months

Turn off and unplug the unit
Press the Lock & Release Button and
remove the Rear Cover from the unit
Remove the HEPA filter.
Use a screwdriver to remove the
two screws and detach the UV lamp
cover. The HEPA Filter will only fit in
one way. Install the rear cover back
to the unit and securely latch in
place.
Grasp the UV lamp and pull it
straight out from the lamp socket.
The lamp is made of quartz so it is
stronger than a standard UV lamp
however we recommend reaching in
toward the base since it is easier to
remove from here than pulling on
the end of the lamp.
Take a new UV lamp and insert it
into the lamp socket. Simply press in
on the end of the glass lamp to snap
into place. Re-install the UV lamp
cover (the large metal face should be
above the uv lamp and align the two
screw holes with the back of the air
purifier), then install the filter and
rear cover.
Please reference www.oransi.com
for more information including a
video demonstration that shows how
to replace the UV lamp
1.
2.
3.
4.
5.
6.
7.
CAUTION: UV lamp is a glass product,
please handle it carefully.
NOTE: The metal cover over the lamp
must be in place for the air purifier to
operate.
Removing or Installing UV Lamp
M A I N T E N A N C E
12

Using Your Oransi
Always operate your air purifier
indoors on a level surface.
Locate your air purifier wherever
you spend most of your time.
Typically, a bedroom, living space,
office waiting room, or classroom.
Set the fan speed to a level that is
comfortable for you. Low settings
are less audible. In most cases, you
can run your air purifier on a very
low fan.
For larger areas, consider a higher
fan speed when you’re absent and
then turn the setting lower when
you return.
Air enters your Oransi at the
bottom and exits the top, so you
can place the unit anywhere in a
room. However, be careful that
curtains do not block air intake or
exit.
Be sure the air purifier is plugged into a working electrical outlet.
Check to be sure the UV lamp and UV lamp cover are firmly seated in place.
Check to be sure the HEPA filter is firmly seated in place.
Check to be sure the rear cover is latched firmly in place.
If the air purifier shuts off unexpectedly, safety features may have been activated
to prevent damage or injury. If this happens:
1.
2.
3.
4.
NOTE: If the air purifier will not start, press the safety switch located under the HEPA
filter in the base of housing, then replace the filters and restart.
T R O U B L E S H O O T I N G
F O R A S S I S T A N C E
v i s i t w w w . o r a n s i . c o m
c a l l 8 8 8 - 2 8 1 - 3 9 4 8
o r e m a i l c s @ o r a n s i . c o m
13

warranty
O R A N S I W A R R A N T Y D I S C L A I M E R
The Air Purifier is operated in accordance
with the instructions provided in the
Oransi User Manual
The Air Purifier is connected to a proper
power supply (see voltage label on the
machine).
The unit shows no evidence of tampering,
mishandling, neglect, accidental damage,
modification, and/or repair by anyone
other than authorized Oransi service
personnel.
Replacement filters are purchased directly
from Oransi or an authorized dealer.
The Finn Air Purifier carries a 10-year limited
warranty from the original purchase date. Oransi
will replace your air purifier provided the product
is determined to be defective as a result of faulty
material or workmanship while in normal use.
Oransi’s sole obligation under this warranty is to
replace or at Oransi’s discretion, to repair, free of
charge, all defective parts. This warranty will not
be valid if the unit is damaged by the user. Proof
of purchase may be required by Oransi’s warranty
service representative. All parts or units that are
replaced become the property of Oransi.
W a r r a n t y r e m a i n s i n e f f e c t o n l y i f :
1.
2.
3.
4.
This manual suits for next models
1
Table of contents
Other Oransi Air Cleaner manuals

Oransi
Oransi OVHP44 User manual

Oransi
Oransi EJ 120 User manual

Oransi
Oransi mod User manual

Oransi
Oransi OV200 User manual

Oransi
Oransi max User manual

Oransi
Oransi OVHM80 User manual

Oransi
Oransi OI939 User manual

Oransi
Oransi AirMend User manual

Oransi
Oransi Erik User manual

Oransi
Oransi ERIK650A User manual
Popular Air Cleaner manuals by other brands

AllerAir
AllerAir 6000 DX Vocarb Technical specifications

Stadler Form
Stadler Form Jasmine operating instructions

Vivendi
Vivendi Naomi Design Technical specification

KRUEGER
KRUEGER PAC Series Installation, operation and maintenance manual

Blueair
Blueair Classic 500 Series user manual

Field Controls
Field Controls UV-Aire UV-18X manual