6 7
1. With the telescope aimed at a fairly
bright object and with the camera app
turned on, use the telescope’s focuser
to bring the object into focus.
2. If you have trouble achieving focus,
you may have to adjust the spacing
between the smartphone’s camera
lens and the eyepiece. This is done by
adjusting the eyepiece clamp position
on the slotted L-bracket arm, using the
lens height thumbscrew. If the slot on
the L-bracket does not provide enough
travel, the height of the eyepiece
can be adjusted further by sliding it
forward or back in eyepiece clamp,
and tightening with the clamp bolt.
If the image is not centered in the eyepiece
or the image does not appear clearly, try
re-adjusting the telescope focus and the
SteadyPix adjustment points. It takes a little
time initially to get everything adjusted just
right, so be patient. After a couple of ses-
sions, you’ll get the hang of it.
Taking Photographs with the SteadyPix Universal Adapter and
Your Smartphone
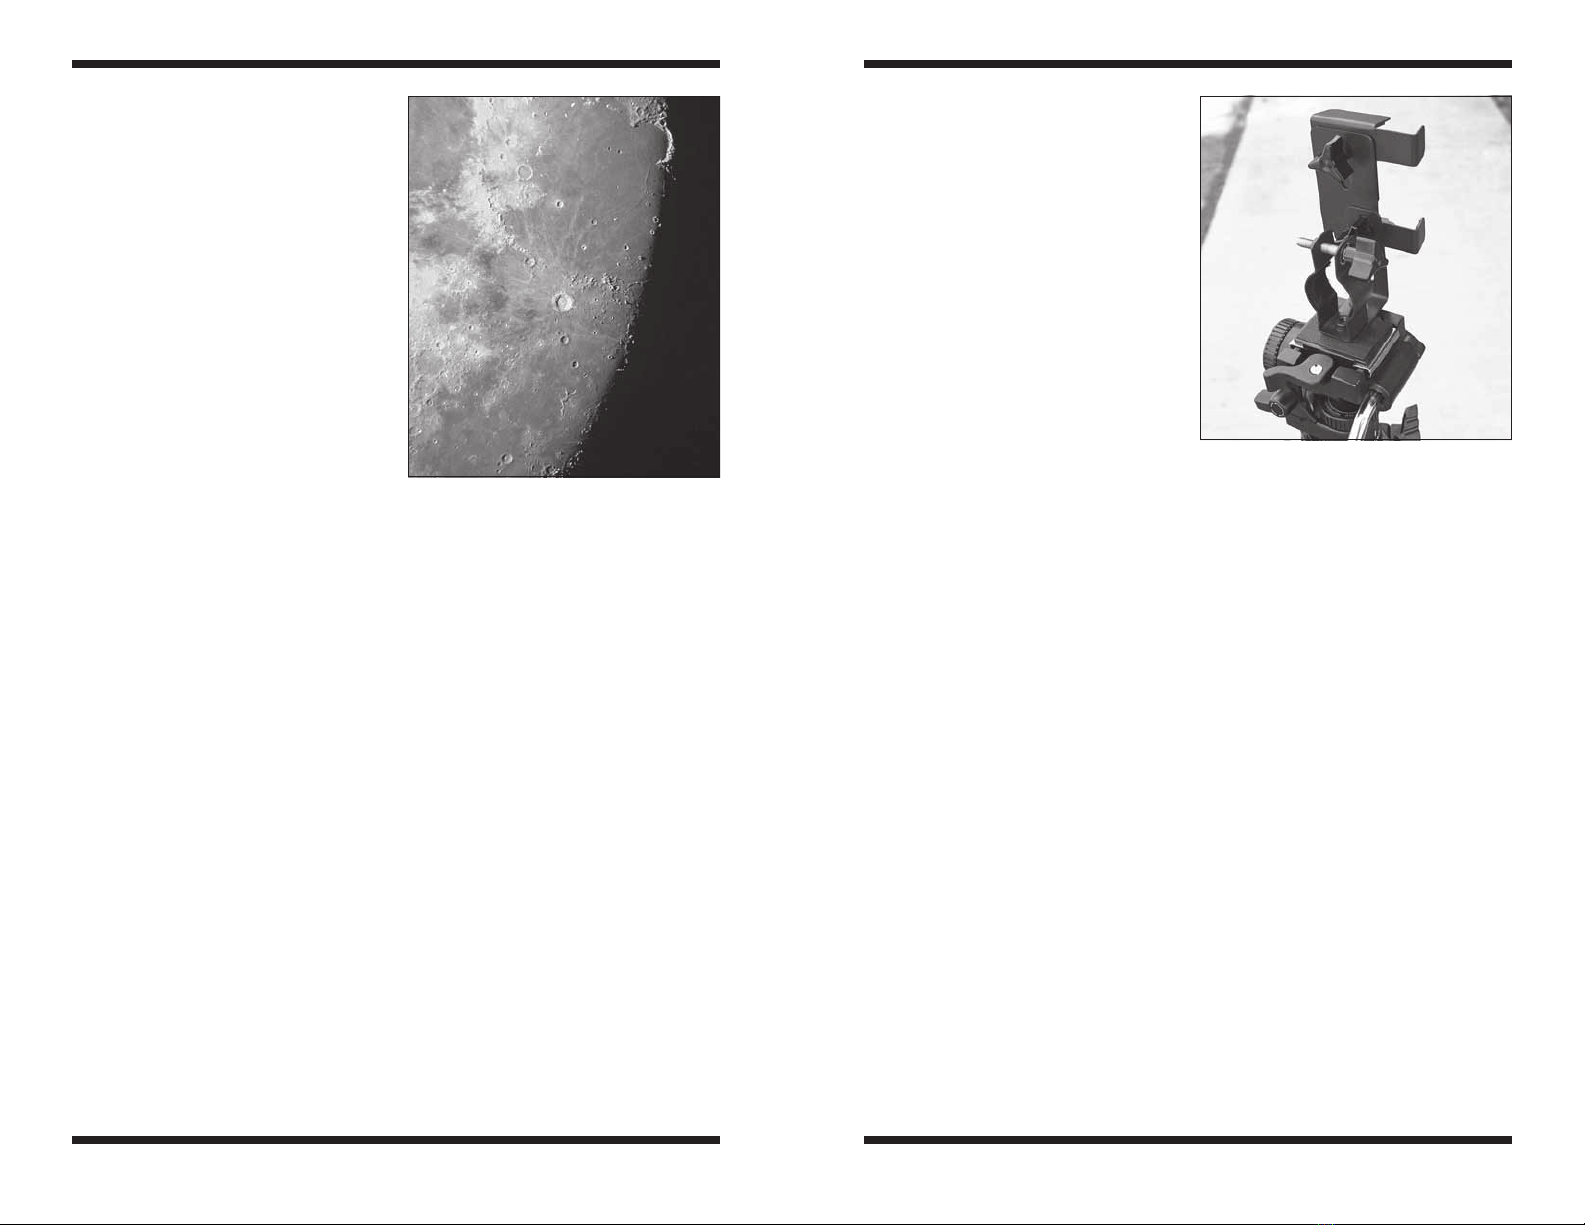
Moon: Our closest neighbor in the solar system is dazzling through even a very small
telescope. The SteadyPix will allow you to take beautiful images of the whole Moon or clo-
seups that showcase the craters, mountains, or maria (Figure 8). Single snapshots work
well and multiple shots can be stacked later in a program such as Registax to increase the
signal-to-noise ratio and dynamic range of the image. Also, you can take video and then
stack a series of the sharpest individual video frames.
Bright Planets: The bright planets Venus, Mars, Jupiter and Saturn also make excellent
targets for afocal photography. Try using a higher power eyepiece and maybe a Barlow
lens to boost the magnification – planets are tiny objects in the sky! You’ll need a steady
atmosphere, i.e., good “seeing,” to get sharp planetary images. The smatphone’s display
will allow you to show off your target object to friends and passers-by – no waiting in line at
the eyepiece!
No need to stop at Saturn, though. At least one amateur astronomer has captured the dis-
tant planet Neptune with his iPhone and an 8" Schmidt-Cassegrain telescope!
Deep-sky Objects: Most deep-sky objects are extremely difficult to photograph using
afocal photography. Try working with brighter objects such as M42 (Orion Nebula) or M13
(Hercules Cluster). You will likely need a mount that tracks the motion of the sky so that
you can take “long” exposures using a 3rd-party app that offers that capability (try Slow
Shutter by Tomoki Kobayashi), and you will have to stack multiple images to get a good
final image.
Sun: If you have a proper solar filter to cover the front of your telescope, you can get ter-
rific images of sunspots on the surface of our nearest star in the daytime with your smart-
phone. Sunspots are constantly changing,
so shooting them is always interesting and
a lot of fun.
Nature/Terrestrial: The SteadyPix
Universal can be used to take through-
the-telescope photos and videos of distant
subjects in daylight.
Mouting the SteadyPix
Universal Adapter on a Photo
Tripod
The SteadyPix Universal also allows you to
mount your smartphone directly on a stan-
dard photo tripod as shown in Figure 9,
for taking scenic panoramas and for hold-
ing the camera while taking self-portraits
or group photos (when you’re part of the
group). The SteadyPix Universal bracket
can be mounted in either portrait or land-
scape orientation. The only requirement is
that the tripod have a ¼"-20 threaded post.
1. To attach the SteadyPix Universal to
the tripod, first remove the eyepiece clamp from the L-bracket by completely removing
the clamp height adjustment knob. Put it and the rubber washer in a safe place as
they will not be needed for tripod mounting of the SteadyPix.
2. Adjust the L-bracket for the orientation you want (portrait or landscape). Make sure
the bottom of the L-bracket clears the lower edge of the main phone bracket. Then
tighten the triangular bracket length adjustment knob.
3. Assuming that the tripod has a removeable mounting shoe, remove it from the tripod
head. Place the ¼"-20 threaded bolt on the shoe through the slot in the short arm of
the L-bracket, then place the empty eyepiece clamp onto the threaded bolt.
4. Now thread the ¼"-20 bolt into the eyepiece clamp by turning the bolt itself until tight.
When properly attached the SteadyPix assembly should look like Figure 9 (shown in
horizontal, or “landscape,” orientation).
Camera Apps
The native camera apps on most smartphones are adequate, but may not be terribly ver-
satile. There are other, 3rd party camera apps available that offer additional features and
settings that you may find useful, such as shutter delay (or self-timer), burst mode, and the
ability to take “long exposures” (really probably just multiple exposures digitally stacked).
Exposure delay is nice to have. Taking the iPhone as an example, with its native camera
app, when you tap the camera icon on the screen to take the picture, the exposure com-
mences immediately. The vibration from the tap is enough to cause blurring of the image
in many instances. Having a delay of a few seconds between the screen tap and the onset
of exposure eliminates the problem by allowing any vibration to dissipate prior to image
capture.
Figure 9. The SteadyPix Universal
adapter can be mounted directly on a photo
tripod, as shown, for steady wide-field
shots and self-portraits.
Figure 8. An iPhone afocal close-up
image of the lunar surface captured with an
Orion StarMax 90mm Maksutov-Cassegrain
at 62x magnification.